Go Back
- 2 cups rolled oats - 1 cup natural peanut butter - 1/2 cup honey or maple syrup - 1/4 cup unsweetened cocoa powder - 1/2 teaspoon vanilla extract - 1/4 teaspoon salt - 1/2 cup dark chocolate chips (dairy-free option) - 1/4 cup chopped nuts (almonds, sunflower seeds) - Flaky sea salt for topping To create these no bake chocolate peanut butter oat bars, gather your core ingredients first. The rolled oats give the bars their base and texture. Natural peanut butter adds creaminess and flavor. Use honey or maple syrup for sweetness. Unsweetened cocoa powder provides the rich chocolate taste. Vanilla extract boosts the flavor, while salt enhances all the ingredients. Finally, dark chocolate chips add bursts of chocolatey goodness. You can also personalize your bars with optional add-ins. Chopped nuts or seeds give a nice crunch. A sprinkle of flaky sea salt on top adds a gourmet touch. These ingredients are easy to find and make the recipe fun. Feel free to mix and match based on your taste or what you have at home. Gather everything, and you're ready to make a delicious snack! - Preparation time: 15 minutes - Total time: 1 hour 15 minutes (includes chilling) First, take a large mixing bowl. Add 2 cups of rolled oats, 1/4 cup of cocoa powder, and 1/4 teaspoon of salt. Stir well until all the dry ingredients blend together nicely. This step sets the base for our delicious bars. Next, grab a microwave-safe bowl. Combine 1 cup of natural peanut butter and 1/2 cup of honey or maple syrup. Microwave this mix for about 30 seconds. Remove it and stir until smooth. This creates a sweet and creamy blend that adds flavor and texture. Now, pour the melted peanut butter and honey into the bowl with oats and cocoa. Don’t forget to add 1/2 teaspoon of vanilla extract. Mix everything together well until it forms a thick and slightly sticky mixture. This means all the ingredients are nicely combined. Take an 8x8 inch square baking dish and line it with parchment paper. Make sure some paper hangs over the edges for easy removal. Transfer your mixture into the dish. Use a spatula or your hands to press it down firmly. This will help shape the bars and keep them together. Cover the baking dish with plastic wrap or a lid. Place it in the fridge for at least 1 hour. This step is important so the bars can set and hold their shape. After chilling, lift the bars out using the parchment overhang. Cut into squares or rectangles based on your preference. Enjoy your tasty creation! You can change the amount of honey or maple syrup to fit your taste. If you like it sweeter, add more. If you want less sweetness, reduce it. This flexibility lets you make the bars just right for you. Press the mixture firmly into the dish. This step is key. If you pack it tightly, your bars will hold together better. Use your hands or a spatula to flatten it evenly. A good press means no crumbling when you cut the bars. Store your bars in an airtight container in the fridge. This keeps them fresh for up to a week. If you have extras, try freezing them for later. Just remember to wrap them well to avoid freezer burn. Enjoy them chilled or at room temperature! {{image_4}} You can easily change the flavor of these bars. Try using different nut butters, like almond or cashew. They will add a unique taste and a new twist. You can also mix in dried fruits such as cranberries or raisins for a fruity burst. These additions bring color and extra nutrients. If you want to switch things up, consider using white chocolate chips or carob chips. Each option offers a different taste and sweetness level. White chocolate adds creaminess, while carob chips bring a more earthy flavor. Experimenting with these options makes each batch special. You can make these bars vegan-friendly with simple swaps. Use maple syrup instead of honey for sweetness. For the chocolate, choose dairy-free chocolate to keep it plant-based. These changes make the bars suitable for a wider audience without losing that delicious flavor. To keep your no bake chocolate peanut butter oat bars fresh, store them in an airtight container in the refrigerator. This helps maintain their flavor and texture. Avoid leaving them out at room temperature, as they can become too soft and lose their shape. You can freeze these bars for longer shelf life. Cut them into squares before freezing. Wrap each piece in plastic wrap or foil. Place them in a freezer-safe bag or container. They can last for up to three months in the freezer. These bars last up to 1 week in the fridge. If you notice any changes in smell or texture, it’s best to toss them. Enjoy your bars as a quick snack or a healthy treat! Yes, you can use quick oats. They cook faster and can make your bars softer. Rolled oats give a chewier texture. Quick oats blend in easily but may not hold shape as well. If you want a firmer bar, stick with rolled oats. To cut the bars, first chill them well. Use a sharp knife for clean edges. Lifting the bars out with parchment helps. Start by cutting into squares or rectangles. For easier serving, cut smaller pieces. This way, everyone gets a tasty bite! If you have nut allergies, try sunflower seed butter. It has a similar taste and texture. You can also use soy nut butter or tahini. These options keep the bars creamy and delicious. Choose what works best for your needs! Absolutely! These bars are great for meal prep. Make a batch and store them in the fridge. They last up to a week. Just grab a bar for a quick snack or breakfast. This makes your week easier and more delicious! In this post, we explored how to make easy and tasty energy bars. We covered the key ingredients, from oats to cocoa powder, and shared step-by-step instructions. You learned tips to customize sweetness and ensure sturdy bars. You can also consider flavor variations and proper storage methods. Now, you have all the tools to create your own delicious energy bars at home. Enjoy creating your snacks and share them with friends!

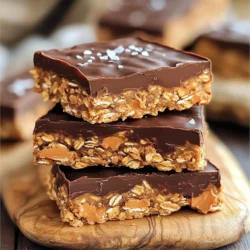
No Bake Chocolate Peanut Butter Oat Bars

Indulge in the ultimate no-bake chocolate peanut butter oat bars that are quick to prepare and incredibly delicious! Made with wholesome ingredients like rolled oats, natural peanut butter, and dark chocolate, these bars are perfect for a nutritious snack or a satisfying breakfast. With just 15 minutes of prep, you’ll enjoy rich flavors and a chewy texture. Click through now to explore the full recipe and start creating these tasty treats today!

Ingredients
  

2 cups rolled oats

1 cup natural peanut butter

1/2 cup honey or maple syrup

1/4 cup unsweetened cocoa powder

1/2 teaspoon vanilla extract

1/4 teaspoon salt

1/2 cup dark chocolate chips (dairy-free if preferred)

Optional: 1/4 cup chopped nuts or seeds (e.g., almonds, sunflower seeds)

Optional: Flaky sea salt for sprinkling on top

Instructions
 

In a large mixing bowl, combine 2 cups of rolled oats, 1/4 cup of cocoa powder, and 1/4 teaspoon of salt. Stir the mixture well until all dry ingredients are evenly blended.

    In a separate microwave-safe bowl, combine 1 cup of natural peanut butter and 1/2 cup of honey (or maple syrup). Microwave the mixture for approximately 30 seconds. Remove from the microwave and stir until it becomes smooth and fully combined.

      Pour the melted peanut butter and honey mixture into the bowl of oats and cocoa. Add 1/2 teaspoon of vanilla extract. Mix thoroughly until your mixture is thick and slightly sticky, ensuring all ingredients are well incorporated.

        Gently fold in 1/2 cup of dark chocolate chips and any optional chopped nuts or seeds, mixing until they are evenly distributed throughout the oat mixture.

          Line an 8x8 inch square baking dish with parchment paper, allowing some overhang for easy removal later.

            Transfer your prepared mixture into the lined baking dish. Using a spatula or your hands, press the mixture down firmly to create an even layer. Ensure it is tightly packed for a sturdier bar structure.

              If desired, sprinkle a pinch of flaky sea salt over the surface for an extra flavor dimension.

                Cover the baking dish with plastic wrap or a lid and refrigerate for at least 1 hour to allow the bars to set properly and hold their shape.

                  After chilling, lift the bars out of the dish using the parchment overhang. Cut the chilled mixture into squares or rectangles, as preferred.

                    Prep Time: 15 minutes | Total Time: 1 hour 15 minutes | Servings: 12 bars

                      - Serving Suggestion: Enjoy these bars as a quick breakfast, a satisfying snack, or a post-workout treat! Store any leftovers in an airtight container in the refrigerator for up to a week.