Skip to content
DisclaimerTerms Of UseGDPR PolicyCookie Policy

recipetorch

  • Home
  • Drinks
  • Appetizers
  • Dinner
  • Dessert
  • About
  • Contact
  • Privacy Policy
DisclaimerTerms Of UseGDPR PolicyCookie Policy

NO-ING-IMG

- Oreo cookies - Semi-sweet chocolate chips - White chocolate chips - Pretzel twists - Candy eyes - Red M&M's - Vegetable oil The key to making these Chocolate Covered Oreo Reindeer is gathering the right ingredients. Start with a package of Oreo cookies. These cookies give the base a rich and chocolatey flavor that everyone loves. Next, you’ll need semi-sweet chocolate chips. They melt beautifully and coat the Oreos perfectly. If you want to add a fun twist, use white chocolate chips. They will help create a festive look and a nice flavor contrast. Don’t forget about the fun extras! Pretzel twists serve as antlers. Candy eyes add character, and red M&M's make the perfect nose. Each component adds to the fun and flavor of these treats. For a smoother chocolate finish, you might want to use a tablespoon of vegetable oil. This step is optional but helps the chocolate glide on easily. With these ingredients ready, you can create a tasty treat that brings joy to any holiday gathering! {{ingredient_image_2}} To start, melt the semi-sweet chocolate chips. Use a microwave-safe bowl. If you want a smooth finish, add one tablespoon of vegetable oil. Heat the chocolate in the microwave. Do this in 30-second intervals. Stir the chocolate well after each interval. This helps it melt evenly. Be careful not to overheat. You want it melted and smooth. Next, take each Oreo cookie. Use a fork to dip it into the melted chocolate. Make sure the cookie is fully submerged. This gives it a nice, even coating. Allow excess chocolate to drip back into the bowl. This step is key for a clean look. Place the dipped Oreos on wax paper on a baking sheet. While the chocolate is still wet, add the pretzel antlers. Insert two pretzel twists into the top of each Oreo. This makes them look like reindeer. Now, melt the white chocolate chips in the microwave, just like before. Once smooth, drizzle the white chocolate over the cookies. You can make fun patterns or zigzags. It adds a nice touch. Next, quickly place two candy eyes on each cookie. Finally, add one red M&M as the nose. This completes the look of your festive reindeer. To make the best chocolate-covered Oreo reindeer, start with high-quality chocolate. Good chocolate melts smoothly and tastes better. I recommend using semi-sweet chocolate chips for a rich flavor. If you want a nice shine, add one tablespoon of vegetable oil. This makes the chocolate smooth and easy to coat. To prevent chocolate from overheating, use short bursts in the microwave. Heat it in 30-second intervals. Stir the chocolate well between each interval. This helps you avoid burning the chocolate. If you see some lumps, keep stirring. The heat will melt them. When it comes to decorating, try creative ways to drizzle white chocolate. You can use a piping bag or a ziplock bag with a tiny corner cut. This gives you control over the drizzle. Make fun patterns on top of your reindeer. You can also alternate candy eyes for a unique look. Mix and match the colors for a playful vibe. For holiday presentations, place your reindeer on a decorative platter. Arrange them nicely to create a festive display. You can add sprigs of pine or jingle bells around the edges. This adds a cheerful touch to your table. If you are serving at a party, consider using small plates. Guests will enjoy picking them up easily. Pro Tips Use Quality Chocolate: For the best flavor, opt for high-quality chocolate chips. They melt more smoothly and have a richer taste, enhancing the overall deliciousness of your reindeer. Chill Between Steps: If the chocolate starts to become too soft while dipping the Oreos, consider chilling the cookies for a few minutes before proceeding. This helps maintain a nice coating. Experiment with Toppings: Feel free to add additional decorations like sprinkles or crushed candy canes for a festive twist. This will make your reindeer even more eye-catching! Perfect for Gift Giving: These chocolate-covered Oreos make great edible gifts. Package them in a decorative box or tin, and add a festive ribbon for a charming presentation. {{image_4}} You can switch things up with flavored Oreos. Try mint Oreos for a cool twist. Peanut butter Oreos add a nutty taste. These flavors pair well with chocolate. You can also experiment with different types of chocolate. Dark chocolate gives a rich flavor. Milk chocolate adds sweetness. Each option makes a unique treat. You can adapt these reindeer for other holidays too. For Halloween, use orange chocolate and spooky sprinkles. For Valentine's Day, make them with pink chocolate and heart candies. This keeps your treats fun and festive. Use seasonal decorations to match the theme. Different colors and shapes make them exciting. If you want a healthier version, try dark chocolate. It has less sugar and more antioxidants. You can also reduce the sugar in the recipe. Use less candy or choose sugar-free options. This way, you can enjoy these treats without guilt. Remember, small changes can make a big difference! To keep your Chocolate Covered Oreos fresh, store them in a cool, dry place. If your home is warm, the fridge is a better choice. Make sure to use an airtight container. This helps keep moisture out. You want these treats to stay crunchy and tasty. These festive treats can last about one week at room temperature. If you store them in the fridge, they can stay fresh for up to two weeks. Look for signs of spoilage, like a change in texture or white spots on the chocolate. If they smell off, it's best to toss them. If you want to save some for later, freezing is a great option. Wrap each cookie tightly in plastic wrap. Then, place them in a freezer bag. This prevents freezer burn and keeps them safe. When you're ready to eat, let them thaw in the fridge. This keeps the chocolate from melting too fast. Yes, you can use other cookies. Try chocolate wafers, vanilla cookies, or even graham crackers. Each cookie gives a new taste and texture. Experiment and find your favorite! To thin your chocolate coating, add a little vegetable oil. Start with one teaspoon and stir well. This helps the chocolate flow better when dipping. If you lack pretzel twists, use candy canes or almonds instead. They can mimic antlers well. Just make sure they stick into the chocolate nicely. Yes, you can prepare these treats ahead of time. Store them in an airtight container in the fridge. They will stay fresh for about a week. To transport your reindeer, place them in a sturdy container. Use parchment paper to separate each layer. This keeps the decorations intact and prevents them from sticking. This article walks you through making fun chocolate-covered Oreos. You learned about the key ingredients, like Oreo cookies, chocolate chips, and pretzel twists. I shared tips for dipping and decorating them with candy eyes and M&M's. Don't forget to try different flavors or seasonal themes for a unique twist. In the end, these treats are great for any occasion. Enjoy making them fresh and sharing the joy with friends and family!

Chocolate Covered Oreo Reindeer Festive Treat Idea

Get ready to spread some holiday cheer with an easy and fun treat: Chocolate Covered Oreo Reindeer! These festive snacks

- 8 thick slices of bread (preferably Challah or Brioche for optimal flavor and texture) - 1 cup cream cheese, softened to room temperature - 1/2 cup powdered sugar - 1 teaspoon pure vanilla extract - 4 large eggs - 1 cup whole milk - 1 teaspoon ground cinnamon - 1 cup fresh blueberries (you can reserve some for garnish) - 2 tablespoons unsalted butter (for cooking) - Maple syrup (for drizzling, to taste) The heart of this recipe lies in its key ingredients. Cream cheese gives the French toast a rich and creamy flavor. Softening it first makes mixing easy. Powdered sugar adds sweetness and smoothness, making each bite delightful. Vanilla extract brings warmth and a sweet note that works well with blueberries. Fresh blueberries are a star in this dish. They burst with flavor as you cook them, adding a juicy pop. The eggs and milk create a custard-like mix that coats the bread. This mix makes the French toast soft inside and golden outside, while cinnamon adds a warm, cozy touch. Choosing the right bread is vital. I suggest using Challah or Brioche. Both have a rich flavor and a soft texture, making them perfect for soaking up the creamy filling. Their eggy nature holds up well during cooking. You can also try Texas toast or sourdough if you want something different. Just avoid thin bread, as it may get too soggy. {{ingredient_image_2}} First, gather your ingredients. You need cream cheese, powdered sugar, and vanilla. In a bowl, blend the cream cheese until smooth. Use an electric mixer or a spatula. Add the powdered sugar and vanilla. Mix until creamy and well combined. Set this aside for later. This mix gives the French toast a rich, sweet flavor. Next, you need to make the egg mixture. In a separate bowl, crack four large eggs. Pour in one cup of whole milk and add ground cinnamon. Whisk the mix until it’s frothy. This mixture coats the bread and gives it a soft texture. Make sure it’s well mixed for even flavor. Now, it's time to assemble the sandwiches. Take a slice of your bread and spread a layer of the cream cheese mix on one side. Scatter fresh blueberries on top. Place another slice of bread on top to form a sandwich. Repeat this with the rest of the bread. Then, preheat a skillet over medium heat. Add unsalted butter to melt. Dip each sandwich into the egg mixture. Make sure both sides are coated. Let any extra egg drip off. Place the sandwiches in the skillet. Cook for 3-4 minutes on each side. Look for a golden-brown color. When done, take the sandwiches out and slice them diagonally. Serve warm, drizzled with maple syrup, and topped with more blueberries. Enjoy this delightful twist on French toast! To get the perfect texture, choose thick-cut bread. I recommend using Challah or Brioche. These breads soak up the egg mixture well. This adds flavor and keeps the toast soft inside. When cooking, keep the heat medium. Too high, and the outside burns. Too low, and the inside stays raw. Flip the toast when it turns golden brown. This gives it a nice crunch. Soggy bread can ruin your French toast. To avoid this, do not soak the bread too long. A quick dip in the egg mixture is enough. Let excess egg drip off before cooking. Also, ensure the skillet is hot before you add the bread. The butter should sizzle when it touches the pan. This seals the bread and keeps it from getting soggy. Serve your Blueberry Cheesecake French Toast warm. Drizzle maple syrup on top for sweetness. You can add extra blueberries for color and taste. For a fun touch, serve with whipped cream or a scoop of yogurt. It makes the dish feel special. Arrange slices on a nice platter for a beautiful presentation. Enjoy every bite! Pro Tips Choose the Right Bread: Using thick slices of Challah or Brioche enhances the flavor and texture, making your French toast extra indulgent. Perfect Egg Mixture: Ensure your egg mixture is well whisked and slightly frothy to achieve a light and fluffy texture in the French toast. Don’t Rush Cooking: Cooking the sandwiches on medium heat allows for an even, golden-brown finish without burning them. Garnish for Presentation: Fresh blueberries and a drizzle of maple syrup not only add flavor but also make your dish visually appealing. {{image_4}} You can change things up with this recipe. Add nuts like walnuts or pecans for a nice crunch. Chopped nuts pair well with the creamy cheese and sweet blueberries. You might also try other fruits. Sliced bananas or strawberries add fresh flavors. Mixing berries, like raspberries or blackberries, brings color and taste. Each fruit adds its own twist, so feel free to be creative! If you want a lighter version, use low-fat cream cheese. It will still taste great and save some calories. You can also swap whole milk for skim milk. This change keeps the rich taste while cutting fat. Another option is to use less sugar in the cheese mixture. You can even use a sugar substitute if you prefer. These small swaps help you enjoy this dish while being mindful of health. Making this dish vegan is easy! Use dairy-free cream cheese and plant-based milk instead of regular milk. You can replace eggs with a mixture of flaxseed and water. This mix binds well and gives a nice texture. For gluten-free options, choose gluten-free bread. Many brands offer tasty choices that work well here. These simple changes let everyone enjoy this delicious treat! To store leftovers, let the Blueberry Cheesecake French Toast cool down completely. Place the slices in an airtight container. You can keep them in the fridge for up to three days. Make sure to separate layers with parchment paper to avoid sticking. When you are ready to eat, preheat your oven to 350°F (175°C). Place the French toast on a baking sheet. Heat for about 10-15 minutes, or until warm. You can also use a microwave for quick reheating. Just warm them for about 30 seconds to 1 minute. If you want to save some for later, you can freeze the slices. Wrap each piece tightly in plastic wrap. Then place them in a freezer bag. They can last up to two months in the freezer. When ready to eat, thaw in the fridge overnight before reheating. For the best Blueberry Cheesecake French Toast, I recommend using thick slices of either Challah or Brioche. These breads have a soft texture and absorb the egg mixture well. Their sweetness and richness enhance the overall flavor of the dish. Yes, you can prepare some parts in advance. Make the cream cheese mixture and store it in the fridge for up to two days. You can also assemble the sandwiches and keep them in the fridge. Just cook them fresh when you are ready to eat! To reduce the sweetness, you can cut back on the powdered sugar in the cream cheese mixture. You can also use less maple syrup when serving. Choosing a less sweet bread, like whole wheat, can also balance the flavors nicely. This blog post outlined how to make a tasty French toast sandwich. We covered key ingredients, the steps to create the dish, and helpful tips for perfect results. I shared flavor variations and storage tips to help you enjoy it longer. Remember, your choice of bread and how you prepare it make a big difference. You can adapt this recipe to fit your taste or needs. Enjoy making your own delicious French toast creation every time!

Delicious Blueberry Cheesecake French Toast Recipe

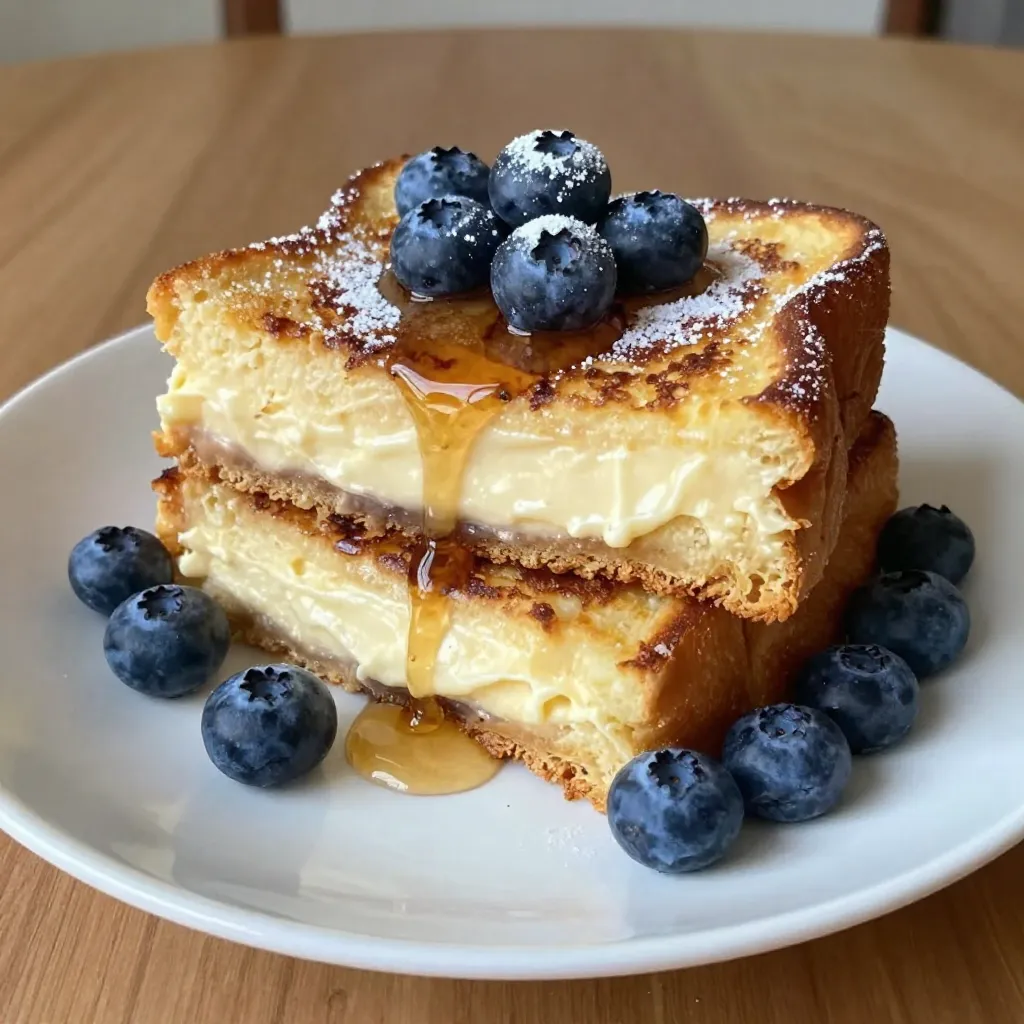
Are you ready to treat yourself to a sweet breakfast twist? This delicious blueberry cheesecake French toast recipe combines creamy

- 2 cups all-purpose flour - 1 teaspoon baking powder - 1 teaspoon baking soda - 1/2 teaspoon salt - 1 teaspoon ground cinnamon - 1/2 teaspoon ground nutmeg - 1/2 cup unsalted butter, softened - 3/4 cup granulated sugar - 1/4 cup packed brown sugar - 2 large eggs, at room temperature - 1 teaspoon pure vanilla extract - 1/2 cup buttermilk - 2 medium apples, peeled and diced For the Streusel Topping: - 1/3 cup all-purpose flour - 1/3 cup rolled oats - 1/4 cup packed brown sugar - 1 teaspoon ground cinnamon - 3 tablespoons unsalted butter, melted - A pinch of salt When baking, measure dry and wet ingredients separately. Use a dry measuring cup for flour. Scoop the flour and level it off with a straight edge. For wet ingredients, use a liquid measuring cup. Always check for accuracy. To soften butter, cut it into small pieces and leave it at room temp for 15 to 20 minutes. You can also microwave it in short bursts, about 5 seconds each. If you don't have buttermilk, mix 1/2 tablespoon of vinegar with milk to make a quick substitute. You can also use yogurt or sour cream. For apples, Granny Smith adds a nice tartness, while Honeycrisp offers sweetness. You can mix and match types for extra flavor. First, you need to preheat the oven. Set it to 350°F (175°C). This step is key. A hot oven helps the loaf rise well. While the oven heats, prepare your loaf pan. Grease it with unsalted butter. Then, dust it lightly with flour. This keeps the loaf from sticking. You can also line the pan with parchment paper for easier removal. To make the streusel topping, start with a small bowl. Combine 1/3 cup all-purpose flour, rolled oats, and packed brown sugar. Add a teaspoon of ground cinnamon. Pour in 3 tablespoons of melted butter. Mix this well. You want it to look like coarse crumbs. This texture gives a nice crunch. Set the mixture aside while you work on the batter. Now, let’s mix the batter. In a medium bowl, whisk together the dry ingredients: flour, baking powder, baking soda, salt, cinnamon, and nutmeg. In a large bowl, cream the softened butter with granulated and brown sugar. Use an electric mixer for this step. Beat until the mixture is light and fluffy, about three to four minutes. Next, add the eggs one by one. Mix well after each egg. Then stir in the vanilla extract. Now, combine the dry ingredients with the wet mixture. But do it slowly. Alternate adding the dry mix and buttermilk. Start and end with the dry ingredients. Mix just until combined. Overmixing will make the loaf tough. After mixing, gently fold in the diced apples. Use a spatula for this. Be careful not to deflate the batter. The apples should be evenly spread. Now, you’re ready to pour half of the batter into the prepared pan. Sprinkle half of the streusel topping on top. Then add the rest of the batter and finish with the remaining streusel. With everything in the pan, it’s time to bake. Place it in the oven and bake for 55 to 65 minutes. You can check for doneness with a toothpick. If it comes out clean, your loaf is ready! Using room temperature ingredients is key for a great loaf. When butter and eggs are warm, they mix better. This gives you a smooth batter. Cold ingredients can make the batter lumpy. When you fold in the apples, do it gently. Use a spatula to mix them in. This way, you won’t deflate the batter. A light touch keeps the loaf fluffy and airy. To check if your loaf is done, use a toothpick. Insert it into the center. If it comes out clean, the loaf is ready. If it has batter on it, bake a few more minutes. Baking time can change based on your pan size. If you use a smaller pan, the loaf may bake faster. Always keep an eye on it. Adjust the time based on how thick your batter is. For a fun serving style, slice the loaf warm. You can dust it with powdered sugar for a sweet touch. Pair the slices with a small bowl of vanilla or caramel sauce. This adds flavor and makes it look pretty. You can also serve it with whipped cream on the side for extra indulgence. {{image_4}} You can make this loaf even better. Adding nuts like walnuts or pecans gives a nice crunch. You can also toss in raisins for a sweet touch. They pair well with apples and spices. Different spices can change the flavor too. Try adding ginger or allspice. These spices add warmth and depth to your loaf. A dash of cardamom can also bring out the apple's sweetness. Want to make this loaf gluten-free? Use a gluten-free flour blend instead of all-purpose flour. Make sure it has xanthan gum for the right texture. If you prefer a vegan version, swap the eggs for flaxseed meal. Mix one tablespoon of flaxseed with three tablespoons of water. Let it sit for a few minutes to thicken. Use plant-based butter instead of regular butter. This way, everyone can enjoy the loaf! You can change the fruits based on the season. In the fall, use apples and pears for a cozy flavor. In summer, try peaches or berries for a fresh twist. Festive flavors can make your loaf special too. Add a splash of maple syrup for a fall vibe. Cinnamon and nutmeg are great for winter holidays. You can even sprinkle some pumpkin spice for a fun twist! To keep your Bakery-Style Apple Streusel Loaf fresh, follow these tips: - Wrap the loaf tightly in plastic wrap. This method helps keep moisture in. - You can also use an airtight container. It protects the loaf from air exposure. - If you cut the loaf, cover the cut side to keep it moist. Freezing the loaf is simple and effective: - Wrap the cooled loaf in plastic wrap, then foil. This prevents freezer burn. - Place the wrapped loaf in a freezer bag for extra protection. - To thaw, leave the loaf in the fridge overnight. - For a quick option, you can microwave slices for about 15-20 seconds. Understanding how long your loaf lasts is important: - At room temperature, it stays fresh for about 3 days. - In the fridge, it can last up to a week. - If frozen, it keeps well for 2-3 months. If you don't have buttermilk, don’t worry! You can make a quick substitute. Mix 1/2 tablespoon of vinegar with enough milk to make 1/2 cup. Let it sit for five minutes. This will mimic buttermilk's tangy taste. You can also use plain yogurt or sour cream thinned with a bit of milk. These options keep your loaf moist and tasty. Yes, you can prepare this loaf ahead of time. You can mix the batter and store it in the fridge for a few hours. Just remember to bring it back to room temperature before baking. If you bake it in advance, let it cool fully. Wrap it in plastic wrap before storing it in an airtight container. The loaf stays fresh for up to three days on the counter. To check if your loaf is done, use a toothpick. Insert it into the center of the loaf. If it comes out clean or with a few crumbs, it's ready. If the toothpick has wet batter, it needs more time. Keep an eye on the color. The top should be golden brown. If you notice it browning too fast, cover it with foil. This will help it bake evenly. In this article, we covered key ingredients for your loaf, along with helpful tips. You learned about measuring, substitutes, and techniques for mixing. We shared ways to enhance flavor and adjust for dietary needs. Storage methods were also discussed to keep your loaf fresh. Remember, baking is an adventure. Experiment with ingredients and enjoy the process! Your perfect loaf awaits.

Bakery-Style Apple Streusel Loaf Delightful Recipe

Are you ready to bake a delicious Bakery-Style Apple Streusel Loaf? This easy recipe is perfect for any home cook.

- 1 pound large shrimp, peeled and deveined - 2 cups fresh broccoli florets - 1 bell pepper, sliced (you can choose red, yellow, or green for color) - 1 cup snap peas, trimmed - 2 medium carrots, cut into thin rounds - 1/4 cup high-quality teriyaki sauce - 2 tablespoons extra virgin olive oil - 2 teaspoons fresh ginger, finely minced - 2 cloves garlic, finely minced When I make this dish, I love using fresh, colorful veggies. They add great taste and look lovely on the plate. Shrimp is the star here. It cooks fast and soaks up all the flavors from the teriyaki sauce. - Toasted sesame seeds, for garnish - Fresh green onions, thinly sliced, for garnish - Lime wedges These garnishments take your meal to the next level. The toasted sesame seeds add crunch, and the green onions bring a fresh taste. A squeeze of lime brightens everything up. You can serve these on the side or sprinkle them right on top before serving. 1. Preheat the Oven: Start by preheating your oven to 400°F (200°C). This heat will help cook the shrimp and veggies just right. 2. Mix the Marinade: In a bowl, whisk together 1/4 cup of teriyaki sauce, 2 tablespoons of olive oil, 2 teaspoons of minced ginger, and 2 cloves of minced garlic. Make sure it blends well. 3. Marinate the Shrimp: Add 1 pound of peeled and deveined shrimp to the marinade. Coat them evenly and let them sit for 15 minutes. This step brings out the flavors. 4. Prepare the Vegetables: On a large baking sheet, place 2 cups of broccoli florets, 1 sliced bell pepper, 1 cup of trimmed snap peas, and 2 sliced carrots. Drizzle with olive oil and sprinkle with salt and pepper. Toss everything to coat. 1. Add the Shrimp: Once marinated, place the shrimp on top of the seasoned vegetables. Spread them out to ensure even baking. 2. Bake the Dish: Put the sheet pan in the oven and bake for 12-15 minutes. Watch the shrimp; they should turn pink and opaque. The veggies should be tender-crisp. 3. Garnish and Serve: Take the sheet pan out of the oven. Sprinkle toasted sesame seeds and sliced green onions on top for extra crunch and flavor. This easy recipe makes a colorful and tasty meal. Enjoy your delicious sheet-pan teriyaki shrimp and veggies! To make your sheet-pan teriyaki shrimp and veggies shine, follow these tips: - Ensure Even Baking: Spread the shrimp and veggies in a single layer on the pan. This allows hot air to circulate and cook everything evenly. - Use Fresh Ingredients: Fresh shrimp and crisp vegetables give the best flavor. Look for vibrant colors and firm textures. - Proper Seasoning: Don’t skimp on the salt and pepper. This boosts the dish's overall taste. Season both the shrimp and veggies before baking. Presentation can elevate your meal: - Rustic Look: Serve directly from the sheet pan. It looks cozy and inviting. - Elegant Touch: Plate the shrimp and veggies individually. Drizzle with extra teriyaki sauce for a refined look. - Add Lime Wedges: A wedge of lime on the side adds a fresh zing when squeezed over the dish. If you want to explore more, consider pairing this dish with steamed rice or a light salad for a complete meal. {{image_4}} You can easily change up the veggies in this dish. Try adding zucchini, asparagus, or even mushrooms. Each vegetable brings a unique taste and texture. If you want to swap the shrimp, chicken and tofu work great too. Chicken gives a heartier bite, while tofu adds a nice plant-based option. Just remember to adjust cooking times for these substitutes. Spice it up with a pinch of red pepper flakes or a dash of cayenne. This will add a kick to your teriyaki shrimp. You can also try different sauces. For instance, use a spicy garlic sauce or a sweet chili sauce for a new twist. Mixing flavors keeps the meal exciting and fresh each time you make it. To keep your delicious sheet-pan teriyaki shrimp and veggies fresh, store leftovers in the fridge. Use airtight containers for the best results. Glass containers work well, but plastic ones are fine too. Make sure to cool the dish before sealing it to avoid condensation. This will help keep the shrimp and veggies tasty for up to three days. When it's time to enjoy your leftovers, reheating them properly is key. You can use the oven or a microwave. If you choose the oven, preheat it to 350°F (175°C). Place the shrimp and veggies on a baking sheet. Heat them for about 10 minutes. This keeps the shrimp juicy and the veggies crisp. If using a microwave, heat on medium power for 1-2 minutes. Stir halfway to ensure even warming. Enjoy your meal! Bake your sheet-pan teriyaki shrimp for 12 to 15 minutes. Check for doneness when the shrimp turn pink and opaque. The veggies should be tender but still crisp. If they need more time, you can leave them in for a few extra minutes. Just avoid overcooking, which can make shrimp tough. Yes, you can use frozen shrimp! Just thaw them in cold water before marinating. Drain them well to avoid excess water in your dish. Fresh shrimp will cook faster, but frozen shrimp work fine. Just make sure they are peeled and deveined. Great choices include broccoli, bell peppers, snap peas, and carrots. These veggies add color and crunch. You can also try zucchini, asparagus, or mushrooms for a twist. Mixing different textures and flavors makes the dish even better! This blog post covered how to make sheet-pan teriyaki shrimp. We discussed main ingredients like shrimp and fresh vegetables. You learned important tips for preparation and cooking. We also explored variations to suit your taste and storage tips for leftovers. In conclusion, this dish is easy to make and customizable. Enjoy experimenting with flavors and ingredients. Your kitchen can turn into a flavorful space with just a few steps. Happy cooking!

Sheet-Pan Teriyaki Shrimp and Veggies Delightful Meal

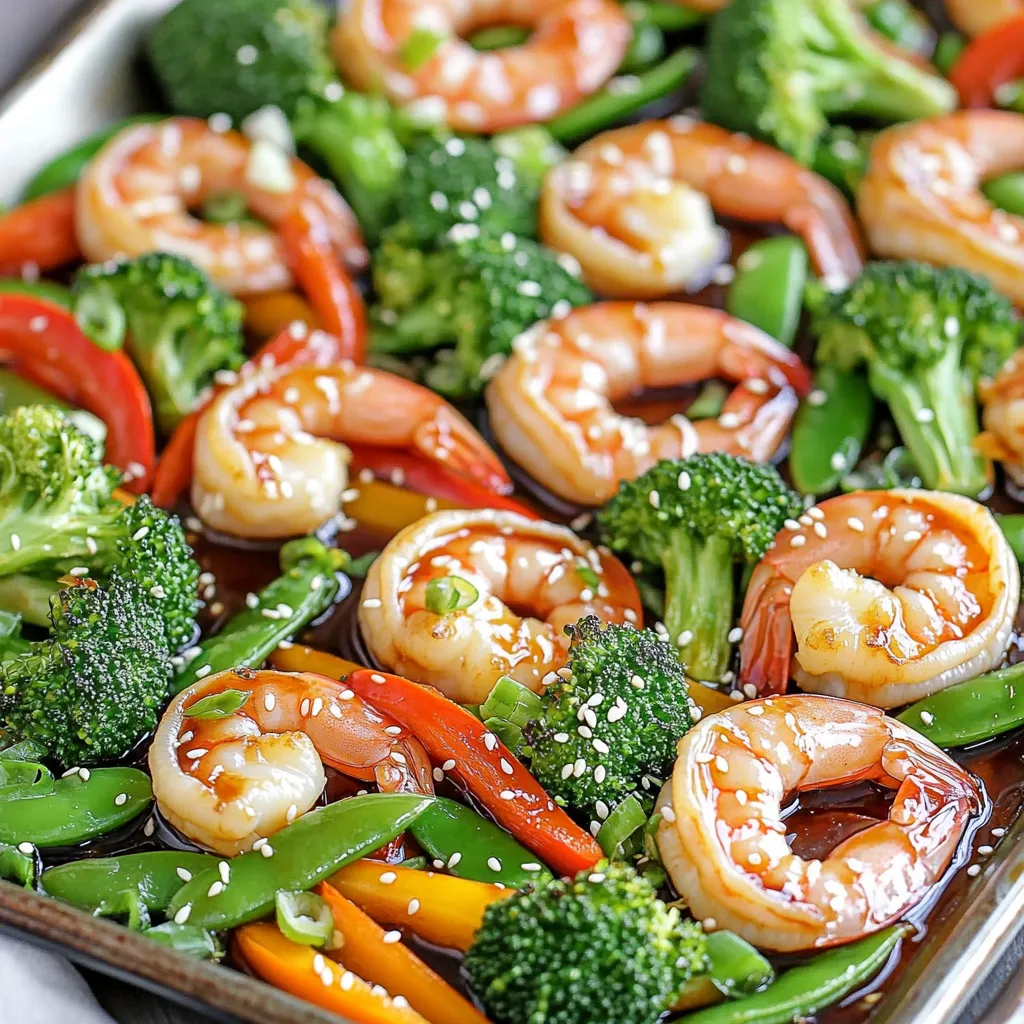
Looking for a quick and tasty dinner? You’ve come to the right place! This Sheet-Pan Teriyaki Shrimp and Veggies recipe

For this caramel apple bread pudding, you will need: - 6 cups of day-old bread (brioche or challah works best), cut into cubes - 3 medium apples (Granny Smith or Honeycrisp), peeled, cored, and diced - 1 cup granulated sugar - 1 cup whole milk - 1 cup heavy cream - 4 large eggs - 1 teaspoon pure vanilla extract - 1 teaspoon ground cinnamon - 1/2 teaspoon ground nutmeg - 1/4 teaspoon salt - 1 cup caramel sauce (store-bought or homemade) The key flavors come from the apples, spices, and caramel. - Apples: They add sweetness and a tart bite. Granny Smith gives a punch while Honeycrisp adds a juicy crunch. - Spices: Ground cinnamon and nutmeg bring warmth and depth. These spices make every bite cozy and inviting. - Caramel Sauce: Drizzling caramel on top finishes the dish. It creates a rich layer of sweetness that ties everything together. You can add more fun to your bread pudding with these options: - Nuts: Walnuts or pecans add crunch. Toast them first for even more flavor. - Chocolate Chips: Add semi-sweet or dark chocolate for a sweet twist. - Dried Fruit: Raisins or cranberries can bring extra sweetness and chewiness. These add-ins can make your dessert even more special! Customize it to fit your taste. First, preheat your oven to 350°F (175°C). This step is key for baking. Next, grease a 9x13 inch baking dish with butter or cooking spray. This helps prevent sticking. In a large bowl, add 6 cups of day-old bread cut into cubes. I prefer brioche or challah for the best texture. Then, add 3 medium apples that are peeled, cored, and diced. Toss the bread and apples gently to mix. Now, transfer this mixture into the prepared baking dish. Spread it evenly across the bottom. In another bowl, whisk together 1 cup of granulated sugar, 1 cup of whole milk, 1 cup of heavy cream, and 4 large eggs. Add 1 teaspoon of pure vanilla extract, 1 teaspoon of ground cinnamon, 1/2 teaspoon of ground nutmeg, and 1/4 teaspoon of salt. Whisk until smooth. Pour this custard mixture over the bread and apple mix. Make sure to coat the bread well. Press down with a spatula so all the bread absorbs the liquid. Let it sit for 15-20 minutes to soak. Now, drizzle half of the 1 cup of caramel sauce over the top of the soaked mix. Use a spatula to swirl the caramel in gently. This adds a nice flavor. Place the baking dish in your preheated oven. Bake for 40-45 minutes. You want the top to be golden-brown and the pudding fully set. When it’s done baking, take the dish out of the oven. Let it cool for about 10 minutes. This helps the texture set. Serve the bread pudding warm. Add an extra drizzle of caramel sauce on top. If you like, you can also add whipped cream for a rich finish. For a fun twist, serve in individual ramekins or on dessert plates. A sprinkle of cinnamon or a few apple slices on top makes it even prettier! For this recipe, I recommend using brioche or challah. These breads have a rich flavor and soft texture. They soak up the custard well, making the pudding creamy. Avoid using very dry bread, as it will not absorb the liquid properly. Day-old bread works best because it is firmer and less soggy. Soaking the bread is key to great bread pudding. After mixing the bread and apples, pour the custard over it. Press the bread down gently with a spatula. This helps each piece soak up the liquid. Let it sit for 15 to 20 minutes before baking. If time allows, soak it longer for a richer flavor. If your bread pudding comes out too dry, it likely did not soak long enough. Next time, allow more time for the bread to absorb the custard. If it is too wet, you may have added too much liquid. Make sure to measure your ingredients carefully. Lastly, if the top burns before the inside sets, cover it with foil during baking. This protects the top while the center cooks through. {{image_4}} You can mix up the fruit in this recipe. Pears work well, too. They add a sweet and juicy flavor. You might also try berries like blueberries or raspberries for a fun twist. Each fruit gives a new taste and texture. So, feel free to experiment and find your favorite! Want to add a bit of crunch? Toss in some chopped nuts. Walnuts or pecans bring a nice texture. You can also add chocolate chips for a sweet touch. Dark, milk, or white chocolate all make great choices. Just sprinkle them on top before baking for extra flavor. Change the spices for the season! In fall, add more cinnamon or swap in pumpkin spice. In winter, try ginger or even a hint of peppermint. Each season brings its own flavors, so use them to inspire your dessert. Adjusting these flavors keeps the dish fresh and exciting! To store your caramel apple bread pudding, let it cool first. Once cool, cover it tightly with plastic wrap or foil. You can also place it in an airtight container. Keep it in the fridge for up to three days. This keeps it fresh and tasty. When you're ready to enjoy leftovers, preheat your oven to 350°F (175°C). Place the pudding in an oven-safe dish. Add a splash of milk or cream to keep it moist while reheating. Bake for about 15-20 minutes until hot. You can also use the microwave. Heat in short bursts of 30 seconds, checking often. You can freeze caramel apple bread pudding for later. After it cools, cut it into portions. Wrap each piece in plastic wrap, then place in a freezer bag. Remove as much air as possible. It can stay in the freezer for up to three months. To eat, thaw overnight in the fridge before reheating. Yes, you can make this recipe ahead of time. Prepare the bread pudding up to the soaking step. Cover it well and chill it in the fridge for up to 24 hours. When you are ready to bake, just take it out and let it sit at room temperature for about 30 minutes. Then, pour on the caramel sauce and bake as directed. If you need a substitute for heavy cream, use whole milk or half-and-half. You can also blend milk with a tablespoon of butter for a similar effect. This will change the texture a bit, but it still works well in this recipe. To check if your bread pudding is done, look for a golden-brown top. The edges should puff up, and the center should not jiggle. You can also insert a knife in the center. If it comes out clean, your pudding is ready. If not, give it a few more minutes in the oven. This blog post guides you through making a delicious bread pudding. We covered the main ingredients, key flavors, and optional add-ins. I walked you through detailed steps for prep, baking, and serving. You learned tips for choosing the best bread and troubleshooting common issues. We explored fun variations and storage methods for leftovers, too. Try this recipe and enjoy a comforting treat. With these tips, you can create the perfect bread pudding every time.

Caramel Apple Bread Pudding Delightful Dessert Recipe

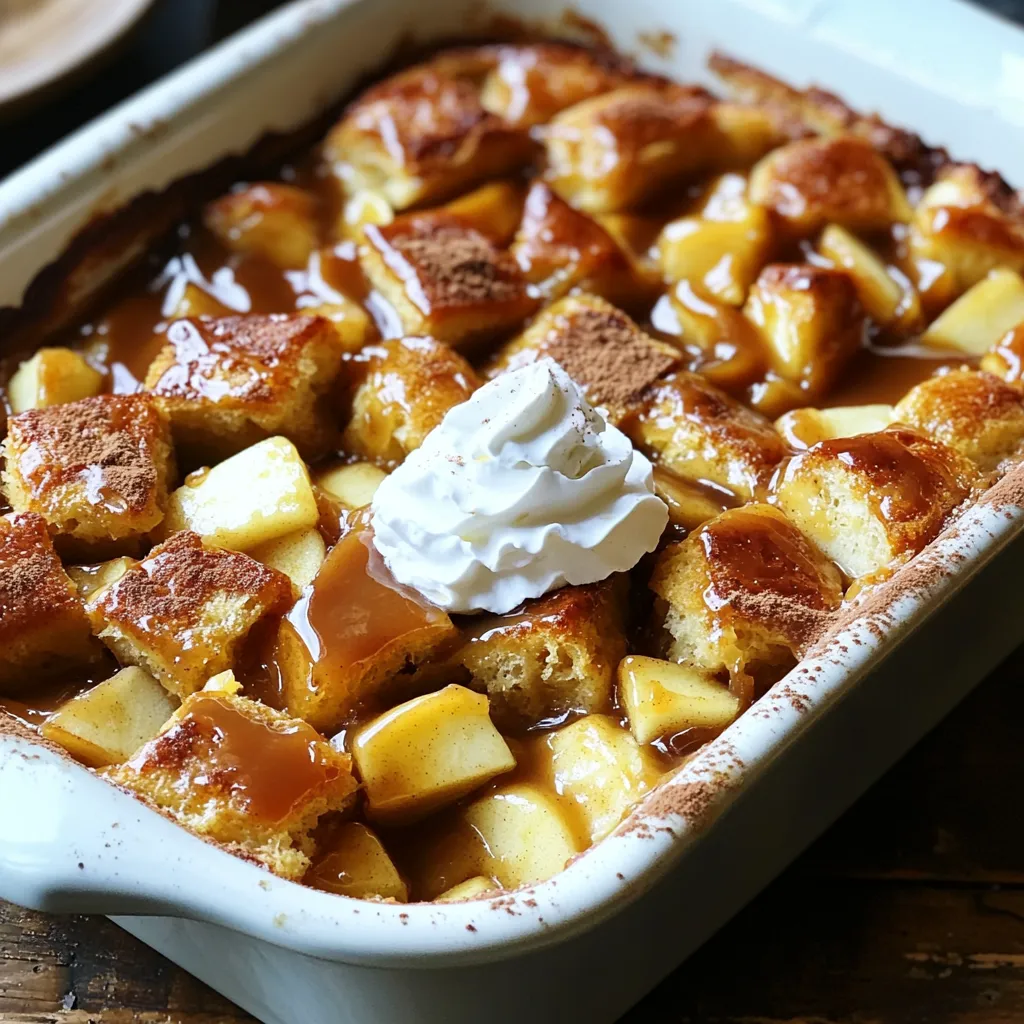
Get ready to indulge in a warm, sweet treat with my Caramel Apple Bread Pudding! This dessert blends soft bread,

To make Pumpkin Cheesecake Icebox Bars, you need these simple ingredients: - 1 ½ cups graham cracker crumbs - ½ cup unsalted butter, melted - 2 tablespoons granulated sugar - 1 (8 oz) package cream cheese, softened - 1 cup canned pumpkin puree - ½ cup powdered sugar - 1 teaspoon pure vanilla extract - 1 teaspoon ground cinnamon - ½ teaspoon ground nutmeg - 1 teaspoon pumpkin pie spice - 1 cup heavy whipping cream - ¼ cup granulated sugar (for whipping cream) These ingredients come together to create a creamy, pumpkin-flavored dessert. The graham cracker crumbs make a great base, while the cream cheese and pumpkin give it a rich texture. The spices add warmth and flavor, making each bite delightful. Make sure your cream cheese is at room temperature. This helps it blend smoothly with the other ingredients. Feel free to adjust the spices to your taste. If you love cinnamon, add a little more! If you like nutmeg, go for it! Using canned pumpkin puree saves time and gives consistent flavor. You can try fresh pumpkin, but it takes longer to prepare. Gather these ingredients, and you are on your way to a tasty treat! First, gather your graham cracker crumbs, melted butter, and sugar. In a medium bowl, mix the graham cracker crumbs with the melted butter and sugar. Stir until the mixture feels moist and holds together. This step is key for a great crust. Next, press the mixture evenly into the bottom of an 8x8 inch pan. Use your hands or a flat tool to pack it tightly. This will help form a sturdy base for your bars. Place the crust in the fridge while you prepare the filling. This keeps it firm and ready for the next step. In a large bowl, beat the softened cream cheese until it's smooth. You can use a hand mixer for this. Next, add in the pumpkin puree, powdered sugar, vanilla extract, ground cinnamon, nutmeg, and pumpkin pie spice. Mix until everything is blended well and creamy. The spices will give your filling that warm, cozy flavor. Make sure there are no lumps in the mixture for a smooth texture. Tasting the filling at this stage is a must! Adjust spices if needed for your taste. In a separate bowl, pour in the heavy cream and add granulated sugar. Using a mixer, whip the cream until stiff peaks form. This means the cream should hold its shape when you lift the mixer out. Be careful not to over-whip, or it can turn grainy. Once it's ready, gently fold the whipped cream into the pumpkin mixture. Use a spatula and combine until no white streaks remain. This step adds lightness and creaminess to your bars. Now it's time to assemble! Pour the creamy filling over the chilled crust. Use a spatula to spread it evenly. Smooth the top to make it nice and pretty. Cover the pan with plastic wrap and place it in the refrigerator. Chill for at least four hours, or until the filling is firm. This cooling time is crucial for the bars to set properly. Once ready, you can cut them into squares and serve. Enjoy your tasty treat! To get the best texture, start by making sure your cream cheese is soft. Leave it out for about an hour before mixing. This helps it blend smoothly with other ingredients. If it's too cold, your filling will be lumpy. When you whip the cream, go slow at first. Use a mixer on low speed to combine the cream and sugar. Once it starts to thicken, increase the speed. You want stiff peaks for a light and fluffy texture. When you fold the whipped cream into the pumpkin mix, be gentle. Use a spatula and a folding motion. This keeps the air in the whipped cream, giving the bars a light feel. Don't stir too hard, or you'll lose that fluffiness. For a stunning presentation, serve the bars chilled on a nice platter. You can add a dollop of whipped cream on top of each bar. A sprinkle of cinnamon adds a nice touch. It makes the bars look pretty and adds more flavor. When cutting the bars, use a sharp knife. Dip the knife in hot water first, then dry it. This helps create clean cuts. Cut them into squares for a neat look. You can also decorate each square with a piece of caramel or chocolate drizzle for extra flair. {{image_4}} You can easily change the taste of your Pumpkin Cheesecake Icebox Bars. Adding chocolate or caramel drizzles can create a rich twist. Just melt some chocolate or caramel sauce and drizzle it on top before serving. This adds a sweet touch and looks great too! You can also use alternative spices if you want a new flavor. Instead of just cinnamon and nutmeg, try ginger, cardamom, or allspice. Each spice will give the bars a different taste. Experimenting with spices can make this recipe fun! You can adjust this recipe to fit your diet. For a gluten-free crust, use gluten-free graham cracker crumbs. Mix them with the butter and sugar just like the original recipe. This way, everyone can enjoy the bars. If you need a dairy-free option, swap cream cheese with a dairy-free cream cheese. You can also use coconut cream instead of heavy whipping cream. Just chill the coconut cream first. This will help it whip better. These adjustments make the bars suitable for more diets! To keep your Pumpkin Cheesecake Icebox Bars fresh, store them in the fridge. Use an airtight container to prevent them from drying out. If you don’t have one, wrap them tightly in plastic wrap. This keeps them moist and tasty. These bars last about five days in the refrigerator. After that, they can lose their fresh taste and creamy texture. Always check for any off smells or changes in texture before enjoying them. If you want to save some bars for later, freezing is a great option. Cut the bars into squares first. Then, place them in a single layer on a baking sheet. Freeze them for about one hour. This step keeps them from sticking together. After they are frozen, wrap each square in plastic wrap. Next, put them in a freezer-safe bag or container. This way, they stay fresh for up to three months. When you are ready to eat them, remove the bars from the freezer. Let them thaw in the fridge for a few hours. This method helps maintain their creamy texture. Enjoy your delicious treat anytime! Can I use fresh pumpkin instead of canned? Yes, you can use fresh pumpkin. First, cook the pumpkin until soft. Then, mash it until smooth. Make sure to remove excess water. This keeps your bars from being too wet. What can I substitute for cream cheese? You can use Greek yogurt or mascarpone cheese. Both give a creamy texture. Greek yogurt adds a tart flavor that works well in the bars. How do I know when the bars are set? The bars are set when they feel firm to the touch. You can also gently shake the pan. If the filling jiggles slightly in the center, give it more chilling time. What to do if the filling is too runny? If your filling is runny, try adding more powdered sugar. This can help thicken it. You can also chill the mixture longer before pouring it over the crust. How to fix a crumbling crust? To fix a crumbling crust, add more melted butter. Mix it well until the crumbs stick together. Press the mixture firmly into the pan for a solid base. This pumpkin cheesecake icebox bar recipe combines tasty layers with simple steps. You'll create a crunchy crust, a creamy filling, and whip up light cream for a perfect finish. Remember to follow tips for texture and garnish for a lovely presentation. Explore variations to suit your taste or dietary needs. Store leftovers correctly so they stay fresh. With these tips, your cheesecake bars will impress everyone. Enjoy making this delicious treat.

Pumpkin Cheesecake Icebox Bars Easy and Tasty Treat

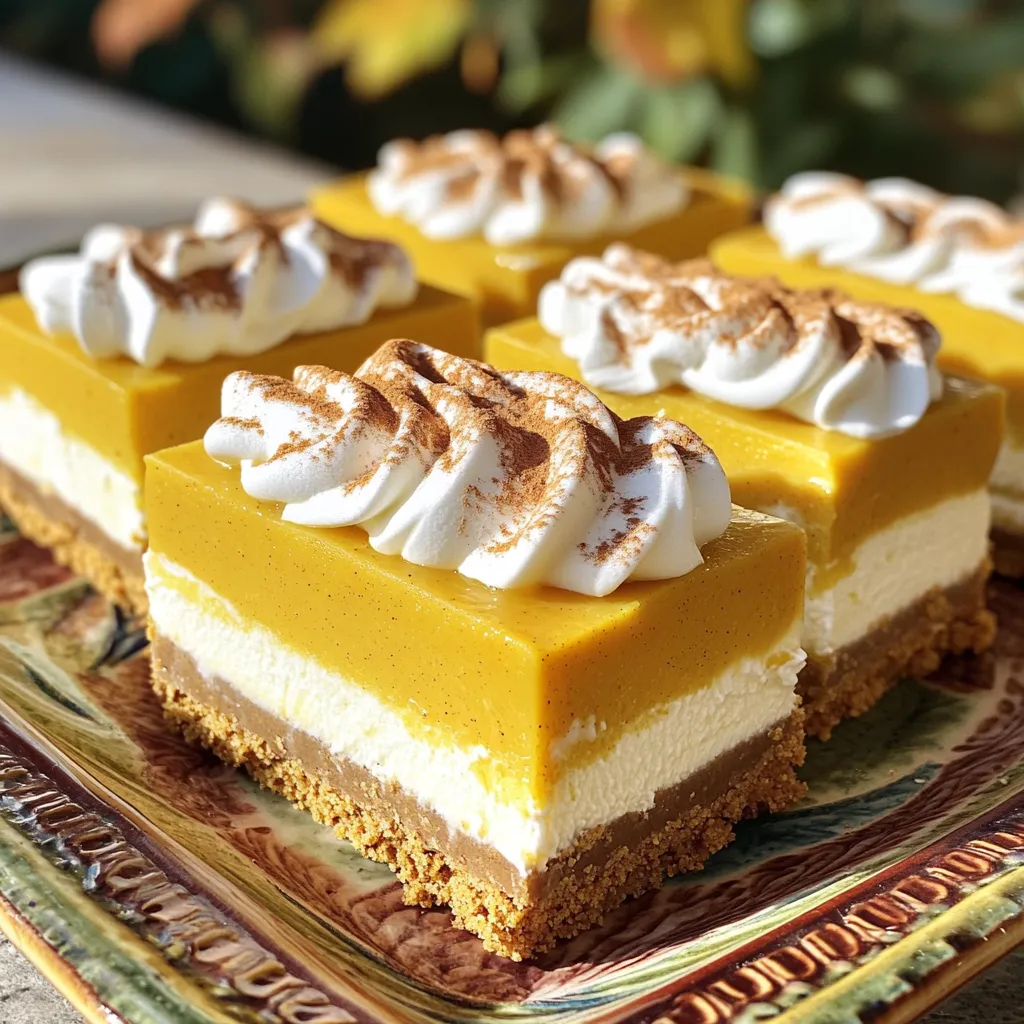
Love pumpkin treats? You’re in for a real treat with my Pumpkin Cheesecake Icebox Bars! These no-bake bars blend creamy

- 2 packs of instant ramen noodles (omit the flavor packets) - 4 cups vegetable broth - 4 cloves garlic, finely minced - 1-inch piece ginger, finely grated - Soft-boiled eggs (1 per serving) - Sesame seeds, for garnish - 2 tablespoons soy sauce - 2 tablespoons sriracha (adjust to desired heat level) When I make Spicy Garlic Ramen Bowls, I start with instant ramen noodles. They cook fast and taste great. I skip the flavor packets because I want to make my own broth. For the base, I use vegetable broth. It’s healthy and tasty. Next, garlic and ginger bring a bold flavor. I finely mince four cloves of garlic. Then, I grate a one-inch piece of ginger. Together, they make the broth aromatic. For extra richness, I use soy sauce and sriracha. The soy sauce adds depth, while sriracha gives it heat. I love the balance of flavors in this dish. You can add soft-boiled eggs for protein. They also make the bowl look fancy. A sprinkle of sesame seeds on top adds a nice crunch. These ingredients come together to create a warm, comforting meal. They are easy to find at any grocery store. Gather these items, and you’re ready to cook! To start, heat 1 tablespoon of sesame oil in a large pot over medium heat. Once it’s hot, add 4 cloves of minced garlic and 1 inch of grated ginger. Sauté these for about 1 minute. You want them fragrant, but not burnt. Next, pour in 4 cups of vegetable broth, 2 tablespoons of soy sauce, and 2 tablespoons of sriracha. Stir well and bring the mix to a gentle simmer. Now it’s time to add some good stuff! Toss in 1 cup of thinly sliced shiitake mushrooms and 1 medium julienned carrot into the broth. Let everything simmer for about 5 minutes. You want the vegetables to be tender but still bright. While the veggies cook, grab 2 packs of instant ramen noodles. Prepare them according to the package instructions. Once cooked, drain the noodles and set them aside. Keep them nearby; you will add them back to the pot soon! To make your ramen just right, you can adjust the spice level with sriracha. Start with two tablespoons for a good kick. If you want it milder, use less. You can always add more later! If you want to switch things up, try other ingredients. For example, use tamari instead of soy sauce for a gluten-free option. You can also add miso paste for a deeper flavor. For perfect soft-boiled eggs, cook them for 6 to 7 minutes. This will give you a nice runny yolk. After cooking, place the eggs in an ice bath. This cools them down fast and makes peeling easier. Be gentle when you peel them to keep the egg intact. A beautiful bowl of ramen starts with how you arrange the noodles. Place the noodles neatly in the bowl. Then, pour the hot broth over them. This helps the noodles soak up the flavor. Next, add the veggies and egg on top. Finish with chopped green onions and a sprinkle of sesame seeds. This makes a tasty and pretty dish! {{image_4}} If you want to make this dish vegetarian, adding tofu is a great choice. Tofu gives protein and a nice texture. Use firm or extra-firm tofu for the best results. Simply cube it and toss it in the broth while it simmers. You can also swap in different vegetables. Try bell peppers, bok choy, or snow peas. These options add color and crunch. Just remember to adjust cooking times so they stay crisp. Not everyone likes the same heat. If sriracha is too spicy, use less or try another sauce. Chili paste or hot sauce can also work well. For those who love heat, add more sriracha or sprinkle in red pepper flakes. Just taste as you go to find your perfect balance. While vegetable broth is tasty, you can switch it up. Chicken or beef broth adds rich flavor. This change makes it hearty and filling. If you want a homemade broth, simmer vegetables, herbs, and spices in water. This method takes a bit longer, but the taste is worth it. Use onion, garlic, and carrots for a base. Then, strain and use it in your ramen! To store your Spicy Garlic Ramen Bowls, first, let them cool. Place the ramen in an airtight container. This keeps moisture out and helps maintain freshness. Refrigerate them right away. They stay good for about 3 days. To reheat, use a pot on the stove. Add a splash of broth or water to help steam the noodles. Heat on low and stir gently. This keeps the noodles from getting mushy. If you made soft-boiled eggs, add them fresh before serving. You can freeze the soup and veggies, but not the noodles. Noodles don’t freeze well. For best results, freeze the broth and veggies separately. Use freezer-safe bags for easy storage. When ready to eat, thaw in the fridge overnight and reheat as mentioned above. To make great ramen noodles, start with water. Boil a pot of water. Add the noodles and cook for 3-4 minutes. Stir the noodles gently. This keeps them from sticking. When done, drain the noodles. Rinse them under cold water. This helps stop the cooking process. Now your noodles are ready for the spicy garlic broth. Yes, you can meal prep these ramen bowls! Cook the broth and vegetables first. Store them in the fridge for up to three days. Cook the noodles fresh when you are ready to eat. This helps keep the noodles from getting soggy. If you want to make it even easier, you can store the broth and veggies separately. If you need a soy sauce substitute, try tamari. It’s gluten-free and tastes great. You can also use coconut aminos. This option is lower in sodium and works well. Another choice is making a mix of broth with a bit of vinegar. This gives a similar salty taste. This article explored how to make delicious Spicy Garlic Ramen. We covered key ingredients like instant noodles and vegetable broth. You learned to create a flavorful broth with garlic and ginger and how to cook the noodles perfectly. There are tips for adding soft-boiled eggs and customizing flavors. Don't forget about storage and reheating for leftovers. Enjoy experimenting with different vegetables and spice levels in your ramen. You now have everything you need to create your perfect bowl!

Spicy Garlic Ramen Bowls Flavorful and Easy Recipe

If you’re craving a quick and spicy meal, look no further! My Spicy Garlic Ramen Bowls are packed with flavor

- 4 salmon fillets - 2 cups broccoli florets - 1 red bell pepper, sliced into strips - 1 cup cherry tomatoes, halved - 1 small red onion, thinly sliced - 1/4 cup pure maple syrup - 1/4 cup balsamic vinegar - 3 tablespoons extra virgin olive oil - 2 cloves garlic, finely minced - Sea salt and black pepper to taste - Fresh parsley, finely chopped for garnish I love how simple yet flavorful this dish is. The salmon brings a rich taste, while the veggies add bright colors and crunch. When I go to the market, I always look for fresh salmon fillets. They should smell like the ocean, not fishy. For the veggies, I choose vibrant broccoli, sweet red bell peppers, juicy cherry tomatoes, and mild red onions. They roast well and mix flavors beautifully. The marinade is the star here. Maple syrup adds sweetness, while balsamic vinegar gives a tangy kick. The olive oil brings it all together, making a nice coating for both salmon and veggies. Fresh garlic adds depth and warmth. I love using fresh herbs like parsley to finish the dish. They add color and a fresh taste that brightens every bite. These ingredients come together to create a meal that is not just tasty but also visually appealing. You can serve it right from the sheet pan for a rustic look or plate it for a more formal dinner. Enjoy the vibrant colors and rich flavors! First, preheat your oven to 400°F (200°C). This step helps cook the salmon and veggies evenly. Next, line a large baking sheet with parchment paper. This makes cleanup easy and stops food from sticking. In a small bowl, combine the maple syrup, balsamic vinegar, olive oil, and minced garlic. Mix these ingredients well. This marinade brings sweet and tangy flavors to the dish. Add a pinch of sea salt and black pepper for extra taste. Now, take a big mixing bowl. Add the broccoli florets, red bell pepper strips, halved cherry tomatoes, and sliced red onion. Drizzle half of the marinade over the veggies. Toss them gently to coat every piece. This step ensures the veggies soak up that delicious flavor. Spread the marinated veggies on one side of the lined baking sheet. Make sure they sit in a single layer. This helps them roast nicely. On the other side, lay the salmon fillets, skin-side down. Use a brush or spoon to apply the rest of the marinade on top of the salmon. This adds a tasty glaze. Place the baking sheet in the preheated oven. Bake for about 15-20 minutes. The salmon should flake easily with a fork when it’s done. The veggies will become soft and slightly caramelized. After baking, take the sheet pan out of the oven. Sprinkle freshly chopped parsley over the salmon and veggies. This adds a pop of color and freshness. Now, it’s time to serve and enjoy your meal! When you buy salmon, look for bright, clear skin. The fillets should feel firm and moist. Fresh salmon smells like the sea, not fishy. You can also ask your fishmonger for wild-caught salmon. It often has a richer flavor. If possible, choose salmon with a deep pink color. To get the best texture from your veggies, cut them into even pieces. This helps them cook at the same rate. Broccoli should be in small florets, while bell peppers need thin strips. Toss them in a bit of oil before roasting. This will help them get crispy edges. Make sure not to overcrowd the pan. This allows hot air to circulate for even cooking. To boost flavors in your dish, consider herbs like thyme or rosemary. You can add spices like paprika or chili flakes for heat. Lemon zest can also brighten the dish. If you like a sweet twist, add a splash of orange juice. These additions will make your meal even more delicious. Don't be afraid to try new flavors! {{image_4}} You can switch up the veggies in this dish. Try using: - Asparagus - Zucchini - Carrots - Cauliflower Each of these vegetables brings its own taste and texture. For instance, asparagus adds a nice crunch, while zucchini soaks up the flavors well. If you want to mix things up, try other marinades. Consider: - Soy sauce and honey - Lemon juice and herbs - Mustard and maple syrup These options give your dish a new twist. The sweet and salty combos work well with salmon too. Pair your dish with simple sides. Here are some ideas: - Quinoa or rice - A fresh green salad - Garlic bread These sides add balance to your meal. A nice salad with lemon dressing brightens the plate and palate. To keep your salmon and veggies fresh, use airtight containers. Let them cool first. Place the salmon fillets and veggies separately if possible. This helps keep them from getting soggy. Store them in the fridge for up to three days. Always check for any signs of spoilage before eating. To reheat your leftovers, use the oven for the best taste. Preheat the oven to 350°F (175°C). Place the salmon and veggies on a baking sheet. Heat for about 10-15 minutes or until warm. You can also use a microwave, but it may not keep the texture the same. If using a microwave, cover the dish with a damp paper towel to prevent drying out. You can freeze this dish, but the texture may change. Wrap the salmon and veggies tightly in plastic wrap, then in foil. This helps prevent freezer burn. Label the package with the date. You can freeze for up to three months. Thaw in the fridge overnight before reheating. Yes, you can use frozen salmon. Just remember to thaw it first. Place it in the fridge overnight. If you're short on time, seal it in a bag and run it under cold water. This method works well. Thawed salmon cooks more evenly. Frozen salmon may need a bit more time in the oven. Always check its doneness. You can use many vegetables with this dish. Some great options include: - Asparagus - Zucchini - Carrots - Cauliflower - Brussels sprouts These veggies add different flavors and textures. Choose what you like or what you have on hand. Just make sure they roast well. Cut them into similar sizes for even cooking. To check if the salmon is done, use a fork. Gently flake the thickest part of the fillet. If it flakes easily, it's ready. The inside should be opaque, not translucent. The fish should reach an internal temperature of 145°F (63°C). If you have a meat thermometer, it’s a handy tool for this. In this blog post, we explored a tasty salmon dish with fresh veggies and a sweet marinade. We covered how to prepare the ingredients, make the marinade, and bake it all perfectly. I shared tips to choose the best salmon and variations to switch things up. Remember, you can store leftovers and even freeze them for later. Enjoy trying this simple recipe that is both nutritious and delicious. Cook with confidence and get creative in the kitchen!

Sheet Pan Maple Balsamic Salmon Veggies Delight

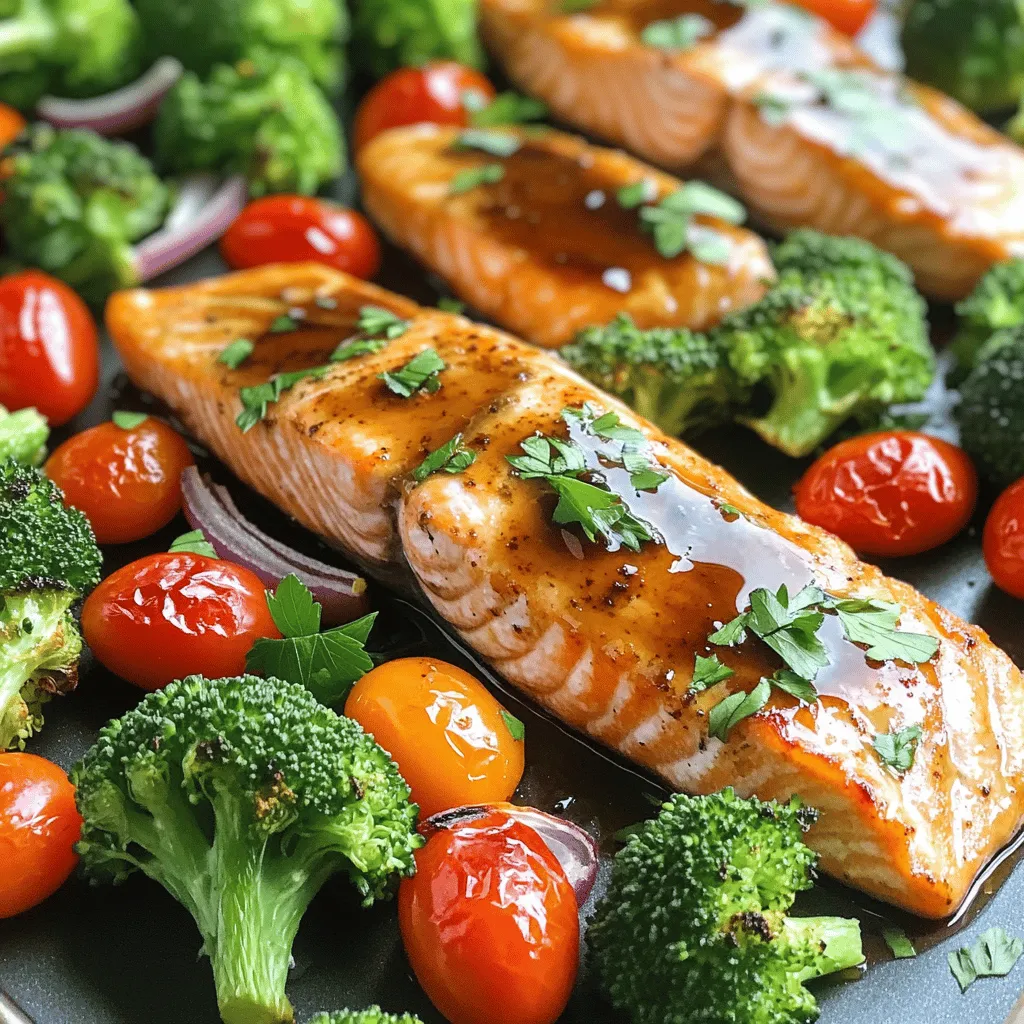
Want a meal that’s tasty and easy? “Sheet Pan Maple Balsamic Salmon Veggies Delight” is here to help! This one-pan

- 1 cup quinoa, rinsed thoroughly - 2 cups vegetable broth or water - 1 can (15 oz) black beans, drained and rinsed - 1 cup corn, fresh or thawed if frozen - 1 medium red bell pepper, diced - 1 small red onion, finely chopped - 1 ripe avocado, diced just before serving - 1/4 cup fresh cilantro leaves, chopped - Juice of 2 limes (about 1/4 cup) - 2 tablespoons extra virgin olive oil - 1 teaspoon ground cumin - 1 teaspoon chili powder - Salt and pepper, to taste - Additional vegetables like diced cucumber or cherry tomatoes - Cheese options like feta or cotija cheese - Protein additions like grilled chicken or shrimp To make the best Southwest Black Bean Quinoa Salad, you need fresh, quality ingredients. Quinoa acts as a great base. It is a protein-packed grain that cooks quickly. Black beans add fiber and a rich taste. Corn brings sweetness and crunch. The red bell pepper and red onion add vibrant colors and sharp flavors. Don’t forget the avocado, which gives creaminess. Fresh cilantro adds a pop of herbaceousness. Lime juice and olive oil create a zesty dressing. Ground cumin and chili powder bring warmth and spice. Adjust salt and pepper to your liking. You can customize this salad with optional add-ins. Add more veggies for extra nutrition. Cheese can add a savory touch. Protein options will make it more filling. Use these ingredients to create a fresh and quick dish that everyone will love! - First, bring 2 cups of vegetable broth or water to a rolling boil in a medium pot. - When the liquid boils, add 1 cup of rinsed quinoa. - Lower the heat to a gentle simmer and cover the pot. - Cook for about 15 minutes until the liquid is fully absorbed. - After cooking, remove the pot from heat. Let it sit covered for 5 minutes. - Finally, fluff the quinoa with a fork to separate the grains. - While the quinoa cooks, grab a small bowl. - Whisk together the juice of 2 limes and 2 tablespoons of extra virgin olive oil. - Add 1 teaspoon of ground cumin and 1 teaspoon of chili powder. - Sprinkle in a pinch of salt and pepper. - Mix until everything blends well. Adjust the taste to your liking. - In a large mixing bowl, combine 1 can of drained black beans, 1 cup of corn, and 1 diced red bell pepper. - Add 1 finely chopped red onion to the mix. - Once the quinoa has cooled slightly, add it to the bowl with the other ingredients. - Pour the dressing over the quinoa salad and gently toss to coat everything evenly. - Just before serving, fold in 1 diced avocado and 1/4 cup of chopped cilantro. - Taste and adjust the seasoning with more salt or pepper if needed. - Serve the salad right away for a fresh crunch or chill it for up to an hour for better flavor. To avoid mushy quinoa, use the right water-to-quinoa ratio. I recommend 2 cups of broth or water for every 1 cup of quinoa. Rinse the quinoa well before cooking. This removes the bitter coating called saponin. When the quinoa cooks, keep the lid on. After 15 minutes, let it sit for 5 minutes. Then, fluff it with a fork to separate the grains. Fluffing helps keep the quinoa light and airy. You can spice up your dressing easily. Try adding a pinch of cayenne pepper for heat. If you want a zesty twist, add some orange juice too. Different oils can change the flavor. Use avocado oil or sesame oil for a unique touch. For vinegars, try apple cider or red wine vinegar. Each option gives a new taste to the dish. This salad is great on its own. You can also pair it with grilled chicken or fish for a full meal. Serve it in colorful bowls to make it pop. Add extra cilantro leaves on top for color. A lime wedge on the side adds a fresh look. Serve it right away for a crunchy texture, or chill it for an hour. Chilling helps the flavors blend together. {{image_4}} The Southwest Black Bean Quinoa Salad is already vegetarian and vegan. To make it even better, you can swap out any animal-based items. Use vegan-friendly ingredients like plant-based cheese or yogurt if you want a creamy texture. This keeps the salad fresh and healthy. This recipe is gluten-free! Just check your ingredient labels. Ensure that the vegetable broth and any canned goods don't have gluten. If you follow these steps, you can enjoy the salad without worry. You can give this salad a fun twist. A Mediterranean version could use chickpeas and cherry tomatoes. Add feta cheese and a touch of oregano for extra flavor. For an Asian-inspired salad, try adding edamame and sesame oil. This adds a unique taste and takes the dish to new heights. To store your leftover Southwest Black Bean Quinoa Salad, place it in an airtight container. Keep the salad in the refrigerator. It will stay fresh for about three to four days. If you want to freeze it, I suggest not adding the avocado until you serve it. The rest of the salad freezes well for up to three months. When you're ready to eat, let it thaw in the fridge overnight. In the fridge, your salad lasts about three to four days. If frozen, it can stay good for three months. After that, the quality may go down. Always check for any odd smells or changes in color before eating. To reheat, gently warm the salad in a microwave. Use low power to avoid cooking it further. If serving cold, just take it out of the fridge. Add a splash of lime juice or olive oil to refresh the flavors. Keep the texture in mind; don't overheat! Yes, you can make this salad in advance. Here are some tips for prepping: - Cook the quinoa a day before. - Mix the salad ingredients, minus the avocado. - Store everything in the fridge. - Add the avocado right before serving. This keeps the avocado fresh and green. If you want to swap quinoa, here are some great options: - Couscous for a softer texture. - Brown rice for a heartier bite. - Farro for a nutty flavor. These grains work well and still keep the salad tasty. To keep your avocado fresh, try these storage tips: - Use lemon or lime juice on the cut surface. - Store it in an airtight container. - Place it in the fridge. These methods help keep the color bright and the flavor fresh. This blog post covered the key ingredients and steps to make a delicious salad. We explored how to cook quinoa, mix a tangy dressing, and combine flavors for the best result. I shared tips for perfecting the dish and offered variations for different diets. In closing, using fresh ingredients and exploring options adds fun to your meal. Enjoy experimenting and creating your own twists on this salad. Embrace the process and savor every bite.

Southwest Black Bean Quinoa Salad Fresh and Quick Dish

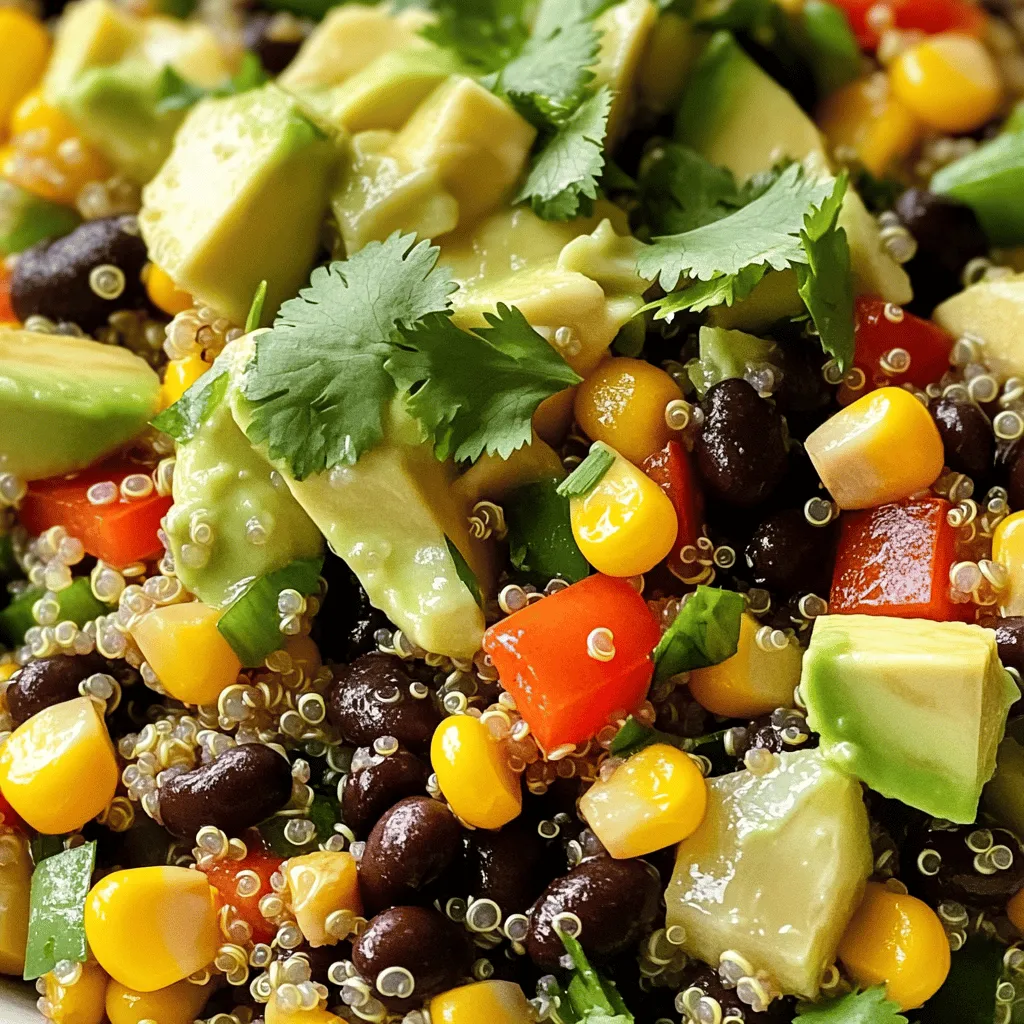
Are you looking for a fresh, quick dish that bursts with flavor? My Southwest Black Bean Quinoa Salad is perfect

To make tasty air fryer garlic breadsticks, gather these simple ingredients: - 1 cup warm water (about 110°F or 43°C) - 2 ¼ teaspoons active dry yeast (1 packet) - 2 tablespoons granulated sugar - 3 cups all-purpose flour - 1 teaspoon sea salt - 2 tablespoons extra virgin olive oil - 4 cloves fresh garlic, minced - 2 tablespoons unsalted butter, melted - 1 teaspoon dried Italian seasoning - Fresh parsley, finely chopped (for garnish) These ingredients work together to create soft, flavorful breadsticks. The warm water wakes up the yeast, helping the dough rise. The sugar feeds the yeast, making it active. The flour gives the bread its structure. Sea salt enhances flavor. Olive oil keeps the bread moist. Adding fresh garlic and Italian seasoning makes these breadsticks savory. The melted butter adds richness. Finally, fresh parsley brightens the dish with color. With these ingredients, you set the stage for a delicious treat. To start, combine 1 cup of warm water, 2 ¼ teaspoons of active dry yeast, and 2 tablespoons of granulated sugar in a small bowl. Stir it gently. Let the mixture sit for 5 to 10 minutes. You want it to become frothy. This froth shows that the yeast is alive and ready. In a large mixing bowl, whisk together 3 cups of all-purpose flour and 1 teaspoon of sea salt. Make a well in the center of the flour. Pour the frothy yeast mixture and 2 tablespoons of extra virgin olive oil into this well. Use a spatula or your hands to mix until it comes together into a dough. Transfer the dough to a lightly floured surface. Knead it for about 5 minutes. You want it to feel smooth and elastic. Next, place the dough in a greased bowl. Cover it with a clean kitchen towel. Let it rise in a warm spot for about 1 hour, or until it doubles in size. Once the dough has risen, punch it down gently. Roll it out on a floured surface into a rectangle about ½ inch thick. Cut the dough into strips about 1 inch wide. Take each strip and twist it gently before placing it in the air fryer basket. Ensure there is space between each twist. In a small bowl, mix 2 tablespoons of melted unsalted butter, 4 cloves of minced fresh garlic, and 1 teaspoon of dried Italian seasoning. Mix well. Use a brush to generously coat the twisted dough with this tasty mixture. Preheat your air fryer to 370°F (188°C). Place the basket into the air fryer. Cook the breadsticks for 8 to 10 minutes. You want them to be golden brown and fully cooked. - To activate the yeast, mix warm water, yeast, and sugar. - Let this mix sit until it gets frothy, about 5-10 minutes. - Knead the dough for about 5 minutes until smooth and elastic. - The dough is ready when it feels soft and springs back when pressed. - Always preheat your air fryer to 370°F (188°C) before cooking. - Cooking times can vary by air fryer brand, so check your breadsticks often. - Serve these breadsticks with marinara or garlic dip. - They pair well with pasta dishes or salads for a tasty meal. {{image_4}} Adding cheese to your dough makes these breadsticks even better. You can mix in 1 cup of shredded mozzarella when you combine the dry ingredients. This gives the breadsticks a fun, cheesy inside. You can also sprinkle cheese on top before air frying. Parmesan or cheddar work great as toppings. Just add them during the last few minutes of cooking for a melty finish. Using different herbs can change the flavor of your breadsticks. Try adding fresh basil or thyme to the butter mixture. This adds a nice touch to the garlic flavor. You can also use seasoning blends like garlic powder or red pepper flakes. This helps you create a unique taste that suits your family's liking. If you need a gluten-free version, swap the all-purpose flour for a gluten-free flour blend. Make sure to check for a blend that works well for bread. You might need to add a bit more water to get the right dough texture. For flavor, add a teaspoon of garlic powder to the dough. This keeps the garlic taste strong and yummy. To keep your breadsticks fresh, store them in a sealed container. This helps them stay soft. You can refrigerate them for up to three days. If you want to save them longer, you can freeze your breadsticks. Wrap each one tightly in plastic wrap. Then, place them in a freezer bag. They stay good for about three months in the freezer. When you're ready to eat your breadsticks, you can reheat them in the air fryer. Set the air fryer to 350°F (175°C). Heat them for about 3-5 minutes. This method keeps them crispy and warm. To ensure your breadsticks stay moist, brush them lightly with olive oil before reheating. This adds flavor and helps them not dry out. Enjoy your delicious garlic breadsticks again! Yes, you can use instant yeast. It works well and does not need to be activated. Just mix it with your dry ingredients. This saves time since you skip the frothing step. The breadsticks cook in about 8 to 10 minutes. I recommend checking them at the 8-minute mark. They should be golden brown and fully cooked when ready. Yes, you can make the dough ahead. After kneading, let it rise and shape it into breadsticks. Then, cover and refrigerate the dough for up to 24 hours. Bring it back to room temperature before cooking. These garlic breadsticks pair well with marinara sauce, garlic dip, or any soup. You can also serve them alongside pasta dishes for a complete meal. Absolutely! You can add cheese, herbs, or spices before air frying. Just remember to keep the toppings light so the breadsticks cook evenly. You learned how to make delicious garlic breadsticks step by step. We covered the ingredients, instructions, tips, variations, and storage options. Remember, activating the yeast and kneading the dough well are key to success. You can tweak the recipe to fit your taste, whether you want cheesy or gluten-free options. Enjoy these tasty breadsticks with dips or alongside your favorite meals. With practice, you'll create the perfect snack or side dish every time. Happy cooking!

Air Fryer Garlic Breadsticks Savory and Easy Recipe

Are you ready to make soft and savory Air Fryer Garlic Breadsticks? These easy-to-make treats are perfect for any meal

Older posts
Newer posts
← Previous Page1 … Page6 Page7 Page8 … Page86 Next →

dsad

© 2026 recipetorch • Built with GeneratePress

Our Policies

  • Copyright Policy
  • Cookie Policy
  • GDPR Policy
  • Privacy Policy
  • Disclaimer
  • Terms Of Use

More Information

  • Home
  • About
  • Contact
  • Appetizers
  • Dessert
  • Dinner
  • Drinks
©2026, recipetorch About Back To Top