Skip to content
DisclaimerTerms Of UseGDPR PolicyCookie Policy

recipetorch

  • Home
  • Drinks
  • Appetizers
  • Dinner
  • Dessert
  • About
  • Contact
  • Privacy Policy
DisclaimerTerms Of UseGDPR PolicyCookie Policy

NO-ING-IMG

- 1 cup unsalted butter, melted - 1 cup light brown sugar - 1 cup granulated sugar - 2 large eggs, at room temperature - 2 teaspoons pure vanilla extract - 2 cups all-purpose flour, sifted - 1 teaspoon baking powder - ½ teaspoon salt - Zest of 2 fresh lemons - 1 cup fresh strawberries, hulled and diced - ½ cup fresh lemon juice - ½ cup powdered sugar for glaze - 2 tablespoons fresh lemon juice for glaze The ingredients for Strawberry Lemon Blondies create a perfect balance of sweet and tart. The unsalted butter adds richness. Light brown sugar gives a soft, moist texture. Granulated sugar adds just the right sweetness. Using room temperature eggs helps create a smooth batter. Pure vanilla extract enhances the flavor. Sifting the flour keeps the blondies light. Baking powder ensures they rise nicely. Salt is key to bringing out all the flavors. The zest of fresh lemons adds a bright touch. Diced strawberries give a lovely burst of fruitiness. Fresh lemon juice adds tang and keeps the blondies moist. For the glaze, powdered sugar and lemon juice create a sweet and tart topping. This glaze makes the blondies look extra special. Each ingredient plays a role in making these blondies delightful and easy to bake. {{ingredient_image_2}} Set your oven to 350°F (175°C). This is the perfect temperature for baking blondies. Grab a 9x13 inch baking pan. Grease it lightly with butter. You can also line it with parchment paper. This makes it easy to take the blondies out later. In a large mixing bowl, mix the melted butter with both sugars. Use a whisk or a spatula to blend them until smooth. Next, add the eggs one at a time. Mix well after each egg. Then, stir in the vanilla extract for extra flavor. In another bowl, whisk together the flour, baking powder, salt, and lemon zest. Make sure to sift the flour first. This keeps the blondies light and fluffy. Once mixed, slowly add the dry mix to the wet mix. Stir gently to avoid overmixing. Now it's time to add the fun stuff! Fold in the diced strawberries and lemon juice. Be gentle when you mix. You want the strawberries to stay chunky and not break apart too much. Pour the batter into your prepared baking pan. Spread it evenly with a spatula. Bake in the preheated oven for 25-30 minutes. Check if they are done by inserting a toothpick in the center. It should come out clean or with a few crumbs. While the blondies bake, you can make the glaze. In a small bowl, mix the powdered sugar with 2 tablespoons of lemon juice. Whisk until it’s smooth. This glaze will add a nice shine and sweetness. Once the blondies are cool, drizzle the glaze over the top. Let it set for a few minutes. Then, slice the blondies into squares. Enjoy your delicious strawberry lemon blondies! To get the best texture in your strawberry lemon blondies, focus on a few key steps. First, make sure to melt the butter until it’s warm but not hot. This helps the sugars blend better. Use both light brown sugar and granulated sugar. The brown sugar keeps the blondies moist. When mixing the wet and dry ingredients, stir gently. Overmixing can make your blondies tough. Mix until just combined. This keeps them soft and chewy. Adding diced strawberries last helps maintain their shape. For a lovely display, cut your blondies into neat squares. Arrange them on a pretty platter. Garnish with fresh strawberry slices and a sprinkle of lemon zest. This adds color and a fresh look. Drizzling the glaze over the top makes them extra special. Serve them warm or at room temperature for the best flavor. One common mistake is overmixing the batter. This can lead to dense blondies. Mix just until combined to keep them fluffy. Another mistake is underbaking. Check your blondies a few minutes before the time is up. Insert a toothpick into the center. If it comes out clean or with a few crumbs, they are done. If it has wet batter, give them a few more minutes. Always let them cool completely for the right texture. Pro Tips Use Room Temperature Eggs: Allowing your eggs to reach room temperature before mixing can help the batter emulsify better, resulting in a smoother texture. Don’t Overmix the Batter: Mix the dry ingredients into the wet until just combined to prevent the blondies from becoming tough. A few lumps are okay! Check for Doneness: Use a toothpick to test for doneness. It should come out clean or with a few moist crumbs, ensuring your blondies remain soft and chewy. Cool Completely Before Glazing: Let the blondies cool fully before adding the glaze. This helps the glaze set properly and prevents it from sliding off. {{image_4}} You can change up the fruit in your blondies. Try using blueberries or raspberries instead of strawberries. If you want to use tropical flavors, diced mango or pineapple adds a fun twist. Each fruit brings its own taste and makes your blondies special. You can also mix different fruits for a colorful treat. Just keep the same amount of fruit to keep the texture right. Want to add more flavor? Use almond extract for a nutty taste. Coconut extract can add a lovely tropical note. You could even add a touch of cinnamon for warmth. Each of these options will change the flavor profile. You can experiment to find your favorite mix. Just remember, a little goes a long way. To make gluten-free strawberry lemon blondies, swap all-purpose flour with a gluten-free blend. Look for a blend that includes xanthan gum. This will help mimic the texture of regular flour. You should follow the same steps in the recipe. Your blondies will still taste amazing, and they will be safe for those who cannot eat gluten. To keep your strawberry lemon blondies fresh, store them in an airtight container. This will lock in moisture and flavor. Line the container with parchment paper for easy removal. Place a piece of wax paper between the blondies if you stack them. This prevents them from sticking together. You can freeze blondies for a longer shelf life. First, let them cool completely. Once cool, cut them into squares. Wrap each square tightly in plastic wrap. Then, place them in a freezer-safe bag or container. When you're ready to enjoy, thaw them in the fridge overnight. You can also heat them in the microwave for a warm treat. When stored properly, your blondies will last about 5 days at room temperature. If you refrigerate them, they can last up to a week. In the freezer, they can stay good for about 3 months. Always check for any off smells or changes in texture before eating. Yes, you can use frozen strawberries. Just thaw and drain them first. This helps avoid excess moisture. Chopped pieces should be about the same size as fresh ones. This way, they mix well into the batter. To check if the blondies are done, use a toothpick. Insert the toothpick into the center of the blondies. If it comes out clean or with a few crumbs, they are ready. Keep an eye on the time too. Bake for 25 to 30 minutes. You can definitely add nuts! Chopped walnuts or pecans work well. Fold them into the batter along with the strawberries. This adds a nice crunch and depth of flavor to the blondies. If you need an egg substitute, use flaxseed meal or applesauce. For one egg, mix one tablespoon of flaxseed meal with three tablespoons of water. Let it sit for a few minutes. For applesauce, use a quarter cup for one egg. This helps keep the blondies moist. In this blog post, I covered how to make delicious strawberry lemon blondies. We went through each step, from gathering ingredients to baking and glazing. Following my tips, like avoiding overmixing, helps you achieve the perfect texture. Remember, you can also mix in different fruits or make them gluten-free. Enjoy sharing these tasty treats with friends and family. Whether for a party or a snack, these blondies are sure to impress!

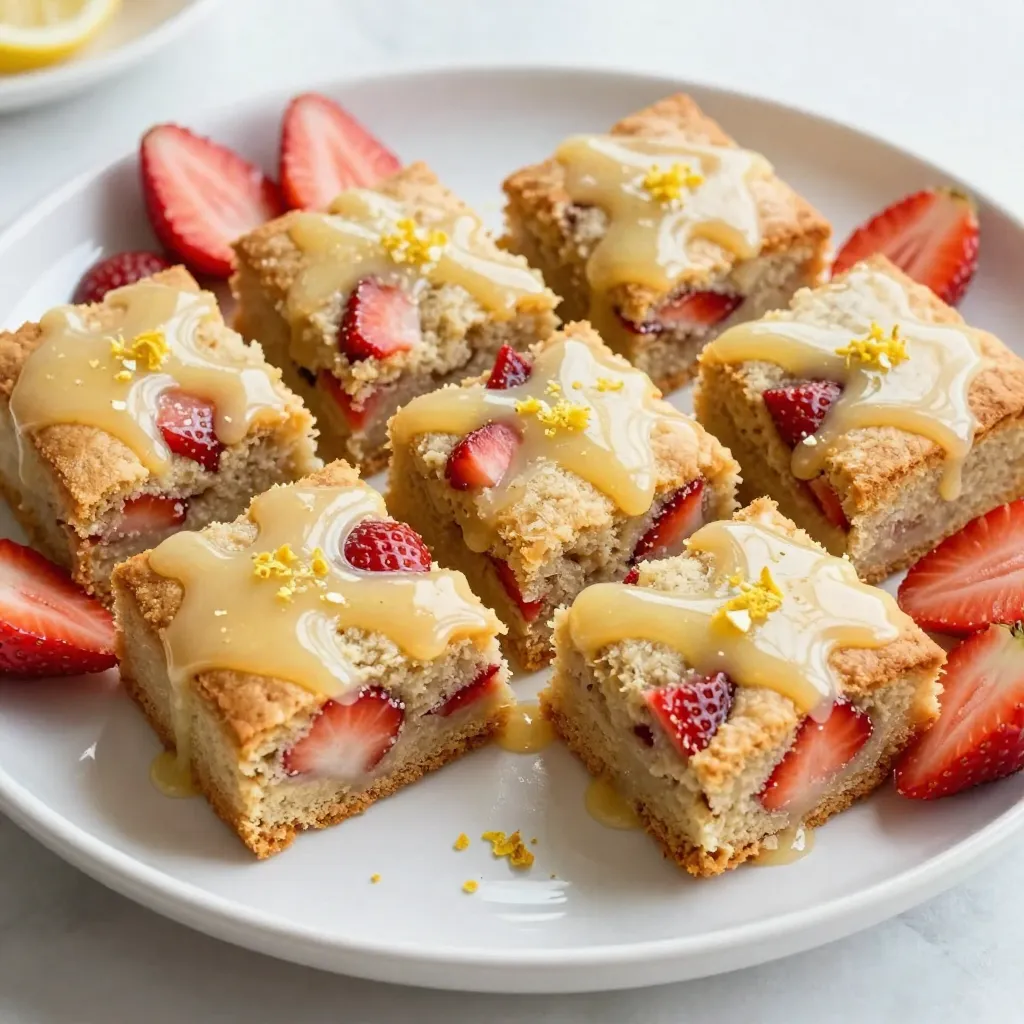
Strawberry Lemon Blondies Delightful and Easy Bake

If you’re looking for a sweet treat that’s both refreshing and easy to make, look no further! Strawberry Lemon Blondies

To create cheesy spinach stuffed mushrooms, gather these key ingredients: - 12 large portobello mushrooms, stems carefully removed - 2 cups fresh spinach, roughly chopped - 1 cup cream cheese, softened at room temperature - 1 cup ricotta cheese - 1 cup shredded mozzarella cheese - 1/2 cup grated Parmesan cheese - 2 cloves garlic, finely minced - 1 teaspoon Italian seasoning blend - 1/4 teaspoon red pepper flakes (optional for heat) - Salt and freshly ground black pepper to taste - 2 tablespoons olive oil, divided - Fresh parsley, finely chopped (for garnish) These ingredients come together to create a rich, savory filling that pairs perfectly with the earthy flavor of portobello mushrooms. The blend of cheeses adds creaminess, while the spinach provides freshness. Don't forget the garlic and spices to enhance the flavor. {{ingredient_image_2}} Start by setting your oven to 375°F (190°C). This temperature ensures the mushrooms bake evenly. A hot oven makes the cheese melt perfectly. Always remember to check that the oven is ready. Using an oven thermometer can help with accuracy. Be careful when opening the oven. Always use oven mitts to avoid burns. You need a skillet for this step. Heat 1 tablespoon of olive oil on medium heat. Once the oil shimmers, add 2 cloves of minced garlic. Sauté it for about 1 minute until it smells great. Next, add 2 cups of chopped spinach. Cook this for 2-3 minutes, stirring it often. The spinach should wilt down nicely. Once done, take the skillet off the heat and let it cool. Grab a large mixing bowl for this part. Combine 1 cup of softened cream cheese, 1 cup of ricotta cheese, 1 cup of shredded mozzarella, and 1/2 cup of grated Parmesan. Use a spatula or mixer to blend them together. Mix until the cheese is smooth and creamy. This texture is key for a great filling. Now, take your portobello mushrooms. Brush both sides with 1 tablespoon of olive oil. Sprinkle a little salt and pepper on them. Take the cheese and spinach mixture and fill each mushroom cap generously. Make sure to pile the filling a bit on top. This makes for a nice look and taste. Place the stuffed mushrooms on a baking sheet lined with parchment paper. Bake them in the oven for 20-25 minutes. Look for signs that they are ready: the mushrooms should be soft, and the cheese should be bubbly and golden. After baking, let them cool for a few minutes. Garnish with finely chopped parsley for a fresh touch. Serve them warm for the best flavor! To get the right creaminess, mix your cheeses well. I use cream cheese, ricotta, and mozzarella. This blend makes the filling rich and smooth. If you want a lighter mix, add more spinach. For flavor balance, use garlic and Italian seasoning. The red pepper flakes add a hint of heat, but adjust to your taste. For plating, arrange the stuffed mushrooms on a large platter. This makes a beautiful display. You can sprinkle extra Parmesan and parsley on top for color. Serve them warm as an appetizer or a side dish. They look great and taste even better! One common mistake is overstuffing the mushrooms. This can cause the filling to spill out while baking. Aim for a generous amount but don’t go overboard. Another mistake is underseasoning the filling. Taste as you go and adjust with salt and pepper. A well-seasoned filling makes all the difference in flavor! Pro Tips Choose Fresh Spinach: Always use fresh spinach for the best flavor and texture. If using frozen, ensure it's thoroughly drained and squeezed dry to avoid excess moisture in your filling. Mix Cheeses for Creaminess: For a smoother filling, blend the cream cheese and ricotta together until fully combined before adding the other ingredients. This ensures an even distribution of flavors. Experiment with Cheese: Feel free to substitute different cheeses like feta or goat cheese for a unique twist. Each cheese brings its own flavor profile that can enhance the dish. Serve Immediately: For the best experience, serve the stuffed mushrooms fresh out of the oven while they're hot, gooey, and delicious. They tend to lose their appeal as they cool. {{image_4}} You can boost the flavor by adding meat to the filling. Chicken or turkey works well. Just cook the meat first. Dice it into small pieces. Stir it into the cheese and spinach mix. You can also use cooked bacon or sausage for a smoky touch. Each option adds richness and makes the dish more filling. For a vegan twist, you can swap out the cheese. Use cashew cheese or almond cream instead. These options provide a similar creamy texture. You can also use tofu as a binding agent. Just blend it until smooth. This keeps your stuffed mushrooms tasty while making them dairy-free. If you like heat, add more red pepper flakes. You can also use diced jalapeños. For less heat, skip the flakes or use sweet peppers. Adjusting the spice level helps you create the perfect bite. This way, everyone can enjoy the flavor without burning their tongues. To store leftovers, let the mushrooms cool to room temperature. Place them in an airtight container. Keep the container in the fridge. They’ll last for up to three days. When you’re ready to eat, check for any signs of spoilage. If they look good, you can reheat them. Want to save some for later? You can freeze stuffed mushrooms! First, let them cool completely. Then, place them on a baking sheet in a single layer. Freeze them for about an hour. Once frozen, transfer them to a freezer-safe bag or container. They can last for up to three months in the freezer. Label the bag with the date for easy tracking. Reheat your stuffed mushrooms in the oven for the best results. Preheat your oven to 350°F (175°C). Place the mushrooms on a baking sheet. Cover them with foil to keep them moist. Heat for about 15-20 minutes. You can also use a microwave, but the texture may change. If you choose this method, heat in short bursts of 30 seconds, checking in between. Enjoy your cheesy spinach stuffed mushrooms warm! You can pair these stuffed mushrooms with many tasty sides. Here are some great options: - A fresh garden salad - Garlic bread or breadsticks - Roasted vegetables - Pasta with light sauce - Grilled chicken or fish These sides balance the rich flavor of the mushrooms. They also add color and texture to your meal. You can check if the mushrooms are done by looking for a few key signs: - The mushrooms should look tender and juicy. - The cheese on top should be bubbly and golden brown. - A fork should easily pierce through the mushrooms. When you see these signs, you know they are ready to eat. Yes, you can make the filling ahead of time! Here are some tips to do it: - Prepare the cheese and spinach filling a day before. - Store it in an airtight container in the fridge. - When you're ready, stuff the mushrooms and bake them. This makes cooking easy and quick when you want to enjoy them later! In this post, we explored how to create cheesy spinach stuffed mushrooms. We covered everything from ingredients to cooking steps. You now know how to prepare, bake, and serve them perfectly. Remember, the key is balance in flavor and texture. Don’t forget to customize your filling with meats or spices if you like. With these tips and variations, you can make this dish your own. Try these mushrooms for your next meal, and enjoy the great taste!

Cheesy Spinach Stuffed Mushrooms Flavorful and Easy

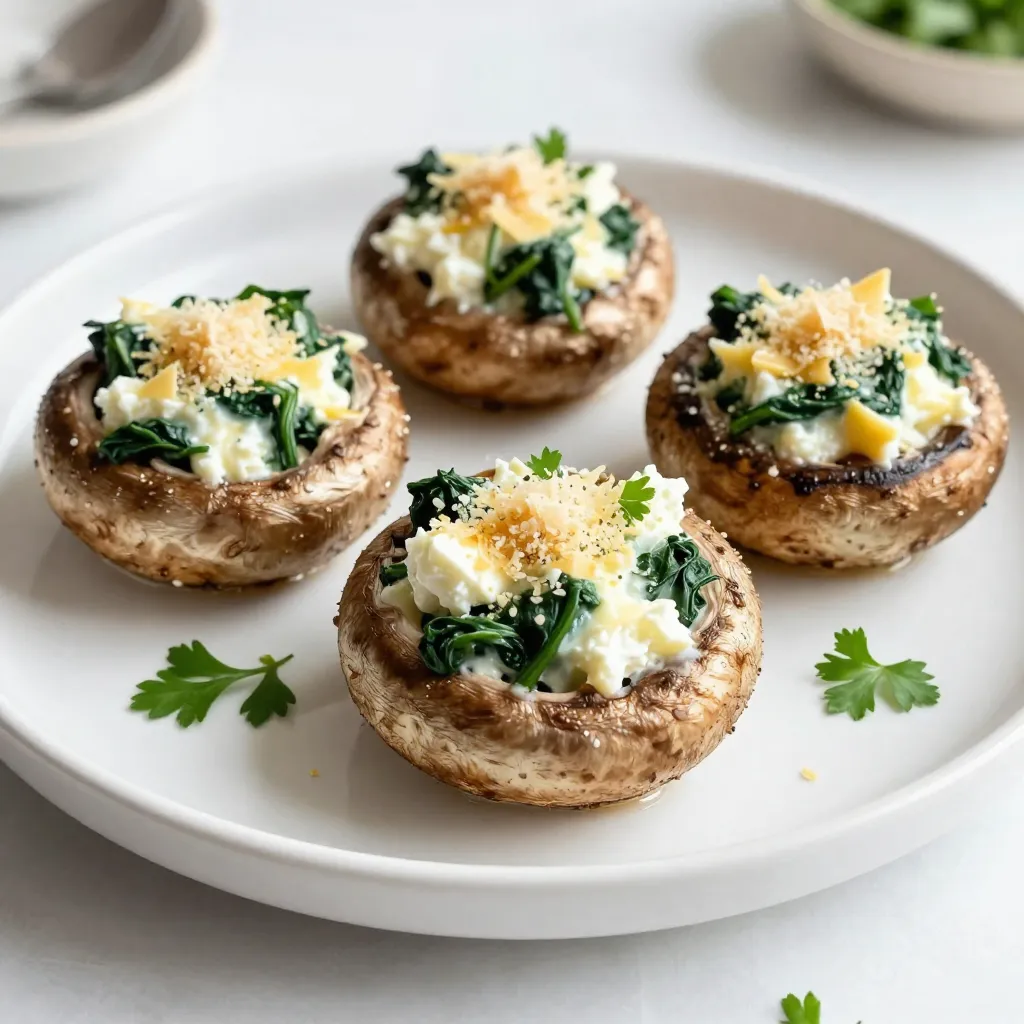
If you’re craving a tasty treat that packs a punch, try my Cheesy Spinach Stuffed Mushrooms. They are simple to

- 3 cups all-purpose flour - 1 tablespoon baking powder - 1 teaspoon salt - 1 teaspoon garlic powder - 1 cup sharp cheddar cheese, shredded - 1-2 jalapeños, finely chopped (remove seeds for a milder flavor) - 12 oz non-alcoholic beer (or substitute with sparkling water) - 1/4 cup honey - 1/4 cup unsalted butter, melted I love using sharp cheddar cheese for its rich flavor. You can also try mild cheddar for a softer taste. If you want to mix it up, smoked gouda adds a nice twist. Pepper jack gives a spicy kick. Choose what fits your taste! To get the best flavor from jalapeños, start by choosing fresh ones. Look for firm peppers with bright skin. Next, slice them open and take out the seeds if you want less heat. Finely chop them for even distribution in the bread. You can also roast or sauté them for added depth. {{ingredient_image_2}} First, preheat your oven to 375°F (190°C). This ensures the heat is just right for baking. While the oven heats, grab a 9x5 inch loaf pan. Grease it well with butter or cooking spray. This step is key to prevent the bread from sticking. In a large mixing bowl, add 3 cups of all-purpose flour. Then, add 1 tablespoon of baking powder, 1 teaspoon of salt, and 1 teaspoon of garlic powder. Whisk these dry ingredients together until they blend nicely. Make sure there are no lumps. Next, fold in 1 cup of shredded sharp cheddar cheese. Add 1-2 finely chopped jalapeños too. If you want less heat, remove the seeds. In a separate bowl, take 12 ounces of non-alcoholic beer and 1/4 cup of honey. Stir them together until the honey dissolves completely. This creates a smooth mixture that adds flavor to the bread. Now, gently pour the wet mixture into the dry ingredients. Use a spatula to mix until just combined. It's okay if the batter has some lumps; this gives the bread a nice texture. Then, add 1/4 cup of melted unsalted butter to the batter. Fold it in gently. Be careful not to overmix. Transfer the batter into your prepared loaf pan. Level the top with your spatula. If you like, sprinkle extra cheddar cheese and jalapeño slices on top. Place the pan in your oven and bake for 40-45 minutes. The bread is done when it's golden brown and a toothpick comes out clean. Let it cool for about 10 minutes in the pan. Finally, remove it and let it cool completely on a wire rack before slicing. To get that fluffy texture, mix the batter gently. You want it combined but not smooth. Leaving some lumps gives the bread a nice rustic touch. Avoid overmixing when you add the melted butter. This keeps the bread light and airy. Cool the bread in the pan for about 10 minutes. This helps it set. After that, move it to a wire rack. Let it cool completely before slicing. If you cut it too soon, the bread may crumble and not hold its shape. Serve this bread warm for the best taste. Spread creamy butter on each slice. You can also use jalapeño-infused olive oil for extra flavor. For a pop of color, add chopped cilantro or chives on top. This makes your dish more vibrant and appealing. Pro Tips Adjusting Spiciness: For a milder bread, remove the seeds and membranes of the jalapeños. For more heat, leave some seeds in or add more jalapeños to the mix. Beer Selection: Use a flavorful non-alcoholic beer that you enjoy drinking, as it will enhance the flavor of the bread. Alternatively, sparkling water can be used for a lighter texture. Cheese Variations: Experiment with different types of cheese, such as pepper jack or gouda, to create unique flavor profiles for your bread. Storage Tips: Store any leftover bread in an airtight container at room temperature for up to 2 days, or freeze for up to 3 months to enjoy later. {{image_4}} You can change up the cheese for fun flavors. Try pepper jack for a spicy kick. Gouda adds a smoky taste. For a cheesy twist, mix in crumbled feta. Each cheese gives a unique flavor and texture. You just need to keep the total amount around one cup. This way, the bread stays soft and moist. If you crave more heat, use habaneros instead of jalapeños. Habaneros pack a punch! Make sure to remove the seeds and chop finely. You can also try serrano peppers for a milder spice. If you want a mix, add a few more jalapeños with the habaneros. Adjust the amount to fit your taste. Just remember, the heat level can vary with each pepper. For a gluten-free version, swap all-purpose flour with a gluten-free blend. Look for blends that include xanthan gum to help with texture. The rest of the recipe stays the same. Mix in your favorite cheese and peppers. This way, everyone can enjoy this tasty bread, no matter their diet! To store leftover Jalapeño Cheddar Beer Bread, first let it cool completely. This step is key for keeping it fresh. Once cool, wrap the bread in plastic wrap or foil. Place it in an airtight container to keep out air. This method helps maintain moisture and flavor. Store it in the fridge for up to five days. If you want to enjoy it longer, freezing is a great option. To freeze your bread, wrap it tightly in plastic wrap or foil. You can also use freezer bags for extra protection. Label the bags with the date. This way, you won’t forget when you made it. It can last up to three months in the freezer. When you're ready to eat, simply thaw it overnight in the fridge. You can also leave it at room temperature for a few hours. Reheating Jalapeño Cheddar Beer Bread is easy. Preheat your oven to 350°F (175°C). Place the bread on a baking sheet. Heat it for about 10-15 minutes. This warms it up and crisps the outside. If you want it softer, wrap it in foil before reheating. You can also microwave a slice for about 20-30 seconds. Enjoy it warm, and let the flavors come alive! Yes, you can use regular beer. The flavor will change a bit. Regular beer adds a rich taste. It also gives the bread a nice rise. If you prefer non-alcoholic, that works too. Just use the same amount as the recipe states. To make the bread spicier, use more jalapeños. You can add extra seeds if you like heat. Another great option is to use habaneros. These peppers pack a punch! Chopping them finely helps spread the heat evenly. Adding a pinch of cayenne pepper also boosts the spice. Jalapeño Cheddar Beer Bread pairs well with many dishes. It goes great with soups, especially chili. The bread's flavor complements creamy soups too. Try it with a hearty stew for a filling meal. It also works well as a side for grilled meats. Enjoy it warm with some butter for a tasty treat! We covered the key parts of making Jalapeño Cheddar Beer Bread in this post. You learned about ingredients, step-by-step instructions, and important tips. I shared ideas for variations like different cheeses and spice levels. Remember, the right texture makes this bread stand out, and storage is easy! Enjoy your homemade bread with friends or family. With these tips, you will bake with confidence!

Jalapeño Cheddar Beer Bread Lively Flavor Experience

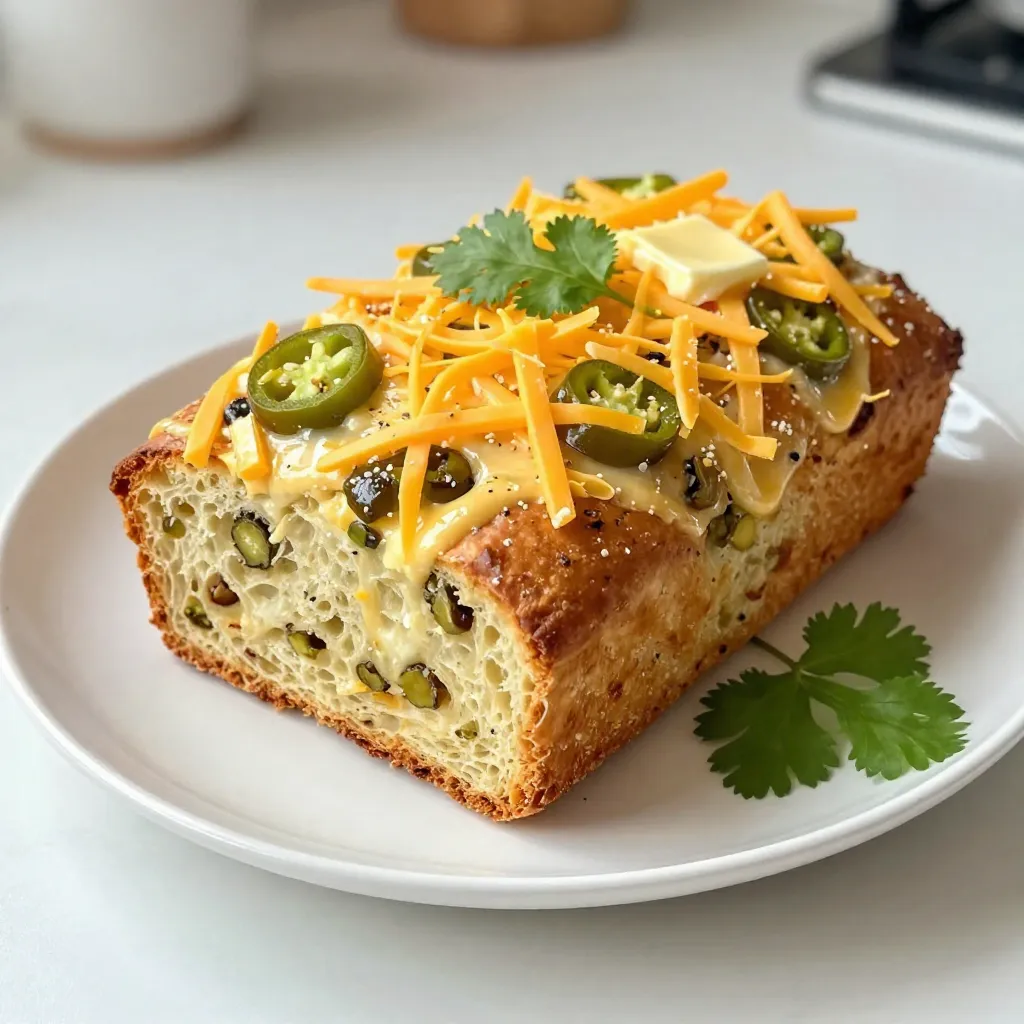
If you’re ready to spice up your baking routine, let’s dive into Jalapeño Cheddar Beer Bread! This easy and fun

- Baby carrots and their preparation - Use 1 pound of baby carrots. - Wash them well in cold water. - Dry them on a paper towel. - For larger carrots, cut them into bite-sized pieces. - Sweeteners and fats - You need 3 tablespoons of honey for sweetness. - Use 2 tablespoons of unsalted butter for rich flavor. - Seasonings and garnishes - Add 3 cloves of finely minced garlic. - Include 1 teaspoon of fresh thyme leaves or ½ teaspoon of dried thyme. - Season with salt and freshly ground black pepper to taste. - For a bright finish, use 1 tablespoon of fresh lemon juice (optional). - Garnish with chopped fresh parsley for color and flavor. These ingredients come together to create a dish that is both sweet and savory. The honey adds a lovely glaze, while the garlic gives it a nice kick. The thyme and parsley enhance the overall taste and presentation. {{ingredient_image_2}} First, wash the baby carrots in cold water. This helps remove any dirt. After rinsing, dry them on a paper towel. If you use larger carrots, slice them into bite-sized pieces. This ensures they cook evenly. Next, heat a large skillet over medium heat. Add the unsalted butter and let it melt. Be careful not to let it brown. When the butter melts, add the minced garlic. Sauté it for about one minute. Stir constantly until the garlic smells nice. Watch it closely so it does not burn. Then, add the baby carrots to the skillet. Toss them gently to coat with the garlic-butter mix. Cook for about five minutes. Stir occasionally for even cooking. Now, drizzle honey over the carrots. Season them with thyme, salt, and pepper. Mix well to combine all the flavors. Continue cooking for another five to seven minutes. Keep stirring until the carrots are tender and glazed. If you want more flavor, add lemon juice at the end. This gives a nice, bright finish to the dish. When the carrots are done, take the skillet off the heat. Carefully move the glazed carrots to a serving dish. To make them look great, sprinkle chopped parsley on top. This adds color and fresh taste to the dish. - Ensuring even cooking: To cook carrots evenly, cut larger ones into smaller pieces. This helps them cook at the same rate as baby carrots. Always stir them often while cooking. This keeps them from sticking and helps them cook through. - Monitoring garlic to prevent burning: Garlic can burn quickly. When you add it to the butter, watch it closely. Stir for about one minute until it smells good. If it turns brown, it will taste bitter. If that happens, start over with fresh garlic. - Serving suggestions and dish choices: Use a white dish to show off the bright orange of the carrots. You can arrange them in a fan shape or stack them high for a pretty look. This makes the dish more inviting. - Garnishing with fresh parsley: Add chopped parsley on top before serving. This not only adds color but also a fresh flavor. It makes your dish look professional and appetizing. Pro Tips Use Fresh Ingredients: Opt for farm-fresh baby carrots for the best flavor and texture. Fresh produce will elevate your dish! Control the Heat: When sautéing garlic, keep the heat at medium to avoid burning. Burnt garlic can impart a bitter taste to your dish. Adjust Sweetness: Feel free to modify the amount of honey based on your taste preferences. You can also substitute maple syrup for a different flavor profile. Garnish with Care: Fresh parsley not only adds color but also a burst of flavor. Chop it finely to distribute its essence throughout the dish. {{image_4}} You can change the sweetener if you want. Maple syrup works great in this dish. It adds a different flavor while still being sweet. If you prefer a less sweet option, try using agave nectar. You can also switch up the herbs. Instead of thyme, try rosemary for a more earthy taste. Fresh basil can add a nice twist too. Experimenting with spices can bring out new flavors in the carrots. Roasting and sautéing each give unique results. Roasting brings out natural sweetness with a caramelized finish. To roast, toss the carrots with honey and butter, then place them on a baking sheet. Roast at 400°F for about 20 minutes, stirring halfway. Sautéing is quicker and keeps the carrots firm. You can achieve a nice glaze in just 10 to 12 minutes. If you have an Instant Pot, you can cook glazed carrots in it too. Add a cup of water and place the carrots on a trivet. Cook on high pressure for 3 minutes. After, quickly release the pressure. Then, toss the carrots with honey and garlic in a skillet for that delicious glaze. To store leftover glazed carrots, let them cool first. Place them in an airtight container. This keeps them fresh for up to four days in the fridge. If you have a large batch, divide them into smaller portions. This way, you can grab just what you need. Use glass or plastic containers for storage. Glass containers are great because they do not stain. They also help keep the flavors intact. Make sure the container has a tight lid to prevent air from getting in. When reheating, aim to keep the texture right. The best methods are on the stovetop or in the microwave. For the stovetop, add a splash of water and heat over low. Stir gently until hot. In the microwave, use a microwave-safe bowl. Cover it with a damp paper towel. Heat in short bursts, stirring in between. This helps the carrots heat evenly. To enhance flavor, add a touch of honey or lemon juice when reheating. This brings back that sweet, tangy taste. You can also sprinkle some fresh thyme or parsley for a fresh kick. Can I use other types of carrots? Yes, you can use other carrots! While baby carrots are sweet and tender, regular carrots work well too. Just slice them into smaller pieces. This helps them cook evenly. You can also use rainbow carrots for a colorful dish. How can I adjust the sweetness? To adjust sweetness, add more or less honey. If you prefer a less sweet taste, use less honey. You can also try maple syrup or agave syrup for a different flavor. Balancing the sweetness with lemon juice can also help if the dish is too sweet. What can I serve with honey garlic glazed carrots? These glazed carrots pair well with many dishes. Try them with roasted chicken or grilled fish. They also complement rice or quinoa nicely. For a vegetarian meal, serve them with lentils or a grain salad. How long do cooked carrots last in the fridge? Cooked carrots can last about 3 to 5 days in the fridge. Store them in an airtight container. Make sure they cool down before sealing the container. This keeps them fresh and tasty for your next meal. This blog post covered how to make honey garlic glazed carrots. We discussed the key ingredients, preparation steps, and cooking tips. You learned the best practices for even cooking and how to present your dish well. We also explored variations you can try and how to store your leftovers. In my view, with these tips, you can impress everyone at your table. Enjoy your cooking and share this delicious dish with friends and family!

Honey Garlic Glazed Carrots Savory and Simple Dish

Looking for a quick side dish that packs a flavor punch? Honey Garlic Glazed Carrots are your answer! With just

- 1 ½ cups graham cracker crumbs - ½ cup unsalted butter, melted - ¼ cup granulated sugar - 1 teaspoon ground cinnamon - 16 oz cream cheese, softened - ¾ cup granulated sugar - 2 large eggs - 1 teaspoon vanilla extract - 1 tablespoon all-purpose flour - ¼ cup granulated sugar - 1 tablespoon ground cinnamon - ½ cup chocolate chips (optional) To make churro cheesecake bars, you need a few simple ingredients. First, for the crust, you will use graham cracker crumbs, melted butter, sugar, and cinnamon. These give a sweet and crunchy base. For the cheesecake filling, you need softened cream cheese, sugar, eggs, vanilla, and flour. The cream cheese makes it rich and creamy. The eggs help it set, while vanilla adds flavor. Finally, for the topping, you mix sugar and cinnamon. You can also add chocolate chips if you want extra sweetness. These ingredients create a fun and tasty dessert that everyone loves. {{ingredient_image_2}} - Preheat oven to 325°F (163°C). - Line an 8x8 inch baking pan with parchment paper. First, set your oven. This temperature helps the bars bake evenly. The parchment paper makes it easy to lift the bars out later. - Combine ingredients in a bowl. - Press mixture into the baking pan evenly. In a bowl, mix graham cracker crumbs, melted butter, sugar, and cinnamon. Stir until it feels like wet sand. Press this mix into the pan’s bottom. Make sure it is even. - Bake crust for 10 minutes. - Prepare cheesecake filling while crust cools. Bake the crust for 10 minutes. This step gives it a nice, firm base. While it cools, you can start making the cheesecake filling. - Beat cream cheese until smooth. - Add sugar, eggs, vanilla, and flour. In a separate bowl, beat the softened cream cheese until creamy. Then, mix in sugar until smooth. Add the eggs one by one, mixing well after each. Finally, add vanilla and flour. Stir gently so it stays creamy. - Pour filling over crust. - Bake for 30-35 minutes until set. Carefully pour the cheesecake filling over the baked crust. Spread it evenly with a spatula. Bake for 30-35 minutes. The edges should be set but the center can still jiggle slightly. - Cool at room temperature; chill in refrigerator. - Prepare topping and cut into bars. Let the bars cool at room temperature for about an hour. After that, chill them in the fridge for at least two hours. When ready, mix sugar and cinnamon for the topping. Lift the cheesecake from the pan using the parchment. Cut into bars and sprinkle the cinnamon sugar mixture on top. Enjoy your sweet treat! - Use fresh graham cracker crumbs. Old crumbs lose their flavor and texture. - Ensure butter is fully melted. This binds the crust well and gives a great crunch. - Soften cream cheese completely. Cold cream cheese makes lumps in your filling. - Avoid overmixing after adding eggs. This keeps the filling light and avoids cracks. - Adjust the cinnamon amount for the topping. More cinnamon adds warmth, while less gives a milder taste. - Consider adding citrus zest for brightness. A touch of lemon or orange zest can elevate the flavors. Pro Tips Chill the Cream Cheese: For a smoother cheesecake filling, ensure your cream cheese is at room temperature before mixing. This helps avoid lumps and creates a creamy texture. Don’t Overmix: When adding eggs to the cheesecake filling, mix just until combined. Overmixing can incorporate too much air, leading to cracks during baking. Use a Water Bath: If you want an extra creamy texture and to reduce the risk of cracks, consider baking your cheesecake in a water bath. Wrap the pan in foil and place it in a larger pan filled with hot water. Let It Set: After baking, allow the cheesecake bars to cool at room temperature before chilling in the refrigerator. This helps the filling firm up properly and enhances the flavor. {{image_4}} You can make your churro cheesecake bars even more fun! Try adding some chopped nuts to the filling. Walnuts or pecans add a nice crunch. You can also swap out vanilla extract for almond extract. This gives your bars a whole new flavor. Let's talk toppings! Instead of chocolate chips, try a caramel drizzle. It adds a sweet twist. You can also use fresh fruit, like strawberries or raspberries. They add color and a fresh taste to each bite. Want a gluten-free version? No problem! Use gluten-free graham crackers for the crust. Just make sure all your ingredients are certified gluten-free. This way, everyone can enjoy these tasty treats without worry. You should store your churro cheesecake bars in an airtight container. This keeps them fresh and tasty. They are best enjoyed within 3-5 days. After that, they may lose some of their charm. You can freeze cut bars for up to 3 months. This is a great way to save some for later. Just make sure to wrap them well to avoid freezer burn. When you want to enjoy them again, thaw the bars in the refrigerator before serving. This keeps their texture smooth and creamy. If you want to warm your churro cheesecake bars, simply reheat them in the microwave for a few seconds. This can help enhance the flavors. You can serve them chilled or at room temperature, depending on your preference. Enjoying them both ways is a treat! Check for a slight jiggle in the center. This means it is not overbaked. The edges should be firm, while the center stays soft. It will set more as it cools. Yes, you can make these bars up to 2 days prior. This makes them great for parties or gatherings. Just store them in the fridge until you are ready to serve. You can use crushed cookies or pie crust as alternatives. Oreos or digestive biscuits work well. Just make sure to adjust the sugar if your substitute is sweet. Yes, you can use low-fat cream cheese. However, it may change the texture and flavor a bit. It might not be as rich and creamy as the full-fat version. Store uneaten bars in an airtight container in the fridge. They stay fresh for about 3-5 days. Enjoy them chilled or let them sit at room temperature before serving. You now know how to make delicious cheesecake bars. We covered crust, filling, and toppings. Each step is clear, from mixing ingredients to baking and storing. Don’t forget the tips for a creamy texture and variations to try. You can enjoy these bars fresh or chilled, and they are easy to make in advance. With some practice, you'll master this recipe. Enjoy your tasty treat, and share it with friends and family!

Churro Cheesecake Bars Deliciously Sweet Treats

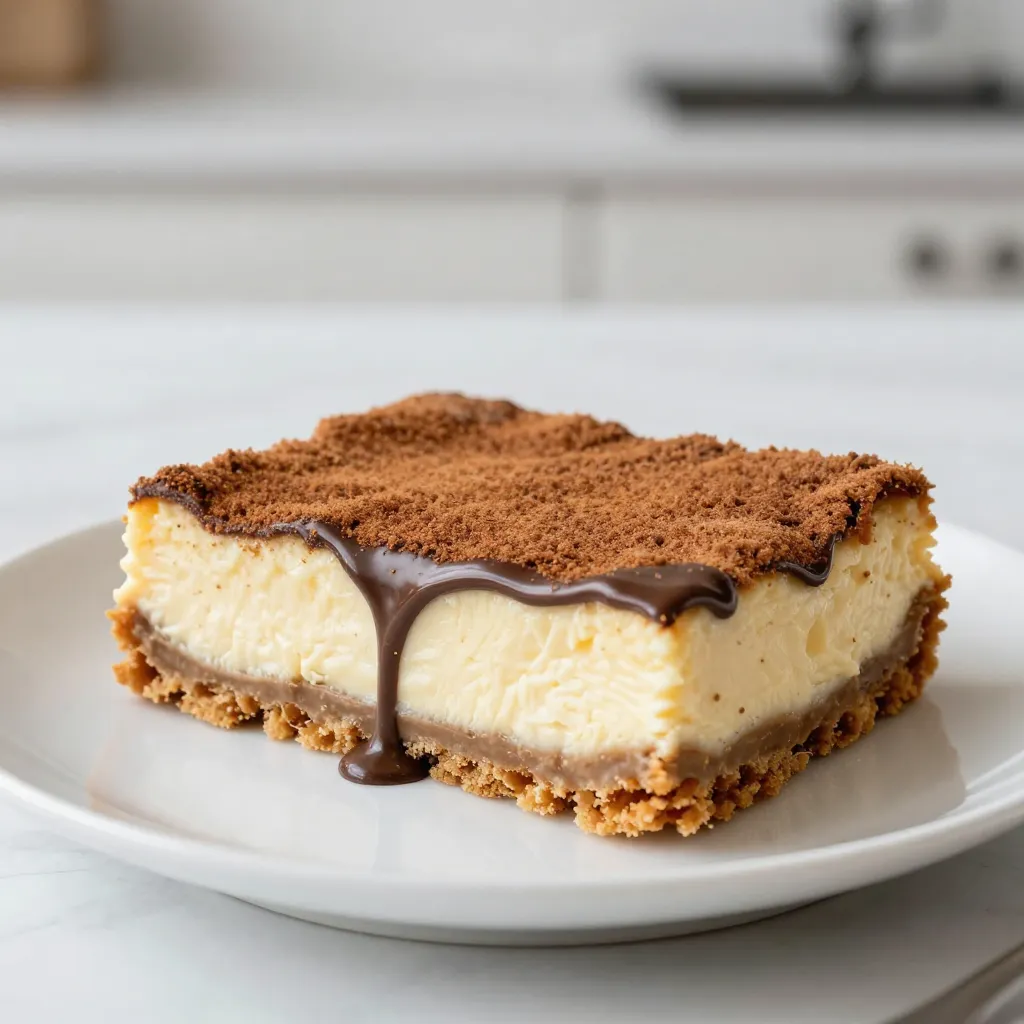
Are you ready to indulge in a sweet delight that brings together two beloved desserts? These Churro Cheesecake Bars will

- 1 cup green or brown lentils, thoroughly rinsed - 1 medium onion, finely diced - 2 cloves garlic, minced - 2 medium carrots, diced - 2 celery stalks, diced - 1 red bell pepper, diced - 1 can (14 oz) diced tomatoes, with juice - 4 cups vegetable broth - 1 teaspoon ground cumin - 1 teaspoon smoked paprika - 1/2 teaspoon ground coriander - 1/4 teaspoon cayenne pepper (optional) - 2 tablespoons high-quality olive oil - Salt and freshly ground black pepper, to taste - Fresh parsley, chopped, for garnish - Lemon wedges, for serving This Mediterranean lentil soup is simple yet packed with flavor. Each ingredient adds something special. The lentils are a great source of protein and fiber. They help keep you full and satisfied. The vegetables bring sweetness and crunch. Onions and garlic form the base of many dishes. They add depth and aroma to the soup. Carrots and celery add sweetness and a nice texture. Red bell pepper gives the soup a pop of color. The diced tomatoes add richness and a slight tang. The spices are key to the Mediterranean flavor. Cumin gives a warm, earthy taste. Smoked paprika adds a hint of smokiness. Ground coriander has a light, citrusy flavor. If you want heat, add cayenne pepper. Good quality olive oil enhances all the flavors. It also makes the soup feel rich. Don’t forget to season with salt and black pepper. Fresh parsley brightens the dish. Squeeze lemon juice over the soup for a fresh finish. This soup is not only tasty but also healthy. It’s a perfect choice for any meal. Enjoy it with a slice of crusty bread for dipping. {{ingredient_image_2}} 1. Heat the olive oil in a large pot over medium heat. 2. Add the diced onion, carrots, and celery. Sauté for 5-7 minutes. 3. Stir until the vegetables soften and the onion turns clear. 4. Next, add minced garlic and diced red bell pepper. 5. Sprinkle in ground cumin, smoked paprika, ground coriander, and cayenne pepper if you like heat. 6. Cook for another 2-3 minutes until the spices smell great. - Sautéing for Optimal Flavor: Start with medium heat to soften your veggies. This makes them sweet and tasty. Stir often for even cooking. - Stirring and Adjusting Liquids: Keep stirring the soup as it cooks. This helps mix the flavors. If the soup gets too thick, just add more broth or water. - Achieving the Right Soup Consistency: You want a nice, smooth texture. If you prefer it creamier, use an immersion blender to puree part of the soup. Blend until it feels just right. - Garnishing Options: Top your soup with fresh parsley and a drizzle of olive oil. This adds a nice look and taste. - Best Pairings: Serve with warm bread or a light salad. These sides make your meal even better. Enjoy the soup with lemon wedges for a zesty kick. Squeeze the lemon over your bowl right before eating. - Adding herbs or spices for extra depth: Fresh herbs like parsley or thyme add brightness. You can also try dried oregano or bay leaves for rich flavor. These herbs make the soup taste fresh and vibrant. - Recommendations for chili heat: If you like spice, add more cayenne pepper. You can also include red pepper flakes for a different kind of heat. Start small and taste, so you can find your perfect level. - Suggestions for creamy texture: To make the soup creamy, blend part of it with an immersion blender. This adds smoothness without needing cream. You can also stir in a dollop of yogurt or a splash of coconut milk for a twist. - Recommended pots and tools for efficiency: Use a large pot for even cooking. A heavy-bottomed pot helps prevent burning. Good knives and a cutting board save time during prep. - Benefits of using an immersion blender: An immersion blender lets you blend soup right in the pot. This means less mess and quick clean-up. It helps you control texture easily without transferring hot soup. - Overcooking lentils: Watch the cooking time closely. Overcooked lentils turn mushy and lose their texture. Aim for tender but firm. - Not seasoning correctly: Season your soup throughout cooking. Taste as you go to avoid blandness. A good amount of salt and pepper makes a big difference. - Letting soup thicken too much: If the soup gets too thick, add more broth or water. It should be hearty but not like a stew. Adjusting the liquid keeps it enjoyable and easy to eat. Pro Tips Use Fresh Herbs: Adding fresh herbs like dill or basil at the end of cooking enhances the soup's flavor profile and adds brightness. Adjust the Spice Level: If you prefer a milder soup, omit the cayenne pepper. For more heat, increase the amount or add a dash of hot sauce when serving. Make it a Meal: To turn this soup into a heartier dish, add cooked quinoa or rice just before serving for additional texture and nutrition. Storage Tips: This soup stores well in the refrigerator for up to 5 days. It also freezes beautifully, so consider making a double batch for easy meals later! {{image_4}} You can change up the lentils in this soup. Try red or black lentils for a new taste. They cook faster and add different textures. You can also swap in different vegetables. Spinach or kale works great. These greens add color and nutrients. If you want more protein, add cooked chicken or sausage. Both will make your soup heartier. This soup is great for many diets. You can make it vegetarian by using vegetable broth. For a vegan version, skip any meat and stick to veggies. The soup is also gluten-free. All the ingredients are safe for those avoiding gluten. Add a Mediterranean flair with olives or feta cheese. These ingredients will brighten the flavor. You can also switch the stock. Try chicken or beef stock for a richer taste. These small changes make the soup unique each time you make it. To store leftover soup, let it cool first. Then, transfer it to an airtight container. You can keep it in the fridge for about 3-5 days. Use glass or BPA-free plastic containers for safe storage. These work well to preserve flavor and texture. To freeze the soup, cool it completely before packing. Use freezer-safe containers or bags. Leave some space at the top, as soup expands when frozen. You can freeze it for up to 3 months. For thawing, place it in the fridge overnight or use the microwave. When you reheat the soup, do it slowly over low heat. Stir frequently to help it warm evenly. If it looks thick, add a splash of water or broth. This keeps the soup flavorful and smooth. Enjoy your tasty Mediterranean Lentil Soup warm! You can pair Mediterranean Lentil Soup with several tasty options. Warm crusty bread makes a great side. A fresh salad adds crunch and brightness. You can also serve it with lemon wedges to enhance the flavor. For extra protein, try adding a scoop of yogurt on top. The soup lasts about 4 to 5 days in the fridge. Make sure to store it in an airtight container. When you reheat it, check the flavor. You might want to add a little salt or lemon for freshness. Yes, you can make this soup ahead of time. It tastes even better the next day as the flavors blend. Just cool it down before storing it in the fridge. This makes it a perfect meal prep option. Yes, Mediterranean Lentil Soup is a healthy choice. It is high in fiber, which helps digestion. Lentils provide protein without the fat of meat. The veggies add vitamins and minerals. Plus, using olive oil adds healthy fats. You can try many fun variations! Swap green lentils for red or black lentils. Add leafy greens like spinach for extra nutrients. For a protein boost, toss in cooked chicken or sausage. You can even add olives or feta for a Mediterranean twist. In this blog post, we explored the key ingredients and steps to create a delicious Mediterranean Lentil Soup. We discussed cooking techniques, tips for storage, and variations to make it your own. Remember, this soup is not only tasty but also packed with nutrients. You can adapt it to suit your tastes. I encourage you to try different spices or vegetables. Enjoy making this soup, and share it with your friends and family!

Mediterranean Lentil Soup Flavorful and Healthy Choice

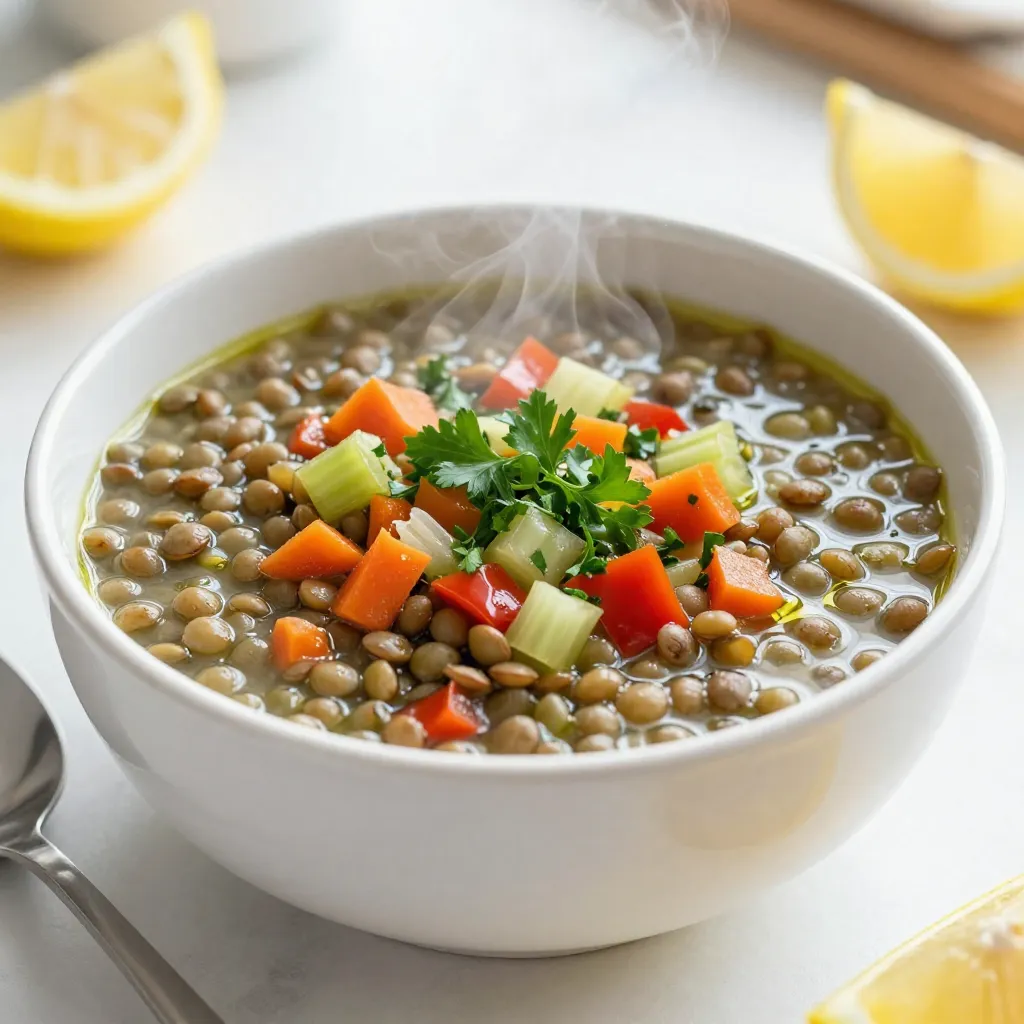
If you’re looking for a dish that’s both flavorful and healthy, Mediterranean Lentil Soup is your answer! Packed with protein

- 1 cup unsalted butter, melted - 2 cups packed brown sugar - 2 large eggs - 2 teaspoons vanilla extract - 1 ½ cups all-purpose flour - 1 teaspoon baking powder - ½ teaspoon salt - 1 cup butterscotch chips - ½ cup chopped pecans (optional) The quality of your ingredients matters a lot. Fresh butter and brown sugar make a big difference. They add rich flavor and nice texture. For eggs, choose large ones for best results. Always pick pure vanilla extract for depth in flavor. If you have allergies, you can make swaps. For gluten-free blondies, use a good gluten-free flour blend. This keeps the texture light and fluffy. If you can't have nuts, skip the pecans without worry. The blondies stay delicious! These tips help you create the best butterscotch blondies. You can enjoy them, share them, or save them for later. {{ingredient_image_2}} 1. Preheat oven and prepare baking pan: Start by preheating your oven to 350°F (175°C). Take a 9x13 inch baking pan and grease it with butter or line it with parchment paper. This step helps you lift the blondies out easily later. 2. Mix wet ingredients: In a large mixing bowl, add 1 cup of melted unsalted butter and 2 cups of packed brown sugar. Use a whisk to blend these together until smooth and glossy. Next, add 2 large eggs one at a time, whisking well after each addition. Finally, mix in 2 teaspoons of vanilla extract for a rich flavor. 3. Combine dry ingredients and integrate with wet mixture: In another bowl, combine 1 ½ cups of all-purpose flour, 1 teaspoon of baking powder, and ½ teaspoon of salt. Mix these well. Gradually fold the dry ingredients into the wet mixture. Use a spatula or wooden spoon and stop when no flour streaks remain. This keeps your blondies soft. 1. Pouring batter into the pan: Carefully pour the batter into your prepared baking pan. Spread it evenly across the surface. This ensures consistent baking. 2. Baking time and visual cues for doneness: Place the pan in the oven and bake for 25-30 minutes. You’ll know they are done when the edges turn a lovely golden brown. Insert a toothpick into the center; it should come out with a few moist crumbs. 1. Importance of cooling time: Once baked, take the pan out of the oven. Let the blondies cool in the pan for about 10 minutes. This short time helps them firm up, making them easier to remove. 2. Tips for cutting blondies into squares: After 10 minutes, carefully transfer the blondies to a wire rack to cool completely. Once cooled, use a sharp knife to cut them into squares. Enjoy the sweet, buttery goodness! - Avoiding overmixing the batter: Mixing too much can lead to tough blondies. Mix just until you see no flour streaks. This keeps them soft and chewy. - Ensuring even cooking: Spread the batter evenly in the pan. This helps all parts cook at the same rate. A well-greased pan also helps the blondies lift out easily. - Adding a pinch of sea salt: Just a small amount of salt can boost the flavors. It makes the sweetness pop and adds depth. - Optional mix-ins for different flavor profiles: Feel free to add chocolate chips, nuts, or dried fruit. Pecans give a nice crunch, while chocolate adds richness. Experiment to find your favorite blend! Pro Tips Use Room Temperature Eggs: Let your eggs sit out for about 30 minutes before using them. Room temperature eggs mix more easily into your batter, resulting in a smoother texture. Check for Doneness: Instead of relying solely on baking time, use a toothpick to test for doneness. If it comes out with a few moist crumbs, your blondies are perfect. Chill the Batter: For a chewier texture, consider chilling your batter in the fridge for 30 minutes before baking. This helps to develop the flavors further. Customize Your Mix-Ins: Feel free to experiment with different mix-ins like chocolate chips, dried fruit, or nuts. This adds a personal touch to your blondies! {{image_4}} You can change your butterscotch blondies in fun ways. Here are two ideas: - Chocoholic Blondies: Add 1 cup of chocolate chips to the batter. This will give your blondies a rich chocolate taste. You can mix in dark, milk, or even white chocolate chips for fun. - Nutty Twist: Use different nuts like walnuts or almonds. Just replace the pecans or add them along with the butterscotch chips. This adds a nice crunch and flavor. Making your blondies fit your diet is easy. Here are some options: - Vegan Butterscotch Blondies: Replace the eggs with flax eggs. Use 1 tablespoon of ground flaxseed mixed with 3 tablespoons of water for each egg. Swap the butter with coconut oil or vegan butter. - Gluten-Free Blondies: Choose a gluten-free flour blend instead of all-purpose flour. This keeps the blondies soft and tasty. Make sure the other ingredients are also gluten-free. To keep your butterscotch blondies fresh, store them in an airtight container. This keeps them moist and prevents them from drying out. You can store them at room temperature for up to five days. If you live in a warm climate, consider refrigerating them. Just make sure to let them cool completely before you seal them up. If you want to save some blondies for later, freezing is a great option. First, let the blondies cool fully. Then, slice them into squares. Wrap each square tightly in plastic wrap. Place the wrapped squares in a freezer-safe bag or container. Your blondies can last in the freezer for up to three months. When you’re ready to enjoy them, simply take out the number you want. Let them thaw at room temperature for a few hours. If you want them warm, pop them in the oven for a few minutes. This will bring back that fresh-baked taste. Butterscotch blondies are sweet, chewy bars with a rich butterscotch flavor. They are made with melted butter and brown sugar, which gives them a soft and gooey texture. The addition of butterscotch chips adds bursts of sweetness. Sometimes, people add nuts like pecans for extra crunch. These treats are easy to make and perfect for sharing. Yes, you can use dark brown sugar instead of light. Dark brown sugar has more molasses, which adds a deeper flavor. Your blondies will taste richer and more complex. The texture may also be slightly denser, which many find delightful. It's a great choice if you want a bold taste in your blondies. To check if your blondies are done, look for golden edges. The center should be set but still soft. Insert a toothpick into the middle; it should come out with a few moist crumbs. If it comes out clean, they might be overbaked. Keep an eye on them as they bake. Yes, you can substitute butterscotch chips. Try chocolate chips for a classic twist. White chocolate chips also work well and add a nice contrast. For a fruity touch, use dried cranberries or cherries. You can even mix in peanut butter chips for a fun flavor. There are many options to explore! This blog post guides you through making delicious butterscotch blondies. We covered key ingredients and the importance of quality. The step-by-step instructions help ensure perfect baking. Adding tips can enhance flavor while variations cater to dietary needs. Remember, proper storage keeps them fresh longer. Enjoy these treats with friends and family. Happy baking!

Butterscotch Blondies Irresistible and Easy to Make

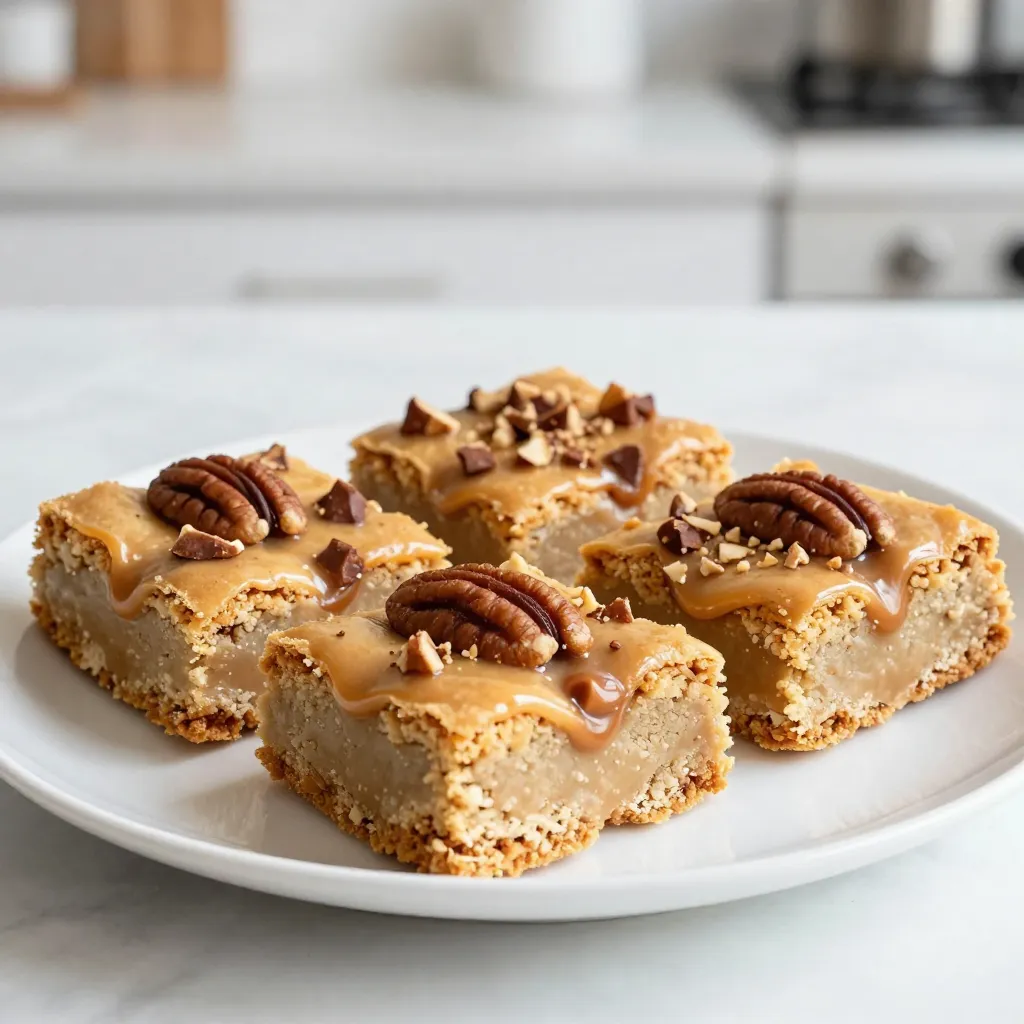
Looking for a sweet treat that’s simple to make and oh-so-satisfying? Butterscotch blondies are the answer! With their rich flavor

- 2 large sweet potatoes - 3 tablespoons extra virgin olive oil - 4 cloves garlic - 1 teaspoon smoked paprika - 1 teaspoon onion powder - ½ teaspoon sea salt - ¼ teaspoon freshly ground black pepper - ½ cup freshly grated Parmesan cheese - Fresh parsley for garnish The star of this dish is the sweet potato. I love using two large sweet potatoes. They add a touch of sweetness and color. Next, I use three tablespoons of extra virgin olive oil. This oil helps to crisp the fries and adds flavor. Garlic plays a big role here. I use four cloves of finely minced garlic. It gives the fries a nice kick. For a bit of warmth, I add one teaspoon of smoked paprika. This spice gives a smoky flavor that pairs well with sweet potatoes. Onion powder is another must. I use one teaspoon for its savory notes. A little salt goes a long way too. I add half a teaspoon of sea salt. For some heat, I use a quarter teaspoon of freshly ground black pepper. Finally, I sprinkle half a cup of freshly grated Parmesan cheese on top. This cheese melts beautifully and adds a rich flavor. For a pop of color, I garnish with fresh parsley. It brightens the dish and makes it look great! {{ingredient_image_2}} 1. Preheat the oven and prepare the baking sheet Begin by preheating your oven to 425°F (220°C). This high heat helps the fries crisp up nicely. Line a large baking sheet with parchment paper. This makes cleanup easy and helps prevent sticking. 2. Cut sweet potatoes into wedges Take 2 large sweet potatoes and cut them into thin wedges. Aim for uniform sizes to ensure even cooking. The thinner the wedges, the crispier they’ll be! 3. Mix the seasonings In a large bowl, add the sweet potato wedges. Pour in 3 tablespoons of extra virgin olive oil. Then, sprinkle in 4 finely minced garlic cloves, 1 teaspoon of smoked paprika, 1 teaspoon of onion powder, ½ teaspoon of sea salt, and ¼ teaspoon of freshly ground black pepper. Toss the wedges well, making sure every piece is coated in that flavorful mix. 1. Arrange wedges on the baking sheet Lay the seasoned sweet potato wedges on the prepared baking sheet. Place them in a single layer, leaving space between each wedge. This is key to getting them crispy! 2. Bake for 25-30 minutes and flipping Slide the baking sheet into the oven and bake for 25 to 30 minutes. Halfway through, flip the fries. This helps them brown evenly and get that perfect crunch. 1. Adding the Parmesan cheese Once the fries turn golden and crispy, take them out of the oven. Immediately sprinkle ½ cup of freshly grated Parmesan cheese over the hot fries. The heat will start to melt the cheese, adding rich flavor. 2. Ensuring the cheese is melted For an extra cheesy finish, put the fries back in the oven for 2 to 3 minutes. Watch closely until the cheese is beautifully melted and slightly bubbly. This step makes all the difference in your Garlic Parmesan Sweet Potato Fries! To get crispy sweet potato fries, bake them in a single layer. This lets hot air reach all sides. If the fries touch, they can steam instead of crisp. Use a large baking sheet for this. Flipping the fries halfway through cooking helps them brown evenly. I like to set a timer for halfway. This way, I don’t forget. When you flip, use a spatula to turn each fry gently. This keeps them intact and ensures a nice golden color. You can boost flavor by trying new seasonings. I love adding cayenne pepper for heat or garlic powder for more garlic taste. Just sprinkle a little extra on before baking. Dipping sauces can also add fun. Try garlic aioli for creaminess or spicy ketchup for a kick. You can even mix a yogurt dip with herbs. It’s a great way to enjoy your fries more. Pro Tips Cut Evenly: Ensure your sweet potato wedges are cut to a uniform size for even cooking and consistent crispiness. Soak for Crispiness: Soaking the sweet potato wedges in cold water for 30 minutes before baking can help achieve a better texture. Use Fresh Garlic: Freshly minced garlic adds a more robust flavor compared to pre-minced or jarred garlic. Experiment with Seasonings: Don’t hesitate to mix in other spices like cayenne pepper or Italian herbs to customize the flavor profile. {{image_4}} You can swap the Parmesan cheese for other types. Try using Pecorino Romano for a sharper taste. Cheddar adds a nice, creamy texture. If you want a milder flavor, mozzarella works great too. For a fun twist, sprinkle feta on top after baking. If you prefer vegan options, there are plenty of choices. Nutritional yeast gives a cheesy flavor without dairy. Vegan cheeses made from nuts or soy are also good substitutes. Just ensure they melt well for the best results. Do you want to boost the flavor of your fries? Adding herbs can make a big difference. Fresh rosemary or thyme brings a fragrant touch. Chopped basil or oregano adds a Mediterranean flair. You can mix and match to find what you like best. Spices can also take your fries to the next level. Try adding cayenne for heat or cumin for a warm, earthy taste. A dash of chili powder can enhance the flavor too. Feel free to experiment and find your favorite blend! To keep your fries fresh, place them in an airtight container. This helps keep moisture out. Store the container in the fridge. Ideally, eat your fries within three days. If you leave them out too long, they can get soggy. To avoid sogginess, let the fries cool before sealing them. This stops steam from building up. If you have extra fries, consider freezing them. Place the cooled fries on a baking sheet. Freeze them for a few hours, then transfer to a freezer bag. This keeps them from sticking together. Reheating fries can be tricky. To get them crispy again, use the oven. Preheat it to 400°F (200°C). Spread the fries on a baking sheet in a single layer. Bake for about 10-15 minutes. Check them often to avoid burning. If you want to use the microwave, place them on a microwave-safe plate. Cover them with a damp paper towel. Heat in short bursts, about 30 seconds at a time. This helps keep them soft but won't get them crispy. For crispiness, you can return them to the oven for a few minutes after microwaving. This way, you enjoy your Garlic Parmesan Sweet Potato Fries just like fresh! Yes, you can use regular potatoes. They will give a different taste and texture. Sweet potatoes are sweeter and have more nutrients. If you choose regular potatoes, stick to similar cuts. Yukon gold or russet potatoes work well. To keep fries crispy, follow a few key steps. First, cut sweet potatoes into thin and even wedges. This helps them cook evenly. Second, make sure to coat them lightly with oil. Too much oil can cause sogginess. Third, bake them in a single layer. This allows hot air to circulate around each fry. Lastly, flip them halfway through cooking for even crispiness. Garlic Parmesan Sweet Potato Fries pair well with many dishes. They make a great side for burgers or sandwiches. You can also serve them with a zesty dipping sauce. Some popular options include garlic aioli, spicy ketchup, or ranch dressing. Feel free to get creative with your dips! Leftover fries can last up to three days in the fridge. Store them in an airtight container to keep them fresh. To enjoy them again, reheat in the oven. This will help restore their crispiness. Avoid microwaving, as this can make them soggy. In this post, we explored making Garlic Parmesan Sweet Potato Fries. We covered ingredients, step-by-step instructions, and tips for the best results. Remember to bake them in a single layer and flip midway for crispiness. Try different cheeses and seasonings for fun flavors. Store extras properly to keep them tasty. Enjoy your fries with great dipping sauces. Cooking can be simple and fun with the right steps. Now, get cooking and dig into these delicious bites!

Garlic Parmesan Sweet Potato Fries Crispy and Delicious

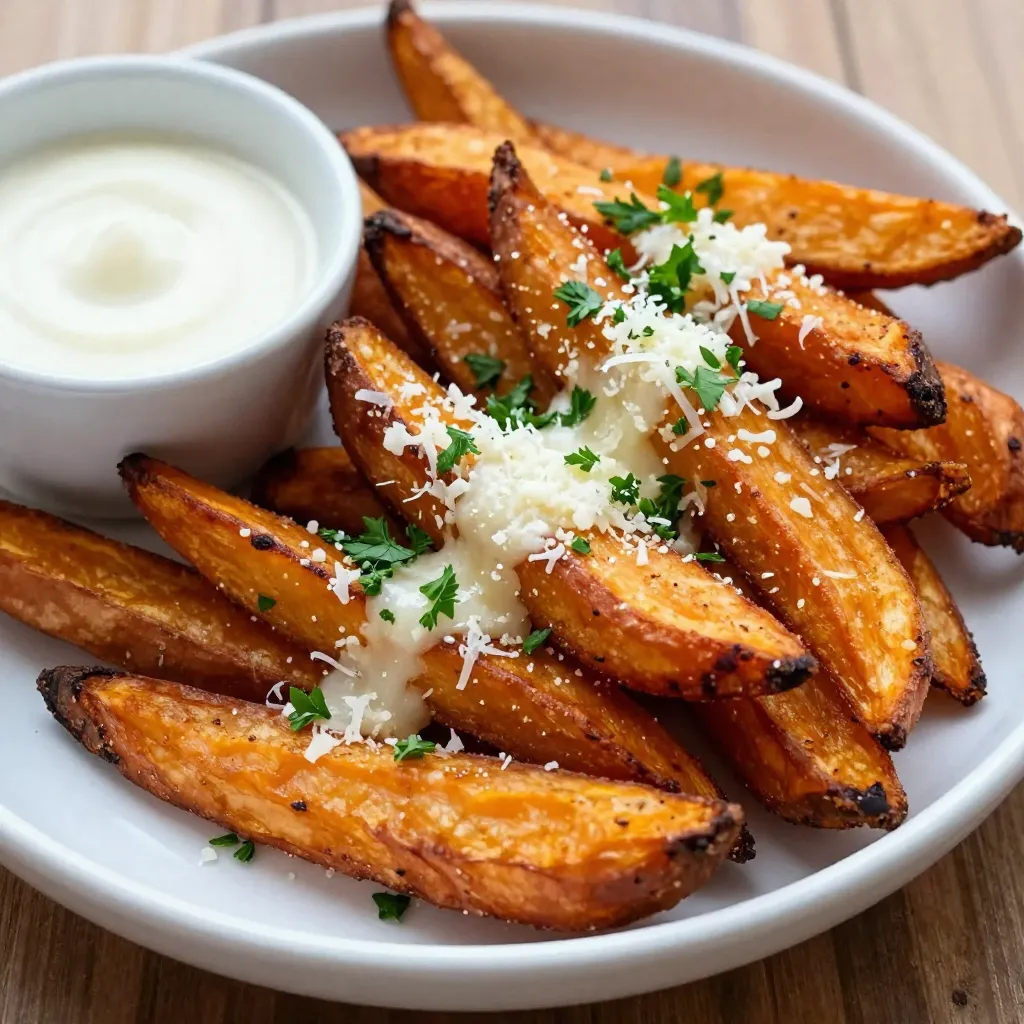
Looking for a tasty snack that’s both crispy and satisfying? You need to try my Garlic Parmesan Sweet Potato Fries!

- 1 sheet of puff pastry, fully thawed - 8 oz cream cheese, softened to room temperature - 1/4 cup powdered sugar, plus extra for dusting - 1/2 teaspoon pure vanilla extract - 1 cup fresh strawberries, hulled and sliced thin The main ingredients create the heart of the Strawberry Cream Cheese Danish. The puff pastry forms the flaky base. It puffs up beautifully when baked. Cream cheese gives a rich, creamy center. Adding powdered sugar sweetens the filling just right. The vanilla extract enhances the cream cheese flavor. Fresh strawberries bring a burst of color and taste. - Powdered sugar for dusting - Fresh lemon juice You can use optional ingredients to elevate your dish. Dusting with powdered sugar adds a sweet touch. Fresh lemon juice brightens the strawberry flavor. It can make each bite even fresher. You can adjust the sweetness with powdered sugar based on your taste. - 1 egg, beaten (for the egg wash) An egg wash is an optional step. It gives your danish a golden finish. Just brush the top of the pastries with the beaten egg before baking. This small step makes a big difference in looks. It creates an appetizing shine and color. {{ingredient_image_2}} First, preheat your oven to 400°F (200°C). This step is key for a crisp finish. While the oven heats, line a baking sheet with parchment paper. This helps with easy cleanup later. Next, take your thawed puff pastry. On a lightly floured surface, roll it out gently until smooth. Use a sharp knife or a pizza cutter to cut the pastry into four equal squares. Now, let's make the cream cheese filling. In a medium bowl, combine 8 oz of softened cream cheese, 1/4 cup of powdered sugar, and 1/2 teaspoon of pure vanilla extract. Mix them well using a hand mixer or whisk until the mixture is creamy and smooth. In another bowl, toss 1 cup of sliced strawberries with 1 tablespoon of fresh lemon juice. If you like, add a bit of powdered sugar for extra sweetness. This step keeps the strawberries fresh and bright. Take each puff pastry square and place about a tablespoon of the cream cheese filling in the center. Layer a few strawberry slices on top of the cream cheese. Now, fold each corner of the pastry towards the center, creating a diamond shape. Pinch the corners to seal them tight. Brush the tops of the pastries with a beaten egg for a golden finish. Place the danishes in the oven and bake for 15-20 minutes. Keep an eye on them so they don’t over-brown. Once baked, let them cool slightly on a wire rack. Dust with extra powdered sugar for a nice touch before serving. To make the best puff pastry, start by thawing it slowly in the fridge. This keeps it cold and easy to handle. When you're ready to roll, sprinkle flour on your surface to prevent sticking. Use a rolling pin to gently roll the pastry. Aim for a smooth, even layer. Cut it into four squares with a sharp knife or pizza cutter. This helps keep the edges neat. To make a smooth cream cheese filling, ensure the cream cheese is at room temperature. Cold cream cheese can create lumps. In a bowl, mix softened cream cheese with powdered sugar and vanilla. Use a hand mixer or a whisk to blend until creamy. This will ensure you have a velvety texture for your filling. Presentation can make your danishes stand out. After baking, let them cool slightly on a wire rack. Dust them with powdered sugar for a sweet finish. For an extra touch, serve the danishes on a pretty platter. Add fresh mint leaves and sliced strawberries to enhance the look. This adds color and freshness to your dessert table. Pro Tips Keep Pastry Cold: Make sure your puff pastry is chilled before rolling out. This helps achieve a flakier texture when baked. Maximize Creaminess: For an even creamier filling, consider adding a tablespoon of sour cream to the cream cheese mixture. Fresh Strawberries: Use ripe strawberries for the best flavor. If they are not in season, you can substitute with frozen ones, but thaw and drain them first. Egg Wash Alternatives: If you prefer a vegan option, brush the pastries with a mixture of almond milk and maple syrup for a glossy finish. {{image_4}} You can change up the fruit in your danish. Blueberries, raspberries, or peaches work great. Each fruit brings its own taste. For blueberries, use a similar amount as strawberries. Raspberries add a nice tartness. Peaches give a sweet and juicy bite. Mix and match to find your favorite! Adding almond extract can boost flavor. Just a drop or two makes a big difference. You can also try spices like cinnamon or nutmeg. These spices add warmth and depth. Experiment with flavors to create your unique twist on this classic treat. If you want to switch up the crust, try phyllo dough. It gives a flaky and crisp texture. You can also use biscuit dough for a thicker, biscuit-like base. Both options are easy to find. Each choice changes the taste and feel of your danish. To keep your danishes fresh, store them in an airtight container. This prevents moisture loss and keeps them tasty. You can store them in the fridge for up to 3 days. If you want to keep them longer, freezing is a great option. To reheat your danishes, use the oven for the best results. Preheat your oven to 350°F (175°C). Place the danishes on a baking sheet and warm them for about 5-8 minutes. This restores their crispiness. You can also use a microwave, but this may make the pastry softer. To freeze your danishes, wait for them to cool completely. Wrap each one tightly in plastic wrap. Place them in a freezer bag and remove as much air as possible. They can be frozen for up to 2 months. When ready to eat, thaw in the fridge overnight and reheat as needed. Enjoy your treats anytime! To make a Strawberry Cream Cheese Danish, you start with puff pastry. First, you preheat your oven to 400°F (200°C). Then, you roll out the puff pastry and cut it into squares. Next, mix cream cheese, powdered sugar, and vanilla in a bowl until smooth. Toss your sliced strawberries with lemon juice to enhance their flavor. Place cream cheese filling on each pastry square, add strawberries, and fold the corners. Brush with egg wash, bake for 15-20 minutes, and enjoy! Yes, you can use store-bought cream cheese for this recipe. It saves time and still tastes great. However, homemade cream cheese has a fresher flavor. If you have the time, making it from scratch can add a special touch to your danish. Just remember, both options will yield delicious results! If you don’t have powdered sugar, you can use granulated sugar. Simply blend granulated sugar in a blender until it turns into a fine powder. You can also use honey or maple syrup, but adjust the amount as these are sweeter. For a low-carb option, try erythritol or another sugar substitute. This pastry lasts about 3 days in the fridge. To store, place the danishes in an airtight container. They may lose some crispness but will still taste good. If you need to keep them longer, consider freezing them. Just make sure they cool completely before freezing. You’ve learned how to make a delightful Strawberry Cream Cheese Danish, from the main ingredients to options for variations. Each step adds flavor and fun, making this pastry a joy to prepare. Remember, you can customize it with different fruits or store it for later. I hope you enjoy making this treat as much as I do. Get ready to impress friends and family with your baking skills!

Strawberry Cream Cheese Danish Easy and Tasty Recipe

If you crave a treat that’s both easy and delicious, this Strawberry Cream Cheese Danish is for you! You’ll use

To make these spicy Mexican hot chocolate cookies, you will need: - 1 cup all-purpose flour - 1/2 cup unsweetened cocoa powder - 1/2 teaspoon baking soda - 1/4 teaspoon fine sea salt - 1/2 cup unsalted butter, softened - 1 cup packed brown sugar - 1 large egg - 1 teaspoon pure vanilla extract - 1 teaspoon ground cinnamon - 1/4 teaspoon cayenne pepper (adjust for heat) - 1/2 cup semi-sweet chocolate chips - 1/4 cup granulated sugar (for rolling) If you want to switch things up, here are some substitutions: - Use coconut oil instead of unsalted butter for a dairy-free option. - Swap brown sugar with white sugar for a lighter taste. - Choose gluten-free flour to make these cookies gluten-free. - Use dark chocolate chips if you prefer a richer flavor. You can enhance the flavor in several fun ways: - Add nuts like pecans or walnuts for crunch. - Toss in some dried chilies for extra heat. - Mix in a splash of espresso powder for depth. - Try adding a pinch of sea salt on top for a sweet and salty twist. Experiment with these options to find your perfect cookie! {{ingredient_image_2}} Start by preheating your oven to 350°F (175°C). This step ensures your cookies bake evenly. Line a baking sheet with parchment paper. This keeps the cookies from sticking and makes cleanup easy. In a medium bowl, combine the all-purpose flour, unsweetened cocoa powder, baking soda, fine sea salt, ground cinnamon, and cayenne pepper. Whisk these ingredients together until they are well mixed. This helps get rid of any lumps. Set this dry mix aside for now. In a large mixing bowl, take the softened unsalted butter and packed brown sugar. Beat these together with an electric mixer on medium speed. Mix for about 2-3 minutes. The goal is to make it light and fluffy. Next, add the large egg and pure vanilla extract to the butter mixture. Keep mixing until everything is smooth and well combined. This adds moisture and flavor to your cookies. Slowly pour the dry mixture into the wet mixture. Stir gently with a spatula or wooden spoon until just combined. Don’t overmix; this can change how your cookies feel. Now, fold in the semi-sweet chocolate chips evenly. Using a tablespoon or cookie scoop, drop heaping spoonfuls of dough onto the prepared baking sheet. Space them about 2 inches apart for room to grow. Roll each dough ball in granulated sugar for a sweet crust. Put the baking sheet in the oven. Bake for about 10-12 minutes. The edges should set, but the centers should stay soft. When done, let the cookies cool on the baking sheet for about 5 minutes. Then move them to a wire rack to cool completely. Enjoy your cookies with a warm cup of Mexican hot chocolate! To get the right texture in your cookies, mix carefully. Overmixing dough makes cookies tough. Once you combine the wet and dry ingredients, stop mixing as soon as you see no more flour. The dough should feel soft but not sticky. The cayenne pepper brings heat to your cookies. Start with 1/4 teaspoon if you like a mild kick. If you crave more spice, add up to 1/2 teaspoon. Taste the dough before baking to find your perfect level. Remember, the heat can change slightly after baking. After baking, let the cookies cool on the sheet for 5 minutes. This helps them firm up. Then, transfer them to a wire rack. Once completely cool, store the cookies in an airtight container. They stay fresh for about a week. For longer storage, freeze them. Simply place them in a freezer-safe bag. Enjoy these spicy treats whenever you like! Pro Tips Adjust the Spice Level: Feel free to modify the amount of cayenne pepper to match your heat preference. Start with less if you're unsure and add more for a spicier kick! Chill the Dough: For a thicker cookie, chill the dough for 30 minutes before baking. This helps the cookies maintain their shape and prevents spreading too much. Use High-Quality Chocolate Chips: Opt for high-quality semi-sweet chocolate chips for a richer chocolate flavor that complements the spicy notes beautifully. Storage Tips: Store the cookies in an airtight container at room temperature for up to a week. For longer freshness, freeze them and thaw as needed. {{image_4}} To make these cookies nut-free, simply skip any nuts in the recipe. The main ingredients are already nut-free. You can still enjoy the rich chocolate flavor and spice without adding any nuts. This keeps the cookies safe for those with nut allergies. It’s a great way to have everyone join in on this treat! Want to switch things up? You can add unique flavors to your cookies. Try using orange zest for a citrus kick. You could also mix in some instant coffee powder for a mocha flavor. A pinch of cardamom can add warmth and depth. Each of these flavors works well with the chocolate and spice. If you need a gluten-free option, you can swap the all-purpose flour. Use a gluten-free flour blend instead. Make sure it has xanthan gum for better texture. You can also use almond flour if you want a nutty flavor. Just remember, this will change the texture a bit, making it softer. To keep your Spicy Mexican Hot Chocolate Cookies fresh, store them in an airtight container. Use a container that fits the cookies snugly. This helps prevent them from becoming stale. You can also add a slice of bread to the container. The bread will absorb any moisture, keeping the cookies soft. When stored properly, these cookies can last up to one week at room temperature. If you want them to last longer, consider refrigerating them. In the fridge, they can stay fresh for about two weeks. Just make sure to seal them well to avoid absorbing odors from other foods. Freezing is a great option for longer storage. To freeze, first, let the cookies cool completely. Then, place them in a single layer on a baking sheet. Freeze for about an hour until they are firm. After that, transfer the cookies to a freezer bag or container. They can last up to three months in the freezer. When you want to enjoy them, just let them thaw at room temperature. You can also warm them up in the oven for a few minutes for that fresh-baked taste! Yes, you can use salted butter. However, it may change the flavor. You might want to reduce added salt. This helps keep the balance right. Unsalted butter gives you more control over the salt level in the cookies. To spice up these cookies, add more cayenne pepper. Start with a little, then taste the dough. You can also mix in some chili powder for a different kick. If you want a real punch, try adding a pinch of ground chipotle. If your cookie dough feels too sticky, add more flour. Start with a tablespoon at a time. Mix well, and check the texture. You want it to be soft but manageable. Chilling the dough for about 30 minutes can also help. Absolutely! You can use dark chocolate or milk chocolate chips. Each type will change the taste slightly. For a fun twist, try white chocolate chips or even peanut butter chips. Mixing different chips can create a unique flavor! We covered the key steps to bake great cookies, from choosing your ingredients to storing them. You can tailor flavors and textures to fit your taste. Remember to try substitutions if needed, and don’t hesitate to experiment with add-ins. Proper storage will keep your cookies fresh and tasty. Baking is fun and can lead to delicious treats. Enjoy every bite you create!

Spicy Mexican Hot Chocolate Cookies Delightful Recipe

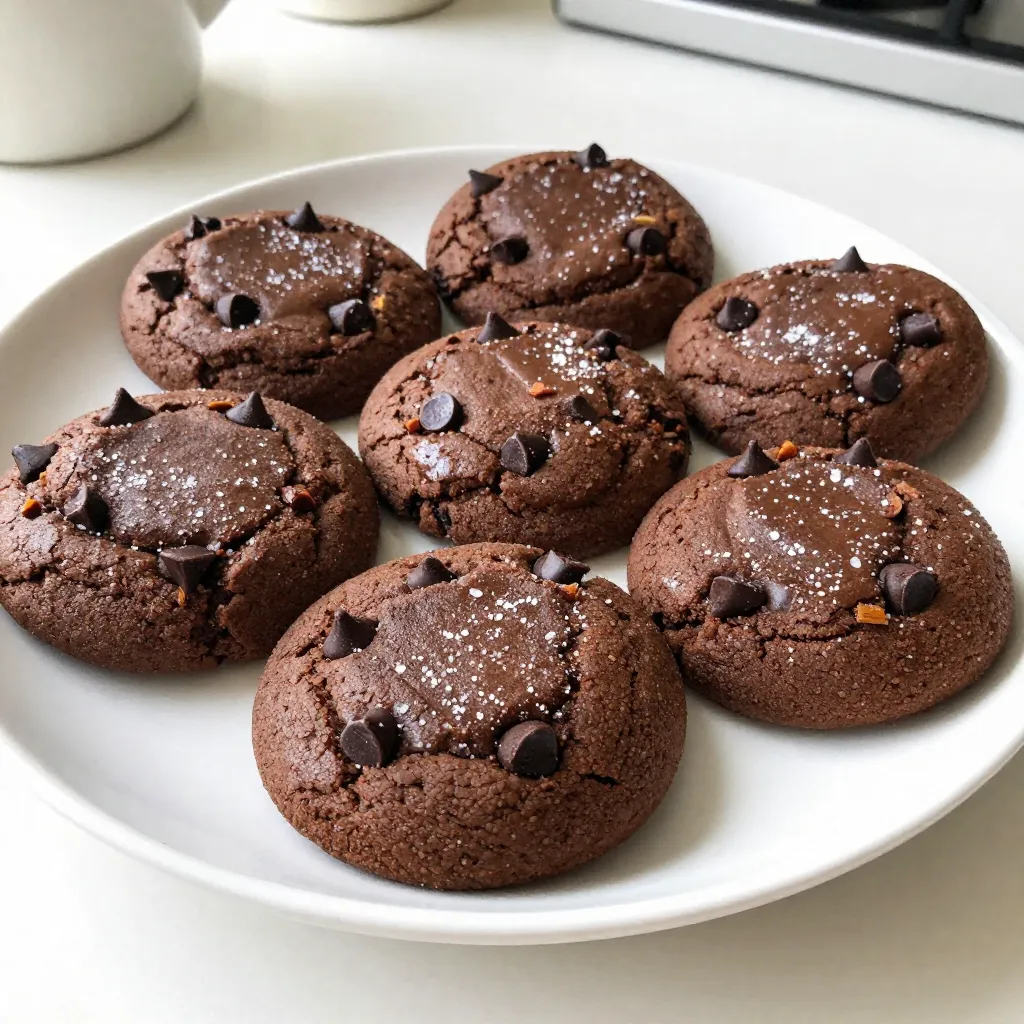
If you love chocolate and a kick of spice, you’ll adore my Spicy Mexican Hot Chocolate Cookies! This delightful recipe

Older posts
Newer posts
← Previous Page1 Page2 Page3 … Page86 Next →

dsad

© 2026 recipetorch • Built with GeneratePress

Our Policies

  • Copyright Policy
  • Cookie Policy
  • GDPR Policy
  • Privacy Policy
  • Disclaimer
  • Terms Of Use

More Information

  • Home
  • About
  • Contact
  • Appetizers
  • Dessert
  • Dinner
  • Drinks
©2026, recipetorch About Back To Top