Skip to content
DisclaimerTerms Of UseGDPR PolicyCookie Policy

recipetorch

  • Home
  • Drinks
  • Appetizers
  • Dinner
  • Dessert
  • About
  • Contact
  • Privacy Policy
DisclaimerTerms Of UseGDPR PolicyCookie Policy

NO-ING-IMG

- 1 lb fresh broccoli florets - 4 cloves garlic, finely minced - 2 tablespoons extra virgin olive oil - 1 large lemon (zested and juiced) - 1 teaspoon red pepper flakes - Sea salt and freshly cracked black pepper to taste - 2 tablespoons freshly grated Parmesan cheese (optional) - 1 tablespoon fresh parsley, finely chopped (for garnish) The ingredients for Lemon Garlic Roasted Broccoli are simple yet full of flavor. Fresh broccoli florets are key. They provide a crisp texture and bright color. Garlic adds depth and richness. The minced garlic infuses the dish with its bold taste. Extra virgin olive oil brings a smooth finish. It helps the broccoli roast nicely. Lemon plays a vital role as well. Zesting and juicing one large lemon gives the dish a zesty kick. The acidity cuts through the richness and brightens the flavors. Red pepper flakes add a hint of heat. Adjust the amount to your taste. Don't forget the seasoning! Sea salt and freshly cracked black pepper enhance all the flavors. Optionally, you can add freshly grated Parmesan cheese for a cheesy touch. Lastly, sprinkle fresh parsley on top for a pop of color. It also adds a fresh taste. These ingredients work together beautifully. They create a simple yet delicious dish you can enjoy any day. {{ingredient_image_2}} Set your oven to 425°F (220°C). This high heat helps the broccoli roast well. Preheating makes sure your broccoli cooks evenly. It also helps achieve that nice crispy edge we all love. In a big bowl, combine 1 pound of fresh broccoli florets, 4 minced garlic cloves, and 1 teaspoon of red pepper flakes. Mixing these ingredients together infuses the broccoli with bold flavors. The garlic adds a savory touch, while red pepper gives it a little heat. In a small bowl, whisk 2 tablespoons of extra virgin olive oil, the juice of 1 lemon, and the zest from that lemon. Whisk until smooth. Using fresh lemon juice and zest makes this dressing bright and flavorful. It adds a refreshing twist that perfectly complements the broccoli. Pour the lemon-olive oil dressing over the broccoli mixture. Season with sea salt and freshly cracked black pepper. Use your hands or a wooden spoon to toss everything well. This helps each floret get coated with flavor, so every bite bursts with taste. Spread the broccoli mixture evenly on a parchment-lined baking sheet. Roast it in the oven for 20 to 25 minutes. Halfway through, stir the broccoli gently to help it cook evenly. You want tender broccoli with crispy edges for the best texture. If you like cheese, sprinkle 2 tablespoons of freshly grated Parmesan cheese over the broccoli in the last 5 minutes of roasting. This adds a rich, savory finish. Once done, remove the broccoli and transfer it to a serving dish. Garnish with 1 tablespoon of finely chopped fresh parsley. Serve hot for the best taste experience. To pick the best broccoli, look for bright green florets. They should be firm and crisp. Avoid any yellowing or floppy stems. Fresh broccoli has small, tightly packed buds. The smell should be fresh and mild. A good head of broccoli feels heavy for its size. Roasting time can change based on how you like your broccoli. For tender and crispy florets, aim for 20-25 minutes. If you want softer broccoli, roast it a bit longer. Keep an eye on it to avoid burning. Every oven is different, so adjust as needed. You can boost the flavor with more spices or herbs. Try adding garlic powder for a stronger garlic taste. A pinch of cumin gives a warm flavor. Fresh herbs like thyme or basil add freshness. For a nutty crunch, consider adding nuts like almonds or pine nuts. Experiment and find what you love! Pro Tips Use Fresh Ingredients: Fresh broccoli and garlic will provide the best flavor and texture. Look for vibrant green florets and firm stalks. Don’t Overcrowd the Pan: Spreading the broccoli out on the baking sheet allows for even roasting. If they're too close together, they'll steam instead of roast. Adjust the Spice Level: Feel free to increase or decrease the red pepper flakes according to your personal heat preference. You can also substitute with paprika for a milder flavor. Experiment with Additional Flavors: Consider adding lemon slices or other vegetables, like bell peppers or carrots, to the mix for a colorful and flavorful roast. {{image_4}} You can add cheese to your dish for extra flavor. Parmesan is a great choice. It melts well and adds a rich taste. You can also try cheddar or feta. Each cheese brings its own unique twist. Sprinkle the cheese on top during the last few minutes of roasting. This gives it a nice golden color and a creamy texture. To turn up the heat, add more red pepper flakes. You can start with a teaspoon and increase it based on your taste. If you want even more spice, try adding sliced jalapeños or crushed chili peppers. These options will give your broccoli a bold kick. Just remember to balance the heat with the zesty lemon flavor. For a crunchy twist, add nuts to your broccoli. Almonds and pine nuts work well. You can chop them up or leave them whole. Add them to the mix before roasting. They will toast in the oven, adding a nice crunch. This also adds healthy fats and protein to your dish. To keep your Lemon Garlic Roasted Broccoli fresh, store it in an airtight container. Make sure it cools down before sealing. Place it in the fridge. It will stay good for about three days. If you want to keep it longer, consider freezing. When reheating, aim to keep that crispiness. You can use an oven or an air fryer. Preheat the oven to 350°F (175°C). Spread the broccoli on a baking sheet. Heat for about 10 minutes. If using an air fryer, cook at 350°F (175°C) for 5-7 minutes. Both methods help restore that crunchy texture. If you want to freeze your roasted broccoli, it’s best to do it right away. Let it cool completely first. Then, place it in freezer bags, removing as much air as possible. You can freeze it for up to three months. When ready to use, thaw it in the fridge overnight and reheat as mentioned above. To make this dish, follow these simple steps: - Preheat your oven to 425°F (220°C). - In a bowl, add 1 lb of fresh broccoli florets, 4 minced garlic cloves, and 1 teaspoon of red pepper flakes. - In another bowl, whisk 2 tablespoons of olive oil, the juice and zest of 1 lemon. - Pour the lemon mix over the broccoli and season with sea salt and pepper. - Toss everything to coat the broccoli well. - Spread the broccoli on a baking sheet lined with parchment paper. - Roast in the oven for 20-25 minutes. Toss halfway for even cooking. - Optional: Add grated Parmesan cheese during the last 5 minutes. - Garnish with fresh parsley and serve hot. Yes, you can use frozen broccoli. Here are some tips: - Thaw the broccoli first and drain excess water. - Adjust the roasting time. Frozen broccoli needs a bit longer to cook. - Keep an eye on it to avoid overcooking. This dish pairs well with many main courses. Here are some ideas: - Grilled chicken or fish for a light meal. - Pasta dishes for a hearty option. - Quinoa or rice for a tasty vegetarian dish. To make this dish vegan, simply omit the cheese. Here are some alternatives: - Use nutritional yeast for a cheesy flavor. - Add more herbs, like basil or thyme, for extra taste. - Make sure your olive oil is vegan-friendly. In this blog post, we covered a simple, tasty Lemon Garlic Roasted Broccoli recipe. I detailed the ingredients, steps, and tips for perfecting your dish. Fresh broccoli, garlic, and lemon create a flavorful meal. Remember to combine the right ingredients and roast at the right temperature for crispy edges. This dish pairs well with various meals and offers room for variations. Enjoy making this easy recipe. It’s a great way to eat veggies and can fit any diet!

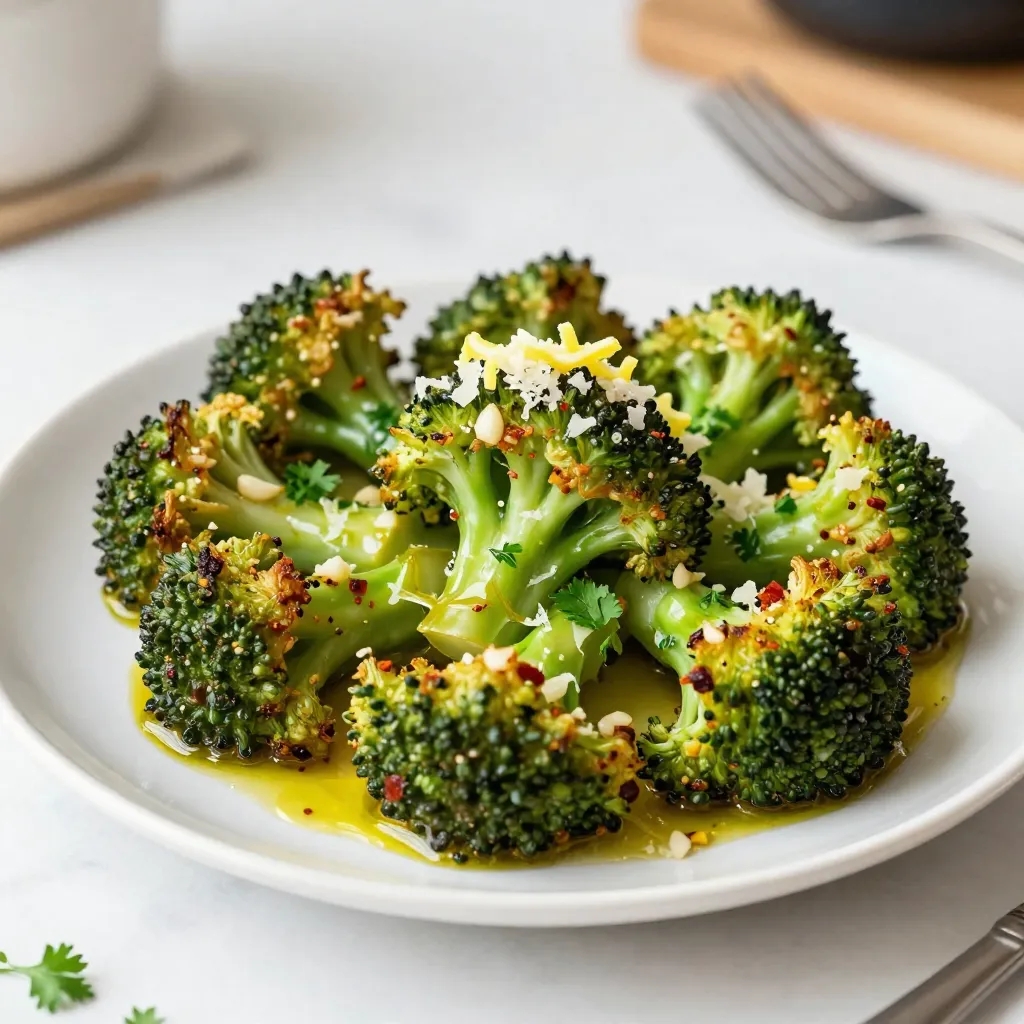
Lemon Garlic Roasted Broccoli Flavorful and Simple Dish

Looking for a tasty and easy side dish? Lemon Garlic Roasted Broccoli is your answer! This simple recipe combines fresh

Fresh cilantro leaves are the star of this dressing. Their bright green color adds a lively touch. The taste is sharp, fresh, and slightly citrusy. They bring a burst of flavor to any dish. For the best result, use tightly packed leaves. This ensures you capture all the flavor. Greek yogurt and mayonnaise are essential for creating a creamy base. Greek yogurt adds protein and tang. Mayonnaise gives the dressing its smooth richness. Together, they balance the flavors and textures perfectly. Freshly squeezed lime juice is key for adding zesty brightness. It cuts through the creaminess, making the dressing feel light. Always use fresh limes for the best flavor. Bottled juice lacks the same vibrant taste. Garlic plays a crucial role in this dressing. It adds depth and a savory note. Use one clove finely minced to ensure a smooth blend. Honey or agave syrup brings a touch of sweetness. This balances the acidity of the lime juice. Adjust this to your taste. Salt and black pepper are vital for seasoning. They enhance all the flavors in the dressing. Always season to your own preference; start with a pinch and add more if needed. Water can help thin the dressing if it’s too thick. Start with one tablespoon and blend. Add more if needed until you reach your desired consistency. Feel free to customize with additional herbs or spices. Dill, cumin, or paprika can add unique flavors. Experiment to find your perfect blend! {{ingredient_image_2}} - First, rinse the fresh cilantro leaves under cold running water. This step removes dirt and keeps your dressing fresh and clean. - After rinsing, shake off the excess water. Next, finely chop the cilantro. This helps it blend smoothly later on. - Measure out the other ingredients: 1/2 cup Greek yogurt, 1/4 cup mayonnaise, and 2 tablespoons lime juice. Also, prepare 1 clove of finely minced garlic, 1 teaspoon honey or agave syrup, and salt and pepper to taste. - Now, place all the prepared ingredients into a food processor or blender. Add the chopped cilantro, Greek yogurt, mayonnaise, lime juice, minced garlic, and honey. - Blend on high until the mixture reaches a smooth and creamy consistency. This usually takes about 30 seconds. - To achieve the best results, make sure to scrape down the sides of the bowl. This helps include all the ingredients into the mix. - After blending, taste the dressing. This is a crucial step. You may want to add salt and freshly ground black pepper to suit your taste. - If the dressing is too thick, add water to thin it out. Start with 1 tablespoon at a time. Blend again after each addition until it feels just right. - Once seasoned, pour your dressing into a clean jar or airtight container. Seal it tightly. - For the best flavor, refrigerate the dressing for at least 30 minutes. This resting time allows the flavors to blend beautifully. To make the flavors pop, let the dressing rest for at least 30 minutes. This time allows the cilantro and lime to blend well. If the dressing tastes too tangy, add a bit more honey. For sweetness, a touch of lime juice can help balance it out. For the best results, use a high-speed blender or food processor. These tools make the dressing creamy and smooth. If you don’t have a blender, you can whisk the ingredients in a bowl. Just chop the cilantro finely and mix well. Drizzle this dressing on salads, grilled chicken, or roasted veggies for extra flavor. It also works great as a dip for fresh veggies. For a beautiful presentation, garnish with chopped cilantro or lime wedges before serving. Pro Tips Storage Tip: Store the dressing in an airtight container for up to one week in the refrigerator to maintain its freshness and flavor. Flavor Enhancer: For an extra kick, add a pinch of cumin or a dash of hot sauce to the dressing for added depth and heat. Consistency Control: Adjust the thickness of the dressing to your liking by varying the amount of water added; use less for a thicker dip. Herb Variations: Experiment with other fresh herbs like parsley or dill for a different flavor profile that complements various dishes. {{image_4}} You can easily make this dressing dairy-free. Replace Greek yogurt with silken tofu. Use vegan mayo instead of regular mayo. Add a splash of coconut milk for creaminess. You can also try adding a bit of lemon juice to enhance flavor. For more flavor, consider blending in nutritional yeast. It adds a cheesy flavor without the dairy. Another option is to toss in some crushed garlic for a kick. These swaps keep the dressing tasty while fitting dairy-free diets. If you like heat, this version is for you. Start by adding a chopped jalapeño to the blend. Remove the seeds for less heat. If you want a quicker fix, use hot sauce instead. Just a few drops can give it a nice kick. You can adjust the heat level. If it’s too hot, add more yogurt or mayo to cool it down. Always taste as you go, so you find the perfect balance for your palate. Feel free to play with other herbs in your dressing. You can add parsley for a fresh taste. Basil also brings a sweet hint that pairs well with the lime. Start with a small amount, about a tablespoon, and blend it in. Adjust the proportions to create a unique flavor. Mixing cilantro with these herbs can make the dressing more complex. It’s fun to experiment and find the blend you love the most! To keep your creamy cilantro lime dressing fresh, use a clean glass jar or airtight container. Glass is great because it won’t hold onto smells. Make sure to seal it tightly. This step keeps air and moisture out. An airtight seal helps maintain the flavor and texture of the dressing. This dressing lasts about one week in the refrigerator. After a week, check for signs of spoilage. If you see mold or notice an off smell, it’s best to toss it. Always trust your senses when it comes to food safety. You can freeze the dressing if you want to store it longer. Pour it into an ice cube tray for easy portions. Once frozen, transfer the cubes to a freezer bag. When you need it, just thaw what you need in the fridge overnight. Mix it well before using. The texture may change slightly, but it still tastes great. You can use this dressing in many fun ways. Here are some ideas: - Drizzle it over tacos for a zesty kick. - Use it as a dip for fresh veggies. - Spread it on sandwiches for extra flavor. - Pair it with grilled fish or chicken. - Add it to grain bowls to brighten up the dish. Yes, you can make this dressing ahead. Preparing it in advance has many perks: - The flavors blend better when it sits. - You save time on busy days. - It stays fresh for up to a week in the fridge. To adjust the spice level, try these tips: - For spicier, add chopped jalapeño or hot sauce. - For milder, use less garlic or skip it altogether. - Taste as you go, so it matches your preference. This blog post showed you how to create a creamy cilantro lime dressing. Fresh ingredients like cilantro, Greek yogurt, and lime juice bring out the best flavors. You learned to blend the dressing smoothly and adjust its taste, too. Tips for variations and storage help you keep it fresh. Finally, you can enjoy this dressing with salads, meats, or veggies. Now you can make this tasty dressing easily and customize it to suit your palate. Enjoy your flavorful creations!

Creamy Cilantro Lime Dressing Flavorful and Fresh Recipe

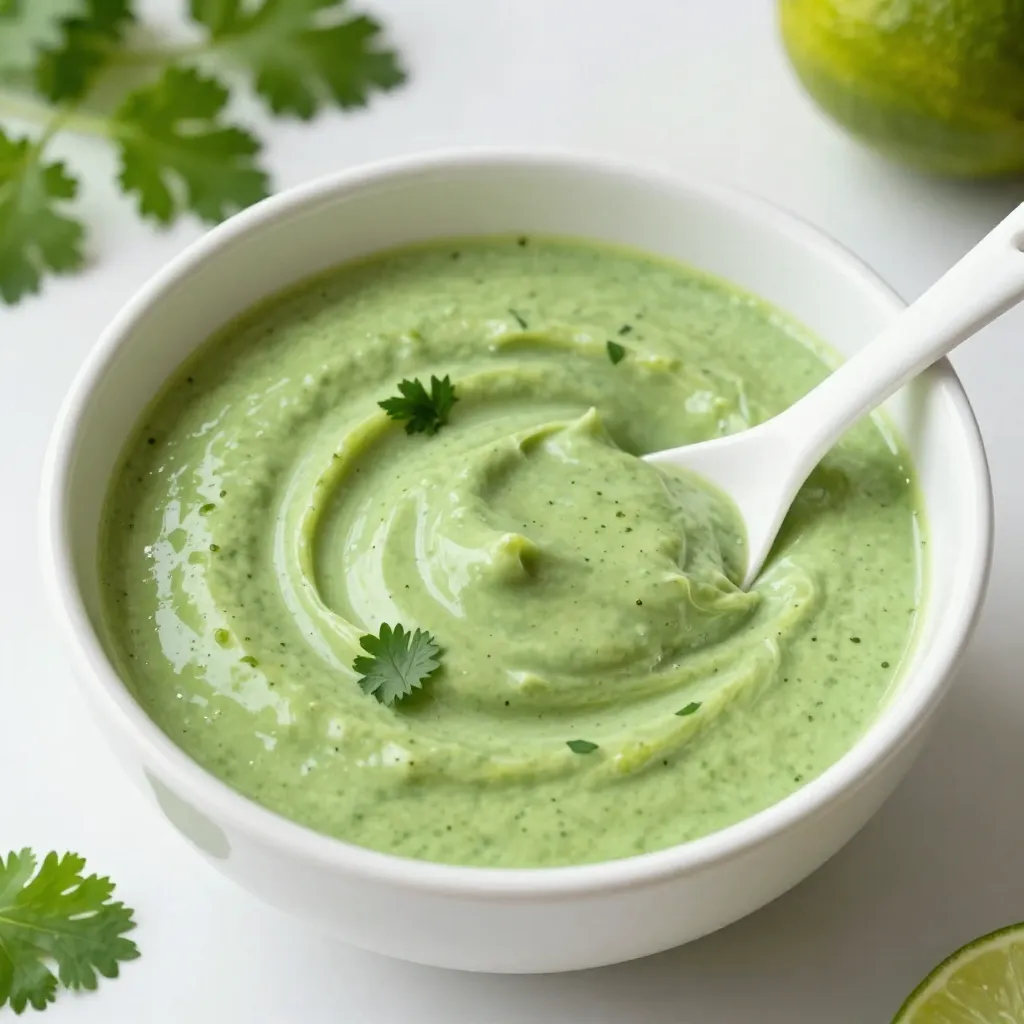
Do you want to elevate your meals with a burst of flavor? This Creamy Cilantro Lime Dressing is the answer!

- Ripe mangoes - Full-fat coconut milk - Ripe banana - Honey or maple syrup - Chia seeds - Pure vanilla extract The main ingredients in the Mango Coconut Smoothie Bowl are simple yet full of flavor. Ripe mangoes give the bowl its tropical taste. You need two ripe mangoes, peeled and diced into bite-sized pieces. Full-fat coconut milk adds creaminess. One cup of coconut milk makes it rich and smooth. A ripe banana, sliced, adds natural sweetness and thickness. For a hint of sweetness, use one tablespoon of honey or maple syrup. Chia seeds provide texture and nutrition, so add one tablespoon. Finally, a pinch of pure vanilla extract enhances the overall flavor. - Granola - Fresh fruits (e.g., kiwi, strawberries, blueberries) - Toasted shredded coconut Toppings make your smoothie bowl fun and colorful. A quarter cup of granola adds a satisfying crunch. You can add an assortment of fresh fruits like kiwi, strawberries, or blueberries. These fruits not only look pretty but also taste great! Toasted shredded coconut is a must for garnish. It adds texture and a hint of coconut flavor that pairs well with mango. - Spinach or kale for a nutritional boost - Protein powder for extra filling If you want to make your smoothie bowl even healthier, consider adding spinach or kale. These greens give a nutrition boost without changing the taste much. You can also stir in some protein powder for extra filling. This is perfect if you want the bowl to be a full meal. {{ingredient_image_2}} Preparing the ingredients To start, gather your ingredients. You will need: - 2 ripe mangoes, peeled and diced - 1 cup full-fat coconut milk - 1 ripe banana, sliced - 1 tablespoon honey or maple syrup - 1 tablespoon chia seeds - 1/2 teaspoon pure vanilla extract Make sure your mangoes are ripe. This ensures they are sweet and juicy. Dice the mangoes into bite-sized pieces for easy blending. Slice the banana and set everything ready for the blender. Blending the smoothie Now, add the mangoes, coconut milk, banana, honey, chia seeds, and vanilla extract into a high-speed blender. Blend on high until you achieve a smooth and creamy texture. If the mixture is too thick, add more coconut milk. Blend until silky. Taste the mixture and adjust sweetness if needed by adding more honey or maple syrup. Pouring the smoothie into bowls Once blended, carefully pour the smoothie into two bowls. Fill them generously. This gives you space for toppings. You want a nice, full bowl for a good presentation. Adding toppings Now it’s time for the fun part—adding toppings! Start with a handful of granola on one side. Then, add colorful fresh fruits like kiwi, strawberries, or blueberries. Use your creativity to arrange the fruit nicely. Finally, sprinkle some toasted shredded coconut on top for extra flavor and crunch. Adjusting thickness with coconut milk If you like a thicker smoothie, use less coconut milk. For a thinner texture, add more. This way, you can make it just how you like it. Modifying sweetness levels You can change the sweetness to match your taste. If you prefer it sweeter, add more honey or maple syrup. Taste as you go to find the perfect balance. Using a high-speed blender is key for this smoothie bowl. It ensures a smooth mix. When you blend, start at a low speed. Gradually increase to high. This helps combine the mango, coconut milk, and banana well. You want a creamy texture without lumps. If the mix is too thick, add more coconut milk. Blend again until silky. Adjust until it feels just right. Choose vibrant bowls for a nice presentation. Bright colors make the dish pop. You can use glass bowls or colorful ceramic ones. To make your smoothie bowl more filling, add extra toppings. Granola adds crunch, while fruits add fiber. You can also include nuts or seeds for added nutrition. Drizzle some honey on top for a sweet touch. If you have leftover smoothie, store it in a sealed container. Keep it in the fridge for up to one day. Stir it before serving again. If the mix separates, just blend it lightly. For ingredient storage, keep mangoes and bananas at room temperature. Store coconut milk in the fridge after opening. Chia seeds can last a long time in a cool, dry place. Pro Tips Use Frozen Mango: For a thicker, creamier texture, consider using frozen mango chunks instead of fresh ones. This will also keep your smoothie bowl chilled longer. Customize Sweetness: Adjust the sweetness of your smoothie bowl according to your preference by adding more or less honey or maple syrup. Add Protein: Boost the nutritional value of your smoothie bowl by adding a scoop of protein powder or a tablespoon of nut butter. Layer Your Toppings: For a more appealing presentation, layer your toppings in sections rather than mixing them all together. This adds visual interest and texture. {{image_4}} You can change the taste of your Mango Coconut Smoothie Bowl easily. Try adding different fruits like pineapple, strawberries, or blueberries. These fruits add a burst of flavor and color. You can also switch the base. Instead of coconut milk, use almond milk for a nutty twist or yogurt for creaminess. If you're vegan, replace honey with maple syrup. This keeps the sweetness without animal products. For gluten-free options, choose a gluten-free granola. Always check labels to ensure they meet dietary needs. These small changes keep your smoothie bowl yummy and safe for everyone. Seasonal fruits make your bowl fresh and exciting. In summer, use ripe peaches or cherries. In fall, try apples or pears. You can also adjust flavors for holidays. Add cinnamon and pumpkin for a fall vibe or peppermint for winter. These tweaks give your smoothie bowl a fun twist for any season. Mangoes are more than just tasty. They are rich in vitamins A and C. These vitamins help keep your skin healthy and strong. Mangoes also have antioxidants. Antioxidants fight free radicals in your body. This helps reduce the risk of diseases. Mangoes can aid digestion too. They contain enzymes that help break down proteins. This makes it easier for your body to absorb nutrients. Eating mango can also help prevent constipation. Coconut is a great source of hydration. It has healthy fats that keep your energy up. Full-fat coconut milk gives a creamy texture. This makes the smoothie bowl rich and satisfying. The fats in coconut can boost energy levels. They help your body absorb vitamins too. This means you'll feel full longer and energized throughout the day. Chia seeds are tiny but mighty. They are a great source of Omega-3 fatty acids. These healthy fats are good for your heart and brain. Chia seeds are also high in fiber. Fiber helps you feel full and satisfied. This makes them a fantastic addition to your smoothie bowl. They add texture and nutrition without extra calories. Making a Mango Coconut Smoothie Bowl takes just 10 minutes. You can prep it quickly and enjoy it right away. The key is to gather all your ingredients first. Then, blend them until smooth. You can make this smoothie bowl in advance, but it is best fresh. If you must store it, keep it in an airtight container. Place it in the fridge and eat it within one day. If it thickens, stir in a splash of coconut milk before serving. If you don’t have mango, you can use other fruits. Pineapple and peaches work well. You can also try bananas or berries for a different taste. Each fruit will give the bowl a unique flavor while keeping it delicious. This blog post covered how to make a tasty Mango Coconut Smoothie Bowl. You learned about the main ingredients, toppings, and ways to customize your bowl. I provided tips on blending and serving, along with storage ideas. We also explored flavor and dietary variations to suit your needs. In my view, this smoothie bowl is a fun, healthy treat. Try it out, get creative, and enjoy the fresh flavors!

Mango Coconut Smoothie Bowl Refreshing and Nutritious

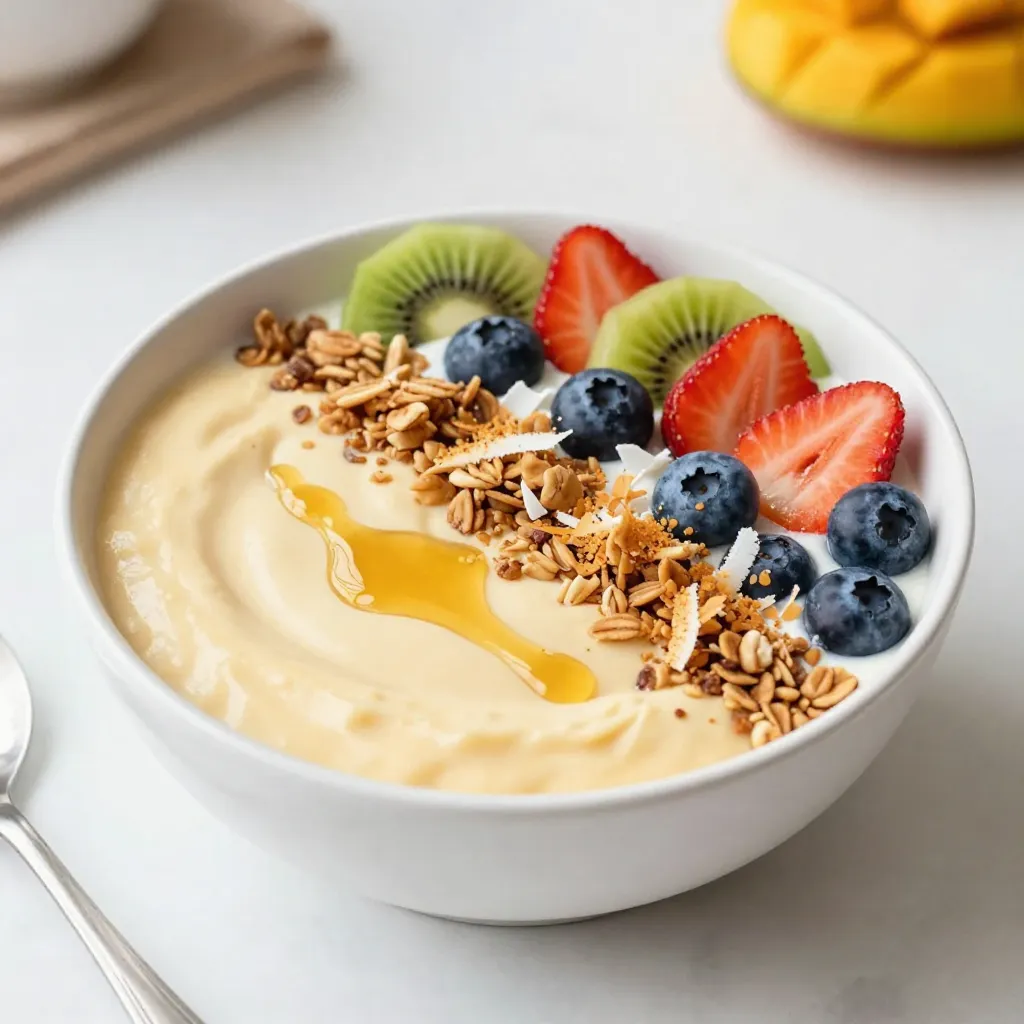
Are you ready to whip up a delicious treat that’s both refreshing and healthy? The Mango Coconut Smoothie Bowl is

To create this dish, you will need: - 4 lobster tails - 1/2 cup unsalted butter (1 stick) - 6 cloves garlic, minced - 1 tablespoon fresh lemon juice - 1 tablespoon fresh parsley, finely chopped - 1 teaspoon smoked paprika - Salt and freshly ground pepper to taste - Lemon wedges for serving These main ingredients combine to give you rich flavor and a delightful aroma. The butter serves as the base, while garlic adds depth. Lemon juice brightens the dish, and smoked paprika gives it a warm, subtle kick. You can enhance your lobster tails with some optional ingredients. Try adding: - Red pepper flakes for heat - Fresh herbs like thyme or basil for a unique twist - Parmesan cheese for a savory layer - A splash of white wine for extra richness These additions can help you tailor the dish to your taste. Feel free to experiment and find your favorite combination! Using the right tools makes cooking easier. Here are some items you should have on hand: - Kitchen shears for cutting the lobster shells - A small saucepan for melting the butter - A pastry brush for applying the garlic butter - A baking sheet for roasting the lobster tails With these tools, you can prepare your Garlic Butter Lobster Tails with ease. Each tool plays a key role in achieving that perfect finish. {{ingredient_image_2}} First, preheat your oven to 425°F (220°C). A hot oven cooks the lobster tails well. Next, take kitchen shears and cut the top shell of each lobster tail. Cut lengthwise down the middle but stop before the end. This way, you keep the shell intact. Now, gently pull the lobster meat from the shell. Lay the meat on top of the shell for a great look. For the garlic butter, melt 1/2 cup of unsalted butter in a small saucepan over medium heat. Once melted, add 6 minced garlic cloves. Sauté for 1-2 minutes until the garlic smells nice. Be careful not to let it burn. Remove the pan from heat and mix in 1 tablespoon of fresh lemon juice, 1 tablespoon of parsley, and 1 teaspoon of smoked paprika. Season with salt and pepper to taste. Now, brush the lobster meat with the garlic butter mixture. Coat some butter inside the shell too. Save some of the garlic butter for basting later. Arrange the lobster tails on a baking sheet and place them in the hot oven. Bake for 12-15 minutes until the meat is opaque and fully cooked. Halfway through, baste with the reserved garlic butter for extra flavor. When done, let the lobster tails rest for a couple of minutes before serving. Enjoy your delicious meal! When picking lobster tails, look for ones that feel firm. The shells should be hard and shiny. A fresh tail has a clean ocean smell, not a fishy one. Size matters too; larger tails usually mean more meat. Aim for tails that weigh about 6 to 8 ounces. You can find them in seafood shops or online. Start with unsalted butter for the best taste. Melt it gently over medium heat. Add minced garlic and cook until it's fragrant. This should take just 1-2 minutes. Be careful not to let it burn; burnt garlic tastes bitter. Once the garlic is cooked, mix in lemon juice, chopped parsley, and smoked paprika. This blend gives a rich flavor and nice color. Adjust salt and pepper to your taste. Cut the lobster tails with kitchen shears. This helps you access the meat easily. Pull the meat out and place it on top of the shell for a stunning look. Basting with garlic butter during baking keeps the meat moist. Bake at 425°F for 12-15 minutes. Look for meat that turns opaque, which means it’s ready to eat. Allow the tails to rest before serving; this keeps them juicy. Pro Tips Choose Fresh Lobster: Always opt for the freshest lobster tails available to enhance the flavor of your dish. Check for a firm shell and a fresh sea scent. Don’t Overcook: Keep an eye on the cooking time. Lobster tails can become tough if overcooked. They should be opaque and tender when done. Basting is Key: For extra flavor and moisture, baste the lobster tails with the garlic butter mixture halfway through cooking. Garnish Thoughtfully: Enhance the presentation by garnishing with additional lemon wedges and fresh parsley for a vibrant look on the plate. {{image_4}} You can play with flavors to make garlic butter lobster tails even better. Here are some ideas: - Herbs: Try adding thyme or tarragon for a fresh taste. - Spices: A dash of cayenne pepper adds heat without overpowering. - Citrus: Swap lemon juice for lime juice for a zesty twist. - Cheese: Sprinkle some grated Parmesan on top before baking for extra richness. Each of these additions can change the dish's flavor profile. Experimenting is fun and boosts your cooking skills! You can cook lobster tails in different ways, and each method offers unique flavors. - Grilling: Grilling gives a smoky flavor. Brush the lobster with garlic butter and grill for 6-8 minutes, turning halfway. - Baking: Baking is easy and keeps the lobster juicy. Follow the oven instructions for a perfect bake. Both methods work well. Choose the one that fits your style and the weather! Garlic butter lobster tails pair well with many sides. Here are some delicious options: - Rice: A light lemon rice complements the richness of the lobster. - Vegetables: Steamed asparagus or green beans add color and crunch. - Salad: A fresh Caesar salad brightens the meal. - Bread: Serve with crusty bread to soak up the garlic butter. These sides enhance the lobster experience. Mix and match to create your perfect meal! To keep your garlic butter lobster tails fresh, place them in an airtight container. Make sure to let them cool down first. Store the container in the fridge. Use the leftovers within two days for the best taste and texture. If you have leftover garlic butter, store it in a small jar. It can add flavor to other dishes later. When you are ready to enjoy your leftovers, preheat your oven to 350°F (175°C). Place the lobster tails on a baking sheet. Cover them with aluminum foil to keep moisture in. Heat for about 10-15 minutes until warm. Avoid using the microwave, as it can make the lobster rubbery. If you want to freeze your lobster tails, make sure they are cooked and cooled first. Wrap each tail in plastic wrap tightly, then put them in a freezer bag. Remove as much air as possible to prevent freezer burn. Lobster tails can stay in the freezer for up to three months. When ready to use, thaw them overnight in the fridge before reheating. You should use fresh lobster tails. They offer the best taste and texture. Look for tails that are firm and have a nice color. Avoid any that have a strong fishy smell. If fresh is not available, good quality frozen tails are a decent choice. Yes, you can use frozen lobster tails. Just make sure to thaw them properly. Place them in the fridge overnight or run them under cold water for a quicker thaw. This helps keep the meat moist and tender. Always check the packaging for any cooking instructions too. Lobster tails are done when the meat turns opaque and firm. You'll notice a white color instead of translucent. The internal temperature should reach 140°F (60°C). Use a food thermometer for the best results. If you cut into the meat, it should be slightly springy, not mushy. In this blog post, you learned how to make garlic butter lobster tails. We covered main ingredients, optional flavors, and key tools. I shared step-by-step instructions for preparing and cooking the dish. You also got tips on selecting fresh lobster tails and perfecting the garlic butter mix. In the end, enjoy this dish your way. Try different flavors and methods. Remember, cooking is fun and creative! Happy cooking!

Garlic Butter Lobster Tails Flavorful Dinner Delight

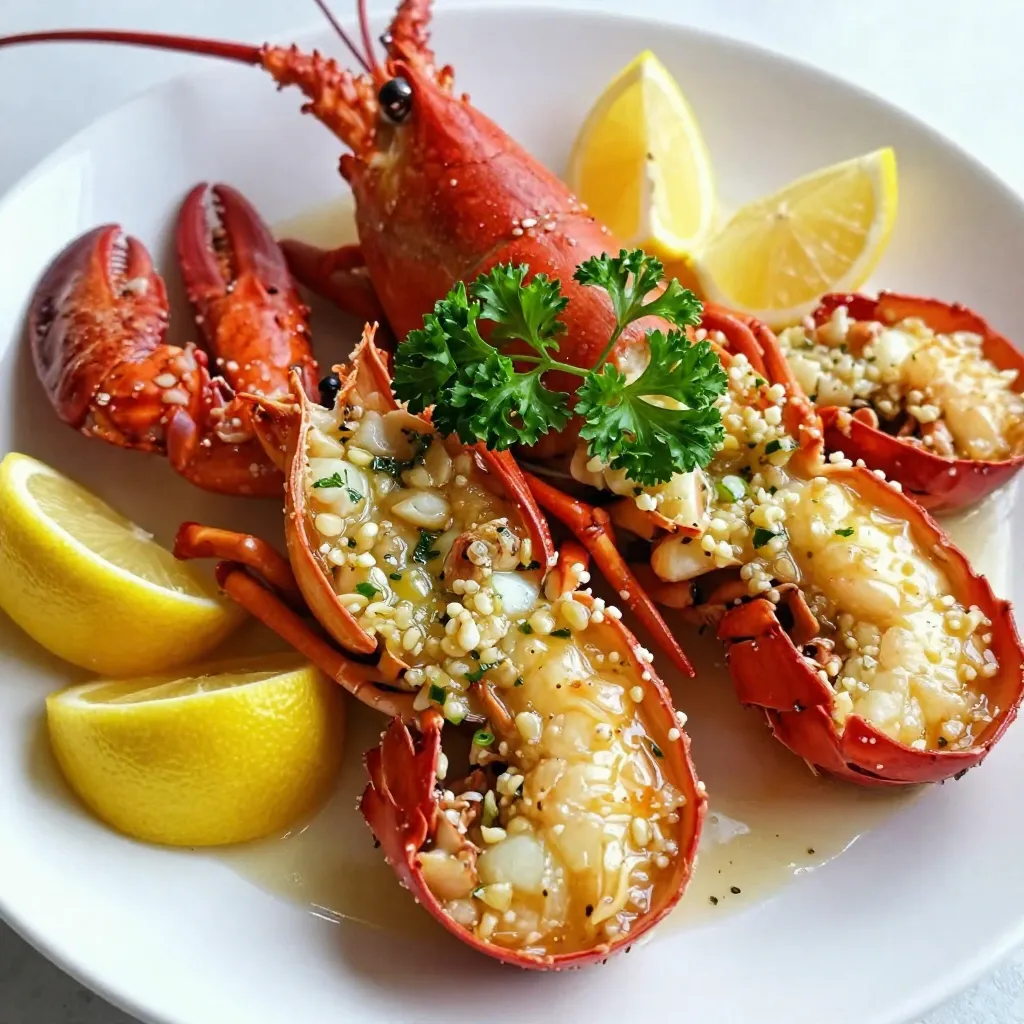
Looking to impress your dinner guests? Garlic Butter Lobster Tails are a surefire way to do just that! This simple

- 1 large head of cauliflower, cut into evenly sized florets - 4 cloves garlic, peeled and left whole - 1/4 cup cream cheese, softened to room temperature - 1/4 cup sour cream - 2 tablespoons unsalted butter, at room temperature These main ingredients form the base of our creamy garlic mashed cauliflower. The cauliflower provides a light and fluffy texture. Garlic adds a savory flavor that makes this dish shine. Cream cheese, sour cream, and butter bring a rich creaminess that elevates the dish. - 1/4 cup grated Parmesan cheese - Fresh chives, finely chopped, for garnishing Adding grated Parmesan gives a nice depth to the flavor. Fresh chives not only look great but also add a fresh, onion-like taste. These ingredients are not needed, but they can enhance your dish. - Salt and black pepper Salt and pepper are key to bringing out the flavors in this dish. You can adjust the amount based on your taste. A pinch of salt and a sprinkle of pepper can make a big difference. {{ingredient_image_2}} Start by cutting the cauliflower into small, even florets. This helps them cook evenly. Next, put enough salted water in a large pot to cover the florets. Bring the water to a rolling boil. Carefully add the cauliflower and garlic cloves. Cook for 10-12 minutes. You want the cauliflower to be fork-tender and the garlic soft. Once cooked, pour the cauliflower and garlic into a colander. Make sure to drain all the water. After draining, return them to the pot. Let them sit for about one minute. This step helps any extra moisture escape. Now, it’s time to mash! You can use a potato masher for a rustic texture. If you prefer smooth, use an immersion blender. Blend the cauliflower and garlic until creamy. Then, add the softened cream cheese, sour cream, and room temperature butter. Mix well until all ingredients blend together. For added flavor, fold in the grated Parmesan cheese if you want. This step is optional but gives a rich taste. Now, season with salt and freshly ground black pepper. Taste as you go. Adjust the seasoning until it's just right for you. Scoop the creamy mashed cauliflower into a serving bowl. For a beautiful finish, top it with finely chopped fresh chives. This adds a nice touch and a pop of color. You can also create a small well in the center and drizzle olive oil or melted butter for extra richness. Enjoy this delightful side dish! To get that smooth, creamy texture, start with warm ingredients. Cold cream cheese or butter can cause lumps. I recommend letting your cream cheese and butter sit out before you begin. This trick makes mixing easy and quick. When you blend, keep mashing until you see no lumps. To elevate your creamy garlic mashed cauliflower, think beyond garlic. You can add fresh herbs like thyme or rosemary for a new twist. A pinch of nutmeg also brings warmth. If you like some heat, consider a dash of cayenne pepper or smoked paprika. These spices add depth to the dish, making every bite exciting. Serving this dish can be fun and creative. For a beautiful look, use a serving bowl that contrasts with the cauliflower's color. Create a small well in the center of the mash. Drizzle some olive oil or melted butter in this well. Top with extra chives or Parmesan to impress your guests. A simple touch makes it elegant and inviting. Pro Tips Choose the Right Cauliflower: Opt for a large, firm head of cauliflower with tightly packed florets for the best texture and flavor. Control the Creaminess: Adjust the amount of cream cheese and sour cream based on your preference for creaminess and tanginess. Enhance the Garlic Flavor: For a stronger garlic flavor, roast the garlic cloves before adding them to the cauliflower for a sweeter, more mellow taste. Garnish Creatively: Experiment with different herbs like parsley or dill for garnishing to add a fresh twist to the dish. {{image_4}} To make this dish dairy-free, swap out the cream cheese and sour cream. You can use cashew cream or coconut cream instead. Both options give a rich, creamy flavor that works well. You can blend soaked cashews with water until smooth. This change keeps the texture and taste amazing while making it dairy-free. Want to boost nutrition? Add other veggies! Spinach and broccoli are great choices. For spinach, just stir it in after mashing. It wilts down quickly, adding color and health benefits. For broccoli, steam it separately and mix it in with the cauliflower. This adds a fun crunch and extra flavor. If you enjoy heat, you can spice it up! Add red pepper flakes to the mix. Start with a pinch and taste as you go. You can also add jalapeños or hot sauce for more kick. A little spice brings a new depth to the creamy garlic flavor. Store your creamy garlic mashed cauliflower in airtight containers. This keeps it fresh and tasty. Let it cool before sealing to avoid steam buildup. You can keep it in the fridge for up to three days. For best taste, use it sooner rather than later. When reheating, make sure to add a splash of cream or milk. This helps keep it creamy and smooth. Stir it often over low heat. You can also use the microwave. Heat it in short bursts, stirring in between. This way, it warms evenly without drying out. To freeze mashed cauliflower, let it cool completely first. Place it in freezer-safe bags or containers. Remove as much air as possible to prevent freezer burn. It can last up to three months in the freezer. When ready to eat, thaw it overnight in the fridge. Reheat as mentioned above to restore its creamy texture. Yes, you can prepare creamy garlic mashed cauliflower ahead of time. To do this, follow these tips: - Cook and Mash: Make the mashed cauliflower as usual. Let it cool slightly. - Store: Place it in an airtight container. Refrigerate for up to three days. - Reheat: Warm it in the microwave or on the stove. Add a splash of cream or butter to keep it creamy. This recipe saves well and allows you to enjoy it later. Yes, creamy garlic mashed cauliflower is low in carbs. Here’s why: - Cauliflower: This vegetable has fewer carbs than potatoes. A cup of cauliflower has about 5 grams of carbs. - Creamy Add-ins: The cream cheese and sour cream add richness but keep the carb count low. This dish is perfect if you're watching your carb intake. You can pair this dish with many main courses. Here are some great options: - Grilled Chicken: The creamy texture balances the flavors of grilled chicken. - Steak: Mashed cauliflower complements the richness of steak. - Roasted Vegetables: Pair it with seasonal roasted veggies for a colorful plate. Feel free to mix and match your favorite dishes for a complete meal! In this post, we explored how to make creamy garlic mashed cauliflower. We covered key ingredients like cauliflower, garlic, and cream cheese. You learned step-by-step instructions for preparation, mashing, and seasoning. Helpful tips showed how to get the best texture and flavor. I also shared options for variations and storage advice. Creamy garlic mashed cauliflower is a tasty and versatile dish. Feel free to experiment with flavors and serve it however you like!

Creamy Garlic Mashed Cauliflower Delightful Side Dish

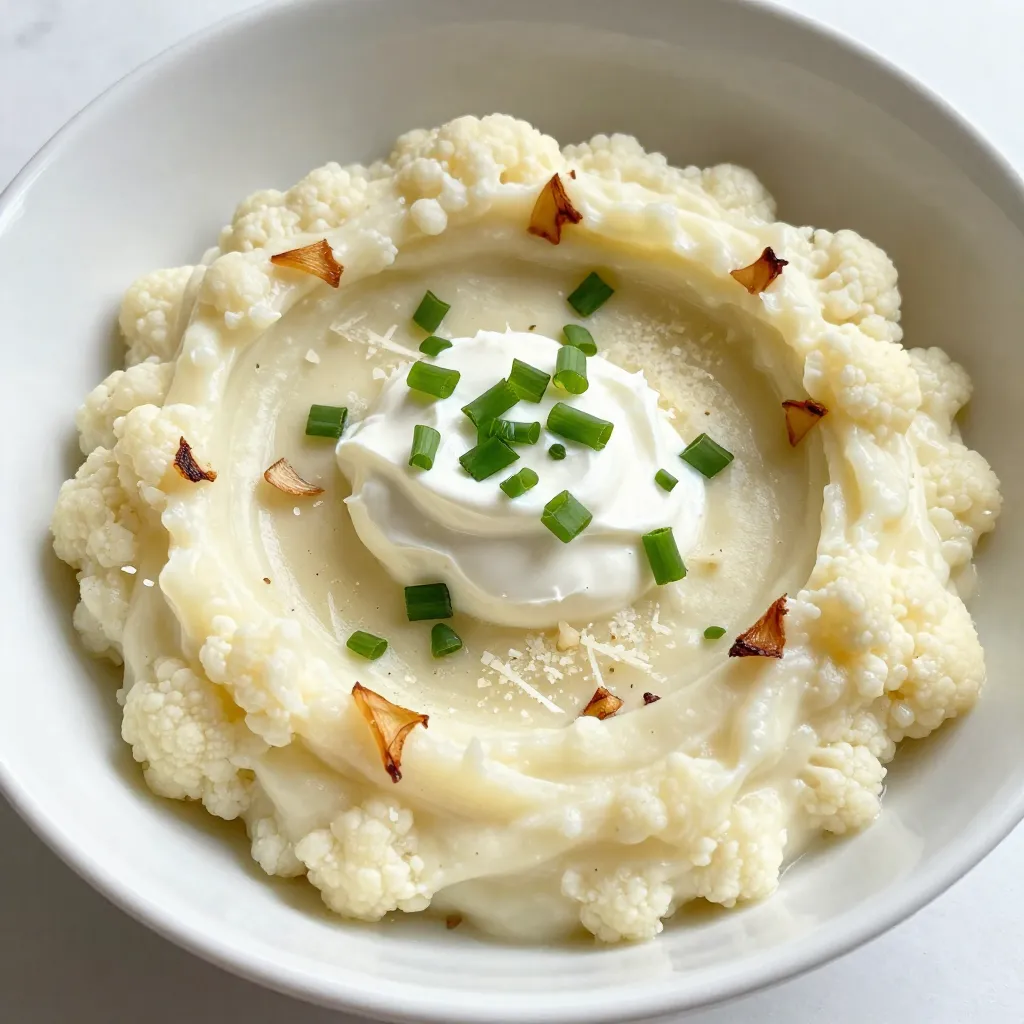
Looking for a healthier alternative to traditional mashed potatoes? Creamy Garlic Mashed Cauliflower is the answer! This delightful side dish

To create a rich and creamy salted caramel hot chocolate, gather the following ingredients: - 2 cups whole milk - 1/2 cup heavy cream - 1/2 cup semi-sweet chocolate chips - 1/4 cup salted caramel sauce (plus extra for drizzling) - 1 teaspoon pure vanilla extract - A pinch of flaky sea salt - Whipped cream (for topping) - Optional: Dark chocolate shavings (for garnish) Each ingredient plays a key role in crafting this cozy drink. Whole milk and heavy cream give a smooth and creamy base. Semi-sweet chocolate chips add depth and richness. Salted caramel sauce brings a sweet and salty twist that makes this drink special. Pure vanilla extract enhances the flavor, while flaky sea salt adds a delightful contrast. Topping with whipped cream creates a fluffy finish. Dark chocolate shavings are a fun touch for extra flavor and looks. Gather these ingredients, and you are on your way to a delightful treat. This hot chocolate is not just a drink; it’s a warm hug in a mug! {{ingredient_image_2}} 1. Heating the milk and cream Start by taking a medium saucepan. Pour in 2 cups of whole milk and 1/2 cup of heavy cream. Set the heat to medium. Warm the mixture gently, stirring often. You want it hot but not boiling. 2. Incorporating chocolate and caramel When the milk and cream are warm, it’s time to add flavor. Gradually whisk in 1/2 cup of semi-sweet chocolate chips and 1/4 cup of salted caramel sauce. Keep whisking until everything melts together. The mix should look creamy and smooth. 3. Adding flavorings Next, stir in 1 teaspoon of pure vanilla extract. Add a pinch of flaky sea salt for that perfect salty touch. Mix well to ensure all flavors blend evenly. 1. Pouring into mugs Carefully remove the saucepan from the heat. Pour the hot chocolate into two mugs or heatproof cups. Make sure to share equally, so both cups are filled with this rich drink. 2. Topping with whipped cream and caramel Now, it’s time for the fun part! Top each mug with a fluffy layer of whipped cream. Then, drizzle extra salted caramel sauce on top. This adds a sweet, sticky finish that is simply delightful. 3. Adding decorative garnishes For a fancy touch, sprinkle dark chocolate shavings over the whipped cream. This adds both beauty and extra chocolate flavor. Your salted caramel hot chocolate is now ready to enjoy! To make the best salted caramel hot chocolate, focus on the consistency. You want it creamy, not too thick or thin. Start with whole milk and heavy cream for that rich texture. Heat them gently together, stirring often. You should see steam rising, but don’t let it boil. Using high-quality chocolate is key. I like semi-sweet chocolate chips for a nice balance of sweetness and richness. They melt well and blend smoothly into the drink. Always whisk them in gradually for the best results. You can add fun flavors to your hot chocolate. Try a dash of peppermint extract for a minty twist. A sprinkle of cinnamon can add warmth, too. For toppings, think beyond whipped cream. Drizzle more salted caramel sauce on top for that extra sweetness. Dark chocolate shavings add a nice crunch and look great. You can even use crushed nuts for texture and flavor. Pro Tips Use Quality Chocolate: Opt for high-quality semi-sweet chocolate chips for a richer flavor in your hot chocolate. Control the Sweetness: Adjust the amount of salted caramel sauce based on your sweetness preference; less for a more intense chocolate flavor. Whip Your Cream: For an extra fluffy topping, whip the cream until soft peaks form before adding it to your hot chocolate. Garnish Creatively: Experiment with garnishes like crushed nuts, marshmallows, or a sprinkle of cinnamon for added texture and flavor. {{image_4}} You can enjoy a vegan version of salted caramel hot chocolate. First, swap whole milk and heavy cream with your favorite plant-based milk. Almond milk, coconut milk, or oat milk work well. Each adds a unique flavor and texture. Next, choose vegan chocolate options. Look for semi-sweet chocolate chips that are dairy-free. Many brands offer these, so you can find one that suits your taste. Check the label to ensure they are vegan-friendly. If you want to cut back on sugar, you can easily make this drink healthier. Start by swapping regular caramel sauce with a sugar-free version. You can find these in stores or make your own. For sweetening, choose natural sweeteners like maple syrup or stevia. These alternatives can help you enjoy the flavor without the extra sugar. Adjust the amount based on your taste, and remember that a little goes a long way. By making these small changes, you can still enjoy a rich and cozy drink while meeting your dietary needs. To store your salted caramel hot chocolate, let it cool first. Pour the drink into an airtight container. You can keep it in the fridge for up to three days. If you want to enjoy it later, note that the flavors will still be great. Just remember to give it a good shake before using it. When you're ready to enjoy your leftover hot chocolate, pour it into a saucepan. Heat it over low heat. Stir it gently as it warms. This helps keep the texture smooth and creamy. If you find it too thick, you can add a splash of milk. This will bring it back to the right consistency. Enjoy your cozy treat! You can use whole milk or coconut milk. Both options will still give you a rich flavor. If you want a thicker drink, add a bit of butter to the milk. This will help mimic the creaminess of heavy cream. Yes, you can! Prepare it as normal, then let it cool. Store it in the fridge for up to three days. When you want to enjoy it, just reheat it gently on the stove. Stir well to mix everything before serving. You can find premade salted caramel hot chocolate at most grocery stores. Look for it in the drink mix aisle or near the coffee section. Some cafes also offer it as a seasonal drink, especially in winter. This blog post covered how to make a rich salted caramel hot chocolate. I shared ingredients like whole milk, chocolate chips, and whipped cream to create a delicious drink. You learned step-by-step instructions for preparing and serving it, plus tips to get the best flavor. We also talked about interesting variations for vegan or low-sugar options. In the end, you can enjoy hot chocolate in many ways, perfect for any occasion. Try these tips and make your own delightful version!

Salted Caramel Hot Chocolate Irresistible Cozy Treat

Cozy up with a mug of Salted Caramel Hot Chocolate, the perfect treat for chilly days. This drink combines rich

To make Cheesy Spinach Stuffed Chicken, gather the following ingredients: - 4 boneless, skinless chicken breasts - 2 cups fresh spinach, chopped - 1 cup cream cheese, softened to room temperature - 1 cup shredded mozzarella cheese - 1/2 cup grated Parmesan cheese - 2 cloves garlic, minced - 1 teaspoon onion powder - 1/2 teaspoon red pepper flakes (optional for heat) - Salt and pepper to taste - 2 tablespoons olive oil, divided - Fresh herbs (like parsley or basil) for garnish These ingredients come together to create a tasty dish. The chicken serves as a tender canvas for the rich and creamy filling. Fresh spinach adds a healthy touch, while the cheeses provide a delightful melt-in-your-mouth experience. Garlic and onion powder enhance the flavors, making each bite a joy. You can choose to add red pepper flakes for a bit of spice if you like. Using high-quality ingredients makes a big difference in flavor. Always try to source fresh spinach and good-quality cheese. This ensures your dish stands out. Enjoy preparing these ingredients, as they will lead to a meal you'll want to share with family and friends. {{ingredient_image_2}} Set your oven to 375°F (190°C). Preheating is key for even cooking. A hot oven helps the chicken cook well and stay juicy. In a bowl, mix together chopped spinach, cream cheese, mozzarella, and Parmesan. Add minced garlic, onion powder, and red pepper flakes if you like heat. Season with salt and pepper to taste. Mix until creamy and smooth. Take each chicken breast and place it on a cutting board. Butterfly it by slicing it horizontally, but do not cut all the way through. This creates a pocket to hold the filling. Fill each chicken pocket with the spinach and cheese mix. Be generous! If needed, use toothpicks or kitchen twine to close the pocket. This keeps the filling inside while cooking. Sprinkle salt and pepper on the outside of each stuffed chicken breast. Drizzle olive oil for flavor. Heat an oven-safe skillet over medium-high heat. Add the chicken and sear for 3-4 minutes on each side. You're looking for a nice golden brown crust. After searing, transfer the skillet to the preheated oven. Bake for 20-25 minutes. The chicken should reach an internal temperature of 165°F (75°C) to be safe to eat. Let the chicken rest for a few minutes after baking. This keeps it juicy. Remove any toothpicks or twine. Before serving, sprinkle fresh herbs on top for color and taste. To get the best filling, mix your ingredients well. You want a creamy blend. Start with softened cream cheese. Then, add the chopped spinach, mozzarella, and Parmesan. Mix in minced garlic and onion powder. If you like heat, toss in red pepper flakes. Always season with salt and pepper. The right texture makes a big difference. It should hold together but still be spreadable. To keep your chicken moist, don’t overcook it. Use a meat thermometer for accuracy. Chicken is done at 165°F (75°C). Also, let it rest after baking. This helps the juices settle back in. Searing the chicken first adds flavor and locks in moisture. Remember to drizzle olive oil before cooking. This small step helps a lot. You can change how you cook this dish. Try grilling the stuffed chicken for a smoky flavor. Just be careful not to let the filling spill out. Air frying is another option. It cooks fast and makes the chicken crispy. Set your air fryer to 375°F (190°C) and cook for about 20 minutes. These methods can add fun twists to your meal! Pro Tips Use Fresh Spinach: Always opt for fresh spinach for the best flavor and texture in your stuffing. It will enhance the overall taste of the dish. Butterfly Carefully: When butterflying the chicken, take your time to ensure the pocket is deep enough to hold the filling without breaking through the other side. Secure the Filling: If you're worried about the filling leaking out, use toothpicks or kitchen twine to secure the openings after stuffing the chicken breasts. Let it Rest: Allow the chicken to rest for a few minutes after baking. This step is crucial for keeping the chicken juicy and tender. {{image_4}} You can use many types of cheese for your filling. For a creamier texture, try using ricotta or goat cheese. If you want a sharper taste, consider cheddar or blue cheese. For those who prefer vegan options, use cashew cheese or tofu cream cheese. These substitutes keep the dish creamy while being plant-based. While spinach is great, you can swap it for other leafy greens. Kale, Swiss chard, or collard greens work well. These greens add unique flavors and nutrients. Just remember to chop them finely for easy stuffing. Adding herbs and spices can really enhance the taste. Consider using basil, thyme, or oregano for a fresh twist. If you enjoy heat, add cayenne pepper or smoked paprika. These spices can make your dish pop and keep it exciting. To keep your cheesy spinach stuffed chicken fresh, place leftovers in an airtight container. Refrigerate them right away to prevent bacteria. The stuffed chicken lasts for 3-4 days in the fridge. Before eating, check for any off smells or colors to ensure it's still good. You can freeze stuffed chicken for later. First, let the chicken cool completely. Wrap each piece tightly in plastic wrap, then place them in a freezer-safe bag. This helps prevent freezer burn. The chicken can stay in the freezer for up to 3 months. For reheating, move the chicken to the fridge to thaw overnight. If you need it faster, thaw it in cold water for about an hour. Always reheat the chicken to an internal temperature of 165°F (75°C) before serving. Enjoy that cheesy goodness again! Yes, you can prep the Cheesy Spinach Stuffed Chicken ahead. Here’s how: - Prepare the filling: Mix the spinach, cream cheese, and cheeses in advance. - Stuff the chicken: Fill the chicken breasts and secure them. - Store: Wrap each breast tightly in plastic wrap. Place them in the fridge. - Cook later: You can bake them the next day. Just add a few extra minutes to the bake time. Pairing sides enhances your meal. Here are some great options: - Garlic bread: A classic choice that everyone loves. - Roasted veggies: Carrots, zucchini, or bell peppers add color and flavor. - Simple salad: A fresh green salad with light dressing complements the dish. - Mashed potatoes: Creamy potatoes balance the flavors nicely. Check the internal temperature for safety. Use a meat thermometer to ensure the chicken reaches: - 165°F (75°C): This is the safe cooking temperature for chicken. - Juices run clear: If you cut into the chicken, the juices should not be pink. Yes, frozen spinach works well too. Here’s what to consider: - Thaw and drain: Make sure to thaw it fully and squeeze out extra water. - Flavor adjustment: Frozen spinach may have a milder taste, so adjust seasoning as needed. - Same filling process: Use it the same way as fresh in your filling mix. This blog post guides you through making cheesy spinach stuffed chicken. You learned about the needed ingredients, step-by-step instructions, and useful tips to ensure success. Remember to preheat your oven and secure your chicken well. Feel free to experiment with different cheeses and greens for variety. Follow proper storage methods to enjoy leftovers later. With these tips, your dish will impress every time. Happy cooking!

Cheesy Spinach Stuffed Chicken Delightful and Easy Meal

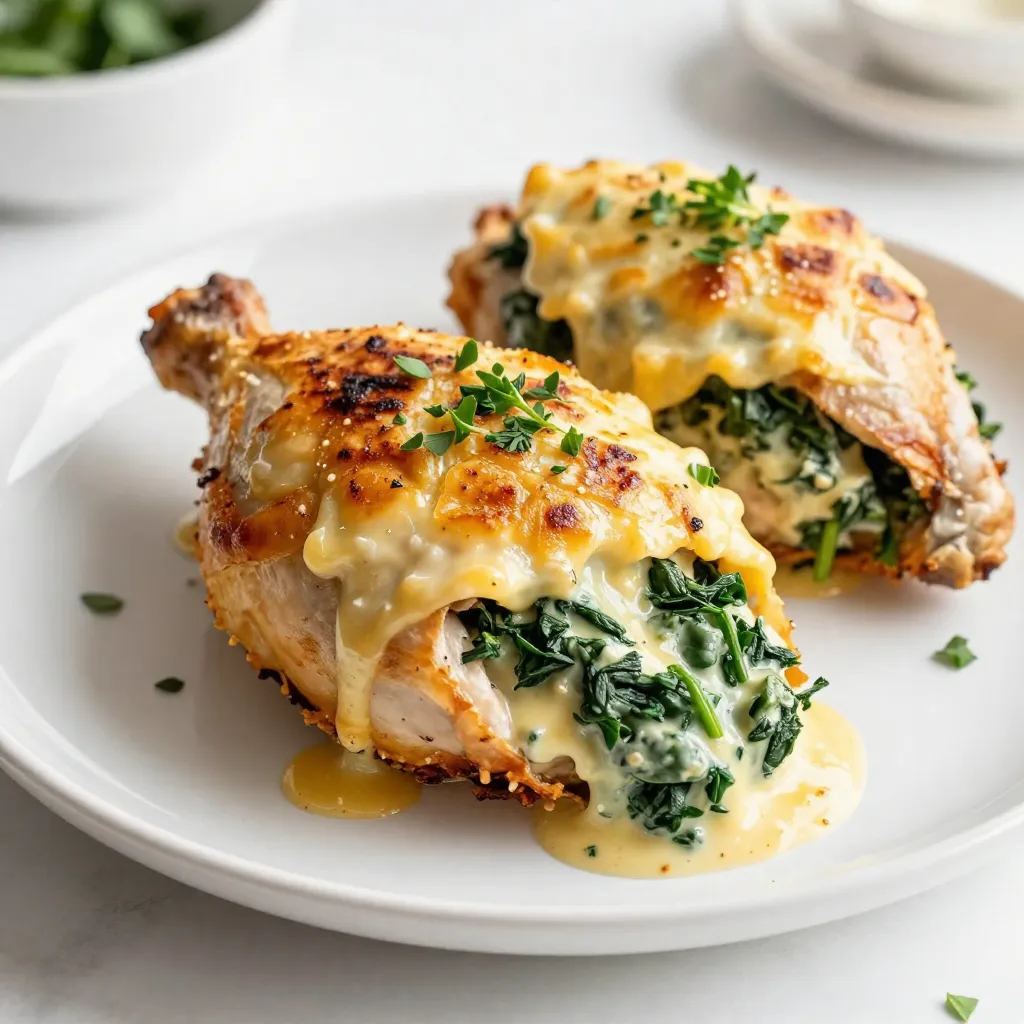
Looking for a simple yet flavorful meal? Cheesy Spinach Stuffed Chicken is the perfect dish! This recipe combines juicy chicken

- 4 bone-in, skin-on chicken thighs - 4 cloves of garlic, finely minced - 2 tablespoons fresh rosemary, finely chopped - 2 tablespoons fresh thyme, finely chopped - 1 teaspoon smoked paprika - 1 teaspoon kosher salt - ½ teaspoon freshly ground black pepper - 3 tablespoons extra virgin olive oil - 1 lemon, thinly sliced - Fresh parsley leaves for garnishing Gather these ingredients to make a delightful dish. The chicken thighs have rich flavors and juicy meat. Garlic adds a nice aroma, while rosemary and thyme bring freshness. Smoked paprika gives a warm color and a hint of spice. Kosher salt and black pepper enhance the taste. Olive oil keeps the chicken moist and helps it brown well. Lemon slices add a zesty touch, brightening the dish. Lastly, parsley adds a lovely splash of color on top. Prepare these ingredients for a simple yet tasty meal that everyone will enjoy! {{ingredient_image_2}} Preheating your oven to 400°F (200°C) is key. This high temperature helps the chicken roast evenly. A hot oven also gives the skin a nice, crispy texture. Before starting, double-check that your oven is empty. This ensures nothing interferes with cooking. In a bowl, mix 4 cloves of minced garlic, 2 tablespoons of chopped rosemary, and 2 tablespoons of chopped thyme. Add 1 teaspoon of smoked paprika, 1 teaspoon of kosher salt, and ½ teaspoon of black pepper. Finally, pour in 3 tablespoons of olive oil. This mix will be your marinade. Stir well until it combines. The oil helps the flavors soak into the chicken. Take 4 bone-in, skin-on chicken thighs and pat them dry with paper towels. A dry surface is crucial for crispy skin. Next, rub the herb mixture on the thighs, making sure to get some underneath the skin. This allows the herbs to infuse the meat fully. Place the seasoned chicken thighs in a large oven-safe skillet or baking dish. Make sure the skin side is up. Now, take a lemon and slice it thinly. Arrange the lemon slices around the chicken. As the chicken cooks, the lemon will add a fresh flavor. Roast the chicken for 35-40 minutes. Use a meat thermometer to check if the internal temperature reaches 165°F (75°C). The skin should be a beautiful, golden brown. This means your chicken is ready and looks great. Once cooked, remove the chicken from the oven and let it rest for about 5 minutes. Resting helps the juices stay in the meat. Just before serving, sprinkle fresh parsley leaves on top. This adds color and a burst of freshness to your dish. To get crispy skin on your chicken thighs, start with drying them well. Use paper towels to pat the skin until it feels dry. This step helps remove excess moisture. Moisture can lead to soggy skin, which is not what we want. Next, render the fat properly during roasting. Place the chicken skin-side up in the oven. This allows the fat to drip down and crisp up the skin. Roasting at 400°F (200°C) helps achieve that golden brown look. You can boost the flavor of your chicken with more herbs and spices. Try adding oregano or basil for a twist. These herbs pair well with garlic and rosemary. You can also use red pepper flakes for a bit of heat. Adding citrus juices enhances flavor too. Squeeze some lemon juice over the chicken before roasting. The acidity brightens the dish and keeps it fresh. If you want to try other cooking methods, consider grilling or air frying. Grilling adds a smoky flavor that is hard to resist. For air frying, cook at 375°F (190°C) for about 25-30 minutes. Adjust cooking times and temperatures for these methods. The key is to monitor the internal temperature. It should reach 165°F (75°C) to ensure it is safe to eat. Enjoy experimenting with these techniques! Pro Tips Dry the Chicken Thighs: Pat the chicken thighs dry with paper towels before seasoning. A dry surface ensures crispy skin by allowing the fat to render properly during roasting. Use a Meat Thermometer: To ensure perfectly cooked chicken, use a meat thermometer to check that the internal temperature has reached 165°F (75°C). Let It Rest: After roasting, let the chicken rest for about 5 minutes before serving. This allows the juices to redistribute, making the meat more tender and juicy. Enhance Flavor with Fresh Herbs: Garnish the chicken with fresh parsley just before serving to add a pop of color and a fresh flavor that complements the roasted dish. {{image_4}} You can easily switch herbs in this recipe. If you have dried herbs, they work just as well. Use about one-third the amount of dried herbs. For fresh herbs, try basil or oregano. They add a nice twist to the chicken. Want to make it a one-pan meal? Add veggies like carrots and potatoes. They soak up the flavors from the chicken. You can roast them together for a complete dish. Just cut them into even pieces for even cooking. Switch up the oils for different flavors. Try avocado oil for a buttery taste. You can also use soy sauce or honey for a sweet glaze. For a zingy kick, use vinegar or citrus juice. These changes add a new twist to your chicken. To store cooked chicken, let it cool first. Place the chicken thighs in a shallow dish. Cover it tightly with plastic wrap or aluminum foil. This helps keep the chicken fresh. You can store it in the fridge for up to four days. If it smells or looks off, throw it away. If you have extra chicken, freezing is a great option. First, let the chicken cool down. Wrap each thigh in plastic wrap, then place them in a freezer bag. Make sure to remove as much air as you can. Label the bag with the date. You can freeze the chicken for up to three months. When you are ready to eat, thaw it in the fridge overnight. For reheating, place it in a 350°F (175°C) oven until hot. For refrigeration, use airtight containers or wrap the chicken well. Glass containers or heavy-duty plastic work best. When freezing, use freezer-safe bags or containers. To avoid freezer burn, make sure there is little air left in the bags. Consider using a vacuum sealer for long storage. To check chicken thighs, use a meat thermometer. Insert it into the thickest part of the thigh. The safe internal temperature is 165°F (75°C). This ensures the chicken is safe to eat. If you don’t have a thermometer, look for clear juices. When you cut into the thigh, the juices should run clear. The meat should also feel firm and not jiggly. Yes, you can use skinless chicken thighs. They will cook faster, so adjust your time. Skinless thighs may not be as crispy or flavorful. For added flavor, you can marinate them longer. You can also try adding a bit more oil or fat to the pan. This helps mimic the richness that skin provides. Great sides for this dish include roasted vegetables or a fresh salad. Try pairing it with mashed potatoes or rice for a hearty meal. You can also serve it with crusty bread to soak up the juices. For a complete meal, think about adding a simple dessert, like fruit salad. This makes a balanced and tasty dinner. To make delicious garlic herb roasted chicken thighs, you need fresh ingredients and clear steps. We explored the marinade, seasoning, and roasting techniques for juicy, flavorful meat. Tips for crispy skin and variations add extra flair. Proper storage ensures your leftovers stay fresh. Trust these techniques for future meals. Enjoy creating dishes that impress and satisfy. Your cooking journey starts here; embrace the fun!

Garlic Herb Roasted Chicken Thighs Tasty and Simple Meal

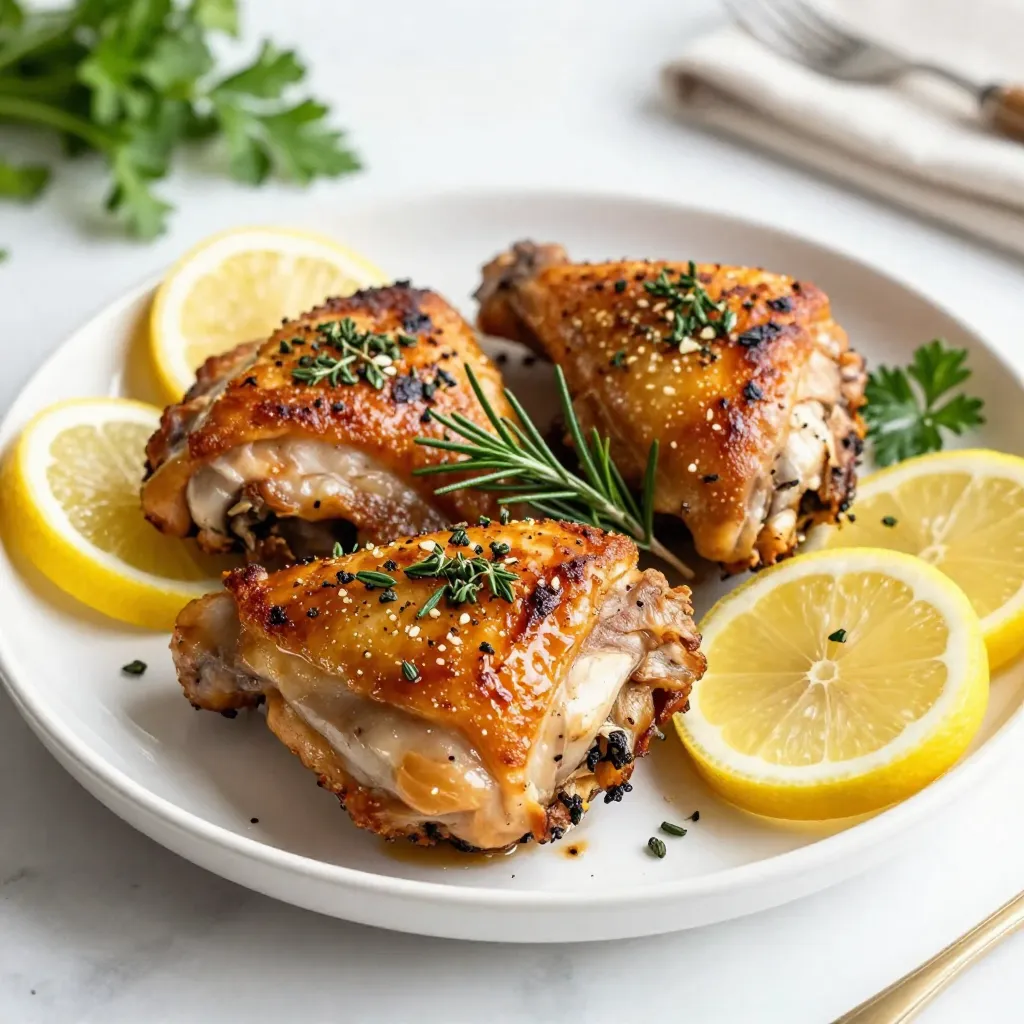
Looking for a simple, tasty meal that impresses? Look no further than garlic herb roasted chicken thighs! This dish features

- 4 cups water - 2 tablespoons fresh ginger, peeled and thinly sliced - 2 ripe peaches, pitted and sliced into wedges - 4 black tea bags (or 4 teaspoons of loose leaf black tea) - 2 tablespoons honey (adjust to taste) - 1 tablespoon fresh lemon juice - Ice cubes - Fresh mint leaves (for garnish) Gather these fresh and simple ingredients for a great summer drink. The water forms the base, while the fresh ginger adds spice. Ripe peaches give sweetness and a lovely color. Black tea brings depth to the drink. Honey sweetens the tea, but you can change it to fit your taste. Lemon juice adds a bright twist. Ice cubes keep it cool and refreshing. Lastly, mint leaves make a nice touch on top. These ingredients create a balance of flavors that will keep you coming back for more. Enjoy each sip, and let the taste of summer fill your glass. {{ingredient_image_2}} 1. Start by boiling 4 cups of water in a medium pot over medium-high heat. 2. Once the water boils, add 2 tablespoons of thinly sliced fresh ginger. Reduce the heat to low and let it simmer for 5–7 minutes. This step helps to release the strong flavor of the ginger. 3. After simmering, remove the pot from heat. Add 4 black tea bags to the pot and let them steep for 5 minutes. This allows the tea to soak up the ginger flavor. 1. With the mixture still warm, take out the tea bags and ginger slices. Stir in 2 tablespoons of honey until it fully dissolves. You can adjust the amount of honey based on your taste. 2. Next, add the sliced peaches to the warm tea. Use the back of a spoon to press the peach slices gently. This will help release their sweet juices into the tea. 3. Finally, mix in 1 tablespoon of fresh lemon juice for a nice zesty kick. 1. Allow the tea to cool to room temperature. This usually takes about 15-20 minutes. 2. Once cooled, strain the tea through a fine mesh sieve into a pitcher. This removes the peach solids and gives you a smooth drink. 3. Place the pitcher in the refrigerator and chill the tea for 1-2 hours. 4. To serve, fill tall glasses with ice cubes. Pour the chilled ginger peach iced tea over the ice. Garnish with fresh mint leaves for a nice touch. - Adjusting sweetness with honey: Start with 2 tablespoons of honey. Taste the tea after mixing. If it's not sweet enough, add more honey until it suits your taste. - Choosing the right tea: Use black tea for a strong base. You can also try green tea for a lighter flavor. Each tea brings its own notes to the drink. - Tips for fresh ginger preparation: Peel the ginger with a spoon for easy removal. Slice it thin to release more flavor when simmering. Fresh ginger adds a spicy kick that balances the sweetness of peaches. - Garnishing ideas with mint and peaches: Add a few fresh mint leaves to each glass. This adds color and aroma. You can also place a peach slice on the rim for a fun touch. - Choosing the right glassware: Clear tall glasses work best for iced tea. They show off the beautiful color of the tea. Use glasses that hold ice well to keep your drink cold longer. Pro Tips Use Fresh Ingredients: Always opt for ripe, fresh peaches and high-quality black tea for the best flavor. Adjust Sweetness: Taste the tea before serving and adjust the honey according to your preference for sweetness. Serve with Style: Adding a peach slice and mint sprig to each glass not only enhances presentation but also adds an aromatic touch. Experiment with Teas: Feel free to try different tea varieties, like green or herbal, to create unique flavor profiles. {{image_4}} You can make ginger peach iced tea more fun by adding herbs. Mint gives a cool taste, while basil adds a sweet twist. Just toss in a few fresh leaves when you steep the tea. You can also try citrus fruits. Oranges or limes bring a bright flavor that pairs well with the peach. If you want to change the sweetness, use agave nectar or stevia. Both options are natural and lower in calories. You can also try flavored syrups. Vanilla or peach syrup can add a unique touch to your drink. Cold brew is a simple way to make ginger peach iced tea. Start by adding cold water, ginger, and tea bags into a pitcher. Let it steep in the fridge for about 6-12 hours. This method gives a smooth and less bitter flavor. Adjust steeping time based on your taste. Try shorter times for a lighter flavor and longer for a stronger taste. To keep your ginger peach iced tea fresh, store it in a pitcher. Use a tight lid or plastic wrap to cover it. This will help keep the flavors strong. You should chill the tea in the fridge for up to 3 days. After that, the taste may fade. If you want to save iced tea for later, freezing is a great choice. Pour the tea into ice cube trays or freezer-safe containers. Leave some space at the top to allow for expansion as it freezes. To enjoy later, thaw the tea in the fridge overnight. You can also use a microwave on low power. After thawing, stir the tea before serving for even flavor. Ginger peach iced tea stays fresh for up to 5 days in the fridge. To keep it tasting great, store it in a sealed container. This helps keep flavors and aromas strong. If you notice any strange smells or colors, it's best to toss it. Yes, you can use decaffeinated tea. This change will not harm the drink's flavor. The ginger and peaches still shine through. Just keep in mind that the tea's taste may be milder. If you enjoy a stronger flavor, adjust the steeping time slightly. Ginger peach iced tea offers great health perks. Ginger helps with digestion and may reduce nausea. It can also ease inflammation. Peaches are rich in vitamins A and C. They support healthy skin and boost your immune system. Enjoying this drink gives you hydration and taste in one! In this blog post, we explored how to make refreshing ginger peach iced tea. We covered the ingredients, preparation steps, and how to enhance flavors. I shared tips for presentation and variations to suit your taste. Proper storage methods were also discussed for keeping your tea fresh. Enjoying this drink not only cools you down but also offers health benefits. I encourage you to try making it at home. You’ll find it easy and rewarding. Experience the perfect balance of flavors with each sip. Happy brewing!

Ginger Peach Iced Tea Refreshing Summer Beverage

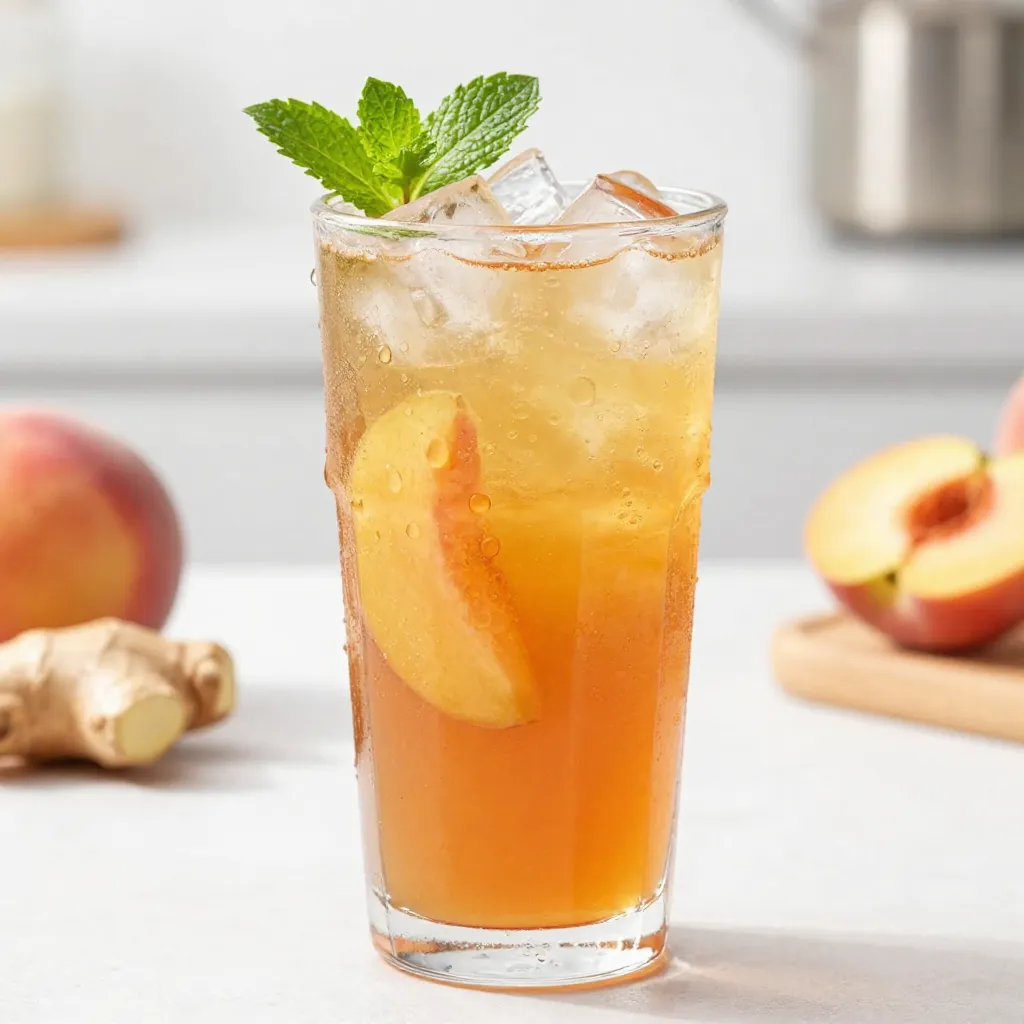
Looking for a refreshing drink to cool off this summer? Ginger Peach Iced Tea is your answer! This delightful blend

- 4 boneless, skinless chicken breasts - 1 cup panko bread crumbs - ½ cup grated Parmesan cheese - 2 teaspoons garlic powder - 1 teaspoon onion powder - 1 teaspoon dried Italian herbs (oregano, basil, thyme) - ½ teaspoon salt - ½ teaspoon black pepper - 2 large eggs - 2 tablespoons milk - 3 tablespoons olive oil - Fresh parsley, finely chopped, for garnish To make the Crispy Baked Garlic Parmesan Chicken, you need simple ingredients. First, gather your chicken breasts. They are the star of the dish and must be boneless and skinless. The next must-have is panko bread crumbs. This special type of bread crumb gives the chicken its crunchy texture. Grated Parmesan cheese adds a rich flavor that pairs well with the chicken. For the seasonings, garlic powder and onion powder provide depth. Dried Italian herbs bring a nice blend of flavors. Don't forget the salt and pepper to enhance everything. For the coating mixture, whisk together eggs and milk. This helps the breading stick. Olive oil adds moisture and helps the chicken brown nicely. Lastly, fresh parsley is for garnish. It adds color and a fresh taste. These ingredients come together to create a delightful meal that is sure to impress. {{ingredient_image_2}} First, you need to preheat your oven to 400°F (200°C). This step warms the oven, so your chicken cooks evenly. Next, prepare a baking sheet by lining it with parchment paper. This makes cleanup easy and helps the chicken not stick. In a shallow bowl, combine 1 cup of panko bread crumbs, ½ cup of grated Parmesan cheese, 2 teaspoons of garlic powder, 1 teaspoon of onion powder, and 1 teaspoon of dried Italian herbs. You should also add ½ teaspoon of salt and ½ teaspoon of black pepper. Stir everything together until it is well mixed. In another bowl, whisk together 2 large eggs and 2 tablespoons of milk. Make sure it's smooth and mixed well. Take each chicken breast and dip it into the egg mixture first. Let any extra egg drip back into the bowl. Next, coat the chicken in the panko mixture. Press down gently to ensure you cover the chicken well. Place the coated chicken breasts on the baking sheet in a single layer. Make sure not to overcrowd them. Drizzle 3 tablespoons of olive oil over each piece for even browning. Put the baking sheet in the oven. Bake the chicken for 25 to 30 minutes. You want it to turn golden brown and reach an internal temperature of 165°F (75°C). If you like extra crispiness, you can broil the chicken for an additional 2 to 3 minutes at the end. Once you take the chicken out of the oven, let it rest for about 5 minutes. This helps the juices go back into the meat, keeping it moist. Before serving, sprinkle freshly chopped parsley on top. This adds a nice touch of color and flavor. To get that perfect crunch, use panko bread crumbs. They are lighter and flakier than regular crumbs. This helps create a nice, crispy layer. Drizzle olive oil over the chicken. This oil helps the crumbs brown and crisp up in the oven. You will love how golden and crunchy the chicken turns out. Avoid overcrowding the baking sheet. If the chicken pieces touch, they will steam instead of crisp. Give each piece space to breathe. Also, don’t skip the resting period after baking. Allow the chicken to rest for five minutes. This helps keep the juices in, making each bite juicy and tender. You can add more flavor by mixing in spices or herbs. Try adding paprika for a smoky taste or cayenne for heat. You can also use different cheese options. Mix in some cheddar or mozzarella for a twist. Each choice brings a new taste to your dish. Experiment and find your favorite flavor. Pro Tips Use Fresh Garlic: For an even more intense flavor, use freshly minced garlic instead of garlic powder. Let Chicken Rest: Allowing the chicken to rest for a few minutes after baking helps keep it juicy and flavorful. Experiment with Seasonings: Feel free to customize the herb blend to your taste by adding herbs like rosemary or thyme. Check Doneness: Use a meat thermometer to ensure the chicken reaches an internal temperature of 165°F (75°C) for perfect doneness. {{image_4}} You can add a twist to your Crispy Baked Garlic Parmesan Chicken. Try using different Italian herbs like rosemary or sage. These flavors will freshen the dish. For some heat, add cayenne pepper or crushed red pepper flakes. This gives the chicken a spicy kick that many enjoy. If you need gluten-free options, use crushed nuts instead of panko crumbs. Almonds or walnuts work well. They add a nice crunch, too. For those who follow a dairy-free diet, swap the Parmesan cheese with a plant-based alternative. Nutritional yeast is a great choice and brings a cheesy flavor without dairy. Pair this chicken with tasty sauces. A tangy barbecue sauce or creamy ranch dressing works great. For sides, serve it with roasted vegetables or a fresh garden salad. These options make a full meal that everyone will love. A side of mashed potatoes can add comfort to your dinner. Store any leftover chicken in an airtight container. Keep it in the fridge. This keeps it fresh. You can enjoy it for up to 3 days. Make sure to cool it down before you store it. To reheat the chicken, use the oven for the best results. Preheat the oven to 350°F (175°C). Place the chicken on a baking sheet and cover it with foil. Heat it for about 15-20 minutes. This helps keep it crispy. Avoid using the microwave. It can make the chicken soggy. You can freeze the cooked chicken. Wrap each piece tightly in plastic wrap. Then, place them in a freezer-safe bag. This helps protect it from freezer burn. The chicken stays good for up to 3 months. When you’re ready to eat, thaw it in the fridge overnight. Reheat it in the oven as mentioned before. Enjoy your crispy chicken again! This dish takes about 45 minutes total. You spend 15 minutes prepping. Then, bake the chicken for 25-30 minutes. The chicken is ready when it is golden brown and reaches an internal temperature of 165°F. This way, you ensure it is safe and juicy. Yes, you can use chicken thighs. They are juicier and add more flavor. Just adjust the cooking time. Thighs may take a bit longer to cook through. Always check the internal temperature to ensure doneness. Pair this chicken with some great sides. Roasted vegetables work well. You might also enjoy a fresh salad or mashed potatoes. These flavors complement the garlic and Parmesan nicely. To make this dish gluten-free, swap panko for crushed gluten-free crackers or nuts. You can also find gluten-free breadcrumbs at stores. Just make sure to check the labels. This way, you can still enjoy the crunch without gluten. In this blog post, I covered how to make Crispy Baked Garlic Parmesan Chicken. We explored the main ingredients, seasonings, and the step-by-step process for perfecting the dish. I shared tips to ensure a crispy coating and variations for dietary needs. You now have the skills to enjoy this delicious chicken dish. Experiment with flavors and serving suggestions to make it your own. Happy cooking!

Crispy Baked Garlic Parmesan Chicken Delightful Meal

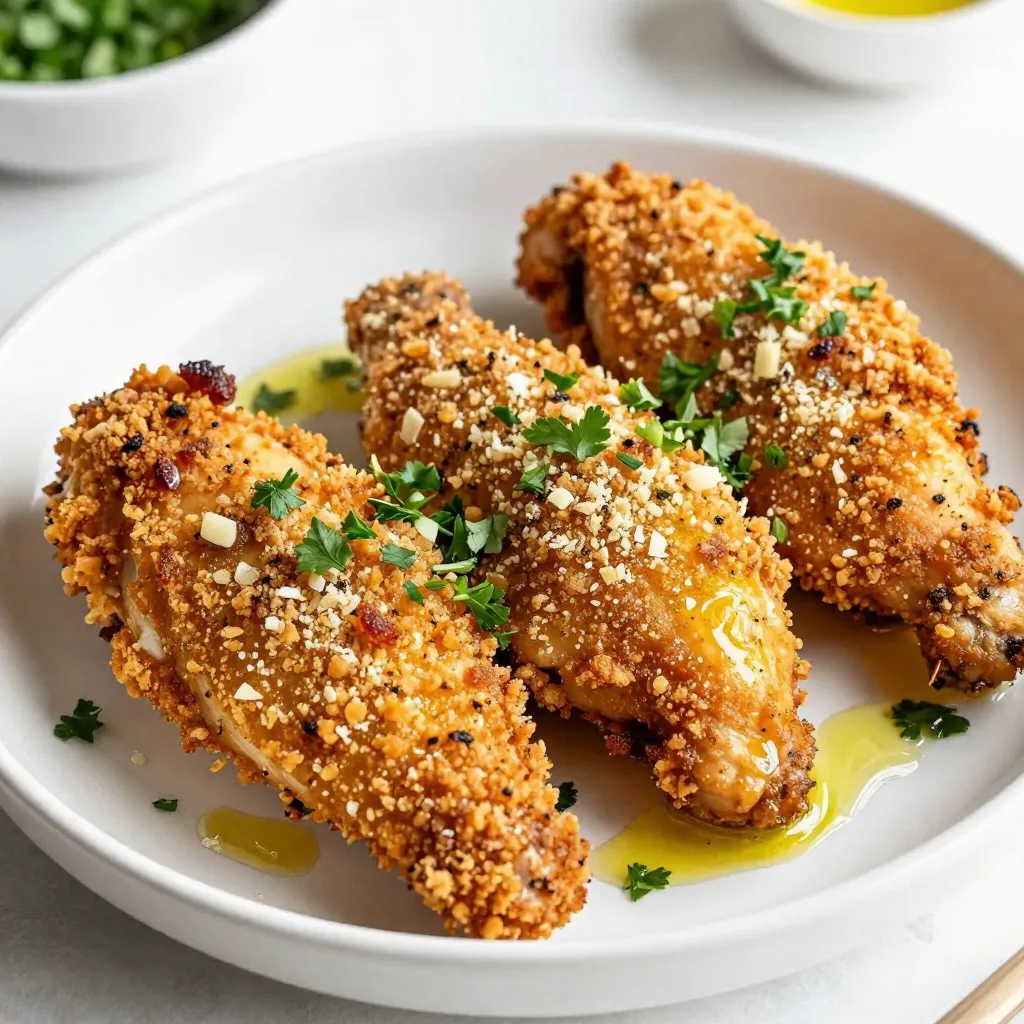
Are you ready to impress your taste buds? My Crispy Baked Garlic Parmesan Chicken is about to become your new

Older posts
Page1 Page2 … Page86 Next →

dsad

© 2026 recipetorch • Built with GeneratePress

Our Policies

  • Copyright Policy
  • Cookie Policy
  • GDPR Policy
  • Privacy Policy
  • Disclaimer
  • Terms Of Use

More Information

  • Home
  • About
  • Contact
  • Appetizers
  • Dessert
  • Dinner
  • Drinks
©2026, recipetorch About Back To Top