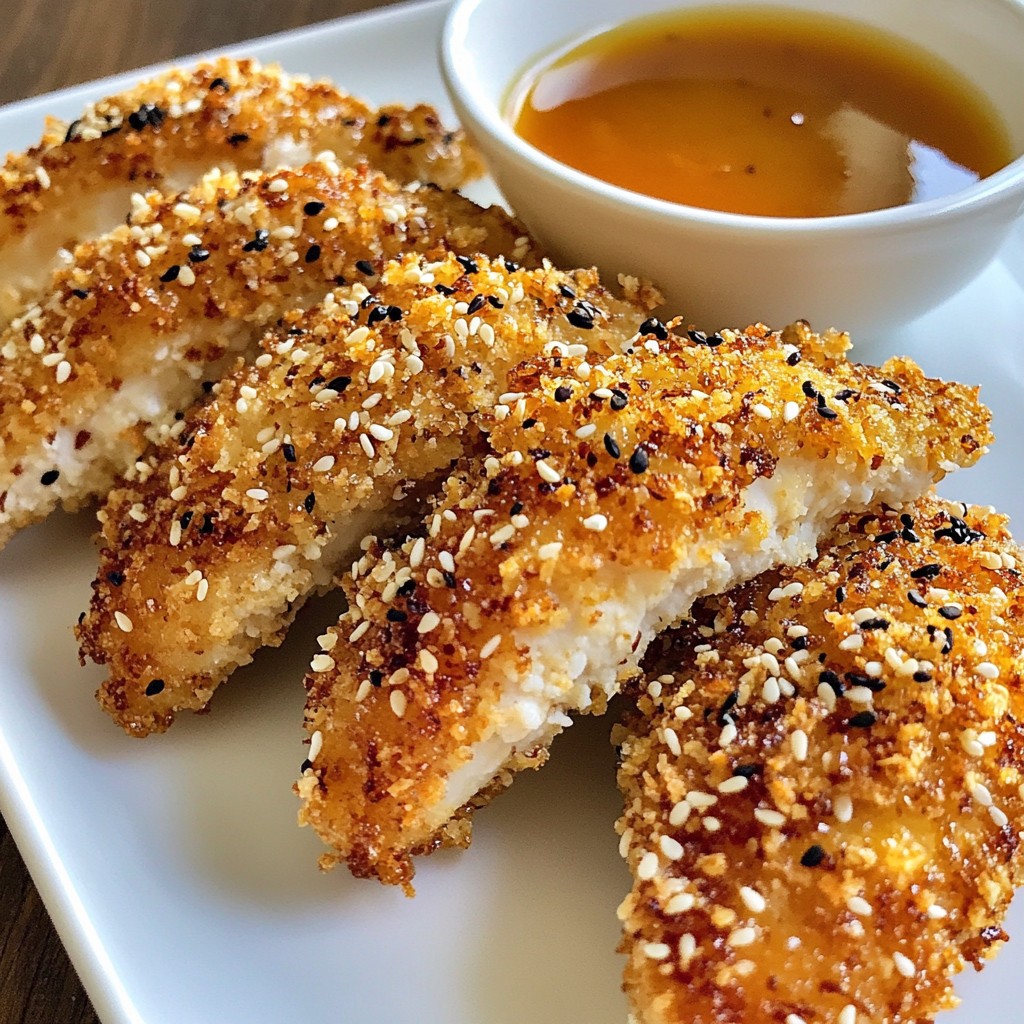
Looking for a fun and easy dinner idea? Try my Sesame Crusted Chicken Tenders! These tasty bites are crispy on the outside and juicy on the inside. Made with simple ingredients like chicken, sesame seeds, and a few spices, they cook up quickly. Plus, I’ll share tips to make them extra crunchy and variations to suit your taste. Let’s dive into this delicious recipe that your family will love!
Why I Love This Recipe
- Flavorful Crunch: The sesame crust adds a delightful crunch and nutty flavor that elevates the chicken tenders beyond the ordinary.
- Healthier Option: Baked instead of fried, these chicken tenders are a healthier alternative without sacrificing taste.
- Quick to Make: With a prep time of just 15 minutes, this recipe is perfect for busy weeknights or last-minute gatherings.
- Versatile Dipping Sauce: The honey-soy dipping sauce pairs wonderfully, providing a sweet and savory contrast that complements the chicken perfectly.
Ingredients
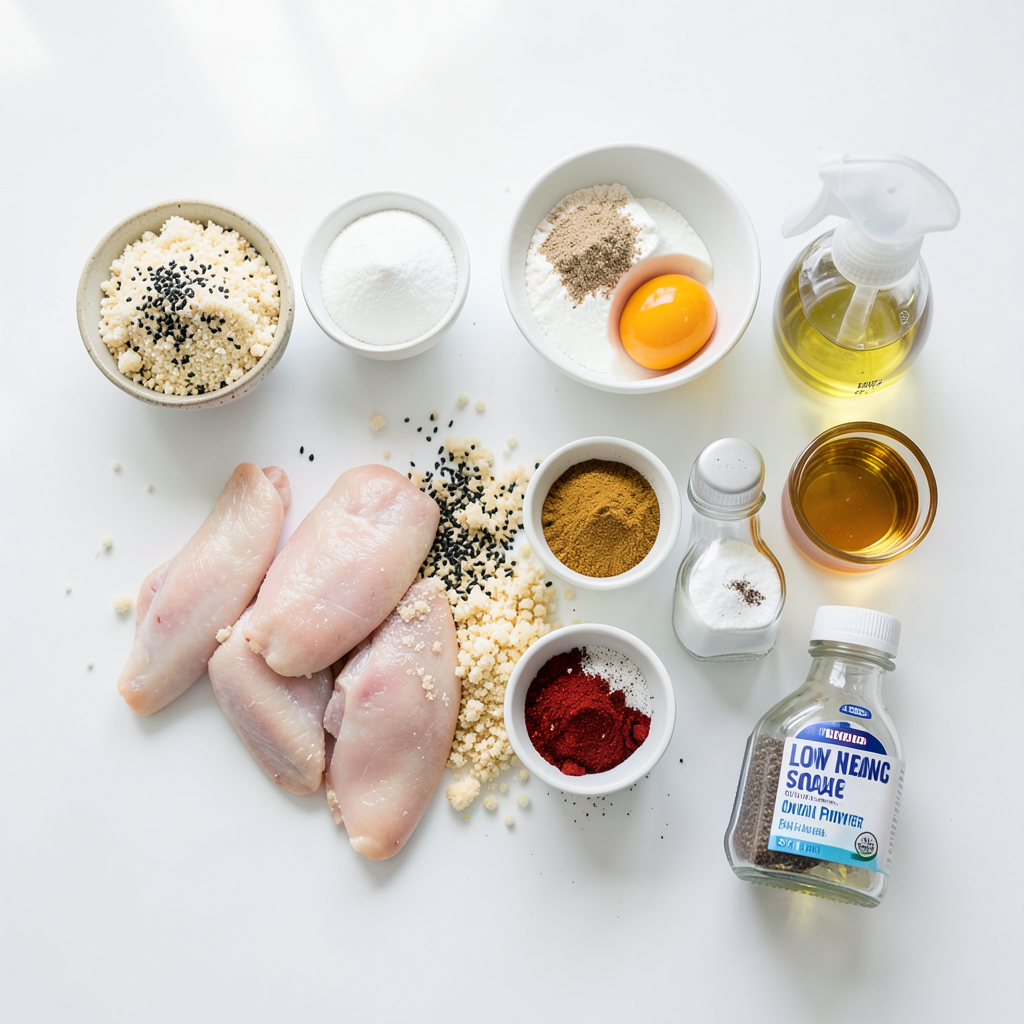
To make sesame crusted chicken tenders, gather the following ingredients:
- 1 lb chicken tenders
- 1 cup panko breadcrumbs
- 1/2 cup mixed sesame seeds (a vibrant blend of white and black)
- 1/2 cup all-purpose flour
- 2 large eggs
- 1 teaspoon garlic powder
- 1 teaspoon onion powder
- 1 teaspoon smoked paprika
- Salt and freshly ground black pepper to taste
- 1/4 cup honey
- 2 tablespoons low-sodium soy sauce
- 1 tablespoon sesame oil
- Cooking spray or a light drizzle of oil for baking
Each ingredient plays a key role in flavor and texture. The chicken tenders provide a juicy base. The panko breadcrumbs add crunch. Mixed sesame seeds give a nutty taste. Flour helps the coating stick. The eggs bind everything together.
Seasonings like garlic powder and smoked paprika enhance taste. Honey, soy sauce, and sesame oil create a sweet and savory dip. This mix of flavors makes each bite delightful.
Gather everything before you start cooking. This way, you can move smoothly through the recipe. Enjoy the process, and prepare for a tasty meal!
Step-by-Step Instructions
Prepping the Oven and Baking Sheet
First, set your oven to 400°F (200°C). This heat is perfect for crispy chicken. Next, take a baking sheet and line it with parchment paper. This keeps the chicken from sticking. Lightly spray or brush the paper with cooking spray or oil. This step helps to achieve that golden brown color.
Coating the Chicken Tenders
In a shallow dish, mix together the flour, garlic powder, onion powder, smoked paprika, salt, and pepper. Stir until everything blends well. In another bowl, crack the eggs and whisk them until smooth. Now, in a third bowl, combine the panko breadcrumbs and mixed sesame seeds. Mix well to spread the seeds evenly.
Take a chicken tender. First, dip it in the flour mix. Make sure it is fully coated. Shake off any extra flour. Next, dip the tender in the whisked eggs. Let any excess egg drip back into the bowl. Lastly, roll the chicken tender in the sesame-panko mix. Press gently to make sure it sticks well. Repeat this for each tender.
Baking the Chicken Tenders
Place the coated chicken tenders on the baking sheet. For extra crunch, lightly spray or drizzle them with cooking spray. Bake them in your preheated oven for 15 to 20 minutes. Flip them halfway through to cook evenly. They are ready when they look golden brown and reach an internal temperature of 165°F (74°C).
Preparing the Dipping Sauce
While the chicken bakes, you can make the dipping sauce. In a small bowl, mix together honey, low-sodium soy sauce, and sesame oil. Stir until the sauce is smooth and well blended. This sweet and savory sauce pairs perfectly with your chicken tenders.
Tips & Tricks
Achieving Extra Crispiness
To get that perfect crunch, use panko breadcrumbs. They are light and airy, which helps create a great texture. Before baking, a light spray of cooking oil adds to the crispiness. Flip the tenders halfway through baking to ensure even cooking. Bake until they turn golden brown and reach 165°F inside.
Storing Leftovers
If you have extra chicken tenders, store them in an airtight container. Place parchment paper between layers to keep them from sticking. They stay fresh in the fridge for up to three days. Reheat them in the oven for best results. This keeps the outside crispy while heating the inside.
Making Ahead of Time
You can prepare the chicken tenders in advance. Coat them, then place them on a baking sheet. Cover and keep them in the fridge for up to 24 hours. When ready to cook, just pop them in the oven. This makes it easy to enjoy a tasty meal without much fuss.
Pro Tips
- Choose the Right Chicken: For the juiciest tenders, opt for fresh, high-quality chicken tenders rather than frozen ones, as they tend to be more tender and flavorful.
- Coating Technique: Ensure that each chicken piece is well-coated in each step to achieve a thicker, crunchier crust. Don’t rush the process!
- Experiment with Seeds: Feel free to mix different types of seeds such as poppy or flaxseeds to enhance flavor and nutrition in your coating.
- Perfect Dipping Sauce: For a spicier kick, add a splash of sriracha or a pinch of chili flakes to the honey-soy dipping sauce.
Variations
Gluten-Free Options
You can make sesame chicken tenders gluten-free. Instead of all-purpose flour, use gluten-free flour. Many brands offer great options. For the breadcrumbs, look for gluten-free panko or make your own by grinding gluten-free bread. This way, you can enjoy crispy chicken tenders without the gluten.
Spicy Sesame Chicken Tenders
If you like heat, add spices! Mix cayenne pepper or chili powder into the flour. You can also add sriracha or hot sauce to your dipping sauce. This gives a nice kick. For a fun twist, sprinkle crushed red pepper flakes on the chicken before baking. It adds flavor and heat.
Serving Suggestions
Serve your chicken tenders with tasty sides. Fresh veggies make a good pair. Try a simple salad or steamed broccoli. You can also serve them with rice or quinoa for a hearty meal. For a fun snack, add some sweet potato fries. The sweet and savory combo is sure to please everyone.
Storage Info
How to Store Leftovers
To store your leftover sesame crusted chicken tenders, let them cool first. Place them in an airtight container. They will stay fresh for about 3 to 4 days in the fridge. Make sure to keep them sealed to prevent drying out. If you want to keep them longer, consider freezing.
Freezing Instructions
To freeze your chicken tenders, follow these steps:
- Let them cool completely.
- Place them in a single layer on a baking tray.
- Freeze until solid, then transfer to a freezer bag.
This way, they won’t stick together. You can freeze them for up to 2 months. Just remember to label the bag with the date.
Reheating Tips
When you’re ready to enjoy your leftovers, reheating is key. Preheat your oven to 375°F (190°C). Place the chicken tenders on a baking sheet. Bake for about 10 to 15 minutes. This helps them regain their crispiness. You can also use an air fryer for about 5 to 7 minutes. Just make sure they reach an internal temp of 165°F (74°C) before serving.
FAQs
Can I use regular breadcrumbs instead of panko?
Yes, you can use regular breadcrumbs. However, panko gives a lighter, crispier texture. When using regular breadcrumbs, expect a denser coating. For best results, try mixing in some sesame seeds for added crunch.
How can I ensure the chicken stays juicy?
To keep the chicken juicy, do not overcook it. Bake just until it reaches 165°F (74°C). You can also marinate the chicken in a mix of soy sauce and sesame oil for 30 minutes. This adds flavor and moisture.
What alternate sauces can I serve with these tenders?
You can serve these tenders with many sauces. Try sweet and sour sauce, ranch dressing, or a spicy mayo. Each sauce adds a unique twist. Explore different flavors to find your favorite pairing!
To make delicious chicken tenders, we covered key ingredients, steps, and tips. You learned how to prepare, bake, and store them for later. Don’t forget the variations like gluten-free or spicy options to suit your taste. Remember, the right sauce can make these tenders even better. Enjoy making and sharing these tasty bites. They’re perfect for meals or snacks! Now, get cooking and have fun with your own twists!