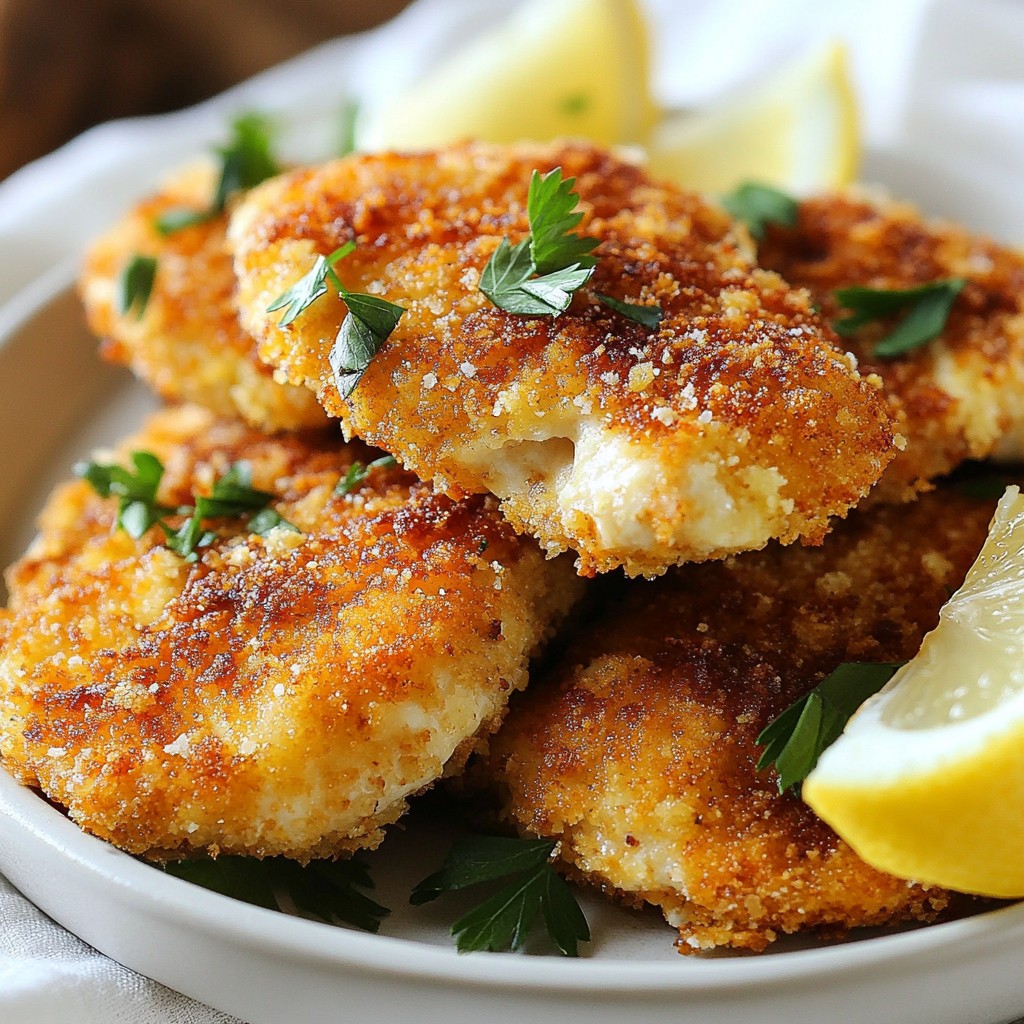
Are you ready to impress your family with a dinner that’s crispy and flavorful? My Parmesan Crusted Chicken Cutlets are not just a meal; they are a delight! With a perfect golden crust and tender chicken inside, these cutlets are easier to make than you think. In this post, I’ll guide you step by step on how to create this mouthwatering dish, plus tips for variations and storage. Let’s dive in!
Why I Love This Recipe
- Crispy Texture: The use of panko breadcrumbs creates an irresistible crunch that elevates the chicken cutlets beyond the ordinary.
- Flavorful Coating: The combination of Parmesan cheese and Italian herbs adds a rich flavor profile that complements the chicken perfectly.
- Quick and Easy: This recipe is not only simple to prepare but also takes just 30 minutes, making it perfect for busy weeknights.
- Versatile Serving Options: These chicken cutlets can be enjoyed on their own or paired with various dipping sauces for a customizable experience.
Ingredients
Main Components
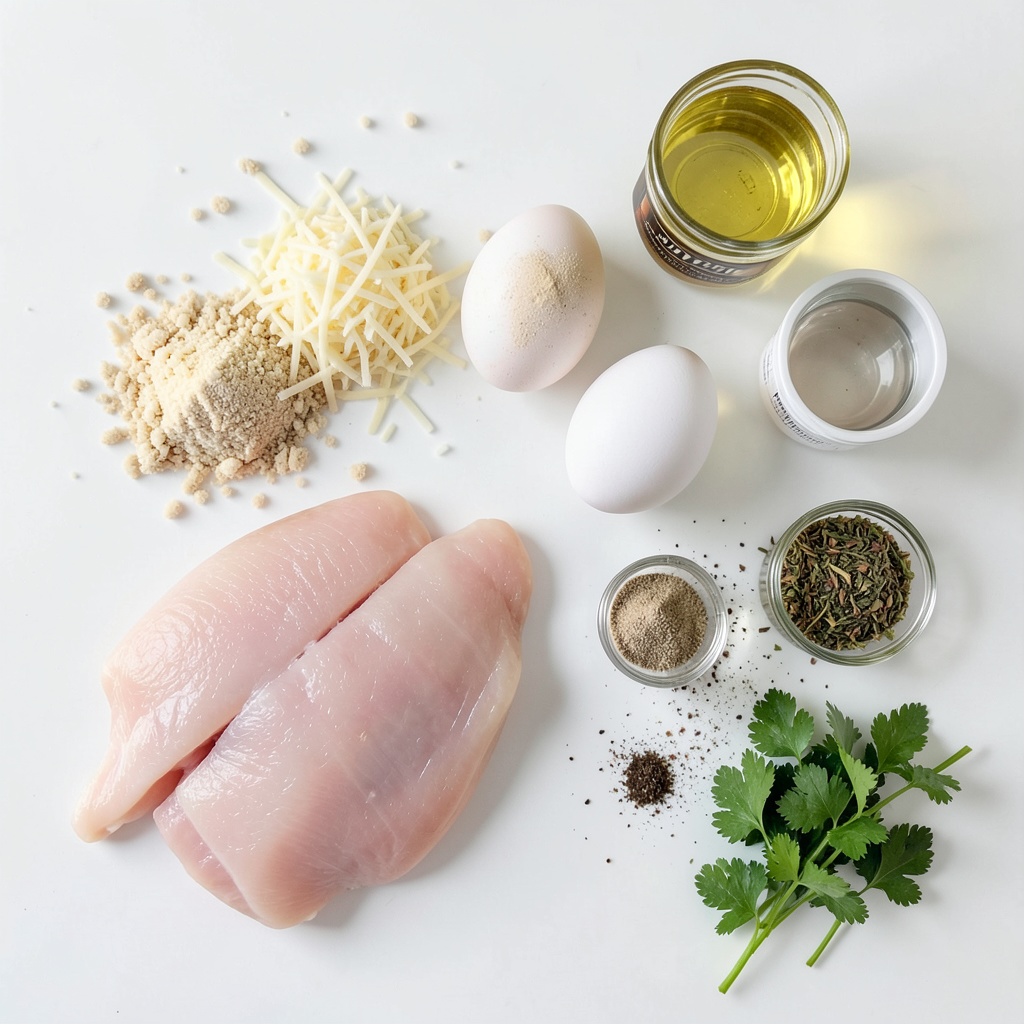
To make Parmesan crusted chicken cutlets, you need the following main ingredients:
- 4 boneless, skinless chicken breasts
- 1 cup panko breadcrumbs
- 1 cup freshly grated Parmesan cheese
- 2 large eggs
- 1 tablespoon Dijon mustard
- 1 teaspoon garlic powder
- 1 teaspoon onion powder
- ½ teaspoon freshly ground black pepper
- ½ teaspoon salt
- ½ teaspoon dried Italian herbs (like oregano, thyme, and basil)
- Cooking oil (vegetable or olive oil works great)
- Fresh parsley, finely chopped (for garnish)
For the Parmesan cheese, I recommend using freshly grated Parmesan. It melts and sticks better than pre-grated cheese. Plus, it adds a rich flavor that makes the cutlets irresistible.
Optional Ingredients
You can add a twist to your cutlets with these optional ingredients:
- Extra spices like smoked paprika or cayenne for heat
- Fresh herbs like basil or parsley mixed into the breadcrumb coating
For dipping sauces, I suggest serving with marinara sauce or a zesty lemon-garlic aioli. These add a nice touch and enhance the flavors of the chicken. Feel free to get creative with your dips!
Step-by-Step Instructions
Preparing the Chicken
Start with your chicken breasts. It's really important to pound them to an even thickness. This makes sure they cook nicely and stay juicy. If the chicken is too thick in some spots, it won't cook right. Use a meat mallet or a rolling pin for this job. Place each breast between two sheets of plastic wrap or parchment paper. This keeps things clean and helps avoid mess. Pound each piece until it’s about ½ inch thick.
Making the Coating
Now let’s prepare the coating. Take two bowls. In one bowl, whisk together two large eggs and one tablespoon of Dijon mustard. Mix them well until they’re smooth. This will help the crumbs stick to the chicken. In the second bowl, mix one cup of panko breadcrumbs with one cup of freshly grated Parmesan cheese. Add one teaspoon of garlic powder, one teaspoon of onion powder, half a teaspoon of black pepper, half a teaspoon of salt, and half a teaspoon of dried Italian herbs. Make sure everything is mixed evenly. This gives the chicken a great flavor.
Cooking Process
Next, it's time to cook. Grab a large skillet and pour in enough cooking oil to cover the bottom with about ¼ inch of oil. Heat the oil on medium-high heat. To check if the oil is hot enough, sprinkle a few breadcrumbs in. If they sizzle, the oil is ready. Gently place the coated chicken cutlets into the hot oil. Don’t crowd the pan; this helps them fry properly. Cook each side for about 4 to 5 minutes. Look for a golden-brown color. Use a meat thermometer to check that the inside reaches 165°F (75°C). This ensures your chicken is fully cooked. After frying, transfer the cutlets to a plate lined with paper towels. This helps drain any extra oil. Let them rest for a few minutes before serving.
Tips & Tricks
Achieving Crispiness
To get that perfect crunch, use panko breading. Panko is lighter and flakier than regular breadcrumbs. It adds an airy texture that makes your chicken cutlets crispy. The larger pieces of panko create more surface area. This results in a crunchier crust that holds up well during frying.
Choosing the right oil is also key. I recommend vegetable or olive oil for frying. Both options have high smoke points, which help the chicken cook evenly. Make sure to heat the oil until it's hot enough. Test it by dropping a few breadcrumbs in. If they sizzle, you’re ready to go!
Cooking Techniques
Using a meat thermometer ensures your chicken is cooked perfectly. Insert it into the thickest part of the cutlet. You want the temperature to reach 165°F (75°C). This step keeps the chicken juicy and safe to eat.
After cooking, let the chicken rest for a few minutes. Resting allows the juices to redistribute. This step prevents the meat from drying out when you cut into it.
Presentation Ideas
For garnishing, sprinkle fresh parsley on top of the chicken. It adds a pop of color and a hint of freshness. You can also serve lemon wedges alongside the cutlets. The bright color and tangy flavor enhance the dish's appeal.
When serving, arrange the chicken cutlets on a rustic wooden board. This presentation style feels warm and inviting. Drizzle a little olive oil over the cutlets for extra flavor and shine. These small touches make your meal look stunning and delicious!
Pro Tips
- Even Thickness: Ensure your chicken breasts are of even thickness by pounding them out. This allows for uniform cooking, preventing some parts from drying out while others remain undercooked.
- Breadcrumb Crunch: For the crispiest coating, use panko breadcrumbs instead of regular breadcrumbs. They provide a superior crunch and texture that takes the dish to the next level.
- Oil Temperature: Always test the oil temperature before frying. If you add breadcrumbs and they sizzle immediately, the oil is ready. This ensures a perfectly crispy exterior without absorbing too much oil.
- Resting Time: Let the fried chicken cutlets rest on paper towels for a few minutes after cooking. This helps to retain their juiciness and keeps them from becoming soggy.
Variations
Flavor Enhancements
You can easily change the taste of your Parmesan crusted chicken cutlets. Try different herbs to boost flavor. Fresh basil or thyme can add a nice touch. You might also enjoy a mix of rosemary and parsley for a new taste.
Want some heat? You can add spices or peppers to the mix. A pinch of cayenne pepper adds warmth without overpowering the dish. Chopped jalapeños can also bring a spicy kick. Adjust the heat based on your taste!
Healthier Alternatives
If you want a lighter version, consider baking instead of frying. Preheat your oven to 400°F (200°C). Place the coated chicken cutlets on a baking sheet lined with parchment paper. Bake for about 20 minutes, flipping halfway. This method offers crispiness with less oil.
For gluten-free options, swap out the panko breadcrumbs. Use crushed gluten-free crackers or ground oats instead. These alternatives maintain crunch while catering to dietary needs. Enjoy your meal without worry!
Storage Info
Refrigeration Guidelines
To store cooked chicken cutlets, let them cool down first. Place them in an airtight container. This helps keep them fresh. I recommend using glass or BPA-free plastic containers. These containers seal well and keep out air. Store in the fridge for up to three days. If you want to keep them longer, consider freezing.
Reheating Instructions
For reheating, I suggest using the oven. Preheat it to 375°F (190°C). Place the chicken cutlets on a baking sheet. Bake for about 10-15 minutes. This method helps retain their crispiness. You can also reheat in a skillet. Heat a little oil and fry them over medium heat for a few minutes on each side.
If you freeze the cutlets, wrap them tightly in plastic wrap or foil. This prevents freezer burn. To defrost, place them in the fridge overnight. You can also use the microwave, but this may make them less crispy. Enjoy your delicious Parmesan-crusted chicken cutlets!
FAQs
Common Questions
How can I tell when the chicken is fully cooked? You can check the chicken's doneness using a meat thermometer. The chicken should reach an internal temperature of 165°F (75°C). If you don’t have a thermometer, cut into the thickest part of the cutlet. The meat should be white and the juices should run clear. If it looks pink or the juices are red, it needs more time to cook.
Can I make the cutlets ahead of time? Yes, you can prepare the cutlets in advance. Once you coat the chicken, you can cover it in the fridge for up to 24 hours. Just remember to fry them right before serving for the best crispiness. If you need to reheat them, do so in an oven to keep them crispy.
Ingredient Substitutions
What can I use instead of Parmesan cheese? If you don't have Parmesan cheese, you can use Pecorino Romano. It has a similar flavor but is saltier and sharper. Nutritional yeast is a good vegan option that gives a cheesy taste without dairy.
Are there vegetarian alternatives for a similar recipe? Yes! You can use eggplant or zucchini slices instead of chicken. Slice them into even pieces and follow the same coating process. For a protein boost, try using firm tofu. Just press it to remove moisture before coating.
In this post, we explored how to make delicious chicken cutlets. We discussed key ingredients, including types of Parmesan cheese and options for spices or sauces. I shared step-by-step instructions, tips for crispiness, and helpful variations to customize your dish. Remember, even cooking and the right oil make a big difference. With a few storage tips, you can enjoy your cutlets days later. I hope you try this recipe and make it your own. Happy cooking!