No-Churn Cookies And Cream Ice Cream Delight

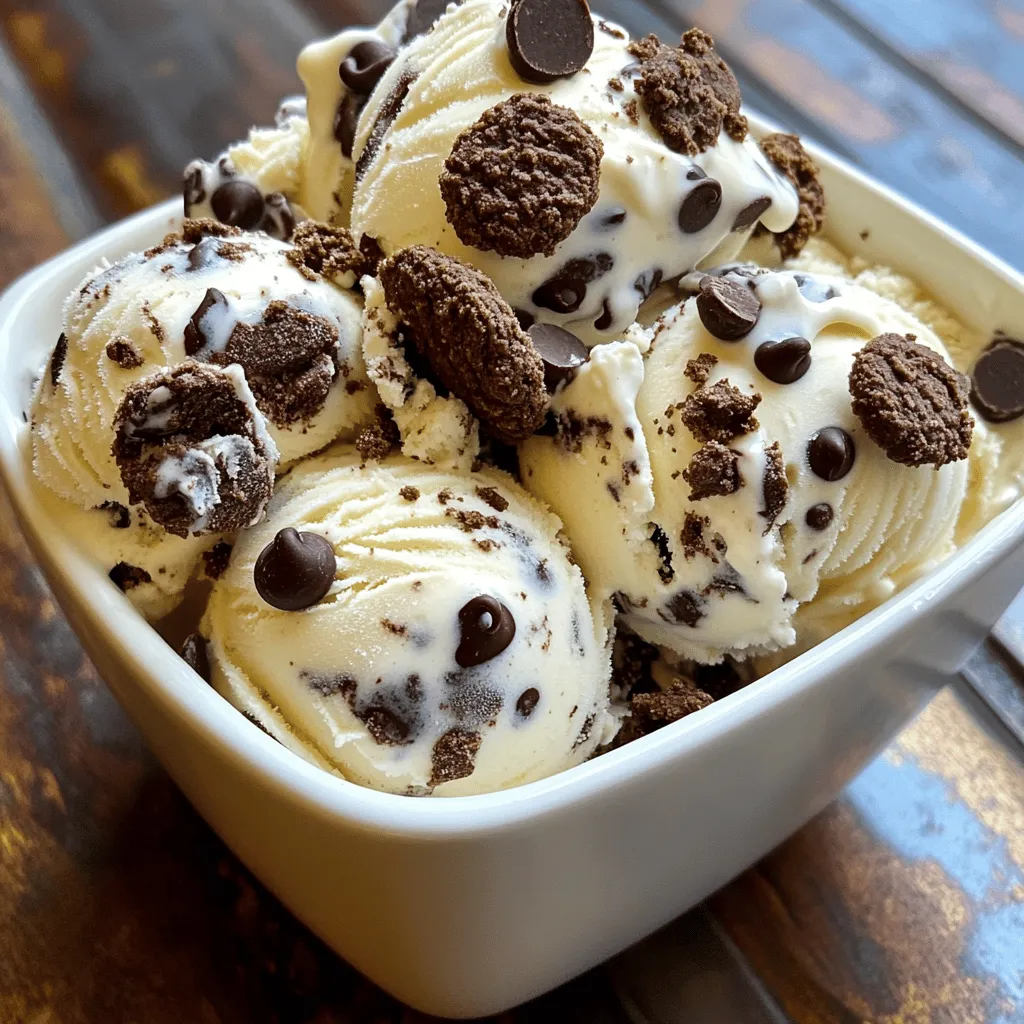
Are you ready to make a rich and creamy ice cream that requires no churn? This No-Churn Cookies And Cream Ice Cream Delight is super easy and delicious. With just a few simple ingredients, you can satisfy your sweet tooth without fancy tools or special skills. Get ready to impress your friends and family with this fun treat. Let’s dive right into the ingredients and make some magic happen!

Ingredients

Required Ingredients

– 2 cups heavy cream

– 1 cup sweetened condensed milk

– 1 teaspoon vanilla extract

– 1 ½ cups chocolate sandwich cookies, crushed

– ½ cup mini chocolate chips (optional)

Tool and Utensils Needed

– Electric mixer

– Large mixing bowl

– Spatula

– Freezer-safe container

The first step in creating your no-churn cookies and cream ice cream is gathering the right ingredients. You need heavy cream, sweetened condensed milk, vanilla extract, chocolate sandwich cookies, and mini chocolate chips if you like.

Next, make sure you have the right tools. An electric mixer helps whip the cream well. A large mixing bowl holds your ice cream mixture. A spatula makes folding easy. Finally, a freezer-safe container is necessary for freezing the ice cream.

Gathering these items will set you up for ice cream success. You’ll enjoy making this treat with simple steps.

Step-by-Step Instructions

Preparation

Step 1: Whip the heavy cream

Start by pouring 2 cups of heavy cream into a large bowl. Use an electric mixer on medium speed. Beat the cream for about 3-4 minutes. Watch closely as soft peaks form. This is key for a light texture.

Step 2: Combine condensed milk and vanilla

In another bowl, mix 1 cup of sweetened condensed milk with 1 teaspoon of vanilla extract. Stir gently until everything blends well. A smooth mixture is what you want.

Mixing

Step 3: Fold whipped cream into the condensed milk mixture

Now, take the whipped cream and carefully fold it into the condensed milk mixture. Use a spatula and be gentle. You want to keep the air in the whipped cream for a fluffy ice cream.

Step 4: Incorporate cookie pieces and optional chocolate chips

Once combined, add in 1 ½ cups of crushed chocolate sandwich cookies. If you like, toss in ½ cup of mini chocolate chips too. Mix gently until the cookie pieces are evenly spread throughout.

Freezing

Step 5: Transfer to a container and prepare for freezing

Pour this tasty mixture into a freezer-safe container. Spread it out evenly so it freezes well. This step is crucial for the best texture.

Step 6: Freeze until firm

Cover the container tightly. Place it in the freezer for at least 6 hours. You want the ice cream to be firm and ready for scooping.

Tips & Tricks

Achieving Perfect Consistency

To make great no-churn ice cream, soft peaks in whipped cream are key. This means you should stop mixing when the cream forms peaks that gently bend over. If you mix too long, the cream can turn grainy.

When you fold the whipped cream into the condensed milk, be gentle. Use a spatula and lift the cream from the bottom to the top. This keeps the air in the cream and makes your ice cream light and fluffy.

Serving Suggestions

For a fun presentation, serve your ice cream in chilled bowls. This keeps it cold longer. You can add extra crushed chocolate cookies on top for a nice look and crunch.

Try drizzling chocolate syrup or caramel over the ice cream. You can also sprinkle some mini chocolate chips for extra sweetness. These toppings make the treat even more special.

Troubleshooting Common Issues

If your ice cream is too hard, let it sit out for a few minutes before scooping. This softens it just enough for easy serving.

If you notice a grainy texture in your ice cream, it may have been whipped too long. To fix this, try mixing it again with a spatula until smooth. Add a bit of heavy cream and gently fold it in to help restore the silky texture.

Variations

Different Cookie Options

You can change the cookies to make this ice cream fun. Using different sandwich cookies adds new flavors. Try using vanilla or mint cookies instead of chocolate. This simple swap gives your ice cream a fresh twist. You can also mix two types of cookies for a unique taste.

Flavor Enhancements

Adding flavorings can take your ice cream to the next level. A splash of almond or mint extract can brighten the taste. You might also infuse the mix with coffee for a rich depth. Peanut butter is another tasty option. Just mix in a few spoonfuls for a creamy, nutty flavor.

Additional Mix-ins

Get creative with mix-ins to boost texture and flavor. You can add fruits like strawberries or bananas for a fruity kick. Chopped nuts can provide a lovely crunch. Swirls of fudge or caramel add sweetness and richness. Don’t hesitate to experiment and find your perfect blend!

Storage Info

Proper Storage Techniques

For the best results, use a freezer-safe container. Look for ones that seal tightly. This keeps air out and helps your ice cream stay fresh. A shallow container works best. It helps the ice cream freeze evenly. To prevent freezer burn, cover the ice cream with plastic wrap before sealing the lid. This added layer stops ice crystals from forming.

Shelf Life

Homemade ice cream can last about two weeks in the freezer. After that, it may start to lose flavor and texture. Signs that your ice cream has gone bad include a strange smell or odd texture. If you see ice crystals on top, it’s time to toss it out. Always trust your senses!

Re-freezing Considerations

You can refreeze ice cream, but it’s not ideal. Each time you refreeze, the texture gets worse. The ice cream may become grainy or icy. To maintain the best texture, only scoop what you need. If you must refreeze, do so quickly. Store it in a tightly sealed container to help keep it creamy.

FAQs

Can I make this recipe without an electric mixer?

Yes, you can whip the cream by hand. Use a large bowl and a whisk. It takes more time, but it’s doable. Whisk until you see soft peaks. This can take about 8 to 10 minutes.

Is this recipe suitable for those with dairy allergies?

No, this recipe contains dairy. However, you can make it dairy-free. Use coconut cream instead of heavy cream. You can also use a dairy-free condensed milk. Make sure to check labels for allergens.

How do I know when the ice cream is ready to serve?

The ice cream is ready when it is firm to the touch. You should be able to scoop it easily. If it feels hard like a rock, let it sit at room temperature for a few minutes. This helps soften it just a bit for perfect scooping.

Making homemade ice cream is fun and easy. You just need simple ingredients and a few tools. We covered everything from whipping cream to freezing tips. With these steps, you can create a tasty treat that suits your taste. Don’t forget to try different mix-ins for variety. Enjoy your treat and share it with friends and family. This ice cream brings joy to every occasion, so get started today!

- 2 cups heavy cream - 1 cup sweetened condensed milk - 1 teaspoon vanilla extract - 1 ½ cups chocolate sandwich cookies, crushed - ½ cup mini chocolate chips (optional) - Electric mixer - Large mixing bowl - Spatula - Freezer-safe container The first step in creating your no-churn cookies and cream ice cream is gathering the right ingredients. You need heavy cream, sweetened condensed milk, vanilla extract, chocolate sandwich cookies, and mini chocolate chips if you like. Next, make sure you have the right tools. An electric mixer helps whip the cream well. A large mixing bowl holds your ice cream mixture. A spatula makes folding easy. Finally, a freezer-safe container is necessary for freezing the ice cream. Gathering these items will set you up for ice cream success. You’ll enjoy making this treat with simple steps. - Step 1: Whip the heavy cream Start by pouring 2 cups of heavy cream into a large bowl. Use an electric mixer on medium speed. Beat the cream for about 3-4 minutes. Watch closely as soft peaks form. This is key for a light texture. - Step 2: Combine condensed milk and vanilla In another bowl, mix 1 cup of sweetened condensed milk with 1 teaspoon of vanilla extract. Stir gently until everything blends well. A smooth mixture is what you want. - Step 3: Fold whipped cream into the condensed milk mixture Now, take the whipped cream and carefully fold it into the condensed milk mixture. Use a spatula and be gentle. You want to keep the air in the whipped cream for a fluffy ice cream. - Step 4: Incorporate cookie pieces and optional chocolate chips Once combined, add in 1 ½ cups of crushed chocolate sandwich cookies. If you like, toss in ½ cup of mini chocolate chips too. Mix gently until the cookie pieces are evenly spread throughout. - Step 5: Transfer to a container and prepare for freezing Pour this tasty mixture into a freezer-safe container. Spread it out evenly so it freezes well. This step is crucial for the best texture. - Step 6: Freeze until firm Cover the container tightly. Place it in the freezer for at least 6 hours. You want the ice cream to be firm and ready for scooping. To make great no-churn ice cream, soft peaks in whipped cream are key. This means you should stop mixing when the cream forms peaks that gently bend over. If you mix too long, the cream can turn grainy. When you fold the whipped cream into the condensed milk, be gentle. Use a spatula and lift the cream from the bottom to the top. This keeps the air in the cream and makes your ice cream light and fluffy. For a fun presentation, serve your ice cream in chilled bowls. This keeps it cold longer. You can add extra crushed chocolate cookies on top for a nice look and crunch. Try drizzling chocolate syrup or caramel over the ice cream. You can also sprinkle some mini chocolate chips for extra sweetness. These toppings make the treat even more special. If your ice cream is too hard, let it sit out for a few minutes before scooping. This softens it just enough for easy serving. If you notice a grainy texture in your ice cream, it may have been whipped too long. To fix this, try mixing it again with a spatula until smooth. Add a bit of heavy cream and gently fold it in to help restore the silky texture. {{image_4}} You can change the cookies to make this ice cream fun. Using different sandwich cookies adds new flavors. Try using vanilla or mint cookies instead of chocolate. This simple swap gives your ice cream a fresh twist. You can also mix two types of cookies for a unique taste. Adding flavorings can take your ice cream to the next level. A splash of almond or mint extract can brighten the taste. You might also infuse the mix with coffee for a rich depth. Peanut butter is another tasty option. Just mix in a few spoonfuls for a creamy, nutty flavor. Get creative with mix-ins to boost texture and flavor. You can add fruits like strawberries or bananas for a fruity kick. Chopped nuts can provide a lovely crunch. Swirls of fudge or caramel add sweetness and richness. Don't hesitate to experiment and find your perfect blend! For the best results, use a freezer-safe container. Look for ones that seal tightly. This keeps air out and helps your ice cream stay fresh. A shallow container works best. It helps the ice cream freeze evenly. To prevent freezer burn, cover the ice cream with plastic wrap before sealing the lid. This added layer stops ice crystals from forming. Homemade ice cream can last about two weeks in the freezer. After that, it may start to lose flavor and texture. Signs that your ice cream has gone bad include a strange smell or odd texture. If you see ice crystals on top, it’s time to toss it out. Always trust your senses! You can refreeze ice cream, but it’s not ideal. Each time you refreeze, the texture gets worse. The ice cream may become grainy or icy. To maintain the best texture, only scoop what you need. If you must refreeze, do so quickly. Store it in a tightly sealed container to help keep it creamy. Yes, you can whip the cream by hand. Use a large bowl and a whisk. It takes more time, but it's doable. Whisk until you see soft peaks. This can take about 8 to 10 minutes. No, this recipe contains dairy. However, you can make it dairy-free. Use coconut cream instead of heavy cream. You can also use a dairy-free condensed milk. Make sure to check labels for allergens. The ice cream is ready when it is firm to the touch. You should be able to scoop it easily. If it feels hard like a rock, let it sit at room temperature for a few minutes. This helps soften it just a bit for perfect scooping. Making homemade ice cream is fun and easy. You just need simple ingredients and a few tools. We covered everything from whipping cream to freezing tips. With these steps, you can create a tasty treat that suits your taste. Don’t forget to try different mix-ins for variety. Enjoy your treat and share it with friends and family. This ice cream brings joy to every occasion, so get started today!

No-Churn Cookies And Cream Ice Cream

Dive into the sweet indulgence of homemade cookies and cream ice cream! This simple recipe combines heavy cream, sweetened condensed milk, and chocolate sandwich cookies for a creamy treat that your family will love. Perfect for hot days or a cozy dessert, it's easy to whip up and freeze. Click through to discover the step-by-step guide and enjoy this delightful dessert that will take your taste buds to bliss!

Ingredients
  

2 cups heavy cream

1 cup sweetened condensed milk

1 teaspoon vanilla extract

1 ½ cups chocolate sandwich cookies, crushed

½ cup mini chocolate chips (optional)

Instructions
 

Begin by pouring the heavy cream into a large mixing bowl. Using an electric mixer, beat the cream on medium speed until soft peaks start to form. This process should take approximately 3-4 minutes; keep an eye on the texture as it thickens.

    In a separate mixing bowl, combine the sweetened condensed milk and vanilla extract. Stir the mixture until it is fully blended together, ensuring a smooth consistency.

      Carefully fold the whipped cream into the condensed milk mixture. Use a spatula and employ gentle folding motions to avoid deflating the whipped cream too much – you want it to remain light and airy.

        Once the cream is incorporated, add in the crushed chocolate sandwich cookies and the mini chocolate chips (if you’re using them). Gently mix until everything is evenly distributed throughout the creamy base.

          Transfer this delicious mixture into a freezer-safe container, spreading it out evenly to ensure it freezes uniformly.

            Cover the container tightly with a lid or plastic wrap, and place it in the freezer for a minimum of 6 hours, or until the ice cream is fully firm and set.

              When you're ready to indulge, scoop generous portions of the ice cream into bowls or cones. Enjoy your delightful homemade cookies and cream ice cream!

                Prep Time: 20 minutes | Total Time: 6 hours 20 minutes | Servings: 6-8

                  - Presentation Tips: Serve the ice cream in chilled bowls and sprinkle some extra crushed chocolate cookies on top for added texture and an appealing look!

                    Leave a Comment

                    Recipe Rating