No-Bake Chocolate Coconut Bars Easy and Tasty Treat

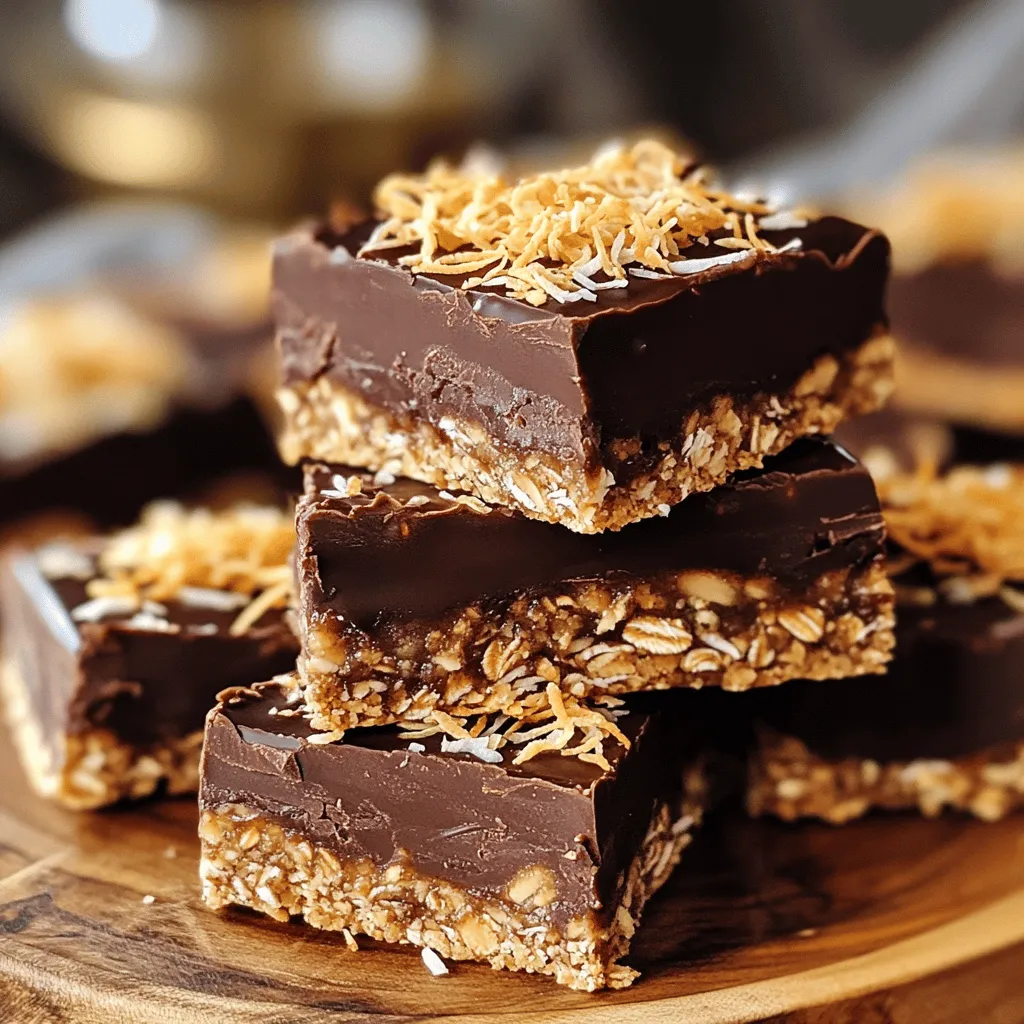
Craving a sweet treat that’s easy to make? You’re in the right place! With just a few simple ingredients, you can whip up these No-Bake Chocolate Coconut Bars in no time. They’re rich, tasty, and perfect for any occasion. I’ll walk you through the easy steps to make this delightful snack, plus share tips to avoid common mistakes and boost the flavor. Let’s get started on creating your new favorite dessert!

Ingredients

List of Ingredients

To make these no-bake chocolate coconut bars, you need the following ingredients:

– 1 cup unsweetened shredded coconut

– 1 cup rolled oats

– 1 cup almond flour

– 1/2 cup pure maple syrup

– 1/4 cup coconut oil, melted

– 1/2 cup dark chocolate chips (ensure dairy-free if preferred)

– 1 teaspoon pure vanilla extract

– A pinch of sea salt

Substitutions for Key Ingredients

If you don’t have almond flour, you can use regular flour or oat flour. For a nut-free option, try sunflower seed flour. If maple syrup is not on hand, agave syrup or honey works well too. You can replace dark chocolate chips with white chocolate or any other flavor you love. Just make sure to adjust the sweetness if using a sweeter chocolate.

Nutritional Information

These bars are not just tasty but also packed with nutrients. Each bar contains about:

– Calories: 180

– Protein: 3g

– Carbohydrates: 22g

– Fat: 9g

– Fiber: 3g

– Sugar: 8g

These values can vary based on the exact ingredients used. These bars are a great source of healthy fats, fiber, and natural sweetness. Enjoying them as a snack or dessert is a smart choice!

Step-by-Step Instructions

Preparation Overview

Making No-Bake Chocolate Coconut Bars is easy and fun. You need just a few steps. Start by gathering your ingredients. This includes shredded coconut, oats, almond flour, maple syrup, and coconut oil.

Detailed Cooking Method

1. In a big bowl, mix together the shredded coconut, rolled oats, and almond flour. Use a spatula to combine them well.

2. In another bowl, whisk the maple syrup, melted coconut oil, vanilla extract, and sea salt. Mix until smooth.

3. Slowly pour the wet mix into the dry mix. Stir until everything sticks together. The mixture should feel sticky.

4. Line an 8×8 inch dish with parchment paper. Leave some paper hanging over the sides for easy lifting. Press the mix into the dish evenly.

5. Melt the dark chocolate chips in a microwave. Do this in short bursts, stirring often until smooth.

6. Pour the melted chocolate over the coconut mix. Spread it out with a spatula to cover all areas.

7. Cover the dish and chill it in the fridge for at least 2 hours. This helps the bars set.

8. Once set, lift the bars out using the parchment paper. Cut them into squares with a sharp knife.

Tips for Best Results

– Use fresh ingredients for the best flavor.

– Don’t skip the chilling step; it makes a big difference!

– Clean your knife between cuts for neat edges.

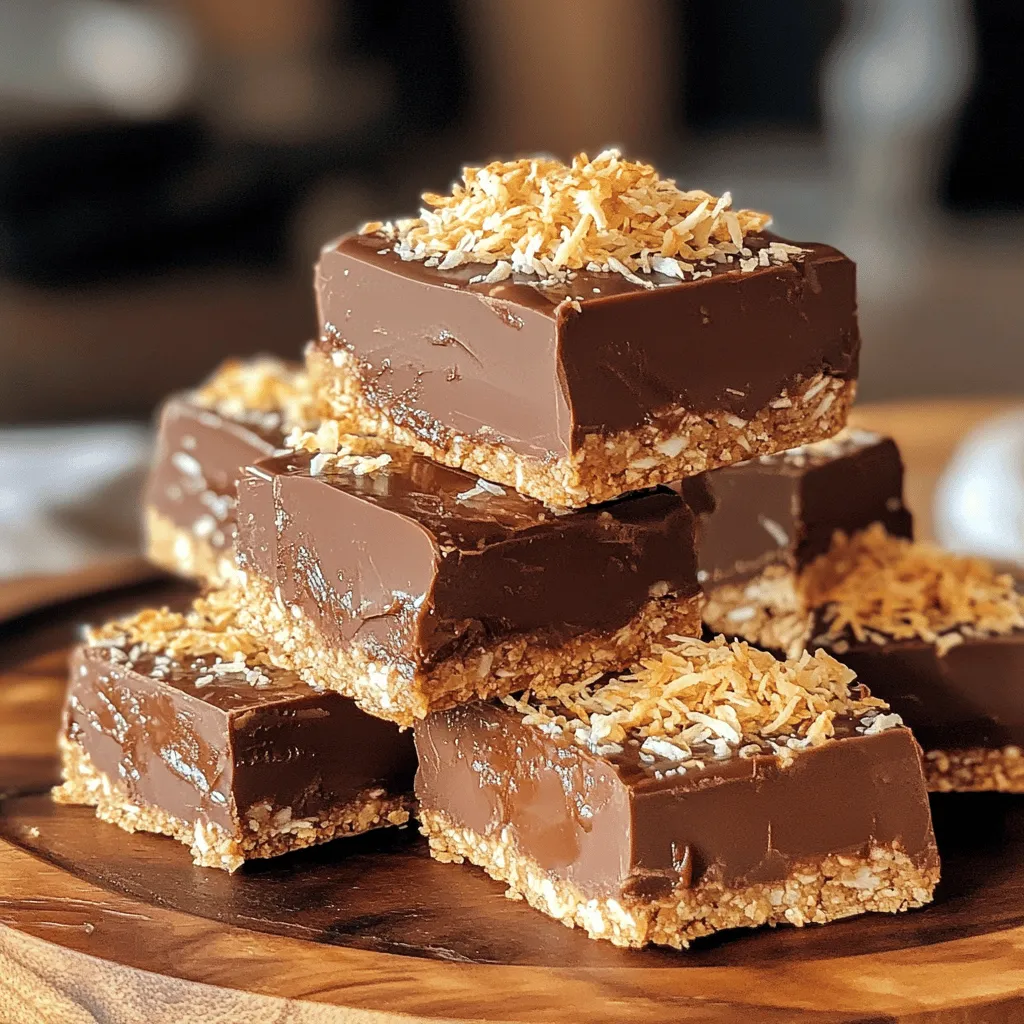
– For an extra touch, sprinkle more coconut or drizzle chocolate on top before serving.

With these tips, you’ll create tasty bars that everyone will love. For the full recipe, check out the complete guide!

Tips & Tricks

Common Mistakes to Avoid

When making no-bake chocolate coconut bars, watch out for a few common errors. First, do not skip the parchment paper. It helps you lift the bars out easily. Second, do not overmix the wet and dry ingredients. This can make your bars too dense. Finally, remember to let them chill long enough. If you cut them too soon, they will fall apart.

How to Achieve the Perfect Texture

To get that ideal texture, balance is key. Use equal parts coconut, oats, and almond flour. This mix creates a sturdy base. Make sure your coconut oil is melted but not too hot. If it’s too warm, it can make the mixture greasy. Press the mixture firmly into the baking dish. This helps the bars hold their shape. Lastly, let them cool completely in the fridge. It’s the secret to a perfect bite!

Enhancing Flavor Options

You can easily tweak the flavor of your bars. Try adding a tablespoon of almond or peanut butter for richness. If you love spices, a dash of cinnamon or nutmeg adds warmth. You could also mix in a handful of chopped nuts or dried fruit for extra texture. For a tropical twist, consider using pineapple or mango. Each adjustment makes the bars uniquely yours.

For the complete details on making these delicious treats, check out the Full Recipe.

Variations

Flavor Variations

You can change the flavor of your no-bake chocolate coconut bars in fun ways. Try adding peanut butter for a nutty twist. Almond butter works well too. You can also mix in some cocoa powder for a richer chocolate taste. If you love fruit, add dried cherries or cranberries for sweetness and texture. A dash of cinnamon can give it a warm flavor that excites your taste buds.

Ingredient Swaps

If you need to make swaps, it’s easy! Instead of almond flour, use oat flour or coconut flour. For a nut-free version, skip the almond flour and use more oats. If you prefer a different sweetener, agave syrup or honey can work just as well. For the chocolate chips, you can use white chocolate or carob chips. These swaps keep your bars tasty and fun.

Alternative Toppings

Toppings can change the look and taste of your bars. After pouring the chocolate, sprinkle sea salt on top for a salty kick. You might also add more shredded coconut or crushed nuts for added crunch. If you want a colorful touch, top with some colorful sprinkles or edible flowers. These simple changes make your no-bake bars unique and delightful.

Storage Info

How to Store No-Bake Chocolate Coconut Bars

You can store these bars in an airtight container. Make sure they are completely cool before sealing. Place parchment paper between layers to prevent sticking. Store them in the fridge for the best taste and texture.

Freezing Instructions

To freeze these bars, first cut them into squares. Wrap each piece in plastic wrap. Then, place the wrapped bars in a freezer-safe container. They can last for up to three months in the freezer. When you’re ready to eat, thaw them in the fridge overnight.

Shelf Life and Best Practices

These bars stay fresh in the fridge for one week. To keep them tasty, avoid leaving them at room temperature for too long. Always check for any signs of spoilage before eating. Storing them properly helps maintain their delightful flavor! For the Full Recipe, refer to the main section.

FAQs

Can I make these bars vegan?

Yes, you can make these bars vegan. Use dairy-free chocolate chips. Ensure all other ingredients are plant-based, such as maple syrup and coconut oil. This way, you create a tasty treat that fits a vegan diet.

How long do they take to set?

These bars need about 2 hours to set in the fridge. This time allows the mixture to firm up. For best results, leave them in the fridge longer if you prefer a firmer texture.

Can I use different chocolate types?

Absolutely! You can use milk chocolate or white chocolate if you prefer. Just remember that the flavors will change. Dark chocolate gives a rich taste, while milk chocolate adds sweetness.

What if I don’t have almond flour?

If you lack almond flour, you can use all-purpose flour or oat flour instead. The texture might change slightly, but it should still taste great. Just make sure to adjust any liquids if needed.

Can I add nuts or seeds?

Yes! Adding nuts like almonds or walnuts can add crunch. You can also sprinkle seeds, like chia or flaxseeds, for extra nutrition. Just chop them up and mix them in before pressing the mixture into the baking dish.

How do I know when the bars are ready to eat?

The bars are ready when they are firm and hold their shape. After chilling, try gently pressing the edge with your finger. If it feels solid, they are good to go!

Can I double the recipe?

Yes, you can double the recipe! Just make sure you use a larger dish to fit all the mixture. You may need to adjust the chilling time slightly, so check for firmness as they set.

Are these bars gluten-free?

Yes, they are gluten-free! The oats and almond flour do not contain gluten. Just make sure your oats are labeled gluten-free to avoid cross-contamination.

Can I use different sweeteners?

You can! Honey or agave syrup can work as substitutes. Each sweetener has a unique taste, so choose what you enjoy most. Just remember to adjust the amount based on the sweetness level you prefer.

How should I serve these bars?

Serve these bars chilled for the best taste. You can cut them into squares and arrange them on a colorful platter. For a fun touch, sprinkle extra coconut on top or drizzle with melted chocolate. Enjoy!

For the full recipe, check out the section on ingredients and instructions.

In this article, we explored the key ingredients, cooking steps, and storage tips for No-Bake Chocolate Coconut Bars. You learned about possible ingredient swaps and flavor variations to customize your bars. I shared helpful advice to avoid common mistakes, ensuring you achieve perfect texture and taste every time. Remember, these bars can be a fun treat for everyone. With these tips, you’re ready to create a delicious snack that lasts. Enjoy making your bars, and don’t hesitate to experiment with new flavors!

To make these no-bake chocolate coconut bars, you need the following ingredients: - 1 cup unsweetened shredded coconut - 1 cup rolled oats - 1 cup almond flour - 1/2 cup pure maple syrup - 1/4 cup coconut oil, melted - 1/2 cup dark chocolate chips (ensure dairy-free if preferred) - 1 teaspoon pure vanilla extract - A pinch of sea salt If you don’t have almond flour, you can use regular flour or oat flour. For a nut-free option, try sunflower seed flour. If maple syrup is not on hand, agave syrup or honey works well too. You can replace dark chocolate chips with white chocolate or any other flavor you love. Just make sure to adjust the sweetness if using a sweeter chocolate. These bars are not just tasty but also packed with nutrients. Each bar contains about: - Calories: 180 - Protein: 3g - Carbohydrates: 22g - Fat: 9g - Fiber: 3g - Sugar: 8g These values can vary based on the exact ingredients used. These bars are a great source of healthy fats, fiber, and natural sweetness. Enjoying them as a snack or dessert is a smart choice! Making No-Bake Chocolate Coconut Bars is easy and fun. You need just a few steps. Start by gathering your ingredients. This includes shredded coconut, oats, almond flour, maple syrup, and coconut oil. 1. In a big bowl, mix together the shredded coconut, rolled oats, and almond flour. Use a spatula to combine them well. 2. In another bowl, whisk the maple syrup, melted coconut oil, vanilla extract, and sea salt. Mix until smooth. 3. Slowly pour the wet mix into the dry mix. Stir until everything sticks together. The mixture should feel sticky. 4. Line an 8x8 inch dish with parchment paper. Leave some paper hanging over the sides for easy lifting. Press the mix into the dish evenly. 5. Melt the dark chocolate chips in a microwave. Do this in short bursts, stirring often until smooth. 6. Pour the melted chocolate over the coconut mix. Spread it out with a spatula to cover all areas. 7. Cover the dish and chill it in the fridge for at least 2 hours. This helps the bars set. 8. Once set, lift the bars out using the parchment paper. Cut them into squares with a sharp knife. - Use fresh ingredients for the best flavor. - Don’t skip the chilling step; it makes a big difference! - Clean your knife between cuts for neat edges. - For an extra touch, sprinkle more coconut or drizzle chocolate on top before serving. With these tips, you’ll create tasty bars that everyone will love. For the full recipe, check out the complete guide! When making no-bake chocolate coconut bars, watch out for a few common errors. First, do not skip the parchment paper. It helps you lift the bars out easily. Second, do not overmix the wet and dry ingredients. This can make your bars too dense. Finally, remember to let them chill long enough. If you cut them too soon, they will fall apart. To get that ideal texture, balance is key. Use equal parts coconut, oats, and almond flour. This mix creates a sturdy base. Make sure your coconut oil is melted but not too hot. If it's too warm, it can make the mixture greasy. Press the mixture firmly into the baking dish. This helps the bars hold their shape. Lastly, let them cool completely in the fridge. It’s the secret to a perfect bite! You can easily tweak the flavor of your bars. Try adding a tablespoon of almond or peanut butter for richness. If you love spices, a dash of cinnamon or nutmeg adds warmth. You could also mix in a handful of chopped nuts or dried fruit for extra texture. For a tropical twist, consider using pineapple or mango. Each adjustment makes the bars uniquely yours. For the complete details on making these delicious treats, check out the Full Recipe. {{image_4}} You can change the flavor of your no-bake chocolate coconut bars in fun ways. Try adding peanut butter for a nutty twist. Almond butter works well too. You can also mix in some cocoa powder for a richer chocolate taste. If you love fruit, add dried cherries or cranberries for sweetness and texture. A dash of cinnamon can give it a warm flavor that excites your taste buds. If you need to make swaps, it’s easy! Instead of almond flour, use oat flour or coconut flour. For a nut-free version, skip the almond flour and use more oats. If you prefer a different sweetener, agave syrup or honey can work just as well. For the chocolate chips, you can use white chocolate or carob chips. These swaps keep your bars tasty and fun. Toppings can change the look and taste of your bars. After pouring the chocolate, sprinkle sea salt on top for a salty kick. You might also add more shredded coconut or crushed nuts for added crunch. If you want a colorful touch, top with some colorful sprinkles or edible flowers. These simple changes make your no-bake bars unique and delightful. You can store these bars in an airtight container. Make sure they are completely cool before sealing. Place parchment paper between layers to prevent sticking. Store them in the fridge for the best taste and texture. To freeze these bars, first cut them into squares. Wrap each piece in plastic wrap. Then, place the wrapped bars in a freezer-safe container. They can last for up to three months in the freezer. When you're ready to eat, thaw them in the fridge overnight. These bars stay fresh in the fridge for one week. To keep them tasty, avoid leaving them at room temperature for too long. Always check for any signs of spoilage before eating. Storing them properly helps maintain their delightful flavor! For the Full Recipe, refer to the main section. Yes, you can make these bars vegan. Use dairy-free chocolate chips. Ensure all other ingredients are plant-based, such as maple syrup and coconut oil. This way, you create a tasty treat that fits a vegan diet. These bars need about 2 hours to set in the fridge. This time allows the mixture to firm up. For best results, leave them in the fridge longer if you prefer a firmer texture. Absolutely! You can use milk chocolate or white chocolate if you prefer. Just remember that the flavors will change. Dark chocolate gives a rich taste, while milk chocolate adds sweetness. If you lack almond flour, you can use all-purpose flour or oat flour instead. The texture might change slightly, but it should still taste great. Just make sure to adjust any liquids if needed. Yes! Adding nuts like almonds or walnuts can add crunch. You can also sprinkle seeds, like chia or flaxseeds, for extra nutrition. Just chop them up and mix them in before pressing the mixture into the baking dish. The bars are ready when they are firm and hold their shape. After chilling, try gently pressing the edge with your finger. If it feels solid, they are good to go! Yes, you can double the recipe! Just make sure you use a larger dish to fit all the mixture. You may need to adjust the chilling time slightly, so check for firmness as they set. Yes, they are gluten-free! The oats and almond flour do not contain gluten. Just make sure your oats are labeled gluten-free to avoid cross-contamination. You can! Honey or agave syrup can work as substitutes. Each sweetener has a unique taste, so choose what you enjoy most. Just remember to adjust the amount based on the sweetness level you prefer. Serve these bars chilled for the best taste. You can cut them into squares and arrange them on a colorful platter. For a fun touch, sprinkle extra coconut on top or drizzle with melted chocolate. Enjoy! For the full recipe, check out the section on ingredients and instructions. In this article, we explored the key ingredients, cooking steps, and storage tips for No-Bake Chocolate Coconut Bars. You learned about possible ingredient swaps and flavor variations to customize your bars. I shared helpful advice to avoid common mistakes, ensuring you achieve perfect texture and taste every time. Remember, these bars can be a fun treat for everyone. With these tips, you're ready to create a delicious snack that lasts. Enjoy making your bars, and don't hesitate to experiment with new flavors!

No-Bake Chocolate Coconut Bars

Indulge in a sweet treat with these No-Bake Chocolate Coconut Delight Bars! Made with wholesome ingredients like shredded coconut, rolled oats, and almond flour, these bars are deliciously creamy and easy to prepare. Just mix, chill, and enjoy! Perfect for a nutritious snack or a charming dessert, they are sure to please everyone. Click to explore the full recipe and discover your new favorite treat today!

Ingredients
  

1 cup unsweetened shredded coconut

1 cup rolled oats

1 cup almond flour

1/2 cup pure maple syrup

1/4 cup coconut oil, melted

1/2 cup dark chocolate chips (ensure dairy-free if preferred)

1 teaspoon pure vanilla extract

A pinch of sea salt

Instructions
 

In a spacious mixing bowl, combine the shredded coconut, rolled oats, and almond flour. Use a spatula or a whisk to mix them together thoroughly, ensuring an even distribution of all dry ingredients.

    In a separate, medium-sized bowl, whisk together the pure maple syrup, melted coconut oil, pure vanilla extract, and a pinch of sea salt. Mix until the ingredients are well blended and the mixture appears homogeneous.

      Gradually pour the wet mixture into the bowl containing the dry ingredients. Stir vigorously until all components are thoroughly combined, resulting in a sticky and cohesive mixture.

        Prepare an 8x8 inch baking dish by lining it with parchment paper, leaving some excess paper hanging over the edges for easy removal. Spoon the mixture into the dish and press down firmly with your hands or a spatula. Spread it evenly across the base of the dish to ensure uniform thickness.

          In a microwave-safe bowl, melt the dark chocolate chips in short 20-second intervals, stirring after each interval until completely smooth and creamy.

            Pour the silky melted chocolate over the pressed coconut mixture in the baking dish, using a spatula to spread it evenly across the surface. Make sure the chocolate covers all areas for a beautiful finish.

              Cover the dish with plastic wrap or a lid and place it in the refrigerator for a minimum of 2 hours, allowing the bars to set firmly.

                Once the mixture is thoroughly chilled and set, use the overhanging parchment paper to lift the bars out of the dish. Cut into squares or rectangles with a sharp knife, wiping the blade clean between cuts for neater edges.

                  Prep Time: 20 minutes | Total Time: 2 hours 20 minutes | Servings: 12 delicious bars

                    - Presentation Tips: Serve these delightful bars chilled on a vibrant platter. For an elegant touch, sprinkle some additional shredded coconut atop or drizzle with extra melted chocolate. These bars make for a nutritious snack or a delicious dessert option that everyone will love! Enjoy!

                      Leave a Comment

                      Recipe Rating