If you're looking for a snack that's both crunchy and packed with flavor, you’ll love these Lemon Garlic Roasted Chickpeas. In this article, I’ll guide you through the simple steps to create this tasty treat. You’ll learn about the ingredients, cooking tips, and even health benefits. Get ready to impress your taste buds and your friends with this easy, healthy snack! Let’s dive in!
Why I Love This Recipe
- Simple Ingredients: This recipe uses pantry staples, making it easy to whip up whenever you're craving a healthy snack.
- Versatile Snack: Enjoy these roasted chickpeas on their own, or sprinkle them over salads and grain bowls for added texture.
- Flavor Explosion: The combination of zesty lemon and garlic creates a delightful flavor that will keep you coming back for more.
- Healthier Alternative: These chickpeas are a nutritious and satisfying substitute for traditional chips or crackers.
Ingredients
List of Ingredients
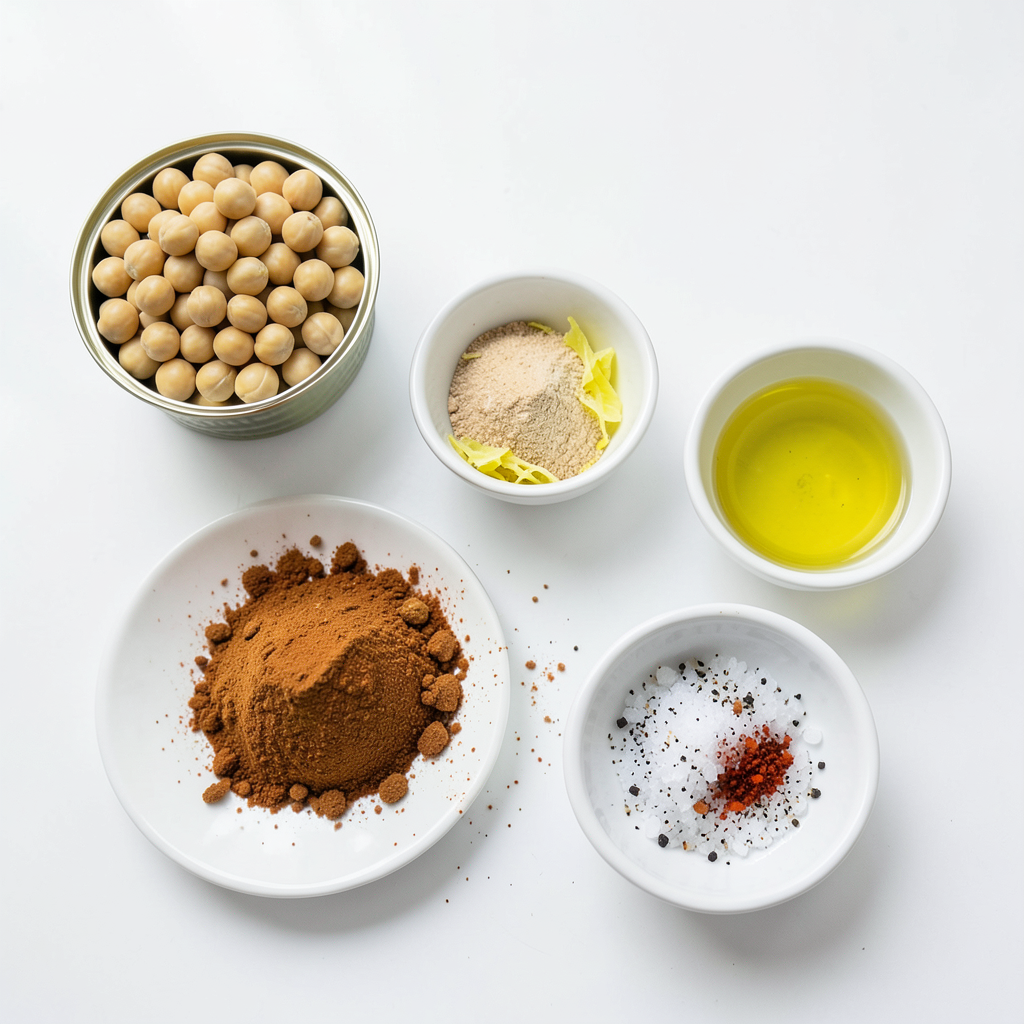
- 1 can (15 oz) chickpeas, thoroughly rinsed and drained
- 2 tablespoons olive oil
- 1 teaspoon garlic powder
- 1/2 teaspoon onion powder
- 1/2 teaspoon smoked paprika
- Zest of 1 vibrant lemon
- 2 tablespoons freshly squeezed lemon juice
- 1 teaspoon coarse sea salt
- 1/4 teaspoon freshly ground black pepper
- 1/4 teaspoon cayenne pepper (adjust based on your heat preference)
Ingredient Notes
Chickpeas are the star of this dish. They are packed with protein and fiber. Rinse and drain them well to remove any extra sodium. Olive oil helps to crisp them up and adds flavor. Garlic powder and onion powder give a savory depth. Smoked paprika adds a nice warmth and aroma. Lemon zest enhances the citrus flavor, while lemon juice brightens the entire dish. Sea salt and black pepper season the chickpeas, and cayenne pepper gives an optional kick.
Substitutions and Alternatives
If you don’t have chickpeas, try using cooked white beans. You can swap olive oil for avocado oil or melted coconut oil for a different taste. If you lack garlic powder, fresh minced garlic works too. For a twist, try using curry powder instead of smoked paprika. You can also use lime juice and zest if you prefer that flavor. If you want less heat, simply skip the cayenne pepper or reduce the amount.
Step-by-Step Instructions
Preheating the Oven
First, I heat my oven to 400°F (200°C). This step is key for crispy chickpeas. I also line a baking sheet with parchment paper to make clean-up easy.
Preparing the Chickpeas
Next, I rinse one can of chickpeas under cold water. After draining them, I place them on a clean kitchen towel. I gently pat them dry, which helps them get crispy.
Creating the Flavorful Coating
In a large mixing bowl, I combine 2 tablespoons of olive oil, 1 teaspoon of garlic powder, 1/2 teaspoon of onion powder, and 1/2 teaspoon of smoked paprika. I also add the zest of one lemon, 2 tablespoons of fresh lemon juice, 1 teaspoon of coarse sea salt, 1/4 teaspoon of black pepper, and 1/4 teaspoon of cayenne pepper. I stir everything together until it forms a rich marinade.
Coating the Chickpeas
Now, I add the dried chickpeas to the bowl with the marinade. I toss them gently but make sure every chickpea gets coated. Each bite will be packed with flavor!
Arranging for Roasting
I spread the seasoned chickpeas in a single layer on the lined baking sheet. It’s important they do not overlap. This helps them roast evenly and become crispy.
Roasting the Chickpeas
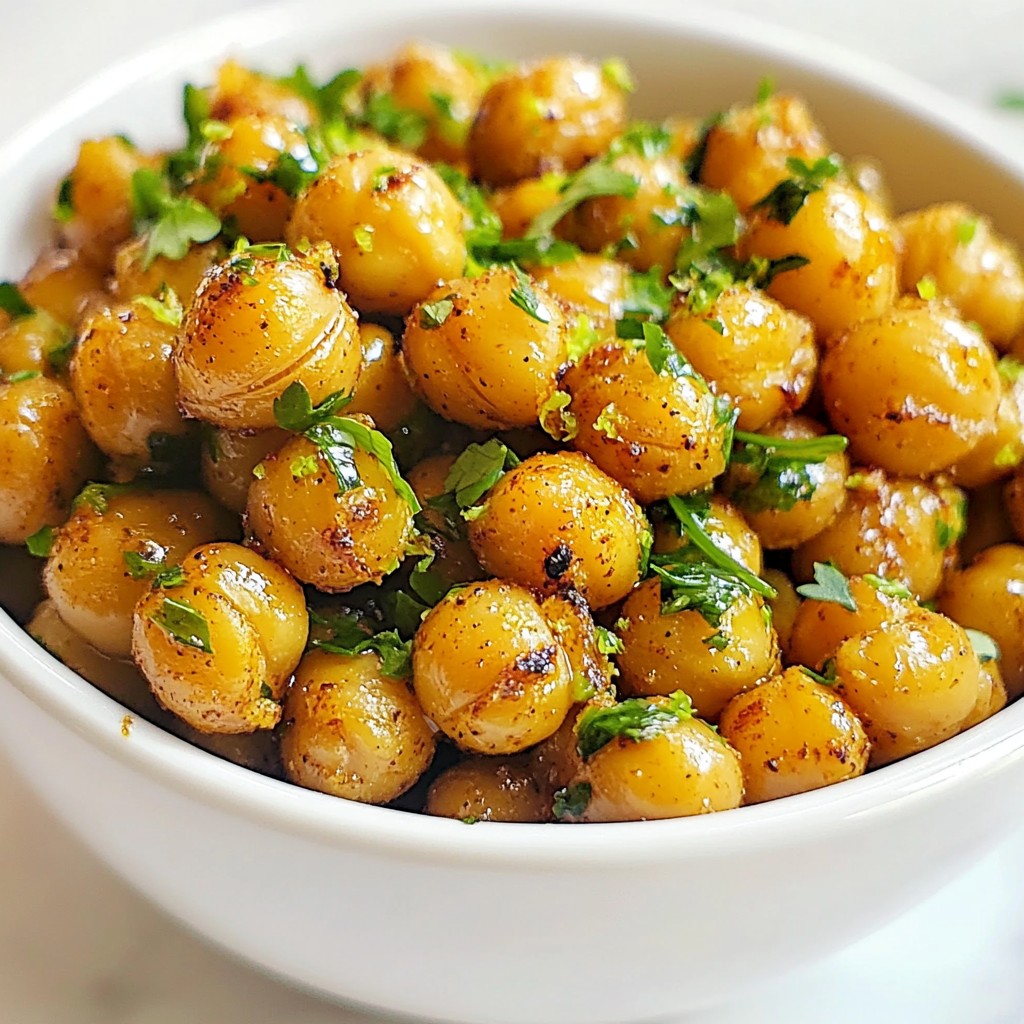
I place the baking sheet in the oven and roast the chickpeas for 25-30 minutes. Every 10 minutes, I stir them to ensure they cook evenly. They should turn golden brown and crunchy.
Cooling and Serving Tips
Once they are done, I take the baking sheet out. I let the chickpeas cool slightly. They will crisp up even more as they cool. I serve them in a rustic bowl or sprinkle them over salads for crunch. Adding a bit of extra lemon zest on top makes it look great too!
Tips & Tricks
Ensuring Crispy Chickpeas
To make your chickpeas crispy, start with dry ones. After rinsing, pat them dry with a towel. This removes moisture that can prevent crispiness. Spread them out on the baking sheet. Avoid overcrowding, as this helps them roast evenly. Stir them every 10 minutes for best results. This ensures all sides get that golden color.
Flavor Variations
You can change the flavor of your chickpeas easily. Try adding different spices to your mix. For a spicy kick, use chili powder or cayenne. If you like sweet, add a pinch of cinnamon. You can also use fresh herbs. Rosemary or thyme adds a fresh taste. Experiment with flavors to find your favorite.
Serving Suggestions
These roasted chickpeas are great as a snack. Serve them in a bowl for a crunchy treat. They also work well on salads or grain bowls. Sprinkle them on top for added crunch. For a fun twist, pair them with dips like hummus or yogurt. Add lemon zest on top for a zesty finish. Enjoy them any time you need a snack!
Pro Tips
- Dry Chickpeas Thoroughly: Ensuring the chickpeas are completely dry before roasting is crucial for achieving that desired crispiness. Use a clean kitchen towel to pat them dry after rinsing.
- Experiment with Spices: Feel free to adjust the spices or add your favorites! Try adding cumin, curry powder, or even nutritional yeast for extra flavor and variety.
- Monitor Roasting Time: Oven temperatures can vary, so keep an eye on the chickpeas as they roast. Remove them once they are golden brown and crispy to avoid burning.
- Store for Freshness: Store any leftover roasted chickpeas in an airtight container at room temperature. For maximum crunch, consume them within a few days.
Nutritional Information
Nutritional Breakdown per Serving
Each serving of Lemon Garlic Roasted Chickpeas contains about:
- Calories: 160
- Protein: 6 grams
- Carbohydrates: 26 grams
- Dietary Fiber: 6 grams
- Total Fat: 5 grams
- Saturated Fat: 0.5 grams
- Sodium: 250 mg
These values may vary slightly based on cooking methods and portion sizes.
Health Benefits of Chickpeas
Chickpeas are a powerhouse of nutrition. They are rich in protein, making them a great meat alternative. They also offer a good source of dietary fiber, which aids digestion. This fiber helps you feel full longer, which can support weight management. Additionally, chickpeas have vitamins and minerals like iron, magnesium, and folate. They may help lower cholesterol levels and support heart health. Eating chickpeas can also stabilize blood sugar levels, making them a smart choice for everyone.
Dietary Considerations
Chickpeas are naturally gluten-free, which makes them safe for those with gluten intolerance. They are also low in fat and contain no cholesterol. If you're watching your sodium intake, you can adjust the salt in the recipe. For those who are vegan or vegetarian, chickpeas provide essential nutrients without animal products. However, if you have a legume allergy, it’s best to avoid chickpeas altogether. Always check for any allergies before serving to others.
Variations
Different Seasoning Ideas
You can change the flavors of your roasted chickpeas by trying different spices. For a Mediterranean twist, use oregano and thyme. For something spicy, add chili powder or curry powder. If you want a cheesy flavor, sprinkle nutritional yeast before roasting. You can even switch the lemon for lime for a different zing. The options are endless!
Alternative Cooking Methods
While roasting is the most common way to cook chickpeas, you can also try air frying. It takes about 15-20 minutes at 380°F. The chickpeas will still be crispy and full of flavor. You can also sauté them on the stove with a bit of oil and seasonings for a quick snack. Each method gives a slightly different texture but keeps that great taste.
Serving with Dips or Sauces
Roasted chickpeas are tasty on their own, but they taste even better with dips! Try serving them with hummus or tzatziki for a creamy contrast. You can also pair them with a spicy salsa or a tangy yogurt sauce. These dips add another layer of flavor and make for a fun snack or appetizer. Enjoy exploring these tasty variations!
FAQs
How to Store Leftover Roasted Chickpeas?
To store leftover roasted chickpeas, let them cool completely. Place them in an airtight container. They will stay fresh at room temperature for up to three days. If you want to keep them longer, store them in the fridge. However, they may lose some crispiness. To revive them, simply reheat in the oven for a few minutes.
Can I make Lemon Garlic Roasted Chickpeas in an Air Fryer?
Yes, you can make these chickpeas in an air fryer! Preheat your air fryer to 400°F (200°C). Follow the same steps for coating the chickpeas. Place them in the air fryer basket in a single layer. Cook for about 15-20 minutes, shaking the basket halfway through. This method gives you a lovely crunch without using much oil.
How do I make these chickpeas less spicy?
To make these chickpeas less spicy, simply reduce or omit the cayenne pepper. You can also add more garlic powder or smoked paprika for flavor. Adjusting the seasoning helps keep the taste enjoyable without the heat. Taste your mixture before coating the chickpeas to ensure it meets your spice level.
What can I serve with Lemon Garlic Roasted Chickpeas?
You can serve these roasted chickpeas as a snack or a salad topping. They add crunch and flavor to grain bowls, too. Try pairing them with a yogurt dip or a fresh salsa for added taste. You can also enjoy them with a light drink, like iced tea or lemonade, for a refreshing treat.
Roasting chickpeas offers a tasty, healthy snack. We covered ingredients, simple steps, and tips for crispiness. Don’t forget flavor variations and serving ideas to suit your taste. Roasted chickpeas fit into many diets and can boost your meals. Try your favorite seasonings or dips for a fun twist. Enjoy experimenting with this easy recipe to find your personal favorite. Happy cooking!