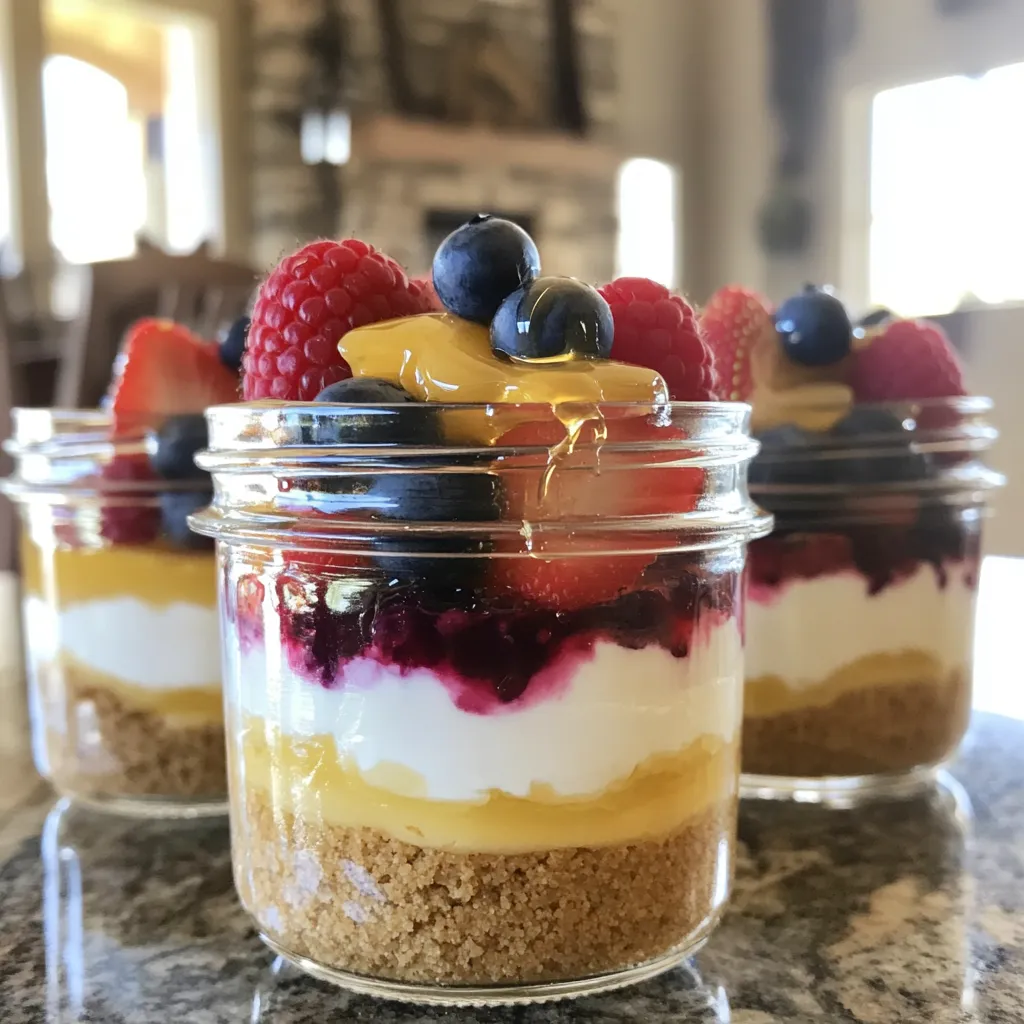
Looking for a tasty treat that packs a protein punch? Try my Greek Yogurt Cheesecake Jars! These little delights combine creamy Greek yogurt and rich cream cheese for a guilt-free dessert. They’re easy to make and perfect for any occasion. Plus, you can customize them with your favorite toppings. Ready to impress your friends and family? Let’s dive into the simple steps and all the delicious options!
Ingredients
To make Greek yogurt cheesecake jars, you need a few key ingredients. Here’s what you will need:
– 2 cups Greek yogurt (preferably full-fat for an ultra-creamy texture)
– 8 oz cream cheese, softened at room temperature
– 1/2 cup honey or maple syrup (adjust based on your sweetness preference)
– 1 teaspoon pure vanilla extract
– 1 tablespoon freshly squeezed lemon juice
– 1/4 teaspoon fine sea salt
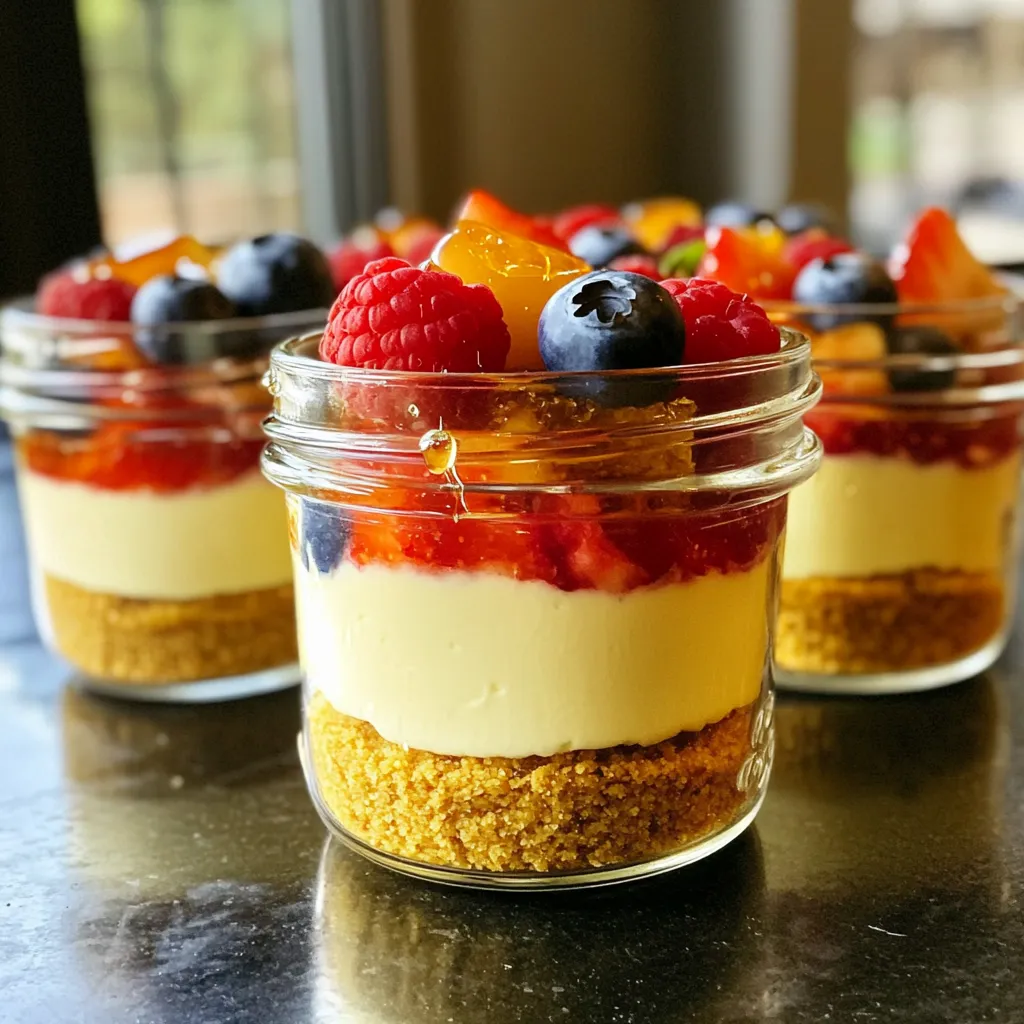
– 1 cup graham cracker crumbs
– 1/4 cup unsalted butter, melted and slightly cooled
– Fresh berries (such as strawberries, blueberries, or raspberries) for topping
Each ingredient plays a role in making the cheesecake creamy and tasty. Greek yogurt adds protein and tang. Cream cheese gives it richness. Honey or maple syrup sweetens it just right. Vanilla extract and lemon juice add depth. The graham cracker crumbs and butter create a crunchy base. Finally, fresh berries add color and flavor.
Step-by-Step Instructions
Preparing the Crust
– Mixing Graham Cracker Crumbs with Butter
In a medium bowl, mix 1 cup of graham cracker crumbs with 1/4 cup of melted butter. Stir until the crumbs soak up the butter. This mixture should feel sandy.
– Pressing Down the Crust in Jars
Take about 2 tablespoons of the crumb mixture for each jar. Press it down firmly with the back of a spoon. You want a nice, compact layer at the bottom of each jar.
Making the Cheesecake Filling
– Beating Cream Cheese until Smooth
In a large bowl, beat 8 oz of softened cream cheese with an electric mixer. Mix until it’s smooth and creamy. This step is key for a good texture.
– Incorporating Greek Yogurt
Next, add 2 cups of Greek yogurt to the cream cheese. Keep mixing until they blend well. The filling should be velvety and thick.
Assembling the Cheesecake Jars
– Layering the Cheesecake Filling
Spoon the cheesecake filling over the crust in each jar. Fill them about three-quarters full. Make sure the filling is even across all jars.
– Tips for Even Distribution
Use the back of a spoon to smooth the top of the filling. This helps with presentation. Clean edges make the jars look more appealing.
Chilling and Serving
– Refrigeration Time for Proper Setting
Place the jars in the fridge for at least 2 hours. This helps the cheesecake set well. If you can wait longer, it will taste even better.
– Final Touches with Fresh Berries
Before serving, add a handful of fresh berries on top. Strawberries, blueberries, or raspberries work great. This adds color and a burst of flavor to your jars.
Tips & Tricks
Achieving the Best Texture
Using full-fat Greek yogurt is key. It gives your cheesecake jars a rich and creamy texture. Low-fat yogurt can make the filling runny. Always choose full-fat for the best results.
For a creamy cheesecake filling, make sure your cream cheese is at room temperature. This step helps blend it smoothly with the yogurt. Beat the cream cheese first until it is silky. Then, add the yogurt slowly, mixing well. This way, you avoid lumps for a perfect texture.
Sweetness Adjustments
To tailor sweetness levels, taste as you mix. Start with half of your sweetener and add more if needed. Honey and maple syrup work well, but they can vary in sweetness. Use your preference to find the right balance.
If you seek alternative sweeteners, consider options like agave syrup or stevia. These can provide sweetness with fewer calories. Just remember to adjust the amount, as some are sweeter than honey.
Presentation Suggestions
For visual appeal, clear jars are ideal. They show off the layers of crust and filling beautifully. Choose jars that are tall and narrow for a stunning look.
Garnish your cheesecake jars with fresh berries. Strawberries, blueberries, or raspberries add color and flavor. You can also place a mint sprig on top for an extra touch. This adds freshness and makes your dessert pop!
Variations
Flavor Variations
You can change up the flavor of your Greek yogurt cheesecake jars easily. Try adding different extracts. Almond or coconut extracts can create a nice twist. Just a few drops can give your cheesecake a new taste.
You can also use fruit purees in the filling. Think about blending in strawberry or raspberry puree. This adds color and a fruity punch. You can adjust the sweetness to match the fruit.
Dietary Adjustments
Want a gluten-free option for the crust? Use gluten-free graham cracker crumbs. They taste great and keep the recipe simple. You still get that crunchy texture.
If you’re looking for a vegan version, swap out the cream cheese. Use soaked cashews or silken tofu instead. Blend them until smooth. You can still use Greek yogurt alternatives made from almond or coconut milk for creaminess.
Seasonal Toppings
Seasonal fruits make great toppings for your jars. In summer, try fresh peaches or blackberries. In fall, use sliced apples and a sprinkle of cinnamon.
For holidays, get creative with themed garnishes. Add crushed peppermint for winter or edible flowers for spring. These small touches can make your dessert feel special and festive.
Storage Info
Best Practices for Storing
– How to Store Leftover Cheesecake Jars
To store leftover cheesecake jars, cover each jar tightly with a lid or plastic wrap. This helps keep air out and prevents drying. Place the jars in the fridge right away. They can stay fresh for later enjoyment.
– Keeping Toppings Fresh
To keep toppings fresh, add berries just before serving. If you must store them, place any extra berries in a separate container. This way, they won’t get mushy or spoil the cheesecake.
Shelf Life
– Duration for Refrigerated Storage
These cheesecake jars last up to five days in the fridge. After that, the texture and taste may change. Always check for freshness before eating.
– Signs of Spoilage
Look for changes in color or smell. If the cheesecake looks off or smells sour, it’s best to toss it. Safety first!
Freezing Options
– Can You Freeze the Cheesecake Jars?
Yes, you can freeze the cheesecake jars. This is a great way to save leftovers. Just ensure they are sealed tightly.
– How to Properly Freeze and Thaw
To freeze, wrap the jars in plastic wrap and then aluminum foil. This prevents freezer burn. When ready to eat, move the jars to the fridge for several hours to thaw. Avoid using the microwave as it can ruin the texture.
FAQs
Can I use low-fat Greek yogurt instead of full-fat?
Yes, you can use low-fat Greek yogurt. However, full-fat yogurt makes a creamier cheesecake. The texture may change slightly, but the taste will still be good. If you want a lighter option, go ahead with low-fat.
How long do I need to chill the jars before serving?
Chill the jars for at least 2 hours. This time helps the cheesecake set properly. If you can, chill them longer. Overnight is best for a firmer texture.
What are some suitable substitutes for cream cheese?
You can use ricotta cheese or mascarpone. Both will give a rich flavor. For a dairy-free option, try cashew cream. Just blend soaked cashews until smooth for a creamy texture.
Is it possible to make these jars in advance?
Absolutely! You can make the jars a day or two ahead. Just store them in the fridge. This not only saves time but also allows the flavors to meld beautifully.
Can I use store-bought graham cracker crust instead?
Yes, store-bought graham cracker crust works well. It saves time and effort. Just spoon the cheesecake filling on top and enjoy!
Making cheesecake jars is simple and fun. You start with quality ingredients like Greek yogurt and cream cheese. Then, follow the steps to prepare the crust, mix the filling, and assemble the jars. Remember to chill them for the perfect texture. You can customize your desserts with different flavors, sweeteners, or toppings.
For best results, use fresh ingredients and store them properly. Enjoy every bite of your creamy treat!