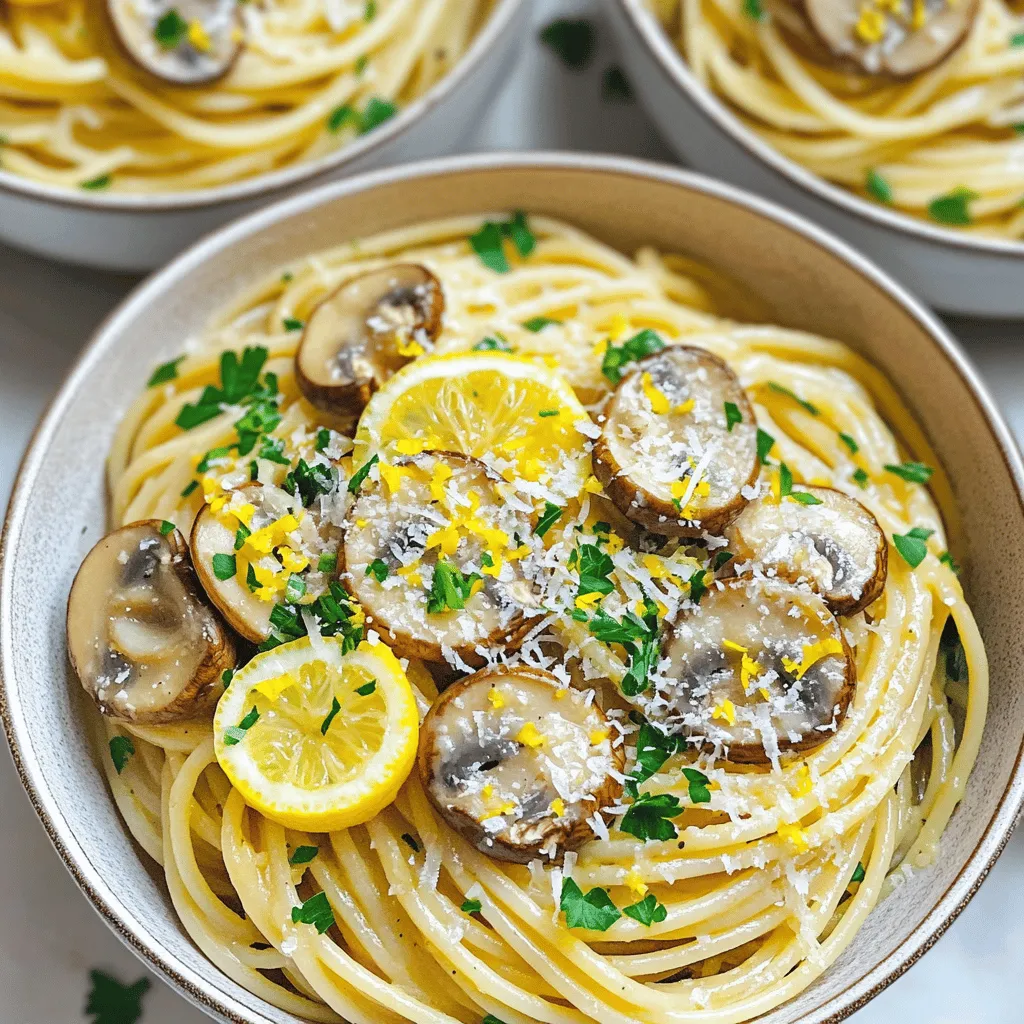
Are you ready to whip up a savory dish that’s both simple and delicious? My Garlic Butter Mushroom Pasta is a breeze to make and packed with flavor. With just a few key ingredients, you’ll create a meal that impresses your taste buds without breaking a sweat. In this post, I’ll guide you step-by-step, ensuring you become a pasta pro in no time. Let’s dive into this delightful recipe!
Ingredients
List of Ingredients
– Main ingredients
– 300g spaghetti or fettuccine
– 400g fresh mushrooms (button or cremini), thinly sliced
– 4 tablespoons unsalted butter
– 4 cloves garlic, finely minced
– 1/2 teaspoon red pepper flakes (optional for heat)
– Salt and freshly ground black pepper to taste
– 1/4 cup freshly grated Parmesan cheese
– 2 tablespoons chopped fresh parsley (for garnish)
– Zest of 1 lemon
– Optional ingredients
– Extra Parmesan for serving
– Lemon wedges for added flavor
In this recipe, I focus on fresh, simple ingredients. The mushrooms add a rich, earthy flavor. Garlic and butter create a lovely sauce that coats the pasta perfectly. I choose spaghetti or fettuccine for their ability to hold the sauce well. The red pepper flakes can add a nice kick, but you can skip them if you prefer mild flavors. Always use fresh herbs like parsley for a pop of color and freshness.
This Garlic Butter Mushroom Pasta is quick and easy. You can have it on your table in about 25 minutes. It’s a great dish for busy weeknights or when you want to impress guests.
Step-by-Step Instructions
Cooking the Pasta
To start, boil a large pot of salted water. Add 300g of spaghetti or fettuccine. Cook the pasta for about 8-10 minutes. You want it to be al dente, meaning firm to the bite. Before draining, reserve 1 cup of the starchy pasta water. This water helps make the sauce creamy later. Drain the pasta and set it aside.
Preparing the Garlic Butter Sauce
Next, grab a large skillet and set it on medium heat. Melt 4 tablespoons of unsalted butter in the skillet. Once the butter is bubbling, add 4 finely minced garlic cloves. If you like heat, sprinkle in 1/2 teaspoon of red pepper flakes. Sauté the garlic for about 1 minute. Keep stirring so it doesn’t burn. Burnt garlic can ruin your dish!
Cooking the Mushrooms
Now, it’s time for the mushrooms. Add 400g of thinly sliced mushrooms to the skillet. Stir-fry them for about 5-7 minutes. You want them to become tender and turn a lovely golden-brown. While they cook, season with salt and freshly ground black pepper to enhance the flavor.
Combining Pasta and Sauce
Lower the heat to its lowest setting. Gently add the drained pasta into the skillet with the mushrooms. Use tongs to toss everything together. Make sure each strand of pasta gets coated in that rich garlic butter sauce. If it looks dry, use the reserved pasta water. Add it a little at a time until you get a nice, silky consistency.
Enhancing Flavor
For a bright flavor boost, stir in the zest of one lemon. Then, mix in 1/4 cup of freshly grated Parmesan cheese. This will help the cheese melt and blend into the pasta, making it even more delicious.
Serving the Dish
When ready to serve, remove the skillet from heat. Plate the pasta in deep bowls. Garnish with 2 tablespoons of chopped fresh parsley. For extra indulgence, add more Parmesan cheese on top. You can also drizzle some melted garlic butter over the pasta. Serve with fresh lemon wedges on the side for a zesty touch!
Tips & Tricks
Common Mistakes to Avoid
One common mistake is overcooking garlic. Garlic cooks fast. If you let it brown, it turns bitter. Always sauté it on medium heat for about one minute. This keeps the flavor bright and fresh.
Another mistake is using the wrong type of pasta. Spaghetti and fettuccine work well. Don’t use pasta that is too thick or too thin. This can affect the texture of your dish.
Best Practices for Mushrooms
When choosing mushrooms, opt for fresh, firm ones. Button or cremini mushrooms are great for this dish. Avoid mushrooms that are slimy or have dark spots.
Cleaning mushrooms is simple. Just wipe them with a damp cloth. Don’t soak them in water. They absorb moisture and lose flavor. Slice them thinly for even cooking. This helps them brown nicely in the pan.
Enhancing the Flavor Profile
To boost the flavor, consider adding spices. Fresh thyme or rosemary pairs well with mushrooms. A pinch of nutmeg can add warmth too.
For extra toppings, try toasted pine nuts or breadcrumbs. They add a nice crunch. You might also sprinkle more Parmesan cheese or fresh herbs before serving. These toppings can bring your Garlic Butter Mushroom Pasta to the next level.
Variations
Vegetarian Alternatives
You can boost the flavor and nutrition of your garlic butter mushroom pasta by adding veggies. Spinach wilts well and adds color. Bell peppers bring sweetness and crunch. Simply toss in a handful of fresh spinach or some diced bell peppers when you add the mushrooms. Cook them until just tender. This way, you keep the dish vibrant and tasty!
Protein Options
Want to add some heartiness? You can include protein like chicken, shrimp, or tofu. For chicken, cut it into bite-sized pieces and cook it in the skillet before adding the mushrooms. For shrimp, toss them in when the mushrooms are nearly done. Tofu is a great choice for a vegetarian option; just cube it and sauté until golden. All these proteins will make the dish filling and delicious.
Different Pasta Types
You can swap out the pasta for gluten-free or whole wheat options. Gluten-free pasta works well and cooks like regular pasta. Whole wheat pasta adds fiber and a nutty flavor. Just follow the cooking instructions on the package. Experimenting with different types keeps your meal exciting.
Storage Info
Storing Leftovers
To keep your Garlic Butter Mushroom Pasta fresh, use airtight containers. Glass containers work best. Make sure to cool the pasta before sealing it. Store it in the fridge for up to three days. If you want to keep it longer, freezing is a great option.
Reheating Guidelines
When reheating, the best method is to use the stove. Add a little water or broth to the pan. This helps keep the pasta moist. Heat it over low heat, stirring gently. You can also use the microwave. Just cover the bowl and add a splash of water. Heat in short bursts, stirring in between.
Freezing Options
To freeze the pasta, let it cool completely. Then, portion it into freezer-safe bags. Remove as much air as possible. The pasta will last for about three months in the freezer. When ready to eat, thaw it overnight in the fridge. Reheat gently, adding a bit of liquid to bring back the creamy sauce.
FAQs
How long does Garlic Butter Mushroom Pasta last in the fridge?
Garlic Butter Mushroom Pasta lasts about 3 to 5 days in the fridge. Store it in an airtight container. Make sure it cools down before sealing. Always check for any signs of spoilage, like off smells or mold, before eating.
Can I make this recipe ahead of time?
Yes, you can make this recipe ahead of time. Cook the pasta and sauce separately. Store them in the fridge. When you’re ready to eat, just reheat the sauce and toss it with the pasta. This keeps everything fresh and tasty.
What can I pair with Garlic Butter Mushroom Pasta?
You can pair this dish with a fresh salad or garlic bread. A simple arugula salad with lemon dressing works well. For drinks, try white wine or sparkling water with lemon. These options add a nice touch to your meal.
How to make Garlic Butter Mushroom Pasta gluten-free?
To make this dish gluten-free, use gluten-free pasta. Options include rice pasta or quinoa pasta. These types mimic the texture of regular pasta well. Cook them according to package instructions for the best results.
In this post, I shared how to make Garlic Butter Mushroom Pasta. We discussed key ingredients and steps, from cooking the pasta to making the sauce. I also offered tips on avoiding common mistakes and enhancing flavors. You can make this dish your own with variations and proper storage methods. Remember, enjoy the cooking process, and feel free to experiment. Simple changes can lead to great results. Happy cooking!