
If you love rich flavors and sweet treats, then you’re in for a treat! Chocolate hazelnut crepes are simple to make and utterly delicious. In this post, I’ll guide you through every step, from gathering the right ingredients to perfecting your cooking technique. Whether you want a fun breakfast or a decadent dessert, these crepes will impress everyone. Let’s dive into this sweet adventure!
Ingredients
List of Ingredients for Chocolate Hazelnut Crepes
To make delicious chocolate hazelnut crepes, gather these ingredients:
– 1 cup all-purpose flour
– 2 large eggs
– 1 ½ cups milk
– 2 tablespoons melted butter (plus more for cooking)
– 2 tablespoons granulated sugar
– 1 teaspoon pure vanilla extract
– 1/4 teaspoon fine salt
– 1/2 cup chocolate hazelnut spread
– 1/4 cup toasted hazelnuts, chopped
– Whipped cream (for serving)
– Fresh berries, like strawberries or blueberries (for garnish)
Measurement Details for Each Ingredient
Knowing how to measure your ingredients is key. Use a dry measuring cup for flour and sugar. Crack the eggs into a bowl to avoid shells. Measure milk in a liquid measuring cup for accuracy. Melt the butter in a small bowl, then let it cool slightly before adding.
– Flour: 1 cup equals about 120 grams.
– Eggs: Use large eggs for best results.
– Milk: 1 ½ cups is about 360 milliliters.
– Butter: 2 tablespoons is about 30 grams.
– Sugar: 2 tablespoons is about 25 grams.
– Vanilla Extract: Always use pure for great taste.
– Salt: Fine salt mixes better than coarse.
– Chocolate Hazelnut Spread: Brands like Nutella work well.
– Hazelnuts: Chop them finely for a better crunch.
– Whipped Cream and Berries: Add as much as you like for serving.
Possible Ingredient Substitutions
If you need to swap ingredients, here are some options:
– Flour: Use whole wheat flour for a nuttier taste.
– Eggs: You can use flaxseed meal mixed with water as a vegan egg.
– Milk: Almond or oat milk works for a dairy-free option.
– Butter: Coconut oil can replace butter for a dairy-free choice.
– Sugar: Honey or maple syrup can sweeten nicely.
– Chocolate Hazelnut Spread: Peanut butter or almond butter can also work.
Feel free to mix and match these ingredients based on your taste and needs.
Step-by-Step Instructions
Preparation of the Batter
To start, gather your ingredients. You need all-purpose flour, eggs, milk, melted butter, sugar, vanilla extract, and salt. In a large mixing bowl, combine the flour, sugar, and salt. Whisk these dry ingredients until they mix well. In another bowl, crack the eggs and beat them. Add the milk, melted butter, and vanilla extract to this bowl. Whisk until everything blends together. Gradually pour this wet mix into the dry mix. Use a whisk to combine them until the batter is smooth. Let the batter sit for about 20 minutes. This helps the crepes become tender and tasty.
Cooking the Crepes
Now, it’s time to cook! Preheat your non-stick skillet over medium heat. Lightly grease the pan with melted butter to prevent the crepes from sticking. Pour about 1/4 cup of batter into the skillet. Quickly tilt and swirl the pan to spread the batter into a thin layer. Cook the crepe for 2-3 minutes. You will see the edges lifting and the bottom turning golden. Carefully flip the crepe with a spatula and cook for another minute. Once done, transfer the crepe to a plate. Repeat this with the rest of the batter, adding more butter to the pan when needed.
Assembling the Crepes
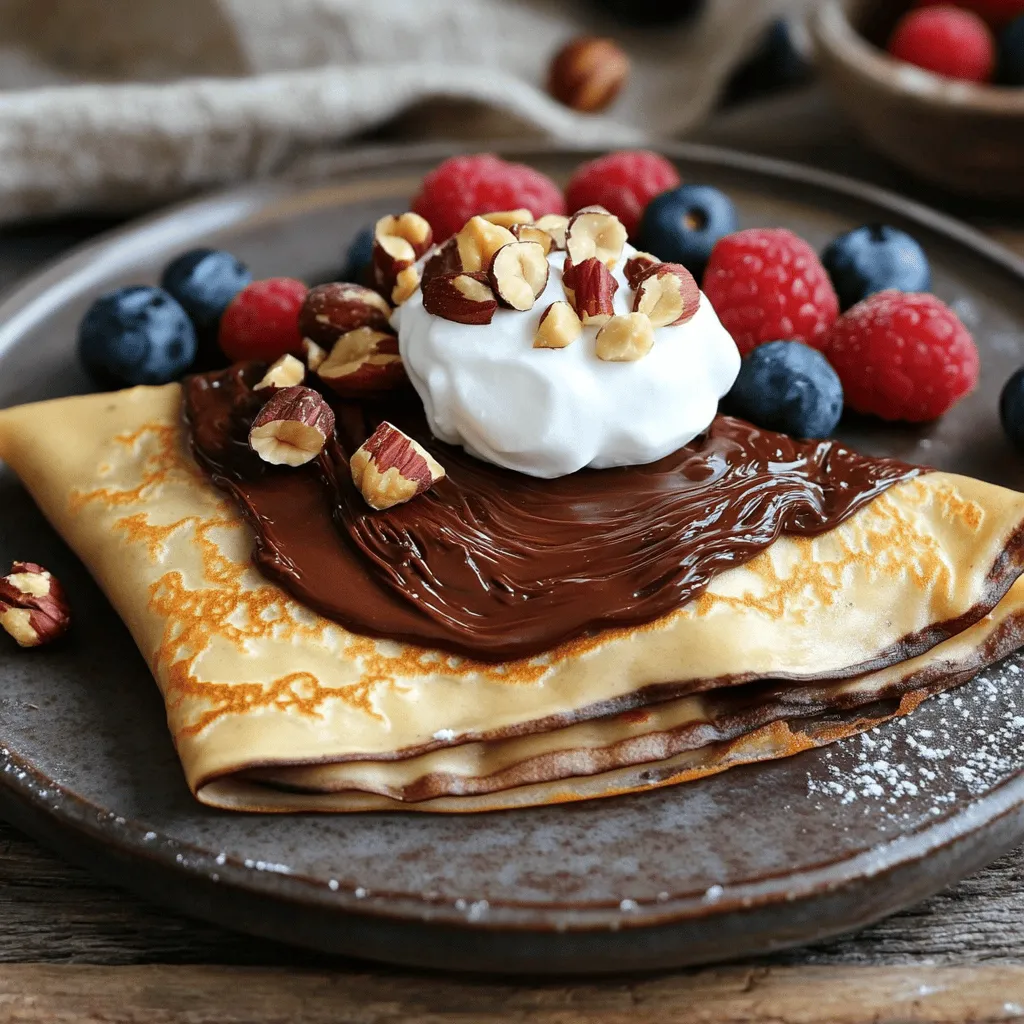
To assemble, take one cooked crepe and spread about 1 tablespoon of chocolate hazelnut spread on one half. Fold the crepe in half over the spread, then fold it again to form a triangle. Sprinkle the chopped toasted hazelnuts on top. Add a dollop of whipped cream and some fresh berries for color and flavor. Serve your crepes warm. Enjoy the rich chocolate, nutty hazelnuts, and the freshness of the berries!
Tips & Tricks
How to Ensure Perfectly Thin Crepes
To get thin crepes, you need the right batter. Make sure to whisk it well until smooth. Resting the batter for about 20 minutes helps too. This step makes the crepes tender. Use a non-stick skillet or a crepe pan for easy cooking. When you pour the batter, use about 1/4 cup each time. Quickly tilt the pan to spread the batter thinly. The goal is a nice, even layer. If you see bubbles forming, it’s time to flip!
Common Mistakes to Avoid
One common mistake is using too much batter. This makes thick crepes, which are not what we want. Another mistake is not preheating the pan enough. If it’s too cold, the crepes stick. Also, don’t rush the cooking. Let the edges lift before flipping. Lastly, avoid overcooking, as this can dry out the crepes. Aim for a light golden color on each side.
Enhancing Flavor and Texture
To boost flavor, add a touch of vanilla extract to the batter. This small change makes a big difference. You can also try using milk alternatives like almond or oat milk. For added texture, sprinkle in some chopped toasted hazelnuts directly into the batter. This makes every bite a little crunchier. Pair the crepes with fresh berries and whipped cream to balance the sweetness. Enjoy creating your own twist on this chocolate hazelnut delight!
Variations
Nut-Free Alternative Ideas
If you want to make nut-free crepes, simply skip the hazelnuts. You can use sunbutter or soy nut butter instead of chocolate hazelnut spread. This option gives a similar creamy texture and taste. You can also use fruit preserves or chocolate spread made without nuts. These alternatives ensure everyone can enjoy the crepes without worry.
Adding Different Fillings and Toppings
You can get creative with fillings and toppings. Try adding fresh fruits like bananas, strawberries, or raspberries. Cream cheese or mascarpone cheese can add a nice twist. You can also drizzle caramel or chocolate sauce on top. For a fun mix, add a sprinkle of cinnamon or powdered sugar before serving. These changes make your crepes unique and fun every time.
Vegan or Gluten-Free Modifications
To make vegan crepes, replace eggs with flaxseed meal mixed with water. Use plant-based milk, like almond or oat milk, instead of regular milk. For gluten-free crepes, swap all-purpose flour with a gluten-free flour blend. These adjustments keep the crepes delicious while catering to different diets. Remember, each change adds a new layer of flavor and texture to your dish.
Storage Info
Best Practices for Storing Leftover Crepes
To keep your leftover crepes fresh, stack them neatly. Place a piece of parchment paper between each crepe. This method prevents sticking and keeps them intact. Then, store them in an airtight container. Keep the container in the fridge for up to three days. If you notice any moisture, use a paper towel to absorb it before sealing.
Reheating Instructions
Reheating crepes is simple. You can use a skillet or microwave. For the skillet, heat it over low heat. Add a small amount of butter to the pan. Place the crepe in the skillet and warm it for about 30 seconds on each side. If using the microwave, wrap the crepe in a damp paper towel. Heat it for 15-20 seconds. Check it to ensure it’s warm, but not hot.
Freezing Crepes for Later Use
Freezing crepes is a great way to save time. First, let the crepes cool completely. Then, stack them with parchment paper in between. Place the stack in a freezer-safe bag or container. You can freeze them for up to two months. When you’re ready to use them, thaw the crepes overnight in the fridge. Reheat as mentioned above. Enjoy your delicious crepes anytime!
FAQs
What is the Best Way to Flip a Crepe?
The best way to flip a crepe is simple. Use a thin spatula. Start by gently lifting the edges of the crepe. Once the edges lift, slide the spatula under the crepe. Quickly flip it over in one smooth motion. Practice makes perfect, so don’t worry if it takes a few tries. A non-stick pan makes this easier.
Can I Make the Batter Ahead of Time?
Yes, you can make the batter ahead of time. Mix the ingredients, and let the batter rest. Cover it and store it in the fridge for up to two days. This can save you time on busy mornings. Just remember to stir the batter again before cooking.
How Can I Serve Chocolate Hazelnut Crepes for Breakfast or Dessert?
You can serve chocolate hazelnut crepes in many fun ways. For breakfast, top with whipped cream and fresh berries. Add a drizzle of maple syrup for extra sweetness. For dessert, you might layer them with more chocolate hazelnut spread. Serve with a scoop of ice cream for a treat. These crepes are great for any meal! Enjoy them warm and fresh from the pan.
You learned about making chocolate hazelnut crepes, a tasty treat. We covered the key ingredients, how to prepare the batter, and ways to cook and assemble. I shared tips for perfect thin crepes and common mistakes to avoid. You can also explore delicious variations and proper storage methods. With these insights, you can confidently enjoy your crepes for any meal. Dive in, experiment, and have fun creating your own delicious versions.