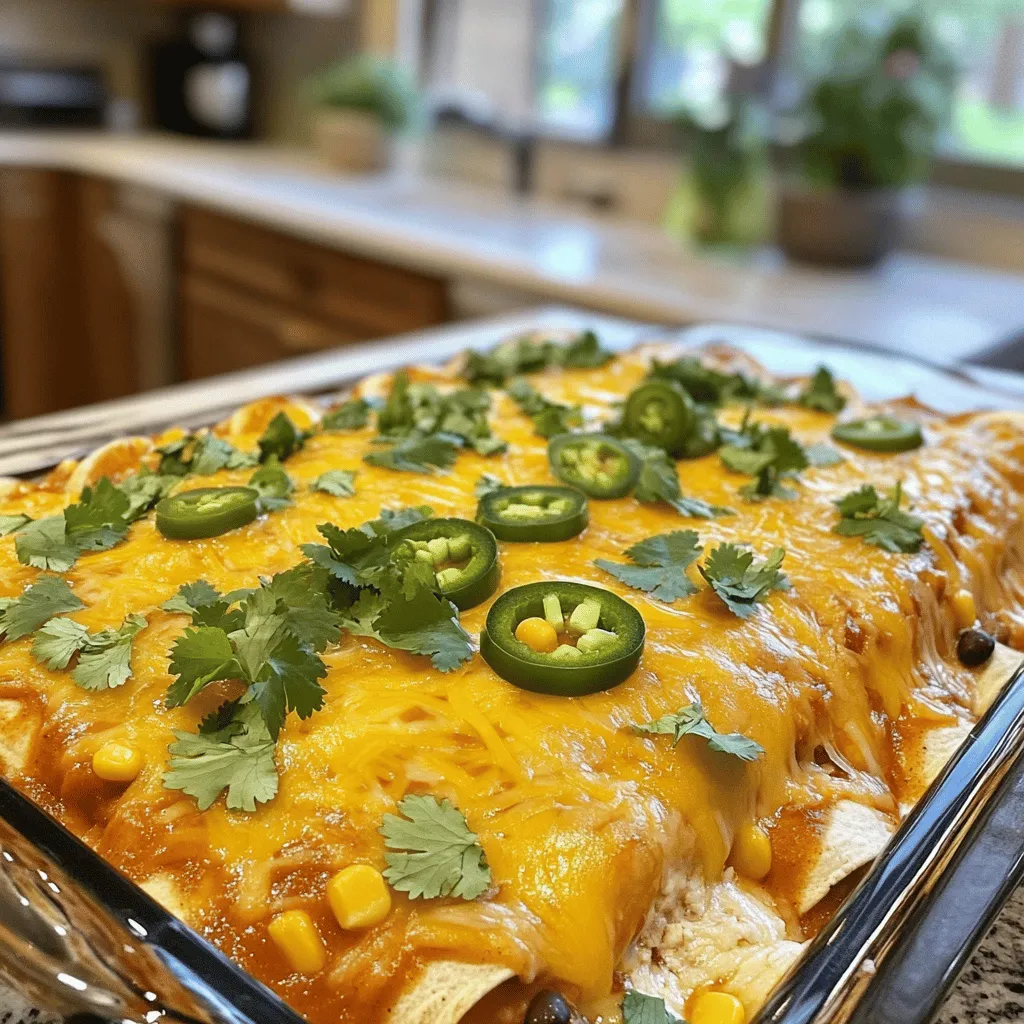
Craving a family meal that brings everyone together? My Chicken and Cheese Enchiladas Bake is your answer! This easy recipe combines tender chicken, creamy cheese, and zesty enchilada sauce, all wrapped in warm tortillas. Ready in under an hour, it makes for a hearty dinner everyone will love. Let’s dive into the simple ingredients and steps to create this delicious dish that turns dinner time into a fiesta!
Ingredients
List of Ingredients
– 2 cups cooked chicken, shredded
– 1 cup cream cheese, softened
– 1 cup shredded cheddar cheese, plus extra for topping
– 1 cup shredded Monterey Jack cheese
– 1 cup enchilada sauce (red or green)
– 8 small flour tortillas
– 1/2 cup black beans, drained and rinsed
– 1/2 cup corn kernels
– 1 teaspoon ground cumin
– 1 teaspoon chili powder
– 1/2 teaspoon garlic powder
– Salt and pepper to taste
– Chopped fresh cilantro for garnish
– Sliced jalapeños for optional heat
Gather all these ingredients before you start. Each one plays a key role in making the dish rich and tasty. You can use leftover chicken or rotisserie chicken to save time. Cream cheese adds a creamy texture and helps bind the filling. The cheeses bring a delicious flavor, while the enchilada sauce gives it that classic taste. Black beans and corn add texture and color.
Recommended Kitchen Tools
– Mixing bowl
– Baking dish (9×13 inch)
– Spatula or spoon
– Aluminum foil
These simple tools will help you create this yummy meal. A good mixing bowl is key for combining your filling. The baking dish holds everything together as it cooks. A spatula or spoon helps you scoop and spread. Aluminum foil keeps your dish moist while baking. With everything ready, you can dive right into making your Chicken and Cheese Enchiladas Bake.
Step-by-Step Instructions
Prepping the Oven and Filling
– Preheat the oven to 375°F (190°C). This makes sure your enchiladas cook evenly.
– In a large bowl, mix together all the filling ingredients. Combine the shredded chicken, cream cheese, half of the cheddar cheese, cumin, chili powder, garlic powder, black beans, corn, and a bit of salt and pepper. Stir well until smooth.
Assembling the Enchiladas
– Pour a layer of enchilada sauce into the bottom of a 9×13 inch baking dish. This helps the tortillas not stick.
– Take a flour tortilla and spoon some of the chicken mixture into the center. Roll it tightly and place it seam-side down in the dish. Repeat this for all the tortillas.
Baking the Enchiladas
– Pour the remaining enchilada sauce over the rolled tortillas. Make sure every part is covered.
– Sprinkle the rest of the cheddar cheese and Monterey Jack cheese on top.
– Cover the dish with aluminum foil to keep the cheese from burning. Bake for 25 minutes.
– After 25 minutes, take off the foil and bake for another 15 minutes. This browns the cheese nicely.Enjoy making this easy family meal!
Tips & Tricks
Perfecting the Enchiladas
To prevent tortillas from breaking, warm them first. Heat them on a hot skillet for about 10 to 15 seconds on each side. This makes them soft and easy to roll. If you skip this step, they may crack and ruin your enchiladas.
Adjusting spice levels is simple. If you like heat, add sliced jalapeños or extra chili powder. For milder flavors, reduce the chili powder and skip the jalapeños. You can always add more spice later, but it’s hard to take it out once it’s in!
Serving Suggestions
For side dishes, a refreshing green salad pairs well. You can also serve creamy guacamole or chips with salsa. These add nice texture and flavor alongside the enchiladas.
To enhance flavor, try topping with fresh cilantro or avocado slices. You can also drizzle some sour cream or add a squeeze of lime. These toppings add color and a burst of taste to your meal.Enjoy making your chicken and cheese enchiladas bake!
Variations
Ingredient Substitutions
You can easily change the protein in this dish. Try using ground beef or turkey for a richer taste. For a meatless option, black beans or lentils work well too. Each protein brings its unique flavor to the enchiladas.
You can also swap out the cheese types. For a sharp taste, try pepper jack cheese. If you want something milder, use mozzarella. Mixing different cheeses can create new and exciting flavors.
Dietary Modifications
If you need gluten-free options, choose corn tortillas instead of flour. This keeps the dish safe for those with gluten issues. Look for gluten-free enchilada sauce too.
For dairy-free options, use dairy-free cream cheese and cheese. Many brands offer tasty alternatives. You can still enjoy creamy and cheesy enchiladas without dairy.
If you follow a vegan diet, replace chicken with sautéed mushrooms or jackfruit. These add great texture. Use vegan cheese to keep it plant-based and tasty.
These variations make the Chicken and Cheese Enchiladas Bake flexible for everyone. You can create your own twist while keeping it delicious.
Storage Info
Proper Storage Methods
To store leftovers in the refrigerator, first let them cool down. Place the enchiladas in an airtight container. They can stay fresh for about 3 to 4 days.
If you want to freeze enchiladas for later use, wrap them tightly in plastic wrap. Then, put them in a freezer-safe bag or container. They will last up to 3 months in the freezer. When ready to eat, just thaw them overnight in the fridge.
Reheating Tips
For the best texture, reheat your enchiladas in the oven. Preheat it to 350°F (175°C). Place the enchiladas in a baking dish and cover with foil. Bake for about 20 minutes. This helps keep them moist.
To keep cheese from drying out, add a splash of enchilada sauce or a bit of water before reheating. This adds moisture and keeps the cheese creamy. Enjoy your delicious enchiladas again!
FAQs
Can I make Chicken and Cheese Enchiladas Bake ahead of time?
Yes, you can prepare the enchiladas a day in advance. Store them in the fridge before baking. This makes meal prep easy. Just cover the dish tightly with plastic wrap or aluminum foil. When you are ready to bake, remove the cover and bake as directed. You may need to add a few extra minutes to the baking time.
What can I serve as a side dish with Chicken and Cheese Enchiladas?
Great side dishes include:
– Mexican rice
– Refried beans
– Fresh guacamole
– A crisp green salad
– Corn on the cob
These sides add color and flavor to your meal. They complement the enchiladas perfectly.
How long will leftovers keep in the fridge?
Leftovers last about three to four days in the fridge. Store them in an airtight container. Always check for any off smells or mold before eating. If you want to keep them longer, you can freeze them. They will last up to three months in the freezer.
Can I use corn tortillas instead of flour?
Yes, you can use corn tortillas. They add a nice flavor and texture. However, they may break more easily. To avoid this, warm them in a skillet or microwave before filling. Flour tortillas are softer and hold up better during baking. Choose based on your taste and preference.
This post walked through making delicious Chicken and Cheese Enchiladas. We covered key ingredients, easy steps, and helpful tips. You can mix in your favorite flavors and adjust heat levels. Storing and reheating leftovers is a breeze, ensuring no meal goes to waste. Enjoy making these enchiladas with friends and family. Trust me, they will love every bite! Your kitchen adventures just got tastier, so get cooking!