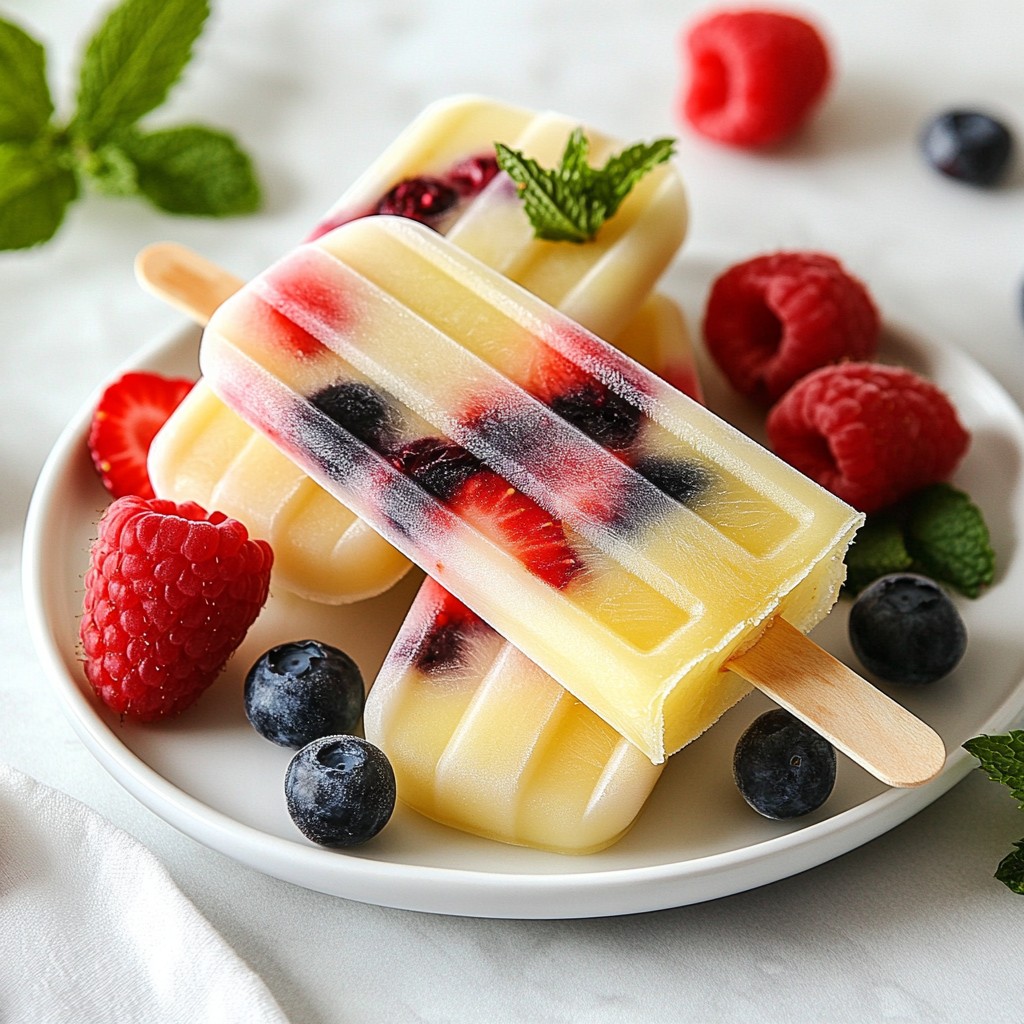
Beat the summer heat with Berry Lemonade Popsicles, the ultimate refreshing treat! These colorful pops bring together the flavors of mixed berries and freshly squeezed lemon juice. Easy to make and delightful to eat, they are perfect for kids and adults alike. In this guide, I’ll walk you through every step to create these tasty pops. Get ready for a summer full of fun and flavor!
Why I Love This Recipe
- Refreshing Flavor: The combination of tart lemon and sweet berries creates a delightful balance that is perfect for hot days.
- Easy to Make: With simple ingredients and straightforward steps, these popsicles can be whipped up in no time.
- Healthy Treat: Packed with vitamins from the berries and natural sweetness from honey, these popsicles are a guilt-free dessert.
- Customizable: Feel free to experiment with different fruits or sweeteners to make this recipe your own.
Ingredients
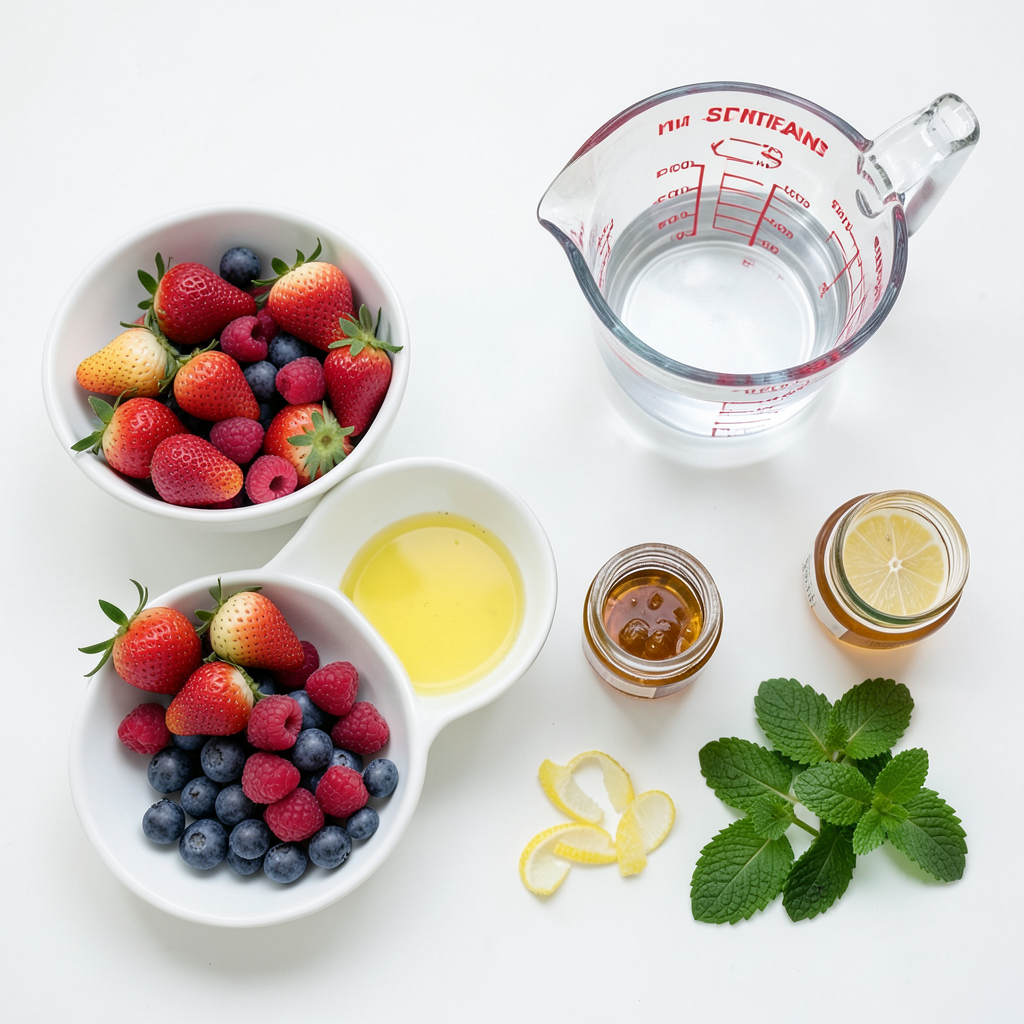
To make Berry Lemonade Popsicles, gather these simple and fresh ingredients:
- Mixed berries: strawberries, blueberries, raspberries (2 cups total)
- Freshly squeezed lemon juice (1 cup, about 4-6 lemons)
- Water (2 cups)
- Honey or agave syrup (1/2 cup, adjust for sweetness)
- Lemon zest (from 1 lemon)
- Optional: Fresh mint leaves for garnish
These ingredients make your popsicles bright, refreshing, and full of flavor. The mixed berries provide natural sweetness and vibrant color. Fresh lemon juice adds a zesty kick that balances the sweet berries. Honey or agave syrup brings everything together with just the right amount of sweetness. You can also add mint leaves for a cool touch. Each ingredient plays a key role in making these popsicles a perfect summer treat.
Step-by-Step Instructions
Preparing the Berries
To start, take your mixed berries. You can use strawberries, blueberries, or raspberries. Place them in a medium bowl. Use a fork or potato masher to gently mash the berries. This helps release their juices while keeping some chunks for texture. After mashing, set the bowl aside. This allows the flavors to blend together nicely.
Making the Lemonade Base
Next, grab a small saucepan. Combine 2 cups of water, 1/2 cup of honey (or agave syrup), and 1 cup of freshly squeezed lemon juice. Stir these together. Heat the mixture over low heat. Keep stirring until the honey dissolves completely. After that, remove it from the heat and let it cool for about 10 minutes.
Combining Mixtures
Now, it’s time to combine everything. Carefully fold the mashed berries into the cooled lemonade base. Don't forget to add the lemon zest too. This adds a nice burst of flavor. Make sure everything is well mixed together.
Filling Popsicle Molds
Next, you'll fill your popsicle molds. Use a measuring cup or a pitcher to pour the berry lemonade mixture into the molds. Fill each mold about three-quarters full. This is very important, as it leaves room for the popsicles to expand while freezing.
Inserting Sticks
If your molds have a lid, insert the popsicle sticks right away. If not, wait about 1-2 hours. Check the mixture; it should be slightly frozen. Then insert the sticks into the center of each mold.
Freezing Process
Put the filled molds in the freezer. Let them freeze for at least 4-6 hours. You want them to be solid and completely frozen. The longer, the better.
Unmolding and Serving
When it’s time to enjoy your popsicles, it’s time to unmold them. Run warm water over the outside of the mold for a few seconds. This helps loosen the pops. Gently pull on the sticks to release each popsicle. For a fun touch, you can garnish them with fresh mint leaves before serving. Enjoy your refreshing berry lemonade popsicles!
Tips & Tricks
Adjusting Sweetness
You can change the sweetness of your Berry Lemonade Popsicles easily. If you find the mix too tart, add more honey or agave syrup. Start with a half cup, then taste it. If you want it sweeter, stir in a little more. Just remember, the berries add their own flavor, too.
Alternative Sweeteners
If you want to try something different, consider using other sweeteners. You can use maple syrup, stevia, or even coconut sugar. Each of these can give a unique taste. Just adjust the amount you add based on how sweet you want it.
Enhancing Flavor
To make your popsicles even better, think about adding more fruits or herbs. You can mix in some sliced peaches or mango for a tropical twist. Fresh herbs like mint or basil can also add a nice touch. Just chop them finely and fold them into the mix before you pour it into molds. This extra step boosts the flavor in a fun way!
Pro Tips
- Use Fresh Ingredients: Always opt for fresh berries and lemons to enhance the flavor of your popsicles. Frozen berries can work in a pinch, but fresh ones provide a brighter taste.
- Adjust Sweetness: Taste your lemonade base before pouring it into the molds. Depending on the tartness of your lemons, you may want to adjust the amount of honey or agave syrup.
- Experiment with Flavors: Feel free to mix and match different types of berries or add other fruits like kiwi or mango for unique flavor combinations.
- Store Properly: To keep your popsicles fresh, wrap them individually in plastic wrap after unmolding and store them in an airtight container in the freezer.
Variations
Fruit Combinations
You can change the berries for fun new flavors. Try using blackberries or boysenberries. Citrus fruits like oranges or limes also work well. Mixing different fruits adds a twist to the popsicles. You can create a bright, colorful treat. Each fruit gives a unique taste, making every batch special.
Dairy-Based Twists
For a creamier popsicle, add yogurt or coconut milk. Greek yogurt gives a tangy flavor and thick texture. Coconut milk adds a rich and smooth taste. You can use any yogurt flavor you like. This twist makes the popsicles feel more like a dessert. Plus, they still stay healthy and refreshing.
Flavor Infusions
Herbs can take your popsicles to the next level. Try adding fresh basil or lavender for a unique taste. Just a few leaves can add a nice twist. You can steep the herbs in the lemonade base. This method releases their flavors beautifully. It makes your popsicles stand out at any summer party!
Storage Info
Proper Freezing Techniques
To get the best popsicles, start with clean molds. Pour the berry lemonade mix carefully, filling each mold three-quarters full. This gives room for the pops to expand as they freeze. If your molds have lids, insert the sticks right away. If not, freeze for 1-2 hours first, then add the sticks.
Storage Duration
Homemade popsicles can last in the freezer for up to two months. After that, they may lose flavor and texture. Keep them in an airtight bag or container. Label it with the date. Enjoy them within the first month for the best taste.
Thawing Instructions
To thaw popsicles, you can run warm water over the molds. This helps loosen them easily. Avoid using a microwave, as it may melt them unevenly. If you have time, let them sit at room temperature for a few minutes. This will make them easier to enjoy.
FAQs
How long do homemade popsicles last in the freezer?
Homemade popsicles can last about two months in the freezer. To keep them fresh, wrap them tightly. If you see ice crystals or freezer burn, it’s best to toss them.
Can I use frozen berries instead of fresh?
Yes, you can use frozen berries! They are just as good. Thaw them first to help release their juices. This makes the flavor rich and amazing.
What can I substitute for honey in this recipe?
You can use agave syrup or maple syrup. Both sweeteners work well. Adjust to your taste, as some may be sweeter than honey.
Are these popsicles healthy?
Yes, these popsicles are quite healthy! They use fresh fruit and natural sweeteners. The berries add vitamins and antioxidants. Enjoying these treats can be a guilt-free choice.
Can I make popsicles without molds?
Yes, you can! Use small cups or ice cube trays. Just insert sticks once the mixture starts to freeze. This is a fun way to make popsicles without special tools.
This blog post covered a fun recipe for berry lemonade popsicles. We explored the ingredients, from mixed berries to honey. You learned how to prepare the berries, make the lemonade base, and freeze your popsicles. We shared tips on sweetness and alternative flavors, plus ideas for variations.
These pops are not just tasty; they are easy to make and a hit in summer. Enjoy creating your own fruity treats with friends and family!