Skip to content
DisclaimerTerms Of UseGDPR PolicyCookie Policy

recipetorch

  • Home
  • Drinks
  • Appetizers
  • Dinner
  • Dessert
  • About
  • Contact
  • Privacy Policy
DisclaimerTerms Of UseGDPR PolicyCookie Policy

Nicole

- 1 lb ground beef - 8 oz mushrooms, diced - 1 medium onion, chopped - 2 cloves garlic, minced - 2 tablespoons olive oil - 1 cup beef broth - 1 tablespoon Worcestershire sauce - 1 teaspoon dried thyme - 1 teaspoon dried rosemary - 1 tablespoon cornstarch - 2 tablespoons water - Salt and pepper to taste - 1 sheet puff pastry (thawed if frozen) - 1 egg, beaten (for egg wash) Making a savory beef and mushroom pie starts with good ingredients. Each one plays a role in the pie's rich flavor. Ground beef gives the filling a hearty base. Diced mushrooms add earthiness and moisture. Chopped onion and garlic provide sweetness and depth. Olive oil helps to sauté these veggies, making them tender. You'll need beef broth for a flavorful sauce. Worcestershire sauce adds a touch of umami. Dried thyme and rosemary bring warmth and herbal notes. Cornstarch thickens the filling, making it satisfying. You can adjust the salt and pepper to your liking. The puff pastry is the star for the crust. It puffs up beautifully while baking. Finally, the egg wash makes the top golden and shiny. With these ingredients, you create a dish that comforts and delights. For the full recipe, check out the provided link. - Preheat the oven to 400°F (200°C) to prepare for baking. - In a large skillet, heat 2 tablespoons of olive oil over medium heat. - Add 1 medium onion, chopped, and 2 cloves of minced garlic. Sauté for 2-3 minutes. - Cook until the onion becomes soft and fragrant. - Introduce 1 lb of ground beef to the skillet. Brown the beef for about 5-7 minutes. - Break the beef apart with a spatula as it cooks. Drain any excess fat to keep the filling lean. - Add 8 oz of diced mushrooms, cooking for about 5 minutes until they shrink. - Pour in 1 cup of beef broth and 1 tablespoon of Worcestershire sauce. - Sprinkle in 1 teaspoon of dried thyme and 1 teaspoon of dried rosemary. - Season the filling with salt and pepper to taste. - Mix 1 tablespoon of cornstarch with 2 tablespoons of water to make a slurry. - Stir the slurry into the filling. Let it thicken for 2-3 minutes, then remove from heat. - On a floured surface, roll out 1 sheet of puff pastry. Make it large enough for your pie dish. - Place the pastry into the dish, lining the bottom and sides. - Spoon the savory beef and mushroom filling into the pastry. - Fold the edges over the filling to seal it. - Brush the top of the pie with 1 beaten egg for a golden finish. - Cut several small slits into the top of the pastry. This allows steam to escape while baking. - Place the pie in the oven and bake for 25-30 minutes. Look for a golden brown color on the pastry. - Once done, let the pie cool for 5-10 minutes before slicing and serving. For the complete recipe, refer to the Full Recipe section. - Best practices for refrigeration: Store any leftover pie in an airtight container. This keeps it fresh and tasty. You can keep it in the fridge for up to three days. - Reheating tips: When reheating, use the oven for the best results. Preheat it to 350°F (175°C). Place the pie on a baking sheet and heat for about 15-20 minutes. This helps restore the crispiness of the pastry. - Additional herbs and spices: Want to spice things up? Try adding a pinch of smoked paprika or a dash of cayenne pepper for heat. Fresh herbs like parsley or chives also brighten the flavor. - Pairing suggestions for sides: Serve your pie with a simple green salad or creamy mashed potatoes. Both options balance the rich filling and make it a complete meal. - Overbaking the pastry: Keep an eye on the pie as it bakes. Overbaking can lead to a tough and dry crust. Look for a golden brown color. - Not draining excess fat: After browning the beef, be sure to drain off any extra fat. This keeps the filling from becoming greasy and makes the pie more enjoyable. Using these tips will help you create a savory beef and mushroom pie that you and your guests will love. For the complete process, check out the Full Recipe. {{image_4}} You can make a tasty vegetarian pie by using lentils or mushrooms instead of beef. Lentils provide protein and a nice texture. Use cooked green or brown lentils, as they hold their shape well. For mushrooms, use a mix of types like portobello and cremini for added flavor. You can also sauté onions and garlic with the mushrooms to enhance the taste. This makes a hearty, filling dish that everyone can enjoy. If you want a twist, try using other meats. Chicken and lamb work great in this recipe. For chicken, use cooked and shredded meat to keep it tender. Lamb adds a unique flavor that pairs well with mushrooms. Just make sure to adjust the cooking time based on what meat you choose. Each option brings its own special taste to the pie. Adding cheese or different sauces can take your pie to the next level. For cheese, try sharp cheddar or creamy goat cheese. These add richness and depth. You can also experiment with sauces. A spoonful of barbecue sauce or a dash of hot sauce can add a fun kick. Mix and match to find your favorite flavor combination. The possibilities are endless! For the full recipe, check out the Savory Beef and Mushroom Pie recipe. To keep your savory beef and mushroom pie fresh, store it in the fridge. You can safely eat it within 3-4 days after cooking. Make sure to cover the pie well with plastic wrap or foil. This keeps it from drying out and preserves the flavor. If you want to save some pie for later, freezing is a great option. First, let the pie cool completely. Then, wrap it tightly in plastic wrap and place it in a freezer bag. It can stay frozen for up to 3 months. When you’re ready to enjoy it, defrost it in the fridge overnight. After that, heat it in the oven at 350°F (175°C) until hot. For leftovers, use airtight containers. Glass or plastic containers work well. They keep the pie fresh and make reheating easy. If you store single slices, you can use small containers or wrap each slice in foil. This makes grabbing a quick meal simple and keeps the flavors intact. For the full recipe, check the earlier section. To make this tasty pie, follow these steps: 1. Preheat the oven to 400°F (200°C). 2. Heat olive oil in a skillet over medium heat. 3. Add chopped onion and minced garlic. Cook until they turn soft. 4. Stir in ground beef. Cook until it is brown and crumbly. 5. Add diced mushrooms. Cook until they shrink down. 6. Pour in beef broth and Worcestershire sauce. Mix in thyme and rosemary. 7. Season with salt and pepper. Stir well. 8. Mix cornstarch and water in a bowl. Add to the beef mix and stir until thick. 9. Roll out puff pastry on a floured surface. Place it in a pie dish. 10. Fill the pastry with the beef mix. Fold over the edges to seal. 11. Brush the top with beaten egg. Cut slits for steam to escape. 12. Bake for 25-30 minutes until golden brown. This full recipe gives you all the details you need to create this pie. You can serve several sides with this pie: - Mashed potatoes for creaminess. - Steamed green beans for crunch. - A fresh green salad for brightness. - Roasted carrots for sweetness. - Coleslaw for a crunchy contrast. These sides will enhance the meal and add more flavors. Yes, you can use store-bought pie crust. Advantages: - Saves time, making cooking easy. - Consistent texture and flavor. Disadvantages: - May not taste as fresh. - Limited control over ingredients. If you're in a hurry, store-bought is a good choice. Check for these signs: - The crust should be golden brown. - The filling should bubble slightly. - A knife inserted in the filling should come out hot. These visual cues tell you the pie is ready. Enjoy your cooking! This article showed you how to make a Savory Beef and Mushroom Pie. We covered the key ingredients, step-by-step preparation, cooking tips, and creative variations. Remember to follow the instructions carefully for the best results. Keeping common mistakes in mind will ensure your pie turns out great every time. Enjoy exploring different flavors and sharing this comforting dish with friends and family. By storing leftovers properly, you can savor your pie longer. Happy cooking!

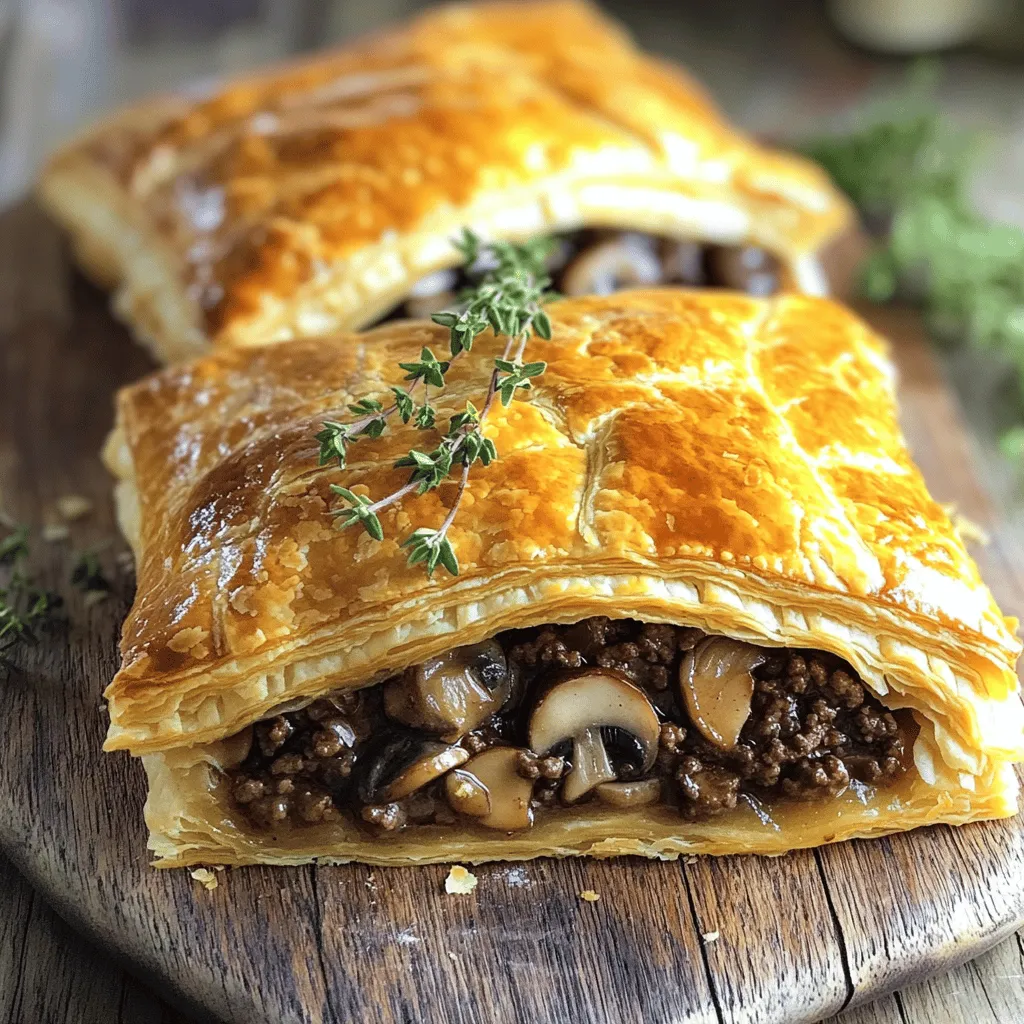
Savory Beef and Mushroom Pie Flavorful Comfort Meal

Are you craving a hearty meal that warms your soul? Look no further than my savory beef and mushroom pie!

For this savory roasted vegetable quiche, you will need the following: - 1 pre-made 9-inch pie crust - 2 cups mixed vegetables (such as zucchini, bell peppers, cherry tomatoes, and red onions), roasted - 4 large eggs - 1 cup heavy cream - 1 cup shredded cheese (Gruyère or cheddar recommended) - 1 teaspoon dried thyme - 1 teaspoon garlic powder - Salt and freshly ground black pepper, to taste - Fresh parsley, finely chopped (for garnish) When making this quiche, you can switch the vegetables based on your taste. Try using spinach, mushrooms, or broccoli instead. If you want a lighter option, use half-and-half instead of heavy cream. You can also use egg substitutes if you prefer a vegan quiche. Just make sure to adjust the baking time. Cheese adds a nice flavor and creaminess to the quiche. I like Gruyère for its nutty taste. Cheddar is another great choice, giving a sharp bite. You can also mix different cheeses, like feta or mozzarella, for a fun twist. Just remember, the cheese should melt well for the best texture! For the full recipe, check out the detailed instructions to bring this dish to life. Start with a pre-made pie crust. Roll it out gently. Fit it into a 9-inch pie dish. Use your fingers to crimp the edges. This gives it a nice look. Prick the bottom with a fork to stop bubbles. Pre-bake the crust at 375°F for 10 minutes. Then, set it aside to cool. Next, prepare the mixed vegetables. Use 2 cups of your favorites, like zucchini and bell peppers. Dice them up and place them in a bowl. Add olive oil, salt, pepper, and dried thyme. Toss everything together until coated. Spread the veggies on a baking sheet. Roast them in the oven for 20 to 25 minutes. Stir once midway for even cooking. They should be tender and a bit caramelized. Let them cool slightly after roasting. In a large bowl, whisk together 4 eggs and 1 cup of heavy cream. Add 1 teaspoon of garlic powder, and a pinch of salt and pepper. Mix until smooth. This creamy blend will make your quiche rich and tasty. Once the vegetables cool, scatter them over the pie crust. Pour the egg mixture over the veggies. Make sure they are fully covered. Sprinkle 1 cup of shredded cheese on top. I recommend Gruyère or cheddar for great flavor. Bake the quiche in the oven for 30 to 35 minutes. The center should be set, and the top should be golden brown. After baking, let it cool for a few minutes. Then, slice it into wedges and enjoy! Don’t forget to garnish with fresh parsley for a nice touch. For the full recipe, check out the details above. To make a great quiche, start with the crust. A pre-made pie crust saves time. Gently roll it out and fit it into your pie dish. Crimp the edges to make it look nice. Don't forget to prick the bottom with a fork. This helps prevent bubbles while baking. Pre-bake it for 10 minutes. This step makes the crust crispy and strong. For a creamy filling, I use heavy cream and eggs. Whisk them together until smooth. Add garlic powder and a pinch of salt and pepper for flavor. Make sure the mixture is well combined. This creates a rich texture that blends perfectly with the roasted veggies. Pour it carefully over the veggies in the crust. This helps the filling cover all the delicious vegetables. When it’s time to serve, cut the quiche into wedges. You can serve it warm or at room temperature. Arrange the slices on a nice platter. Add some finely chopped parsley on top for color. This gives a fresh look to your dish. Pair it with a simple green salad for a complete meal. You can also enjoy it with a side of fruit for a fun twist. Don't forget to check the Full Recipe for more details! {{image_4}} If you want a vegetarian twist, use different veggies. Consider spinach, mushrooms, or broccoli. These add color and taste. You can also try seasonal vegetables. For example, in fall, use squash or sweet potatoes. The key is mixing flavors and textures for a great bite. To make a gluten-free quiche, swap the pie crust. Use a gluten-free crust made from almond flour or rice flour. You can also make a crustless version. Just pour the filling into a greased pie dish. The eggs will set and hold everything together. Want to add some protein? Bacon or ham works well. Cook the bacon until it's crispy, then crumble it into the filling. If you prefer ham, chop it up and mix it in with the vegetables. This adds a savory kick to your quiche. You can also use cooked sausage or smoked salmon for extra flavor. These variations let you customize your roasted vegetable quiche. Check the Full Recipe for the basic steps, and feel free to experiment! To keep your roasted vegetable quiche fresh, store it in the fridge. Wrap it well in plastic wrap or place it in an airtight container. This helps to seal in moisture and flavor. Leftovers will last for about 3 to 4 days. If you need to store it longer, consider freezing it. When you're ready to enjoy the leftovers, reheating is easy. Preheat your oven to 350°F (175°C). Place the quiche on a baking sheet. Heat for about 15 to 20 minutes. This method helps keep the crust crispy. You can also microwave the quiche. Heat it for about 1 to 2 minutes. Check to make sure it’s warm all the way through. If you want to freeze your quiche, it's best to do this before baking. Wrap the unbaked quiche tightly in plastic wrap and then in foil. Label the package with the date. It will stay fresh for up to 3 months. When you’re ready to bake, remove the wrapping and bake directly from the freezer. Just add a few extra minutes to the baking time. You can also freeze cooked slices. Wrap them well and store in an airtight container, following the same timeline. For a detailed guide, check the Full Recipe to make this delicious dish! The quiche takes about 30 to 35 minutes to bake. You want to see it puff up and turn golden. If you insert a knife in the center, it should come out clean. That shows the egg is set. Timing can vary based on your oven, so keep an eye on it. Yes, you can make this quiche ahead of time. You can prepare it the night before and store it in the fridge. Just cover it well. When you are ready to bake, pop it in the oven. If it’s cold from the fridge, it might take a few extra minutes to cook. Pair your quiche with a fresh green salad. A simple vinaigrette adds a nice touch. You could also serve it with crusty bread or fruit. This makes a lovely brunch or light lunch. Enjoy it warm or at room temperature. For the full recipe, check the section above! This post covered how to make a delicious roasted vegetable quiche. We reviewed the main ingredients, step-by-step instructions, and tips for perfecting your dish. Remember to explore variations like vegetarian or gluten-free options. Storage tips ensure your quiche stays fresh. In conclusion, making quiche is easy and fun. With practice, you can create a dish your friends will love. Enjoy the process and share your tasty results!

Roasted Vegetable Quiche Flavorful and Easy Recipe

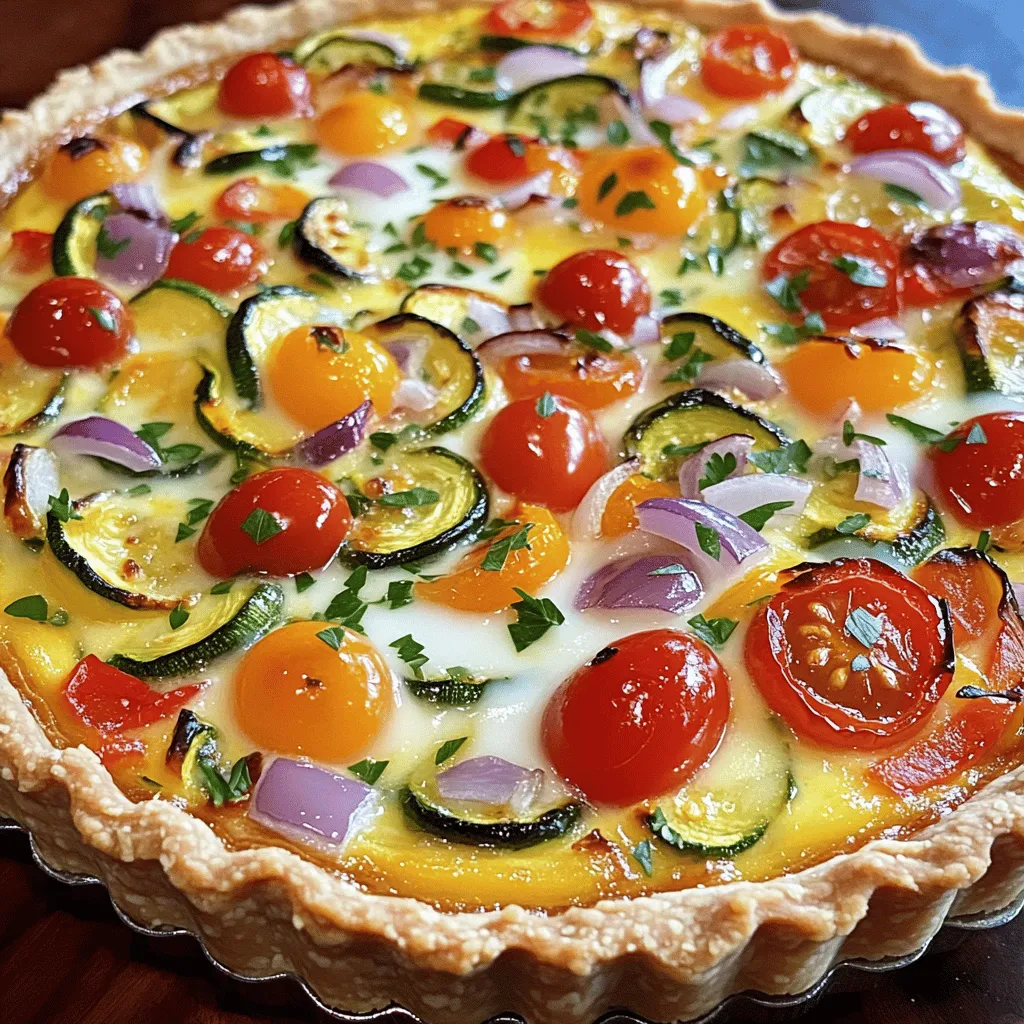
Looking for a delicious dish that’s both easy to make and full of flavor? My Roasted Vegetable Quiche is just

- 8 oz rice noodles - 1 cup shredded carrots - 1 cup bell peppers, thinly sliced (choose from red, yellow, or orange) - 1 cup cucumber, julienned - 1 cup red cabbage, finely shredded - 3 green onions, sliced - 1/2 cup fresh cilantro, chopped - 1/4 cup roasted peanuts, chopped These ingredients bring the salad to life. The rice noodles form a soft base. The fresh veggies add color and crunch. Carrots, bell peppers, and cucumber give a crisp texture. Red cabbage offers a slight sweetness, while green onions and cilantro add flavor. Roasted peanuts give a delightful crunch. - 1/4 cup creamy peanut butter - 2 tablespoons soy sauce - 2 tablespoons sesame oil - 1 tablespoon lime juice - 1 tablespoon honey or maple syrup - 1 teaspoon grated ginger - 1 clove garlic, minced - 1 tablespoon water (to thin the dressing if needed) The dressing is rich and creamy. Peanut butter is the star, providing flavor and creaminess. Soy sauce and sesame oil add a savory touch. Lime juice brightens up the dressing. Honey or maple syrup adds sweetness. Ginger and garlic bring warmth and depth. - Additional toppings (e.g., extra cilantro, sriracha for heat) - Protein additions (e.g., grilled chicken, shrimp, or tofu) You can customize this salad. Add more cilantro for freshness. A drizzle of sriracha gives it heat. For protein, grilled chicken or shrimp works well. Tofu is a great plant-based option. You can find the Full Recipe for more details on making this dish. To start, boil water in a large pot. Add the rice noodles to the pot. Follow the package instructions for cooking time. Typically, this takes about 5 to 7 minutes. Stir the noodles gently to prevent sticking. Once they are soft but still firm, drain the noodles in a colander. Rinse them under cool water. This stops the cooking process and keeps them from turning mushy. Set the noodles aside for later use. Next, grab your fresh vegetables. Use a grater for the carrots. For bell peppers, cut them into thin slices. A sharp knife works best for the cucumber and red cabbage. Julienning the cucumber gives a nice crunch. Combine all the veggies in a large mixing bowl. This should include the shredded carrots, bell peppers, cucumber, red cabbage, green onions, and chopped cilantro. Toss them gently to mix everything well. Now, let’s whip up the peanut dressing. In a separate bowl, add creamy peanut butter, soy sauce, sesame oil, lime juice, honey, grated ginger, and minced garlic. Use a whisk to mix everything together until smooth. If the dressing is too thick, add a tablespoon of water to thin it out. You want it to coat the noodles nicely. Taste the dressing and adjust any flavors if needed. You want it to be rich and flavorful. Now you're ready to combine everything for a delicious Thai Peanut Noodle Salad. To see the full recipe, check the section above. Enjoy your cooking! To make your Thai Peanut Noodle Salad even better, try adding spices or herbs. A sprinkle of red pepper flakes can bring heat. Fresh mint or basil adds a bright touch. You can also mix in some sesame seeds for a nutty crunch. When serving, think about pairings. This salad works well with grilled chicken, shrimp, or tofu. They boost protein and make it a full meal. Serve with lime wedges for an extra zing of flavor. How you present the salad can make a big difference. Serve it in a large bowl for family style. For a fancy touch, use a ring mold. This creates a neat, layered look. After molding, top with more peanuts and cilantro. This adds color and texture. Another fun idea is to use individual cups or jars. Each person gets their salad, and it looks cute too! For easy meal prep, store your ingredients separately. Keep the rice noodles, veggies, and dressing in different containers. This helps keep everything fresh. When you’re ready to eat, just mix them together. On busy weekdays, you can quickly assemble your salad. Prep the veggies ahead of time. Then, just cook the noodles and mix everything. It takes only a few minutes! This makes it easy to enjoy a healthy meal without stress. You can find the full recipe for Thai Peanut Noodle Salad [here](#). {{image_4}} You can easily make this Thai Peanut Noodle Salad vegetarian or vegan. For dressings, swap honey with maple syrup. This keeps the sweetness while staying plant-based. If you want protein, add tofu or chickpeas. Both options work well and add great texture. To make the dish fully plant-based, focus on fresh veggies. Use colorful bell peppers, carrots, and cucumbers. They bring crunch and flavor. You can also add edamame for more protein. It’s a tasty way to boost nutrition without losing flavor. For a gluten-free version, choose gluten-free rice noodles. They are easy to find in stores. Make sure to read the labels to be sure. They cook up just like regular noodles and taste great! For soy sauce, you can use tamari. Tamari is a gluten-free alternative. It has a similar taste. You can also try coconut aminos. This option is sweeter and adds a unique flavor. You can switch up the nut butter in your salad. Instead of peanut butter, try cashew or almond butter. Each nut butter gives a different taste and texture. It’s fun to experiment with flavors! Adding tropical fruits makes the salad more fun. Think about adding mango or pineapple. These fruits add sweetness and a juicy burst. They pair perfectly with the peanut dressing, making each bite refreshing and bright. To keep your Thai Peanut Noodle Salad fresh, use airtight containers. Glass containers work best as they don't retain odors. You can also use plastic containers if you prefer. Store the salad in the fridge right after serving. It stays good for 2-3 days. This salad is great cold, but you can warm it up too. If you want to enjoy it warm, heat it gently in a pan. Add a splash of water or extra dressing to keep it moist. After storage, you may need to toss in more dressing. This helps refresh the flavors and texture. You can freeze this salad, but I don’t recommend it. Freezing can change the texture of the veggies and noodles. If you choose to freeze it, make sure to use a freezer-safe container. For best results, eat the salad within 1-2 months. When ready to eat, thaw it in the fridge overnight. Keep in mind that the texture might not be the same after freezing. If you cannot find rice noodles, try using these alternatives: - Soba noodles: Made from buckwheat, these give a nutty taste. - Zucchini noodles: Also called "zoodles," they are fresh and light. - Spaghetti: Regular pasta works in a pinch, but it will change the flavor. - Whole wheat noodles: They add a different texture and more fiber. These options can change the taste and look of your salad, but they all work great. The Thai Peanut Noodle Salad stays fresh for about 3-5 days in the fridge. To keep it fresh: - Store it in a sealed container. - Keep the dressing separate until you are ready to eat. This prevents the noodles from getting soggy. Make sure to check for any signs of spoilage before eating. Yes, you can make this salad ahead of time! Here are some tips: - Prepare the salad and store it in the fridge for up to 5 days. - Mix the veggies and noodles but wait to add the dressing until just before serving. This keeps everything crisp and fresh. - For even better flavor, let the salad sit for 30 minutes before serving. This helps the flavors blend nicely. For the full recipe, check the earlier section. Enjoy your cooking! This blog post covered how to make a delicious Thai Peanut Noodle Salad. You learned about the main ingredients like rice noodles, fresh veggies, and peanut dressing. We discussed step-by-step instructions, tips for flavor, and storage advice. You can even explore variations for dietary preferences. I hope this recipe inspires your next meal. Enjoy making this fresh and tasty dish!

17. Thai Peanut Noodle Salad Flavorful and Fresh Dish

Are you ready to dive into a dish that’s bursting with flavor? This Thai Peanut Noodle Salad is a fresh,

Here are the key ingredients you'll need for your spinach and feta stuffed chicken: - 4 boneless, skinless chicken breasts - 2 cups fresh spinach, finely chopped - 1 cup feta cheese, crumbled - 1/2 cup cream cheese, softened to room temperature - 2 cloves garlic, minced - 1 teaspoon dried oregano - 1/2 teaspoon freshly ground black pepper - 1/4 teaspoon sea salt - 1 tablespoon extra virgin olive oil - 1/4 teaspoon red pepper flakes (optional) - Fresh lemon wedges for serving Each ingredient plays a big role in the flavor. The chicken breasts are your main protein source. The spinach adds nutrients and a lovely green color. Feta cheese brings a salty and tangy kick. Cream cheese adds creaminess and helps bind the filling. Garlic and oregano enhance the taste with bold flavors. Black pepper and sea salt round out the seasoning. Olive oil adds richness and aids in cooking. Red pepper flakes can give a nice spicy touch, while lemon wedges brighten the dish. For the full recipe, check out the detailed instructions. You’ll love how all these ingredients work together! - Preheat the oven to 375°F (190°C). - Prepare the baking dish or skillet. This step is key for even cooking. - In a bowl, combine: - 2 cups fresh spinach, finely chopped - 1 cup feta cheese, crumbled - 1/2 cup cream cheese, softened - 2 cloves garlic, minced - 1 teaspoon dried oregano - 1/2 teaspoon black pepper - 1/4 teaspoon sea salt - 1/4 teaspoon red pepper flakes (optional) - Mix well until creamy. This filling adds a burst of flavor. - Take 4 chicken breasts and slice them to create pockets. - Fill each pocket generously with the spinach and feta mixture. - Use toothpicks if needed to hold the filling in. - Heat 1 tablespoon of olive oil in a large skillet. - Sear the stuffed chicken for 4-5 minutes on each side. Look for a nice golden color. - Transfer the skillet to the oven and bake for 20-25 minutes. Make sure the chicken is cooked through. - When finished, let the chicken rest for a few minutes before serving. - Serve hot with fresh lemon wedges for a zesty touch. For the full recipe, check out the details above. To make the best spinach and feta stuffed chicken, secure the pockets well. After slicing each chicken breast, fill it carefully. Use toothpicks if needed to keep the filling inside. This step is key to avoid any mess while cooking. To keep the chicken juicy and tender, avoid overcooking it. Sear the chicken on high heat first. This creates a nice crust that locks in moisture. Then, bake it until just cooked through. The internal juices should run clear when done. Pair your stuffed chicken with simple side dishes. Roasted vegetables, rice, or a fresh salad work well. These sides help balance out the meal and add flavor. For an impressive presentation, slice the chicken on a diagonal. This shows off the colorful filling. Arrange the slices on a plate with fresh lemon wedges. A sprinkle of herbs, like parsley, adds a nice touch too. For the full recipe, check out the section above. {{image_4}} You can change the cheese for a different taste. Try mozzarella for a milder flavor. Goat cheese adds a tangy twist that pairs well with spinach. Fresh herbs like basil or thyme can brighten the filling. They add a fresh kick to the dish. Experimenting with flavors keeps your meals exciting and unique. Feel free to get creative with the filling. Sun-dried tomatoes bring a sweet, tangy burst. You can also add bell peppers for extra crunch and flavor. Roasting extra veggies as a side dish makes a great pairing. Think about zucchini, asparagus, or carrots to add color and nutrients. These small changes can elevate your meal. For the full recipe, refer back to the main section. After you enjoy your spinach and feta stuffed chicken, let it cool first. This step helps keep the chicken juicy. Store leftovers in an airtight container. They should last for 3 to 4 days in the fridge. If you want to keep it fresh, avoid placing hot chicken directly in the fridge. This can raise the temperature inside, risking other food. To freeze your stuffed chicken, wrap each piece tightly in plastic wrap. Then, place them in a freezer bag. Make sure to squeeze out as much air as possible. This helps prevent freezer burn. You can freeze the chicken for up to 3 months. When you want to enjoy it again, take the chicken out and place it in the fridge overnight to thaw. After thawing, reheat it in the oven at 350°F (175°C) until it's hot throughout. This keeps the chicken moist and flavorful. For a quick meal, you can also microwave it. Just be careful not to overheat it, as this can dry it out. For the complete experience, check the Full Recipe for tips on preparation and cooking. Yes, you can prepare the filling a day in advance. Store it in the fridge. This saves time on busy days. Just remember to bring it to room temperature before stuffing the chicken. To know if chicken is done, check its internal temperature. It should reach 165°F (75°C). The juices should run clear, not pink. Cut into the thickest part to check. If it’s no longer pink, it’s ready to eat. Yes, you can grill the stuffed chicken! Just follow the same steps. Sear the chicken on the grill for a few minutes. Then, move it to indirect heat to cook through. This adds a nice smoky flavor. Absolutely! Frozen spinach works well. Just thaw and squeeze out excess water. This keeps the filling from becoming too watery. It’s a great time-saver, too! Taste the filling before stuffing the chicken. It should have a balanced flavor. If it tastes bland, add more salt or spices. Remember, the filling flavors the chicken, so it should be tasty on its own. This blog post shared a tasty and easy recipe for stuffed chicken breasts. You learned how to make a filling with spinach, feta, and spices. We covered how to prep, cook, and store this dish. Finally, I offered tips on variations and serving ideas. By following these steps, you can impress at your next meal. Enjoy cooking this healthy dish that is sure to please everyone!

16. Spinach and Feta Stuffed Chicken Flavorful and Easy

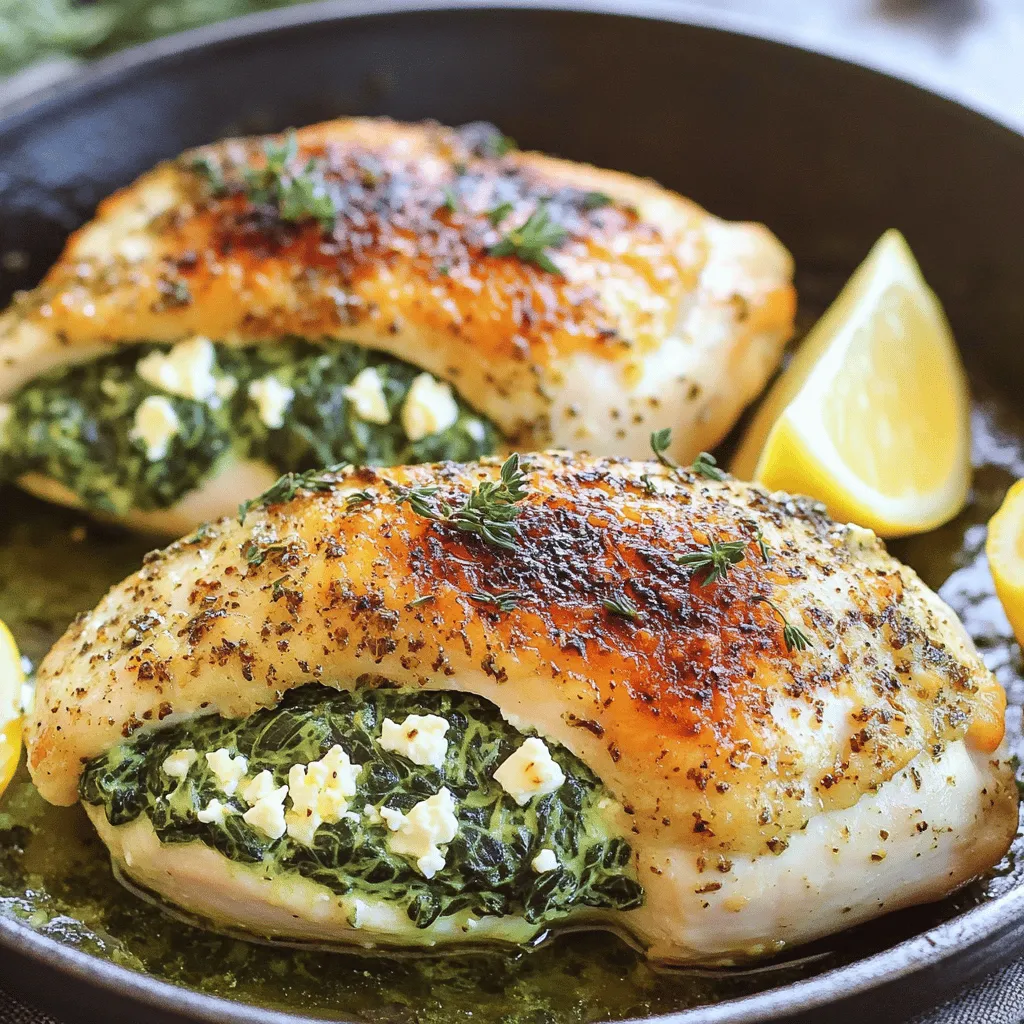
Are you ready to impress your dinner guests? Spinach and feta stuffed chicken is a flavorful dish that’s easy to

- 2 medium eggplants, sliced into 1/2 inch rounds - Olive oil for frying - Marinara sauce - 2 cups mozzarella cheese - 1/2 cup Parmesan cheese - 1 cup all-purpose flour - 2 large eggs, beaten - 2 cups breadcrumbs - 1 teaspoon dried oregano - 1 teaspoon dried basil - Salt and pepper to taste - Fresh basil leaves for garnish The heart of Eggplant Parmesan Stacks lies in its fresh, vibrant ingredients. You start with medium eggplants. Cut them into thick rounds. This thickness helps keep them firm during cooking. Olive oil is key to frying. It adds flavor and helps achieve that crispy texture we all love. Next, you need marinara sauce. A good sauce elevates the dish. Choose a sauce you love. Mozzarella cheese makes it gooey and rich. Parmesan cheese brings a sharp, salty bite. Together, they create a melty layer that ties everything together. When it comes to seasoning and coating, the process is simple. All-purpose flour gives a light crust. The eggs help the breadcrumbs stick. Breadcrumbs add crunch. You can spice up your breadcrumbs with dried oregano and basil. A pinch of salt and pepper brings out all the flavors. For a fresh touch, use basil leaves as a garnish. They look great and add a burst of flavor. This blend of ingredients makes Eggplant Parmesan Stacks both flavorful and satisfying. For the full recipe, check the details above! First, slice the eggplants into 1/2 inch rounds. This thickness helps them cook evenly. Next, sprinkle salt on both sides of each slice. The salt pulls out moisture and bitterness. Let the slices rest for about 30 minutes. After that, rinse them under cold water. Gently pat the slices dry with paper towels. This step is key to getting a nice texture. Now it’s time to set up your breading station. You need three shallow dishes. In the first dish, put the all-purpose flour. In the second dish, beat two large eggs until smooth. In the third dish, mix breadcrumbs with dried oregano, dried basil, salt, and pepper. Make sure to mix well for even flavor. Take each eggplant slice and dredge it in the flour. This helps the egg stick. Next, dip the slice into the beaten eggs, letting excess drip off. Finally, coat the slice with the seasoned breadcrumbs. Press lightly to make sure they stick. Place the breaded slices on a baking sheet. Heat olive oil in a large skillet over medium heat. You want enough oil to cover the bottom. Once it's hot, add the eggplant slices in batches. Fry each slice for about 3-4 minutes per side. Look for a golden brown color. After frying, transfer the slices to a plate lined with paper towels. This step helps drain extra oil. With these steps, you're well on your way to creating delicious Eggplant Parmesan Stacks! You can find the full recipe [here](#). To fry eggplant right, you need to focus on oil temperature. Heat the oil to about 350°F. If it is too cool, the eggplant will soak up oil and become soggy. If it is too hot, the outside will burn before the inside cooks. Use a thermometer for best results. To avoid soggy eggplant slices, salt them before cooking. After slicing, sprinkle salt on both sides and let them sit for 30 minutes. This step draws out moisture and bitterness. After resting, rinse the slices and pat dry with paper towels. This keeps your eggplant crispy. When stacking your eggplant, aim for balanced layers. Start with a slice, then add marinara, cheese, and repeat. This way, each bite will have all the flavors. Try to keep the stacks about 3-4 layers high. For portion control, think about how many servings you want to make. Each stack should be enough for one person. This way, you can serve everyone without waste. Pair your eggplant stacks with a simple side salad or some garlic bread. These sides can help lighten the meal while adding flavor. For presentation, serve the stacks on individual plates. Drizzle some extra marinara sauce around the base. Finish with a sprig of fresh basil. This adds a splash of color and makes it look fancy. For the full recipe, check out the Eggplant Parmesan Stacks recipe. {{image_4}} You can change the sauce for your eggplant Parmesan stacks. Try pesto for a fresh twist. Alfredo sauce adds a creamy texture that many love. For cheese, there are many options. Vegan cheese works great for a dairy-free choice. It melts well and still tastes good. You can bake or fry your stacks. Frying gives a crispy crust, but baking is healthier. If you choose to bake, preheat your oven to 375°F. The air fryer is another method. It takes less oil and keeps the stacks lighter. Just set it to 375°F and cook for about 15 minutes. Want more flavor? Add vegetables like spinach or bell peppers. They add color and nutrients. You can also spice things up. A pinch of chili flakes gives a nice kick. Fresh garlic adds a rich taste, too. These simple changes make a big difference in flavor. For the full recipe, see the section above. Enjoy your cooking adventure! To store leftovers, let your eggplant Parmesan stacks cool down. Place them in an airtight container. This helps keep them fresh. You can store them in the fridge for up to four days. Make sure the container is sealed properly. This will prevent them from drying out or absorbing other odors. If you want to save them for later, freezing is a great option. First, let the stacks cool completely. Then, wrap each stack in plastic wrap. After that, place them in a freezer-safe bag or container. This method helps keep the flavor intact. You can freeze them for up to three months. When ready to eat, thaw them overnight in the fridge. To reheat your eggplant stacks, the oven is best. Preheat your oven to 350°F (175°C). Place the stacks on a baking sheet. Cover with foil to keep them moist. Heat for about 20 minutes. If you prefer a crispy top, remove the foil for the last five minutes. Always check the center to ensure it's hot. Enjoy your dish warm and delicious! Yes, you can prepare Eggplant Parmesan Stacks ahead of time. Here are some tips: - Slice and Salt: Prepare the eggplants and salt them. This helps remove moisture. - Bread and Fry: Bread and fry the eggplant slices. Let them cool. - Assemble and Refrigerate: Layer the stacks in a baking dish. Cover and refrigerate for up to 24 hours. - Bake Before Serving: When ready to eat, bake at 375°F (190°C) until hot and bubbly. To keep your eggplant crispy, use these techniques: - Salt the Eggplant: Salting helps draw out excess moisture. Rinse and dry well afterward. - Fry Properly: Use hot oil. Fry until golden brown on both sides. Don't overcrowd the pan. - Cool on Paper Towels: After frying, place the slices on paper towels to absorb extra oil. Eggplant Parmesan Stacks pair well with: - Salad: A light green salad with vinaigrette complements the rich stacks. - Bread: Serve with garlic bread for a hearty meal. - Wine: A glass of Chianti or Pinot Noir enhances the flavors. To get that perfectly melted cheese, consider these tips: - Use Fresh Cheese: Fresh mozzarella melts better than pre-shredded cheese. - Layer Properly: Distribute cheese evenly between layers for consistent melting. - Bake Covered: Cover the dish with foil for the first half of baking. This helps the cheese melt before it browns. Try these ideas to make your Eggplant Parmesan Stacks truly delicious. For the full recipe, check out the detailed instructions above! In this blog post, we covered how to make delicious Eggplant Parmesan Stacks. We went through the key ingredients, such as eggplants, marinara sauce, and cheese. You learned the important steps to prepare, bread, and cook the eggplants. We also shared helpful tips for perfect frying and serving. Now, you can enjoy this dish any time and impress others. With various options and storage tips, you can customize the stacks to your taste. Enjoy your cooking journey with Eggplant Parmesan Stacks!

15. Eggplant Parmesan Stacks Flavorful and Satisfying Dish

Are you ready to elevate your dinner game? These Eggplant Parmesan Stacks are not only delicious but also easy to

- 1 rack of lamb (approximately 8 ribs, frenched) - 1 cup fresh mixed herbs (parsley, rosemary, thyme), finely chopped - 2 tablespoons Dijon mustard (for coating) - 1 cup breadcrumbs (panko preferred for extra crunch) - 1/4 cup freshly grated Parmesan cheese - 2 cloves garlic, minced - 2 tablespoons high-quality olive oil - Zest of 1 fresh lemon - Salt and freshly cracked black pepper, to taste When preparing an herb-crusted rack of lamb, you want quality ingredients. The lamb should be fresh and tender. Look for a rack with a nice layer of fat. This fat will add flavor and moisture to your dish. Fresh mixed herbs bring vibrant flavors. I love using parsley, rosemary, and thyme for a well-rounded taste. You can mix and match herbs based on what you have. Dijon mustard acts as a glue to hold the herbs in place. It adds a subtle tang that enhances the lamb's flavor. The breadcrumbs and Parmesan give a crunchy crust. This texture contrasts nicely with the tender meat. Garlic adds depth to the dish. It infuses the lamb with warmth and aroma. Olive oil helps everything stick and adds richness. Don’t forget lemon zest! It brightens the dish and balances the richness of the lamb. Seasoning is key, so use salt and pepper generously. For a special touch, consider drizzling balsamic glaze before serving. It adds sweetness and acidity, making every bite a delight. For the full recipe and detailed instructions, check out the [Full Recipe]. 1. Preheat your oven to 400°F (200°C). This step is key to roasting well. 2. Season the rack of lamb with salt and freshly cracked black pepper. Coat it with 2 tablespoons of Dijon mustard for flavor and to help the herbs stick. 1. In a bowl, mix the fresh herbs, minced garlic, breadcrumbs, grated Parmesan cheese, and lemon zest. Add a pinch of salt and black pepper to bring out the flavors. 2. Drizzle olive oil over the herb mixture. Stir until everything is moist. The texture should feel like wet sand. 3. Press the herb and breadcrumb mix onto the mustard-coated lamb. Make sure to cover it well for the best flavor. 1. Place the herb-crusted rack of lamb bone-side down in a roasting pan. Roast it for 20-25 minutes. Aim for a medium-rare finish. 2. Use a meat thermometer to check the temperature. It should reach 130°F (54°C). 3. Let the lamb rest for 10 minutes after roasting. This helps keep it juicy and tender. 4. Cut the rack into individual chops. Serve them on a platter. A splash of balsamic glaze adds a nice touch. For a complete recipe, check out the Full Recipe. Achieving the perfect crust To get a great crust, use fresh herbs. Mix them with breadcrumbs and cheese. Press the mixture firmly onto the lamb. The mustard helps it stick well. This creates a tasty crust that adds flavor. Using a meat thermometer for doneness A meat thermometer helps you cook the lamb just right. Insert it into the thickest part. Aim for 130°F (54°C) for medium-rare. This ensures your lamb is juicy and tender. Plating the dish attractively For a lovely presentation, slice the rack into chops. Fan them out on a big plate. This makes the dish look elegant and inviting. Garnishes for added visual appeal Add fresh herbs on top for color. A wedge of lemon adds brightness. You might drizzle balsamic glaze for a shiny finish. These small touches make a big difference. Recommended spices and herbs Besides the main herbs, consider adding mint or dill. These spices can brighten the dish. You could also use a pinch of red pepper flakes for heat. Optional ingredient variations Try different crusts to mix things up. Use crushed nuts for crunch. You can even add grated cheese for a richer flavor. These changes keep the dish exciting. For more details, check the [Full Recipe]. {{image_4}} You can cook herb-crusted rack of lamb using different methods. Grilling gives the lamb a smoky flavor. It also adds nice grill marks. Roasting, on the other hand, allows the meat to cook evenly. It also lets the crust get nice and crispy. Both methods work well, but choose based on your taste. Sous vide is another great option. This method cooks the lamb slowly in a water bath. It keeps the meat juicy and tender. After sous vide cooking, you can finish it on the grill or in the oven. This gives you a perfect crust without losing moisture. Try different herb mixes to change the flavor. You can use herbs like mint, dill, or tarragon. These herbs add unique tastes to the lamb. Seasonal herbs can also change the dish. In spring, use fresh parsley and chives. In fall, rosemary and sage work great. Mixing herbs can create a lovely flavor profile. Don’t be afraid to experiment! Use what you have on hand. You may discover a new favorite combination. The right side dishes can elevate your meal. Roasted seasonal vegetables are a great choice. They add color and flavor. Creamy mashed potatoes also pair well. Their richness complements the herb crust. Wine can enhance the dining experience too. A nice red wine, like Cabernet Sauvignon, works well. Its bold flavors match the lamb. For a lighter option, try a Pinot Noir. It has a fruity note that balances the dish. For more tips, check the Full Recipe for herb-crusted rack of lamb. After you enjoy your herb-crusted rack of lamb, store any leftovers properly. The best way to keep them fresh is to place them in an airtight container. Make sure the container is clean and dry. This helps prevent moisture loss and keeps the meat juicy. You can store it in the fridge for up to three days. If you want to keep it longer, think about freezing the lamb. When reheating the lamb, you want to keep that delicious crust crispy. The best method is to use an oven. Preheat your oven to 350°F (175°C). Place the lamb on a baking sheet and cover it loosely with foil. This keeps the moisture in while allowing the crust to crisp up. Heat it for about 10-15 minutes or until warmed through. You can also use an air fryer for a quick reheat. To freeze your herb-crusted lamb, first let it cool down completely. Wrap each piece tightly in plastic wrap. Then, place the wrapped lamb in a freezer-safe bag. Label the bag with the date. You can freeze it for up to three months. When you're ready to eat, move the lamb to the fridge to thaw overnight. For best results, reheat it in the oven to revive that tasty crust. How do I know when my rack of lamb is done? You can know your rack of lamb is done by using a meat thermometer. For medium-rare, aim for an internal temperature of 130°F (54°C). Insert the thermometer into the thickest part of the meat. If you don’t have one, cut into the meat. Look for a rosy pink center. Can I prepare the crust in advance? Yes, you can prepare the crust in advance. Mix the herbs, breadcrumbs, and cheese, then store it in the fridge. Coat the lamb with mustard just before cooking. This keeps the crust fresh and flavorful. Can I use a different cut of lamb? Yes, you can use different cuts. Lamb chops or loin can work well. Adjust cooking times based on the thickness. Remember that cooking times may vary. What's the best way to marinate lamb before cooking? Marinate lamb in olive oil, garlic, and herbs. Let it sit for at least one hour. For best results, marinate overnight in the fridge. This adds flavor and tenderizes the meat. How to make this dish gluten-free? To make this dish gluten-free, substitute regular breadcrumbs with gluten-free breadcrumbs. You can also use crushed gluten-free crackers or nuts. Check all labels to ensure they are gluten-free. Can I substitute the herbs with dried versions? Yes, you can use dried herbs. Use about one-third of the amount when substituting. Dried herbs are more potent than fresh ones. Crush them in your hand for better release of flavor. For the full recipe, check out the Herb-Crusted Rack of Lamb with a Zesty Twist. In this post, we covered how to make a perfect herb-crusted rack of lamb. You learned about the main ingredients, preparation steps, and roasting techniques. I shared tips on achieving the best crust and creative presentation ideas. We also explored variations, storage info, and answered common questions. Remember, with a little care, you can impress anyone at your dinner table. Enjoy making this dish your own, and savor every bite!

14. Herb-Crusted Rack of Lamb Flavorful and Succulent Dish

Get ready to impress your friends and family with a mouthwatering Herb-Crusted Rack of Lamb! This dish is not only

- 8 oz. fusilli pasta - 1 cup cherry tomatoes, halved - 1 cucumber, diced - 1/3 cup red onion, finely chopped - 1/2 cup fresh dill, chopped - 1/4 cup feta cheese, crumbled - 1/3 cup olive oil - 2 tablespoons fresh lemon juice - Zest of 1 lemon - Salt and freshly ground pepper to taste For this Lemon Dill Pasta Salad, I suggest using a kitchen scale for precise measurements. The fusilli pasta should weigh around 8 ounces. For the cherry tomatoes, one cup means about 12-15 tomatoes, depending on size. The cucumber should be diced into small pieces, which makes it easier to eat. When measuring fresh dill, use a packed cup to capture its strong flavor. For the olive oil and lemon juice, standard measuring cups work great. Adjust salt and pepper to your taste. Using fresh ingredients greatly enhances the flavor. Fresh dill has a bright taste that dried dill cannot match. Fresh lemon juice gives a zesty kick, while bottled juice lacks the same vibrancy. The cherry tomatoes and cucumber stay crisp and juicy, making each bite delightful. For a creamy touch, use fresh feta cheese, which adds richness. Though dried herbs can work in a pinch, I recommend sticking to fresh for this dish. Fresh ingredients truly shine in Lemon Dill Pasta Salad and elevate the whole meal. For the complete recipe, check out the Full Recipe section. Start by boiling a large pot of salted water. Add 8 oz. of fusilli pasta. Cook it until al dente, usually 8-10 minutes. Once ready, drain the pasta and rinse it under cold water. This stops the cooking and cools it down quickly. While the pasta cools, grab your veggies. Halve 1 cup of cherry tomatoes. Dice 1 cucumber into small pieces. Finally, finely chop 1/3 cup of red onion. Toss all these chopped veggies together in a big mixing bowl. In a small bowl, mix together 1/3 cup of olive oil, 2 tablespoons of fresh lemon juice, and the zest of 1 lemon. Add salt and freshly ground pepper to taste. Whisk until it's smooth and combined. Once the pasta is cool, add it to the bowl with the veggies. Drizzle the dressing over the pasta. Use a spatula or tongs to toss everything gently. Make sure all the ingredients get coated with the dressing. Next, fold in 1/2 cup of chopped fresh dill and 1/4 cup of crumbled feta cheese. Be gentle; you want to mix these in without breaking up the feta too much. Cover the pasta salad with plastic wrap or a lid. Put it in the fridge for at least 30 minutes. This chilling time allows the flavors to blend. When ready to serve, give it a gentle toss again. Taste and add more salt or pepper if needed. Serve it chilled or at room temperature. Enjoy this fresh and flavorful delight! For the full recipe, check out the details above. To cook fusilli pasta just right, start with plenty of water. Use a large pot and add a good amount of salt. Bring the water to a rolling boil before adding the pasta. Cook it according to the package directions, usually 8 to 10 minutes. Check for doneness by tasting a piece. You want it al dente, meaning firm but not hard. Once cooked, drain the pasta and rinse it under cold water. This stops the cooking and cools the pasta quickly. Olive oil plays a key role in the flavor of your salad. Opt for extra virgin olive oil for the best taste. It has a rich, fruity flavor that enhances your salad. Look for oils that are cold-pressed and have a dark green color. This indicates quality and freshness. Avoid oils labeled as “light,” as they often lack flavor. A good olive oil will make your dressing shine. While dill is the star in this dish, other herbs can boost flavor. Consider adding fresh parsley or basil for extra freshness. Chives can add a mild onion taste that pairs well with the lemon. If you want a bit of heat, try adding fresh mint. Mix and match until you find your perfect blend. Fresh herbs not only elevate the taste but also add color and nutrients to your salad. For the complete experience, check out the Full Recipe to make this zesty dish come alive! {{image_4}} Want to make your pasta salad heartier? Add protein! Grilled chicken works great. It adds a savory taste. Simply cube cooked chicken and mix it in. For a vegetarian option, try chickpeas. They lend a great texture and protein boost. Rinse canned chickpeas and toss them in with the pasta. Both options make the dish more filling and satisfying. If you want a vegan twist, skip the feta cheese. Instead, use a dairy-free cheese option. Look for brands that offer plant-based feta. You can also add avocado for creaminess. It adds a rich flavor without dairy. Just toss in diced avocado before serving for a fresh touch. Seasonal vegetables can elevate your salad. Zucchini is a fantastic choice. Slice it thinly and mix it in raw. It adds crunch and freshness. Bell peppers are another great option. Dice them up for a sweet pop of color. Both add nutrients and make your salad even more vibrant. You can explore these variations to create your unique Lemon Dill Pasta Salad. Check the [Full Recipe] for the basic version and get cooking! To keep your Lemon Dill Pasta Salad fresh, store it in an airtight container. This helps prevent the salad from absorbing other odors in the fridge. Make sure it is completely cooled before you seal it. If you have leftovers, you can enjoy them for lunch or dinner the next day. While I recommend eating this salad fresh, you can freeze it if needed. Place the salad in a freezer-safe container. However, avoid freezing the feta cheese and fresh herbs. They may change texture and flavor when thawed. For best results, enjoy the pasta salad fresh within a few days. Lemon Dill Pasta Salad stays good in the fridge for about 3 to 5 days. After that, the flavors may fade, and the veggies can lose their crunch. Always check for any signs of spoilage before serving. Enjoy the fresh and zesty flavors of this dish from the [Full Recipe]. Yes, you can make this salad ahead of time. I often prepare it a day prior. This allows the flavors to blend well. Just keep it in the fridge until you are ready to serve. If you make it too early, the pasta may absorb the dressing, so add it before serving. You can get creative with herbs! Fresh parsley, basil, or chives work well. Each herb offers a different taste. Mix and match to find your favorite combination. I love using mint for a refreshing twist. If you need a substitute for feta, try goat cheese or a dairy-free cheese. Crumbled tofu works great if you want a vegan option. Both provide a nice texture and flavor. Adjust the amount to fit your taste. This pasta salad is not gluten-free as written. However, you can use gluten-free pasta. Many brands offer great gluten-free options today. Just ensure you follow the cooking time on the package for the best results. To boost the dressing's flavor, add minced garlic or shallots. A splash of vinegar, like red wine or balsamic, can enhance the taste too. You can also try a pinch of red pepper flakes for some heat. Experimenting is key to finding your perfect balance! For the full recipe, check out the detailed instructions above! In this blog post, I shared how to create a tasty lemon dill pasta salad. We discussed the best ingredients, like fresh herbs and quality olive oil. You learned step-by-step cooking tips, from boiling pasta to mixing flavors. I also covered variations, storage ideas, and answered common questions. The right ingredients and methods can make your pasta salad shine. Enjoy experimenting and sharing this dish with others!

Lemon Dill Pasta Salad Fresh and Flavorful Delight

Craving a bright, fresh dish that’s easy to make? Look no further! My Lemon Dill Pasta Salad is a fun

- 1.5 pounds fresh Brussels sprouts, trimmed and halved - 1/4 cup high-quality balsamic vinegar - 2 tablespoons honey, preferably raw for richer flavor - 3 tablespoons extra-virgin olive oil - 1 teaspoon garlic powder - Salt and freshly ground black pepper, to taste - 1/4 cup grated parmesan cheese (optional for a cheesy twist) - Fresh thyme sprigs, for garnish Balsamic roasted Brussels sprouts are simple yet packed with flavor. Fresh Brussels sprouts are the star of this dish. When you choose them, look for bright green, firm sprouts. Halve them for even cooking. Balsamic vinegar adds tang and sweetness, while honey enhances the natural flavors. Extra-virgin olive oil helps with roasting. It adds richness and keeps the sprouts from sticking. For seasoning, garlic powder gives a nice kick. Salt and pepper bring out the taste. If you want a cheesy touch, parmesan cheese is a great option. It melts beautifully and adds depth. Fresh thyme sprigs are perfect for garnish. They add a pop of color and a hint of herbal aroma. This recipe is easy to follow. You can find the full recipe above. Enjoy making this delightful side dish! Start with fresh Brussels sprouts. Trim the ends and remove any yellow leaves. Cut each sprout in half. This helps them cook evenly. Next, preheat your oven to 425°F (220°C). A hot oven gives us great roasting results. In a large bowl, add the halved Brussels sprouts. Pour in 3 tablespoons of extra-virgin olive oil. Add 1/4 cup of balsamic vinegar and 2 tablespoons of honey. Sprinkle in 1 teaspoon of garlic powder. Season with salt and pepper to taste. Toss everything together. Make sure each sprout gets coated well with the mixture. Spread the Brussels sprouts on a baking sheet in a single layer. Avoid overlapping them. This helps them roast evenly. Place the sheet in the preheated oven. Roast for about 20 to 25 minutes. Halfway through, toss them to ensure even caramelization. If you want, add 1/4 cup of grated parmesan cheese during the last 5 minutes. This gives a nice cheesy flavor. When they’re done, let them cool a bit before serving. Garnish with fresh thyme for a lovely touch. For the full recipe, check out the details above! To achieve optimal crispiness with your Brussels sprouts, spread them out evenly on the baking sheet. Avoid overcrowding them. This allows hot air to circulate around each sprout, making them crisp and golden. Toss the sprouts halfway through cooking. This step helps ensure all sides get that perfect caramelization. To check for doneness, look for a deep golden color. The sprouts should be tender but not mushy. You can test one by piercing it with a fork. If it goes in easily, they are ready! If you want a cheesy twist, add the grated parmesan cheese during the last five minutes of roasting. This way, the cheese melts slightly and coats the sprouts. The result is a rich, savory flavor that pairs perfectly with the balsamic glaze. Make sure to use freshly grated parmesan for the best taste. It melts better and adds a nice texture. For plating, use a large white platter to really make the sprouts stand out. Arrange them in a neat pile or in a circle for visual appeal. To elevate your dish, drizzle some balsamic glaze over the top just before serving. This adds extra flavor and makes the dish look restaurant-quality. A few sprigs of fresh thyme can add a nice touch too! {{image_4}} You can easily change the taste of balsamic roasted Brussels sprouts. Adding spices like cayenne pepper or paprika gives a nice kick. If you want a sweet and savory mix, try adding a splash of maple syrup. This adds depth and balances the flavors. For a healthier option, swap out honey for maple syrup. It offers a similar sweetness with fewer calories. Additionally, using a low-sodium balsamic vinegar helps you cut back on salt. This way, you can enjoy a tasty dish without worrying too much about sodium intake. Balsamic roasted Brussels sprouts pair well with many main dishes. They complement chicken, fish, or even a hearty veggie burger. You can also toss them into a salad. This adds a warm element and a burst of flavor. For the full recipe, check the section above. To keep your leftover balsamic roasted Brussels sprouts fresh, store them in the fridge. Use an airtight container for the best results. These sprouts taste great for up to 3 days. Make sure to cool them down before sealing. This helps keep them crisp and delicious. You can reheat Brussels sprouts in a few ways. The oven works best. Preheat it to 350°F (175°C). Spread the sprouts on a baking sheet and heat for about 10 minutes. This keeps them crispy. You can also use the microwave. Heat them in short bursts of 30 seconds. Stir between each burst to avoid sogginess. If you want to save them longer, freezing is an option. First, cool the sprouts completely. Then, place them in a freezer-safe bag. Remove as much air as you can. They can last up to 3 months in the freezer. When you're ready to eat, thaw them in the fridge overnight. Reheat as usual for a tasty side dish later. For the full recipe, check out the details above. Yes, you can use frozen Brussels sprouts. They save time and can be just as tasty. Here are a few tips: - Thaw First: Thaw them in the fridge overnight or use the microwave. - Drain Well: Make sure to drain any excess water. This helps them roast better. - Roasting Time: Increase cooking time by 5-10 minutes since frozen sprouts are colder. Using frozen Brussels sprouts can still yield a delightful dish, especially when you follow these steps. To make balsamic roasted Brussels sprouts vegan, simply substitute a couple of ingredients: - Honey: Use maple syrup or agave nectar instead. Both add sweetness. - Parmesan Cheese: Skip it or use a vegan cheese alternative. Nutritional yeast also adds a cheesy flavor. These simple swaps keep your dish plant-based while still being delicious. Balsamic roasted Brussels sprouts pair well with many dishes. Here are a few ideas: - Roasted Chicken: The savory notes complement the sprouts nicely. - Grilled Fish: Light fish enhances the meal without overpowering it. - Quinoa Salad: A hearty salad adds texture and makes it filling. These options create a balanced meal that everyone will enjoy. To avoid bitterness in Brussels sprouts, follow these tips: - Trim Properly: Cut off the ends and remove any yellow leaves. - Season Generously: Use salt, pepper, and a good balsamic vinegar. These enhance flavor. - Roast Well: Proper roasting brings out their natural sweetness, reducing bitterness. With these steps, you will get delicious, flavorful Brussels sprouts every time. For the full recipe, click here: [Full Recipe]. This recipe for balsamic roasted Brussels sprouts combines fresh ingredients for a delicious dish. You learned how to cut, season, and roast them for optimal taste. We also explored tips for perfecting your sprouts and variations to keep meals exciting. Remember, you can store leftovers easily or make them vegan. Enjoy these delicious sprouts with your favorite meals or salads. Experiment and find the flavors that you love most. Happy cooking!

12. Balsamic Roasted Brussels Sprouts Simple Side Dish

Looking for a quick, tasty side dish? Balsamic Roasted Brussels Sprouts are your answer! In just a few simple steps,

- 1 cup red lentils, thoroughly rinsed: These lentils cook quickly and add a nice texture. You can use green lentils, but they take longer to cook. - 1 can (13.5 oz) creamy coconut milk: Coconut milk adds richness and creaminess. Look for full-fat for the best flavor. - 1 large onion, finely diced: Onions build the foundation of flavor. You can swap with shallots for a sweeter taste. - 3 cloves garlic, minced: Garlic gives a strong, aromatic flavor. Fresh garlic is best, but you can use garlic powder in a pinch. - 1-inch piece fresh ginger, finely grated: Ginger adds warmth and spice. Ground ginger can work, but fresh is much better. - 1 tablespoon curry powder: This spice blend is key for flavor. Choose a good quality curry powder for the best taste. - 1 teaspoon ground turmeric: Turmeric adds a warm yellow color and health benefits. Fresh turmeric is great but hard to find. - 1 teaspoon cumin seeds: Cumin seeds add a smoky flavor. You can use ground cumin if you don't have seeds. - 1 medium carrot, peeled and diced: Carrots bring sweetness and color. You could use sweet potatoes for a twist. - 1 bell pepper, diced (any vibrant color): Bell peppers add crunch and color. Use red, yellow, or orange for sweetness. - 4 cups vegetable broth: This is the base of your soup. You can use homemade or store-bought broth. - 2 tablespoons extra virgin olive oil: Oil helps sauté your veggies. Coconut oil is a tasty alternative. - Salt and freshly ground black pepper, to taste: These spices enhance all flavors. Always taste before serving. - Juice of 1 fresh lime: Lime juice brightens flavors. You can use lemon juice if lime is not available. - Fresh cilantro, chopped, for garnish: Cilantro adds freshness. If you're not a fan, try parsley instead. Fresh spices bring stronger flavors than dried ones. For example, fresh ginger has a bright, zesty taste. Dried spices lose their flavor over time. Always check the date on your spices. You can find most ingredients at local grocery stores. Look for fresh produce at farmers' markets. Specialty stores often have better spices. If you want organic options, check health food stores. Always choose the freshest ingredients for the best soup. For the full recipe of the Coconut Curry Lentil Soup, you can refer to the recipe details provided above. 1. Start by heating the olive oil in a large pot over medium heat. 2. Add the finely diced onion and sauté it for about 5 minutes. Stir it often until the onion is soft and clear. 3. Next, toss in the minced garlic and grated ginger. Cook for another minute. Stir constantly to release their lovely aroma. 4. Now, sprinkle the curry powder, ground turmeric, and cumin seeds into the pot. Stir for 30 seconds to toast the spices. This step really brings out their flavors. 5. Add the diced carrot and bell pepper. Cook them together for about 3-4 minutes. You want them to start softening but not mushy. 6. Incorporate the rinsed red lentils and mix well with the vegetables. This helps the lentils absorb all the flavors. 7. Pour in the vegetable broth and stir again. Increase the heat to a gentle boil. 8. Once boiling, reduce the heat to low. Let it simmer uncovered for about 20 minutes. The lentils should be tender but still hold their shape. 9. Stir in the creamy coconut milk. Let the soup simmer for an extra 5 minutes. 10. If the soup is too thick, add more vegetable broth or water until you like the consistency. 1. Taste the soup and add salt and freshly ground black pepper. Adjust as needed for flavor. 2. Squeeze in the fresh lime juice. This adds a bright finish to the soup. 3. Serve the soup hot in deep bowls. Garnish with fresh chopped cilantro for a pop of color and flavor. This coconut curry lentil soup is so comforting. It’s perfect for cozy nights. For the full recipe, check the section above! When making Coconut Curry Lentil Soup, common mistakes can trip you up. One big mistake is overcooking the lentils. They should be soft but not mushy. To avoid this, keep an eye on them as they simmer. Start checking around the 15-minute mark. Another mistake is not rinsing the lentils. Rinsing removes dust and dirt, making your soup cleaner. Make sure to rinse thoroughly before adding them to the pot. For cooking lentils, a few best practices can help. Use the right type of lentils. Red lentils cook quickly and turn soft. If you choose green or brown lentils, they take longer and stay firmer. Adjust cooking times based on the lentil type. Also, always use enough liquid. Lentils soak up water as they cook. If your soup seems too thick, add more broth or water. This keeps the soup smooth and enjoyable. To make your soup even better, try adding extra spices or herbs. A pinch of cayenne pepper or crushed red pepper can add heat. If you enjoy sweet flavors, consider adding a dash of cinnamon. Fresh herbs like basil or mint can brighten the dish. Add them just before serving for a pop of freshness. You can also stir in some spinach or kale for added nutrition. If you want to change the heat level, start small. Taste the soup as you go. You can always add more spice, but it's hard to take it away. If you like it mild, skip the hot spices altogether. Adjust to match your taste. For the full recipe, check out the complete instructions. Enjoy your cozy night with this rich and tasty soup! {{image_4}} You can make this soup your own by swapping ingredients. If you want to try different lentils, use green or brown lentils. They will change the soup's color and texture, but they still taste great. Cook them a bit longer, about 10 minutes more, to ensure they are tender. Need to add protein? You can toss in cooked chicken for a hearty twist. If you prefer a plant-based option, add tofu. Just cube it and stir it in during the last few minutes of cooking. Both options will give you a filling meal. Cooking this soup in a slow cooker is easy. Just follow the same steps for sautéing the onion, garlic, and spices in a pan. Then, add all ingredients to the slow cooker. Set it on low for 6-8 hours or high for 3-4 hours. Your soup will be ready when the lentils are soft. If you need a quicker option, try the Instant Pot. After sautéing the onion and spices, add all the other ingredients. Seal the lid and cook on high pressure for 10 minutes. Once done, let it naturally release pressure for 10 minutes before serving. This method saves time without losing flavor. To keep your Coconut Curry Lentil Soup fresh, follow these steps: - Cool Down: Let the soup cool to room temperature before storing. - Refrigeration: Place the soup in an airtight container. It can stay in the fridge for about 4-5 days. - Freezing: For longer storage, freeze the soup. Use freezer-safe containers or bags. It can last up to 3 months in the freezer. Reheating soup correctly keeps its rich flavor and texture. Here’s how: - Thawing: If frozen, thaw the soup overnight in the fridge. - Stovetop Method: Pour the soup into a pot. Heat over medium heat, stirring often, until hot. - Microwave Method: Use a microwave-safe bowl. Heat in short bursts, stirring in between, until warm. When reheating, you may want to add a splash of vegetable broth to adjust the soup’s thickness. This keeps it creamy and delicious. Enjoy every warm bowl! Can I make this soup vegan? Yes, this soup is already vegan! It uses coconut milk for creaminess. You can enjoy it without any animal products. How to make this a gluten-free recipe? This soup is gluten-free as is. All the ingredients, like lentils and spices, are safe for gluten-free diets. Just make sure your vegetable broth is gluten-free, too. How long does this soup last in the fridge? This soup will stay fresh in the fridge for about 4 to 5 days. Store it in an airtight container to keep it tasty. Can I serve it with bread or sides? Absolutely! This soup pairs well with crusty bread or a side salad. It makes for a cozy meal. You can also serve it with rice or quinoa for a filling dish. This blog post walked you through all the steps to make a great soup. We discussed the key ingredients and what makes them special. You learned how to prepare them and cook at the right temps. I shared tips to avoid common mistakes and enhance flavors. You also found ways to swap ingredients and adjust cooking methods. Now, with your new knowledge, you're ready to make a tasty soup that suits your taste. Enjoy experimenting and creating your favorite version!

Hearty Coconut Curry Lentil Soup for Cozy Nights

When the nights turn chilly, there’s nothing quite like a warm bowl of Coconut Curry Lentil Soup to wrap you

- Young green jackfruit - Aromatic vegetables: onion and garlic - Spices for flavor: smoked paprika, cumin, chili powder - Barbecue sauce options: store-bought vs. homemade - Suggested toppings for added taste The star of this dish is young green jackfruit. This fruit mimics the texture of pulled pork perfectly. When cooked, it becomes tender and easily shreds. Look for canned jackfruit packed in water or brine. Drain and rinse it well before using. Next, we have aromatic vegetables. Onion and garlic add depth and flavor to our dish. Finely chop the onion and mince the garlic for the best results. Spices are key for that smoky taste. Smoked paprika gives it that rich, smoky flavor. Ground cumin adds warmth, while chili powder brings a bit of heat. Use these spices to season the jackfruit well. Barbecue sauce is essential. You can use store-bought sauce for speed. However, homemade sauce can elevate the dish even more. Choose the option that fits your needs best. Lastly, toppings can enhance your sandwich. Creamy coleslaw adds crunch and coolness. Crunchy pickles give a nice bite. Sliced jalapeños can bring heat for those who like spice. - Essential cookware: skillet and spatula - Serving utensils and presentation ideas - Measuring tools for accuracy You will need a large skillet to cook your jackfruit. A spatula helps to mix and shred the jackfruit easily. These tools make the process smooth and fun. For serving, have utensils ready. You want to present your sandwiches beautifully. A sharp knife is great for slicing buns and toppings. Measuring tools help keep your spices and sauces accurate. This ensures consistent flavor every time you make these sandwiches. For the full recipe, check out the Smoky BBQ Pulled Jackfruit Sandwiches. To start, we need to prepare the jackfruit. Open the cans and drain the jackfruit pieces. Rinse them well under cold water. This helps remove any briny taste. Next, take two forks or your hands and shred the jackfruit into smaller pieces. You want a pulled texture. It's important to discard any tough core parts you find. These pieces won’t taste good in the dish. Now, let’s move on to cooking the base. In a large skillet, pour in one tablespoon of olive oil and heat it over medium heat. Add the finely chopped onion to the skillet. Sauté the onion for about five minutes until it softens and turns translucent. This step builds a great flavor. After that, add three cloves of minced garlic. Cook the garlic for one more minute, stirring often. Don’t let it burn; we want it fragrant and tasty. Next, it’s time to incorporate the jackfruit. Add the shredded jackfruit to the skillet. Sprinkle in one teaspoon each of smoked paprika, ground cumin, and chili powder. This will add depth to your flavor. Season with salt and pepper to taste. Stir well to mix all the ingredients together. Let the jackfruit mixture cook for about ten minutes. Stir occasionally until you see it slightly browned. This browning adds richness to the dish. After that, pour in one cup of your favorite barbecue sauce. Stir everything until the jackfruit is well-coated. Lower the heat and let it simmer for about 20 to 25 minutes. This step is crucial; it helps the jackfruit soak in all the delicious barbecue flavor. Look for a thick, sticky consistency before serving. For the perfect sandwich, toast your burger buns while the jackfruit simmers. This gives them a nice crunch. Once everything is ready, you can assemble your sandwiches. Enjoy this smoky BBQ pulled jackfruit delight! For the full recipe, check out the one provided above. To make your smoky BBQ pulled pork sandwiches shine, start with the right spices. I recommend these measurements: - 1 teaspoon smoked paprika - 1 teaspoon ground cumin - 1 teaspoon chili powder These spices give your dish a deep, rich flavor. Adjust the amounts based on your taste. If you love heat, add more chili powder. Next, select the best barbecue sauce. You can use store-bought or homemade. Look for sauces labeled as "smoky" or "hickory." Read the labels for sugar content, too. A sauce with a good balance of sweetness and tang works best. Now, let’s talk about those burger buns. Toasting them well makes a big difference. Heat a skillet over medium heat. Place the buns cut-side down and toast until golden brown. This adds flavor and keeps the buns sturdy. For an appetizing look, think about presentation. Serve your sandwiches with a side of sweet potato fries. Add a colorful garden salad on the side. To make your dish pop, sprinkle fresh parsley over the sandwiches. This small touch makes a big impact. Try these tips to make your smoky BBQ pulled pork sandwiches a flavor-packed delight! You can find the full recipe in the earlier section. {{image_4}} You can easily switch up the jackfruit in this recipe. Pulled chicken or pork works great if you prefer meat. For a plant-based option, try mushrooms. They have a nice texture and soak in flavors well. When it comes to barbecue sauce, the sky's the limit! You can use smoky, spicy, or sweet sauces. For extra kick, add some hot sauce or make your own sauce with honey and vinegar. This way, you can create a taste just for you! Pairing sides with your smoky BBQ pulled pork sandwiches can elevate the meal. Sweet potato fries are a favorite. Their sweetness balances the smoky flavors. You can also serve with a fresh garden salad for something light. For those who want vegetarian or vegan options, consider a cabbage salad or grilled corn. These sides add texture and flavor without overpowering the sandwich. Feel free to explore your favorite sides and toppings! Each choice can make your smoky BBQ pulled pork sandwiches even more delightful. To keep your smoky BBQ pulled jackfruit sandwiches fresh, store them in the fridge. Wrap each sandwich tightly in plastic wrap or foil. Place them in an airtight container. This method keeps the bread from getting soggy. Try to eat them within three days for the best taste. When reheating, you want to keep the flavors vibrant. Remove the sandwich from its wrap. Place it on a microwave-safe plate. Heat it in short bursts, about 30 seconds at a time. Check to see if it's warm enough. You can also reheat in a skillet. This method helps keep the bread nice and crispy. Freezing is great for pulled jackfruit if you want to save some for later. Start by cooling the mixture completely. Then, pack the shredded jackfruit in a freezer-safe bag. Remove as much air as possible before sealing. This keeps it fresh for up to three months. When you're ready to enjoy it again, thaw it in the fridge overnight. Reheat it on the stove or microwave. You can prepare the burger buns fresh when you are ready to eat. This way, you have a quick meal ready in no time! Jackfruit is a large fruit that grows in tropical areas. It has a unique taste. When cooked, it has a mild flavor, similar to pulled pork. The texture is fibrous and tender, making it great for shredding. You can enjoy its natural sweetness, which pairs well with savory sauces. This quality makes jackfruit a fun and tasty meat alternative in dishes like our smoky BBQ pulled pork sandwiches. Yes, you can make this recipe ahead of time! Cook the jackfruit and mix it with the barbecue sauce. Let it cool, then store it in the fridge. It stays fresh for three to four days. When you’re ready to eat, simply reheat it on the stove or in the microwave. This makes meal prep easy and helps save time during busy days. Many sides pair well with BBQ pulled pork sandwiches. Here are some tasty options: - Sweet potato fries - Coleslaw - Corn on the cob - Baked beans - Potato salad These sides add flavor and texture. They also help create a fun and filling meal for family and friends. You can easily change the spiciness to fit your taste. If you like it mild, use less chili powder. For more heat, add sliced jalapeños or a dash of hot sauce. Experiment with spices to find your perfect flavor. Remember, you can always add more spice later, but it’s hard to take it out once it’s in! This blog post explored how to make delicious BBQ pulled jackfruit sandwiches. We covered key ingredients, tools, and a step-by-step guide. You learned how to prepare the jackfruit, cook the base, and finish the dish. I shared tips for flavoring and serving, along with recipe variations and storage info. Final thoughts: Embrace your creativity with this recipe. Enjoy experimenting with flavors and toppings. Your BBQ pulled jackfruit sandwiches will surely impress friends and family!

Smoky BBQ Pulled Pork Sandwiches Flavor-Packed Delight

Looking to spice up your dinner with a flavor-packed delight? Try my Smoky BBQ Pulled Pork Sandwiches made with jackfruit!

Older posts
Newer posts
← Previous Page1 … Page4 Page5 Page6 … Page38 Next →

dsad

© 2025 recipetorch • Built with GeneratePress

Our Policies

  • Copyright Policy
  • Cookie Policy
  • GDPR Policy
  • Privacy Policy
  • Disclaimer
  • Terms Of Use

More Information

  • Home
  • About
  • Contact
  • Appetizers
  • Dessert
  • Dinner
  • Drinks
©2025, recipetorch About Back To Top