![Here are the main ingredients for chili oil udon noodles: - 400g udon noodles - 3 tablespoons chili oil - 2 cloves garlic, minced - 1 inch fresh ginger, grated - 1 tablespoon soy sauce - 1 tablespoon sesame oil - 1 tablespoon rice vinegar - 1 tablespoon sugar - 1 cup bok choy, chopped - 1 red bell pepper, thinly sliced - 2 green onions, finely chopped - Sesame seeds for garnish - Fresh cilantro for garnish For chili oil, I recommend using brands like Zha Jiang or Lao Gan Ma. They offer bold flavors that really shine in this dish. When choosing udon noodles, look for fresh or frozen varieties for the best texture. You can find these ingredients at most Asian grocery stores or online. Using fresh veggies not only enhances the taste but also adds vibrant colors. Fresh cilantro and sesame seeds make lovely garnishes. They add the finishing touch to your meal. First, you need to cook the udon noodles. Start by boiling a large pot of water. Make sure the water is bubbling. Add the udon noodles and cook them for about 8-10 minutes. Check the package for exact times. Once they are soft, drain them in a colander and set them aside. Keep them warm by covering them with a clean towel. Next, let's make the chili oil sauce. Heat three tablespoons of chili oil in a large skillet over medium heat. When the oil is hot, add two cloves of minced garlic and one inch of grated ginger. Sauté them for 1-2 minutes. You want them to smell good, but don’t let them burn. Burnt garlic and ginger can ruin the flavor. Now, it’s time to mix everything. Add one cup of chopped bok choy and one thinly sliced red bell pepper to the skillet. Stir-fry the veggies for about 3-4 minutes. They should be tender but still crunchy. Then, pour your sauce mixture over the noodles. Toss everything well to coat the noodles evenly. Cook for 2-3 more minutes. This allows the noodles to soak up all those tasty flavors. For the full recipe, you can refer to the details outlined above. To make your chili oil udon noodles just right, start with spice levels. If you love heat, keep the chili oil as is. If you prefer less spice, use less oil or add a splash of soy sauce to cool it down. You can also try adding sugar to balance the heat. Enhance the flavor with extra seasonings. A dash of sesame oil brings depth. You can also sprinkle in some black pepper or a hint of lime juice for a zesty kick. Don't be afraid to experiment until you find the mix you love! For a beautiful dish, serve the noodles in deep bowls. This adds warmth and comfort. Drizzle some extra chili oil on top for a glossy finish. This makes the dish look inviting and vibrant. Think about garnishing too. A handful of fresh cilantro adds color and freshness. Chopped green onions and sesame seeds create a lovely contrast. Arrange everything neatly to make your meal pop. When you serve it this way, everyone will want to dig in! {{image_4}} You can make your chili oil udon noodles more filling by adding protein. Chicken, tofu, and shrimp are great choices. - Chicken: Use boneless, skinless chicken breasts. Slice them thinly. Sauté the chicken in the chili oil before adding the garlic and ginger. Cook until the chicken turns white and is no longer pink. - Tofu: Use firm or extra-firm tofu. Press it to remove extra water. Cut it into cubes and fry it in the chili oil until golden brown. Add it to the noodles with the veggies. - Shrimp: Use fresh or frozen shrimp. If frozen, thaw them first. Add the shrimp to the skillet after the garlic and ginger. Cook until they turn pink and curl up, then mix in with the noodles. Cooking tips: - Cook protein first to avoid overcooking the veggies. - Adjust cooking time based on the protein's thickness. You can swap the vegetables based on what you like or what's in season. - Mushrooms: Add shiitake or button mushrooms for a rich flavor. Sauté them for a few minutes before adding other veggies. - Carrots: Thinly slice or julienne them. They add a nice crunch and sweetness. - Snap peas: They give a sweet and crisp bite. Toss them in for the last minute of cooking. - Zucchini: Cut it into half-moons. It cooks quickly and adds a fresh taste. Seasonal variations: - In spring, add asparagus or peas. - In fall, think about adding broccoli or butternut squash. Experiment with your favorite vegetables to find the perfect mix. This keeps the dish fresh and exciting! Don't forget to check the [Full Recipe] for the base you can customize. To store your chili oil udon noodles, you should first let them cool. Once they're cool, place them in an airtight container. This helps keep out moisture and air. Store the container in the fridge. Your noodles will stay fresh for about 3 to 4 days. If you want to keep them longer, consider freezing them. They can last up to two months in the freezer. To reheat your udon noodles, you have a few good options. The best way is to use a skillet. Simply add a splash of water or broth to the skillet. Heat over medium until warm. Stir the noodles gently to avoid sticking. You can also use a microwave. Place the noodles in a bowl and add a bit of water. Cover the bowl with a lid or a damp paper towel. Heat in short bursts, stirring in between. This keeps the noodles from drying out. Remember, no one wants dry noodles! Chili oil is a spicy oil made with hot peppers. It adds heat and flavor to dishes. You can drizzle it on noodles, stir-fries, or soups. The oil boosts taste with its rich, warm flavors. It also has health benefits. Chili oil can help with digestion and improve metabolism. Yes, you can use other noodles if you prefer. Soba noodles or rice noodles work well. Just be sure to cook them according to their package instructions. This way, you can still enjoy a tasty dish. Each noodle type brings a unique texture and flavor to your meal. This recipe has a mild to medium spice level. The heat comes from the chili oil. If you like it milder, use less chili oil. You can also add more sugar to balance the heat. For extra spice, just add more chili oil or some red pepper flakes. To make this dish vegan, swap out the non-vegan ingredients. Use vegetable broth instead of chicken broth if needed. Replace the sugar with maple syrup or agave. This keeps the flavors rich while making it plant-based. You can still enjoy all the taste without animal products. You can find udon noodles at most grocery stores. Look in the international aisle or the pasta section. Chili oil is also available online or in Asian markets. Some brands have unique flavors, so try different ones to find your favorite. To make a single serving, divide the ingredient amounts by four. Use about 100g of noodles and ¾ tablespoon of chili oil. This way, you ensure the right flavor and texture. Adjust the other ingredients similarly for a perfect single dish. In this post, we explored making chili oil udon noodles. We covered key ingredients, cooking tips, and sauce details. You learned how to mix flavors and present your dish beautifully. We also discussed protein and vegetable alternatives, plus storage and reheating methods. Remember, cooking is about experimenting. Adjust spice levels and try new ingredients. With practice, you'll create a delicious, personalized meal every time. Enjoy your cooking journey!](https://recipetorch.com/wp-content/uploads/2025/04/989e9633-fc6c-4a35-a8b3-5bf922f67e26.webp)
Chili Oil Udon Noodles Simple and Flavorful Recipe
Do you crave a dish that’s both simple and packed with flavor? Look no further than chili oil udon noodles!
Do you crave a dish that’s both simple and packed with flavor? Look no further than chili oil udon noodles!
![To make a delightful coconut cream pie, you need a few key ingredients: - 1 ½ cups graham cracker crumbs - ½ cup unsweetened shredded coconut, toasted - ½ cup unsalted butter, melted - 1 cup granulated sugar, divided - ¼ cup cornstarch - ½ teaspoon salt - 2 cups whole milk - 4 large egg yolks, lightly beaten - 1 teaspoon pure vanilla extract - 1 ½ cups heavy whipping cream - 3 tablespoons powdered sugar - Extra toasted coconut and whipped cream for garnish Using fresh coconut versus dried coconut greatly impacts flavor. Fresh coconut gives a richer, creamier taste. Dried coconut might lack that fresh pop, but it can still work well. For sweeteners, you can use honey or maple syrup instead of granulated sugar. Just keep in mind that it may alter the texture and taste a bit. Here are the kitchen tools you will need: - A 9-inch pie dish - Mixing bowls - Electric mixer - Medium saucepan - Whisk - Measuring cups and spoons I recommend using a glass or ceramic pie dish for even baking. These materials help the crust bake nicely. An electric mixer is important for whipping the cream. It helps you achieve those beautiful stiff peaks needed for topping. For the full recipe, check out the detailed instructions in the recipe section above. Happy baking! To make the graham cracker crust, start with 1 ½ cups of graham cracker crumbs. Mix these crumbs with ½ cup of toasted shredded coconut and ½ cup of melted unsalted butter. Add ¼ cup of granulated sugar to the mix. Stir until you achieve a crumbly texture. This step is key for a crunchy crust. Next, press the mixture firmly into a 9-inch pie dish. Make sure the crust covers the bottom and the sides evenly. This helps it hold its shape when baked. Bake the crust in a preheated oven at 350°F (175°C) for 8 to 10 minutes until it turns golden brown. After baking, let it cool completely. Cooling is important to prevent the filling from melting the crust. For the coconut filling, begin by whisking together ¾ cup of sugar, ¼ cup of cornstarch, and ½ teaspoon of salt in a medium saucepan. Gradually pour in 2 cups of whole milk while whisking. This helps create a smooth mixture. Cook the mixture over medium heat. It's vital to whisk constantly until it thickens and bubbles. Once you see bubbles, take the saucepan off the heat. This prevents the mixture from overcooking. Now, we need to temper the egg yolks. Take 4 large egg yolks and lightly beat them. Carefully scoop a bit of the hot mixture and whisk it into the egg yolks. This step warms the yolks without cooking them. Then, pour the tempered yolks back into the saucepan. Return it to the stove for one more minute, stirring constantly. Finally, stir in 1 teaspoon of pure vanilla extract and 1 cup of shredded coconut. This adds flavor and texture to your filling. Let the filling cool a bit before pouring it into the cooled pie crust. To set the filling, cover the pie with plastic wrap and chill it in the fridge for at least 4 hours. This will ensure a perfect slice later. For the full recipe, check out the details above! To make the filling just right, avoid these common mistakes: - Not whisking enough: Always whisk the mixture well as it heats. This helps prevent lumps. - Cooking at too high a heat: Keep the heat medium. High heat can ruin the texture by cooking too fast. - Skipping the tempering step: Always temper the egg yolks. This step is key to a smooth filling. You’ll know the filling is ready when it thickens and starts to bubble. It should coat the back of a spoon. This shows it's thick enough. For smooth whipped cream, follow these tips: - Chill the bowl and beaters beforehand. This helps the cream whip faster. - Beat until stiff peaks form. This means the cream holds its shape well. - Add powdered sugar slowly for sweetness and better texture. Pair coconut cream pie with these great side dishes or drinks: - Fresh fruit salad adds a nice contrast. - A cold glass of lemonade works well too. For a beautiful dessert display, try these presentation tips: - Use a clean, sharp knife for slicing. - Serve each slice on a colorful plate for eye appeal. - Add extra toasted coconut on top for a nice finish. To slice and serve the pie without a mess: - Use a pie server for clean cuts. - Wipe the knife after each slice. This helps keep the pieces neat. For the full recipe, check out the Tropical Coconut Cream Pie. {{image_4}} For a vegan coconut cream pie, you can swap dairy ingredients for plant-based ones. Use almond or coconut milk instead of whole milk. For egg yolks, try silken tofu or a mix of cornstarch and water. This keeps the filling creamy and rich without eggs. You can also change the crust to make it vegan. Use crushed nuts and dates to create a no-bake crust. Just blend them together and press into your pie dish. It’s simple, tasty, and adds a nice texture. If you need a gluten-free option, you can make a crust with gluten-free graham crackers or almond flour. Both provide great flavor and texture. You can also use crushed nuts mixed with coconut oil as a base. For the filling, always check if your cornstarch is gluten-free. Most brands are, but it's good to confirm. When cooking the filling, whisk constantly. This helps prevent lumps and keeps it smooth. The filling should thicken nicely, giving you that delightful creamy texture. Feel free to explore the [Full Recipe] for more detailed steps! To keep your coconut cream pie fresh, store it in the fridge. Use a pie cover or wrap it tightly in plastic wrap. This helps prevent the pie from absorbing any odors from your fridge. Proper storage keeps the pie tasty for about 3 to 4 days. Watch for signs of spoilage. If the pie looks dry or the filling separates, it’s best to toss it out. Always trust your senses; if it smells off, don’t eat it. If you want to freeze the pie, it's easy! First, let the pie cool completely. Then, wrap it tightly in plastic wrap and place it in a freezer-safe container. This helps keep it safe from freezer burn. The pie can last in the freezer for up to 2 months. When you’re ready to enjoy it, thaw the pie in the fridge overnight. This keeps the texture nice and creamy. Avoid thawing at room temperature, as it can make the filling watery. A well-thawed pie will taste just as delightful as when you first made it! You can use canned coconut milk. It adds a rich coconut flavor. However, it may change the texture. The filling could be creamier and thicker. If you want a lighter pie, stick to whole milk. If you don't have cornstarch, try using flour. You can also use arrowroot powder or tapioca starch. Both work well for thickening. Use double the amount of these substitutes for best results. The filling is done when it thickens and bubbles. It should coat the back of a spoon. You can also check by dipping a whisk into the mixture. It should leave a line when you run your finger through it. Add fresh fruit like mango or pineapple on top. You can also use macadamia nuts for crunch. A splash of rum in the filling gives it a fun twist. Another option is to mix in lime zest for a tangy flavor. Garnish the pie with toasted coconut and whipped cream. Spread the whipped cream evenly over the pie. Sprinkle the toasted coconut on top for a nice look. You can also add fresh fruit as a colorful touch. Coconut cream pie is a delightful treat. We covered the key ingredients, the right tools, and the step-by-step process. I shared tips for perfect texture and tasty variations. Don’t forget storage methods to keep your pie fresh. Whether you choose vegan or gluten-free options, there’s a way for everyone to enjoy. Making this pie can be fun and rewarding. So get in your kitchen and create a delicious coconut cream pie today!](https://recipetorch.com/wp-content/uploads/2025/04/e31f8943-5420-4e33-bba9-1ad669aba346.webp)
Coconut cream pie is a tropical treat that everyone loves. In this simple and tasty recipe, I’ll show you how

Crispy fried chicken is a comfort food classic, loved by many. In this article, I’ll guide you through a simple
![To make Tangy Lemon Garlic Roasted Carrots, you need a few simple items. Here’s what you will need: - 1 lb fresh carrots, peeled and cut into uniform sticks - 3 tablespoons extra virgin olive oil - 4 cloves garlic, finely minced - Zest of 1 large lemon - 2 tablespoons freshly squeezed lemon juice - 1 teaspoon natural honey (or maple syrup for a vegan option) - 1 teaspoon dried thyme leaves - Sea salt and freshly cracked black pepper, to taste - 2 tablespoons fresh parsley, chopped (for garnish) These ingredients come together to create a bright and zesty flavor. You can customize this dish to suit your taste. Here are some ideas: - Add a pinch of red pepper flakes for heat. - Use fresh herbs like rosemary or oregano instead of thyme. - Mix in orange zest for a different citrus flavor. - Drizzle balsamic glaze on top for extra depth. These options can make your roasted carrots even more exciting! When picking carrots, look for the freshest ones. Here’s how to choose: - Choose firm carrots with smooth skin. - Avoid carrots with spots or soft spots. - Opt for medium-sized carrots for even cooking. - If possible, buy organic carrots for better flavor and health benefits. Selecting the right carrots ensures your dish will be a hit! For the full recipe, check out the [Full Recipe]. First, gather all your ingredients. You need fresh carrots, olive oil, garlic, lemon zest, and juice. You will also need honey, thyme, salt, and pepper. 1. Preheat your oven to 425°F (220°C). 2. Line a baking sheet with parchment paper. This helps with easy cleanup. 3. In a mixing bowl, combine olive oil, minced garlic, lemon zest, and lemon juice. 4. Add honey, thyme, and a good pinch of salt and pepper. 5. Whisk until the mixture is blended and fragrant. 6. Peel and cut the carrots into uniform sticks. This helps them cook evenly. 7. Toss the carrot sticks in the bowl until they are coated well. 1. Spread the coated carrot sticks onto the lined baking sheet. 2. Make sure they are in a single layer. This ensures they roast, not steam. 3. Place the baking sheet in your preheated oven. 4. Roast the carrots for 20 to 25 minutes. 5. Halfway through, gently toss the carrots to help them roast evenly. 6. They should be tender and caramelized when done. 1. Remove the carrots from the oven once they are perfectly roasted. 2. Sprinkle freshly chopped parsley on top for color and flavor. 3. Serve the carrots warm as a tasty side dish. 4. For an extra touch, drizzle fresh lemon juice over them before serving. You can find the full recipe for these zesty lemon garlic roasted carrots in the article. Enjoy your cooking! To get the best roasted texture on your carrots, start with uniform sticks. Cut each carrot into even pieces. This helps them cook at the same speed. Use a high oven temperature, like 425°F (220°C). This allows the carrots to caramelize nicely. Spread them out on the baking sheet. If they are too close, they will steam instead of roast. One common mistake is not preheating the oven. Always make sure your oven is hot before adding the carrots. Another mistake is overcrowding the baking sheet. If you pile them high, they won’t roast well. Also, avoid skipping the tossing step halfway through. This helps them cook evenly. Lastly, don’t forget to season well. A pinch of salt and pepper enhances the carrots’ natural flavor. To boost the flavor of your roasted carrots, use fresh ingredients. Fresh herbs, like thyme or parsley, add great taste. You can also add a splash of balsamic vinegar before serving. This gives a tangy kick that pairs well with lemon. For a hint of sweetness, drizzle honey or maple syrup. Experiment with spices like cumin or paprika for a unique twist. If you want the full recipe, check out [Full Recipe]. {{image_4}} You can switch up the flavor of your carrots easily. Try adding fresh rosemary for a piney taste. Oregano gives a warm, earthy feel. If you like heat, sprinkle in some red pepper flakes. These herbs add depth and make each bite exciting. This recipe is already vegan if you use maple syrup. For gluten-free options, check your honey source. Most honey is gluten-free, but it’s good to be sure. You can also swap out the olive oil for avocado oil. This keeps the dish light and tasty. Serve the carrots on a big platter for family meals. You can also pair them with hummus for a fun appetizer. Try adding them to salads for more flavor. A sprinkle of feta cheese or toasted nuts can turn the dish into a full meal. These ideas make your tangy lemon garlic roasted carrots shine in any meal. For the full recipe, check out the details above. After you enjoy your tangy lemon garlic roasted carrots, you may have some left. Store them in an airtight container. This helps keep them fresh. You can keep them in the fridge for up to three days. If you want to enjoy them later, follow the steps below. To reheat your carrots, the oven is the best choice. Preheat the oven to 350°F (175°C). Spread the carrots on a baking sheet. Heat them for about 10 to 15 minutes. This will help keep them crispy. You can also use the microwave. Place the carrots in a safe bowl and cover them. Heat in 30-second intervals until warm. If you want to save your carrots for a long time, you can freeze them. First, let them cool completely. Place the cooled carrots in a freezer-safe bag. Remove as much air as you can before sealing. They can last up to three months in the freezer. When ready to eat, thaw them in the fridge overnight before reheating. For the full recipe, check out the details above. You can prep roasted carrots a day ahead. Just follow the recipe and stop before roasting. Place the coated carrots in a sealed container in the fridge. When you’re ready, spread them on a baking sheet and roast them. This way, you save time and still enjoy a tasty dish. Yes, you can! Many vegetables roast well. Try using zucchini, bell peppers, or Brussels sprouts. Just cut them to a similar size as the carrots. Adjust your cooking time based on the vegetable for the best results. These carrots go great with many meals. They pair well with grilled chicken, fish, or steak. You can also serve them with pasta or quinoa for a vegetarian option. Their zesty flavor adds brightness to any plate. For more ideas, check the Full Recipe for inspiration! In this post, we explored how to make Tangy Lemon Garlic Roasted Carrots. You learned about key ingredients, tips for selecting the best carrots, and step-by-step cooking instructions. We discussed ways to customize your dish and common mistakes to avoid. Understanding storage and reheating methods is key for leftovers. These roasted carrots are a tasty, healthy side dish. Feel free to experiment with herbs and spices to make it your own. Enjoy your delicious creation!](https://recipetorch.com/wp-content/uploads/2025/04/d776abae-2ece-482f-b622-a53afad2a989.webp)
Looking for a bright, vibrant side dish? Tangy Lemon Garlic Roasted Carrots are just what you need! Their zesty flavor
![- 4 boneless, skinless chicken breasts - 4 tablespoons olive oil, divided - 4 cloves garlic, minced - 1 tablespoon fresh rosemary, finely chopped - 1 tablespoon fresh thyme, finely chopped - Zest and juice of 1 large lemon - Salt and freshly ground black pepper, to taste - 2 cups low-sodium chicken broth - 1 cup orzo pasta - 2 cups baby spinach - ¼ cup grated Parmesan cheese (optional) The main ingredients in this dish create a lovely balance of flavors. The chicken provides protein, while garlic and herbs bring aroma and taste. Lemon adds brightness, and orzo offers a perfect base. - ¼ cup grated Parmesan cheese - Fresh herbs for garnish, like parsley or basil Parmesan adds creaminess and depth to the dish. Fresh herbs can brighten up the final presentation and enhance flavor. - Chicken: Use turkey breast or firm tofu for a vegetarian option. - Orzo: Swap with quinoa or rice for gluten-free options. - Olive oil: Can be replaced with avocado oil or melted butter. Substitutions help tailor the recipe to your needs. Don’t be afraid to experiment! Each change can create a new twist on this fresh delight. For the full recipe, check the complete guide above. To start, you need to marinate the chicken. This step brings out the flavors. In a medium bowl, mix 2 tablespoons of olive oil, minced garlic, chopped rosemary, chopped thyme, lemon zest, lemon juice, salt, and pepper. This marinade is simple but very tasty. Add the chicken breasts to the bowl. Make sure every piece is well-coated. Cover the bowl with plastic wrap and place it in the fridge. Let it marinate for at least 30 minutes. For the best flavor, try to marinate overnight. After marinating, it’s time to cook the chicken. Heat the remaining 2 tablespoons of olive oil in a large skillet over medium-high heat. Take the chicken out of the marinade, letting the extra drip off. Place the chicken in the hot skillet. Sear each side for 5-6 minutes. You want that nice golden-brown color. Use a meat thermometer to check for doneness. The internal temperature should reach 165°F (75°C). Once done, move the chicken to a plate and cover it with foil to keep it warm. Now, let’s prepare the orzo. In the same skillet, pour in the low-sodium chicken broth. Bring it to a gentle simmer. Add the orzo pasta and cook as per the package instructions. This usually takes about 8-10 minutes. Stir it occasionally. You want the orzo to be tender, yet firm. After it’s cooked, toss in the baby spinach. Stir until the spinach wilts, which takes about 1-2 minutes. If you like, add Parmesan cheese for creaminess. Stir well and adjust the seasoning as needed. For the complete recipe, check out the [Full Recipe]. To get juicy chicken, marinate it well. Use a mix of lemon, garlic, and herbs. This helps the chicken absorb flavor. Make sure to let the chicken sit in the marinade for at least 30 minutes. For best results, marinate overnight. When cooking, heat your skillet to medium-high. This creates a nice crust. Sear the chicken for about 5-6 minutes on each side. Always check the internal temperature. It should reach 165°F (75°C). Let it rest before slicing. This keeps the juices locked in. Cooking the orzo in chicken broth adds depth. Use low-sodium broth to control the salt. Once the broth simmers, stir in the orzo. Cook it for about 8-10 minutes. This gives it a firm texture. You can add a squeeze of lemon juice or some zest for extra flavor. Don’t forget the baby spinach! It wilts quickly and adds a fresh taste. If you want creaminess, sprinkle in some Parmesan cheese at the end. This makes the dish richer and more satisfying. For a stunning plate, slice the chicken and place it on top of the orzo. Drizzle some pan juices over the chicken for added flavor. Garnish with a bit of lemon zest or fresh herbs. This adds color and makes the dish pop. Using a colorful plate can enhance the look, too. The vibrant colors of the dish will impress your guests. Serve it warm to ensure the flavors shine. These details will make your dish not only tasty but also beautiful. For more ideas, check the Full Recipe for inspiration! {{image_4}} You can switch out the chicken for other meats. Try turkey breasts for a leaner option. Pork chops also work well if you want something different. For those who love seafood, shrimp adds a great twist. Just adjust the cooking time, as shrimp cooks faster than chicken. For a vegetarian meal, replace chicken with hearty vegetables. Grilled eggplant or zucchini can bring a nice texture. Tofu is another choice; marinate it like the chicken. This adds flavor and keeps it moist. You can also use chickpeas for protein and a pleasant bite. Feel free to get creative with your herbs. Basil or parsley can replace rosemary and thyme. Adding a pinch of red pepper flakes gives a spicy kick. If you love citrus, add more lemon zest or juice. This will brighten the dish and enhance the flavors. To keep your Garlic Herb Chicken with Lemon Orzo fresh, let it cool first. Place the leftovers in an airtight container. Make sure to store it in the fridge. It stays good for 3 to 4 days. If you have leftover orzo, store it separately to prevent mushiness. Reheat the chicken and orzo in the microwave. Use a microwave-safe dish and cover it with a lid or plastic wrap. Heat on medium for 1 to 2 minutes. Stir halfway through to ensure even heating. Check that the chicken is warm all the way through. You can also reheat them in a skillet. Add a splash of chicken broth to keep it moist. You can freeze Garlic Herb Chicken for later use. First, let it cool completely. Wrap each chicken piece tightly in plastic wrap, then place it in a freezer bag. Label it with the date. It can stay in the freezer for up to 3 months. For the orzo, freeze it in a separate container. When you’re ready to eat, thaw in the fridge overnight before reheating. For the best texture, try to avoid freezing cooked orzo for too long. Yes, you can use whole wheat orzo. It adds a nutty flavor and extra fiber. The cooking time may vary slightly, so check the package for specific instructions. Whole wheat orzo is a healthier choice that still pairs well with garlic herb chicken. You can marinate the chicken for at least 30 minutes. For best results, marinate overnight. This allows the flavors to soak in deeply. Use a glass or plastic bowl for marinating to avoid any reactions with the acid from the lemon juice. Garlic herb chicken with lemon orzo pairs well with a simple green salad. A side of roasted vegetables also works nicely. You can also serve garlic bread for a hearty meal. If you want to stay light, try some steamed broccoli or asparagus. For a refreshing drink, serve with iced tea or lemonade. Check the Full Recipe for more serving suggestions! In this post, we covered the key ingredients for Garlic Herb Chicken with Lemon Orzo. We discussed how marinating, cooking, and preparing create delicious flavors. I shared tips for cooking chicken perfectly and enhancing your orzo. Exploring substitutions lets you customize this meal for your tastes. Proper storage ensures your leftovers stay fresh. Remember, cooking should be fun and creative. Enjoy making this dish your own!](https://recipetorch.com/wp-content/uploads/2025/04/4a2218f3-ef32-458b-968b-48efa88413b9.webp)
Welcome to my kitchen! Today, I’m excited to share my recipe for Garlic Herb Chicken with Lemon Orzo. This dish

Looking for a delicious meal that packs a flavor punch? Gyeran Bap, or savory rice with a flavorful egg mix,
![- 4 cups all-purpose flour - 1/4 cup granulated sugar - 1 packet (2 1/4 tsp) instant yeast - 1/2 teaspoon salt - 1 cup warm milk (about 100°F) - 1/4 cup unsalted butter, melted - 2 large eggs, at room temperature - 1 tablespoon vanilla extract - 1/2 cup packed brown sugar - 2 tablespoons ground cinnamon - 1/4 cup unsalted butter, softened (for spreading) - 1 cup powdered sugar (for icing) - 2 tablespoons milk (for icing) - 1 teaspoon vanilla extract (for icing) Gathering the right ingredients is key to making great cinnamon rolls. Each item plays a special role. The flour gives the rolls their structure. The sugar adds sweetness. Instant yeast helps them rise. Warm milk activates the yeast and softens the dough. Butter gives a rich flavor. Eggs add moisture and richness. Vanilla extract brings a lovely aroma. For the filling, brown sugar and cinnamon create that warm, cozy flavor we love. The softened butter helps the filling stick to the dough. Lastly, the icing, made with powdered sugar, milk, and vanilla, adds a sweet finish. Using fresh ingredients makes a big difference. Make sure your yeast is active. If you store your ingredients well, they will taste better. Now, let’s get ready to bake! For the full recipe, check out the detailed instructions. To start, combine warm milk, melted butter, granulated sugar, and yeast in a large bowl. Let it rest for about five minutes. You want to see bubbles form. Next, add two large eggs and one tablespoon of vanilla extract. Mix until it's smooth. Gradually add four cups of all-purpose flour and half a teaspoon of salt. Stir until you see a dough form. Transfer the dough to a floured surface and knead it for five to seven minutes. The dough should feel smooth and elastic. Now, transfer the dough into a greased bowl. Cover it with a clean kitchen towel. Place it in a warm area to rise for about one hour. The dough will double in size. This step is key for fluffy rolls. While the dough rises, combine half a cup of packed brown sugar and two tablespoons of ground cinnamon in a bowl. This mix will give your rolls that sweet, spicy flavor. Next, prepare your baking dish by greasing it lightly. This will help the rolls not stick. After the dough has risen, gently punch it down. Roll it out on a floured surface into a rectangle, about 16 by 12 inches. Spread a quarter cup of softened butter over the dough. Leave a small border around the edges. Sprinkle the cinnamon-sugar mix evenly over the butter. Starting from one long edge, roll the dough tightly into a log. Pinch the seams to seal it. Cut the log into 12 equal pieces and place them in the greased baking dish. Cover the dish with a cloth. Let the rolls rise for another 30 to 45 minutes. They should look puffy when ready. This second rise makes them light and airy. Preheat your oven to 350°F (175°C). Bake the rolls for 20 to 25 minutes. They should turn golden brown. While the rolls bake, prepare the icing. Whisk together one cup of powdered sugar, two tablespoons of milk, and one teaspoon of vanilla extract until smooth. Once the rolls cool for about five minutes, drizzle the icing over the top. Enjoy your homemade cinnamon rolls! For the complete recipe, check out the Full Recipe. To make the best cinnamon rolls, focus on the dough. You want it soft and stretchy. Start by mixing warm milk, melted butter, sugar, and yeast. Let it sit until it bubbles. This means your yeast is alive. Then, add the eggs and vanilla. Next, slowly mix in the flour and salt. Kneading is key. Use your hands to push the dough down and fold it over. Do this for about 5 to 7 minutes. When done, the dough should feel smooth. You can check this by pressing your finger into it. If it springs back, you’re good to go! The dough needs warmth to rise. Find a cozy spot, like near a warm oven. Cover the bowl with a towel. Let it sit for about an hour. You’ll know it’s ready when it’s doubled in size. If it looks puffy and soft, it’s perfect! For the second rise, after you cut the rolls, let them sit again for 30-45 minutes. This makes them fluffy. The rolls should look puffy and ready to bake. Icing makes your cinnamon rolls shine. For a thick icing, mix powdered sugar with milk and vanilla. Start with a small amount of milk. You can always add more if it’s too thick. Want to spice it up? Add some cinnamon or nutmeg to the icing. This gives it a warm flavor. You can even try adding cocoa powder for a chocolate touch. Check out the [Full Recipe] for step-by-step instructions to guide you! {{image_4}} To make vegan cinnamon rolls, you can swap a few ingredients. Instead of milk, use almond or soy milk. Replace the eggs with flaxseed meal or applesauce. Use a plant-based butter in place of the regular butter. This way, you get soft and fluffy rolls that everyone can enjoy! If you need gluten-free cinnamon rolls, choose the right flour. Almond flour or a gluten-free all-purpose blend works well. Make sure the blend has xanthan gum for better texture. This option gives you tasty rolls without the gluten. You can easily change up the flavors in your cinnamon rolls. Try adding chopped nuts, like walnuts or pecans, to the filling. Dried fruits such as raisins or cranberries add a sweet twist. If you're a chocolate lover, sprinkle mini chocolate chips inside the rolls. Each variation adds a fun new taste! To keep your cinnamon rolls fresh, store them in an airtight container. If you use the fridge, they last about 3 to 5 days. For longer storage, freeze them. Wrap each roll in plastic wrap and place them in a freezer-safe bag. This way, they stay good for about 2 to 3 months. When it’s time to enjoy your rolls again, use the oven or microwave. For the oven, preheat it to 350°F (175°C). Place the rolls on a baking sheet and cover them with foil. Heat for about 10 minutes until warm. If using the microwave, place a roll on a plate and heat for 20 to 30 seconds. Add a splash of water to keep them soft. Cinnamon rolls can last up to 5 days in the fridge. If frozen, they can stay fresh for 2 to 3 months. Always check for signs of spoilage, like an off smell or change in texture. Enjoy your heavenly cinnamon rolls at their best by storing them right! To make cinnamon rolls from scratch, follow these steps: 1. Combine Ingredients: Start by mixing warm milk, melted butter, sugar, and yeast in a bowl. Let it sit for about 5 minutes. 2. Add Eggs: Stir in room temperature eggs and vanilla extract until mixed well. 3. Mix Dough: Gradually add flour and salt. Mix until the dough pulls away from the sides. 4. Knead: Place the dough on a floured surface. Knead for 5-7 minutes until smooth. 5. First Rise: Put the dough in a greased bowl. Cover it and let it rise for about 1 hour. 6. Prepare Filling: Mix brown sugar and cinnamon while the dough rises. 7. Roll Out: Roll the dough into a rectangle. Spread softened butter, then sprinkle the cinnamon mix. 8. Shape Rolls: Roll the dough tightly and cut into pieces. 9. Second Rise: Place the rolls in a dish. Let them rise again for 30-45 minutes. 10. Bake: Preheat your oven to 350°F. Bake for 20-25 minutes. 11. Icing: Whisk powdered sugar, milk, and vanilla. Drizzle over warm rolls. This detailed process ensures that you create soft, warm cinnamon rolls. You can find the full recipe above. Several factors can cause your cinnamon rolls to not rise properly: - Old Yeast: If your yeast is expired, it won't work. Always check the date. - Cold Ingredients: If your milk or eggs are too cold, it can slow down yeast activity. Use warm milk and room temperature eggs. - Drafty Area: Yeast needs a warm, draft-free space to rise. Find a cozy spot in your kitchen. - Over-Kneading: Too much kneading can make the dough tough. Knead just until smooth. If your rolls do not rise, check these common issues. You can adjust your process next time for better results. Yes, you can prepare the dough ahead of time. Here’s how: - Refrigerate: After kneading, place the dough in a greased bowl. Cover it tightly and put it in the fridge. It can last up to 24 hours. - Bring to Room Temp: Before rolling, let the dough sit out for about 30 minutes. This allows the yeast to wake up again. - Follow Normal Steps: Once it’s at room temperature, follow the regular steps for rolling, filling, and rising. Making dough in advance helps save time on baking day. If you don’t have brown sugar, here are some great alternatives: - Granulated Sugar: Use white sugar in the same amount. It will be less rich but still sweet. - Honey or Maple Syrup: Use 3/4 cup of honey or maple syrup for each cup of brown sugar. Reduce liquid in the recipe slightly. - Coconut Sugar: This is a great 1:1 substitute. It has a similar flavor profile. - Agave Nectar: Use 2/3 cup of agave for every cup of brown sugar. Adjust for liquid in the recipe. These substitutes can help you achieve sweet and flavorful cinnamon rolls without brown sugar. This blog post guides you through making delicious cinnamon rolls from scratch. We covered the key ingredients, tools needed, and detailed steps for success. You learned tips on perfecting the dough and how to store your rolls. In closing, don’t shy away from trying variations like vegan or gluten-free options. Enjoy the joy of baking with these simple steps and create a treat that everyone will love. Your kitchen will smell great, and you’ll have warm rolls to share. Get started and savor the process!](https://recipetorch.com/wp-content/uploads/2025/04/0f1801e4-9625-44f2-8505-b883d8c822cf.webp)
There’s nothing quite like the smell of homemade cinnamon rolls filling your home. These warm, soft treats are perfect for
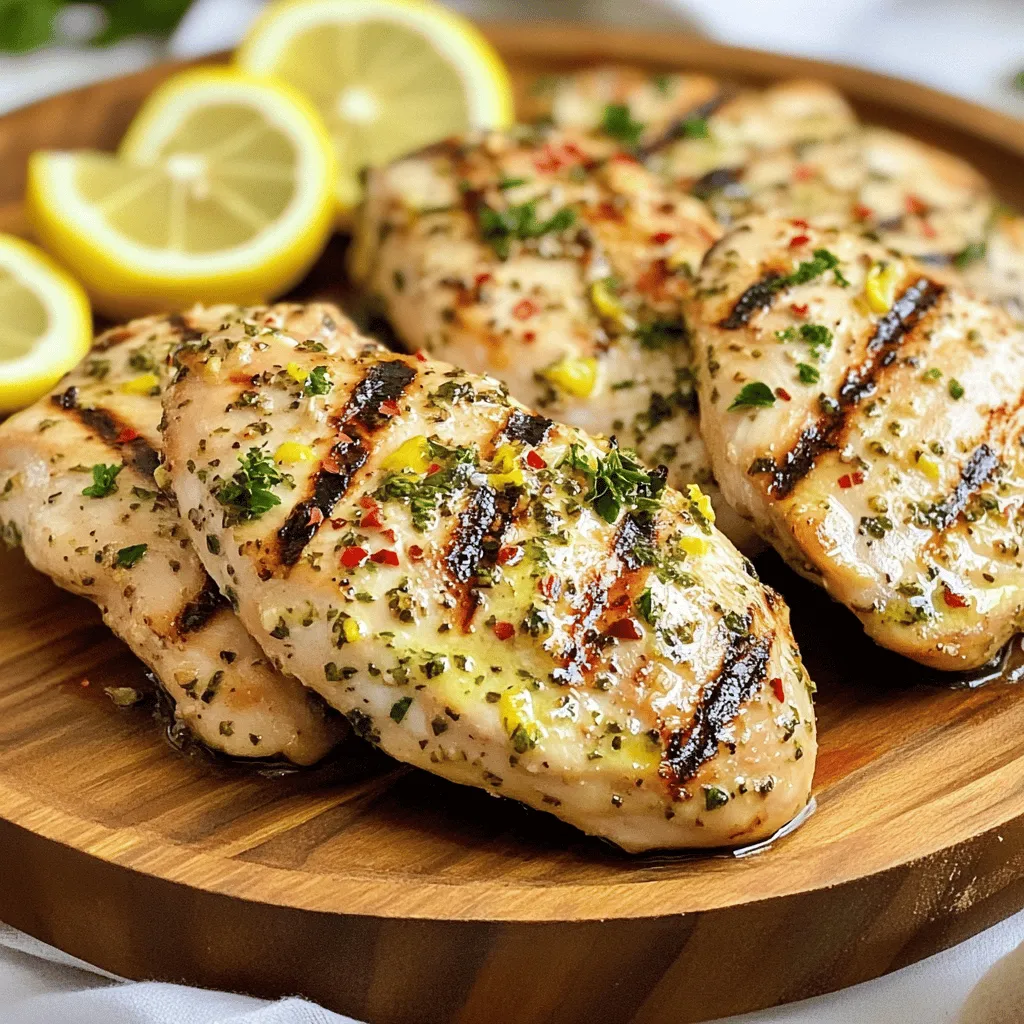
Ready to elevate your grilling game? This Chicken Salmoriglio guide shows you how to transform ordinary chicken into an extraordinary
![Chicken and Mushroom Selection For this dish, use two boneless, skinless chicken breasts. Slice them into thin strips. Choose a mix of mushrooms for depth. I like shiitake, cremini, and button mushrooms. Clean and slice two cups of these mushrooms. This variety gives a rich flavor and nice texture. Aromatics: Onions and Garlic One medium onion adds sweetness. Slice it thinly to cook evenly. You’ll also need three cloves of garlic. Mince them finely to release their aroma. Garlic enhances the taste and makes the dish smell great. Flavor Enhancers: Soy Sauce and Balsamic Vinegar Two tablespoons of soy sauce add a savory depth. Use low-sodium soy sauce for a healthier option. One tablespoon of balsamic vinegar brings a sweet tang. These two ingredients work together to create a rich umami taste in the sauce. Fresh Thyme vs. Dried Thyme I prefer using fresh thyme in this recipe. It gives a brighter flavor. You can use one tablespoon of fresh thyme leaves. If fresh isn’t available, one teaspoon of dried thyme works too. Just remember, dried thyme is stronger. Salt and Pepper to Taste Always season your food. Use salt and freshly ground black pepper to taste. This simple step enhances all flavors. Adjust the seasoning as needed while you cook. Fresh Parsley for Presentation Chop some fresh parsley for a pop of green. It adds color to your dish. Sprinkle it on top right before serving for a fresh touch. Other Garnish Ideas You can also use thin lemon slices or extra thyme. These add brightness and a lovely look. Get creative with your garnishes to make your dish stand out. This recipe is simple yet packed with flavor. For the full recipe, check out the details. To make perfect mushroom chicken, start with sautéing the chicken. Heat the olive oil in your skillet over medium-high heat. When the oil shimmers, add the chicken strips. Season with salt and pepper. Cook for about 5-7 minutes. Stir occasionally until golden brown. Make sure to remove the chicken once fully cooked. Set it aside on a plate. Cooking time may vary with chicken thickness. If your chicken strips are thicker, add a few extra minutes. Always check that the chicken reaches an internal temperature of 165°F. This ensures it is safe and juicy. Next, we need to cook the aromatics. In the same skillet, add the sliced onions. Sauté for about 3-4 minutes until they soften. You'll know they're ready when they turn translucent. Then, add minced garlic. Sauté for an additional minute. Keep an eye on the garlic to prevent burning. If it burns, the flavor can become bitter. Now, it's time for the mushrooms. Choose your favorite varieties, like shiitake, cremini, or button mushrooms. Add them to the skillet and stir well. Cook for about 5-6 minutes. This allows the mushrooms to release their moisture. You'll want them to develop a nice golden color for the best flavor and texture. To achieve the perfect mushroom texture, make sure not to overcrowd the skillet. This helps them cook evenly and prevents steaming. If you have many mushrooms, cook them in batches. This way, they brown nicely, adding depth to your dish. For the full recipe, check out the details provided above. Overcooking Chicken Overcooking chicken is a common mistake. It dries out the meat. To avoid this, cook the chicken until it is golden brown. Use a meat thermometer for best results. Chicken should reach an internal temperature of 165°F. Remove it from the skillet as soon as it’s done. Not Enough Seasoning Many people under-season their chicken. This can make the dish bland. Always season your chicken and mushrooms well with salt and pepper. Add soy sauce and balsamic vinegar for more flavor. Taste the dish before serving and adjust the seasoning if needed. Adding Wine or Broth Variations Adding wine can elevate the flavor of your Mushroom Chicken. Use a dry white wine for a nice depth. If you prefer, use low-sodium chicken broth instead. This gives a rich flavor without being overpowering. Techniques to Build Umami Flavor Umami is the savory taste we often crave. Use a mix of mushrooms for better flavor. Shiitake and cremini add depth. Soy sauce and balsamic vinegar enhance umami, too. Sautéing the mushrooms until golden also brings out their natural flavors. Serving Suggestions: Rice vs. Mashed Potatoes How you serve Mushroom Chicken matters. For a light meal, serve over fluffy jasmine rice. For a comforting dish, creamy mashed potatoes work great. Both options soak up the sauce well. Creative Plating Ideas Plating can make your dish look more appealing. Try placing the chicken in the center of the plate. Spoon the sauce over it. Add a sprinkle of fresh parsley on top. This adds color and freshness. A light dusting of thyme can also improve the look. For the full recipe, check out [Full Recipe]. Enjoy your cooking! {{image_4}} You can make this dish even better with a few simple changes. If you're looking for vegetarian options, try using tofu or tempeh instead of chicken. Both can soak up flavors well and give you that hearty texture you crave. For those who need gluten-free meals, swap soy sauce for tamari. It gives the same umami taste without gluten. You can also use gluten-free broth to keep the dish safe for all diets. Want to spice things up? Add Asian influences by using sauces like hoisin or oyster sauce. They add a sweet and savory kick that pairs well with mushrooms. You can also drizzle some sesame oil on top before serving for extra flavor. If Italian flavors excite you, use fresh herbs like basil or oregano. A sprinkle of Parmesan cheese on top before serving brings a rich, cheesy touch. Mixing in sun-dried tomatoes can also add a nice twist. Using seasonal vegetables can change the game for Mushroom Chicken. In spring, add asparagus or peas for a fresh crunch. In fall, consider adding butternut squash for a sweet, creamy texture. For festive times, think about holiday-inspired recipes. You can add cranberries or chestnuts to the dish, creating a warm, cozy feel. These options will make your meal feel special no matter the season. Check out the Full Recipe for more details! How do you store leftover Mushroom Chicken? First, allow the dish to cool down. Then, place it in an airtight container. This keeps it fresh and tasty. You can store it in the fridge for up to four days. What are the best containers for storage? Glass or plastic containers with tight lids work well. Make sure they are clean and dry before use. If you plan to eat it soon, these options are great. How do you freeze Mushroom Chicken properly? Start by letting it cool completely. Then, portion it into freezer-safe bags or containers. Remove as much air as possible to prevent freezer burn. You can freeze it for up to three months. What are the thawing and reheating guidelines? To thaw, move the container to the fridge overnight. For quick thawing, place it in cold water. When reheating, warm it gently on the stove or microwave. Ensure it reaches a safe temperature of 165°F before serving. What should you know about expiration dates? Always check for the date on your container. If you freeze it, write the date on the bag. This helps you keep track of how long it’s been stored. What are the signs of spoilage? Look for changes in color or texture. If it smells off or shows mold, it’s time to discard it. Trust your senses; they guide you well. For the full recipe, look back at the beginning of this article. You can serve Mushroom Chicken with many tasty sides. Here are some great ideas: - Fluffy jasmine rice - Creamy mashed potatoes - Steamed green beans - Roasted broccoli - Garlic bread - Quinoa salad For a quick salad, try mixing greens with cherry tomatoes. A light vinaigrette works well. You can also add nuts for a nice crunch. Mushroom Chicken stays good in the fridge for about 3-4 days. Make sure to store it in an airtight container. To keep it fresh, let it cool first. Avoid leaving it out at room temperature for too long. Yes! You can use turkey, tofu, or shrimp. If using turkey, cut it into thin strips like chicken. For tofu, press it first to remove excess water. Then, cube it and sauté until golden. For shrimp, cook until pink and firm. Adjust the cooking time based on the protein you choose. Mushroom chicken combines key ingredients like chicken, mushrooms, and herbs for rich flavor. In this blog, I shared step-by-step instructions to cook it right. Avoid common mistakes, such as overcooking the chicken, to keep it juicy. Explore different variations for seasonal and dietary needs. Remember to store leftovers properly to enjoy later. Mushroom chicken is versatile, tasty, and easy to make. With these tips, you can create a dish your family loves. Happy cooking!](https://recipetorch.com/wp-content/uploads/2025/04/49072085-f4f4-44fd-93ac-aa702ad0cb67.webp)
Get ready to elevate your dinner game with my simple Mushroom Chicken recipe! I’ll guide you through selecting the best

Ready to spice up your breakfast? Let me introduce you to Spicy Chipotle Breakfast Pigshots. These bites are a flavorful
