![Sno Ball Brownies - 1 cup unsalted butter, melted - 2 cups granulated sugar - 4 large eggs - 2 teaspoons vanilla extract - 1 cup all-purpose flour - ¾ cup unsweetened cocoa powder - ½ teaspoon salt - 1 teaspoon baking powder - 1 cup mini marshmallows - ½ cup shredded coconut (choose between sweetened or unsweetened) - 1 cup chocolate frosting (store-bought or homemade) - Additional shredded coconut for garnish You can make these brownies gluten-free. Use a gluten-free flour blend instead of all-purpose flour. This swap keeps the texture nice. For a vegan version, replace the butter with a plant-based butter. You can also use flax eggs. Mix 1 tablespoon of ground flaxseed with 3 tablespoons of water for each egg. Let it sit for a few minutes to thicken. These substitutions let everyone enjoy the joy of Sno Ball Brownies! First, you need to preheat your oven. Set it to 350°F (175°C). While the oven heats up, grab a 9x13 inch baking pan. Lightly grease it with cooking spray or butter. Next, line the bottom with parchment paper. Make sure the paper hangs over the sides. This helps when you want to take the brownies out later. Now, let’s mix the batter. In a large bowl, pour in the melted unsalted butter. Add the granulated sugar and stir well. You want it to be smooth. Then, add the four large eggs one at a time. Mix well after each egg. This step adds richness. Next, pour in two teaspoons of vanilla extract for flavor. In another bowl, whisk together the dry ingredients. Combine one cup of all-purpose flour, three-quarters cup of unsweetened cocoa powder, half a teaspoon of salt, and one teaspoon of baking powder. Whisk until everything is mixed well. Now, slowly add the dry mix to the wet mix. Stir gently until just combined. A few flour streaks are okay. Now, fold in one cup of mini marshmallows. Make sure they are spread evenly in the batter. This will give you that gooey texture. Pour the batter into the prepared pan. Use a spatula to spread it evenly. Place the pan in the preheated oven. Bake for 25 to 30 minutes. To check if they are done, insert a toothpick in the center. If it comes out with a few moist crumbs, they are ready. Once baked, take the pan out and let the brownies cool completely on a wire rack. Cooling is key for the perfect texture. When they are cool, you can start frosting. Spread chocolate frosting generously across the top. Finally, sprinkle shredded coconut on top, pressing it gently to stick. For more details, check the [Full Recipe]. To get the best brownie texture, start with room temperature ingredients. This helps them mix well. Use melted butter, not too hot, to avoid cooking the eggs. Mix the wet and dry ingredients gently. Overmixing can make them tough. When baking, check them a few minutes early. A toothpick should have moist crumbs, not clean. One common mistake is not measuring ingredients correctly. Use a kitchen scale for accuracy. Also, don’t skip the cooling step. It helps the brownies set and makes cutting easier. If you forget the baking powder, the brownies may not rise. Lastly, make sure your oven is preheated. An unheated oven leads to uneven baking. For frosting, use a spatula to spread chocolate evenly. Start in the center and move outwards. If the frosting is too thick, warm it slightly. This makes it easier to spread. When adding coconut, press it down gently. This helps it stick to the frosting. For a fun touch, dip the edges in more coconut. It adds flair and flavor. For the full recipe, check the above section. {{image_4}} To make gluten-free Sno Ball Brownies, swap the all-purpose flour. Use a gluten-free blend instead. This blend usually works well in baked goods. Just be sure to check the label for the right mix. You can also add a bit of xanthan gum. This helps give the brownies a nice texture. For vegan Sno Ball Brownies, replace the eggs with flax eggs. Mix one tablespoon of ground flaxseed with three tablespoons of water. Let it sit for five minutes to thicken. Use a plant-based butter in place of unsalted butter. You can also choose a vegan chocolate frosting. This keeps the recipe fully plant-based while still delicious. You can add fun flavors to your brownies! For a minty twist, mix in mint extract. Start with half a teaspoon and taste as you go. For a fruity version, add raspberry puree to the batter. This adds a lovely tartness and color. You can even fold in peanut butter for a nutty flavor. Each change gives you a new treat! Check out the Full Recipe for all the details on how to make these yummy brownies. To keep your Sno Ball Brownies fresh, store them in an airtight container. Place parchment paper between layers to avoid sticking. Keep your brownies at room temperature for up to four days. If you want to keep them longer, refrigeration can help, but it may change their texture. You can freeze these brownies for up to three months. Cut them into squares and wrap each piece tightly in plastic wrap. Then, place them in a freezer-safe bag. When you are ready to enjoy them, just remove them from the freezer. Let them thaw in the fridge or at room temperature. For a warm treat, reheat brownies in the microwave. Heat them for about 10-15 seconds. Check to ensure they are not too hot. You can also warm them in the oven at 350°F for about 5-10 minutes. Enjoy them with a scoop of ice cream or a drizzle of chocolate sauce for extra fun! To check if your brownies are ready, insert a toothpick into the center. If it comes out with a few moist crumbs, they are done. If it has wet batter, they need more time. Bake for 25-30 minutes. The edges should look set, but the center may still look soft. This ensures a fudgy texture. Absolutely! You can use any frosting you like. Cream cheese frosting adds a nice tang. Peanut butter frosting gives a rich flavor. You can even use a simple glaze for a lighter touch. Just make sure it pairs well with the coconut and chocolate. When stored in an airtight container, these brownies last about 4 to 5 days at room temperature. For longer storage, you can freeze them. Wrap each brownie in plastic wrap and then place them in a freezer bag. They will stay fresh for up to 3 months. You learned how to make delicious brownies using essential ingredients and simple steps. We covered substitutions for gluten-free and vegan options. I shared tips for the perfect texture and how to avoid mistakes. You can also explore flavor variations and storage tips. Brownies are fun to bake and share. Now, it’s your turn to try these recipes. Enjoy your baking journey and treat yourself to sweet rewards!](https://recipetorch.com/wp-content/uploads/2025/05/11a9fce6-93d4-4576-b261-c7de428301e4.webp)
Sno Ball Brownies Irresistible Coconut Delight Recipe
Craving a sweet treat that’s both chewy and fluffy? You’ll fall in love with my Sno Ball Brownies! This dessert
Craving a sweet treat that’s both chewy and fluffy? You’ll fall in love with my Sno Ball Brownies! This dessert
![To make Huli Huli Chicken, gather the following fresh ingredients: - 4 boneless, skinless chicken thighs - 1/4 cup soy sauce - 1/4 cup brown sugar - 2 tablespoons ketchup - 2 tablespoons apple cider vinegar - 2 tablespoons freshly grated ginger - 3 cloves garlic, minced - 1 teaspoon sesame oil - 1/2 teaspoon freshly ground black pepper - 1/4 teaspoon cayenne pepper (optional, for a spicy kick) - 1/4 teaspoon cayenne pepper (adds heat) - 1 fresh pineapple, cut into rings - 2 green onions, finely chopped (for garnish) This combination of ingredients creates a sweet and tangy marinade that pairs perfectly with the chicken. The optional cayenne pepper adds a nice kick if you enjoy some spice. The fresh pineapple adds a tropical touch and balances the flavors beautifully. You can find the complete preparation details in the Full Recipe provided above. Enjoy the grilling process and the delightful aromas that will fill your kitchen! Marinating the Chicken First, grab a medium bowl. Combine the soy sauce, brown sugar, ketchup, apple cider vinegar, grated ginger, minced garlic, sesame oil, black pepper, and cayenne pepper if you want it spicy. Whisk these ingredients until the sugar dissolves. Place your chicken thighs in a resealable bag or a shallow dish. Pour half the marinade over the chicken. Make sure every piece is coated. Seal the bag or cover the dish with plastic wrap. Refrigerate for at least one hour or up to overnight. The longer it sits, the better the flavor. Preparing the Marinade You’ll want to save the remaining marinade. This will go on your grilled chicken later for more flavor. Just set it aside for now. Remember, it’s important to discard any used marinade that touched raw chicken. Grill Setup and Cooking Preheat your grill or grill pan to medium heat. Clean and lightly oil the grill grates to prevent sticking. Once the grill is hot, take the chicken out of the marinade. Discard the used marinade. Place the chicken thighs on the grill. Cook for about 6-7 minutes on one side. Then flip and cook for another 6-7 minutes. The chicken is ready when it reaches an internal temperature of 165°F (75°C). Grilling the Pineapple While the chicken grills, prepare the pineapple. Brush the pineapple rings lightly with oil. Place them on the grill for about 2-3 minutes on each side. Look for nice grill marks and caramelization. This adds sweetness and flavor to your dish. Plating Tips Once both the chicken and pineapple are done, take them off the heat. Let the chicken rest for a few minutes. This keeps it juicy. Slice the grilled chicken into bite-sized pieces. Arrange the chicken on a serving platter. Place the grilled pineapple rings around it. Drizzling Additional Marinade Now, drizzle the reserved marinade over the chicken. This adds an extra layer of flavor. For a fresh touch, garnish with finely chopped green onions. They add a nice crunch and color to your dish. Enjoy your Huli Huli Chicken! For the complete recipe, check the [Full Recipe]. Recommended Marinade Time I suggest marinating chicken thighs for at least one hour. For the best flavor, try to marinate overnight. This helps the chicken soak up all those tasty ingredients. How to Enhance Flavor To boost flavor, add some fresh herbs like cilantro or basil. You can also mix in some lime or orange juice for a zesty kick. This will give your Huli Huli chicken a bright and fresh taste. Avoiding Sticking on the Grill Make sure your grill is hot and clean. Before adding chicken, brush the grates with oil. This simple step keeps the chicken from sticking and helps create those beautiful grill marks. Ensuring Proper Cooking Temperature Aim for a medium heat when grilling. This ensures the chicken cooks evenly. Use a meat thermometer to check the internal temperature. It should reach 165°F (75°C) for safety. If you don’t have one, cut into the chicken to check it’s no longer pink inside. Remember to let the chicken rest for a few minutes after grilling. This keeps it juicy and tender. For the full recipe, check out the detailed instructions above! {{image_4}} Alternative Proteins If you want to try different proteins, use pork or tofu. Both absorb the marinade well. For a lighter option, chicken breasts work too. They may cook faster, so keep an eye on them. Different Marinade Options Feel free to mix up the marinade! You can use honey instead of brown sugar for sweetness. Try adding lime juice for a zesty twist. Switch soy sauce for coconut aminos if you want a soy-free option. Oven-Baked Version You can bake Huli Huli chicken if you can't grill. Preheat your oven to 400°F (200°C). Place the marinated chicken on a baking sheet. Bake for 25-30 minutes, turning halfway for even cooking. Always check the internal temperature; it should reach 165°F (75°C). Skillet Cooking for Indoor Preparation A skillet is a great indoor choice. Heat a bit of oil in a large skillet over medium heat. Add the marinated chicken and cook for 6-7 minutes on each side. The chicken will get nice and brown. Don't forget to check the temperature for doneness! To keep your Huli Huli chicken tasty, store it right. - Use airtight containers for storage. - Let the chicken cool to room temperature before sealing. - Refrigerate within two hours after cooking. - It lasts up to four days in the fridge. When it's time to enjoy leftovers, reheating matters. - Use a skillet to keep the chicken juicy. - Heat over medium-low heat for about 5-7 minutes. - Add a splash of water or broth to keep it moist. Avoid overcooking by checking the temperature. Aim for 165°F (75°C). You can also use a microwave. Cover the chicken with a damp paper towel. This helps keep moisture in. This way, your Huli Huli chicken stays delicious, just like the first time! For more details, check the Full Recipe. What is the origin of Huli Huli Chicken? Huli Huli Chicken comes from Hawaii. It was created by a man named Ernest Morgado in the 1950s. He cooked chicken over an open flame, using a special sauce. The word "huli" means "to turn" in Hawaiian. This refers to turning the chicken while it cooks. The dish became popular at local events and luaus. Can I make this recipe ahead of time? Yes, you can make this recipe ahead of time. Marinate the chicken the night before. This helps the flavors soak in well. You can also grill the chicken and pineapple early, then store them in the fridge. Reheat when ready to serve. Can I use chicken breasts instead of thighs? Yes, you can use chicken breasts. They are leaner than thighs, so they may dry out faster. Keep an eye on the cooking time. Cook them for about 5-6 minutes on each side. What can I serve with Huli Huli Chicken? You can serve many sides with Huli Huli Chicken. Here are a few ideas: - Steamed rice - Grilled vegetables - Coleslaw - Coconut rice - Fresh salad Is Huli Huli Chicken spicy? Huli Huli Chicken is not very spicy. The recipe includes cayenne pepper, but it is optional. You can skip it if you want a milder flavor. The sweetness from the brown sugar and pineapple balances the taste. Is this dish gluten-free? Huli Huli Chicken can be gluten-free. Simply use gluten-free soy sauce instead of regular soy sauce. This small change makes it safe for those avoiding gluten. Always check labels for any hidden gluten ingredients. For the complete recipe, you can refer to the Full Recipe section above. This blog post covered everything you need for perfect Huli Huli Chicken. We talked about the ingredients, from the marinade to garnishes. I shared step-by-step instructions for marinating, grilling, and serving. You also learned tips for optimal marinating and grilling techniques, plus variations for cooking and storing. In closing, cooking this dish can be fun and tasty. Try different ingredients and methods to find your favorite. Enjoy making this delicious meal!](https://recipetorch.com/wp-content/uploads/2025/05/e27c0502-5b6e-41d9-ab06-25acd6d678b7.webp)
Are you ready to elevate your grilling game? Huli Huli Chicken is a tasty and fun dish everyone loves. In
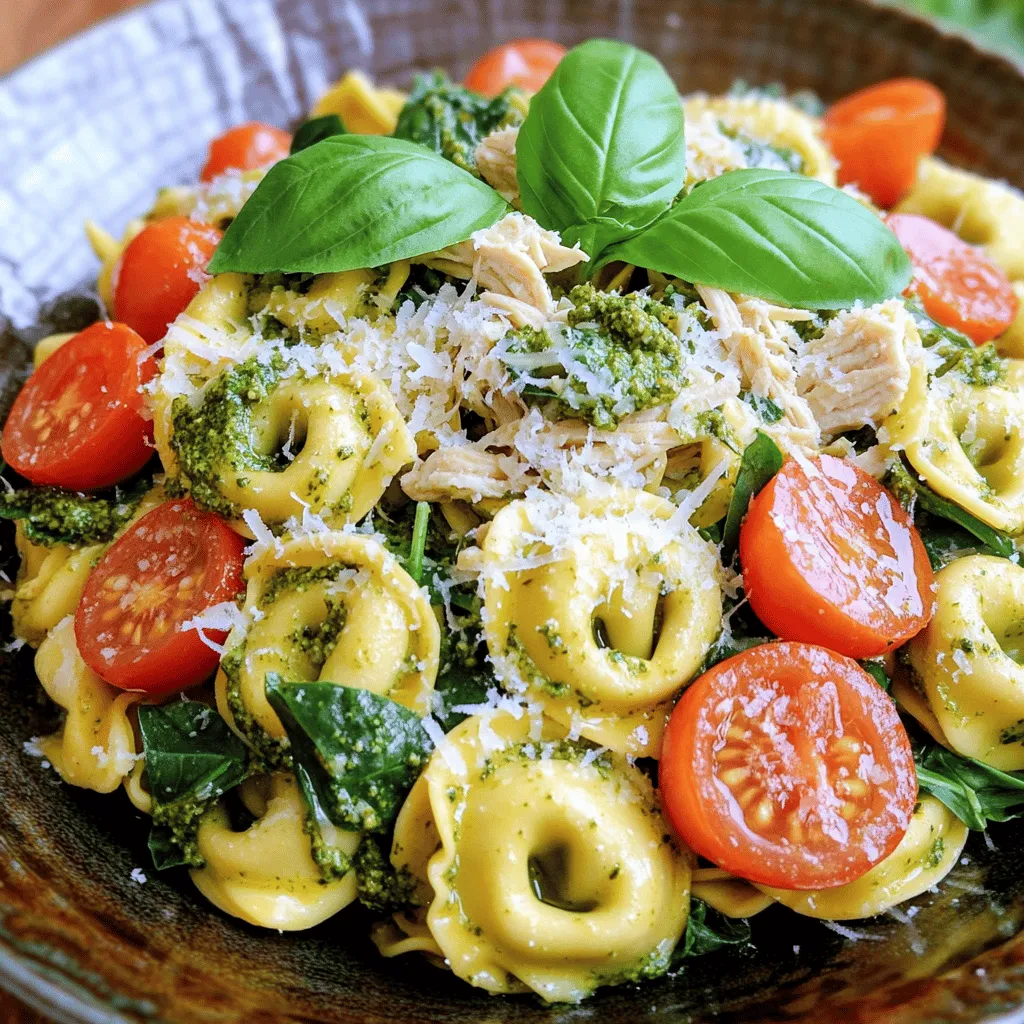
Looking for a quick and tasty meal? Let me introduce you to Pesto Chicken Tortellini. This dish combines tender tortellini
![- 8 oz cream cheese, softened - 1/2 cup sour cream - 1/4 cup honey - 2 tablespoons hot honey - 1 tablespoon lemon juice - 1 teaspoon garlic powder - 1/2 teaspoon smoked paprika - Salt and black pepper to taste - Chives or parsley for garnish - Assorted dippers (pretzels, crackers, apple slices) In this recipe, I use cream cheese as the base. It gives a rich, smooth texture. Sour cream adds a bit of tang, balancing the sweetness. Honey and hot honey bring a sweet and spicy kick that is hard to resist. The lemon juice brightens all the flavors. For seasonings, garlic powder adds depth. Smoked paprika gives a hint of smokiness. Adjust salt and pepper to your taste. You want a mix that feels right for your palate. Garnishing with chives or parsley is a great idea. It makes the dip look fresh and inviting. Choose dippers like pretzels or apple slices. They complement the dip well. You can find the full recipe with all these details to help you create this delicious dip! Start by taking 8 oz of softened cream cheese and 1/2 cup of sour cream. Place them in a medium mixing bowl. Use a hand mixer or a sturdy whisk to beat them together. Mix until the cream cheese and sour cream become smooth and creamy. Make sure there are no lumps left. This step sets a solid base for your dip. Next, it’s time to add flavor. Slowly mix in 1/4 cup of honey and 2 tablespoons of hot honey. Then squeeze in 1 tablespoon of fresh lemon juice. Sprinkle in 1 teaspoon of garlic powder and 1/2 teaspoon of smoked paprika. Blend these ingredients together at a low speed. Keep mixing until everything is silky smooth and well combined. Now, taste your dip! Add salt and freshly cracked black pepper to suit your liking. If you want it sweeter or spicier, add more honey or hot honey. Once seasoned, transfer the dip to a serving bowl. Use a spatula to smooth the top for a polished look. For a fresh touch, sprinkle chopped chives or parsley on top. Finally, arrange your assorted dippers around the bowl for a fun and inviting presentation. Enjoy your hot honey cream cheese dip! For the full recipe, check the detailed instructions above. To get that perfect creamy texture, let your cream cheese sit out. Make sure it is at room temperature before mixing. Cold cream cheese can leave lumps in your dip. Softening it helps everything blend smoothly. This small step makes a big difference. You can play with the honey levels to match your taste. If you want more sweetness, add extra honey. For a spicier kick, use more hot honey. Taste as you go. This way, you create a dip that suits your palate just right. Make your dip look as good as it tastes! Use fresh herbs like chives or parsley as a garnish. This adds color and freshness. Arrange your dippers in a fun way around the dip. Create a platter that invites everyone to enjoy. For the full recipe, check out the earlier section. {{image_4}} You can boost the flavor of your dip in simple ways. Try adding chopped jalapeños for extra heat. This spice gives the dip a nice kick. If you prefer a fresh taste, incorporate herbs like dill. Dill adds a unique flavor and makes the dip more interesting. If you need a vegan option, substitute cream cheese with vegan alternatives. There are many great brands that taste amazing. You can also use Greek yogurt for a lighter dip. Greek yogurt keeps the creaminess but reduces calories. Think outside the box for serving this dip! Serve with seasonal veggies or pita chips for a crunchy contrast. Fresh veggies like carrots or bell peppers work great. For a sweet twist, pair with fruits like pears. The sweet and spicy mix is truly delightful. For the full recipe, be sure to check out the [Full Recipe]. After you enjoy this hot honey cream cheese dip, store any leftovers in an airtight container in the fridge. This keeps it fresh and tasty for later snacking. The dip is best consumed within 3-5 days. This timeframe ensures you enjoy it at its peak flavor and texture. If you want to serve the dip warm again, simply warm it gently in the microwave. Make sure to do this in short bursts, stirring in between. This keeps it creamy and delicious. Hot honey is honey infused with heat. It blends sweetness with a spicy kick. You can buy it or make it at home. To make your own, add red pepper flakes to honey and let it sit. This process gives the honey a rich flavor that pairs perfectly with many dishes. Yes, you can make this dip ahead of time. Prepare the dip and store it in an airtight container. Keep it in the fridge for up to three days. When you are ready to serve, just take it out and let it sit at room temperature for a bit. You have many options for dippers! Here are a few ideas: - Pretzels - Crackers - Apple slices - Carrot sticks - Celery sticks - Pita chips These dippers enhance the creamy dip and create fun flavor pairings. Enjoy! This blog covered a simple and tasty hot honey cream cheese dip. We talked about the main ingredients, key seasonings, and how to prepare it step by step. I shared tips for creamy texture and flavor adjustments, plus ideas for different dippers. Remember, you can make this dip your own with fresh herbs or spicy add-ins. Store any leftovers well, but enjoy it within a few days. This dish is sure to impress at any gathering!](https://recipetorch.com/wp-content/uploads/2025/05/ffd65ee9-6dcb-475d-9430-09cd56929ba1.webp)
Looking for a new crowd-pleaser? This Hot Honey Cream Cheese Dip is your answer! It’s creamy, sweet, and just the
![- 1 lb (450g) fresh shrimp, peeled and deveined - 3 tablespoons unsalted butter - 4 cloves garlic, finely minced - 1 cup heavy cream - 1/2 cup grated Parmesan cheese - 1/2 cup shredded mozzarella cheese - 1/4 cup seasoned breadcrumbs - Salt and black pepper to taste - 2 tablespoons fresh parsley, finely chopped - Lemon wedges, for serving Fresh shrimp is key for this dish. I love using shrimp that is sweet and fresh. The unsalted butter gives a rich flavor. Garlic adds a nice kick and aroma. Use fresh garlic for the best taste. For the creamy sauce, heavy cream is essential. It binds all the flavors together perfectly. Parmesan cheese adds a salty depth, while mozzarella gives a gooey texture. The seasoned breadcrumbs create a crunchy topping that contrasts well with the creamy shrimp. Don’t forget the seasonings! A little salt and black pepper can enhance all the flavors. If you love spice, add red pepper flakes to the shrimp when cooking. As for garnish, fresh parsley brightens the dish. Lemon wedges serve as a zesty finish. A squeeze of lemon right before eating takes this dish to another level. For the complete guide to making this dish, check out the Full Recipe. - Preheat the oven to 400°F (200°C). - Grease the baking dish with cooking spray or butter. - In a large skillet, melt 3 tablespoons of butter over medium heat. - Add 4 cloves of minced garlic and 1/2 teaspoon of red pepper flakes. Sauté for 1-2 minutes. - Next, add 1 pound of peeled and deveined shrimp. Cook until pink, about 3-4 minutes. - Season lightly with salt and black pepper to taste. - Stir in 1 cup of heavy cream, letting it simmer for 2-3 minutes. - Gradually add 1/2 cup of grated Parmesan cheese until melted. - Transfer the shrimp and cream mixture into the greased baking dish. - In a small bowl, mix 1/4 cup of seasoned breadcrumbs and 1/2 cup of shredded mozzarella cheese. Sprinkle this on top. - Place the baking dish in the preheated oven. Bake for 15-20 minutes until golden brown and bubbly. - Cool slightly before garnishing with 2 tablespoons of freshly chopped parsley. Enjoy your flavorful Garlic Shrimp Gratin using this step-by-step guide! For the complete recipe, check [Full Recipe]. To make your Garlic Shrimp Gratin even better, try some flavor swaps. You can use different cheeses to change the taste. For example, swapping mozzarella for Gouda adds a nice twist. Fresh herbs also boost the flavor. Try parsley, basil, or thyme. They will add a fresh touch to your dish. Cooking shrimp properly is key. Overcooking makes shrimp tough and chewy. Cook them just until they turn pink and opaque. This usually takes about 3-4 minutes. You can also adjust the spice level with red pepper flakes. If you want it spicier, add more flakes. For a milder version, use less. Serving is half the fun! Add lemon wedges for a bright, tangy finish. The squeeze of lemon really brightens the dish. Use a colorful serving dish to make it pop. This adds visual appeal and makes your meal feel special. For the full recipe, check the main article. {{image_4}} You can switch up the seafood in this dish. Try using scallops or lobster for a seafood medley. Both options add a rich taste. You can also sneak in some veggies. Incorporate spinach or artichokes for added nutrients and color. If you need to make it gluten-free, swap regular breadcrumbs for gluten-free ones. This keeps the dish tasty and safe for everyone. For a lighter version, consider using low-fat cream options. This small change makes a big difference without losing flavor. To mix up the flavors, experiment with different herbs. Basil or cilantro can add fresh notes. A splash of white wine can elevate the dish too. This simple addition brings a gourmet twist that will impress your guests. Store leftovers in an airtight container in the fridge. This keeps the dish fresh. It tastes best within 2-3 days. If you try to save it longer, the shrimp might lose its flavor. You can freeze this dish before baking. It lasts for up to 2 months. To cook, thaw it in the fridge overnight. This helps maintain the texture of the shrimp. To reheat, set your oven to 350°F (175°C). Place the dish inside until it warms through. Avoid using the microwave. This keeps the bread topping crispy and delicious. Enjoy the great taste of garlic shrimp gratin every time you heat it! Want the full recipe? Check out the details above! Prep time is 15 minutes. Cook time is 20 minutes. Total time is 35 minutes. Yes, you can prepare the dish up to the baking step. Just refrigerate or freeze it. You can pair it with crusty bread, rice, or a fresh salad. This makes a complete meal. Yes, you can use frozen shrimp. Just make sure they are thawed thoroughly before cooking. For more details, check the Full Recipe. This blog post shared a delicious recipe for Garlic Shrimp Gratin. You learned about fresh ingredients, cooking methods, and tips for great flavor. You can swap proteins, try new cheeses, or adjust for dietary needs. Remember to store leftovers properly and enjoy them later. With these insights, you can impress friends and family with your cooking skills. Simple steps make this dish easy and fun. Now, gather your ingredients and start cooking!](https://recipetorch.com/wp-content/uploads/2025/04/cda93a2a-94f1-4833-a708-4004bcd0a42a.webp)
Are you ready to impress your family or friends with a dish that shines? My Delicious Garlic Shrimp Gratin is
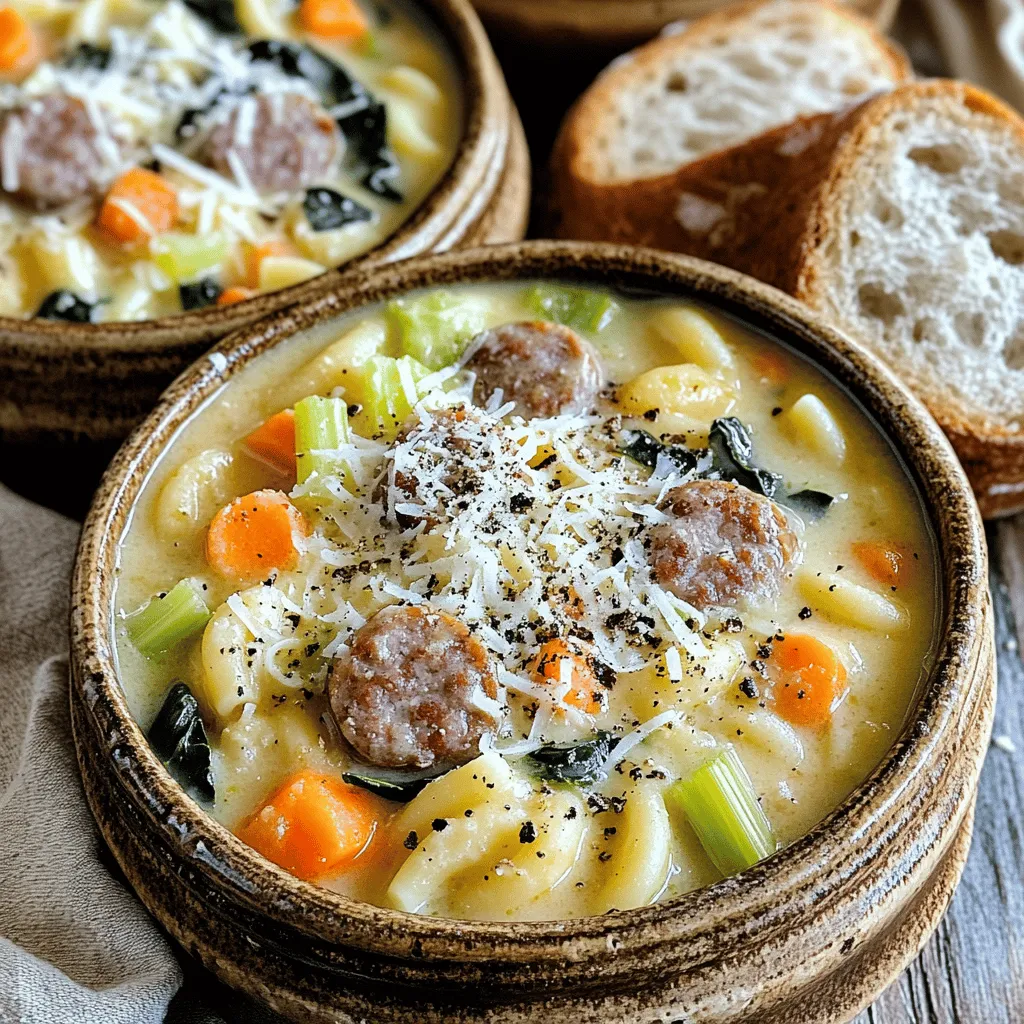
If you’re craving a hearty soup that warms the soul, look no further! My Creamy Parmesan Italian Sausage Ditalini Soup
![- 1 lb boneless, skinless chicken thighs, cut into bite-sized pieces - 1 cup cornstarch - 1/2 cup all-purpose flour - 2 large eggs, beaten - 1/2 teaspoon salt - 1/2 teaspoon black pepper - Vegetable oil for frying - 1/3 cup honey - 1/4 cup soy sauce - 2 tablespoons rice vinegar - 2 tablespoons sriracha (adjust according to your spice preference) - 1 tablespoon garlic, minced - 1 tablespoon ginger, grated - 1 teaspoon sesame oil - 1 tablespoon cornstarch mixed with 2 tablespoons water (for thickening) - 1 red bell pepper, diced - 1 green bell pepper, diced - 1 cup pineapple chunks (fresh or canned) - 2 green onions, thinly sliced for garnish When I make Panda Express Sweet Fire Chicken, I love the mix of sweet and spicy. The chicken is crispy and the sauce is thick and flavorful. You can find the full recipe above if you want to dive deeper into this dish. Each ingredient plays a role in creating layers of flavor. So, gather these ingredients and get ready for a fun cooking adventure! Start by gathering your ingredients. You will need 1 pound of boneless, skinless chicken thighs. Cut them into bite-sized pieces. In a large bowl, mix together 1 cup of cornstarch, 1/2 cup of flour, 1/2 teaspoon of salt, and 1/2 teaspoon of black pepper. This dry mix will help the chicken get crispy. Dip each chicken piece into 2 beaten eggs. Then, coat it in the dry mix until fully covered. In a separate saucepan, combine 1/3 cup of honey, 1/4 cup of soy sauce, 2 tablespoons of rice vinegar, and 2 tablespoons of sriracha. You can adjust the sriracha to match your spice level. Add 1 tablespoon of minced garlic and 1 tablespoon of grated ginger. Heat this mixture over medium heat until it simmers. Mix 1 tablespoon of cornstarch with 2 tablespoons of water until smooth. Add this to the sauce, stirring until it thickens. This will take about 2-3 minutes. In a deep skillet, heat vegetable oil over medium-high heat. You need enough oil to fry the chicken. Carefully add the chicken pieces in batches. Fry them for about 4-5 minutes until golden brown and crispy. Use a plate with paper towels to drain excess oil. Next, use the same skillet and add diced red and green bell peppers and pineapple chunks. Sauté for 2-3 minutes. Then, add your crispy chicken and pour the sweet fire sauce over everything. Toss until well coated. Let it cook for 2 more minutes. Serve it with sliced green onions on top. For the full recipe, check out the details above. To get that crunch you love, use cornstarch. Mixing it with flour makes a great coating. Dip each chicken piece in egg first. This helps the dry mix stick well. Fry the chicken in hot oil. Keep the heat high, but don’t overcrowd the pan. Fry in small batches. This way, each piece cooks evenly and gets crispy. The sweet fire sauce is key. It should taste sweet but also have a kick. Use honey for sweetness. Adjust the sriracha to control heat. If you want it spicier, add more sriracha. For a milder taste, cut back on it. Taste the sauce as you mix. Find the right balance that makes your taste buds happy. Presentation matters. Serve the Sweet Fire Chicken over jasmine rice for a nice touch. The white rice contrasts well with the colorful chicken and veggies. Add green onions on top for a fresh look. For extra flair, sprinkle sesame seeds. These small touches will impress family and friends. They'll love both the taste and the look of your dish. For the full recipe, check out the [Full Recipe]. {{image_4}} You can easily swap the chicken for other proteins. Try shrimp, tofu, or pork. Each protein brings its own flavor and texture. Shrimp cooks fast and adds a nice twist. Tofu is great for a plant-based option. If you use pork, choose tender cuts like loin. Adjust the cooking time based on what you choose. Feel free to load up on veggies. Broccoli, snap peas, or snow peas work well. You can also add carrots for a pop of color. Just cut them into bite-sized pieces. Sauté them with the bell peppers for added crunch. This boosts flavor and gives more nutrition. You can make it a complete meal with colorful veggies. Adjust the heat to suit your taste. If you love spice, add more sriracha. You can also use crushed red pepper flakes for extra heat. For milder flavors, cut back on the sriracha or use sweet chili sauce. Customize the heat to make this dish your own. You control the spice! Check out the Full Recipe for all the details and tips to create your own version. To store leftovers, let the Sweet Fire Chicken cool down first. Place it in an airtight container. This helps keep the chicken fresh. You can store it in the fridge for up to four days. Make sure to keep the sauce and chicken together. This keeps the flavors intact. When you're ready to eat your leftovers, reheating is easy. You can use a microwave or a skillet. If using a microwave, place the chicken in a bowl. Heat it for 1-2 minutes, stirring halfway. If using a skillet, add a little oil and heat on medium. Stir until it’s hot. This keeps the chicken crispy. You can also freeze Sweet Fire Chicken. Place cooled chicken in a freezer-safe bag. Squeeze out all the air before sealing. It can last up to three months in the freezer. When you’re ready to eat, thaw it in the fridge overnight. Then, reheat as mentioned before. Enjoy the flavors even after freezing! Panda Express Sweet Fire Chicken is a popular dish. It features crispy chicken tossed in a sweet and spicy sauce. The sauce has honey, soy sauce, and sriracha, giving it a unique flavor. You can enjoy this dish with bell peppers and pineapple for added crunch and sweetness. Many love its balance of heat and sweetness. You can make this recipe healthier by making a few easy swaps. First, use skinless chicken breast instead of thighs for less fat. You can also bake the chicken instead of frying. Instead of using white flour, try whole wheat flour or almond flour for more fiber. For the sauce, reduce the honey and use less sriracha to cut sugar and sodium. Adding more vegetables can also boost nutrients and flavor. Yes, you can create a vegetarian version of Sweet Fire Chicken. Use tofu or tempeh instead of chicken. Press and cube firm tofu to get the right texture. You can still follow the same steps for the batter and sauce. For added flavor, marinate the tofu in soy sauce before cooking. This will give you a tasty and satisfying meal without meat. This blog post explored the key ingredients for making sweet fire chicken. We covered how to prepare chicken, make the sauce, and fry it. Tips helped you achieve crispy chicken, balance flavors, and enhance your dish's look. Variations let you switch proteins, add veggies, or adjust heat. We also shared storage tips for leftovers and reheating. In the end, this tasty dish is fun to make and enjoy. Experiment with your favorite ingredients to create your unique version!](https://recipetorch.com/wp-content/uploads/2025/04/170ffc6e-b93b-41e3-99e9-5ca33d86ab2d.webp)
Craving Panda Express Sweet Fire Chicken? You can make this tasty dish at home! With just a few simple ingredients,
. - Preheat the oven to 350°F (175°C). - Prepare a 9-inch round cake pan by greasing it with butter and dusting it with flour. You can also line the bottom with parchment paper. - In a large mixing bowl, cream together the softened butter and brown sugar until light and fluffy. This should take about 3 to 4 minutes. - Add the mashed bananas and mix well. Then, add the eggs one at a time. Make sure to mix thoroughly after each addition. Finally, stir in the vanilla extract. - In a separate bowl, whisk together the all-purpose flour, baking powder, baking soda, and salt until even. - Gradually add this dry mixture to the banana batter, alternating with the buttermilk. Start and end with the dry mix. Gently mix until just combined. Be careful not to overmix the batter. - Pour the batter into the prepared cake pan. Smooth the top with a spatula. - Bake in the preheated oven for 25 to 30 minutes. Check for doneness by inserting a toothpick into the center. It should come out clean. - Allow the cake to cool in the pan for 10 minutes. Then, transfer it to a wire rack to cool completely. - In a medium saucepan over medium heat, add the granulated sugar. Stir it continuously as it melts. Watch it turn into a golden amber liquid—do not burn it! - Once melted, remove from heat. Quickly add in the diced butter and stir until melted. - Gradually pour in the warm heavy cream while stirring. The mixture will bubble. Mix in the sea salt until smooth. Let it cool slightly. - When the cake has cooled, drizzle half of the salted caramel sauce over the top. Let it sit for a few minutes so the sauce can soak into the cake. - Keep the remaining sauce for serving. - Slice the cake into generous wedges. Serve each slice with a drizzle of the reserved salted caramel sauce. - For a lovely presentation, place the cake on a rustic wooden serving board. Offer a small bowl of extra salted caramel sauce alongside. Add fresh banana slices and a dollop of whipped cream for garnish. For the complete steps, check out the Full Recipe. - Avoiding overmixing: When you mix the batter, do it gently. Overmixing makes the cake tough. Stop mixing as soon as you see no flour. This keeps the cake light and fluffy. - Ensuring cake moisture: To keep your cake moist, use ripe bananas. They add natural sweetness and moisture. Also, buttermilk helps create a tender crumb. Always check if your cake is done with a toothpick. It should come out clean, but a few crumbs are okay. - Preventing sugar burning: When melting sugar, keep the heat at medium. Stir slowly and watch it closely. If it starts to turn dark too fast, remove it from heat. This helps avoid a burnt taste. - Adjusting sauce consistency: If the sauce is too thick, add a bit more warm cream. If it’s too thin, let it cook a bit longer. Stir well until you get the right smoothness. The perfect consistency will drizzle nicely over your cake. - Garnishing with fresh fruit: Top your cake with fresh banana slices. They add color and a nice touch. You can also add berries for a pop of flavor and color. - Adding extra flavor: To enhance the taste, sprinkle some sea salt on the top. It highlights the salted caramel. You can also add a dollop of whipped cream for creaminess. This makes each bite even better. {{image_4}} You can add extra flavors to your cake. Try adding nuts like pecans or walnuts. They give a nice crunch. Chopped nuts also add a rich flavor. You can also mix in chocolate chips for a sweet twist. The chocolate pairs well with the bananas and caramel. If you want a gluten-free option, use gluten-free flour instead of regular flour. This keeps the cake soft and tasty. For a vegan cake, swap eggs for flaxseed meal mixed with water. Use plant-based butter and non-dairy milk for the sauce. These changes still keep the cake delicious! Serve your cake warm with a scoop of ice cream. Vanilla ice cream works great, but you can try others too. Adding flavored whipped cream is another fun option. It adds creaminess and flavor. You can use caramel or even banana-flavored whipped cream. For the full recipe, check here. To keep your salted caramel banana cake fresh, store it at room temperature. Use a cake dome or cover it with plastic wrap. This will keep the moisture in and the cake soft. If your kitchen is hot, consider refrigerating it. Just make sure to place it in an airtight container. This prevents the cake from drying out. For long-term storage, freezing is the best choice. Wrap individual slices in plastic wrap, then place them in a freezer bag. This helps keep the cake fresh for up to three months. When ready to enjoy, simply remove a slice from the freezer. Let it thaw in the fridge overnight or at room temperature for a few hours. The salted caramel banana cake can last about three days at room temperature. If refrigerated, it can last up to a week. For the best taste, consume it within this time frame. The flavors are at their best when fresh. The salted caramel sauce can last about two weeks in the fridge. Just keep it in a sealed container. To make your cake moist, use ripe bananas. The riper the bananas, the better. You can also add a bit more buttermilk to the batter. Another tip is to avoid overmixing. Overmixing makes the cake dense. Instead, mix just until combined. This keeps it light and fluffy. Yes, you can use frozen bananas! Just thaw them first and drain any excess water. This helps keep the batter from getting too wet. Mashed frozen bananas work just as well as fresh ones. They still add great flavor and moisture to your cake. Salted caramel pairs well with many flavors. Chocolate is a classic choice. It adds richness that contrasts nicely with the sweetness. Nuts, like pecans or walnuts, add crunch and depth. You can also try adding a hint of espresso or coffee for a unique twist. You can store salted caramel sauce in the fridge for up to two weeks. Keep it in an airtight container. To reheat, just warm it gently on the stove or in the microwave. Give it a stir to bring it back to a smooth consistency. This recipe for banana cake with salted caramel sauce is a true delight. You learned about the key ingredients, preparation steps, and baking tips to make it succeed. Remember, using ripe bananas and fresh butter makes a difference. Don't forget to try variations, like adding nuts or chocolate, for extra flavor. Store it well to enjoy every last bite. This cake is perfect for any occasion, and I hope you find joy in each slice. Happy baking!](https://recipetorch.com/wp-content/uploads/2025/04/d3e38c73-e2c9-46a3-887c-8179904e65c5.webp)
If you crave a sweet treat that’s both simple and delightful, you’ve come to the right place! This Salted Caramel
![- 1 lb fresh shrimp, peeled and deveined - 2 ripe avocados, diced - 1 cup cooked quinoa (1/2 cup uncooked) - 1 tablespoon olive oil - 1 teaspoon garlic powder - Juice of 1 lime - Salt and pepper to taste - Fresh cilantro, chopped (for garnish) - 1 ripe mango, diced - 1/2 red onion, finely chopped - 1 jalapeño, finely minced (optional for added heat) - 1 tablespoon lime juice - Salt to taste The main ingredients form the base of this dish. Fresh shrimp brings a sweet flavor and a firm texture. Avocados add creaminess and healthy fats. Quinoa serves as a nice, nutty base to hold all the flavors together. For seasonings, olive oil helps in cooking the shrimp and adds richness. Garlic powder gives a savory kick. Lime juice brightens the entire dish, while salt and pepper elevate the taste. Fresh cilantro adds a pop of color and flavor at the end. Mango salsa is the star of this bowl. Diced mango provides sweetness, while red onion adds crunch. The jalapeño can spice things up if you like heat. Lime juice keeps the salsa fresh, and salt brings all the flavors together. You can find the full recipe in the article. Enjoy creating this vibrant and tasty dish! Combine diced mango, red onion, minced jalapeño, lime juice, and a pinch of salt. Stir gently to mix everything well. Set aside to let the flavors meld while you prepare the other parts of the dish. This salsa adds a fresh and zesty touch to our bowl. First, rinse 1/2 cup of quinoa under cold water. This step helps remove any bitterness. Next, put the rinsed quinoa in a pot with 1 cup of water. Bring it to a boil over medium-high heat. Once boiling, lower the heat to low, cover, and let it simmer for about 15 minutes. When all the water is absorbed, fluff the quinoa gently with a fork. Let it cool for a bit. In a large skillet, heat 1 tablespoon of olive oil over medium heat. Add the peeled and deveined shrimp. Season with garlic powder, salt, and pepper. Cook the shrimp for 3-4 minutes, turning them until they turn pink and opaque. Before taking them off the heat, squeeze the juice of 1 lime over the shrimp and toss them to coat evenly. Start by layering the fluffy quinoa in serving bowls. Next, add diced avocado on top. Arrange the sautéed shrimp over the avocado, making sure each bowl gets shrimp. Finally, spoon a generous helping of mango salsa over the shrimp. This layering makes your bowl look colorful and inviting. Sprinkle freshly chopped cilantro over each bowl for a pop of color and flavor. Serve immediately to enjoy the freshest tastes. Each bite will be a delightful mix of flavors and textures. For the complete recipe, check the [Full Recipe]. How to choose the freshest shrimp: When selecting shrimp, look for a few key signs. Fresh shrimp should have a mild ocean smell, not a strong fishy scent. The shells should be shiny and firm, while the flesh should be translucent. If possible, buy shrimp from a trusted local fishmonger or market. Cooking shrimp to the right level of doneness: Cook shrimp until they turn pink and opaque. This usually takes about 3-4 minutes over medium heat. Avoid overcooking, as it makes shrimp tough. Always check for a slight curl in the shrimp. This means they are perfectly cooked! Common mistakes to avoid when cooking quinoa: One common mistake is skipping the rinsing step. Rinsing removes bitterness. Another mistake is not using enough water. Always use a 2:1 water-to-quinoa ratio for best results. Lastly, don’t forget to fluff the quinoa after cooking. This helps separate the grains. How to enhance flavor in quinoa: You can add flavor to quinoa by cooking it in broth instead of water. Consider adding herbs or spices to the cooking liquid. A bay leaf or garlic clove can add depth. Another option is to mix in lime juice after cooking for a fresh twist. Alternative ingredients for salsa: If you want to switch it up, try using pineapple or peaches instead of mango. You can also add bell peppers for crunch or swap red onion for green onions. This adds a fresh twist to your salsa. Tips on adjusting spice levels: To adjust the spice level in your salsa, add more or less jalapeño. You can also include chopped serrano peppers for extra heat. If you prefer a milder salsa, remove the seeds from the jalapeño before adding. {{image_4}} You can switch shrimp for chicken or tofu. Chicken gives a different taste, but it works well. Cook it the same way as shrimp, seasoning it with garlic powder, salt, and pepper. Tofu is a great vegan option. Just press it to remove water and cut it into cubes. Sauté the tofu until golden and crispy. You can also use scallops or fish. Scallops cook quickly and have a sweet flavor. Fish like salmon or tilapia adds a nice twist. Cook fish until it flakes easily with a fork, and season just like shrimp. Add toppings to make your bowl exciting. Try fresh corn, black beans, or diced tomatoes. You could also add crunchy tortilla chips for texture. Serve the dish as a salad for a lighter meal. Just mix the shrimp, mango salsa, and avocado with leafy greens. You can wrap the filling in a tortilla for a tasty lunch. This gives you a fun way to enjoy the flavors on the go. To make this dish gluten-free, ensure all ingredients are labeled as gluten-free. Quinoa is naturally gluten-free, so you’re already good there! For a vegetarian or vegan version, just use tofu or beans instead of shrimp. You can also use a plant-based yogurt for creaminess. Swap the honey in the salsa for agave syrup if you want sweetness without animal products. To keep your Shrimp Avocado Bowls fresh, store leftovers in airtight containers. This helps maintain their taste and texture. Place the shrimp, avocado, and quinoa in separate containers. This way, you prevent the avocado from browning. Consume leftovers within two days for the best flavor. You can freeze shrimp, but avoid freezing assembled bowls. Freezing affects the texture of the avocado and quinoa. Instead, freeze shrimp and quinoa separately. Wrap shrimp tightly in plastic wrap, then place in a freezer bag. Cooked quinoa can go into a freezer-safe container. Use within three months for the best quality. To reheat shrimp, use a skillet over low heat. This method helps keep them juicy. For quinoa, add a splash of water and cover the pan. Heat on low until warm. Avoid high heat to keep the quinoa from becoming mushy. Enjoy your reheated Shrimp Avocado Bowls just like they were fresh! For the full recipe, you can refer to the earlier sections. Shrimp cook quickly. It usually takes about 3 to 4 minutes. You know they are done when they turn pink and opaque. If you overcook them, they can become tough. So, watch them closely. Yes, you can make mango salsa ahead of time. I recommend preparing it a few hours before serving. Store it in the fridge to keep it fresh. The flavors will blend even better if you let it sit. You can pair your shrimp avocado bowls with many sides. Some great options include: - Corn on the cob - Mixed green salad - Tortilla chips - Light white wine or sparkling water These choices will enhance your meal. Yes, you can use frozen shrimp. Just make sure to thaw them first. You can thaw shrimp by placing them in the fridge overnight. If you’re in a hurry, run them under cold water for about 10 minutes. This method works well and keeps the shrimp juicy. If you want to replace quinoa, try these options: - Brown rice - Couscous - Cauliflower rice These alternatives will still give you a delicious base for your bowl. Yes, this recipe is great for meal prep. You can store the shrimp, quinoa, and salsa separately. This helps keep everything fresh. Use airtight containers for best results. When you’re ready to eat, just assemble your bowl! This blog post shared a simple and tasty recipe for shrimp avocado bowls. You learned about the key ingredients, from shrimp and quinoa to mango salsa. Step-by-step instructions guided you through preparing each part. We covered tips for perfect shrimp and cooking quinoa too. In the end, these bowls offer a fresh meal, easy to customize. Remember, cooking is about fun, so feel free to experiment. Enjoy your healthy, tasty dish!](https://recipetorch.com/wp-content/uploads/2025/04/93d60efc-d323-47e9-840c-26c7c137c682.webp)
Craving a fresh, vibrant meal? My Savory Shrimp Avocado Bowls with Mango Salsa are the perfect solution. This dish combines
. For the best flavor, marinate the steak for at least 30 minutes. If you have time, aim for 2 hours. This longer time helps the flavors soak in. If you like it spicy, adjust the Sriracha. Start with 1 tablespoon for mild heat. Add more Sriracha to increase the spice level. The best way to cook flank steak is on a grill or in a hot skillet. Heat your skillet to medium-high. This high heat gives a nice sear. Cook the steak for about 3-4 minutes on each side. This will give you a tender steak. To check doneness, use a meat thermometer. Aim for 130°F for medium-rare. Make your wraps look great. Use large lettuce leaves for easy wrapping. Lay them out on a platter. Arrange them in a circle for a fun look. Place the lime wedges around the wraps. This adds color and makes it inviting. Enjoy the eye-catching display as much as the taste! {{image_4}} You can switch up the protein in these wraps. If you want a lighter touch, use chicken breast. Just slice it thinly like the flank steak. For a vegetarian option, try tofu. Press the tofu to remove water, then cut it into pieces. Adjust the marinade for these proteins by using the same amounts of soy sauce and sesame oil. Feel free to add extra spices to suit your taste. Feel free to get creative with your veggies. You can add sliced cucumbers, shredded cabbage, or even avocado. Each one brings a new taste and crunch. Don't be shy about trying different sauces too. A peanut sauce or sweet chili sauce can add a fun twist. Just remember to drizzle lightly so it doesn't overpower the other flavors. If you need a gluten-free version, look for gluten-free soy sauce. It works just as well as regular soy sauce in the marinade. For wraps, use lettuce like butter or romaine. You can also try rice paper for a different texture. Topping with fresh herbs like cilantro can add a burst of flavor, too. To keep your Steak & Sriracha Lettuce Wraps fresh, cool them quickly after serving. Place any leftover wraps in a shallow container. This helps them cool evenly. Use airtight containers to keep moisture in and air out. It’s best to eat leftovers within two days for optimal taste. When reheating steak, use a skillet over low heat. This keeps the meat juicy. You can also microwave the steak for quick heating, but do it in short bursts. Wraps can lose their crunch, so eat them fresh. If needed, prepare new lettuce leaves for the best experience. You can freeze marinated steak before cooking. Place it in a freezer bag, removing as much air as possible. When you’re ready, take it out and thaw overnight in the fridge. After thawing, cook it as per the Full Recipe. Enjoy a quick meal without loss of flavor! To make your wraps spicier, you can add more Sriracha. Start with a little extra and taste. You can also mix in chili flakes for more heat. If you want a smoky flavor, try chipotle sauce. Always adjust to fit your heat level. Yes, you can use different lettuce types! Butter lettuce and romaine are great choices. They hold fillings well and add a nice crunch. You could also use green leaf or iceberg lettuce for a lighter wrap. Choose what you like best. Serve these wraps with fresh veggies or rice. Sliced cucumbers and radishes make a nice side. You can also pair them with a tangy dip like peanut sauce or a light soy sauce. These sides add flavor and texture. For the best flavor, marinate the steak for at least 30 minutes. You can go up to 2 hours for a deeper taste. Avoid marinating for too long, as the meat might become too soft. Just stick to that time frame for great results. If you lack Sriracha, use another hot sauce. Try a chili garlic sauce or even a homemade chili paste. You can also mix hot sauce with a bit of honey for sweetness. Always taste and adjust to find the right heat for your wraps. For the complete recipe, check the Full Recipe section above. The Steak & Sriracha Lettuce Wraps offer a tasty mix of flavors and textures. You’ve learned how to marinate the steak and create a fresh and appealing dish. With tips on cooking and presentations, you can impress your friends and family. Don't hesitate to try different proteins and vegetables to suit your taste. These wraps are fun to make and share. Enjoy experimenting with recipes, and have a great time cooking!](https://recipetorch.com/wp-content/uploads/2025/04/970374fc-9bd9-490c-a5a8-d3f37d746276.webp)
Are you ready to spice up your dinner? These Savory Steak & Sriracha Lettuce Wraps combine tender flank steak with
