Skip to content
DisclaimerTerms Of UseGDPR PolicyCookie Policy

recipetorch

  • Home
  • Drinks
  • Appetizers
  • Dinner
  • Dessert
  • About
  • Contact
  • Privacy Policy
DisclaimerTerms Of UseGDPR PolicyCookie Policy

Nicole

For a tasty sweet chili chicken, gather these main items: - 1.5 lbs boneless, skinless chicken thighs - 1/2 cup sweet chili sauce - 3 tablespoons soy sauce - 2 tablespoons honey - 2 cloves garlic, finely minced - 1 teaspoon fresh ginger, grated - 1 tablespoon rice vinegar - 1 tablespoon sesame oil - Salt and freshly ground black pepper, to taste The marinade adds a burst of flavor. You need: - Sweet chili sauce for sweetness and heat - Soy sauce for saltiness and depth - Honey to enhance the caramelization - Garlic and ginger for a fragrant kick - Rice vinegar for a touch of acidity - Sesame oil for a nutty flavor Mix these ingredients well. This blend is key to juicy chicken. Garnishes make your dish pop. Use: - Fresh green onions, chopped - Toasted sesame seeds Serve the chicken with steamed jasmine rice or a fresh vegetable stir-fry. This adds color and texture to your plate. For the full recipe, check the detailed instructions for cooking this delightful dish. First, gather your ingredients. In a large mixing bowl, combine: - 1/2 cup sweet chili sauce - 3 tablespoons soy sauce - 2 tablespoons honey - 2 cloves garlic, finely minced - 1 teaspoon fresh ginger, grated - 1 tablespoon rice vinegar - 1 tablespoon sesame oil Use a whisk and mix well until everything blends smoothly. The sweet chili sauce gives a nice kick, while honey adds depth. This marinade will soak into the chicken. Next, take 1.5 pounds of boneless, skinless chicken thighs and add them to your bowl. Make sure each piece is coated in the marinade. Cover the bowl with plastic wrap. Let it marinate for 30 minutes at room temperature or refrigerate for up to 2 hours. The longer you wait, the more flavor it will soak up. Preheat your oven to 400°F (200°C). Line a baking sheet with parchment paper to stop sticking. Take the marinated chicken out of the bowl and place it evenly on the baking sheet. Bake for 25-30 minutes. Check that the internal temperature reaches 165°F (75°C). If you want a thicker sauce, remove the chicken and pour the leftover marinade into a small saucepan. Bring it to a boil over medium heat. Stir in 1 tablespoon of cornstarch mixed with 2 tablespoons of water. Keep stirring until it thickens. Finally, brush the thickened sauce over the chicken. Return it to the oven for 5 more minutes. This lets the glaze set nicely. After cooking, let the chicken rest for 5 minutes. Garnish with chopped green onions and toasted sesame seeds for extra flavor and crunch. Enjoy your delicious meal! You can find the full recipe for more details. To make your sweet chili chicken even better, try these tips: - Use fresh ginger for a zesty kick. - Add lime juice for a bright, tangy finish. - Experiment with a dash of chili flakes for heat. These changes will elevate the dish and impress your guests. Many home cooks make simple errors. Here’s how to avoid them: - Don’t skip marinating; it adds crucial flavor. - Ensure your oven is preheated; this helps cook evenly. - Check the chicken's internal temperature. It should reach 165°F (75°C). Avoiding these mistakes means better results every time. When serving your sweet chili chicken, keep it fun and easy: - Pair it with steamed jasmine rice for a classic touch. - Serve alongside a fresh vegetable stir-fry for color and crunch. - Add a side of crispy spring rolls for extra texture. These sides complement the chicken and create a balanced meal. For the complete recipe, check out the Full Recipe section. {{image_4}} You can swap chicken for other proteins. Try boneless pork or shrimp for a twist. Both options cook quickly and absorb flavors well. If you prefer beef, flank steak works nicely too. Just remember to adjust cooking times based on the protein you choose. For a vegetarian option, use tofu or tempeh. Press and cube tofu before marinating. This helps it soak up the sweet chili sauce. For a vegan version, simply ensure all ingredients are plant-based. You can also use jackfruit for a meat-like texture that's perfect in this recipe. If you like heat, add red pepper flakes or sriracha to the marinade. Start with a small amount, then taste as you go. You can also serve the chicken with a spicy dipping sauce. For a milder version, use less sweet chili sauce and add more soy sauce. Adjustments ensure everyone enjoys the dish. For the full recipe, check out the complete instructions in the Full Recipe section. You can store leftover sweet chili chicken in the fridge. Place it in an airtight container. It will stay fresh for three to four days. Make sure it cools down before sealing it. This helps keep the chicken juicy and flavorful. If you have more leftovers, freezing is a great option. Wrap the chicken tightly in plastic wrap and then in foil. This gives it extra protection from freezer burn. You can freeze it for up to three months. When you want to enjoy it again, just thaw it in the fridge overnight. To reheat sweet chili chicken, use the oven or a microwave. If using the oven, preheat it to 350°F (175°C). Place the chicken on a baking sheet and cover it with foil. Heat for about 15 minutes. If using a microwave, place it on a microwave-safe plate. Cover it with a damp paper towel and heat in short bursts until warmed through. This keeps the chicken moist. For added flavor, brush on some extra sauce before serving. Enjoy your meal! For the full recipe, check out the delicious steps above. Yes, you can use chicken breasts. They work well in this recipe. Chicken breasts are leaner than thighs. This can make them dry if overcooked. To avoid dryness, check the internal temperature. Cook until it reaches 165°F (75°C). You may also want to marinate them for less time. About 30 minutes should be enough. To change the sweetness, you can add more or less sweet chili sauce. Adding honey will also increase sweetness. If the sauce is too sweet, add more soy sauce. This will balance the flavors. You can also mix in lime juice for a tangy kick. Taste the sauce as you adjust it. Yes, this recipe is great for meal prep. You can make it ahead of time and store it. Cooked chicken stays fresh in the fridge for about four days. To reheat, use a microwave or oven. Pair it with rice or veggies for easy lunches. For the best flavor, glaze the chicken just before serving. For the full recipe, check out the details above. This blog post covers the key ingredients, step-by-step instructions, and helpful tips. You now know how to make a tasty dish that suits your preferences. Variations can help you try new flavors, and proper storage tips ensure your food stays fresh. Remember, cooking is fun and creative. Experiment with different proteins and adjust spice levels to find what you love. Enjoy your cooking journey and impress others with your skills!

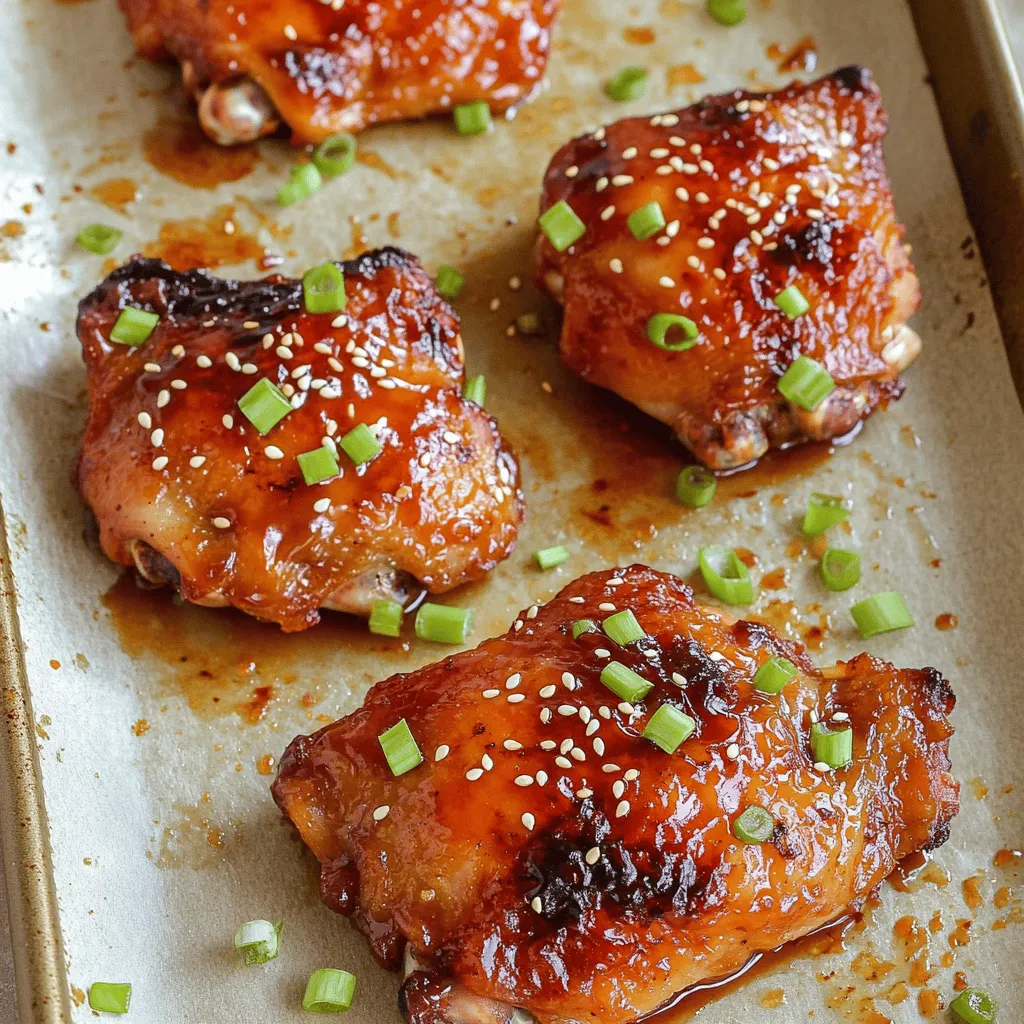
Irresistible Sweet Chili Chicken Flavorful Dinner Idea

Are you ready to impress with a dinner that’s both easy and delicious? My Irresistible Sweet Chili Chicken is a

To make a delightful Strawberry Danish, gather these key ingredients: - 1 sheet of frozen puff pastry, thawed - 1 cup fresh strawberries, hulled and sliced - 1 tablespoon granulated sugar - 1 teaspoon vanilla extract - 1/2 cup cream cheese, softened to room temperature - 1/4 cup powdered sugar - 1 egg, beaten (for egg wash) - 1 tablespoon fresh lemon juice These ingredients bring together the sweetness of strawberries and the creaminess of cheese. For those looking to boost flavor, consider adding: - Zest of 1 lemon for a fresh, zesty touch - A sprinkle of cinnamon for a warm spice - A handful of chopped nuts for crunch These additions can personalize your Danish and make it even more special. Here’s a quick look at the nutrient breakdown for one serving of Strawberry Danish: - Calories: 220 - Protein: 4g - Fat: 12g - Carbohydrates: 25g - Fiber: 1g - Sugar: 6g This pastry offers a nice balance of taste and indulgence, making it a treat worth savoring. For the complete recipe, check out the Full Recipe. Start by washing your fresh strawberries. Cut off the green tops, called hulls, and slice the berries. In a bowl, mix the sliced strawberries with granulated sugar, vanilla extract, and lemon juice. Let them sit for about 10 minutes. This helps the strawberries release their juices. The result is a sweet and syrupy mixture that adds flavor to your Danish. While the strawberries are marinating, take your frozen puff pastry out to thaw. Once it’s soft, lightly flour your work surface. Roll out the pastry to smooth out any creases. You can cut it into one large rectangle or six smaller squares. For a nice shape, score a smaller rectangle inside each piece, about 1 inch from the edge. Be careful not to cut all the way through; this will create a puffed edge when baked. In a bowl, combine softened cream cheese and powdered sugar. Mix until smooth and creamy. If you want more flavor, fold in lemon zest. Spread this cream cheese mixture within the scored border of each pastry piece. Top it with a spoonful of your marinated strawberries, letting some juice seep into the cream cheese. Brush the edges with the beaten egg for a golden finish. Finally, bake the Danish in a preheated oven at 400°F (200°C) for 15-20 minutes. Keep an eye on them; you want a golden-brown color. Once done, let them cool on a wire rack before serving. Enjoy your Strawberry Bliss Danish! For detailed steps, check the Full Recipe. To make great puff pastry, keep your ingredients cold. Use chilled butter and water. Cold dough helps create those lovely layers. Roll the dough gently, and don't overwork it. When baking, preheat your oven well. A hot oven gives you the best rise. For a tasty cream cheese filling, start with softened cream cheese. Mix in powdered sugar until smooth. Add a splash of vanilla extract for depth. For a zesty twist, fold in lemon zest. This brightens the cream cheese and enhances the overall flavor. One mistake is not scoring the pastry. This step is crucial for a nice rise. Also, don’t skip the egg wash. It gives your Danish a beautiful, shiny finish. Lastly, avoid overbaking. Keep an eye on them after 15 minutes. You want golden brown, not burnt! For the full recipe, check out the Strawberry Bliss Danish section. {{image_4}} You can easily make a vegan version of this delightful treat. Swap the cream cheese for a vegan cream cheese alternative. Use a plant-based milk for the egg wash, like almond or soy milk. This keeps your Danish creamy and delicious while being vegan-friendly. For a gluten-free option, use gluten-free puff pastry. There are many brands available now. Ensure that the other ingredients are also gluten-free. This way, everyone can enjoy this tasty pastry without worry. You can mix up the flavors in your Strawberry Danish. Try adding almond extract for a nutty twist. You can also use mixed berries instead of just strawberries. Blueberries and raspberries work well together. Feel free to get creative and make the recipe your own! For the full recipe, check out Strawberry Bliss Danish. To keep your leftover Danish fresh, place them in an airtight container. You can also wrap them in plastic wrap. Store the container at room temperature for one day. If you need a longer storage time, move them to the fridge for up to three days. This helps maintain their taste and texture. If you want to freeze your Strawberry Danishes, first let them cool completely. Then, wrap each one in plastic wrap. Place the wrapped Danishes in a freezer-safe bag. They can stay in the freezer for up to three months. When you are ready to enjoy them, just thaw overnight in the fridge. To reheat your Danish, preheat your oven to 350°F (175°C). Place the Danish on a baking sheet. Heat them for about 10 minutes. This warms them evenly and keeps them crispy. You can also use a microwave, but the texture may change. Enjoy your warm Strawberry Bliss Danish! For the full recipe, check the earlier section. A Strawberry Danish is a sweet pastry that features a flaky puff pastry filled with cream cheese and fresh strawberries. The pastry is often shaped into a neat rectangle or square. It is a delightful treat that is perfect for breakfast or dessert. Yes, you can use frozen strawberries. Just thaw and drain them before using. This helps to avoid excess juice in your filling. However, fresh strawberries provide the best flavor and texture. You can find Strawberry Danish at many bakeries and cafes. Some supermarkets also carry them in the bakery section. If you want a fresh one, consider making it at home using the full recipe. Making Strawberry Danish from scratch takes about 40 minutes. This includes prep and baking time. With some practice, you can whip up a batch in no time. The best toppings include a dusting of powdered sugar or a drizzle of icing. You can also add some fresh mint leaves or extra sliced strawberries for color and freshness. These toppings enhance the visual appeal and taste of your Danish. In this post, we covered essential and optional ingredients for your Strawberry Danish. We walked through easy steps for prepping strawberries and puff pastry and assembling your treat. You learned tips to improve flavor and avoid common mistakes. We also explored tasty variations and how to store or freeze leftovers. Making a Strawberry Danish is fun and rewarding. You can enjoy it fresh or try new flavors. With practice, you'll create a dessert everyone loves. Enjoy your baking journey!

Strawberry Danish Delight Easy and Tasty Recipe

Are you ready to elevate your dessert game? In this post, you’ll learn how to make a delicious Strawberry Danish

To make Savory Onion Beef Fried Rice, you need fresh and simple ingredients. They create a tasty dish that is easy to prepare. Here’s what you will need: - 2 cups cooked jasmine rice (preferably day-old) - 1 lb (450g) beef sirloin, thinly sliced - 2 tablespoons soy sauce - 1 tablespoon oyster sauce (optional) - 1 tablespoon sesame oil - 2 tablespoons vegetable oil (divided) - 1 large onion, thinly sliced - 2 garlic cloves, minced - 1 cup mixed vegetables (peas, carrots, corn) - 2 green onions, chopped - Salt and black pepper to taste - 1 tablespoon fresh ginger, minced - Sesame seeds for garnish Using day-old rice makes the fried rice better. It helps prevent mushiness. Fresh rice can work too, but spread it out and cool it for about 30 minutes. This helps dry it out. Gathering these ingredients will lead to a delicious meal. Check out the Full Recipe for more details! Start by slicing the beef sirloin thinly. Place it in a bowl. Add soy sauce and a pinch of black pepper. Mix it well, so every slice gets coated. Let it sit for at least 15 minutes. This step adds great flavor to the beef. In a large skillet or wok, heat one tablespoon of vegetable oil over high heat. When the oil is hot, add the marinated beef. Stir-fry for about 2-3 minutes. You want the beef to brown nicely and cook through. Once done, take it out and set it aside on a plate. In the same skillet, add another tablespoon of vegetable oil. Toss in the sliced onions. Sauté them for around 5 minutes until they become soft and translucent. Add minced garlic and fresh ginger next. Stir-fry for about a minute, letting those aromas fill your kitchen. Now, it's time for the mixed vegetables. Add them to the skillet and cook for 3-4 minutes. Stir occasionally until they are tender but still bright in color. This keeps them crunchy and fresh. Gently add in the cooked jasmine rice. If your rice is clumpy, break it apart as you mix. Drizzle in sesame oil and optional oyster sauce. Toss everything together until the rice and veggies are well mixed and coated with flavor. Return the cooked beef to the skillet. Stir everything together for another 2-3 minutes. This helps the flavors blend. Taste and adjust the seasoning with salt and black pepper. Finally, add chopped green onions, giving it a last toss to combine all the ingredients. For a colorful presentation, serve this dish on a vibrant platter. A sprinkle of sesame seeds adds a nice touch. Enjoy this savory onion beef fried rice as a perfect weeknight meal. For the complete recipe, refer to the Full Recipe section. For fried rice, jasmine rice works best. It has a nice texture and flavor. Using day-old rice is key. Fresh rice can be too sticky. Spread fresh rice out to cool for 30 minutes. This helps dry it out. Soy sauce adds a rich umami taste. Adding oyster sauce gives extra depth but is optional. Sesame oil brings a warm, nutty flavor. Don't forget salt and black pepper. Use these to taste, adjusting as needed. Heat is vital when cooking fried rice. A hot skillet or wok prevents sticking. Stir-fry quickly to keep the rice from getting mushy. Toss ingredients gently to mix well. This keeps your dish vibrant and full of flavor. {{image_4}} You can change the beef in this dish. Try chicken, shrimp, or tofu. Each protein brings its own flavor. Chicken is tender and mild. Shrimp adds a sweet and briny taste. Tofu is a great choice for a plant-based meal. Just make sure to marinate them like the beef for best taste. If you want a meatless meal, swap beef for more veggies. Use mushrooms for a hearty bite. Bell peppers add sweetness and color. You can also add extra tofu for protein. Replace the oyster sauce with soy sauce for a vegan dish. This way, you still enjoy the great flavors without meat. Change your veggies with the seasons. In spring, add asparagus and snap peas. Summer brings fresh corn and zucchini. In fall, use squash and Brussels sprouts. Winter is great for carrots and kale. These seasonal veggies not only taste great but also make your dish colorful and fresh. Check out the Full Recipe to see how you can make this dish your own! To keep your savory onion beef fried rice fresh, store it in an airtight container. Let the fried rice cool down to room temperature before sealing it. This helps prevent excess moisture, which can make it soggy. It will stay good in the fridge for about 3 to 4 days. If you want to save some for later, freezing is a great option. Place the cooled fried rice in a freezer-safe container or zip-top bag. Remove as much air as possible to avoid freezer burn. It can last for up to 3 months in the freezer. Just remember to label it with the date! When you're ready to enjoy your fried rice again, reheating it properly is key. If it's frozen, let it thaw in the fridge overnight. You can reheat it in a skillet over medium heat. Add a splash of water or soy sauce to help it steam and prevent sticking. Stir it often for even heating. You can also microwave it in short bursts, stirring in between, until it’s hot. For the full recipe, check the earlier section! You can use fresh rice, but it's not ideal. Fresh rice is moist, which can make the fried rice mushy. Day-old rice is drier and gives better texture. If you need to use fresh rice, let it cool for at least 30 minutes. This helps remove some moisture. You can add heat or extra flavor with different spices. Try adding red pepper flakes for heat. You can also mix in some soy sauce or hoisin sauce for more depth. For a twist, add some pineapple for sweetness or a splash of lime juice for tang. Leftover fried rice can last in the fridge for about 3 to 5 days. Store it in an airtight container to keep it fresh. If you want to keep it longer, you can freeze it. It will stay good for about 2 to 3 months in the freezer. Yes, adding eggs is a great idea! Scramble some eggs in the skillet before adding the rice. This adds protein and richness to the dish. You can mix the eggs in after cooking the beef or with the vegetables for more flavor. - Full Recipe: Savory Onion Beef Fried Rice 🥩 This recipe for Savory Onion Beef Fried Rice combines tasty ingredients and simple steps. You now know how to marinate beef, sauté onions, and mix in vegetables. Don’t forget to choose the right rice for best results. You can also explore different proteins and veggies for variety. Store your leftovers with care and use my reheating tips for a quick meal. Enjoy making this dish! It’s a great way to enjoy flavors and share with others. Happy cooking!

Savory Onion Beef Fried Rice Flavorful Weeknight Meal

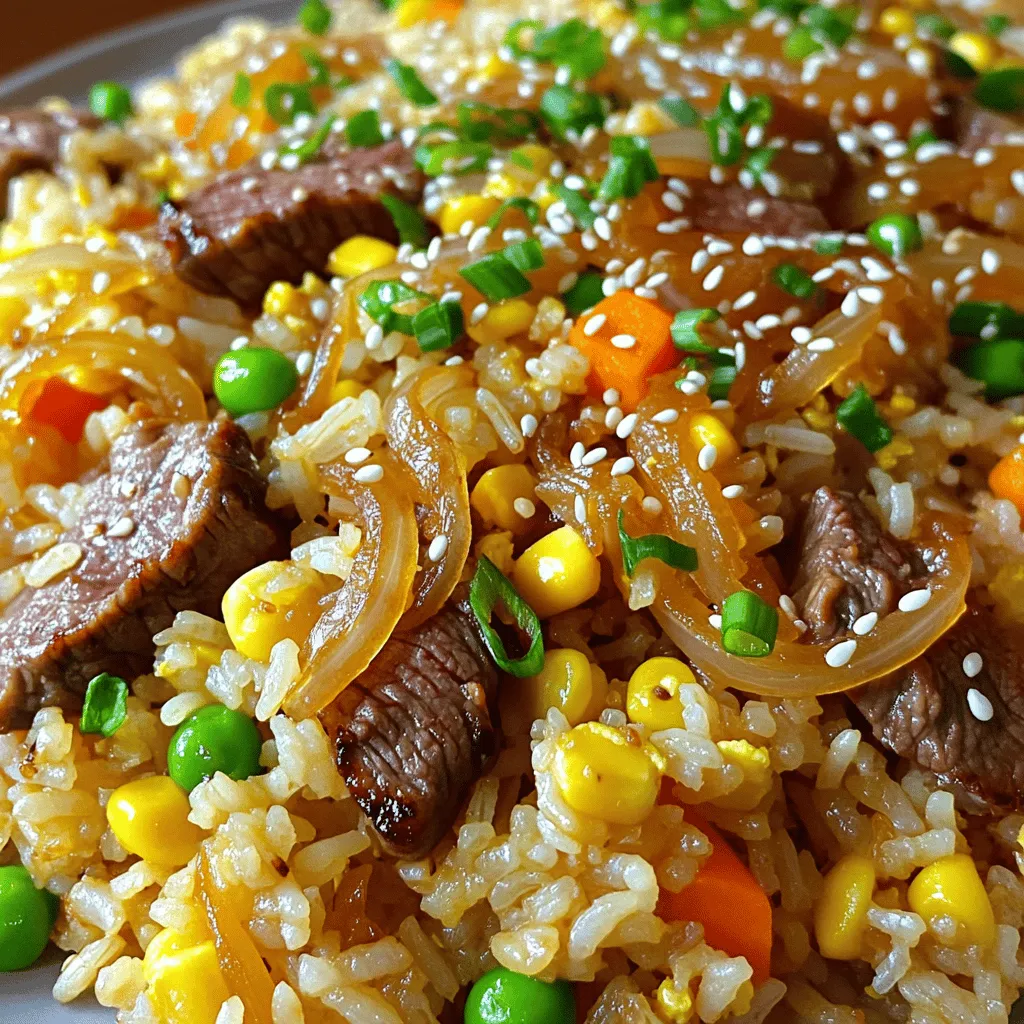
Looking for a quick and tasty dinner idea? This Savory Onion Beef Fried Rice is the answer! With juicy beef,

- Garlic: Roasting garlic brings out its sweet, nutty flavor. This makes the soup rich and warm. - Fresh herbs: Basil and sage add a bright, earthy taste. They balance the garlic's sweetness well. - Vegetables: Onion, carrots, celery, and spinach form the soup base. They provide texture and nutrition. - Vegetable broth: This adds depth and flavor to the soup. Choose a good quality broth for the best taste. - Parmesan cheese: This cheese adds creaminess and a salty kick. It enhances the overall flavor profile. - Walnuts: Toasted walnuts give a nice crunch. They also add healthy fats and protein. - Olive oil: Use high-quality olive oil for sautéing and drizzling. It adds richness and healthy fats. - Lemon juice: A splash of lemon juice brightens the flavors. It adds a refreshing twist to the soup. - Salt and pepper: These are essential for seasoning. Adjust to your taste for the best results. For the complete recipe, check out the Full Recipe. Enjoy making this healthy comfort dish! To start, we need to roast the garlic head. Preheat your oven to 400°F (200°C). Carefully slice off the top of the garlic head. This exposes the cloves inside. Drizzle with one tablespoon of olive oil. Wrap it in aluminum foil and place it on a baking sheet. Roast for 30 to 35 minutes. The cloves should be soft and golden brown. Once done, set it aside to cool slightly. After cooling, squeeze the roasted cloves out of their skins. They should pop out easily. Next, we cook the vegetables. In a large pot, heat two tablespoons of olive oil over medium heat. Add the chopped onion, diced carrots, and diced celery to the pot. Sauté these veggies for about 5 to 7 minutes. They should soften and the onion will turn translucent. Stir occasionally to keep them from sticking. Once they are tender, pour in the vegetable broth. Increase the heat slightly and bring it to a gentle simmer. Now, it’s time to make the pesto. In a food processor, combine the roasted garlic cloves, fresh spinach, basil, sage, grated Parmesan cheese, and toasted walnuts. Blend all the ingredients until the mixture is smooth and creamy. If it looks too thick, add a splash of vegetable broth or water. This will help you reach your desired consistency. After making the pesto, stir it into the simmering vegetable broth. Let the soup cook for an additional 5 to 10 minutes. Stir occasionally to blend the flavors. Once it is heated through, add the freshly squeezed lemon juice. Season with salt and pepper to taste. Make sure everything is evenly seasoned before removing the pot from the heat. For a creamier soup, you can blend it further. Use an immersion blender to puree the soup right in the pot until it’s smooth. If you don’t have one, carefully blend the soup in batches using a standard blender. Just be sure to let the steam escape while blending. When ready to serve, ladle the soup into bowls. For an extra touch, drizzle a little olive oil on top. You can also sprinkle with more grated Parmesan cheese if you like. To make it look nice, garnish each bowl with fresh sage leaves or chopped walnuts. This adds a lovely visual and textural contrast. Enjoy your vibrant and flavorful Roasted Garlic Sage Pesto Soup! For the complete details, check the Full Recipe. - How to avoid burning garlic: Roasting garlic can be tricky. To prevent it from burning, wrap it tightly in foil. Keep an eye on it as it roasts. You want it soft and golden, not dark and crunchy. - Steps for perfect seasoning: Start with a small amount of salt. You can always add more. Taste as you go. The lemon juice adds brightness, but don't skip the salt. It helps bring out all the flavors. - Best bread pairings: Serve your soup with crusty bread, like a baguette or sourdough. These breads soak up the soup nicely and add a nice texture. - Salad recommendations: A simple green salad is a great side. Try mixed greens with a light vinaigrette. It refreshes the palate and balances the richness of the soup. - Preparing in advance: You can make this soup a day ahead. Just let it cool completely before storing it in the fridge. The flavors develop beautifully overnight. - Reheating tips: When reheating, do it slowly on medium heat. Stir often to avoid sticking. If it thickens up, add a splash of broth or water. This soup should be creamy, not too thick. {{image_4}} You can switch up the nuts in the pesto. Instead of walnuts, try pine nuts or almonds. Both add a nice crunch and flavor. If you want a nut-free version, use seeds like pumpkin or sunflower seeds instead. They work great too! For a dairy-free option, replace Parmesan cheese with nutritional yeast. It gives a cheesy taste without the dairy. You can also use a dairy-free cheese alternative. Look for options made from nuts or soy. To spice things up, add chili flakes to your soup. This will give it a nice kick. You can start with a pinch and add more if you like it hot. Using different herbs can change the soup's taste too. Try adding parsley or cilantro for a fresh twist. Even a bit of thyme can give it a warm, earthy flavor. Incorporate seasonal vegetables to enhance your soup. In spring, add peas or asparagus for a pop of color. In fall, try adding sweet potatoes for a hearty feel. You can also adapt the soup for warmer or colder months. For summer, serve it chilled with fresh tomatoes. In winter, keep it hot and comforting by adding root vegetables like turnips or parsnips. Explore these variations to make this soup your own! For the full recipe, check out the instructions above. To keep your Roasted Garlic Sage Pesto Soup fresh, use airtight containers. Glass jars or plastic containers work well. Store in the fridge for up to four days. After that, the soup may lose its nice taste and texture. You can freeze this soup for later meals. Pour the cooled soup into freezer-safe containers or bags. Leave some space at the top for expansion. It stays good in the freezer for up to three months. When you're ready to eat, take it out and thaw overnight in the fridge. For reheating, use the stove or microwave. On the stove, heat over low to medium heat. Stir often to keep it smooth. In the microwave, heat in short bursts. Stop to stir between each round. This way, you avoid texture changes. If the soup seems thick, add a splash of broth or water. Enjoy your warm and tasty soup! Roasted Garlic Sage Pesto Soup is a creamy, hearty dish great for any time. It has rich garlic flavors, fresh herbs, and a smooth texture. The main ingredients include: - 1 head of garlic - Fresh basil and sage - Onion, carrots, and celery - Vegetable broth - Spinach - Parmesan cheese - Walnuts The garlic gets roasted first, adding depth to the flavor. You blend it with fresh herbs and nuts to create a vibrant pesto. This soup warms you up and is perfect for chilly days. Yes, you can easily make this soup vegan. For a dairy-free version, replace Parmesan cheese with nutritional yeast or a vegan cheese. You can also skip the cheese altogether and still enjoy a great taste. To keep the flavor strong without dairy, add a bit more roasted garlic or a squeeze of lemon juice. These will give your soup a bright taste and keep it creamy. The soup lasts about 4-5 days in the fridge. To store it, use airtight containers. Make sure to let it cool down before sealing. Signs of spoilage include an off smell, mold, or a change in color. If you see any of these, it’s best to toss the soup. Yes, adding protein is a great idea! Cooked chicken or white beans work well. They add heartiness and make the soup more filling. If you use cooked chicken, add it during the last few minutes of cooking. If you use beans, stir them in when you add the pesto. This keeps cooking times short and flavors fresh. Yes, Roasted Garlic Sage Pesto Soup can be gluten-free. Always check ingredient labels to ensure that your vegetable broth and any other added products are gluten-free. If you want to thicken the soup, use a cornstarch slurry or pureed beans instead of flour. These options keep the soup gluten-free while adding great texture. This blog post guided you through making delicious Roasted Garlic Sage Pesto Soup. You learned about key ingredients like garlic, fresh herbs, and vegetables. We discussed preparing and blending the soup and shared tips for serving and storage. Final thoughts: This soup is versatile and easy. You can adjust flavors or substitute ingredients as needed. It's perfect for any season, and you'll enjoy experimenting with it. Happy cooking!

Roasted Garlic Sage Pesto Soup Healthy Comfort Recipe

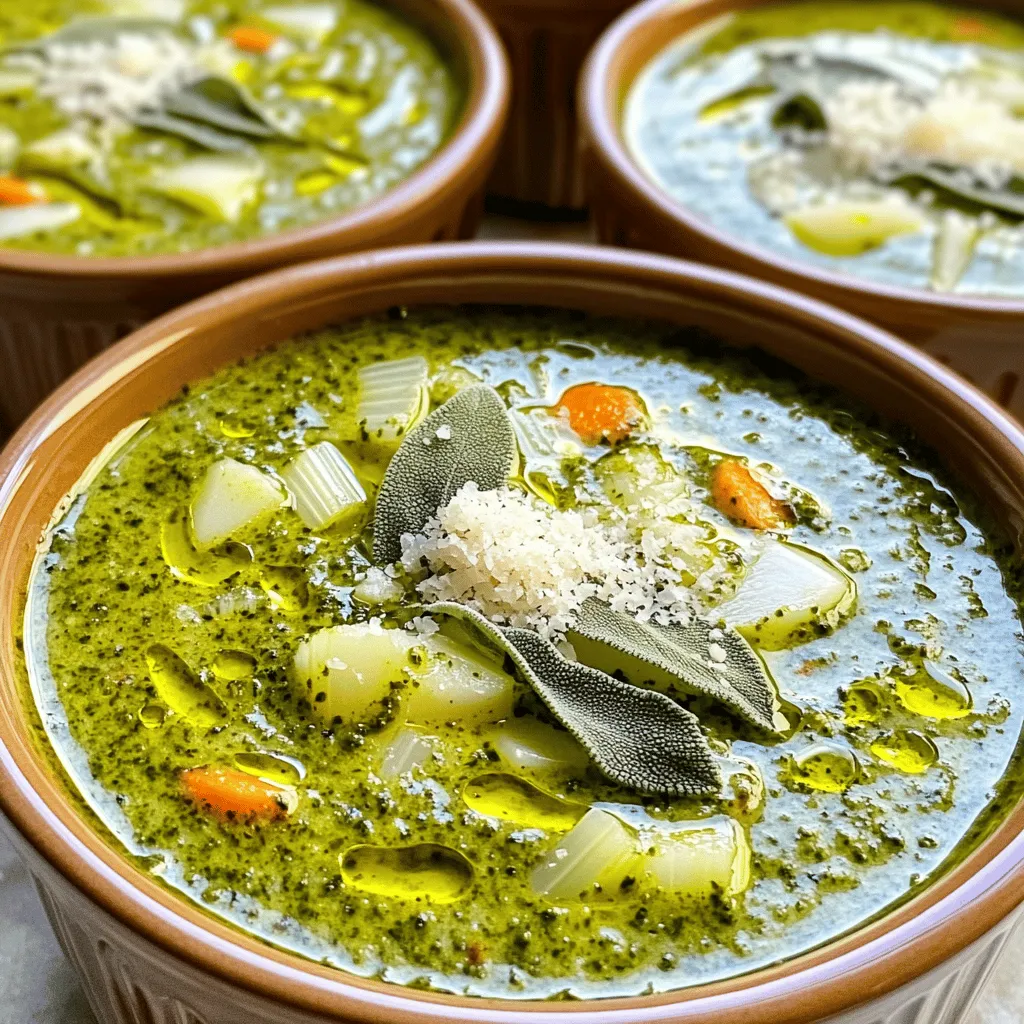
Warm, creamy, and bursting with flavor, Roasted Garlic Sage Pesto Soup is the perfect dish for chilly days. Imagine the

To make Baked Garlic Parmesan Potato Wedges, you need: - 4 medium russet potatoes, thoroughly washed and cut into wedges - 3 tablespoons extra virgin olive oil - 5 cloves of garlic, finely minced These main ingredients form the base of your dish. Russet potatoes give a fluffy inside and a crispy outside. The olive oil helps the spices stick and adds flavor. For seasoning and toppings, gather: - 1 teaspoon smoked paprika - 1 teaspoon Italian seasoning blend - ½ teaspoon sea salt - ½ teaspoon freshly ground black pepper - ½ cup freshly grated Parmesan cheese - Fresh parsley, finely chopped (for garnish) These seasonings bring out the best flavors. Smoked paprika adds a warm, deep note. The Italian blend gives a herbal touch. Parmesan cheese melts into a tasty crust on top of the wedges. If you want to get creative, consider these optional add-ins: - Chili flakes for heat - Different cheese types, like cheddar or mozzarella - Fresh herbs, such as rosemary or thyme These add-ins can give your wedges a unique twist. You can spice them up or make them even cheesier. Choose according to your taste! For the complete recipe, check out the Full Recipe. First, pick medium russet potatoes. Wash them thoroughly to remove any dirt. Cut each potato into wedges. Aim for even sizes so they cook well. This helps them bake evenly and become crispy. Grab a large mixing bowl. Pour in three tablespoons of extra virgin olive oil. Add five cloves of minced garlic for that tasty flavor. Then, mix in one teaspoon of smoked paprika and one teaspoon of Italian seasoning. Sprinkle in half a teaspoon of sea salt and half a teaspoon of black pepper. Stir it all together until it blends well. Now, toss the potato wedges in the bowl with the seasoning. Make sure each wedge is coated fully. Lay the wedges on a lined baking sheet in a single layer. This space helps them get crispy. Bake them in a preheated oven at 425°F (220°C) for about 25 to 30 minutes. Flip them halfway through to brown evenly. After the first bake, sprinkle half a cup of freshly grated Parmesan cheese on top. Bake for another 5 to 7 minutes until the cheese melts. Once done, let them cool briefly before serving. For a pop of color, add fresh parsley on top. Enjoy your crispy delight! For the full recipe, check the details above. To get your potato wedges crispy, start with dry potatoes. After washing, pat them dry with a towel. Use enough olive oil to coat each wedge well. Space them out on the baking sheet; this helps air circulate. Flip them halfway through baking for even crispiness. For extra crunch, broil them for a minute at the end. I love using russet potatoes for their texture. They have a high starch content, which makes them fluffy inside. Yukon golds are also great; they are creamy and add a nice flavor. Avoid waxy potatoes like red or new potatoes; they don’t crisp up well for this recipe. To reheat your baked garlic Parmesan potato wedges, use the oven. Preheat it to 375°F (190°C). Spread the wedges in a single layer on a baking sheet. Bake for about 10-15 minutes until they are hot and crispy again. You can also use an air fryer for a quick and crispy result. {{image_4}} To add heat to your baked garlic parmesan potato wedges, sprinkle chili flakes on top. A half teaspoon of chili flakes can give your dish a nice kick. You can adjust the amount based on your taste. If you love spice, feel free to go wild! Mix the chili flakes with your olive oil and garlic for a consistent flavor. The heat will balance nicely with the creamy parmesan. Cheese can change the flavor of your potato wedges. Cheddar brings a sharp taste, while mozzarella adds a stretchy texture. You can mix cheeses too. Try half a cup of each for a rich, gooey goodness. Just like with parmesan, add the cheese in the last few minutes of baking. This way, it melts perfectly over the hot wedges. If you want a vegan version, swap out the parmesan for nutritional yeast. It has a cheesy flavor and is packed with nutrients. You can also use vegan cheese shreds if you prefer. Use the same amount as parmesan. The rest of the recipe stays the same, so you won't miss out on the fun! These swaps make the dish lighter but still tasty. For the full recipe, check out the details above. To keep leftover potato wedges fresh, place them in an airtight container. Let them cool first. Store them in the fridge for up to three days. This method helps retain taste and texture. If you want to freeze your potato wedges, follow these steps. First, let them cool completely after baking. Next, spread them on a baking sheet in a single layer. Place the sheet in the freezer for about an hour. After that, transfer the frozen wedges to a freezer bag. Squeeze out as much air as you can. They will last for up to three months in the freezer. To reheat your potato wedges, the oven is the best choice. Preheat your oven to 400°F (200°C). Spread the wedges on a baking sheet. Bake for about 10 to 15 minutes until they are hot and crispy again. You can also use an air fryer for a quicker option. Set it to 375°F (190°C) and cook for about 5 to 8 minutes. Enjoy them as if they were freshly made! For the full recipe, you can check the complete instructions and ingredients listed above. Yes, you can! An air fryer is a great option for making these wedges. It cooks them faster and keeps them crispy. To do this, cut the potatoes as usual. Toss them in the seasoning blend just like in the oven method. Preheat your air fryer to 400°F (200°C). Then, place the wedges in the basket in a single layer. Cook them for about 15 to 20 minutes, shaking the basket halfway through. This method yields a crunchy outside and soft inside. Dipping sauces make everything better! Here are some tasty options for your potato wedges: - Ranch dressing for a creamy touch - Ketchup for a classic flavor - Garlic aioli for a rich taste - Spicy sriracha mayo for a kick - Barbecue sauce for a sweet and smoky flavor Feel free to mix and match to find your favorite. Making this recipe gluten-free is easy! The main ingredients are naturally gluten-free. Just ensure that your seasonings, especially the Italian blend, are gluten-free. Check the labels on each product to be safe. You can also pair these wedges with gluten-free sauces for dipping. Enjoy your crispy, delicious potato wedges without worry! This article covered all you need for tasty baked potato wedges. We discussed the main ingredients, seasonings, and optional add-ins for flavor. I explained simple steps from prepping to baking. You learned tips to make them crispy and how to store leftovers. There are fun variations to try, like spicy or cheesy versions. Always feel free to get creative! Now, you're all set to enjoy delicious potato wedges your way. Happy cooking!

Baked Garlic Parmesan Potato Wedges Crispy Delight

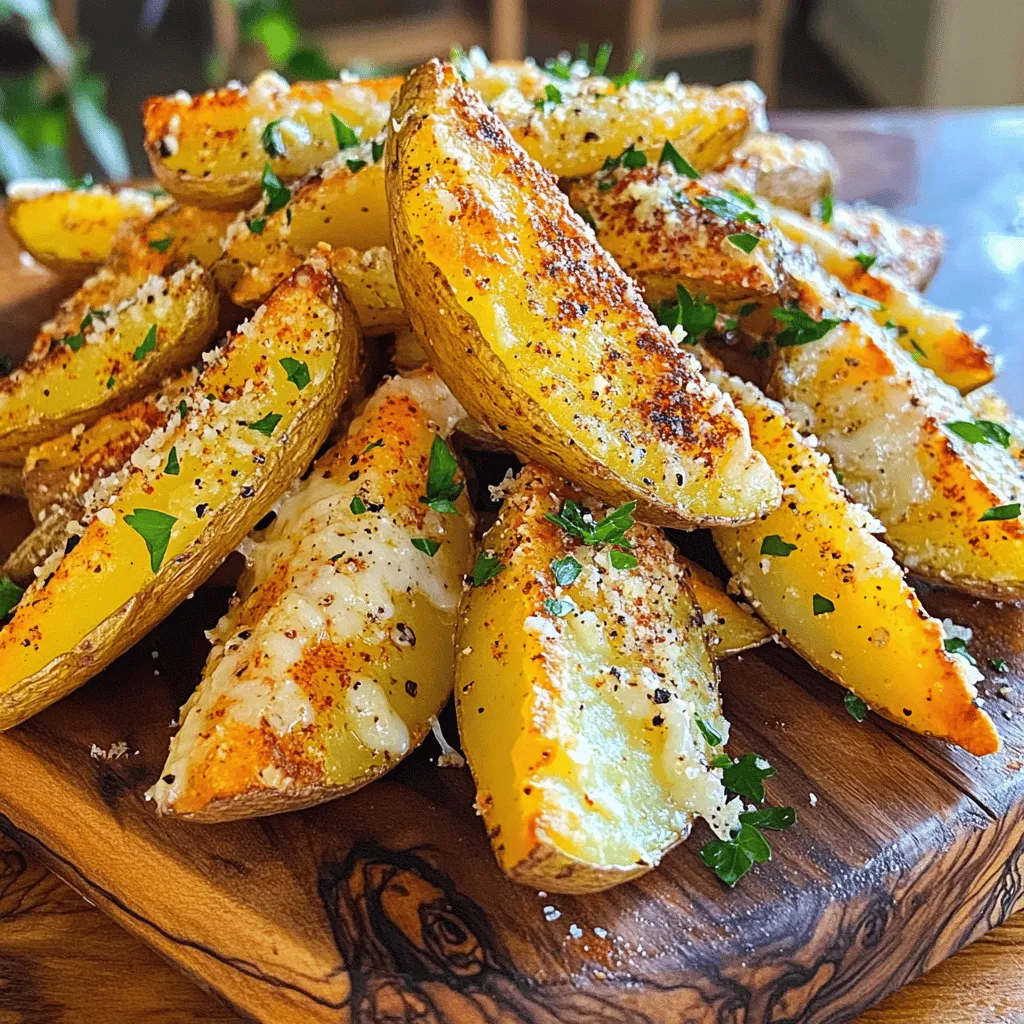
If you’re craving a tasty snack, I’ve got just the thing: Baked Garlic Parmesan Potato Wedges. These crispy delights are

- 6 medium-sized potatoes, peeled and diced - 1 large onion, finely chopped - 3 cloves garlic, minced These three ingredients form the backbone of the soup. Potatoes give the soup its body and creaminess. Use starchy potatoes for the best texture. Onions add sweetness and depth, while garlic brings in a rich flavor that can’t be beaten. - 1 teaspoon dried thyme - 1 teaspoon paprika - 4 cups vegetable broth Seasonings are key in this dish. Dried thyme adds a warm, earthy taste. Paprika gives it a slight smokiness and color. Vegetable broth enhances the overall flavor. You can use homemade broth or store-bought; both work well. - 1 cup heavy cream (or coconut cream for a dairy-free option) - Fresh chives, chopped - 3 tablespoons olive oil or butter These optional ingredients elevate the soup. Heavy cream makes it rich and smooth, while coconut cream is a great dairy-free choice. Fresh chives add a pop of color and a mild onion flavor. Olive oil or butter is perfect for sautéing and adds a lovely richness. For the full recipe, check out the detailed instructions to make this hearty dish. 1. Heat 3 tablespoons of olive oil or butter in a large pot over medium heat. 2. Add 1 large onion, finely chopped. Sauté for about 5 minutes until it is soft and clear. 3. Next, add 3 cloves of minced garlic to the pot. Stir it in, letting it cook for 1 minute. 4. Now, toss in 2 medium carrots, diced, and 2 stalks of diced celery. Cook for 4 to 5 minutes until they soften. 1. Add 6 medium-sized diced potatoes to the pot. Mix in 1 teaspoon of dried thyme and 1 teaspoon of paprika. 2. Season the mix with salt and black pepper. Stir well so the spices coat all the veggies. 3. Carefully pour in 4 cups of vegetable broth. Increase the heat to bring it to a boil. 4. When it starts bubbling, reduce the heat. Let the soup simmer uncovered for 20 to 25 minutes, until the potatoes are tender. 1. Once the potatoes are soft, use a potato masher for a chunky texture or an immersion blender for a smooth soup. 2. Stir in 1 cup of heavy cream or coconut cream. Taste and add more salt or pepper if needed. 3. Allow the soup to warm through for 5 more minutes without boiling. 4. Ladle the soup into bowls and top with fresh chives for extra flavor. This simple process gives you a warm and hearty German Potato Soup. Check the Full Recipe for more tips and variations! To get the texture just right, you can choose how smooth or chunky you want your soup. If you like a chunky feel, use a potato masher. This tool gives you control over how much you mash the potatoes. If you prefer a silky soup, an immersion blender is your best friend. It blends the soup to a smooth finish quickly. Both methods work well, so choose what fits your taste. Adding spices can take your soup to the next level. Consider adding a pinch of nutmeg or a dash of cayenne for warmth. Fresh herbs can also boost the flavor. Add them near the end of cooking to keep their taste bright. While cooking, let the onions and garlic simmer until they smell sweet. This step adds depth to your soup. When serving, use rustic bowls to give a cozy feel. Drizzle a bit of extra cream on top for richness. A sprinkle of fresh chives adds a pop of color and taste. You can also pair the soup with slices of crusty bread. This combination makes for a comforting meal. For a fun twist, serve with a side of pickles or sauerkraut. It adds an exciting contrast to the dish. You’ll impress your guests with both flavor and looks! For the full recipe, check the details above. {{image_4}} You can easily make German potato soup vegetarian or vegan. To make it dairy-free, swap heavy cream for coconut cream. This keeps the soup rich and creamy. You can also use plant-based butter or olive oil for cooking. This way, you still get a tasty, hearty meal. Germany has many regions, and each puts its twist on potato soup. In Bavaria, you might find bacon or sausage added for extra flavor. In the north, they may use local fish to enhance the broth. Each area uses local ingredients, giving the soup a unique taste. Try adding local herbs or spices from your area to make it special. Pair your German potato soup with different types of bread. A crusty sourdough or soft pretzel bread works well. This adds a fun texture to your meal. For heartiness, serve the soup with proteins like grilled chicken or sausage. This makes it a full meal that keeps you warm and satisfied. For the full recipe, check out the Hearty German Potato Soup section above. You can store German potato soup in the fridge for up to five days. To keep it fresh, place it in an airtight container. Make sure to let the soup cool down before sealing it. This prevents moisture from building up, which could make the soup watery or spoil faster. To freeze your soup without losing quality, follow these steps: 1. Allow the soup to cool completely. 2. Pour the soup into freezer-safe containers or bags. 3. Leave some space at the top, as the soup will expand when frozen. 4. Label the containers with the date for easy tracking. For thawing, move the soup to the fridge overnight. If you're in a hurry, you can also thaw it in a microwave. Just make sure to stir it often to heat evenly. When it’s time to enjoy your soup again, the best methods for reheating are on the stove or in the microwave. - Stovetop: Pour the soup into a pot and heat over medium-low heat. Stir often to prevent sticking. - Microwave: Use a microwave-safe bowl, cover it loosely, and heat in short bursts, stirring in between. To keep the texture nice and creamy, add a splash of water or cream while reheating. This helps to restore its velvety feel without being too thick. Enjoy your hearty bowl of comfort! You can use several alternatives for heavy cream. Coconut cream works well for a dairy-free option. It gives a rich texture and flavor. You can also use whole milk for a lighter soup. If you want a thicker result, blend some silken tofu into the soup. Each option will change the taste slightly, so choose what fits your needs best. Making this soup gluten-free is simple. Use gluten-free vegetable broth as your base. The main ingredients like potatoes, carrots, and celery are naturally gluten-free. Always check labels on store-bought broth to ensure no gluten is added. This way, you can enjoy a hearty bowl without worry. Yes, you can prepare German potato soup ahead of time. It stores well and tastes even better the next day. Make the soup and let it cool completely. Store it in an airtight container in the fridge for up to three days. If you want to freeze it, do so before adding the cream. To reheat, warm it slowly on the stove, stirring often so it heats evenly. For the best taste, add the cream just before serving. This German potato soup is an easy and tasty option. We covered key ingredients like potatoes, onions, and seasoning. I shared simple steps to prepare and cook your soup, plus tips for texture and flavor. Explore vegetarian twists or pairing suggestions for extra flair. Remember, proper storage and reheating keep your soup fresh. Enjoy trying this comforting recipe, and make it your own. Happy cooking!

German Potato Soup Hearty and Flavorful Comfort Meal

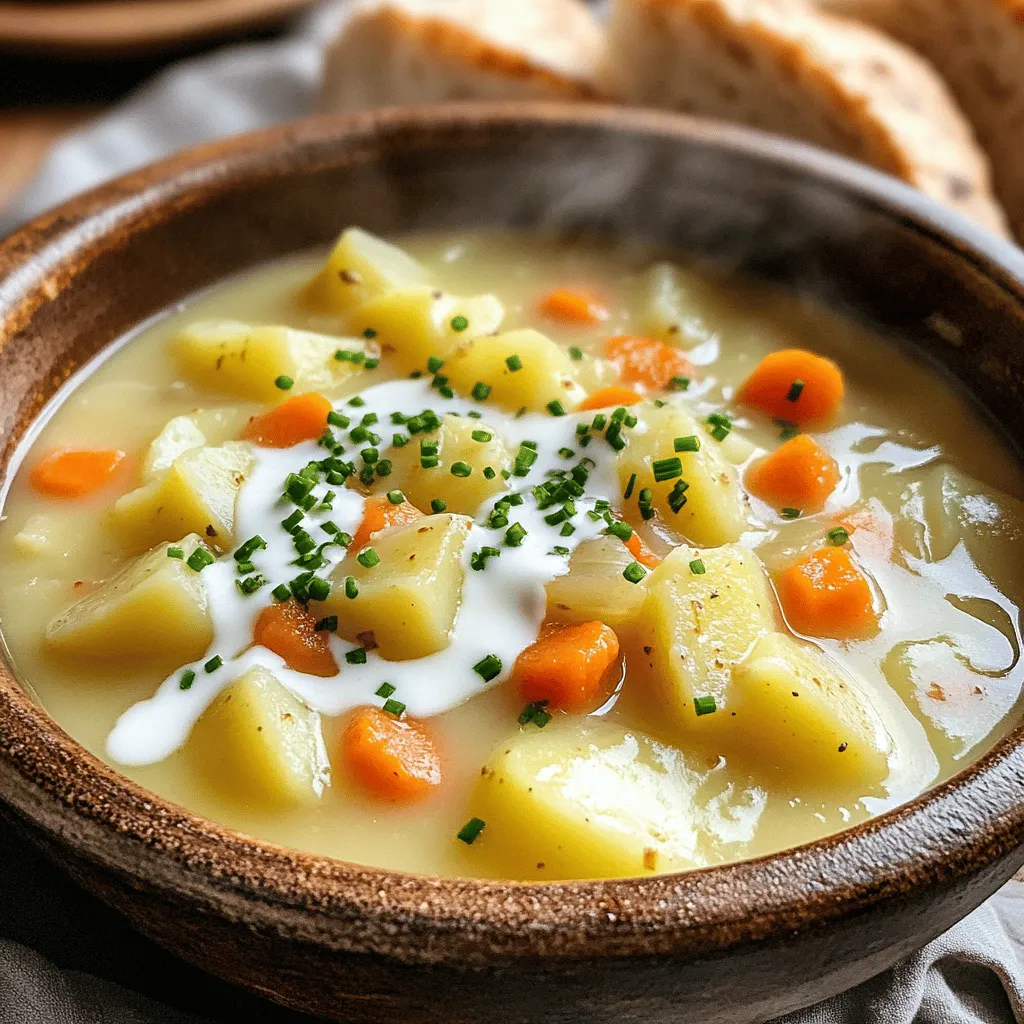
German Potato Soup is a dish that warms the soul with every bite. Packed with simple, hearty flavors, this comfort

To make Easter Dirt Cake Casserole, you need the following items: - 1 package (15.25 oz) chocolate cake mix - 3 cups milk - 2 packages (3.4 oz each) instant vanilla pudding mix - 1 container (8 oz) whipped topping (like Cool Whip) - 1 package (20 oz) crushed Oreo cookies - 1 cup gummy worms - Edible grass (store-bought or homemade) - Fresh berries for garnish (optional) These ingredients come together to create a fun and tasty dessert. The chocolate cake mix forms the base, while the pudding adds creaminess. The crushed Oreos give it a unique texture and flavor. If you need to swap some ingredients, here are a few ideas: - Use a gluten-free cake mix instead of the regular chocolate cake mix. - Swap out the instant vanilla pudding for chocolate pudding for a richer flavor. - Instead of whipped topping, you can use whipped cream for a fresher taste. - For a healthier option, consider using yogurt in place of whipped topping. - If you don't have gummy worms, use any candy that fits the theme. These substitutions can help you adjust the recipe to fit your needs while keeping it fun. For a delightful presentation, consider these garnishes: - Fresh berries add a nice touch and enhance the look. - Use extra gummy worms to create a playful vibe. - Sprinkle edible grass on top for a garden-like finish. - Small chocolate eggs can add color and excitement. These garnishes not only improve the look but also add a burst of flavor. Enjoy customizing your Easter Dirt Cake Casserole! Making Easter Dirt Cake Casserole is fun and easy. You start by gathering your ingredients and tools. You will need a large mixing bowl, a whisk, and a baking dish. It takes about 20 minutes to prep before baking begins. First, preheat your oven to 350°F (175°C). This ensures your cake bakes evenly. Next, you need to grease a 9x13 inch baking dish. I like to use cooking spray for easy cleanup. Follow the directions on the cake mix box to make the batter. Once mixed, pour it into the dish and spread it out. Bake for 30-35 minutes. Check the cake with a toothpick. If it comes out clean, the cake is ready! Let it cool completely on a wire rack before moving on. While the cake cools, it's time to prepare the pudding mix. In a large bowl, combine the pudding mix with 3 cups of milk. Whisk it until smooth. Let it sit for about 5 minutes to thicken. Next, fold in the whipped topping gently. You want it smooth and creamy. After the cake cools, crumble it into large pieces in the baking dish. This gives great texture. Spread the pudding mixture over the crumbled cake evenly. Now, sprinkle crushed Oreo cookies on top for a dirt-like look. Finally, decorate with gummy worms and edible grass. Let the casserole chill in the fridge for at least 2 hours. This helps the layers firm up. Enjoy this fun treat with family and friends! You can find the Full Recipe for more details. Chilling your Easter Dirt Cake Casserole is key. I recommend letting it sit in the fridge for at least 2 hours. This helps the flavors blend well. The pudding gets thicker and creamier when chilled. Plus, the cake absorbs moisture, making it soft and tasty. If you can, chill it overnight for the best taste. Presentation makes this dish even more fun. For a bright touch, add fresh berries on top. You can use strawberries, blueberries, or raspberries. They look lovely and add a burst of flavor. Arrange extra gummy worms around the dish for a playful feel. Edible grass adds texture and a garden-like look, enhancing the theme. Play with colors and shapes for an eye-catching display! One common mistake is skipping the cooling step. Always let your cake cool completely before crumbling it. This helps avoid sogginess. Another mistake is not using enough crushed Oreos. A thick layer of Oreos gives the best "dirt" look. Lastly, don’t forget to chill! If you serve it warm, the layers will not hold up well. Follow these tips for a perfect Easter treat. {{image_4}} You can change the flavor of your Easter Dirt Cake Casserole easily. Try using vanilla cake mix for a lighter taste. You can also use chocolate pudding instead of vanilla for a richer chocolate flavor. For a fruity twist, mix in some pureed strawberries or raspberries into the pudding layer. This adds a fresh taste that pairs well with the chocolate cake. To make a gluten-free version, use a gluten-free chocolate cake mix. You can also choose a dairy-free pudding mix and non-dairy whipped topping. This way, everyone can enjoy the dessert. If you want a lower-sugar option, look for sugar-free pudding mix and use a sugar substitute in the cake. For decorations, get creative! Instead of gummy worms, use chocolate eggs or jelly beans for a fun look. You can also add edible flowers to give it a spring touch. If you want a more elegant look, sprinkle some cocoa powder or crushed nuts on top instead of Oreo crumbs. These small changes can make your dessert stand out. Check out the Full Recipe for all the details to create this delightful treat! To keep your Easter Dirt Cake Casserole fresh, cover it tightly with plastic wrap or foil. This helps prevent drying out. You can also place it in an airtight container. Store it in the refrigerator for up to three days. If you notice any leftovers, try to eat them quickly for the best taste. You can freeze Easter Dirt Cake Casserole, but the texture may change. To freeze, cut the casserole into portions. Wrap each piece tightly in plastic wrap, then place them in a freezer-safe bag. Label the bag with the date. You can freeze the casserole for up to a month. To serve, thaw in the fridge overnight before enjoying. When ready to serve your chilled casserole, cut it into squares. I like to place a fresh berry or two on top for a pop of color. You can also add a few gummy worms for fun. This makes the dish look festive and inviting. Enjoying it cold gives a nice contrast to the rich flavors. Easter Dirt Cake Casserole is a fun dessert that looks like a garden. It has layers of chocolate cake, creamy pudding, and crushed Oreo cookies. You can add gummy worms and edible grass for a playful touch. This dessert is perfect for Easter gatherings and is sure to delight kids and adults alike. Yes, you can make this dessert ahead of time. I recommend preparing it the day before you plan to serve it. This allows the flavors to blend and the layers to set. Just cover it well and keep it in the fridge until you're ready to enjoy. Making it in advance saves time and adds to the fun! When serving Easter Dirt Cake Casserole, scoop out portions with a large spoon. Each serving will show the fun layers. You can add fresh berries on top for color and flavor. Place extra gummy worms around the dish for added charm. This presentation makes it look even more festive and inviting. For the full recipe, check the earlier section. This blog post covered how to make a delightful Easter Dirt Cake Casserole. We explored the key ingredients, step-by-step instructions, and handy tips. I shared ways to customize flavors and adjust for special diets, plus storage info for leftovers. With this knowledge, you can create a fun and tasty dessert. Enjoy making this treat with friends and family, and don’t forget to have fun decorating it. Happy baking!

Easter Dirt Cake Casserole Delightful and Simple Treat

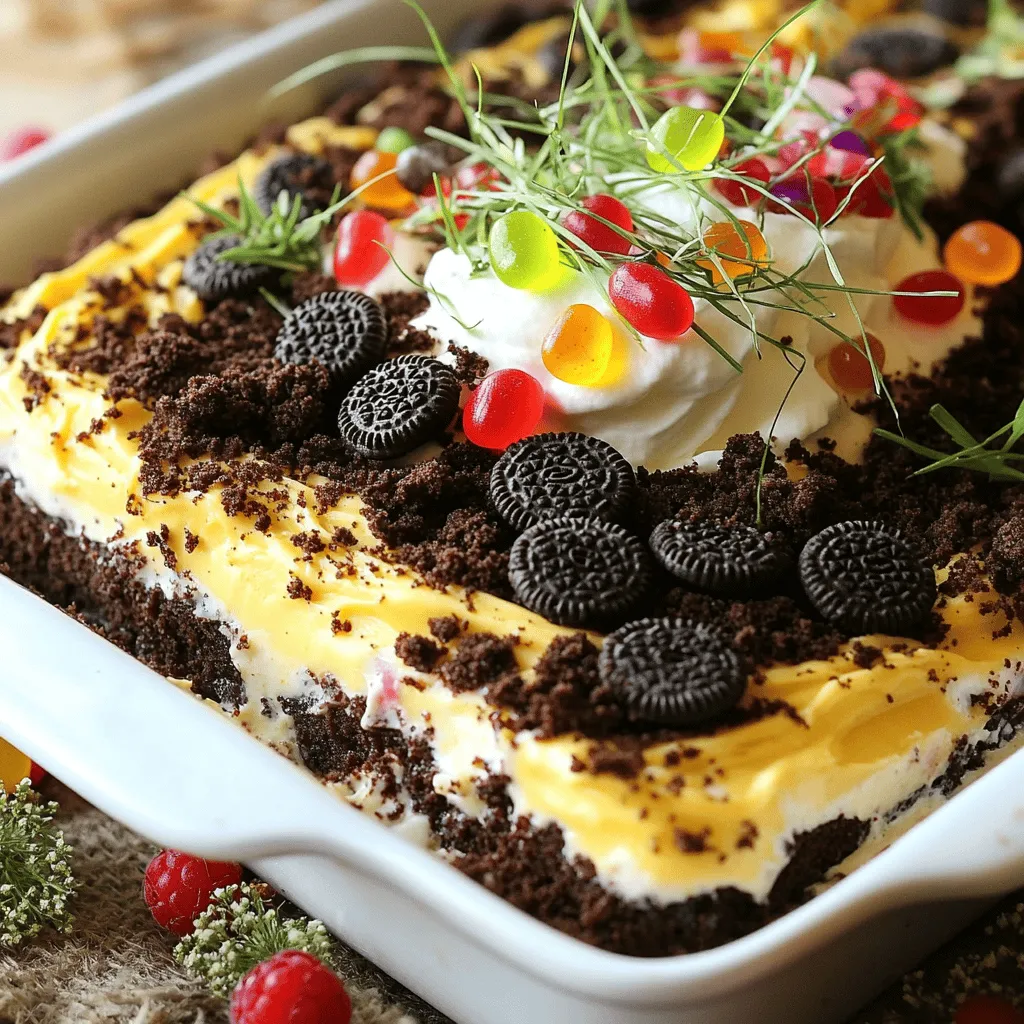
If you’re looking for a fun dessert to impress this Easter, try my Easter Dirt Cake Casserole! This simple treat

To make Nutella stuffed pancakes, you will need the following ingredients: - 1 cup all-purpose flour - 2 tablespoons granulated sugar - 1 teaspoon baking powder - 1/2 teaspoon baking soda - 1/4 teaspoon sea salt - 1 cup buttermilk (or substitute with regular milk mixed with 1 tablespoon white vinegar) - 1 large egg - 2 tablespoons unsalted butter, melted (plus additional for greasing the pan) - 1/2 cup Nutella (or any chocolate-hazelnut spread) - Powdered sugar, for dusting - Fresh strawberries or bananas, for serving These ingredients create soft, fluffy pancakes with a rich Nutella center. The combination of buttermilk and baking soda gives the pancakes a light texture. If you don’t have buttermilk, the vinegar and regular milk mix works just fine. Nutella adds a sweet and creamy touch that makes these pancakes extra special. You can swap Nutella for any chocolate-hazelnut spread you like. Fresh fruit on top not only looks great but also adds a fresh taste. For the best results, use fresh ingredients. This ensures the pancakes rise well and taste delicious. I encourage you to gather all these items before you start cooking. It makes the process smoother and more fun. - In a mixing bowl, combine 1 cup of all-purpose flour, 2 tablespoons of granulated sugar, 1 teaspoon of baking powder, 1/2 teaspoon of baking soda, and 1/4 teaspoon of sea salt. - In another bowl, mix 1 cup of buttermilk, 1 large egg, and 2 tablespoons of melted butter until smooth. - Carefully pour the wet mixture into the dry ingredients. Stir gently until just mixed. A few lumps are okay! - Preheat a non-stick skillet over medium heat. Grease it with a small pat of butter. - Pour about 1/4 cup of pancake batter onto the skillet. Cook until small bubbles form, about 2-3 minutes. - Make a small well in the center of the pancake. Spoon in 1 tablespoon of Nutella, letting it sink slightly. - Cover the Nutella with another 1/4 cup of batter. Gently flip the pancake and cook for another 2-3 minutes until golden brown. Repeat for the rest of the batter. - Stack your pancakes on a plate. Dust them with powdered sugar for a sweet touch. - Top with fresh strawberries or bananas for extra flavor. Enjoy your Nutella stuffed pancakes warm! For the full recipe, check out the details above. - Avoid overmixing the batter. Mix just until combined. - Use fresh ingredients for best results. Fresh eggs and flour work wonders. - Medium heat is ideal for even cooking. This helps pancakes cook through. - Adjust heat as necessary to prevent burning. A small change can make a big difference. - Adjust the amount of batter used per pancake. More batter makes thicker pancakes. - Use a larger skillet for bigger pancakes. This gives you more room to flip! These tips will help you create the perfect Nutella stuffed pancakes every time. For the full recipe, check out the details in the earlier sections. Happy cooking! {{image_4}} You can try other chocolate spreads if you want a twist. Here are a few options: - Almond butter chocolate spread - Hazelnut spread with cocoa - Peanut butter chocolate spread If you want to enhance Nutella’s flavor, consider these options: - Add a pinch of sea salt for boldness. - Mix in a bit of espresso powder for depth. You can boost your pancake batter with fun add-ins. Here are some ideas: - Chopped nuts like walnuts or pecans. - Fresh blueberries or sliced bananas. For even more flavor, try adding: - A teaspoon of vanilla extract. - A sprinkle of cinnamon for warmth. Toppings can change your pancake experience. Here are some great alternatives: - Whipped cream for a light touch. - Maple syrup for classic sweetness. You can also try savory options, such as: - Cream cheese for a rich contrast. - Yogurt with herbs for a unique blend. Feel free to get creative with your Nutella stuffed pancakes! For the full recipe, check out the [Full Recipe]. To store leftover pancakes, place them in an airtight container. You can also wrap them in plastic wrap. This helps keep them fresh for later use. Always let pancakes cool before storing. This prevents steam from making them soggy. Keep them in the fridge for up to three days. To reheat, just pop them in the microwave for 20-30 seconds. To freeze Nutella stuffed pancakes, first let them cool completely. Then, stack pancakes with parchment paper in between. This keeps them from sticking together. Place the stack in a freezer bag or airtight container. They can last up to two months in the freezer. When you're ready to eat, reheat in the microwave or toaster oven. If using the microwave, heat for about 1 minute. For the oven, wrap in foil and bake at 350°F for about 10 minutes. In the fridge, pancakes last about three days. In the freezer, they can stay fresh for two months. Always check for signs of spoilage. If pancakes smell off or have an unusual color, it’s best to toss them. A little care can keep your Nutella stuffed pancakes delicious for days! Yes, you can! Here are some fun options for fillings: - Peanut butter - Almond butter - Cream cheese with fruit jam - Cookie butter - Any flavored chocolate spread Using these options allows you to create new flavors. You can mix and match to find your favorite! You have two good choices for reheating pancakes: microwave or stovetop. - Microwave: Place pancakes on a plate and cover with a damp paper towel. Heat for 15-20 seconds. This keeps them soft. - Stovetop: Warm a skillet over low heat. Add pancakes and cover for 1-2 minutes. This method gives a nice texture. Both ways work well. Choose what fits your time best! Absolutely! Here are some tips for meal prepping Nutella stuffed pancakes: - Make the batter: You can prepare the batter and store it in the fridge for up to one day. - Cook and cool: Make the pancakes ahead of time. Let them cool completely before storing. - Store properly: Keep them in an airtight container in the fridge for up to three days. These tips help you enjoy your pancakes without much fuss on busy mornings! For the full recipe, check the earlier section. You can make delicious Nutella pancakes with simple ingredients. We covered everything, from mixing the batter to cooking. To enjoy the fluffiest pancakes, avoid overmixing and use fresh items. Customize them with your favorite add-ins, toppings, and fillings. You can even freeze leftovers for later enjoyment. With this guide, you’re set to impress anyone who tastes these treats! Get ready to delight your family and friends with these easy, tasty pancakes.

Nutella Stuffed Pancakes Tasty and Easy Recipe

Get ready to treat yourself with my Nutella Stuffed Pancakes! This recipe is not only delicious but also easy to

To make the best honey garlic chicken, you need a few key items. Here’s what you will need: - 4 boneless, skinless chicken thighs - 1/4 cup honey - 3 tablespoons low-sodium soy sauce - 4 cloves garlic, finely minced - 1 tablespoon fresh ginger, finely grated - 1 tablespoon rice vinegar - 1 teaspoon sesame oil - Salt and freshly ground black pepper, to taste - 2 green onions, finely chopped (for garnish) - A sprinkle of sesame seeds (for garnish) These ingredients work together to create a sweet and savory flavor that you will love. While the essential ingredients are great, you can add a few extras for a unique touch. Try these options: - A pinch of red pepper flakes for heat - Fresh lime juice for a tangy twist - Chopped cilantro for freshness These add-ons can enhance your dish and make it even more special. When picking chicken for this recipe, stick to thighs. They stay juicy and tender during cooking. If you prefer breasts, use boneless, skinless ones. Just remember, they can dry out faster. Always check the color and smell when buying chicken. Fresh chicken should be pink and have no strong odors. This way, you ensure a tasty meal every time. For the full recipe, follow the steps outlined in the earlier section. To start, gather your ingredients. You need honey, soy sauce, garlic, ginger, rice vinegar, sesame oil, salt, and pepper. In a bowl, mix the honey, soy sauce, minced garlic, grated ginger, rice vinegar, and sesame oil. Whisk them until they blend well. This marinade brings a sweet and savory flavor to the chicken. Next, take your chicken thighs. Place them in a resealable bag or a shallow dish. Pour the marinade over the chicken. Make sure each piece is well-coated. Seal the bag or cover the dish, and put it in the fridge. Let it marinate for at least 30 minutes. For more flavor, you can marinate it for up to 2 hours. Preheat your oven to 400°F (200°C). For easy clean-up, line a baking dish with parchment paper. Take the chicken out of the marinade, letting excess drips off. Place the chicken in the prepared dish and set aside the leftover marinade. Bake the chicken for 20 minutes. While it bakes, heat the reserved marinade in a saucepan over medium heat. Bring it to a boil, then reduce the heat and let it simmer for 5-7 minutes. This thickens the sauce. After 20 minutes, brush the chicken with the thickened marinade. Return the chicken to the oven and bake for another 10-15 minutes. Check that the chicken reaches 165°F (75°C) inside. Once done, let it rest for a few minutes. Slice it into bite-sized pieces and serve warm. Don’t forget to garnish with green onions and a sprinkle of sesame seeds for extra flavor. For the full recipe, check out the section above. To get the best taste from your honey garlic chicken, use fresh ingredients. Fresh garlic and ginger bring out the most flavor. When making the marinade, whisk the honey and soy sauce well. This helps the flavors blend. Let the chicken marinate for at least 30 minutes, but longer is better. If you can, marinate overnight. This gives the flavors time to soak in deeply. Cooking your chicken at the right temperature is key. Preheat your oven to 400°F (200°C). Bake the chicken for 20 minutes first. Then, add the thickened sauce and bake for another 10 to 15 minutes. The chicken should reach an internal temperature of 165°F (75°C). This keeps the chicken juicy and safe to eat. Always use a meat thermometer to check. To thicken your sauce, simmer the reserved marinade. Pour it into a small saucepan over medium heat. Bring it to a boil, then lower the heat. Let it simmer for 5 to 7 minutes. Stir it often until it thickens. You can add a cornstarch slurry if you want it thicker. Mix one tablespoon of cornstarch with two tablespoons of water. Stir this into the sauce while it simmers. This step makes your sauce rich and sticky, perfect for coating the chicken. {{image_4}} Want to add some heat? You can make spicy honey garlic chicken. Simply add red pepper flakes or sriracha to the marinade. Start with half a teaspoon of red pepper flakes. Taste it, then add more if you like. The spicy kick pairs well with the sweet honey. It makes the dish exciting and fun to eat! You can turn this recipe into a stir-fry. Slice the chicken into thin strips before marinating. Heat a bit of oil in a large pan or wok. Add the marinated chicken and cook until golden. Then, toss in colorful veggies like bell peppers and broccoli. Stir in the reserved marinade to create a tasty sauce. This method gives you a quick and healthy meal that is full of flavor. Don’t have chicken? Try using tofu or pork instead. For tofu, use firm or extra-firm types. Cut it into cubes and marinate just like the chicken. For pork, use tenderloin or chops. Adjust cooking times since pork takes longer to reach safe internal temperatures. Both options absorb the honey garlic flavor very well. You can enjoy the same great taste with a twist! For complete cooking details, check out the Full Recipe. To store leftover honey garlic chicken, let it cool first. Once it is cool, place it in an airtight container. This will keep it fresh for later use. Store the chicken in the fridge. It will last for up to three days. If you want to keep it longer, you can freeze it. Just make sure to wrap it well in plastic wrap before placing it in a freezer bag. When you reheat honey garlic chicken, you want it to stay juicy. The best way is to use an oven. Preheat your oven to 350°F (175°C). Place the chicken in a baking dish and cover it with foil. Heat for about 15-20 minutes. This method helps retain moisture. You can also use a microwave. However, be careful not to overcook it, as it can dry out quickly. Heat in short bursts, stirring in between. For storing honey garlic chicken, use glass or BPA-free plastic containers. Glass containers are great because they do not stain or absorb smells. They also are safe for the microwave. If you use plastic, make sure it is microwave-safe. For freezing, use heavy-duty freezer bags or containers. This helps prevent freezer burn and keeps your chicken fresh longer. Yes, you can use chicken breasts. They will cook slightly faster than thighs. However, thighs are juicier and more tender. If you want a moist dish, stick with thighs. If you use breasts, check the internal temperature early. Honey Garlic Chicken pairs well with many sides. Here are some great options: - Steamed rice or jasmine rice - Stir-fried vegetables like broccoli and bell peppers - A fresh garden salad with a light dressing - Mashed potatoes or sweet potatoes These sides balance the sweet sauce and add color to your plate. You can marinate the chicken for up to 2 hours. This gives it a nice flavor boost. If you need to, 30 minutes is enough for a tasty meal. Just don't marinate too long, or the chicken might become too soft. Check the [Full Recipe] for more tips! Honey garlic chicken is easy and tasty. You learned the key ingredients, how to marinate, and bake it just right. I shared tips to boost flavor and variations to explore. Plus, storing leftovers properly keeps your meal fresh. Try these methods to make this dish your own. You can adjust flavors, use different proteins, or add sides. This recipe gives you a solid base for great meals. Enjoy your cooking and make it fun!

Honey Garlic Chicken Flavorful and Easy Recipe Guide

Get ready to savor a delicious meal with my easy Honey Garlic Chicken recipe! This dish is packed with sweet

To make these tasty pancakes, gather the following items: - 1 cup all-purpose flour - 2 tablespoons granulated sugar - 1 tablespoon baking powder - 1/2 teaspoon salt - 1 cup milk - 1 large egg - 2 tablespoons unsalted butter, melted - 1 teaspoon vanilla extract For the Cinnamon Swirl: - 1/4 cup brown sugar, packed - 1 tablespoon ground cinnamon - 2 tablespoons unsalted butter, softened For the Cream Cheese Glaze: - 4 oz cream cheese, softened - 1/2 cup powdered sugar - 2 tablespoons milk - 1 teaspoon vanilla extract You can swap some ingredients if needed. Use whole wheat flour for a healthier option. Almond milk works well if you want a dairy-free choice. For the egg, try a flax egg by mixing 1 tablespoon of flaxseed meal with 2.5 tablespoons of water. Maple syrup can replace granulated sugar for sweetness. Use coconut oil instead of butter if you prefer. Fresh ingredients make the best pancakes. Check the flour for freshness; it shouldn’t smell stale. Look for milk with a good expiration date and no sour smell. Eggs should be clean, without cracks. Choose butter that feels firm and cool. When buying brown sugar, it should feel moist and clump together. Grab the freshest cream cheese, which should be smooth and creamy. For the spices, ensure they are not past their best by date; fresh spices give the best flavor. To make the cinnamon swirl, start with a small bowl. Combine 1/4 cup brown sugar, 1 tablespoon ground cinnamon, and 2 tablespoons softened butter. Mix until it is smooth. You want it to blend well. Once mixed, put it in a piping bag or squeeze bottle. This makes it easy to swirl on the pancakes. Set this aside for later use. Next, grab a large mixing bowl. In this bowl, whisk together 1 cup all-purpose flour, 2 tablespoons granulated sugar, 1 tablespoon baking powder, and 1/2 teaspoon salt. Make sure everything is even. In another bowl, mix 1 cup milk, 1 large egg, 2 tablespoons melted butter, and 1 teaspoon vanilla extract. Slowly pour this wet mix into the dry mix. Stir gently until just combined. A few lumps are okay. This will help keep your pancakes fluffy. Now it’s time to cook! Heat a non-stick skillet over medium heat. Lightly grease the pan with some butter or cooking spray. Once hot, pour 1/4 cup of pancake batter onto the skillet. Before it sets up, pipe your cinnamon mixture on top. Make a nice swirl for that cinnamon roll look. Cook for about 2-3 minutes until bubbles appear. The edges should look dry. Carefully flip the pancake. Cook the other side for 1-2 minutes until both sides are golden. Repeat this with the rest of the batter and cinnamon mixture. Enjoy the smell as they cook! For the full recipe, check the earlier section. To make your pancakes light and fluffy, don't over-mix the batter. Mix just until the dry and wet ingredients combine. A few lumps are fine. This keeps air pockets in the batter, which results in fluffiness. Letting the batter rest for a few minutes can also help. This allows the baking powder to start working. For the best cinnamon swirl, use a piping bag or squeeze bottle. This makes it easy to create that beautiful swirl. Start piping in a spiral from the center of the pancake outward. Keep it steady and don’t rush. The swirl should look like a cinnamon roll. If the swirl breaks, don’t worry. Just try again with the next pancake! These pancakes shine with a drizzle of cream cheese glaze. You can also add maple syrup for extra sweetness. Top with chopped nuts for crunch or fresh fruit for color. Serve with crispy bacon or sausage for a full breakfast. For a fun twist, sprinkle extra cinnamon on top before serving. Enjoy these pancakes warm for the best taste! For the full recipe, check out the entire guide. {{image_4}} You can add chocolate chips to your cinnamon roll pancakes for a sweet twist. Just sprinkle some chocolate chips into the batter before you cook the pancakes. This adds a rich, chocolatey flavor that pairs well with the cinnamon. I like to use semi-sweet chips, but you can choose dark or milk chocolate, too. The melted chocolate creates a gooey surprise in each bite. If you need a gluten-free option, swap all-purpose flour for a gluten-free blend. Many brands offer one-to-one ratios that work well in pancakes. You will still get a fluffy texture and tasty flavor. Ensure the baking powder is gluten-free as well. The cinnamon swirl and cream cheese glaze can remain the same. Enjoy a delicious breakfast without the gluten! You can enhance your pancakes by adding fruits or nuts. Fresh berries like blueberries or sliced bananas work great. Just fold them into the batter before cooking. For a nutty crunch, try adding chopped pecans or walnuts. They add a nice texture and flavor. Whether you choose fruits, nuts, or both, these additions elevate your cinnamon roll pancakes. Try these variations to make every breakfast special! For the full recipe, check the link. Store leftover pancakes in an airtight container. Let them cool first. You can keep them in the fridge for up to three days. If you want to enjoy them later, consider freezing them for longer storage. To reheat pancakes, use the microwave. Place them on a microwave-safe plate. Heat for about 20-30 seconds. You can also use a skillet. Heat over low heat for about one minute on each side. Both methods keep the pancakes soft. Freezing pancakes is simple. Stack them with parchment paper between each one. Wrap the stack tightly in plastic wrap. Place the wrapped stack in a freezer bag. You can freeze them for up to two months. When ready to eat, thaw in the fridge overnight. Reheat as mentioned above for best results. To flip pancakes, use a wide, flat spatula. Slide it under the pancake gently. Lift the pancake slightly and flip it quickly. Make sure to flip when the edges look dry and bubbles form on top. This way, you avoid breaking the pancake. A good flip keeps your pancakes fluffy and beautiful. Yes, you can prepare the cinnamon swirl ahead of time. Mix the brown sugar, cinnamon, and butter as directed. Then, place it in a piping bag or squeeze bottle. Store it in the fridge until you are ready to use it. This saves time and adds great flavor to your pancakes. Pancakes are done when they turn golden brown on both sides. Look for bubbles forming on the surface. When these bubbles pop, it’s a good sign. The edges should also look slightly dry. If you follow these signs, your pancakes will come out perfectly cooked. For the full recipe, check out the detailed steps. Cinnamon roll pancakes are a fun twist on a classic breakfast. We covered fresh ingredients, simple steps, and tips for fluffiness. You can try variations with chocolate, fruits, or gluten-free options. Don’t forget how to store and reheat leftovers for later. Remember, practice makes your pancakes even better. Enjoy making these tasty treats for loved ones!

Cinnamon Roll Pancakes Flavorful Morning Treat

Start your morning right with my cinnamon roll pancakes! They combine the best of two breakfast favorites into one delicious

Older posts
Newer posts
← Previous Page1 … Page31 Page32 Page33 … Page41 Next →

dsad

© 2025 recipetorch • Built with GeneratePress

Our Policies

  • Copyright Policy
  • Cookie Policy
  • GDPR Policy
  • Privacy Policy
  • Disclaimer
  • Terms Of Use

More Information

  • Home
  • About
  • Contact
  • Appetizers
  • Dessert
  • Dinner
  • Drinks
©2025, recipetorch About Back To Top