![- Chicken and Marinade Ingredients - 2 boneless, skinless chicken breasts - 1/4 cup extra virgin olive oil - 3 tablespoons freshly squeezed lemon juice - Zest of 1 medium lemon - 2 tablespoons fresh dill, finely chopped - 3 cloves garlic, finely minced - Salt and freshly ground black pepper to taste - Quinoa and Vegetable Ingredients - 1 cup quinoa, thoroughly rinsed - 2 cups vegetable broth or water - 1 cup cherry tomatoes, halved - 1 medium cucumber, diced - 1/2 medium red onion, finely chopped - 1/3 cup feta cheese, crumbled - Garnishes and Optional Additions - Fresh parsley leaves, for garnish Using fresh ingredients makes a big difference. Fresh dill gives the chicken a bright taste. The lemon juice adds zest and keeps the chicken juicy. Quinoa provides a nutty base that soaks up all the flavors. Each veggie adds color and crunch. Feta cheese adds creaminess and salt. If you want to change things up, swap out the chicken for grilled shrimp or tofu. Mix in seasonal vegetables like bell peppers or zucchini. These bowls are versatile and fun to play with! For the full recipe, check out the instructions above. Mixing the Marinade In a medium bowl, combine these ingredients: - 1/4 cup extra virgin olive oil - 3 tablespoons freshly squeezed lemon juice - Zest of 1 medium lemon - 2 tablespoons fresh dill, finely chopped - 3 cloves garlic, finely minced - Salt and freshly ground black pepper to taste Whisk these together until fully blended. You want every bit of chicken to soak up this tasty mix. Marinating Duration Recommendations Let the chicken sit in the marinade for at least 30 minutes. For even more flavor, try to marinate it for up to 2 hours. This helps the flavors really sink in. Boiling the Liquid In a medium saucepan, bring 2 cups of vegetable broth or water to a rolling boil. This helps the quinoa cook evenly. Simmering and Resting Process Once boiling, add 1 cup of rinsed quinoa. Reduce the heat to low, cover the pan, and let it simmer for about 15 minutes. After that time, take it off the heat but keep it covered for another 5 minutes. This resting step makes the quinoa fluffy. Understanding Grill Temperature Preheat your grill or grill pan to medium-high heat. This temperature is key for getting those perfect grill marks. Cooking Time and Checking for Doneness Place the marinated chicken on the grill. Cook for about 6-7 minutes on one side. Then flip it over and grill the other side for another 6-7 minutes. The chicken is done when it reaches 165°F (75°C). Let it rest for 5 minutes before slicing. Layering Ingredients In each bowl, start with a scoop of fluffy quinoa. Then, layer on the sliced grilled chicken. Next, add a mix of halved cherry tomatoes, diced cucumber, and chopped red onion. Adding Feta and Garnishes Sprinkle crumbled feta cheese over each bowl for a creamy finish. To make it pop, drizzle a little olive oil on top and add fresh dill and parsley as garnishes. Enjoy your Mediterranean Lemon-Dill Chicken Bowls! For the full recipe, check back to the ingredients section. Importance of Marinating Time Marinating the chicken is key to great flavor. I suggest at least 30 minutes. For a deeper taste, marinate for up to 2 hours. The longer the chicken sits in the marinade, the more it absorbs those bright lemon and dill notes. Flavor Profiles with Additional Herbs You can spice things up by adding herbs. Try fresh oregano or thyme for a warm touch. Basil gives a sweet note that pairs well with lemon. Mix and match to find your favorite! Avoiding Overcooking the Chicken Overcooked chicken can be dry and tough. To avoid this, check the internal temperature. It should reach 165°F. Letting the chicken rest for a few minutes helps keep it juicy. Use a meat thermometer if you have one. Ensuring Fluffy Quinoa Rinsing quinoa is a must. It removes the bitter coating called saponin. After cooking, let it sit for 5 minutes before fluffing. This makes your quinoa light and airy. Serving Suggestions Serve your bowls in bright dishes. This makes the colors pop. Arrange the chicken and veggies neatly for a lovely look. You can even add lemon wedges for a fresh touch. Enhancing Visual Appeal with Colors Mix colorful veggies like red onion and yellow tomatoes. Use lots of green herbs for contrast. A vibrant bowl is more inviting and fun to eat! {{image_4}} - Swap Out Proteins: You can switch the chicken for salmon, shrimp, or tofu. Each option brings its own taste. Salmon adds a rich flavor, while shrimp gives a sweet bite. Tofu is a great choice for a plant-based meal. - Seasonal Vegetable Options: Fresh veggies can change with the seasons. In spring, try asparagus or peas. Summer calls for zucchini or bell peppers. In fall, add sweet potatoes or roasted carrots. Each brings a new color and taste to your bowl. - Quinoa Alternatives: While quinoa is great, you can try couscous, farro, or brown rice. Couscous cooks fast and has a light texture. Farro gives a chewy bite, while brown rice adds heartiness. - Adding Additional Grains: Mix different grains for fun textures. A blend of quinoa and farro creates a tasty base. You can also add barley for a nutty flavor. - Changing the Citrus: Instead of lemon, use lime or orange juice. Lime adds a tangy kick, while orange gives sweetness. Each change can brighten the dish in a new way. - Experimenting with Different Cheeses: Feta is good, but try goat cheese or halloumi. Goat cheese is creamy and tangy, while halloumi adds a salty flavor with a nice grill mark. These cheeses can give a fresh twist to your bowls. For the complete recipe, check out the [Full Recipe]. - Refrigerating Leftovers: Place any leftover chicken bowls in the fridge within two hours. This keeps them safe and fresh. Store them in an airtight container to prevent moisture loss. They stay good for about three to four days in the fridge. - Ideal Storage Containers: Use glass containers for easy reheating. They help keep food from absorbing smells. If you use plastic, make sure it is BPA-free. This keeps your food safe and healthy. - Freezing Instructions: For longer storage, you can freeze the chicken and quinoa. Let them cool to room temperature first. Place them in freezer bags or airtight containers. Label them with the date. They can last up to three months in the freezer. - Thawing and Reheating Recommendations: To thaw, place the frozen bowl in the fridge overnight. Reheat the chicken and quinoa in the microwave or on the stove until hot. Make sure the chicken reaches 165°F (75°C) before serving. - Best Consumed Timeline: For the best taste, eat the bowls within four days of making them. If frozen, consume within three months for the best quality. - Signs of Spoilage: Check for off smells or discoloration. If the chicken feels slimy or the quinoa has an unusual texture, don’t eat it. Always trust your senses to keep your food safe. Yes, you can prepare this dish ahead of time. I recommend marinating the chicken the night before. This gives the chicken more time to soak in those tasty flavors. Cook the quinoa on the same day or the night before too. Store it in the fridge until you are ready to serve. When it’s time to eat, grill the chicken, assemble the bowls, and enjoy! Absolutely! You can swap the chicken for chickpeas or grilled tofu. Both options add protein and flavor. If you choose chickpeas, use canned ones for ease. Just rinse them well and toss them in the marinade. Tofu should be firm and pressed to remove excess water. Then, marinate and grill like the chicken. If you want some heat, add red pepper flakes or hot sauce to the marinade. Start with a small amount, and taste as you go. If you prefer less spice, skip any hot ingredients. You can also balance heat with a dollop of yogurt or tzatziki on top. Yes! You can use rice, farro, or couscous for this dish. Each grain brings its own texture. Cook them according to package instructions. If you choose rice, try brown rice for a nutty flavor. Farro adds a chewy bite, while couscous cooks quickly and makes it easy to enjoy. Pair these bowls with a fresh Greek salad or roasted vegetables. A side of hummus and pita is also great. For a lighter option, serve with a simple cucumber salad. These sides complement the flavors of the chicken and add more color to your meal. In this post, we explored a tasty chicken and quinoa bowl. We covered the key ingredients, cooking steps, and helpful tips. You learned how to make marinated chicken and fluffy quinoa. We discussed variations and storage tips for your meals. As you try this recipe, remember to enjoy the process. Mixing flavors and textures can be fun. Keep it fresh and feel free to experiment. Happy cooking!](https://recipetorch.com/wp-content/uploads/2025/05/cf914d77-5a1b-4e5d-a9b1-4a7be4ded8d5.webp)
Mediterranean Lemon-Dill Chicken Bowls Flavor Boost
Looking for a fresh and tasty meal that’s easy to make? My Mediterranean Lemon-Dill Chicken Bowls are packed with flavor
Looking for a fresh and tasty meal that’s easy to make? My Mediterranean Lemon-Dill Chicken Bowls are packed with flavor
![To make a delicious Slow Cooker Nacho Soup, you need simple, fresh ingredients. Here’s what you will need: - 1 lb ground beef or turkey - 1 medium onion, diced - 2 cloves garlic, minced - 1 can (15 oz) black beans, rinsed and drained - 1 can (15 oz) corn, drained - 1 can (10 oz) diced tomatoes with green chilies - 2 cups beef or chicken broth - 1 packet (about 1 oz) taco seasoning - 1 cup shredded cheddar cheese - 1 cup shredded pepper jack cheese - 1/2 cup sour cream - Tortilla chips, for serving - 2 green onions, sliced (for garnish) - Fresh cilantro, chopped (for garnish, optional) Each ingredient brings its own flavor. The ground meat adds protein, while the beans and corn provide a hearty texture. The diced tomatoes with green chilies add a nice kick. Don't forget the cheese! It melts into the soup, making it creamy and rich. You can find the full recipe to guide you through the cooking process. Enjoy the warmth this soup brings! - Browning the Meat: Start by heating a large skillet over medium heat. Add 1 lb of ground beef or turkey. Cook it for about 6-8 minutes. Stir it often until it turns brown. Make sure to drain any excess fat after cooking. - Sautéing Aromatics: Next, add 1 medium diced onion and 2 minced garlic cloves to the skillet. Sauté these for 3-5 minutes. You want the onion to turn soft and clear. Keep stirring to avoid burning. - Transferring to the Slow Cooker: Once the meat and onions are ready, transfer them to your slow cooker. Add in 1 can of rinsed black beans, 1 can of drained corn, and 1 can of diced tomatoes with green chilies. Pour in 2 cups of beef or chicken broth. - Combining Ingredients: Sprinkle in 1 packet of taco seasoning. Stir everything well to coat the meat and veggies with the spices. - Cooking Times and Settings: Cover your slow cooker. Set it to cook on low for 4-6 hours or on high for 2-3 hours. This lets all the flavors blend together nicely. - Incorporating Cheese and Sour Cream: About 30 minutes before serving, uncover the slow cooker. Stir in 1 cup of shredded cheddar cheese and 1 cup of shredded pepper jack cheese. Mix well until the cheese melts into the soup. After cooking, fold in 1/2 cup of sour cream for a creamy finish. Feel free to check the [Full Recipe] for detailed timing and serving suggestions. Ensuring the perfect texture To get that smooth and creamy soup, add cheese at the right time. Stir in the cheddar and pepper jack about 30 minutes before serving. This ensures they melt perfectly. The sour cream also adds creaminess. Mix it in gently at the end. How to avoid overcooking Set your slow cooker to low for 4 to 6 hours. If you are short on time, use high for 2 to 3 hours. Keep an eye on the cooking time. Too long can make the soup too thick. Flavor enhancement techniques Use fresh herbs to boost flavor. Cilantro, green onions, or even a squeeze of lime can add freshness. You can also adjust the taco seasoning to suit your taste. More spice? Add jalapeños or hot sauce. Best pairings with nacho soup This soup pairs well with fresh tortilla chips. You can also serve it with a side salad or cornbread. For a fun twist, try it with grilled cheese sandwiches for dipping. Presentation ideas Serve the soup in colorful bowls. You can also use bread rolls as bowls for a fun touch. Top with extra cheese, a dollop of sour cream, and fresh herbs for a beautiful finish. Storing leftovers Store leftover soup in an airtight container. It keeps well in the fridge for up to 3 days. For longer storage, freeze it in a freezer-safe bag. Just make sure to leave some space for expansion. {{image_4}} For a vegetarian twist, swap the ground meat with lentils or mushrooms. This change keeps the heartiness while making it plant-based. You can also add more beans, like pinto or kidney, for extra protein. To adjust the spice level, use mild taco seasoning or add fresh jalapeños. If you want more heat, try using spicy pepper jack cheese. This will bring a kick without overwhelming the dish. When it comes to cheese, feel free to mix it up! Use gouda for a smoky flavor, or try a creamy queso fresco for a different taste. Each cheese brings its own flair to the soup. Adding unique toppings can elevate your soup. Try diced avocado for creaminess or pickled jalapeños for tang. Crumbled tortilla chips add a nice crunch, too. Incorporate initial flavors by adding a splash of lime juice or a spoonful of salsa. These small items can brighten the entire dish and make it pop. Substituting broth types can change the flavor entirely. For a lighter soup, try vegetable broth. For a deeper taste, use a rich beef broth. Each choice offers a new angle on the classic recipe. You can find the full recipe for this tasty dish in the article above. To keep your Slow Cooker Nacho Soup fresh, use these tips: - Refrigeration tips: Store the soup in an airtight container. It lasts for about 3 to 4 days in the fridge. Let it cool completely before sealing to avoid condensation. - Freezing instructions: For longer storage, freeze the soup in freezer-safe bags or containers. It stays good for up to 3 months. Remember to leave space for expansion. - How to reheat properly: To reheat, warm the soup on the stove over medium heat. Stir it often until it reaches a nice, hot temperature. You can also use the microwave; heat it in short bursts and stir in between. - Ensuring creaminess upon reheating: If the soup thickens too much, add a splash of broth or water. Stir in a bit of sour cream before serving to keep it creamy and delicious. Feel free to check out the Full Recipe for more details! How to make Slow Cooker Nacho Soup gluten-free? To make your nacho soup gluten-free, use gluten-free taco seasoning. Also, choose gluten-free broth. Most canned beans and corn are gluten-free, but check the labels. Can I use fresh ingredients instead of canned? Yes, you can use fresh ingredients. For example, use fresh tomatoes instead of canned ones. You may need to cook them longer to soften. Fresh corn can also work well, just cook it first. What are the best toppings for nacho soup? Some great toppings include diced avocado, sliced jalapeños, and extra cheese. You can also add salsa or fresh cilantro. Tortilla chips always add a nice crunch. Why is my soup too thick? If your soup is too thick, add more broth. You can also add water to reach your desired consistency. Stir well and let it cook a bit longer. How can I fix an overly salty soup? To fix salty soup, add more liquid. You can use unsalted broth or water. Adding a peeled potato can also absorb some salt. Remove the potato before serving. This blog post covered how to make a delicious slow cooker nacho soup. We discussed the key ingredients, step-by-step instructions, cooking tips, and storage advice. You learned about variations and how to customize flavors. Remember, you can easily adjust the recipe to fit your taste. Enjoy serving it with your favorite toppings. This hearty dish is simple and fun to make. Now, it's time for you to enjoy your creation! Happy cooking!](https://recipetorch.com/wp-content/uploads/2025/05/332f2a1e-cb2f-4dbe-833b-5938bc026e99.webp)
Are you ready to enjoy a warm bowl of Slow Cooker Nacho Soup that’s both hearty and comforting? This simple

Are you ready to impress everyone with a dessert that’s both simple and delicious? The London Fog Cake is a
![- Chicken and Seasoning - 2 boneless, skinless chicken breasts - 2 tablespoons Cajun seasoning - 1 tablespoon olive oil - Pasta and Alfredo Sauce Components - 8 oz fettuccine pasta - 2 tablespoons unsalted butter - 3 cloves garlic, minced - 1 cup heavy cream - 1 cup freshly grated Parmesan cheese - Salt and pepper to taste - Garnishing Elements - Fresh parsley, finely chopped (for garnish) Gather these items before starting. The Cajun seasoning gives the chicken a spicy kick. The heavy cream and Parmesan make the sauce rich and creamy. You can use any pasta you like, but fettuccine works best. Fresh parsley adds a nice color and flavor to the dish. For the full recipe, check out the instructions to bring this dish to life! Searing and Cooking Start by drying the chicken breasts with paper towels. This step helps create a great crust. Next, coat both sides of the chicken with Cajun seasoning. Use your hands for even coverage. In a large skillet, heat the olive oil over medium-high heat. Once hot, add the chicken. Cook each side for about 6-7 minutes. You want a deep blackened crust. When juices run clear, the chicken is done. Remove it from the skillet and let it rest. After a few minutes, slice the chicken into strips. Water Boiling and Salting Technique Fill a large pot with water and add salt. The water should taste a bit like the sea. Bring it to a boil over high heat. Once boiling, add the fettuccine. Stir to prevent sticking. Checking for Al Dente Follow the package instructions for cooking time. Taste the pasta a minute or two before it's done. It should be firm but not hard. When ready, save about ½ cup of pasta water, then drain the rest. Butter and Garlic Sautéing In the same skillet where you cooked the chicken, melt the butter over medium heat. Add the minced garlic and sauté for about 1 minute. You want it fragrant but not burnt. Incorporating Heavy Cream Slowly pour in the heavy cream while stirring. Bring the mixture to a gentle simmer. Adding Parmesan Gradually stir in the grated Parmesan cheese. Keep stirring until the cheese melts and the sauce is smooth. If it’s too thick, add some reserved pasta water to thin it out. Season with salt and pepper to taste. Tossing Pasta with Sauce Add the drained fettuccine to the skillet with the sauce. Toss until the pasta is well coated. Layering Chicken Finally, place the sliced blackened chicken over the pasta. For the full experience, check out the Full Recipe. Enjoy your flavorful dinner delight! Choosing the Right Temperature Start with a hot skillet. This helps the chicken get that great blackened crust. If the pan is too cool, the chicken will not sear well. Aim for medium-high heat. This gives a nice sear while keeping the inside juicy. Avoiding Overcrowding the Pan Cook one or two chicken breasts at a time. If you add too many, the pan will cool down. This leads to steaming instead of searing. Always leave space between the chicken pieces for even cooking. Adjusting Sauce Consistency Keep an eye on the sauce as you cook it. If it’s too thick, add a bit of the reserved pasta water. This will help make it creamy but not too heavy. Stir well to mix in the water evenly. Alternative Cheeses While Parmesan is classic, you can mix other cheeses. Try adding mozzarella for extra creaminess. Or, use Pecorino Romano for a sharper taste. Mixing cheeses can add fun flavors to your Alfredo. Presentation Ideas For a pretty dish, serve the pasta in shallow bowls. Layer the sliced chicken on top. Finish with a sprinkle of fresh parsley. This adds color and makes the plate look more inviting. Pairing with Sides This dish goes great with a fresh salad. A simple green salad balances the richness of the Alfredo. You can also serve it with garlic bread for a comforting touch. Pairing helps create a well-rounded meal. For the full recipe, check out [Full Recipe]. {{image_4}} You can make Blackened Cajun Chicken Alfredo vegetarian by using plant-based proteins. Try using tofu or tempeh as your base. Both options soak up flavors well. Just season them with Cajun spices as you would the chicken. Sauté them until golden brown for a nice texture. Another great option is to use chickpeas. They add protein and a hearty bite to your dish. To amp up the heat, consider adding different peppers. Bell peppers work great for sweetness. If you want more heat, try jalapeños or serrano peppers. Slice them thin and sauté them with garlic in the sauce. This adds a nice kick while still keeping the dish balanced. You can also sprinkle some crushed red pepper flakes for extra spice. While fettuccine is classic, you can switch things up with other pasta types. Penne or rigatoni works well for holding onto the sauce. If you prefer a lighter option, zucchini noodles are great. They add freshness and keep it healthy. Just be mindful of cooking times when using different pastas. Each type will need its own cooking method. For the full recipe, check out the details above. How do I store leftovers? To keep your Blackened Cajun Chicken Alfredo fresh, place it in an airtight container. Make sure to let it cool before sealing. Store it in the fridge for up to three days. This way, you can enjoy it again without losing flavor. What are the best methods to maintain flavor? To reheat your Alfredo, use the stovetop. Warm it gently over low heat. Add a splash of milk or cream to prevent it from drying out. Stir often to keep the sauce smooth. You can also microwave it in short bursts, stirring in between. This helps to evenly warm your meal. Can I freeze the Alfredo sauce separately? Yes, you can freeze the Alfredo sauce on its own. Pour the cooled sauce into a freezer-safe bag or container. Remove as much air as possible to prevent ice crystals. It can last for up to three months. When ready to use, thaw it overnight in the fridge. Reheat on the stove with a bit of cream to restore its creaminess. You can find the Full Recipe for a detailed guide on making this dish. Blackened Cajun Chicken Alfredo is a creamy pasta dish. It features blackened chicken over fettuccine. The chicken gets its flavor from Cajun spices. These spices add heat and depth to the dish. The creamy Alfredo sauce balances the spice well. It makes for a rich and tasty meal that you will love. The total time to make this dish is about 35 minutes. This includes 15 minutes for prep and 20 minutes for cooking. You can have a delicious meal ready quickly! Yes, you can make this dish ahead of time. You can store the chicken and pasta separately. This keeps the chicken from getting soggy. Keep leftovers in the fridge for up to three days. Reheat gently on the stove or in the microwave. Some great sides include garlic bread, salad, or steamed veggies. Garlic bread adds a nice crunch. A fresh salad brightens the meal. Steamed veggies can provide a healthy balance. Enjoy your meal with these tasty pairings! For the full recipe, check out the [Full Recipe]. In this post, we covered how to make Blackened Cajun Chicken Alfredo. We explored key ingredients, from chicken and pasta to the creamy sauce. I shared step-by-step instructions to ensure perfect cooking. We also discussed useful tips for flavor and texture, along with variations to suit different diets. Enjoy this dish with your favorite sides or try the suggested alternatives. Blackened Cajun Chicken Alfredo is a crowd-pleaser sure to impress. Happy cooking!](https://recipetorch.com/wp-content/uploads/2025/05/ebedb3aa-c549-4c6b-a58c-5b8e0734e0ff.webp)
Looking for a bold and tasty twist on dinner? Blackened Cajun Chicken Alfredo is your answer! This dish mixes spicy,
![- 1 pound ground beef - 1 pound ground sausage - 1 cup seasoned breadcrumbs - 1 large egg - 1 tablespoon Cajun seasoning - 1 teaspoon garlic powder - Salt and pepper to taste Ground beef gives the stew a rich taste. Ground sausage adds spices and flavor. Use seasoned breadcrumbs to help bind the meatballs. The egg acts like glue, holding everything together. Cajun seasoning is the star, bringing heat and zest. Garlic powder adds depth, while salt and pepper enhance all the flavors. - 1 large onion, diced - 1 bell pepper (red or green), chopped - 3 cloves garlic, minced - 1 can (14.5 oz) diced tomatoes with juices - 4 cups beef broth - 2 cups okra, sliced - 2 cups corn (fresh or frozen) Onion, bell pepper, and garlic create a wonderful base. They provide sweetness and aroma when sautéed. Diced tomatoes add acidity and texture, while beef broth gives body to the stew. Okra adds a unique texture, and corn brings sweetness. These add-ins make the stew hearty and colorful. - 2 teaspoons Worcestershire sauce - Fresh parsley, finely chopped for garnish - Salt and pepper to taste Worcestershire sauce adds a layer of umami flavor. It enhances the stew's depth. Fresh parsley not only brightens the dish but also adds freshness. Adjust salt and pepper to your liking for the perfect taste. Together, these ingredients make the stew a true comfort food. For the complete recipe, check out the Full Recipe. Start by mixing the meatball ingredients. In a large mixing bowl, combine 1 pound of ground beef and 1 pound of ground sausage. Add in 1 cup of breadcrumbs, 1 large egg, 1 tablespoon of Cajun seasoning, 1 teaspoon of garlic powder, and a pinch of salt and pepper. Mix everything well until it becomes a uniform mixture. Now, shape the mixture into small meatballs, about 1 inch in diameter. This size cooks well and fits nicely in the stew. Next, heat 3 tablespoons of olive oil in a large pot over medium heat. Once the oil is hot, carefully add the meatballs in batches. Avoid overcrowding the pot to ensure they brown nicely. Cook the meatballs for about 5-7 minutes, turning them until they are browned on all sides. Once browned, remove the meatballs from the pot and place them on a plate. In the same pot, without cleaning it, add 1 large diced onion and 1 chopped bell pepper. Sauté these vegetables for about 5 minutes until they soften and become fragrant. Then, add 3 cloves of minced garlic to the pot. Sauté for an additional minute, stirring to keep the garlic from burning. Pour in 1 can of diced tomatoes with juices and 4 cups of beef broth. Stir the mixture well to combine all the flavors. Now it’s time to return the browned meatballs to the pot. Gently add the meatballs back in, along with 2 cups of sliced okra and 2 cups of corn. Stir everything together so that the ingredients are evenly mixed. Bring the stew to a gentle boil. Once boiling, reduce the heat to low. Let the stew simmer uncovered for about 25-30 minutes. Stir occasionally to help the meatballs cook through and blend the flavors. Taste the stew and adjust the seasoning if needed. Serve the stew hot, garnished with fresh parsley for a lovely touch. For the full recipe, check the details above to enjoy this hearty dish! To ensure juiciness in your meatballs, use a mix of ground beef and sausage. This combination adds flavor and moisture. When mixing, avoid overworking the meat. Just combine it until all the ingredients are mixed. Shape the mixture into small balls, about one inch wide. This size helps them cook evenly and stay tender. For even cooking, brown the meatballs in batches. Don't overcrowd the pot. Give each meatball space to sear properly. This step creates a nice crust, sealing in the flavors. After browning, set them aside to finish cooking in the stew. If you want your stew spicier, start with the Cajun seasoning. You can add more or less depending on your taste. A good tip is to begin with one tablespoon and check the flavor. If you want more heat, add extra seasoning gradually. For an extra kick, use hot sauce. Drizzle it in while the stew simmers. This allows the heat to blend with the other flavors. You can try different hot sauces to find your favorite. When serving, use deep bowls for the stew. This makes it easy to enjoy every bite. Ladle the stew into bowls and top it with fresh parsley. This adds a nice color and a burst of flavor. Serve Cajun Meatball Stew with crusty bread on the side. It’s great for dipping. You can also pair it with a simple salad for a complete meal. For an extra touch, consider adding a scoop of rice at the bottom of each bowl. This adds heartiness to the dish. {{image_4}} You can change up the meats in Cajun meatball stew. Try using turkey or chicken instead of beef and sausage. These options are leaner but still taste great. If you want a meatless version, use lentils or chickpeas. These ingredients will add protein and flavor without meat. Want to kick up the flavor? Add smoked sausage or chorizo to the stew. This will add a nice depth of flavor. You can also mix in different vegetables. Try carrots, celery, or zucchini for extra nutrients and taste. The more colors you add, the more fun the dish becomes! You can serve Cajun meatball stew in different ways. One option is to make it a casserole. Just layer the meatballs and veggies in a dish and bake until bubbly. Another choice is to serve it over rice or pasta. This makes a hearty meal that fills you up. The sauce will soak into the grains, creating a comforting dish. Check out the Full Recipe for all the delicious details! To keep your Cajun meatball stew fresh, follow these best practices. First, let the stew cool down to room temperature before storing. This helps prevent condensation. Use airtight containers for storage. Glass containers work great for heat retention and easy reheating. You can also use plastic containers. Just make sure they are BPA-free. If you want to save the stew for later, freezing is a good option. Portion the stew into individual servings for easy meals. Label each container with the date. This way, you know how long it has been in the freezer. For best results, eat the frozen stew within three months. To reheat, thaw it in the fridge overnight. Then, heat it on the stove or in the microwave until hot. In the fridge, your stew will stay fresh for about three to four days. Always check for signs of spoilage. If you see mold or notice a strange smell, it's time to toss it. By following these storage tips, you can enjoy your hearty and flavorful comfort food even after the first meal! For the full recipe, visit the link provided. To add heat, use more Cajun seasoning. You can also add hot sauce while cooking. Start with a little and taste as you go. You can also stir in cayenne pepper for extra heat. Just remember, spice can build up, so adjust slowly. Yes, you can use a slow cooker. First, brown the meatballs in a pan. Then, place them in the slow cooker. Add the sautéed onions, peppers, and other ingredients. Cook on low for 6 to 8 hours or high for 3 to 4 hours. This method makes the flavors richer. The best way is on the stove. Pour the stew into a pot and warm it over low heat. Stir often to prevent sticking. You can also use the microwave. Place it in a bowl and heat in short bursts, stirring in between. Serve with crusty bread for dipping. Rice or cornbread also makes a great side. A fresh salad adds a nice crunch. Pair it with a cold drink like iced tea or a light beer. Cajun Meatball Stew comes from Louisiana. It mixes French, Spanish, and African food styles. Cajun cooking uses local ingredients and bold spices. This dish reflects the rich culture and history of the Cajun people. For the complete recipe with detailed instructions, check out the [Full Recipe]. Cajun Meatball Stew is a tasty dish made with beef, sausage, and veggies. We mixed flavorful ingredients, then shaped and browned the meatballs. Cooking the stew base with sautéed vegetables brought it all together. You can add your own twist with spice levels or different meats. As you enjoy this warm stew, remember it’s versatile. You can store leftovers easily or freeze them for later. This dish has its roots in rich culture. I hope you feel inspired to make your own Cajun Meatball Stew!](https://recipetorch.com/wp-content/uploads/2025/05/7cfe55dc-a58d-4e6f-8489-28f5aa6dbe97.webp)
If you’re looking for a dish that warms you from the inside out, look no further than Cajun Meatball Stew.
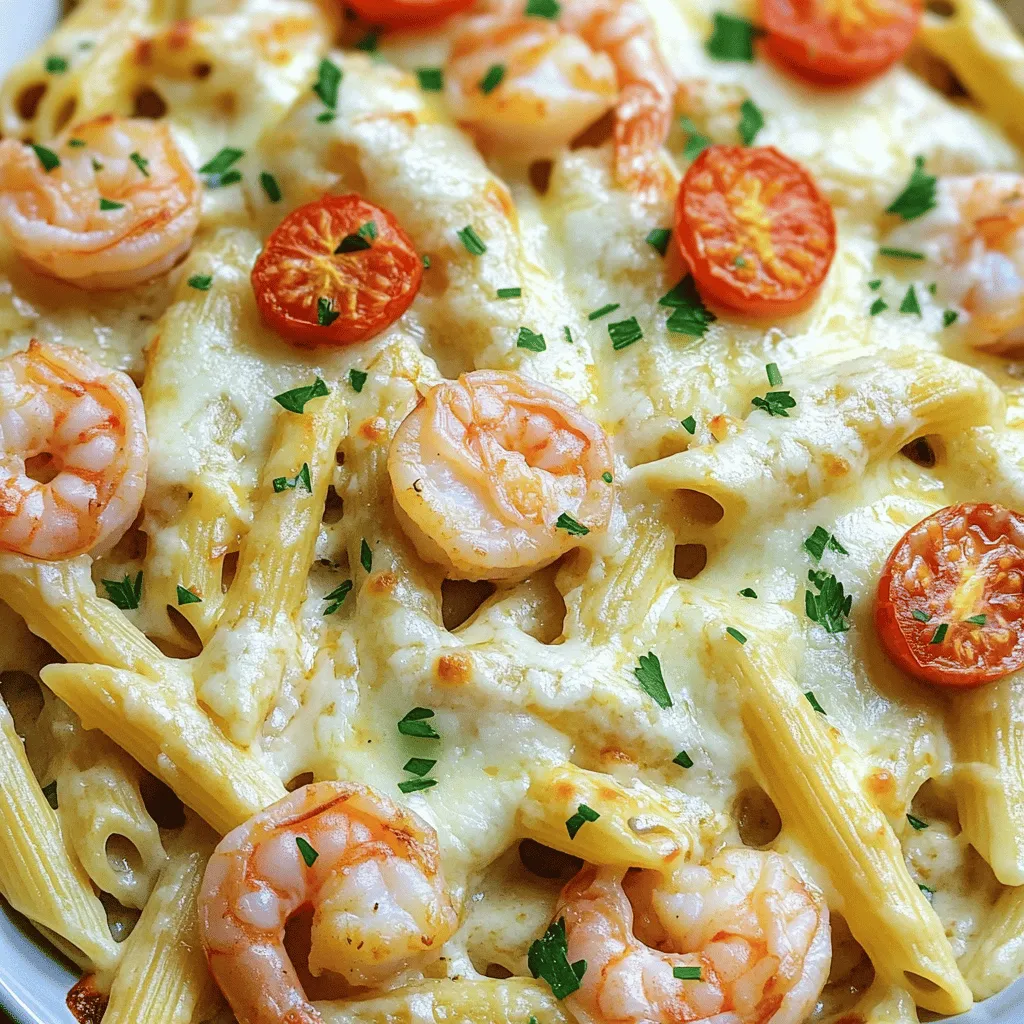
Are you ready to savor a dish that combines rich flavors with easy cooking? This Savory Shrimp Scampi Pasta Bake

Are you ready to enjoy a crispy and flavorful snack? Oven Fried Feta Rolls are the perfect blend of savory
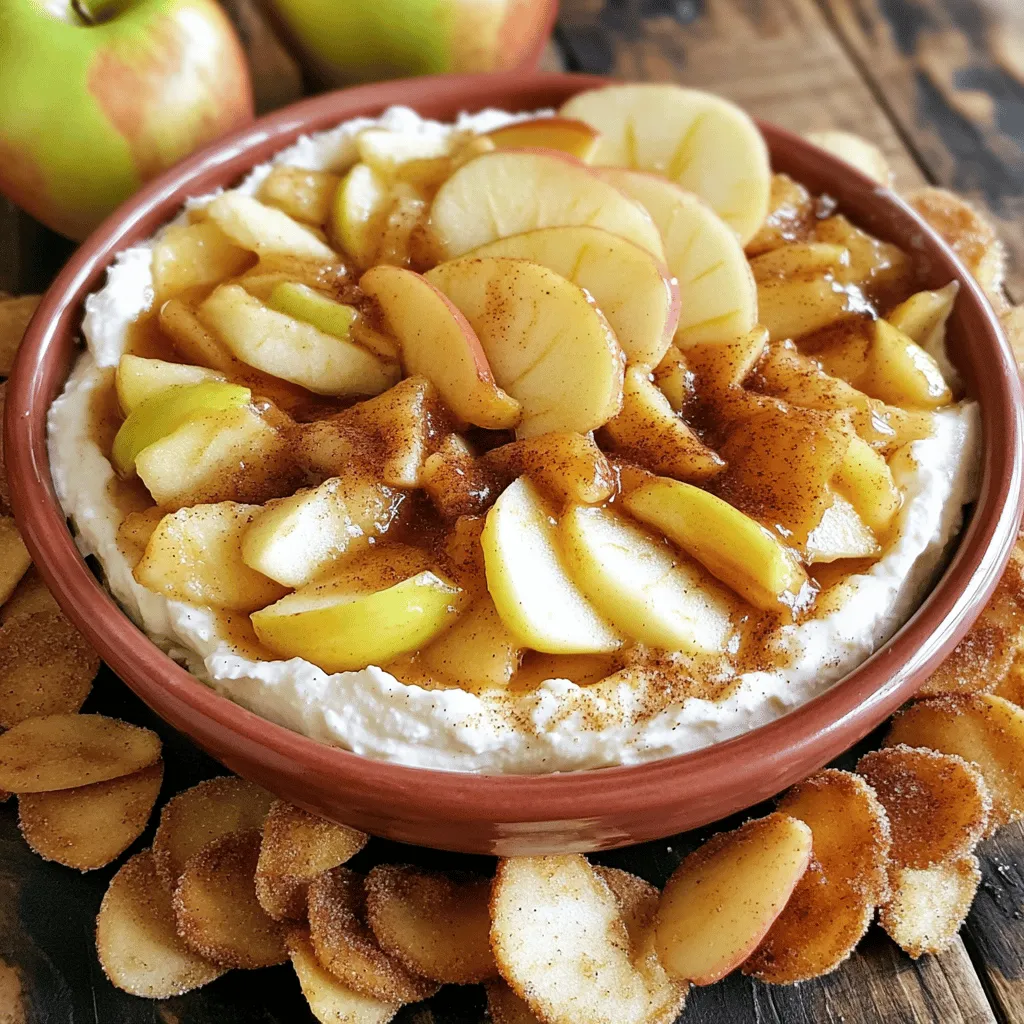
Craving something sweet and fun? My Apple Pie Dip with Cinnamon Chips is the answer! This easy and tasty treat
![- 1 lb ground beef - 4 medium potatoes, peeled and diced into bite-sized pieces - 1 medium onion, finely chopped - 2 cloves garlic, minced - 1 tablespoon Worcestershire sauce - 1 teaspoon paprika - 1 teaspoon dried thyme - Salt and black pepper to taste - 1 cup beef broth - 1 cup frozen mixed vegetables (such as carrots, peas, and corn) - 2 tablespoons olive oil - Fresh parsley, chopped, for garnish When you start your dish, focus on these key ingredients. Ground beef brings a rich flavor and protein. Potatoes add heartiness, making this dish filling. The onion and garlic create a strong base, giving depth to the taste. Flavor enhancers like Worcestershire sauce add umami. Paprika gives warmth, while thyme adds a touch of earthiness. Don’t forget salt and pepper; they are essential for balance. For the additional items, beef broth keeps the dish moist and enhances the flavor. Frozen mixed vegetables add color and nutrients, plus they save time. Olive oil helps sauté the onion and garlic, while parsley brightens the dish as a garnish. Gather these ingredients for a cozy cooking experience. You’ll be on your way to creating a savory comfort dish that warms the heart. For the full recipe, be sure to check out the Beefy Potato Fusion Delight. To start, heat 2 tablespoons of olive oil in a large skillet over medium heat. When the oil is hot, add 1 medium onion, finely chopped, and 2 cloves of minced garlic. Sauté them for about 3-4 minutes. Watch for the onions to turn translucent and fragrant. This step builds a tasty base for your dish. Next, add 1 pound of ground beef to the skillet. Use a spatula to break it into smaller pieces. Cook for about 6-7 minutes. You want the beef to brown nicely and lose all pink color. Season it with a pinch of salt, black pepper, and 1 teaspoon of paprika. Mix everything well to get those rich flavors combined. Now, it’s time to add 4 medium potatoes, peeled and diced into bite-sized pieces. Pour in 1 cup of beef broth to help cook the potatoes. Bring the mixture to a gentle simmer. Cover the skillet with a lid and cook for about 15 minutes. You want the potatoes to be tender enough to pierce easily with a fork. Once the potatoes are tender, add 1 cup of frozen mixed vegetables. This could include carrots, peas, and corn. Stir in 1 tablespoon of Worcestershire sauce and 1 teaspoon of dried thyme for extra flavor. Let the mixture simmer uncovered for an additional 5 minutes. This allows the flavors to blend beautifully. Before serving, taste the dish. Adjust the seasonings with more salt or pepper if needed. Once it’s cooked just right, remove it from the heat. Serve hot, garnished with fresh chopped parsley for a lovely finish. For the full recipe, check out the Beefy Potato Fusion Delight! To make your dish pop, balance your seasonings. Use salt, pepper, and paprika wisely. Too much can overpower the taste. Fresh herbs can enhance flavor too. Try adding chopped parsley or thyme right before serving. They add a burst of freshness. Cook your potatoes until they are soft but not mushy. Cut them into even pieces for uniform cooking. Test doneness by piercing a piece with a fork. If it slides in easily, they are ready. This ensures they blend well with the beef. Prep your ingredients ahead of time. Chop your onions, garlic, and potatoes before you start cooking. This will make the cooking process quick and smooth. Use a large skillet or a Dutch oven. These tools help cook evenly and retain heat well. For more details, check out the Full Recipe. {{image_4}} You can easily switch up the ground beef. Try using turkey or chicken for a leaner dish. They both work well and taste great with potatoes. You can also use plant-based ground meat for a vegetarian option. It adds a nice twist to the meal. When it comes to vegetables, feel free to mix it up! You can use fresh bell peppers, zucchini, or mushrooms. These add different textures and flavors. You can even toss in some spinach at the end for a burst of green. Using a slow cooker can make this dish even easier. Just brown the meat and onions first. Then, add all the ingredients into the slow cooker. Cook on low for 6-8 hours. This lets the flavors blend nicely and the potatoes become very tender. If you prefer oven-baked meals, try this method. After browning the beef and onions, transfer everything to a baking dish. Cover it with foil and bake at 375°F for about 45 minutes. This gives the dish a lovely, roasted flavor. Spicing up your dish can be fun! Consider adding chili powder for heat, or cumin for a warm taste. You can also use fresh herbs like rosemary or oregano to enhance the flavor. Just chop a bit and mix it in before serving. Don't forget about sauces! A splash of hot sauce or a dollop of sour cream can elevate the dish. You can also drizzle some barbecue sauce on top for a sweet and smoky touch. These additions will make your meal stand out. For a complete experience, check out the [Full Recipe] for more details on how to prepare this savory comfort dish! To keep your Ground Beef and Potatoes dish fresh, store leftovers right away. Let it cool to room temperature before placing it in the fridge. Use an airtight container to prevent any odors from mixing. This helps maintain its great taste and texture. If you want to save your savory dish for later, freezing is a smart choice. Portion it into smaller, freezer-safe containers. Make sure to leave some space at the top, as food expands when frozen. When you're ready to eat, thaw it overnight in the fridge. Reheat in a skillet over low heat, stirring often until hot. In the fridge, your dish can last about 3-4 days. Always check for signs of spoilage. If you see changes in color or smell, it's best to throw it away. Trust your senses; they will guide you to safe eating. Yes, you can use sweet potatoes. They add a nice sweetness. Here are some best practices for substitution: - Peel and dice sweet potatoes into similar sizes as regular potatoes. - Adjust cooking time: Sweet potatoes cook faster. Start checking for tenderness after 10 minutes. - Consider flavor: Sweet potatoes bring a different taste. You may want to reduce the salt slightly. This dish pairs well with many sides. Here are some tasty recommendations: - Steamed broccoli adds color and nutrients. - Green salad provides a fresh crunch. - Garlic bread complements the meal nicely. - Rice can soak up the flavors well. Yes, this recipe is great for meal prep. Here are some tips for preparing it in advance: - Cook in batches: Make more and store leftovers. - Use airtight containers: Keep your meals fresh in the fridge. - Reheat carefully: Warm in the microwave or on the stove. Stir well to heat evenly. You can find the Full Recipe to make this delicious dish. Enjoy your cooking! This blog post covered how to make a delicious meal with ground beef and potatoes. We discussed key ingredients like onions, garlic, and herbs that boost flavor. I shared step-by-step instructions for cooking and tips for the best texture. You can customize the recipe with different vegetables and cooking methods. Remember to store leftovers properly to enjoy later. With these insights, you can create a tasty dish your family will love. Happy cooking!](https://recipetorch.com/wp-content/uploads/2025/05/a75671ff-0908-4468-bdd2-06fd2d017343.webp)
If you’re craving a dish that wraps you in warmth and comfort, look no further! Ground Beef and Potatoes is
![- Fresh scallops - Olive oil and unsalted butter - Garlic and cherry tomatoes - Baby spinach and heavy cream - Parmesan cheese and Italian herbs - Seasonings and garnish options Fresh scallops are key for this dish. They should smell like the sea, not fishy. When shopping, look for plump, translucent scallops. These signs mean they are fresh. If you can’t find scallops, shrimp works well too. You can use a mix of vegetables, like zucchini or bell peppers, if you want. Always choose bright, firm veggies for the best taste. When picking tomatoes, choose ripe cherry tomatoes. They should be bright red and firm. If you prefer, you can use sun-dried tomatoes for a richer flavor. Baby spinach should look fresh and crisp. Avoid any wilted leaves. For the cream, heavy cream gives the best richness, but half-and-half can work in a pinch. Lastly, always season to taste. Freshly ground pepper and salt can elevate the dish. You can also add herbs like basil or parsley for extra flavor. For the complete process, check the Full Recipe. To prepare scallops for cooking, start by rinsing them under cold water. This helps to remove any sand or grit. Then, pat them dry with a paper towel. It is important to dry them thoroughly. This ensures a nice sear. Next, season both sides of the scallops with salt and freshly ground pepper. This adds flavor and enhances their natural taste. Now, heat the oil in a large skillet over medium-high heat. Wait until it shimmers, which shows it is hot. This heat is key for searing. If the oil is not hot enough, the scallops will not brown well. For searing scallops, place them in the skillet in a single layer. Avoid overcrowding the pan; this can lead to steaming rather than browning. Sear them for about 2 to 3 minutes on one side. Look for a golden crust to know they are ready to flip. Gently turn them over and sear the other side for another 2 to 3 minutes. They should be opaque when done. Use a slotted spoon to transfer them to a plate and set aside. In the same skillet, reduce the heat to medium. Add the unsalted butter and let it melt. Once it foams, add minced garlic. Sauté for about 1 minute until you smell that lovely garlic scent. Be careful not to brown the garlic, as this can make it bitter. Add the cherry tomatoes and sprinkle the dried Italian herbs. Cook for another 2 to 3 minutes. The tomatoes should soften and release their juices. Next, add the fresh baby spinach. Stir until it wilts, which takes about 1 to 2 minutes. Now, pour in the heavy cream and stir well. Bring the mixture to a gentle simmer. Gradually stir in the grated Parmesan cheese. This makes the sauce creamy and rich. To combine the scallops with the sauce, return them to the skillet. Nestle them gently into the creamy mixture. Let them simmer for another minute. This warms the scallops without overcooking them. Taste the sauce, and adjust the seasoning as needed. Add more salt or pepper to match your flavor preference. For the full recipe, check out the details earlier in this article. This dish is not just simple; it is a flavor-packed meal that impresses. - Best practices for searing scallops: Start with dry scallops. Pat them well to remove moisture. Use a hot skillet with oil. Place them in a single layer. Do not touch them for the first couple of minutes. This helps them get a nice crust. - Preventing overcooking: timing guide: Cook scallops for about 2-3 minutes on each side. They should look golden brown. When they turn opaque, they are done. Remove them from the heat right away to avoid overcooking. - How to achieve optimal creaminess: Start with heavy cream for a rich base. Slowly add Parmesan cheese and stir until smooth. This creates a luscious sauce. If it's too thick, add a splash of pasta water. - Additional flavor boosts with herbs and spices: Adding fresh basil enhances the flavor. You can also mix in a pinch of red pepper flakes for some heat. Experiment with thyme or rosemary for unique twists. - Serving suggestions for a restaurant-style dish: Serve the scallops on a bed of pasta or risotto. Spoon the creamy sauce over the top. This makes the dish look inviting and elegant. - Garnishing ideas to elevate your dish: Use freshly chopped basil as a garnish. You can also sprinkle some extra Parmesan on top. A drizzle of olive oil adds a nice touch. Enjoy the beauty of your dish! {{image_4}} You can mix up the flavors in creamy Tuscan scallops easily. Adding different vegetables gives a fresh twist. Consider using: - Zucchini - Bell peppers - Asparagus These veggies add color and taste. You can also add proteins like shrimp or chicken. Shrimp cooks fast and adds a nice texture. Chicken gives a hearty feel to the dish. Pairing your creamy Tuscan scallops can change the meal. You can serve them over pasta, which soaks up the sauce well. Rice is another great choice if you want something filling. For a lighter option, serve with steamed vegetables. To make a complete meal, consider adding a side salad. A fresh green salad balances the rich flavors of the scallops. If you need gluten-free options, use gluten-free pasta or rice. For dairy substitutes, try coconut cream instead of heavy cream. This keeps the dish creamy and rich without dairy. For low-carb or keto-friendly versions, skip the pasta. Serve your scallops on a bed of sautéed spinach or cauliflower rice instead. This way, you enjoy the dish while sticking to your diet. To get the full recipe and try these variations, check out the [Full Recipe]. When you have leftover Creamy Tuscan Scallops, store them right. Place them in an airtight container. This keeps the scallops fresh and tasty. You can store them in the fridge for 2 to 3 days. If you won’t eat them within that time, consider freezing. To reheat your scallops, use gentle heat. This keeps them tender and moist. You can use a skillet over low heat. Add a splash of cream or broth to keep the sauce creamy. Stir often to avoid sticking. If you choose the microwave, heat in short bursts. Start with 30 seconds. Check and stir between intervals for even heating. Can you freeze Creamy Tuscan Scallops? Yes, but do it with care. First, let them cool completely. Then, place them in a freezer-safe container. Remove as much air as possible to prevent freezer burn. They can last up to 3 months in the freezer. To enjoy, thaw overnight in the fridge before reheating. This helps maintain the quality of your dish. What are the best scallops for this recipe? I recommend using fresh sea scallops. They have a sweet taste and firm texture. Look for scallops that are moist and have a slight sheen. Avoid any with a strong fishy smell. This ensures you get the best flavor in your Creamy Tuscan Scallops. Can I use frozen scallops instead of fresh? Yes, you can use frozen scallops. Just make sure to thaw them completely before cooking. Pat them dry to remove excess moisture. This helps achieve that beautiful golden crust when searing. How do I know when scallops are cooked perfectly? Scallops are done when they turn opaque and have a firm texture. They should also have a nice golden crust on both sides. Typically, this takes about 2-3 minutes per side. If you overcook them, they can become tough. What side dishes pair well with Creamy Tuscan Scallops? These scallops go well with various sides. You can serve them over pasta, rice, or creamy risotto. A fresh salad or steamed vegetables also make great choices. They add color and balance to your meal. Can I make this recipe non-dairy? Yes! You can replace the heavy cream with coconut cream or a non-dairy milk. Choose a creamy variety for the best texture. You can also use a non-dairy cheese to keep it flavorful. How can I make the sauce less rich? To lighten the sauce, reduce the amount of heavy cream. You can also add vegetable or chicken broth. This will give you a delicious flavor while cutting down on richness. In this blog post, we explored how to make delicious Creamy Tuscan Scallops. We covered essential ingredients, preparation steps, and cooking tips. I shared ideas for variations and easy storage methods. Finally, I answered common questions about the dish. To create a standout meal, focus on fresh ingredients and proper cooking technique. Remember, practice makes perfect. With these tips, you’ll impress your family and friends with this tasty dish. Enjoy every bite of your culinary journey!](https://recipetorch.com/wp-content/uploads/2025/05/dcabf9e1-651f-46b1-82e6-c347f60644cd.webp)
If you’re craving a quick, yet luxurious dish, look no further than Creamy Tuscan Scallops. This vibrant recipe combines fresh
