Skip to content
DisclaimerTerms Of UseGDPR PolicyCookie Policy

recipetorch

  • Home
  • Drinks
  • Appetizers
  • Dinner
  • Dessert
  • About
  • Contact
  • Privacy Policy
DisclaimerTerms Of UseGDPR PolicyCookie Policy

Nicole

For these spicy chickpea tacos, gather the following items: - 1 can (15 oz) chickpeas, thoroughly drained and rinsed - 2 tablespoons extra virgin olive oil - 1 teaspoon chili powder - 1/2 teaspoon ground cumin - 1/2 teaspoon smoked paprika - 1/4 teaspoon cayenne pepper (adjust according to your spice preference) - Sea salt and freshly cracked black pepper, to taste - 8 small corn or flour tortillas - 1 ripe avocado, sliced into thin wedges - 1 cup purple cabbage, finely shredded for crunch - 1/4 cup fresh cilantro, roughly chopped - 1 lime, cut into wedges for zesty flavor - Optional: hot sauce, to spice things up Chickpeas are not just tasty; they are also packed with nutrition. They are high in protein and fiber, making them great for full meals. Protein helps build muscles, while fiber aids digestion. Chickpeas also contain important vitamins and minerals, such as iron and magnesium. Eating chickpeas may help you feel full longer, which can aid in weight management. The toppings can take your tacos to the next level. Here are my favorites: - Sliced avocado adds creaminess and healthy fats. - Shredded purple cabbage gives a nice crunch and color. - Fresh cilantro lifts the flavors with its bright notes. - Lime wedges bring a zesty kick that brightens each bite. - Hot sauce can add extra heat for those who love spice. For the full recipe, check out the cooking steps to make these delightful tacos. Start by rinsing the chickpeas. Use a can of chickpeas, about 15 ounces. Drain them well to remove excess liquid. Place them in a medium mixing bowl. Add 2 tablespoons of extra virgin olive oil to the bowl. Then, sprinkle in the spices: 1 teaspoon of chili powder, 1/2 teaspoon of ground cumin, 1/2 teaspoon of smoked paprika, and 1/4 teaspoon of cayenne pepper. Adjust the cayenne to your spice level. Season with sea salt and black pepper to taste. Toss the chickpeas until they are well coated in the oil and spices. Next, heat a non-stick skillet over medium heat. Once hot, add the seasoned chickpeas to the skillet. Cook for 5 to 7 minutes, stirring occasionally. You want them to get slightly crispy on the outside and heated through. The heat will enhance their flavors and texture. This step is key for a great taco experience. While the chickpeas cook, warm your tortillas. You can do this in another skillet or quickly in the microwave for 15-20 seconds. Once warm, take a tortilla and place a generous spoonful of the spicy chickpeas in the center. Add toppings like sliced avocado, shredded purple cabbage for crunch, and chopped cilantro. Squeeze fresh lime juice over the top for a zesty kick. If you like it hot, drizzle your favorite hot sauce over the tacos. Enjoy these flavorful bites! For the full recipe, check out the complete guide. To season chickpeas well, start with a good mix of spices. Use chili powder, cumin, and smoked paprika for depth. Adjust the cayenne pepper to match your spice level. Always taste the mix. Add salt and pepper to enhance the flavor. Make sure every chickpea gets coated. This will give each bite a burst of flavor. Warming tortillas makes them soft and easy to fold. You can heat them in a skillet for about 30 seconds on each side. This method helps bring out their flavor. If you're in a hurry, microwave them for 15 to 20 seconds. Wrap them in a clean kitchen towel to keep them warm and pliable. Serve your tacos on a bright platter. This adds color and makes them look tempting. Use fresh cilantro and lime wedges as garnishes. These not only look nice but also add flavor. For extra fun, offer hot sauce on the side. This allows guests to add spice to their liking. Presenting food well makes it taste better. Enjoy your colorful and tasty Spicy Chickpea Tacos! {{image_4}} You can change the protein in your Spicy Chickpea Tacos. Try black beans for a different flavor. Lentils also work well. They add a nice texture. You can even use shredded chicken or beef for a heartier meal. Just cook them with the same spices for a tasty twist. These tacos shine as vegan and gluten-free. Use corn tortillas if you want to avoid gluten. You can also add plant-based cheese for creaminess. If you love more veggies, add grilled zucchini or bell peppers. They add color and flavor. This keeps your meal light and fresh. Adjust the heat to your taste. If you prefer mild tacos, skip the cayenne pepper. You can use extra smoked paprika instead. This adds flavor without too much heat. For spicy lovers, add more cayenne or hot sauce. You can even try jalapeños for an extra kick. This lets you customize your meal to suit anyone’s taste. Check out the Full Recipe for all the details! To store leftover chickpeas, place them in an airtight container. Make sure the chickpeas are completely cool before sealing. They can last in the fridge for about three to four days. If you want them to stay fresh longer, consider freezing them. Remember to label the container with the date. When you're ready to eat your tacos again, reheating is easy. You can use a skillet on medium heat. Heat the tacos for a few minutes until warm. If you prefer, you can also microwave them. Just wrap them in a damp paper towel. Heat for 30 seconds to one minute. This keeps the tortillas soft. For meal prep, freezing is a great option. First, let the chickpeas cool completely. Place them in a freezer-safe bag or container. Press out any extra air to prevent freezer burn. They can last in the freezer for up to three months. When you’re ready to use them, thaw in the fridge overnight. Then, you can reheat and enjoy your Spicy Chickpea Tacos from the [Full Recipe]. If you want to swap out chickpeas, use black beans or lentils. Both choices add protein and fiber. They also bring a different taste. You can mash the beans for a creamy texture. Cooked lentils can also work well in tacos. Adjust the spices to match your preference. Yes, you can prepare these tacos in advance. Cook the chickpeas and store them in the fridge. They stay fresh for up to three days. Warm them up before serving. You can also prepare the toppings ahead. Just store them separately to keep them fresh. Absolutely! Spicy Chickpea Tacos are packed with nutrients. Chickpeas are rich in protein and fiber. They help keep you full longer. The toppings, like avocado and cabbage, add healthy fats and vitamins. This meal is great for balanced nutrition. You can enjoy it guilt-free. For the full recipe, check the earlier section! In this article, we explored the ingredients for spicy chickpea tacos and their benefits. We covered how to prepare, cook, and assemble these tasty tacos. I shared tips on seasoning and serving to make your meal shine. We also looked at variations for every taste and storage options for leftovers. Overall, spicy chickpea tacos are fun, healthy, and easy to make. Experiment with flavors and enjoy every bite!

Spicy Chickpea Tacos Flavorful and Nutritious Meal

If you crave a meal that’s both flavorful and nutritious, you need to try Spicy Chickpea Tacos! These easy-to-make tacos

To make Chocolate Chip Cookie Dough Bites, you need some key ingredients. Here’s what you will gather: - 1/2 cup unsalted butter, softened to room temperature - 1/2 cup brown sugar, tightly packed - 1/4 cup granulated sugar - 1 teaspoon pure vanilla extract - 1 cup all-purpose flour - 1/4 teaspoon fine sea salt - 1/2 cup semi-sweet chocolate chips These ingredients create the base for your bites. The butter gives them a creamy texture. The sugars add sweetness and help with browning. The flour gives structure, while the salt enhances flavor. You can customize your bites with some fun add-ins. Here are some options: - 1/4 cup mini marshmallows (for extra sweetness) - 1/2 cup finely chopped nuts, like walnuts or pecans (for crunch) Adding mini marshmallows makes the bites chewy and soft. Nuts provide a nice texture contrast. You can mix and match to find your favorite combination. Choosing great ingredients can make your bites even better. Here are some tips: - Butter: Use unsalted butter for better control of salt in your recipe. - Sugars: Opt for light brown sugar for a slight caramel flavor. - Flour: Use all-purpose flour for a balanced texture. - Chocolate Chips: Choose high-quality semi-sweet chocolate for rich flavor. Fresh ingredients lead to tastier bites. Check dates on your flour and sugars. Quality counts when you want to impress! For the full recipe, follow the instructions carefully and enjoy your treats. To make Cookie Dough Bliss Bites, start with your butter. In a medium bowl, cream together the softened butter, brown sugar, and granulated sugar. Use an electric mixer on medium speed for about 2-3 minutes. This step makes the mix light and fluffy. Next, add vanilla extract and stir it in on low speed. Gradually add the flour and salt. Mix slowly until the dough forms, scraping the bowl’s sides when needed. This keeps everything mixed well. Now, fold in the chocolate chips, mini marshmallows, and nuts with a spatula. Make sure they are spread evenly in the dough. With clean hands, scoop out about one inch of dough and roll it into a ball. Place these balls on a parchment-lined baking sheet, leaving space between them. Once all the dough is rolled, cover the baking sheet with plastic wrap. Chill in the fridge for at least 30 minutes. This helps the bites firm up. For a special treat, melt some chocolate in a bowl. Dip each cold dough ball into the melted chocolate. Place them back on the baking sheet. Sprinkle a bit of flaky sea salt on top before chilling for another 15 minutes. Mixing and folding dough can be tricky. Here are some tips to help you: - Use Room Temperature Butter: This helps create a smooth mix. - Mix Gently: When adding chocolate chips and other goodies, mix gently to keep the dough light. - Scrape the Bowl: Always scrape down the bowl to avoid lumps. - Don’t Overmix: Once the dough forms, stop mixing to keep it tender. Storing your Cookie Dough Bliss Bites properly keeps them fresh. After chilling, store them in an airtight container. Place parchment paper between layers to prevent sticking. - Chill Time: Always chill the dough for at least 30 minutes before rolling. - Storage: Keep them in the fridge for up to one week. - Freezing: For longer storage, freeze them for up to three months. Just thaw before eating. These steps will ensure your Cookie Dough Bliss Bites stay delicious and ready to enjoy! For the full recipe, check out the earlier section. To get the best texture in your cookie dough bites, keep a few things in mind. First, make sure your butter is soft but not melted. This helps create a creamy base. Second, mix the dough just until combined. Over-mixing can make the bites tough. Finally, chill the dough before rolling it into balls. This step firms it up, giving you a perfect bite. You can easily customize these cookie dough bites to fit your taste. Want a nutty flavor? Add chopped walnuts or pecans. For a sweeter treat, mix in mini marshmallows. You can also try flavored extracts, like almond or coconut, to change up the profile. If you love dark chocolate, swap semi-sweet chips for dark chocolate ones. The options are endless! Avoid these common mistakes to ensure your cookie dough bites turn out great. First, don’t skip the chilling step. Chilling keeps the dough from spreading too much. Second, measure your flour correctly. Too much flour can dry out the dough. Lastly, be careful not to let the dough sit out for too long. This can cause it to lose its shape and texture. Follow these tips, and you'll create delicious cookie dough bites every time. For the full recipe, check out the details above! {{image_4}} You can change the flavor of your cookie dough bites easily. Add cocoa powder for a rich chocolate flavor. Use different types of chocolate chips, like dark or white, for a twist. If you love nuts, mix in chopped walnuts or pecans for crunch. You can also add a pinch of cinnamon or nutmeg for warmth. Experimenting lets you create your own favorite blend! You can make these bites gluten-free. Just swap regular flour for almond or coconut flour. For a vegan version, use coconut oil instead of butter. Use maple syrup instead of sugar for sweetness. Replace chocolate chips with dairy-free options. These changes keep the treats tasty but make them fit different diets. Serving these bites can be fun! Try stacking them in a jar for a pretty look. Drizzle melted chocolate over them for extra flair. You can serve them with fresh fruit or a scoop of ice cream. Pair with hot coffee or cold milk for a yummy snack. These bites are great for parties or just a cozy night at home. For the full recipe, check out Cookie Dough Bliss Bites! Store your cookie dough bites in an airtight container. This keeps them fresh and tasty. If you stack them, place parchment paper between layers. This prevents them from sticking together. Always store them in the fridge if you plan to eat them soon. When stored properly, cookie dough bites can last about one week in the fridge. You can enjoy them fresh during this time. If they start to dry out, they may lose their yummy taste and texture. To keep them longer, freeze the bites. Place them on a baking sheet first. This helps them hold their shape. Once frozen, transfer them to a freezer bag. They can last up to three months in the freezer. To enjoy, just thaw them in the fridge overnight. For the full recipe, check out the details above. To make Cookie Dough Bliss Bites safe, use heat-treated flour. Regular flour can contain bacteria. To heat-treat, spread flour on a baking sheet and bake at 350°F for 5 minutes. Let it cool before mixing it with other ingredients. This process makes your bites safe to enjoy without baking. Yes, you can use alternative sweeteners. Options like coconut sugar or stevia work well. Remember that these sweeteners may change the taste or texture slightly. Use them in equal amounts to sugar for best results. Always taste the dough to see if it meets your sweetness needs. You can find pre-made Chocolate Chip Cookie Dough Bites at many grocery stores. Check the frozen section for brands like Edoughble or Doughp. Some local bakeries also sell them. If you want, you can make your own at home with the full recipe for a fresh taste! Making Chocolate Chip Cookie Dough Bites is simple and fun. We covered key ingredients, step-by-step instructions, and tips for perfect bites. Don't forget to customize flavors and avoid common mistakes. Proper storage will keep them fresh longer. Enjoy these treats at your next gathering or snack time. With a bit of creativity, you can make them your own. Happy baking!

Chocolate Chip Cookie Dough Bites Delightful Treat

Who doesn’t love the taste of chocolate chip cookie dough? These Chocolate Chip Cookie Dough Bites are a delightful treat

- 1 cup red lentils, thoroughly rinsed and drained - 1 can (14 oz) full-fat coconut milk - 1 tablespoon coconut oil - 1 medium onion, finely chopped - 3 cloves garlic, minced - 1 tablespoon fresh ginger, finely grated - 1 medium carrot, diced - 1 bell pepper, chopped - 1 cup spinach, fresh or frozen - 2 teaspoons curry powder - 1 teaspoon turmeric powder - 1 teaspoon cumin seeds - Sea salt and freshly ground black pepper, to taste - Fresh cilantro leaves, for garnish - Lime wedges, for serving When I make Coconut Curry Lentil Soup, I love using red lentils. They cook fast and add a nice texture. The full-fat coconut milk gives the soup a rich, creamy base. Coconut oil adds a lovely hint of sweetness and depth. For the vegetables, I always start with a finely chopped onion. It creates a great flavor. Minced garlic and fresh ginger are key players, too. They add warmth and spice. I like to throw in a diced carrot and chopped bell pepper for color and crunch. Spinach is my go-to for greens. You can use fresh or frozen, and it wilts nicely. The spices make this soup sing. Curry powder brings warmth. Turmeric adds a golden hue and health benefits. Cumin seeds give an earthy flavor. I finish with sea salt and black pepper to taste. For garnish, fresh cilantro leaves and lime wedges brighten the dish. You can find the full recipe at the end of this article. It’s a comforting and satisfying meal you’ll want to make again and again. Sautéing the aromatics and spices Start by heating the coconut oil in a large pot over medium heat. Once it melts, add the chopped onion. Sauté the onion for about five minutes until it turns soft and slightly golden. Next, add the minced garlic and grated ginger. Stir for two minutes to let the nice smells fill your kitchen. Now, sprinkle in the curry powder, turmeric, and cumin seeds. Mix them in well and let them toast for a moment. This step builds deep, rich flavor in your soup. Adding vegetables and lentils After toasting the spices, pour in the vegetable broth. Scrape the bottom of the pot to lift any tasty bits. Then, bring the mixture to a gentle simmer. Once it simmers, add the rinsed red lentils, diced carrot, and chopped bell pepper. Stir everything together and cover the pot. Let it simmer for about twenty minutes. This will cook the lentils and soften the veggies. Simmering the soup After twenty minutes, check the lentils to see if they are soft. If they are, it’s time to add the coconut milk and spinach. Stir them in gently and let the soup cook for another five minutes. This will heat everything through and make the spinach wilt nicely. Adding coconut milk and spinach The coconut milk gives the soup a creamy texture. It also adds a sweet, rich flavor that balances the spices. If you want a thicker soup, let it simmer a bit longer. Seasoning to taste Now, taste the soup and add sea salt and black pepper as needed. Adjust the spices to fit your liking. This is your chance to make it just right for you. Serving suggestions Serve the soup hot in bowls. Garnish each bowl with fresh cilantro leaves for a pop of color and taste. Offer lime wedges on the side. Squeezing lime juice over the soup brightens the flavors even more. Enjoy your delicious Coconut Curry Lentil Soup! For the full recipe, check the complete guide above. To boost the flavor of your coconut curry lentil soup, consider adding extra spices. A pinch of cayenne pepper adds heat. You can also try garam masala for a deeper taste. Using homemade vegetable broth makes a big difference. It adds rich flavor compared to store-bought options. The perfect soup consistency is key. If you like a creamy soup, blend part of the soup after cooking. For a chunkier texture, keep the lentils and veggies whole. You can also add more broth if it gets too thick or let it simmer longer for a thicker soup. Toppings can take your soup to the next level. Fresh cilantro adds brightness. A drizzle of coconut cream gives richness. You can serve it with crusty bread, naan, or pita. These breads soak up the soup well and make each bite more enjoyable. {{image_4}} You can easily change the type of lentils in this soup. Red lentils cook quickly and break down well, but you can try green or brown lentils too. They add a different texture and flavor. You might need to adjust the cooking time if you switch. Seasonal vegetables can also change your soup. In winter, use root veggies like parsnips or sweet potatoes. In summer, add zucchini or fresh tomatoes. These swaps keep your soup fresh and exciting. Adjusting the spice levels makes the soup perfect for you. If you like heat, add more curry powder or a pinch of cayenne. If you prefer mild, cut back on the spices. This recipe is great for both vegetarians and vegans. To make it vegan, just ensure your vegetable broth is plant-based. You can still enjoy the rich flavors without any animal products. Want to boost the protein? Tofu works great in this soup. Just cut it into cubes and add it when you add the lentils. Cook until heated through. You can also use chicken for a meaty option. Cook pieces of chicken in the pot before adding other ingredients. If using beans, black beans or chickpeas are excellent choices. They add creaminess and flavor. For the full recipe, check out the detailed instructions above. To store leftover coconut curry lentil soup, let it cool first. Then, place it in an airtight container. This keeps it fresh and tasty. The soup lasts about 3 to 5 days in the fridge. For long-term storage, you can freeze the soup. Pour it into freezer-safe containers, leaving some space at the top. This allows the soup to expand as it freezes. It can last for up to 3 months in the freezer. When you want to eat it, thaw the soup overnight in the fridge before reheating. The best way to reheat the soup is on the stove over low heat. Stir it often to keep it smooth. If you use a microwave, heat in short bursts, stirring in between. To prevent coconut milk from separating, add a splash of water or broth while reheating. This keeps the soup creamy and delicious. Yes, you can use different types of curry powder. Each type brings unique flavors. For instance, sweet curry powder has a milder taste. Hot curry powder adds heat and spice. You can also blend curry powders for a custom flavor. Experimenting is part of the fun! Yes, this soup is gluten-free. The main ingredients like lentils and vegetables do not contain gluten. Always check the broth label to ensure it is gluten-free. This soup is perfect for those with gluten sensitivities. Absolutely! This soup is great for meal prep. You can make it a day or two ahead of time. Just store it in the fridge. When ready to eat, reheat it on the stovetop. Add a splash of broth if it thickens too much. If you need a substitute for coconut milk, try almond milk or cashew cream. Both add creaminess. However, they will change the flavor slightly. You can also use soy milk for a dairy-free option. This blog post covered a delicious lentil soup recipe. We explored the ingredients, from lentils and coconut milk to spices and fresh veggies. I shared simple steps to prepare, cook, and serve. Tips offered ways to enhance flavor and adjust texture, while variations showed how to customize. Storage info ensures leftovers last. Remember, you can swap ingredients and adjust flavors to fit your taste. Enjoy making this soup; it’s easy and satisfying!

Coconut Curry Lentil Soup Comforting and Satisfying Meal

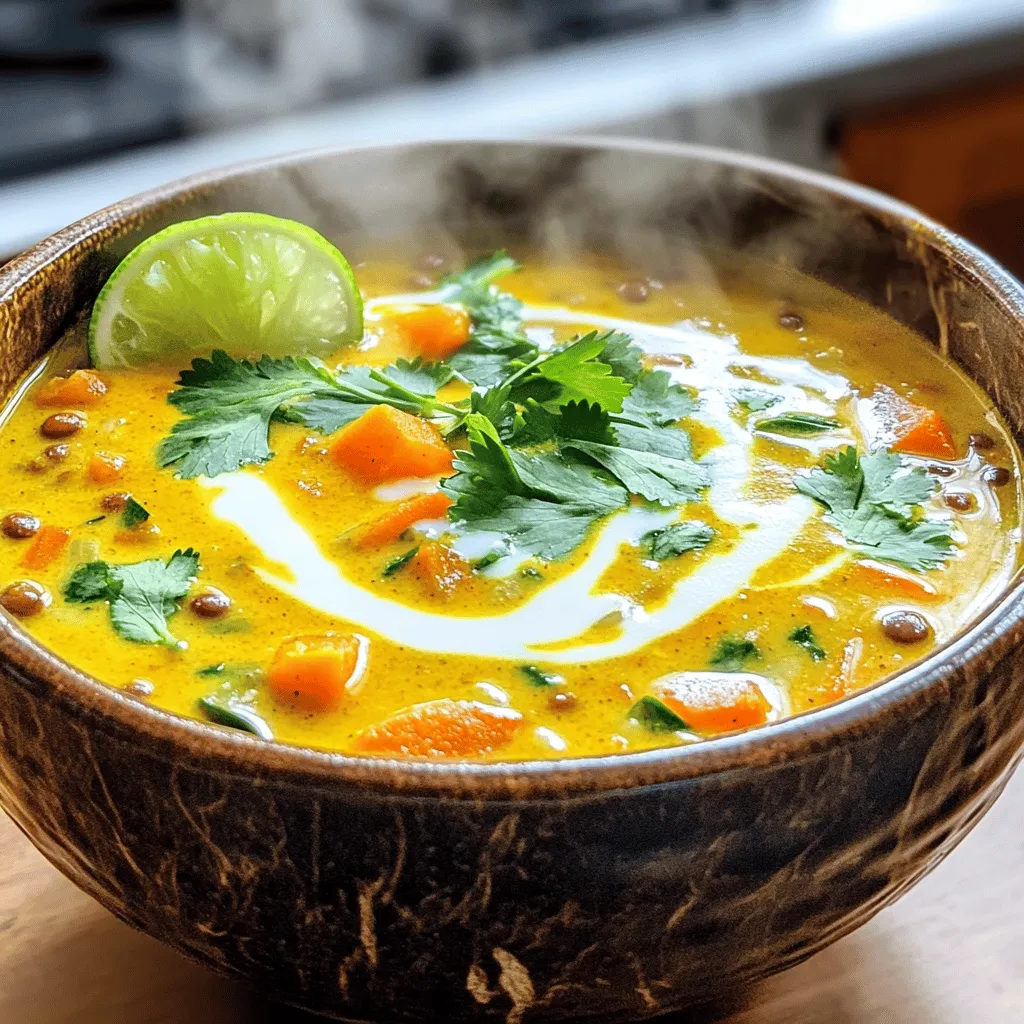
Welcome to the warm embrace of Coconut Curry Lentil Soup! This dish packs flavor and comfort in every spoonful. With

- 2 pounds baby potatoes - 3 tablespoons honey - 3 tablespoons Dijon mustard - 2 tablespoons extra virgin olive oil - 1 teaspoon garlic powder - ½ teaspoon smoked paprika - Sea salt and freshly cracked black pepper - Fresh parsley for garnish When I make honey mustard roasted potatoes, I focus on fresh, simple ingredients. The baby potatoes are the star of the dish. They stay tender inside while getting crispy outside. You want to pick potatoes that are about the same size for even cooking. I use honey and Dijon mustard to create a sweet and tangy glaze. The honey adds a nice sweetness, while the mustard brings a bit of sharpness. Extra virgin olive oil helps the potatoes roast beautifully. It gives them that lovely golden color. Next, I add seasonings to boost the flavor. Garlic powder adds depth, and smoked paprika gives a nice touch of smokiness. I like to finish with sea salt and freshly cracked black pepper to bring out all the flavors. A sprinkle of fresh parsley at the end adds a pop of color and a fresh taste. This dish is not just tasty; it also looks beautiful on a plate. You can find the full recipe [here](#). 1. Preheat the oven to 400°F (200°C). This helps the potatoes roast well. 2. In a large bowl, mix honey, Dijon mustard, olive oil, garlic powder, smoked paprika, salt, and pepper. Stir until smooth. 1. Take the halved baby potatoes and toss them in the honey mustard mix. 2. Ensure each potato is coated well. This gives a great flavor. 1. Line a baking sheet with parchment paper for easy cleanup. 2. Arrange the potatoes cut side down on the sheet. 3. Roast in the oven for 25-30 minutes. Flip them halfway through for even cooking. 4. When done, they should be golden brown and tender. 5. Let them cool for a few minutes before serving. 6. Sprinkle freshly chopped parsley on top for color. Follow the [Full Recipe] for complete details on this dish. To get the best texture, flip the potatoes halfway through cooking. This step helps them brown evenly. If you skip this, some parts may burn while others stay pale. It’s a simple trick that makes a big difference. Using parchment paper is another great idea. It keeps the baking sheet clean and helps the potatoes crisp up nicely. Plus, it makes cleanup a breeze. You won't have to scrub away at stuck-on bits later. To take the flavor up a notch, add herbs or spices. Fresh thyme or rosemary can work wonders. You might try a pinch of chili flakes for heat. If you like things sweet or tangy, adjust the honey and mustard. More honey gives you sweetness, while extra mustard boosts tanginess. Play around until you find the perfect mix for your taste. For a beautiful presentation, serve the potatoes in a rustic wooden bowl. A simple white platter also makes their golden color pop. To make it even nicer, sprinkle more parsley on top just before serving. You can also add a small bowl of extra honey mustard on the side. This gives everyone a chance to dip and adds a fun touch to each bite. {{image_4}} You can use different types of potatoes for this dish. Red potatoes are small and creamy. They hold their shape well. Yukon Gold potatoes are another great choice. They have a buttery flavor and creamy texture. Each type brings its own taste and style to the dish. Experiment with what you like best! You can change the flavor of these potatoes easily. For a sweet and spicy version, add a pinch of cayenne pepper or red pepper flakes. This adds a nice kick. You can also infuse your honey mustard mixture with fresh herbs. Try rosemary, thyme, or dill for a fresh taste. These tweaks make each batch special. If you want a vegan version, use maple syrup instead of honey. It gives a nice sweetness. For a gluten-free option, just ensure your mustard is gluten-free. This dish stays tasty and satisfying, no matter your diet. You can enjoy honey mustard roasted potatoes with these easy adjustments. To keep your honey mustard roasted potatoes fresh, place them in an airtight container. Make sure they cool down first. Store them in the fridge for up to three days. The key is to avoid moisture, which can make them soggy. For the best taste and texture, reheat your potatoes in the oven. Preheat your oven to 350°F (175°C). Spread the potatoes on a baking sheet. Heat them for about 10-15 minutes. This method helps restore their crispiness. You can also use a microwave, but they might lose their crunch. You can freeze honey mustard roasted potatoes, but they may lose some texture. To freeze, let them cool completely. Then, place them in a freezer-safe bag. Squeeze out the air and seal the bag. They can stay frozen for up to three months. When ready to eat, thaw them in the fridge overnight before reheating. To make honey mustard, mix honey and mustard. Start with equal parts. Here’s a simple recipe: - 1 tablespoon honey - 1 tablespoon Dijon mustard Combine them in a bowl. Stir until smooth. Adjust the taste as needed. You can add more honey for sweetness or more mustard for a kick. This quick mix enhances your roasted potatoes. Honey mustard roasted potatoes pair well with many dishes. Here are some great options: - Grilled chicken - Roasted vegetables - Beef or pork chops - A fresh green salad These dishes bring out the potato's sweet and tangy flavor. They create a balanced meal. Yes, you can use regular mustard. The taste will change a bit. Regular mustard is more sharp and less sweet. If you like a stronger taste, it can work well. Try it out and see if you like the change! This blog post guided you through making honey mustard roasted potatoes. First, I shared the key ingredients and provided detailed steps for perfecting the dish. I also included tips for the best texture and flavor, plus ideas for variations and presentation. Lastly, I covered storage and reheating to keep your potatoes delicious. Incorporate your favorite herbs or spices to make it yours. Enjoy cooking and sharing these tasty potatoes!

Honey Mustard Roasted Potatoes Flavorful and Easy Dish

Get ready to elevate your dining experience with my Honey Mustard Roasted Potatoes! This dish is not only flavorful but

To make Garlic Parmesan Roasted Carrots, you need a few simple items: - 1 pound young carrots, peeled and trimmed - 3 tablespoons extra virgin olive oil - 4 cloves garlic, finely minced - 1/2 cup freshly grated Parmesan cheese - 1 teaspoon dried thyme - 1 teaspoon sea salt - 1/2 teaspoon freshly ground black pepper - A handful of fresh parsley, chopped for garnish These ingredients work together to create a tasty side dish. Using fresh ingredients is key to a great meal. Fresh carrots bring a sweet, crunchy texture. They also add a vibrant color to your plate. Fresh garlic gives you bold flavor and aroma. Fresh Parmesan melts nicely and adds creaminess. When you choose fresh items, you make the dish taste better. Fresh ingredients also provide more nutrients. This means you enjoy better flavor and health benefits. If you have food allergies, you can still enjoy this dish. Here are some easy swaps: - For dairy-free, try a vegan Parmesan or nutritional yeast. - If you cannot have gluten, check your Parmesan for gluten-free labeling. - Use olive oil alternatives like avocado oil if you have an allergy to olive oil. These substitutions let everyone enjoy Garlic Parmesan Roasted Carrots. You can find the full recipe in the article to guide your cooking! First, wash your young carrots well. Peel them to remove the skin. Trim off the tops and tails. This step makes them look nice and clean. Cut the carrots into even pieces. Aim for about 2 to 3 inches long. This helps them cook evenly. Grab a large mixing bowl. Place the cut carrots into this bowl. Drizzle in the olive oil and toss them well. Make sure every carrot is coated lightly in oil. Next, add the minced garlic, dried thyme, sea salt, and black pepper. Toss the mixture again. You want the flavors to mix fully over all the carrots. Now, line a baking sheet with parchment paper. Spread the carrots out in a single layer. This space helps them roast well. Place the baking sheet in your preheated oven at 425°F (220°C). Roast the carrots for 20 to 25 minutes. Halfway through, stir them gently. This ensures they cook evenly. When they are tender and caramelized, remove them from the oven. Sprinkle the grated Parmesan cheese on top. Toss them gently to coat. Return them to the oven for 2 to 3 minutes. This melts the cheese slightly and adds great flavor. Finally, sprinkle fresh parsley on top before serving. Enjoy your tasty Garlic Parmesan roasted carrots as a delightful side dish! For the full recipe, check out the instructions above. To get that sweet, golden color, you need the right heat. Set your oven to 425°F (220°C). This high temperature helps the carrots brown well. Spread the carrots out in a single layer on the baking sheet. Avoid crowding them; give them space to breathe. Stir them halfway through roasting to ensure even cooking. This will help them caramelize nicely and develop a rich flavor. If you have leftovers, store them in an airtight container. Let the carrots cool before sealing them up. They can last in the fridge for about 3-5 days. When you're ready to eat them, reheat in the oven. This keeps them crispy and tasty. Avoid microwaving, as it can make them soggy. Using the right tools makes a big difference. A sturdy baking sheet is key. Choose one with a rim to catch any juices. Parchment paper helps with sticking and cleanup. A mixing bowl for tossing the carrots in oil and spices is also handy. Finally, a good set of tongs will help you flip the carrots gently while they roast. For the full recipe, check out the previous sections. {{image_4}} If you like heat, add chili flakes to your carrots. Start with a pinch and mix it in. This small change gives a nice kick. You can adjust the amount to fit your taste. The heat balances well with the garlic and cheese, making every bite exciting. Try this if you enjoy spicy dishes! Parmesan is classic, but you can try other cheeses too. Grated Pecorino Romano adds a stronger flavor. Feta cheese gives a creamy touch. Vegan cheese is great for a dairy-free option. Just sprinkle your choice over the hot carrots for a tasty twist. Each cheese will change the flavor and feel of the dish. Carrots are fantastic, but don’t stop there! You can use parsnips, beets, or sweet potatoes. Each vegetable brings its unique taste. For example, beets add a sweet, earthy flavor and vibrant color. Just cut them to the same size as carrots for even cooking. This way, you can enjoy a mix of flavors in one dish. Remember, every root vegetable has its charm! For the full recipe, check out the details provided earlier. After you make Garlic Parmesan Roasted Carrots, let them cool first. Place the cooled carrots in an airtight container. Store them in the fridge for up to four days. This helps keep the flavors fresh. When you want to enjoy them again, just pull them out of the fridge. You can freeze these tasty carrots if you have leftovers. First, let them cool completely. Next, pack them in a freezer-safe bag. Try to remove as much air as possible to prevent freezer burn. These carrots can stay fresh for up to three months in the freezer. When you're ready to eat, thaw them in the fridge overnight. Reheating Garlic Parmesan Roasted Carrots is easy! You can use the oven for the best results. Preheat your oven to 350°F (175°C). Spread the carrots on a baking sheet. Warm them for about 10-15 minutes, or until heated through. You can also use the microwave for a quick option. Place the carrots in a microwave-safe dish and heat in 30-second intervals until warm. Enjoy them just like you did when they were fresh! For the full recipe, check out the details above. Yes, you can use frozen carrots, but fresh carrots are best. Frozen carrots may not roast as well and can become mushy. If using frozen, thaw them first and pat them dry. This helps avoid excess moisture. Roasting will take longer, so keep an eye on them. To make Garlic Parmesan Roasted Carrots vegan, swap out the cheese. Use nutritional yeast for a cheesy flavor or a vegan cheese substitute. Ensure that the olive oil is pure and free from animal products. This way, you keep the dish tasty while sticking to vegan choices. Garlic Parmesan Roasted Carrots pair well with many dishes. Try serving them alongside roasted chicken, grilled fish, or a hearty pasta. They also go great with veggie burgers or quinoa salads. The bright flavor of the carrots adds a nice touch to any meal. For the full recipe, check the detailed instructions above. Using fresh ingredients really makes a difference in your dish. You learned the steps to prep and roast carrots perfectly. Additionally, I provided tips to store leftovers safely and achieve the best caramelization. You can add different spices or vegetables for fun twists. Remember, reheating is easy! This recipe is simple and offers lots of options. Enjoy your Garlic Parmesan Roasted Carrots, and don't be afraid to experiment!

Garlic Parmesan Roasted Carrots Tasty Side Dish

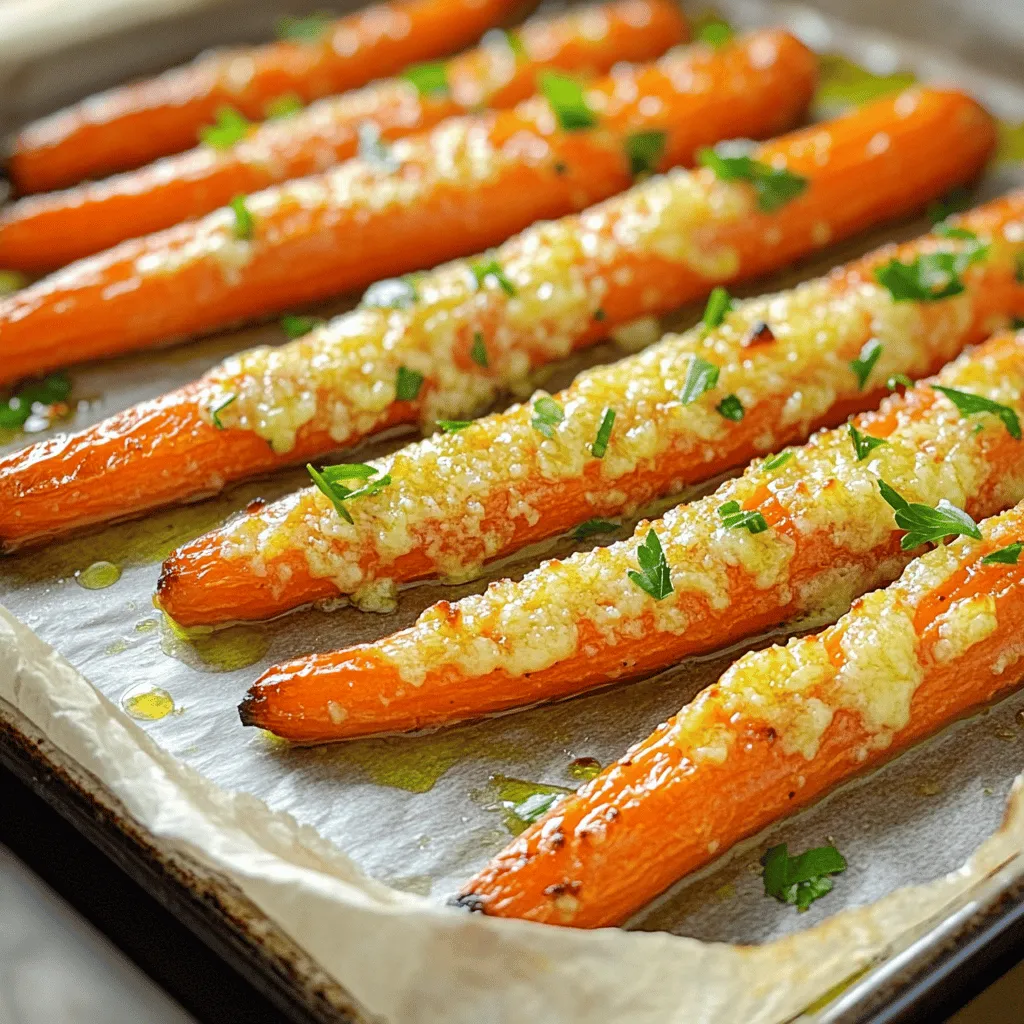
Are you looking for a side dish that’s both tasty and easy to make? Garlic Parmesan Roasted Carrots have you

To make a peach smoothie bowl, you need fresh and tasty items. Here’s what you will need: - 2 ripe peaches, pitted and sliced - 1 frozen banana - 1/2 cup Greek yogurt - 1/2 cup almond milk (or any milk of your choice) - 1 tablespoon honey or maple syrup (to taste) - 1/4 teaspoon pure vanilla extract These key ingredients provide a sweet and creamy base. The peaches add a juicy flavor, while the frozen banana gives a nice chill. Greek yogurt adds protein, and almond milk keeps it light. You can switch up the recipe with optional ingredients. Here are a few ideas: - Spinach or kale for a green boost - Avocado for extra creaminess - Protein powder for a nutritional kick Feel free to mix and match. This way, you can create a bowl that you truly enjoy. Toppings bring your smoothie bowl to life. Here are some great options: - Granola for crunch - Sliced almonds for texture - Chia seeds for nutrition - Coconut flakes for tropical flair - Fresh berries like strawberries, blueberries, or raspberries These toppings not only add flavor but also make your bowl look amazing. You can get creative with how you arrange them. For the full recipe, check out the details above. Start by gathering your ingredients. You need ripe peaches, a frozen banana, Greek yogurt, almond milk, honey or maple syrup, and vanilla extract. Slice the peaches and set them aside. This will help you mix them easily later. Next, add all your ingredients into a blender. Place the sliced peaches, frozen banana, Greek yogurt, almond milk, honey, and vanilla in the blender. This mix gives the smoothie bowl its creamy base. Blend your mix on high speed. Keep blending until the mixture turns smooth and creamy. If it feels too thick, add more almond milk. Just a bit at a time! Scrape down the sides of the blender if needed. This ensures everything blends well. Once you reach the right consistency, the fun begins. Pour the smoothie into a shallow bowl. Use a spoon to spread it evenly. This makes it look nice and inviting. Now, it’s time to make your bowl beautiful. Start with a layer of granola for a crunchy texture. Then, add sliced almonds for an extra bite. Sprinkle some chia seeds on top for added nutrition. Next, arrange fresh berries on your bowl. Strawberries, blueberries, or raspberries make it colorful and fun. Finally, dust the top with coconut flakes to enhance that tropical vibe. For the best look, use a wide, shallow bowl. This allows your toppings to shine. You can add a mint leaf or extra slice of peach on the side for a nice touch. Enjoy your Peach Paradise Smoothie Bowl! For the complete recipe, check out the Full Recipe. To make the best peach smoothie bowl, choose ripe peaches. Look for peaches that feel slightly soft when you squeeze them. Their skin should be bright and have a sweet, fruity smell. If you find hard peaches, let them sit at room temperature for a few days. This helps them ripen fully. Fresh peaches bring great flavor and nutrition to your bowl. Sweetness is key to a good smoothie bowl. Start with the natural sweetness of ripe peaches. You can add honey or maple syrup to boost this. Always add a little at a time, tasting as you go. If your smoothie is too sweet, add a bit of Greek yogurt to balance it. This keeps the flavor bright without overpowering it. The right texture makes your smoothie bowl enjoyable. Start with a frozen banana for a creamy base. Use Greek yogurt for extra richness. If your mixture is too thick, add almond milk slowly. Blend until you reach your preferred creaminess. You want it smooth but not watery. A thicker base will hold your toppings well and make every bite satisfying. {{image_4}} You can easily make a vegan peach smoothie bowl. Just swap Greek yogurt for a plant-based option. Use almond yogurt or coconut yogurt. These alternatives keep the bowl creamy and rich. You still get that delicious peach flavor. Follow the same recipe steps as before. Blend everything until smooth, and enjoy! Want to sneak in some greens? Spinach or kale works great in your peach smoothie bowl. They add nutrients without changing the taste much. Start with a small handful. Blend it in with your peaches and banana. If you like the taste, you can add more next time. This way, you can boost your vitamins and minerals easily! You can make your peach smoothie bowl even more exciting with flavors. Add spices like cinnamon or nutmeg for warmth. A pinch of ginger gives a nice kick, too. You can also try different extracts. Almond or coconut extract adds a new twist. Just use a little, as these flavors are strong. Experiment until you find the mix you love! Feel free to check out the Full Recipe for more details! If you have leftover smoothie bowl, store it in a sealed container. Use an airtight jar or bowl to keep it fresh. Place it in the fridge and eat it within one day. The longer it sits, the more it loses flavor and texture. You can freeze your smoothie ingredients for quick prep later. Cut up ripe peaches and slice bananas. Place them in freezer bags or containers. Make sure to remove excess air to avoid freezer burn. When you're ready to blend, just pull them out and add to your blender. This saves time and keeps your fruits fresh. For serving smoothie bowls later, keep toppings separate. If you add toppings early, they may get soggy. Store granola, nuts, and fruits in small containers. When you're ready to eat, just add your toppings on top. This keeps your bowl looking great and tasting fresh. For more detailed steps, check out the Full Recipe. If you need a substitute for Greek yogurt, there are many options. You can use regular yogurt, but it may be thinner. If you want a dairy-free option, try coconut yogurt or almond yogurt. Silken tofu is another great choice for a creamy base. Just blend it well to ensure smoothness. Each option brings its own flavor, so choose what you like best. To make your smoothie bowl thicker, add more frozen fruit. Frozen bananas or peaches work great. You can also add chia seeds or oats for extra thickness. Start with a small amount, then blend and check the texture. Adjust as needed until you reach your desired consistency. Less liquid helps too, so use less almond milk if you want it thick. A peach smoothie bowl is packed with nutrients. Each bowl has vitamins A and C, which help your skin and eyes. You also get fiber from the fruit, which is good for digestion. The Greek yogurt adds protein, helping you feel full. The nuts and seeds provide healthy fats, giving you energy. Overall, it's a tasty way to enjoy a healthy meal or snack. For the full recipe, check out the Peach Paradise Smoothie Bowl section. You've learned how to make a delicious peach smoothie bowl. We covered key ingredients, blending tips, and fun variations. You can customize it with your favorite fruits and toppings. Remember to pick ripe peaches for the best taste. Store any leftovers properly for later enjoyment. I hope you feel excited to try this easy recipe. Enjoy your smoothie bowl adventure!

Peach Smoothie Bowl Healthy and Refreshing Delight

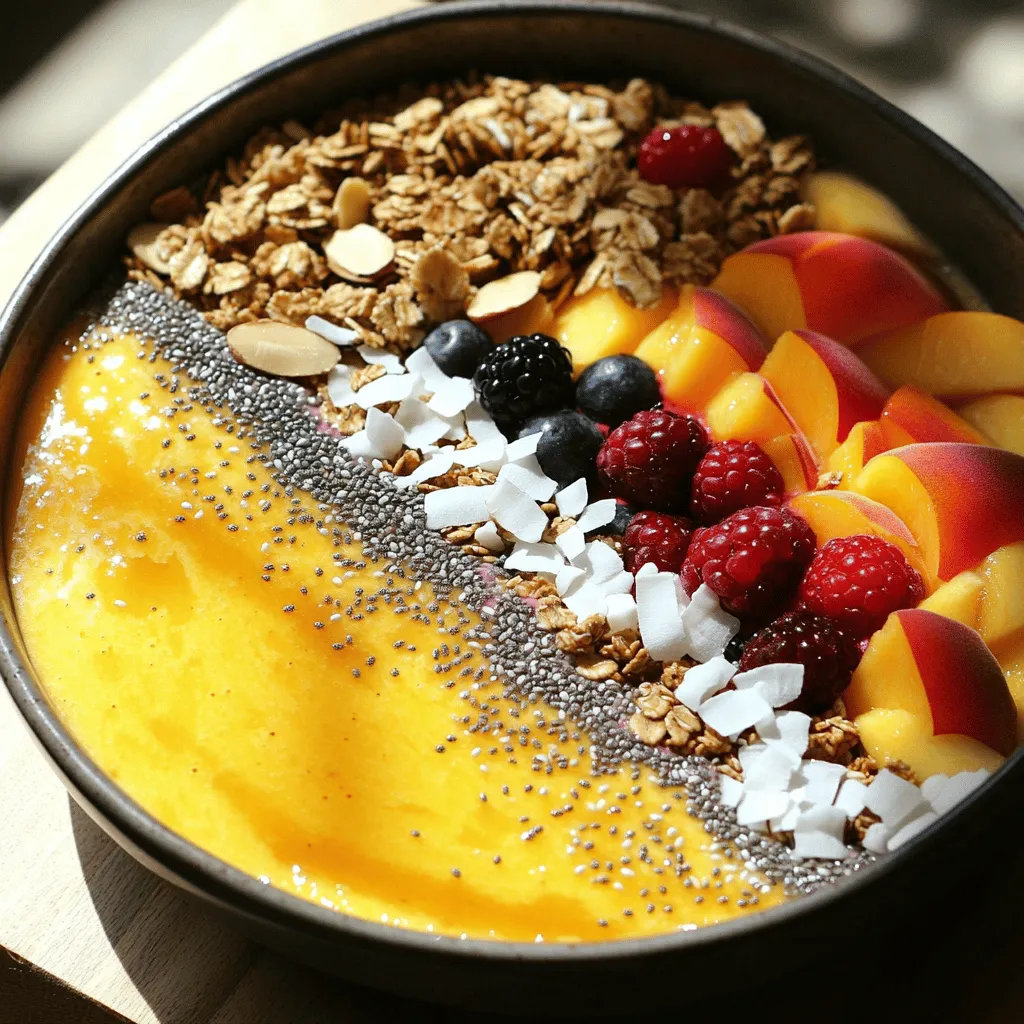
Imagine starting your day with a peach smoothie bowl that’s both healthy and cool. I’ll show you how to blend

- 2 medium zucchinis, grated - 1 teaspoon salt - 1 cup all-purpose flour - 1/2 cup crumbled feta cheese - 2 large eggs, beaten - 1/4 cup green onions, finely chopped - 1/4 cup fresh parsley, chopped - 1 teaspoon garlic powder - 1/2 teaspoon freshly ground black pepper - 1/4 cup olive oil (for frying) - Greek yogurt (for serving) - Lemon wedges (for garnish) Zucchini fritters need simple, fresh ingredients. I love using two medium zucchinis, as they give great flavor. Grating the zucchini breaks it down nicely. Salt helps draw out the moisture, which is key for crispiness. Next, I add all-purpose flour for the perfect texture. Crumbled feta cheese adds a tangy kick. For richness, I use two large eggs. Green onions and parsley provide freshness. Garlic powder and black pepper add depth. I fry the fritters in olive oil. This gives them a lovely golden color. To serve, I top them with Greek yogurt. A squeeze of lemon brightens the dish. You can find the full recipe for these tasty fritters to make it at home. Enjoy! Grate the zucchinis using a box grater or food processor. Place the grated zucchini in a large bowl. Sprinkle 1 teaspoon of salt over the zucchini. Let it rest for 10 to 15 minutes. This step helps draw out excess moisture. After resting, take a clean kitchen towel and squeeze the zucchini tightly. Remove as much moisture as you can. This step is key for crispy fritters. In a separate bowl, combine the drained zucchini with the following ingredients: - 1 cup all-purpose flour - 2 large eggs, beaten - 1/2 cup crumbled feta cheese - 1/4 cup finely chopped green onions - 1/4 cup chopped fresh parsley - 1 teaspoon garlic powder - 1/2 teaspoon freshly ground black pepper Stir everything together until well mixed. Make sure all ingredients combine evenly. Heat 1/4 cup of olive oil in a large skillet over medium heat. Once the oil is hot, take about 2 tablespoons of the zucchini mixture. Shape it into a small patty and place it in the skillet. Cook each fritter for about 3 to 4 minutes on each side. Look for a golden brown color. If needed, work in batches to avoid crowding the pan. This helps each fritter cook evenly. Once cooked, remove the fritters from the skillet. Place them on a plate lined with paper towels to absorb extra oil. For the full recipe, check out the detailed instructions provided above. To make your zucchini fritters crispy, you must remove excess moisture. After grating the zucchinis, sprinkle them with salt. Let them rest for 10-15 minutes. This process draws out water. Next, take a clean kitchen towel and squeeze the zucchini firmly. Get rid of as much liquid as you can. This step is vital. Too much moisture leads to soggy fritters. Cooking in batches also helps achieve crispiness. If you overcrowd the skillet, the temperature drops. This can steam the fritters instead of frying them. Fry only a few at a time, and give them space to cook evenly. This will lead to perfectly golden fritters. Now let's think about toppings. The best way to serve zucchini fritters is with Greek yogurt. It adds a tangy flavor that complements the fritters. You can also use a sprinkle of fresh herbs, like parsley or dill. This adds color and flavor. As for side dishes, a fresh salad pairs well. A simple cucumber and tomato salad is refreshing. You can also serve roasted vegetables for a heartier meal. These sides balance the fritters nicely and make the meal more filling. Plating is important for a great meal. Start by stacking your fritters on a nice platter. They look more inviting this way. Drizzle a bit of extra olive oil on top. This adds shine and flavor. Finish with freshly cracked black pepper to make them pop. For a splash of color, add a sprinkle of herbs. Fresh parsley or chives add a vibrant touch. You can also garnish with lemon wedges. This not only looks good but gives a zesty hint when served. These small changes make your dish stand out and look appetizing. {{image_4}} You can easily jazz up your zucchini fritters with spices or herbs. Consider adding a pinch of smoked paprika for a gentle smokiness. Fresh herbs like dill or basil can also brighten the flavor. If you love cheese, try adding shredded cheddar or pepper jack for a creamy texture. Mixing in different cheeses can add a fun twist to your dish. If you need to avoid gluten, gluten-free flour works great. Almond flour or chickpea flour can also give a nice flavor and texture. For those with egg allergies, you can use flaxseed meal mixed with water as a binder. This mixture mimics the binding power of eggs and keeps your fritters together. Zucchini fritters make a versatile dish. You can serve them as a tasty appetizer or a light main course. Top them with a dollop of Greek yogurt for extra creaminess. They pair well with dips like tzatziki or spicy salsa. You can also enjoy them with a squeeze of fresh lemon for a zesty kick. To store leftover zucchini fritters, let them cool first. Place the fritters in a single layer on a plate. If you stack them, they may get soggy. Use an airtight container to keep them fresh. Glass or plastic containers work well. If you have parchment paper, place it between layers for extra protection. When reheating, you want to keep them crispy. The best way is to use an oven. Preheat it to 350°F (175°C). Place the fritters on a baking sheet. Bake them for about 10 minutes. You can also use a skillet. Heat over medium heat and add a little oil. Cook each side for about 2-3 minutes until crispy again. To freeze fritters, let them cool completely. Arrange them in a single layer on a baking sheet. Freeze until solid, about 1-2 hours. Once frozen, transfer them to a freezer-safe bag or container. They can last up to three months. When you want to eat them, thaw in the fridge overnight. Reheat in the oven or skillet for the best results. If your fritters are soggy, don’t worry! Here are some tips to fix them: - Squeeze out moisture: After grating, let the zucchini rest with salt. Then, squeeze the excess water out with a towel. - Cook longer: If they are undercooked, give them more time in the pan. They should be golden brown and crispy. - Fry in batches: Avoid overcrowding. This helps them cook evenly and get that nice crunch. Managing moisture is key. The more water you remove from the zucchini, the crispier your fritters will be. Yes, you can prepare zucchini fritters ahead of time! Here’s how: - Prep the mixture: You can mix the ingredients and store them in the fridge for a day. - Cook when ready: Fry the fritters just before serving to keep them crisp. - Reheat carefully: If you need to reheat, warm them in a skillet on low heat. This helps them stay crispy. Making fritters in advance saves time. You can enjoy them fresh and hot with ease. Dips can enhance your fritters! Here are some easy options: - Greek yogurt: A simple dollop adds a creamy touch. - Tzatziki: Mix yogurt, cucumber, garlic, and herbs for a fresh taste. - Sour cream: A classic choice for a rich flavor. If you prefer store-bought, look for garlic aioli or spicy salsa. Both pair nicely with zucchini fritters. For the full recipe to make these delicious zucchini fritters, refer to the [Full Recipe]. These zucchini fritters are tasty and easy to make. We covered the ingredients, step-by-step cooking, and tips for crispiness. Don't forget storage methods to keep leftovers fresh. You can also try different flavors and fillings to mix things up. Zucchini fritters work great as snacks, sides, or main dishes. Enjoy making these delicious bites and impress your family and friends with your cooking skills. Happy cooking!

Zucchini Fritters Crispy and Flavorful Snack Idea

Are you ready for a tasty snack that’s both crispy and full of flavor? Zucchini fritters are the perfect answer.

- 12 oz spaghetti - 1 lb ground beef or turkey - 1 medium onion, finely chopped - 3 cloves garlic, minced - 1 carrot, finely diced - 1 bell pepper, finely diced The main ingredients form the base of our dish. Spaghetti is the star, while ground meat adds heartiness. Onions and garlic provide a sweet and savory base. Carrots and bell peppers add color and crunch. - 1 can (15 oz) crushed tomatoes - 2 tablespoons tomato paste - 1 teaspoon dried oregano - 1 teaspoon dried basil - Optional: red pepper flakes, salt, and pepper Seasonings make the flavor pop. Crushed tomatoes give the sauce a rich base. Tomato paste adds depth. Oregano and basil bring aromatic warmth. You can add red pepper flakes for heat and season with salt and pepper to taste. - Fresh basil leaves for garnish - Grated Parmesan cheese - Optional wine pairings for a complete meal For serving, fresh basil adds a bright touch. Grated Parmesan offers a salty finish. Pairing your dish with wine can elevate the meal, making it feel more special. For the full recipe, visit the [Full Recipe]. - Bring salted water to a boil. - Add spaghetti and cook until al dente. To start, fill a large pot with water and add a generous amount of salt. This step flavors the pasta. Heat until the water reaches a rolling boil. Then, add the spaghetti. Check the package for cooking time, usually around 8-10 minutes. You want it firm, not mushy. Once cooked, drain the spaghetti but save about 1 cup of the starchy water. This water helps thicken the sauce later. - Sauté vegetables. - Brown the ground meat. In a large skillet, pour in 2 tablespoons of olive oil and heat it on medium. Once the oil shimmers, add the finely chopped onion. Stir it for about 3 minutes until soft. Next, add the minced garlic, diced carrot, and bell pepper. Cook this mix for about 5-7 minutes until fragrant and tender. Now, add your ground beef or turkey. Use a spatula to break it apart. Cook until browned, about 8-10 minutes. If there’s too much fat, carefully drain it off. - Add sauce components. - Mix in cooked pasta with sauce. Once the meat is browned, add the crushed tomatoes and tomato paste. Then stir in the oregano, basil, and any red pepper flakes if you like heat. Season with salt and pepper to taste. Mix everything well and let it simmer for 15-20 minutes. If it gets too thick, add some of the reserved pasta water. Finally, add the cooked spaghetti to the sauce. Toss gently to coat the pasta. Heat for another 2-3 minutes, making sure everything blends well. This method gives the dish a rich flavor and a satisfying texture. For the full recipe, check the detailed steps above. Cooking pasta is simple, but a few tips help. Always use salted water. Salt adds flavor to the pasta. It makes a big difference in taste. Aim for about 1 tablespoon of salt per gallon of water. Reserve some pasta water after cooking. This water is starchy and helps sauce cling to the pasta. Add a little to your sauce if it gets too thick. This small step can change your dish. Quality meat matters. I suggest using lean ground beef or turkey. Freshness leads to a better taste. When you pick your meat, look for a bright color and a firm texture. Choosing the right tomatoes is key, too. I recommend whole canned tomatoes. They have a richer flavor than crushed or diced. Crush them by hand for a more rustic sauce. You can also use San Marzano tomatoes for a sweet touch. You can cook spaghetti with meat sauce in different ways. A slow cooker works well. Just brown the meat and add all the ingredients to the pot. Cook on low for 6-8 hours. Feel free to add extra ingredients. Chopped mushrooms or spinach can boost nutrition. You can also add a splash of red wine for depth. Each twist makes your dish unique. For the full recipe, you can refer to the detailed instructions above. {{image_4}} You can make spaghetti with meat sauce vegetarian by using lentils or plant-based meat. Lentils offer a hearty texture. They are also full of protein and fiber. You can use any type of lentils, but green or brown work best. Plant-based meats can mimic the taste of beef. Look for good brands at your local store. For added flavor, toss in more veggies. Here are some great choices to include: - Mushrooms for a savory taste - Spinach for added nutrition - Zucchini for a fresh crunch - Bell peppers for sweetness If you want a low-carb option, try using zucchini noodles or spaghetti squash instead of regular pasta. Zucchini noodles are easy to make. Just spiralize zucchini into thin strips. Spaghetti squash is fun to cook. Bake it and scrape the insides with a fork for noodle-like strands. You can also use alternative sauces. Try a creamy Alfredo or a light pesto. These sauces pair well with low-carb noodles. They add a rich flavor without the carbs. Spaghetti with meat sauce can be made with local ingredients. For example, in Italy, fresh tomatoes and basil are key. Use fresh herbs from your garden or local market. They will boost the flavor of your sauce. You can also adjust the spice level. In some regions, people like it spicy. You might add more red pepper flakes or hot sauce. In other places, a milder sauce is preferred. You can leave out the heat and focus on fresh herbs instead. To keep your leftover spaghetti fresh, first, let it cool to room temperature. Place it in an airtight container. Store it in the fridge for up to four days. If you want to save it longer, freeze it. Use a freezer-safe container or bag. Make sure to remove as much air as possible to prevent freezer burn. You can freeze spaghetti with meat sauce for up to three months. When you're ready to eat, you can reheat your pasta using a few methods. The best way is in the microwave. Place it in a bowl and add a splash of water. Cover it with a damp paper towel. Heat it in short bursts, stirring in between. This keeps the pasta moist. You can also reheat it in a skillet. Add a little olive oil or water, and stir over low heat. This method helps keep the texture nice. In the fridge, your spaghetti with meat sauce lasts about four days. If it has been left out at room temperature for more than two hours, it's best to throw it away. Signs that it should be discarded include a sour smell or mold. If it looks or smells off, don’t risk it. Always trust your senses when it comes to food safety. To make sauce from scratch, you need fresh ingredients. Start by heating olive oil in a pan. Add chopped onion and cook until soft. Then, mix in minced garlic, diced carrot, and bell pepper. Cook these for a few minutes. Next, add ground beef or turkey and brown it well. After that, pour in crushed tomatoes and stir in tomato paste. Season with dried oregano, basil, salt, and pepper. Let this simmer for about 15-20 minutes. This method gives you a rich and tasty sauce. Spaghetti and meat sauce pairs well with simple sides. Consider serving a fresh green salad with a light vinaigrette. Garlic bread is always a hit as well. You can also add steamed vegetables like broccoli or green beans for color and nutrition. For something heartier, serve with roasted potatoes. These sides balance the meal and add extra flavor. Yes, you can prepare this dish ahead of time. Cook and store the meat sauce in the fridge for up to three days. Just reheat it before mixing with fresh pasta. You can also freeze the sauce for longer storage. When ready to eat, thaw it overnight in the fridge and heat it on the stove. This makes mealtime quick and easy. This blog post covers everything you need for classic spaghetti with meat sauce. You learned about essential ingredients, step-by-step cooking, and helpful tips. We explored tasty variations, proper storage, and common questions. Spaghetti is fun to make and share. With simple steps and smart choices, you can create a dish that suits your taste. Enjoy cooking, experimenting, and savoring a delicious meal!

Savory Spaghetti with Meat Sauce Easy Recipe Guide

Craving a warm, comforting meal? You’re in the right place! My easy recipe for savory spaghetti with meat sauce will

- 1.5 lbs boneless, skinless chicken thighs - 1/4 cup honey - 1/4 cup soy sauce - 4 cloves garlic, finely minced - 1 tablespoon fresh ginger, freshly grated - 1 teaspoon red pepper flakes - 2 tablespoons sesame oil - Garnishes (green onions and sesame seeds) - Salt and freshly cracked pepper These ingredients are simple yet powerful. The chicken thighs are juicy and tender. Honey adds sweetness, while soy sauce brings saltiness. Garlic gives it a strong kick. Fresh ginger adds warmth and depth. Red pepper flakes give you that spicy bite. Using sesame oil for cooking adds a nutty flavor that makes this dish shine. Finish with green onions and sesame seeds for color and crunch. Together, these ingredients create a tasty meal that is easy to make. For the full recipe, check out the details above. 1. Whisking the sauce ingredients together Start by taking a large mixing bowl. Add the honey, soy sauce, minced garlic, grated ginger, and red pepper flakes. Whisk these together until the mixture is smooth and well combined. This sauce packs a punch with sweet and spicy notes. 2. Seasoning the chicken thighs Next, season both sides of the chicken thighs with salt and freshly cracked pepper. This step is key to enhancing the overall flavor of your dish. Don't rush this part; a good seasoning sets the stage for deliciousness. 3. Searing the chicken in sesame oil Heat a large skillet over medium-high heat. Pour in the sesame oil. Once the oil shimmers, add your seasoned chicken thighs. Sear each side for about 5-7 minutes. You're looking for a golden brown color. Ensure the chicken is fully cooked; it should reach an internal temperature of 165°F (74°C). 4. Adding the honey garlic sauce After searing, lower the heat to medium-low. Pour the honey garlic sauce over the chicken in the skillet. Make sure each piece is coated in that tasty sauce. Let it simmer for about 5 minutes. Turn the chicken occasionally to get a nice glaze. 5. Simmering and glazing the chicken As the sauce thickens, the chicken absorbs more flavor. Keep an eye on it. When the sauce looks glossy, your dish is almost ready. This step creates a beautiful caramelized finish that’s hard to resist. 6. Slicing and garnishing the dish Once cooked, remove the skillet from heat. Slice the chicken thighs into strips. Drizzle any remaining sauce from the pan over the top. For a lovely finish, garnish with chopped green onions and sesame seeds. This adds color and crunch to your meal. Now you have a flavorful and simple meal that’s sure to impress. For the full recipe, check out the details above. Enjoy your cooking! To change the spice level of your Spicy Honey Garlic Chicken, you can modify the amount of red pepper flakes. If you want it spicier, add more flakes. If you prefer it milder, reduce the amount. You can also try using fresh chili peppers or sriracha for a different heat. These options let you control how fiery your dish becomes. To ensure your chicken stays tender, do not overcook it. Chicken thighs cook best at medium-high heat. Sear them for about 5-7 minutes on each side. Make sure the internal temperature reaches 165°F (74°C). This way, the chicken stays juicy and flavorful. Pair your spicy chicken with steamed rice or stir-fried vegetables. This combination adds balance to the meal. For a complete dinner, consider adding side dishes like a fresh salad or roasted broccoli. These sides bring color and nutrition to your plate. You can find the full recipe to explore all the delicious details. {{image_4}} You can switch out honey for maple syrup. Maple syrup adds a nice sweetness without overpowering the dish. If you're low on honey, this swap works great! For chicken, try using chicken breasts. They are leaner but can still soak up all the flavor. You can also use chicken drumsticks for a fun twist. Just adjust the cooking time to ensure they cook through. You can make this dish in the oven. Preheat your oven to 400°F (200°C). Place the chicken in a baking dish, pour the sauce over it, and bake for about 25-30 minutes. This method gives you a crispy outer layer. Grilling is another option. Marinate the chicken with the sauce and grill it for about 6-8 minutes per side. This adds a smoky flavor that pairs well with the honey garlic sauce. Try adding citrus flavors. A splash of orange or lime juice can brighten the dish. You can also mix in fresh herbs like cilantro or basil for a fresh twist. For serving styles, consider going global. Serve the chicken in taco shells with avocado and salsa for a Mexican flair. Or, serve it over jasmine rice with a side of stir-fried veggies for an Asian-style meal. These ideas can make your Spicy Honey Garlic Chicken even more fun! To keep your Spicy Honey Garlic Chicken fresh, store leftovers in the fridge. Place the chicken in an airtight container. This helps keep the sauce and chicken moist. You can also wrap it tightly in plastic wrap before placing it in a container. Aim to eat leftovers within three days for the best taste. When reheating, I suggest using the stovetop. It helps maintain the chicken’s flavor and texture. Heat a skillet over low to medium heat. Add a splash of water or sauce to keep it moist. Cook for about 5 to 7 minutes, turning often. If using a microwave, cover the dish and heat for 1 to 2 minutes. Stir halfway to ensure even heating. Freezing is a great way to save extra chicken. First, let the chicken cool completely. Place it in a freezer-safe bag or container. Remove as much air as possible to avoid freezer burn. You can freeze it for up to three months. To thaw, move it to the fridge overnight. Reheat using the methods mentioned above for the best results. Cook chicken thighs for about 5-7 minutes on each side. This will give you tender, juicy meat. Use a meat thermometer to check that the inside reaches 165°F (74°C). This ensures it is safe to eat and flavorful. Yes, you can use chicken breast instead of thighs. Chicken breasts cook faster, so check them after about 4-5 minutes on each side. They can dry out, so be careful not to overcook them. Thighs will give you a juicier result, but breasts work well too. Spicy Honey Garlic Chicken pairs great with rice or noodles. You can also serve it with steamed broccoli or mixed vegetables. These sides balance the dish's sweetness and add nutrition. For a fun twist, try serving it with a colorful salad. To reduce sweetness, cut back on honey by a tablespoon. You can also add more soy sauce to enhance the salty flavor. Another option is to squeeze in fresh lemon or lime juice. This adds brightness and cuts down the sweetness nicely. This recipe is perfect for meal prep. You can cook it in advance and store it in the fridge for up to four days. Just reheat in the microwave or a skillet before serving. It's easy to pack for lunch or dinner. For the full recipe, check the earlier sections. In this blog post, we explored a tasty Spicy Honey Garlic Chicken recipe. We covered key ingredients, cooking steps, and tips for perfecting flavor. I shared how to enhance spice levels and suggested alternative cooking methods. Remember, you can adapt this dish to fit your taste and needs. Whether you are cooking for a family meal or meal prep, this recipe suits all occasions. Enjoy cooking!

Spicy Honey Garlic Chicken Flavorful and Simple Meal

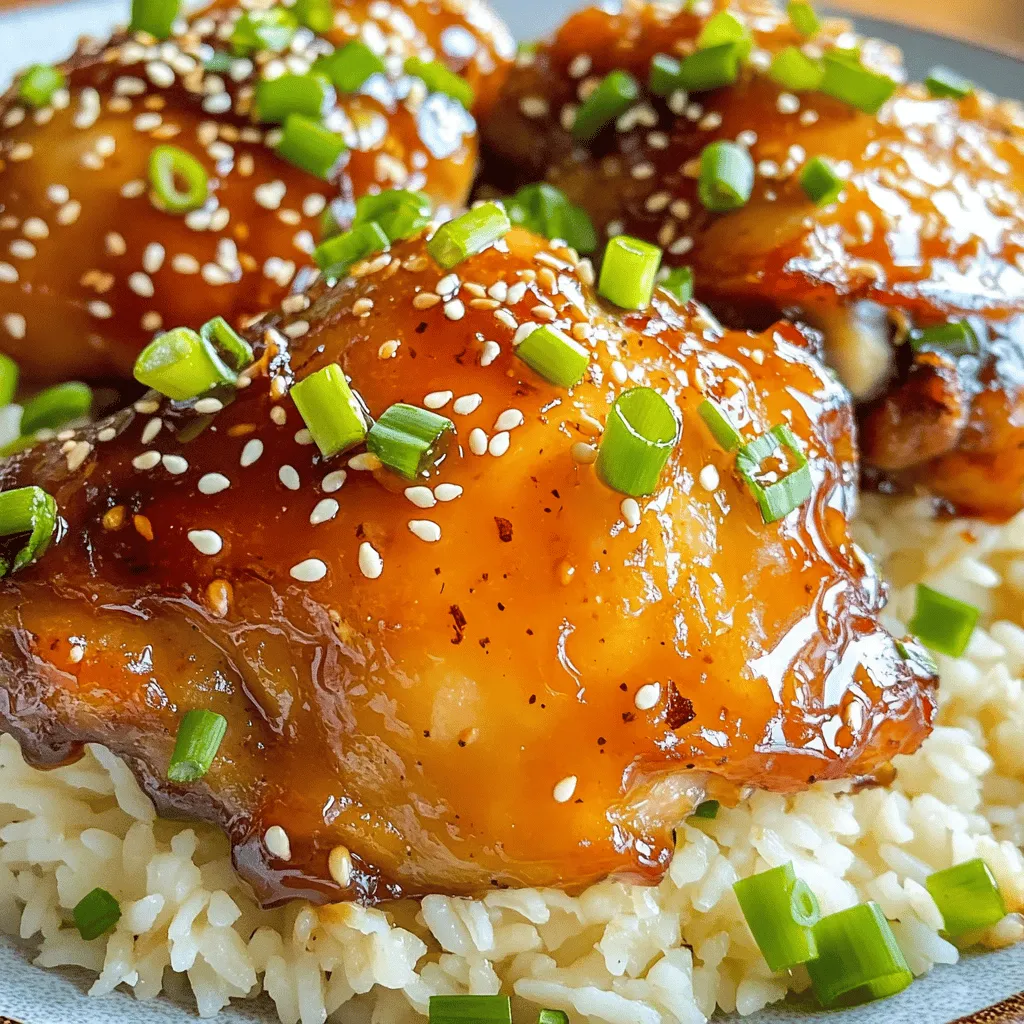
Craving a bold dish that is both tasty and easy to make? Look no further! My Spicy Honey Garlic Chicken

For these tasty lemon garlic chicken skewers, you need some simple items: - 1 pound boneless, skinless chicken breasts, cut into 1-inch cubes - 4 cloves garlic, finely minced - 1/4 cup fresh lemon juice (about 2 medium lemons) - Zest from 1 lemon - 2 tablespoons extra virgin olive oil - 1 teaspoon dried oregano - 1 teaspoon smoked paprika - Salt and black pepper, to taste - Fresh parsley, finely chopped (for garnish) The marinade makes these skewers shine. You need garlic, lemon juice, and zest. Olive oil adds richness. Dried oregano and smoked paprika bring warmth and depth. Don’t forget salt and pepper; they balance the flavors. Mix these well in a bowl to create a zesty blend that soaks into the chicken. You will need a few tools to make this dish. Grab a mixing bowl for the marinade. A whisk helps combine the ingredients smoothly. Use wooden or metal skewers to hold the chicken. If you use wooden skewers, soak them in water. This keeps them from burning on the grill. Finally, a grill or grill pan will cook the skewers perfectly. For best results, brush the grill with oil to prevent sticking. For the full recipe, check out the details above. Enjoy crafting your lemon garlic chicken skewers! Start with a big bowl. Add 4 cloves of minced garlic. Next, pour in 1/4 cup of fresh lemon juice and the zest from 1 lemon. Then, add 2 tablespoons of olive oil, 1 teaspoon of dried oregano, and 1 teaspoon of smoked paprika. Don’t forget to sprinkle in salt and pepper. Whisk everything until it's well mixed. This marinade will give your chicken a bright taste. Now, take 1 pound of chicken breasts and cut them into 1-inch cubes. Toss the chicken into the marinade. Make sure every piece is covered. Cover the bowl with plastic wrap and place it in the fridge. Let it marinate for at least 30 minutes, but 1 hour is even better. This time allows the chicken to soak up all the great flavors. Preheat your grill or grill pan to medium-high heat. If you use a grill, lightly coat the grates with oil. Take the marinated chicken and slide the pieces onto soaked skewers. Leave a little space between each piece for even cooking. Grill the skewers for 10-12 minutes. Keep turning them to get nice grill marks. The chicken is done when it reaches an internal temperature of 165°F. Once cooked, let the skewers rest for a few minutes. This helps keep the chicken juicy. Serve the skewers hot, and sprinkle fresh chopped parsley on top for a nice finish. For the full recipe, check out the details above. Enjoy your cooking! To make the best marinade, use fresh ingredients. Fresh garlic and lemon juice shine here. I always use lemons that are firm and bright. The zest adds a great aroma, so don’t skip it! Mix the garlic, lemon juice, zest, olive oil, oregano, smoked paprika, salt, and pepper well. This mixture should smell fresh and tangy. Let the chicken soak in this marinade for at least 30 minutes. Longer is better, as it lets the flavors soak in. When grilling, preheat your grill to medium-high heat. A hot grill helps lock in juices. Use a brush to oil the grates lightly, so the chicken does not stick. Skewer the chicken pieces with a little space between them. This allows heat to circulate. Grill the chicken skewers for about 10-12 minutes. Turn them every few minutes for even cooking. Check that the chicken reaches an internal temperature of 165°F. This ensures it is safe and juicy. Serve the skewers hot off the grill. They look great on a platter with lemon wedges and parsley. For sides, I love a crisp cucumber and tomato salad. Fluffy rice also pairs well, soaking up the tasty juices. You can even add a yogurt or tahini dip for extra flavor. This dish is fun for gatherings or a simple weeknight meal. Don't forget to enjoy every bite! For the full recipe, check the section above. {{image_4}} You can swap chicken for other proteins. Try shrimp, tofu, or beef. Each offers a unique taste. Shrimp cooks fast and absorbs flavors well. Tofu is great for a vegetarian option. Just press it first to remove water. You can also use vegetables. Bell peppers, zucchini, and cherry tomatoes work nicely. They add color and crunch. While lemon and garlic shine, you can mix it up. For a spicy kick, add chili flakes or hot sauce. A honey-soy blend gives a sweet twist. Use fresh herbs like rosemary or thyme for a fragrant twist. You can even try a yogurt marinade. It keeps the meat tender and juicy. Experiment and find your favorite! Serve the skewers in many ways. Arrange them on a platter with fresh herbs. You can add lemon wedges for a zesty touch. Pair them with dips like tzatziki or hummus. These dips add creaminess and flavor. For a heartier meal, serve with rice or a salad. Each style brings a different vibe to your meal. Check out the Full Recipe for more ideas! After enjoying your lemon garlic chicken skewers, store any leftovers in an airtight container. Make sure they cool down first. Keep them in the fridge for up to three days. This keeps the chicken fresh and tasty. When you’re ready to eat the leftovers, reheat them gently. You can use the oven or the microwave. For the oven, preheat it to 350°F. Place the skewers on a baking sheet and cover with foil. Heat for about 10-15 minutes. In the microwave, place the skewers on a plate and cover. Heat in 30-second bursts until warm. If you want to save your skewers for later, freezing works great. First, let the chicken skewers cool completely. Wrap each skewer tightly in plastic wrap. Then, place them into a freezer bag. They can stay in the freezer for up to three months. When you’re ready to eat, thaw them in the fridge overnight before reheating. For the complete recipe, check out [Full Recipe]. You can tell chicken skewers are cooked when they reach an internal temperature of 165°F. Use a meat thermometer to check the thickest part of the chicken. The meat should be white and no longer pink. Juices should run clear when you cut into the chicken. If you see pink or the juices are red, keep cooking. Rotate the skewers every few minutes for even cooking. This helps to avoid burning and ensures they cook through nicely. Yes, you can make Lemon Garlic Chicken Skewers ahead of time. Marinate the chicken up to 24 hours in advance. This allows the flavors to soak in deeply. After marinating, thread the chicken onto skewers and store them in the fridge until you are ready to grill. If you need to, you can also cook the skewers and store the cooked chicken in the fridge for up to three days. Just reheat them gently before serving. Lemon Garlic Chicken Skewers pair well with many sides. Here are some great options: - Cucumber and tomato salad for a fresh crunch. - Fluffy rice or quinoa to soak up the juices. - Grilled vegetables, like bell peppers or zucchini, for added color and flavor. - Pita bread or flatbread for a fun wrap option. - Yogurt sauce or tzatziki for a creamy dip. These sides enhance the meal and offer balance to the dish. You can also add lemon wedges for extra zest! Lemon garlic chicken skewers are simple and fun to make. We covered the best ingredients, marinade tips, and grilling methods. Enjoy tender, juicy chicken by following the steps we've shared. You can even try different proteins and veggies. Don't forget to store leftovers properly for later meals. With this guide, you'll impress your family and friends with tasty skewers. This dish will elevate your grilling game and bring smiles at every meal. Happy cooking!

Lemon Garlic Chicken Skewers Flavorful and Simple Dish

If you’re craving a tasty meal that’s easy to make, look no further! My Lemon Garlic Chicken Skewers promise a

Older posts
Newer posts
← Previous Page1 Page2 Page3 Page4 … Page38 Next →

dsad

© 2025 recipetorch • Built with GeneratePress

Our Policies

  • Copyright Policy
  • Cookie Policy
  • GDPR Policy
  • Privacy Policy
  • Disclaimer
  • Terms Of Use

More Information

  • Home
  • About
  • Contact
  • Appetizers
  • Dessert
  • Dinner
  • Drinks
©2025, recipetorch About Back To Top