Skip to content
DisclaimerTerms Of UseGDPR PolicyCookie Policy

recipetorch

  • Home
  • Drinks
  • Appetizers
  • Dinner
  • Dessert
  • About
  • Contact
  • Privacy Policy
DisclaimerTerms Of UseGDPR PolicyCookie Policy

Nicole

Here are the ingredients you will need for Easy Tiramisu Cups. Each item plays a key role in making this treat special. - 1 cup mascarpone cheese - 1 cup heavy whipping cream - ½ cup powdered sugar - 1 teaspoon pure vanilla extract - 1 cup brewed coffee, cooled to room temperature - 15 ladyfinger cookies - 2 tablespoons unsweetened cocoa powder for dusting - Dark chocolate shavings for garnish (optional) You can find all these items at your local grocery store. Make sure the coffee is cooled before you dip the ladyfingers. Each ingredient adds its own flavor and texture. Mascarpone gives creaminess, while the heavy whipping cream adds a light, fluffy touch. The ladyfingers soak up the coffee, giving a nice kick. The cocoa powder on top adds a rich finish. For the full recipe, follow the simple steps to create your own delightful dessert! 1. Start by pouring the heavy whipping cream into a large mixing bowl. 2. Use an electric mixer to whip the cream on medium speed. 3. Watch for soft peaks to form. This should take about 1-2 minutes. 4. Gradually add the powdered sugar and vanilla extract while you whip. 5. Increase the mixer speed to high. 6. Whip until stiff peaks form and the cream holds its shape. 1. Take another bowl and add the mascarpone cheese. 2. Gently fold the whipped cream into the mascarpone. 3. Use a spatula and be careful not to overmix. 4. Fold until just combined for a light texture. 1. Grab your ladyfinger cookies. 2. Dip each one into the cooled coffee for about 1-2 seconds. 3. Make sure they soak in enough coffee flavor but stay firm. 1. Start with a layer of soaked ladyfingers at the bottom of each cup. 2. Arrange them to cover the bottom fully. 3. Spoon a layer of the mascarpone mixture over the ladyfingers. 4. Spread it evenly to cover them completely. 5. Repeat this process for 2 to 3 layers. 6. Finish by dusting the top with cocoa powder. 7. Add dark chocolate shavings if desired for a nice touch. 8. Cover the cups with plastic wrap and refrigerate for at least 4 hours. 9. For the best flavor, let them chill overnight. This easy tiramisu cups recipe is a fun way to enjoy a classic dessert. For the full recipe, check out the details above! To make great tiramisu, you need to understand soft and stiff peaks. When you whip cream, soft peaks form first. This means the cream holds its shape but is still somewhat floppy. Stiff peaks hold their shape firmly. You will know you've reached this stage when lifting the beaters leaves a peak that stands tall. This thick cream is key to a rich tiramisu. Always whip on medium speed first, then increase to high for stiff peaks. Pair your tiramisu cups with coffee or espresso. The rich coffee flavor complements the dessert well. I love serving my cups on a decorative platter. This adds a nice touch when you have guests. You can even place small cups of espresso next to each dessert. This makes for a lovely coffee experience. You can add flavor variations to your tiramisu. Consider using espresso instead of regular coffee for a bolder taste. Flavored liqueurs like Amaretto or coffee liqueur can also enhance your dessert. Just a splash is enough to make a difference. These small changes can turn classic tiramisu into something special. For the full recipe, check the detailed steps above. {{image_4}} You can easily twist the classic tiramisu into fun flavors. Here are two popular ideas: - Chocolate Tiramisu Cups: Add cocoa powder to the mascarpone mix. You can also layer in chocolate syrup for extra richness. This version is a treat for chocolate lovers. - Fruit-Infused Tiramisu Cups: Swap coffee for a fruit puree like raspberry or strawberry. Dip ladyfingers into the puree instead of coffee. This gives a fresh and fruity taste that brightens up the dessert. If you have special diet needs, you can still enjoy this dessert. Here are some options: - Gluten-free ladyfingers: You can find gluten-free ladyfingers in stores. They work just as well in this recipe. - Vegan alternatives: Use coconut cream instead of mascarpone. Substitute the heavy cream with a plant-based whipped topping. This makes the dessert suitable for vegans. Make your tiramisu fit the seasons with these fun ideas: - Pumpkin Tiramisu for fall: Mix pumpkin puree and spices into your mascarpone. This adds a cozy flavor perfect for autumn. - Mint variations for summer: Use mint extract in the mascarpone mixture. Top it with crushed mint leaves for a refreshing summer twist. Explore these variations to keep your tiramisu exciting and full of flavor! You can find the full recipe for the base tiramisu cups above. To keep your tiramisu cups fresh, place them in the fridge. Use a tight lid or wrap them in plastic. They will stay good for about 3 days. The longer they sit, the softer the ladyfingers become. If you love the crunch, eat them sooner. You can freeze tiramisu cups if you have extras. First, cover them well with plastic wrap. Then, put them in an airtight container. They will freeze well for about 1 month. To eat, take them out and let them thaw in the fridge overnight. This keeps the texture nice. Always cover your tiramisu cups tightly. This helps to keep them from drying out. If you use plastic wrap, make sure it touches the dessert. This prevents air from getting in. Enjoy the fresh taste of this dessert by storing it properly. You can find the Full Recipe above for more tips. You can store tiramisu cups for up to four days in the fridge. Make sure to cover them with plastic wrap. This keeps them fresh and tasty. The flavors blend better after a day, so they are even more delicious after chilling. Yes, you can make tiramisu cups a day ahead. This dessert needs time to chill and set, so preparing them in advance is perfect. Just remember to cover them well before placing them in the fridge. If you don't have ladyfingers, you can use sponge cake or pound cake. Just cut them into pieces and soak them in coffee. This will give you a similar texture and flavor. You can also use cookies like graham crackers if you like a twist. You can tell whipped cream is ready when it forms stiff peaks. When you lift the beaters, the cream should hold its shape. If it looks thick and fluffy, you did it right! Be careful not to whip it too long, or it can turn buttery. Absolutely! Using flavored coffee can add a fun twist to your tiramisu cups. Try vanilla, hazelnut, or even mocha coffee. Just make sure it is cooled before dipping the ladyfingers. This adds an extra layer of flavor to your dessert. For the full recipe, check the earlier section. Enjoy making your charming tiramisu cups! This article shared a simple tiramisu cups recipe. We covered key ingredients, step-by-step instructions, and helpful tips. You learned about variations, storage, and even answered common questions. Tiramisu cups are versatile, delicious, and fun to make. Whether you add chocolate, fruit, or stick to the classic, these treats impress every time. Enjoy creating your own twist on this beloved dessert. It’s easy and tasty, so dive into your kitchen today!

Easy Tiramisu Cups Simple and Delightful Dessert

If you’re craving a sweet, creamy treat that’s simple to make, you’re in the right place. These Easy Tiramisu Cups

- Flour tortillas - Vegetables: bell pepper, zucchini, spinach, corn - Protein: black beans, eggs - Seasoning and dairy: milk, cumin, chili powder, salt, black pepper, cheese - Serving accompaniments: salsa and guacamole These ingredients make a tasty and healthy breakfast. The flour tortillas hold the filling well. Bell peppers and zucchini add color and crunch. Spinach brings in good nutrients. Corn adds sweetness and texture. Black beans give protein and fiber. Eggs are a great source of protein too. Milk makes the eggs creamy. Cumin and chili powder add nice warmth to the flavor. Salt and black pepper enhance everything. Shredded cheese gives a rich taste. Salsa and guacamole are perfect to top your burrito. They add freshness and zest. When you gather these ingredients, you are ready to cook! You can find the Full Recipe to guide you through the process. Start by heating a splash of olive oil in a large skillet over medium heat. Add the diced bell pepper and zucchini. Sauté for about five minutes. Stir often until they soften and gain some color. This adds flavor and texture to your burrito. Next, stir in the chopped spinach and corn. Cook for an additional two to three minutes, until the spinach wilts down nicely. This mix of vegetables gives your burrito a burst of color and flavor. While the veggies cook, crack the eggs into a mixing bowl. Add milk, cumin, chili powder, and season with salt and pepper. Whisk the mixture until well combined and slightly frothy. This will create a fluffy egg filling. Pour the egg mixture into the skillet with the cooked vegetables. Gently stir and cook for about three to four minutes. Ensure the eggs are fully set but still tender. When done, fold in the rinsed black beans and shredded cheese. Mix everything well until the cheese starts to melt. To make rolling easier, warm the flour tortillas briefly. You can microwave them or heat them on a skillet for a few seconds. This step helps keep the tortillas from tearing. Lay a generous scoop of the filling in the center of each tortilla. Fold in the sides and roll tightly from the bottom up. Make sure the filling stays secure inside the tortilla. For extra texture, heat a skillet over medium heat. Place the burritos seam-side down and toast for two to three minutes on each side. This step gives the burritos a lovely golden brown color. Now, you’re ready to enjoy your veggie breakfast burritos! For the full recipe, check out the complete guide. To get the eggs just right, whisk them well. This adds air and makes them fluffy. Cook them on medium heat. Stir gently while they cook. You want them soft, not dry. This keeps the burrito moist and tasty. For toasting, use a non-stick skillet. Heat it to medium. Place burritos seam-side down. Toast for 2-3 minutes until golden. Flip and toast the other side. This adds a nice crunch. Try adding spices like smoked paprika or dried oregano. These give a new twist to your burrito. Fresh herbs like cilantro or chives work well too. They add brightness and flavor. If you want a cheese swap, try goat cheese or feta. These provide a tangy taste. Vegan cheese is also a great choice. It melts well and keeps it plant-based. Make your burrito look great on a plate. Use a colorful dish to stand out. Add a side of salsa and guacamole for dipping. For extra flair, sprinkle chopped cilantro on top. A dash of paprika adds color and spice. Pair your burrito with fresh fruit or a smoothie. This makes for a well-rounded breakfast. You can also serve it with yogurt for protein. Enjoy your nourishing morning meal! {{image_4}} You can change the veggies in your burrito. Use seasonal vegetables to keep things fresh. Try adding mushrooms or kale for a new taste. Swap out the bell pepper for roasted red peppers or use sweet potatoes instead of zucchini. The options are endless! You can also mix and match your favorites. This way, every burrito can be unique. If you prefer plant-based proteins, consider using tofu or tempeh. Both options add great texture and flavor. You can also try chickpeas or lentils for a hearty bite. If you want meat, add cooked sausage or diced ham. These choices give your breakfast burrito a nice protein boost. For a gluten-free option, look for tortillas made from corn or other gluten-free grains. Many stores offer these choices now. If you are dairy-free, use almond milk or oat milk instead of regular milk. For cheese, try vegan cheese or skip it altogether. These swaps ensure everyone can enjoy a tasty breakfast burrito. For the full recipe, check out the details above. To keep your veggie breakfast burritos fresh, store leftovers in the fridge. Place them in an airtight container. They stay good for about three days. If you want to keep them longer, freezing is a great option. Wrap each burrito tightly in plastic wrap. Then, place them in a freezer-safe bag. They can last up to three months in the freezer. When you're ready to enjoy your burritos, reheating is key. The best way to reheat them is in the oven. Preheat your oven to 350°F (175°C). Place the burritos on a baking sheet. Heat for about 15-20 minutes. This method helps keep the tortillas crisp. You can also use a microwave. Place the burrito on a microwave-safe plate. Heat for 1-2 minutes or until warm. If you choose this method, the burrito may lose some texture. To keep the flavor strong, add a little salsa on top before reheating. It takes about 30 minutes to make veggie breakfast burritos. You need 15 minutes to prep the ingredients. Cooking takes another 15 minutes. This quick time frame makes them great for busy mornings. Yes, you can make these burritos ahead of time. Prepare and cook the filling first. Then, let it cool and store it in the fridge. You can wrap the burritos in plastic wrap or foil. They will stay fresh for up to three days. When ready to eat, just reheat them in the microwave or on a skillet. Veggie breakfast burritos offer many health benefits. They provide protein from eggs and black beans. The vegetables add fiber, vitamins, and minerals. Spinach, for example, is rich in iron. Bell peppers have vitamin C. This meal helps you stay full longer. It also supports overall health with balanced nutrients. You can find the full recipe for veggie breakfast burritos in the section above. It includes all the steps and ingredients you need to make this tasty meal. You can make delicious veggie breakfast burritos with simple steps and ingredients. We covered the key components, from sautéing fresh veggies to cooking the egg mix. Assembling and toasting your burritos gives them a great crunch. Consider varying your veggies or proteins to suit your taste. Proper storage and reheating ensure they taste just as good later. Enjoy these burritos for breakfast or any time of the day! Check the full recipe for more details and enjoy your cooking.

Veggie Breakfast Burritos Nourishing Morning Meal

Start your day with a flavorful Veggie Breakfast Burrito! Packed with fresh veggies, protein, and spices, this dish is both

To make crispy air fryer chickpeas, you need a few simple items. This recipe is quick and easy, perfect for a tasty snack. Here’s what you’ll need: - 1 can (15 oz) chickpeas, thoroughly drained and rinsed - 1 tablespoon extra virgin olive oil - 1 teaspoon smoked paprika - 1 teaspoon garlic powder - 1/2 teaspoon ground cumin - 1/2 teaspoon sea salt - 1/4 teaspoon cayenne pepper (optional, for a touch of heat) - Fresh parsley, chopped, for garnish (optional) The star of this snack is chickpeas. They are high in protein and fiber. This makes them a filling choice. The olive oil helps the spices stick and adds a light flavor. For spices, smoked paprika gives a nice smoky taste. Garlic powder adds a depth of flavor, while cumin brings warmth. Sea salt enhances all the flavors. If you like some heat, cayenne pepper is a great option. You can mix it up with extra spices based on your taste. Try Italian herbs for a different twist. Curry powder can give a warm, exotic flavor. For a sweet touch, sprinkle some cinnamon and a bit of sugar after cooking. Fresh herbs, like cilantro or basil, can also add great freshness. These little tweaks let you customize your crispy chickpeas to your liking! For the full recipe, check out the details above. Preheating the air fryer Start by preheating your air fryer to 400°F (200°C). This step is crucial for crispiness. Let it warm for about 5 minutes. Drying chickpeas thoroughly Next, take your drained and rinsed chickpeas. Pat them dry with a clean kitchen towel. Make sure to remove as much moisture as possible. Wet chickpeas will not get crispy. Mixing chickpeas with oil and spices In a mixing bowl, add your dried chickpeas. Pour in 1 tablespoon of olive oil. Then, add 1 teaspoon smoked paprika, 1 teaspoon garlic powder, 1/2 teaspoon ground cumin, and 1/2 teaspoon sea salt. If you like heat, add 1/4 teaspoon cayenne pepper. Mix well until every chickpea is coated. Importance of even coating Even coating is key for crispiness. If some chickpeas are dry, they won’t crisp up like others. Take your time to ensure each one is well covered. Arranging chickpeas in the air fryer Carefully place the seasoned chickpeas in the air fryer basket. Spread them out in a single layer. Avoid overcrowding. This allows hot air to circulate properly. Cooking times and tips for monitoring doneness Air fry the chickpeas for 15 to 20 minutes. Halfway through, give the basket a shake. This helps them crisp evenly. Start checking for doneness at 15 minutes. They should be golden brown and feel crisp. For the full recipe, refer to the earlier section. Enjoy making these crunchy snacks! To get the best crunch from your chickpeas, follow these steps: - Dry the chickpeas well. After rinsing, use a clean towel to remove moisture. The drier they are, the crispier they will become. - Preheat the air fryer. This helps to start cooking immediately, giving a nice, even texture. Aim for 400°F (200°C). - Space them out. Place the chickpeas in a single layer. This allows hot air to circulate, making them crisp up perfectly. If your chickpeas are undercooked, try these tips: - Cook longer. If they aren't crispy, return them to the air fryer for an extra 5 minutes. - Shake the basket. Halfway through cooking, give the basket a good shake. This helps them cook evenly. If they are overcooked: - Lower the temperature next time. Try 375°F (190°C) for a gentler cook. - Check frequently. Start checking at 15 minutes and adjust based on your air fryer’s performance. To amp up the taste of your crispy chickpeas, consider these ideas: - Add spices. Try Italian herbs, curry powder, or even a sprinkle of cheese. - Mix in heat. If you love spice, increase the cayenne or add hot sauce. - Garnish with fresh herbs. Chopped parsley or cilantro can brighten up the flavors. For the full recipe, check out the [Full Recipe]. {{image_4}} You can easily change the flavors of crispy air fryer chickpeas. For a new taste, try using different spice blends. Italian herbs, like oregano and basil, give a fresh twist. You can also use curry powder for a warm, spicy flavor. Just mix these spices with the oil before coating the chickpeas. Experimenting with flavors is part of the fun! If you want a sweet treat, you can make sweet chickpeas. Instead of spices, use cinnamon and a bit of sugar. Mix 1 tablespoon of honey or maple syrup with the chickpeas. Coat them well before air frying. This sweet version makes a great snack for kids or a tasty dessert! Crispy chickpeas are versatile and fun to serve. You can enjoy them as a snack on their own. They add a nice crunch to salads and grain bowls. Try tossing them with greens, veggies, and your favorite dressing. You might even sprinkle them on soups for extra texture. They taste great in many dishes! For the full recipe, check out the Crispy Air Fryer Chickpeas section. To keep your crispy chickpeas fresh, store them in an airtight container. This helps lock in their crunch. Avoid leaving them at room temperature for long. A cool, dry place works best. If you want to keep them extra crunchy, add a paper towel inside the container. This absorbs any moisture. If your chickpeas lose their crispiness, don’t worry. You can revive them easily. Preheat your air fryer to 350°F (175°C). Spread the chickpeas in a single layer in the basket. Air fry for about 5 to 10 minutes. Check them often. They’ll crisp back up quickly! Crispy chickpeas stay fresh for about 3 to 5 days when stored properly. After this time, they may lose their crunch. For the best taste and texture, enjoy them within the first few days. If you want to keep them longer, consider freezing them. Just remember to reheat them later for that perfect crunch! Yes, you can use dried chickpeas. However, you must soak and cook them first. Soaking helps to soften the chickpeas. It also makes them cook evenly. After soaking, boil them until tender. This may take one to two hours. Once cooked, drain and dry them before air frying. This method requires more time but can give you a fresher taste. To add spice, try extra cayenne pepper. You can also use chili powder or crushed red pepper. Mix these spices with the oil before coating the chickpeas. Start with a small amount, then taste the mix. Adjust to your heat level. For a smoky taste, chipotle powder works well too. These options will elevate your chickpeas to a new flavor level. Crispy chickpeas are fun to use in many dishes. Here are some ideas: - Salads: Add them for crunch and protein. - Grain bowls: They fit well in quinoa or rice bowls. - Soups: Top soups for added texture. - Snacks: Enjoy them straight from the bowl. These ideas help you mix crispy chickpeas into your meals easily. For the complete recipe, check out the Full Recipe section. This blog post covered all you need to know about crispy chickpeas. We explored key ingredients like chickpeas, oil, and spices, plus optional additions for flavor. I shared step-by-step instructions for preparation and cooking, along with tips for the best texture. In the end, remember, you can customize your chickpeas to your taste. Try different spices or serve them in various dishes. With practice, you'll master this tasty snack. Enjoy your cooking journey and make these chickpeas a favorite in your kitchen!

Crispy Air Fryer Chickpeas Flavorful Snack Idea

Looking for a tasty yet healthy snack? Crispy air fryer chickpeas are your answer! I’ll show you how to turn

To make these tasty chicken bites, you will need: - 1 pound boneless, skinless chicken breast, cut into bite-sized pieces - 1/2 cup honey - 1/4 cup soy sauce - 2 tablespoons sriracha (adjust to your desired spice level) - 1 tablespoon rice vinegar - 1 teaspoon garlic powder - 1/2 teaspoon ground ginger - 1/4 teaspoon black pepper - 2 tablespoons sesame seeds - 2 green onions, finely sliced - 2 tablespoons vegetable oil If you can’t find some ingredients, don't worry! Here are some great substitutes: - Use maple syrup instead of honey for a different sweetness. - Swap soy sauce with tamari for a gluten-free option. - Try chili garlic sauce if you want more heat than sriracha. - Use apple cider vinegar instead of rice vinegar for a slight change in flavor. - Ground ginger can be replaced with fresh ginger for a fresher taste. Using fresh ingredients makes a big difference. Fresh chicken gives the best flavor and texture. Fresh green onions add a nice crunch and brightness. Also, fresh spices have a stronger taste. They wake up your dish and make it more exciting. Always look for the freshest options when you shop. This choice will make your Sweet and Spicy Chicken Bites stand out! Don't forget to check out the Full Recipe for all the steps to prepare this dish. Start by gathering your ingredients. In a medium bowl, mix the honey, soy sauce, sriracha, rice vinegar, garlic powder, ground ginger, and black pepper. Use a whisk to blend everything well. This mix will give your chicken a sweet and spicy kick. Next, add the bite-sized chicken pieces to the bowl. Make sure each piece is well-coated with the marinade. Cover the bowl with plastic wrap or a lid. Place it in the fridge for at least 30 minutes. If you can wait, let it marinate for up to 2 hours. This will make the chicken even more flavorful. Now, it’s time to cook! Heat vegetable oil in a large skillet over medium-high heat. Once the oil is hot, take the chicken from the fridge. Let the extra marinade drip off before placing the chicken in the skillet. Cook in a single layer for about 4-5 minutes on each side. Check for doneness by cutting into a piece; it should have no pink inside. While the chicken cooks, pour the reserved marinade into a small saucepan. Heat it over medium heat until it simmers. Let it cook for about 5 minutes to thicken slightly. When the chicken is ready, drizzle the thickened sauce over it. Toss gently to coat every piece. Let it cook for another 2 minutes to soak in the flavors. Finally, remove the skillet from the heat. Sprinkle sesame seeds and sliced green onions on top. This adds flavor and a nice crunch. Your sweet and spicy chicken bites are now ready to serve! For the full recipe, check the earlier section. To get the best texture, start with good chicken. Use boneless, skinless chicken breast. Cut it into bite-sized pieces, so they cook evenly. Marinate the chicken for at least 30 minutes. This helps it soak up all the flavors. For a nice crust, heat your skillet well before adding the chicken. Cook the chicken until it's golden brown. This gives you a great crunch on the outside while keeping it juicy inside. You can easily adjust the spice in this recipe. If you like it mild, use less sriracha. Start with one tablespoon and taste the marinade. Add more if you want it spicier. You can also add some red pepper flakes for extra heat. If you want a sweet taste, balance it with honey. Sweet and spicy can be a perfect match, so taste as you go! Presentation matters, so serve the chicken in a fun way. Use a colorful platter or small bowls. Drizzle the extra sauce over the top for a glossy finish. Adding a sprinkle of sesame seeds gives a nice crunch. Finely sliced green onions add freshness. For sides, try steamed rice or Asian slaw. These will enhance the dish and make it feel complete. For the full recipe, refer to the directions above. {{image_4}} You can switch chicken for other proteins. Tofu works well for a vegetarian option. Choose firm tofu for better texture. Shrimp is another great choice. It cooks quickly and absorbs flavors nicely. Both options keep the dish tasty and fun. Adding vegetables boosts nutrition. Try bell peppers, broccoli, or snap peas. These add color and crunch. Chop them into small pieces. You can sauté them with the chicken or add them to the marinade. This makes your meal even healthier. You can make this dish low-carb or keto-friendly. Replace honey with a low-carb sweetener. Use soy sauce or coconut aminos for flavor. Serve with cauliflower rice instead of regular rice. This keeps the meal light while still being delicious. To keep your Sweet and Spicy Chicken Bites fresh, start by letting them cool. Place them in an airtight container. This helps prevent moisture loss. Store them in the fridge. They can last up to four days. If you want to keep them longer, consider freezing. Reheating can be tricky. To keep your chicken bites tasty, use the oven. Preheat it to 350°F (175°C). Place the chicken bites on a baking sheet. Heat for about 10-15 minutes. This keeps them crispy outside and juicy inside. You can also use a microwave. Just cover with a damp paper towel. Heat in short bursts to avoid drying them out. To freeze, make sure the chicken is fully cooled. Place the bites in a freezer-safe bag. Remove as much air as possible. They can last up to three months in the freezer. When ready to eat, thaw in the fridge overnight. Reheat as mentioned above for best results. By following these steps, you can enjoy your Sweet and Spicy Chicken Bites later! For the full recipe, check out the previous section. Yes, you can prep these chicken bites ahead of time. Marinate the chicken for up to two hours before cooking. For longer storage, you can freeze the marinated chicken. Just remember to thaw it in the fridge before cooking. This makes dinner a breeze on busy nights. These chicken bites pair well with many sides. Consider serving them with: - Steamed rice - Asian slaw - Crispy wontons - Fresh veggie sticks Each side brings out the flavors and adds texture. You can also drizzle extra sauce on the sides for added taste. The chicken bites stay fresh for about three to four days in the fridge. Make sure to store them in an airtight container. Reheat them in a skillet or microwave when you’re ready to eat. Enjoy them as a snack or a quick meal! Sweet and Spicy Chicken Bites are easy to make with fresh ingredients. We covered how to marinate and cook the chicken for great flavor. Use tips to adjust spice levels and achieve a perfect texture. You can even swap proteins and add veggies for more nutrition. Don’t forget about proper storage to keep them tasty. With these steps, you can enjoy delicious bites any day. Enjoy your cooking adventure!

Savory Sweet and Spicy Chicken Bites Recipe

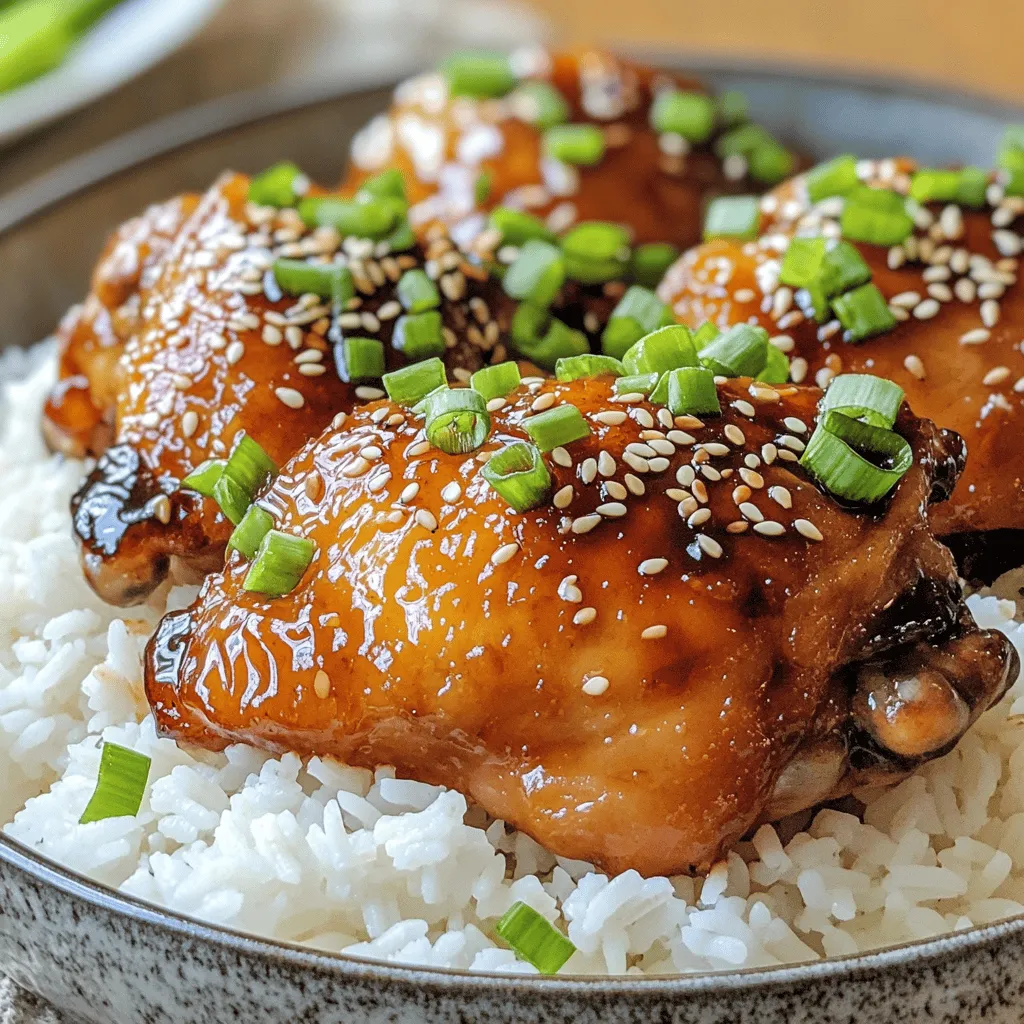
Get ready to indulge in a flavor explosion with my Savory Sweet and Spicy Chicken Bites recipe! You’ll love how

- Black beans - Corn kernels - Red bell pepper - Red onion - Avocado - Cherry tomatoes - Fresh cilantro - Lime juice - Extra virgin olive oil - Ground cumin - Chili powder - Salt and pepper The ingredients for the Zesty Black Bean Salad are simple yet flavorful. Black beans are the star. They provide a great source of protein and fiber. Corn adds a sweet crunch, while red bell pepper offers vibrant color and taste. Red onion gives a mild bite that enhances the overall dish. Ripe avocado brings creaminess and healthy fats. Cherry tomatoes add freshness and color. Fresh cilantro gives a bright flavor that ties everything together. Lime juice adds zesty brightness, making the salad come alive. Extra virgin olive oil enriches the flavors and adds a smooth finish. Ground cumin and chili powder bring warmth and depth, while salt and pepper balance the taste. This salad is not just delicious; it is also healthy. Each serving has around 200 calories. It is packed with about 10 grams of protein and 12 grams of fiber. The healthy fats from the avocado help keep you full and satisfied. This salad is perfect for a light meal or as a side dish. It’s colorful, tasty, and good for you. For the full recipe, check out the Zesty Black Bean Salad section. Enjoy making this healthy delight! 1. Combining the base ingredients Start with a large mixing bowl. Add the rinsed black beans, corn, diced red bell pepper, and chopped red onion. Gently stir them to mix well. This step creates a colorful base for your salad. 2. Integrating the dressing In a small bowl, whisk together the lime juice, olive oil, cumin, and chili powder. Add salt and pepper to taste. Drizzle this dressing over your salad mix. Gently toss everything to coat the ingredients evenly. This dressing adds zest and enhances the flavors. 3. Final touches Carefully fold in the cherry tomatoes and diced avocado. Make sure to keep the avocado pieces intact. Now, add the chopped cilantro and mix gently. Let the salad sit for about 10 minutes. This resting time allows the flavors to meld beautifully. - Presentation tips for a colorful display Serve your zesty black bean salad in a large glass bowl or individual cups. This showcases the vibrant colors of the ingredients. Garnish with extra cilantro and a few lime wedges on the side. This adds an inviting touch. - Suggested pairings with other dishes This salad pairs well with grilled chicken or fish. You can also serve it alongside tacos for a fun meal. Enjoy the freshness and bold flavors of this dish with your favorite sides. Check out the Full Recipe for more details on making this delightful salad! You can easily change this salad to fit your taste. For the black beans, you can swap them for chickpeas or kidney beans. If you want a crunchier texture, add bell peppers or cucumbers. Want more protein? Toss in some grilled chicken or shrimp. Quinoa or brown rice makes the salad heartier, too. Spices can change your salad's taste. You may want to add more cumin or chili powder for extra kick. If you like it spicy, add jalapeños or hot sauce. Always let the salad sit for ten minutes before serving. This lets the flavors blend well. Enjoy this salad as a side or a main dish. You’ll love how fresh and bright it tastes! For the complete recipe, check out the Full Recipe. {{image_4}} You can change the veggies in your Zesty Black Bean Salad based on the season. In summer, add fresh zucchini or cucumbers for a cool crunch. In fall, roasted butternut squash brings sweetness. Winter calls for hearty kale or spinach. These changes keep the salad fresh and exciting. Using seasonal herbs can also boost flavor. Try basil in summer or parsley in spring. Cilantro is great all year but will shine with fresh tomatoes. These herbs add a burst of color and taste. This salad is simple to make vegan or gluten-free. The base is already plant-based and gluten-free. Just make sure all your ingredients, like corn and beans, are certified gluten-free. If you want to lower the calories, swap avocado with diced cucumber. You can use less olive oil for a lighter dressing. Each of these changes keeps the salad tasty while fitting your diet. For the full recipe, check out the section above. Once you make the zesty black bean salad, you should store it in the fridge. Use an airtight container to keep it fresh. This salad stays good for about 3 to 5 days when chilled. If you notice any browning on the avocado, just remove those pieces. You can freeze some of the salad's components. For example, black beans and corn freeze well. Place them in freezer bags and remove as much air as possible. They can last up to 3 months in the freezer. When you want to eat them, thaw them in the fridge overnight. Then, reassemble your salad by mixing the thawed beans and corn back with the fresh ingredients. It helps to add fresh lime juice after thawing for a vibrant taste. For the full recipe, refer back to the ingredient list to ensure everything is fresh and flavorful. How to prevent the avocado from browning? To stop the avocado from browning, use lime juice. The acid in lime juice slows oxidation. You can also store the salad in an airtight container. This keeps air out and helps preserve it. Can I make it ahead of time? Yes, you can make this salad ahead. Prepare it up to a day in advance. Just add the avocado right before serving, so it stays fresh. What are the best serving suggestions? Serve this salad as a main dish or a side. It pairs well with grilled chicken or fish. You can also add tortilla chips for crunch. Can I use dried black beans instead of canned? Yes, you can use dried black beans. Just soak and cook them first. This ensures they’re tender and ready for the salad. What's the difference between regular and low-sodium black beans? Regular black beans have added salt, while low-sodium beans have less salt. Low-sodium beans are a healthier choice if you're watching your salt intake. This blog post covered a tasty salad packed with fresh ingredients. You learned about each component, from black beans to avocado. We explored how to prepare the salad with easy steps and fun serving ideas. There are also tips for customizing flavors and storage options. Remember, you can adjust the recipe to fit your taste. Experimenting with seasonality enhances freshness. I hope you enjoy making this salad! Your kitchen will shine with colorful, healthy dishes.

Zesty Black Bean Salad Flavorful and Healthy Delight

Looking for a quick, tasty dish that packs a nutritious punch? Try my Zesty Black Bean Salad! It’s filled with

To make my vegan mac and cheese, you need these key items: - 2 cups elbow macaroni - 1 cup raw cashews (soaked in water for 2-4 hours) - 1/2 cup nutritional yeast - 1 cup unsweetened almond milk (or any preferred plant-based milk) - 2 tablespoons freshly squeezed lemon juice - 1 tablespoon Dijon mustard - 1 teaspoon garlic powder - 1 teaspoon onion powder - 1/2 teaspoon turmeric (for vibrant color) - Salt and black pepper to taste These ingredients create a creamy and rich sauce. The raw cashews give it that smooth texture. Nutritional yeast adds a cheesy flavor without dairy. You can take your dish up a notch with these extras: - 1/4 teaspoon smoked paprika for an extra depth of flavor - Fresh parsley, chopped (for garnish) - Additional spices for personalization Adding smoked paprika gives a hint of smokiness. Fresh parsley brightens up the dish and adds color. Feel free to mix in your favorite spices for a twist. For the full recipe, check out the section above. 1. Start by boiling a large pot of salted water. 2. Add the elbow macaroni to the boiling water. 3. Cook the macaroni until it is al dente, as per the package instructions. 4. Once cooked, drain the pasta in a colander and set it aside. 1. While the pasta cooks, prepare the creamy sauce. 2. In a high-speed blender, mix the soaked cashews, nutritional yeast, almond milk, lemon juice, Dijon mustard, garlic powder, onion powder, turmeric, salt, and pepper. 3. Blend the ingredients until the mixture is smooth and creamy. 4. If needed, stop the blender to scrape down the sides. 5. Pour the blended sauce into a large saucepan over medium heat. 6. Cook the sauce for about 5 minutes, stirring frequently. 1. Once the sauce is heated through, fold in the cooked macaroni. 2. Stir gently to coat all the pasta with the creamy sauce. 3. Allow the mixture to heat for an additional 2-3 minutes. 4. If you like, sprinkle smoked paprika over the top. 5. Taste and adjust the seasonings with more salt and pepper if needed. 6. Serve the creamy vegan mac and cheese hot, garnished with chopped parsley. For the full recipe, check out the Creamy Dreamy Vegan Mac & Cheese. To make your vegan mac and cheese truly creamy, start with soaking the cashews. Soak them in water for 2-4 hours. This softens them and helps create a smooth sauce. Next, choose a high-speed blender. A strong blender makes it easy to blend the cashews into a creamy texture. If you don’t have one, blend in smaller batches to ensure everything mixes well. Lastly, keep an eye on the cooking temperature. Heat the sauce gently over medium heat. Too high of a heat can cause it to separate. Stir often for the best results. Seasoning is key to a flavorful vegan mac and cheese. Try adding different spices to suit your taste. A little smoked paprika can add a nice smoky flavor. Experiment with garlic powder and onion powder. They bring out the richness of the dish. Adding a pinch of cayenne pepper can give it a spicy kick if you like heat. To avoid bland mac and cheese, taste as you go. Adjust salt and pepper until it’s just right. Everyone’s taste is different, so make it yours! For the full recipe, check out Creamy Dreamy Vegan Mac & Cheese. {{image_4}} You can easily make vegan mac and cheese gluten-free. First, choose a gluten-free pasta. Options like brown rice or quinoa pasta work well. These alternatives provide a similar texture. Next, for thickening, use cornstarch or arrowroot powder instead of regular flour. Mix it with a bit of cold almond milk before adding to the sauce. This keeps it smooth and creamy. Add-ins can make your dish even better. Incorporating vegetables like spinach, broccoli, or bell peppers boosts nutrition. You can steam or sauté them before mixing in. For protein, try adding tofu or lentils. Crumbled tofu adds a nice texture, while lentils increase protein. Both options enhance the meal's heartiness. Make your mac and cheese unique by changing the flavor profile. If you like spice, toss in diced jalapeños for a kick. They add heat and a fresh taste. For a more aromatic twist, infuse herbs like basil, thyme, or oregano. These herbs bring depth and freshness. You can even mix and match these ideas for a fun culinary adventure. Explore the Full Recipe for more ways to customize your vegan mac and cheese! To keep your vegan mac and cheese fresh, you need to store it well. First, let it cool down before putting it in the fridge. Use an airtight container to keep it safe from other smells. Good options include glass containers or BPA-free plastic ones. These containers help keep the creaminess intact. When it’s time to enjoy your leftovers, reheating is key. You can use the microwave or the stovetop. If using a microwave, place the mac and cheese in a bowl and cover it with a damp paper towel. This keeps moisture in, so it stays creamy. Heat it in short bursts, stirring in between. For stovetop reheating, add a splash of plant-based milk to a pan. Warm it on low heat, stirring gently. This helps bring back the smooth texture. If you want to save some for later, freezing is a great option. Portion it into freezer-safe containers. Make sure to leave some space for expansion. When ready to eat, thaw it in the fridge overnight before reheating. Enjoy your creamy delight anytime! If you want a nut-free version, use sunflower seeds instead of cashews. Another great option is white beans; they blend well and add creaminess. You can also try using silken tofu for a rich texture. Just blend any of these with nutritional yeast and plant-based milk for that creamy sauce. Look for brands like Daiya, Violife, or Follow Your Heart. These brands have great taste and melt well. You can also try making your own cheese sauce using nutritional yeast and spices, as I do in my full recipe. This gives you control over flavors. Yes, you can make vegan mac and cheese ahead of time! Store it in an airtight container in the fridge for up to four days. To reheat, warm it in a saucepan over low heat. Add a splash of plant-based milk to keep it creamy. If you freeze it, use it within a month for the best flavor. Vegan mac and cheese is a tasty and fun dish you can easily make. We covered the main ingredients like elbow macaroni and nutritional yeast. You learned tips for creamy sauce and how to personalize flavors with spices. Explore gluten-free options and tasty add-ins for extra nutrition. Don't forget how to store and reheat leftovers for later. Enjoy your cooking and share your delicious vegan mac and cheese creations with others!

Vegan Mac and Cheese Irresistible Creamy Delight

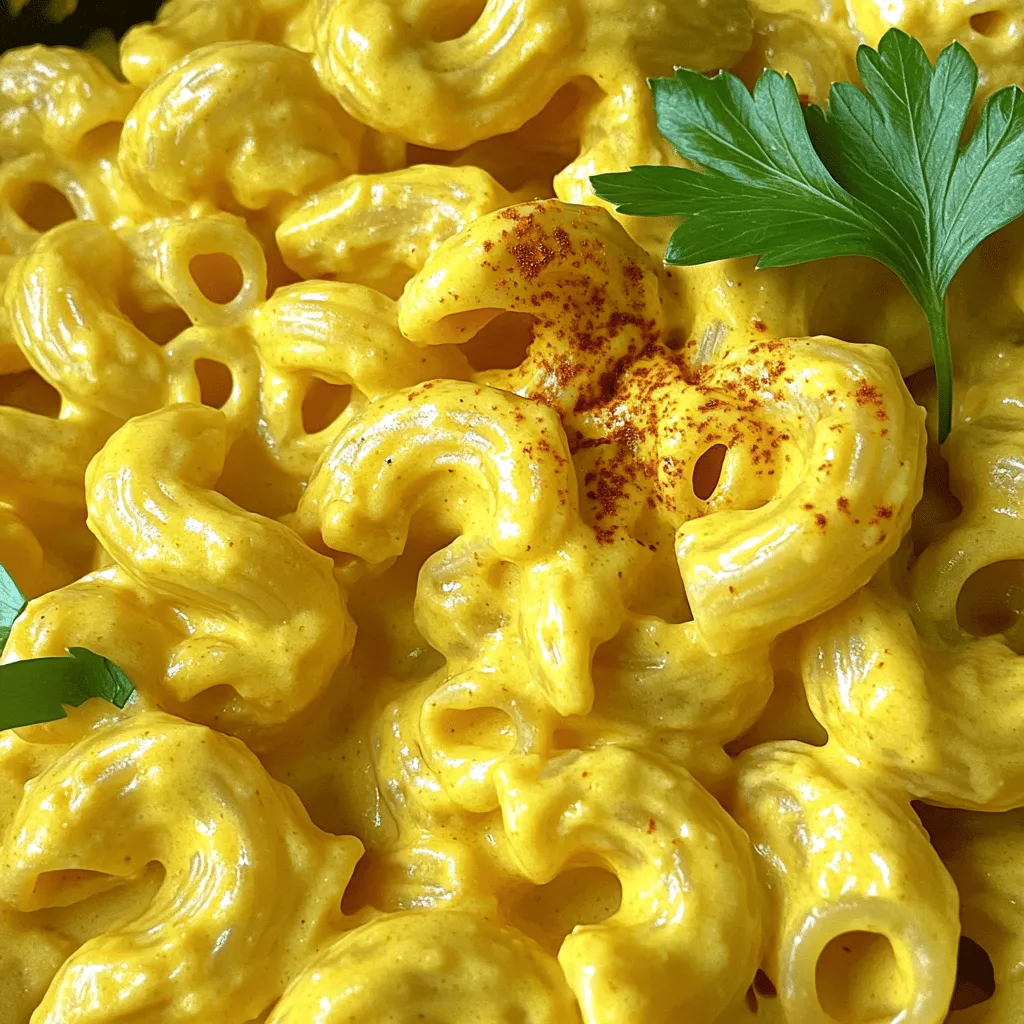
Are you ready to indulge in a bowl of warm, creamy vegan mac and cheese? This dish is not just

- 1 cup rolled oats - 2 cups almond milk (or alternative) - 2 tablespoons natural peanut butter - 1 medium ripe banana, mashed until smooth - 1 tablespoon honey or maple syrup - 1 teaspoon pure vanilla extract - 1/2 teaspoon ground cinnamon - Sliced banana - Chopped nuts (walnuts or almonds) - Chia seeds - Dark chocolate chips When I make peanut butter overnight oats, I always start with the main ingredients. Rolled oats serve as the base. They soak up the almond milk, making them soft and creamy. I choose almond milk, but you can use any milk you like. Next, I add natural peanut butter. This ingredient gives the oats a rich flavor and protein boost. I also mash a ripe banana into the mix. It adds sweetness and makes everything smooth. Sometimes, I want to enhance my oats with optional ingredients. Honey or maple syrup can add extra sweetness if you like. Pure vanilla extract gives a nice aroma, while ground cinnamon adds warmth and spice. These ingredients are not required, but they can elevate the dish. For toppings, I get creative. I love adding sliced banana for freshness. Chopped nuts, like walnuts or almonds, provide crunch. Chia seeds add texture and healthy benefits. Dark chocolate chips can satisfy my sweet tooth. Each topping adds a unique touch, making breakfast even more exciting. You can find the full recipe to get started. Just gather these ingredients, and you are ready to create your own delicious peanut butter overnight oats! 1. Start with a large bowl. Add 1 cup of rolled oats. 2. Pour in 2 cups of almond milk. This makes the oats soft. 3. Add 2 tablespoons of natural peanut butter. Make sure it’s soft for mixing. 4. Mash 1 ripe banana until smooth, then mix it in. 5. If you like sweet oats, add 1 tablespoon of honey or maple syrup. 6. Pour in 1 teaspoon of pure vanilla extract and sprinkle in 1/2 teaspoon of ground cinnamon. 7. Mix all the ingredients well. Use a whisk or spoon. Make sure the peanut butter is blended. 1. Once mixed, spoon the oats into jars or containers. 2. Seal the jars tightly. Place them in the refrigerator overnight. This helps the oats soak up the milk. 1. In the morning, take the jars out. Stir the oats well. 2. If they are too thick, add a splash of milk to loosen them. 3. Top with fresh sliced banana, chopped nuts, chia seeds, or dark chocolate chips. Enjoy your tasty meal! For the complete recipe, check out the [Full Recipe]. Preparing multiple servings is a smart way to save time. You can make enough for the week. Just double or triple the recipe. Store each serving in its own jar. This makes breakfast quick and easy. Soaking time is key. I recommend soaking your oats for at least four hours. This gives the oats time to absorb the milk. The longer they soak, the creamier they become. Overnight is best for the best texture. When choosing peanut butter, opt for natural types. They have no added sugars or oils. This gives your oats a pure peanut taste. Processed versions can be sweeter and less healthy. To soften peanut butter for easy mixing, try a few tricks. You can microwave it for a few seconds. This makes it easier to stir. Alternatively, leave it out at room temperature for about 30 minutes. Controlling the thickness of your oats is simple. If you want thicker oats, use less milk. For creamier oats, add more milk. You can adjust this to fit your taste. To customize creaminess, consider adding yogurt. A spoonful of Greek yogurt can add richness. You can also blend your oats for a smoother texture if you prefer. Experiment to find your perfect balance! {{image_4}} You can jazz up your peanut butter overnight oats in fun ways. Here are two delicious ideas: - Chocolate peanut butter overnight oats: Just mix in 2 tablespoons of cocoa powder. This adds a rich chocolate flavor. You can also top with chocolate chips for extra indulgence. - Berry-infused overnight oats: Add 1/2 cup of fresh or frozen berries. Strawberries, blueberries, or raspberries work great. They add a burst of flavor and color. If you have specific dietary needs, you can still enjoy this recipe. - Gluten-free alternatives: Use gluten-free oats instead of regular rolled oats. This keeps your meal safe for those with gluten intolerance. - Nut-free options: If you can’t have nuts, swap peanut butter for sunflower seed butter. It has a similar texture and taste without the allergens. Changing a few ingredients can give you a new taste. - Substituting type of milk: You can use any milk you like. Try oat milk, soy milk, or coconut milk. Each will give a different flavor. - Different sweetener options: Instead of honey or maple syrup, use agave syrup or stevia. This allows you to control the sweetness while keeping it healthy. For the full recipe, check the Peanut Butter Banana Bliss Overnight Oats. Enjoy exploring these variations! Peanut butter overnight oats can last in the refrigerator for up to five days. If you see any signs of spoilage, such as an off smell or mold, do not eat them. Always check before enjoying your oats. You can freeze overnight oats for longer storage. Portion them into jars or containers and place them in the freezer. When you’re ready to eat, thaw them in the fridge overnight. For a quicker option, you can microwave them for a minute or two. The best jars for overnight oats are mason jars. They seal well and keep your oats fresh. You can also use lidded containers or vacuum-sealed bags to maintain freshness. This helps your oats stay tasty and delicious until you’re ready to enjoy them. You can store overnight oats for up to five days in the fridge. After that, the oats may lose their texture and flavor. Keep them in a sealed jar or container to keep them fresh. Always check for any signs of spoilage, like an off smell or mold. Yes, you can use quick oats, but there are some differences. Quick oats cook faster and absorb liquid more quickly. This means they can make your overnight oats mushier. Rolled oats give a chewier texture. If you prefer a thicker and heartier meal, stick with rolled oats. Peanut butter overnight oats are indeed healthy! They are rich in nutrients. Here are some benefits of the ingredients: - Rolled oats: Provide fiber, keeping you full longer. - Peanut butter: Offers healthy fats and protein, which help build muscle. - Banana: Adds potassium and natural sweetness, plus vitamins. - Almond milk: Low in calories and dairy-free, great for many diets. This meal is both filling and nutritious, making it a great choice for breakfast! This blog post covered how to make tasty overnight oats. We discussed key ingredients like rolled oats, almond milk, and ripe bananas. I shared tips for storage, serving, and how to adjust flavors. You learned about variations for different diets and preferences. These oats are easy to prepare and fun to customize. Enjoy a quick, healthy meal that fits your taste. Dive in and experiment with your creations. You’ll love the process and the results!

Peanut Butter Overnight Oats Easy and Nutritious Recipe

Looking for a quick, easy breakfast? Peanut butter overnight oats are your answer! This tasty recipe combines wholesome ingredients like

To make easy teriyaki chicken, gather these simple items. Each ingredient plays a key role in creating that rich, savory flavor. - 1 lb boneless skinless chicken thighs - 1/2 cup soy sauce - 1/4 cup brown sugar - 2 tablespoons honey - 2 tablespoons rice vinegar - 2 cloves garlic, minced - 1 teaspoon ginger, grated - 1 tablespoon cornstarch - 2 tablespoons water - 2 tablespoons sesame seeds (for garnish) - 3 green onions, chopped (for garnish) - Cooked rice or quinoa (for serving) These ingredients are easy to find at your local store. Each one adds a unique taste. The chicken thighs provide a juicy base. Soy sauce gives that deep umami flavor. Brown sugar and honey add sweetness, balancing the saltiness. Rice vinegar adds a slight tang. Garlic and ginger bring warmth to the dish. Cornstarch thickens the sauce, making it glossy. Sesame seeds and green onions add crunch and color. For a perfect meal, serve the chicken over rice or quinoa. The grains soak up the delicious sauce. Enjoy your cooking adventure! For the complete recipe, check out the Full Recipe. Start by mixing the marinade. In a bowl, combine the soy sauce, brown sugar, honey, rice vinegar, minced garlic, and grated ginger. Whisk until smooth. Next, add the chicken thighs, making sure each piece gets covered in the marinade. Cover the bowl with plastic wrap. Let it sit in the fridge for at least 30 minutes. For the best flavor, marinate for up to 2 hours. Now, heat a non-stick skillet over medium-high heat. Take the chicken out of the marinade, but keep the marinade for later. Place the chicken thighs in the hot skillet. Cook for 5-7 minutes on each side. You want a nice golden-brown color. To check for doneness, use a meat thermometer. Look for an internal temperature of 165°F (75°C). While the chicken cooks, prepare the sauce. In a small saucepan, pour in the reserved marinade. Bring it to a gentle simmer over medium heat. In another bowl, mix the cornstarch and water until smooth. Once the marinade simmers, whisk in the cornstarch mixture. Stir for 2-3 minutes until the sauce thickens and shines. After the chicken is cooked, slice it into strips. Put the chicken back in the skillet. Pour the thickened teriyaki sauce over the chicken. Toss it gently to coat every piece. Let it cook together for another 2 minutes. This helps the chicken soak up the flavors. Serve the teriyaki chicken over cooked rice or quinoa. Finish with sesame seeds and chopped green onions for a crunchy touch. Enjoy your meal! To get juicy chicken, let it rest after cooking. Resting helps the juices stay inside. This makes each bite tender and flavorful. Use a meat thermometer to check the chicken. Insert it into the thickest part. The chicken should reach 165°F (75°C). This ensures it is safe to eat. You can add more flavor with spices. Try adding a pinch of red pepper flakes for heat. A dash of sesame oil brings a nutty taste. Fresh herbs like cilantro or basil make great garnishes. They add color and freshness to your plate. Don't overcook the chicken. This makes it dry and tough. Keep an eye on the cooking time. Also, don’t skip the marinade step. Marinating adds depth to the flavor. A good soak turns ordinary chicken into something special. {{image_4}} You can easily switch up the protein in this dish. If you prefer chicken breasts, they work well too. Chicken breasts are lean and cook quickly. Just be careful not to overcook them. They can dry out faster than thighs. For a vegetarian option, use firm tofu. Tofu soaks up the teriyaki sauce nicely. Cut it into cubes and marinate it just like the chicken. Want to spice things up? Add some chili flakes or sriracha to the teriyaki sauce. This will give your dish a nice kick. If you enjoy citrus flavors, consider adding orange or lime juice. A splash of citrus adds brightness and freshness. You can also mix in some pineapple juice for a tropical twist. This makes the sauce sweet and tangy. When it comes to sides, rice is a classic choice. But you can serve this dish with quinoa for a healthy twist. Quinoa adds a nutty flavor and extra protein. You might try noodles as another option. They soak up the sauce well, making each bite delicious. Pair your teriyaki chicken with steamed veggies for a colorful plate. Broccoli, snap peas, or bell peppers are great choices. For the full recipe, check out the complete guide to making Easy Teriyaki Chicken. To keep your teriyaki chicken fresh, follow these steps: - Allow the chicken to cool to room temperature. - Place it in an airtight container. - Store it in the refrigerator for up to three days. Using a glass container helps avoid stains and odors. When reheating, you have a few options: - Use a microwave for quick heating. - Heat on the stovetop over low heat. - Add a splash of water to keep the chicken moist. To maintain flavor, cover the chicken while reheating. To freeze your teriyaki chicken for long-term storage: - Place cooled chicken in freezer-safe bags. - Remove excess air before sealing. - Store for up to three months. For thawing, move it to the fridge overnight. You can also cook it from frozen, just add extra time. You can pair this dish with many tasty sides. Here are my top picks: - Steamed broccoli - Stir-fried vegetables - Fried rice - Quinoa salad - Cucumber salad These sides add color and texture to your meal. They also enhance the flavors of the teriyaki chicken. Yes, you can make this dish in advance! Here are some tips: - Marinate the chicken the night before. - Cook the chicken and store it in the fridge. - Reheat it just before serving. Making it ahead saves time on busy nights. Plus, the flavors blend better when you let it sit. You can easily modify the recipe for different diets: - For gluten-free, use tamari instead of soy sauce. - To reduce sugar, use a sugar substitute or less honey. These adjustments keep the meal tasty and meet your needs. Homemade teriyaki is fresher and more flavorful. Here’s why: - You control the ingredients and sugar level. - Store-bought often has preservatives. - You can adjust the flavors to your liking. Making it at home gives you a better taste and quality. You can find the full recipe for Easy Teriyaki Chicken in the section above. It has all the details you need to make this delicious dish! This blog post covered the key ingredients for easy teriyaki chicken, step-by-step cooking instructions, and helpful tips. You learned about marinating chicken thighs for flavor, making a thick sauce, and avoiding common mistakes. I shared different ways to adjust the recipe, including protein swaps and flavor tweaks. Whether cooking for yourself or serving guests, these tips will help you create a delicious dish. Enjoy the flavors of homemade teriyaki chicken, and don't hesitate to experiment with your own twists!

Easy Teriyaki Chicken Tasty Dinner in Moments

Craving a quick meal that bursts with flavor? You’re in the right place! In this post, I’ll share my easy

- 4 large portobello mushrooms - 1 cup cooked quinoa - 1/2 cup cherry tomatoes, halved - 1/2 cup baby spinach, finely chopped - 1/4 cup crumbled feta cheese - 1/4 cup toasted pine nuts - 2 tablespoons extra virgin olive oil - 1 teaspoon garlic powder - Salt and freshly ground black pepper to taste - Fresh basil or parsley, finely chopped for garnish I love using portobello mushrooms in my recipes. They are big, meaty, and full of flavor. They make a great base for stuffing. The first step is to gather all your ingredients. You will need quinoa, cherry tomatoes, spinach, and feta cheese, among others. Each ingredient adds its own taste and texture to the dish. Quinoa gives a nice, nutty flavor and fills you up. Cherry tomatoes add a sweet touch, while spinach brings in some greens. Feta cheese provides a creamy and salty kick. Pine nuts add a crunchy element. Using fresh herbs like basil or parsley at the end makes it pretty. It also adds freshness to the dish. With these simple ingredients, you can create a dish that is both tasty and healthy. For the full recipe, check out the instructions that follow! 1. Preheat your oven to 375°F (190°C). This warm-up helps cook the mushrooms evenly. 2. Clean the portobello mushrooms. Remove the stems and use a small spoon to scrape out the dark gills. This makes space for the filling. Place the mushrooms, open side up, on a baking sheet lined with parchment paper. This step keeps your baking sheet clean. 1. In a large mixing bowl, combine the following: - 1 cup cooked quinoa - 1/2 cup cherry tomatoes, halved - 1/2 cup baby spinach, finely chopped - 1/4 cup crumbled feta cheese - 1/4 cup toasted pine nuts - 2 tablespoons extra virgin olive oil - 1 teaspoon garlic powder - Salt and freshly ground black pepper to taste Mix well until everything is evenly coated. 2. Now, take a spoon and fill each portobello mushroom with the quinoa mixture. Press it down gently to pack the filling. This helps it stay together. 1. Transfer the baking sheet with the filled mushrooms to your preheated oven. Bake for 20-25 minutes. The mushrooms should become tender, and the topping should turn golden brown and slightly crispy. 2. Once they are done, carefully remove the mushrooms from the oven. Let them cool for about 5 minutes. This cooling time helps with serving. 3. To make your dish look nice, sprinkle some freshly chopped basil or parsley on top just before serving. For more details, check the Full Recipe. To avoid soggy mushrooms, select large, firm portobellos. Clean them gently without soaking them in water. A quick rinse is fine, but dry them well. Remove the gills to create space for the filling. This also helps reduce moisture. For a crispy topping, use a mix of breadcrumbs and cheese. Sprinkle it on top just before baking. A drizzle of olive oil adds flavor and helps achieve that golden crunch. Spices and herbs can really lift your dish. I love using garlic powder, oregano, and thyme. Fresh basil or parsley adds brightness. Feel free to experiment with your favorites! If you want to adjust seasoning, taste your filling before stuffing. Add salt and pepper in small amounts. You want a balanced flavor that sings but doesn’t overwhelm. You need a few basic tools for this recipe. A mixing bowl and a spoon make prep easy. A small spoon helps remove the gills from the mushrooms. For baking, a rimmed baking sheet lined with parchment paper is best. This ensures even cooking and easy cleanup. If you have a cooling rack, place it on top of the baking sheet. This helps air circulate around the mushrooms for even cooking. Try these tips to make your stuffed portobello mushrooms shine. Use the Full Recipe to guide you through each step! {{image_4}} Vegetarian options You can make stuffed portobello mushrooms with many tasty vegetarian fillings. Try using black beans, corn, and diced bell peppers for a colorful mix. You can also use a blend of mushrooms, zucchini, and cheddar cheese. These options keep the dish fresh and add great flavor. Meat-based options For those who love meat, add ground turkey or sausage to your stuffing. Mix cooked meat with quinoa, diced onions, and spices. This adds richness and protein to your meal. Another great choice is chopped cooked bacon mixed with cream cheese. It makes the dish savory and fulfilling. Gluten-free suggestions Stuffed portobello mushrooms are easy to make gluten-free. Make sure to use gluten-free breadcrumbs or replace them with crushed nuts. Quinoa, which is naturally gluten-free, works perfectly as a base. You can also use rice or a mix of grains for a hearty filling. Vegan adaptations To make this dish vegan, skip the feta cheese and use a plant-based cheese instead. You can also add some nutritional yeast for a cheesy flavor. For a creamier texture, blend soaked cashews with a little water. This mix adds a rich taste without any animal products. Pairing ideas with sides Stuffed portobello mushrooms go well with many sides. Serve them with a fresh green salad or a side of roasted veggies. You can also pair them with a creamy soup for a warm meal. These sides enhance the flavors and make your meal more enjoyable. Creative serving presentation styles Presentation can make your meal look more appealing. Try placing the stuffed mushrooms on a colorful plate with a drizzle of balsamic glaze. Garnish with fresh herbs like basil or parsley for a pop of color. Arrange them on a wooden board for a rustic touch that guests will love. For the full recipe, check the section above. Enjoy your cooking adventure! To keep your stuffed portobello mushrooms fresh, store them in the fridge. Place leftovers in an airtight container. This keeps moisture in and prevents them from drying out. Make sure to eat them within three days for the best taste. Reheat your mushrooms in the oven. Set it to 350°F (175°C) and warm them for about 10-15 minutes. This method keeps the mushrooms tender and the filling crispy. You can also use the microwave, but it may make them soggy. If you choose the microwave, heat them for about 1-2 minutes. You can freeze stuffed mushrooms for later use. Wrap each mushroom tightly in plastic wrap, then place them in a freezer bag. This helps prevent freezer burn. When ready to cook, thaw them overnight in the fridge. Bake them at 375°F (190°C) for 20-25 minutes until heated through. Enjoy your savory stuffed portobello mushrooms later with ease! For a full recipe, check out the Full Recipe section. How many servings does this recipe provide? This recipe makes four servings. Each large portobello mushroom holds a nice amount of filling. You can adjust the number of mushrooms based on how many people you serve. Can I use different types of mushrooms? Yes, you can use other mushrooms like shiitake or cremini. However, make sure they are large enough to hold the filling. Each type will add its unique flavor and texture. What temperature should I bake stuffed mushrooms? You should bake stuffed mushrooms at 375°F (190°C). This temperature helps the mushrooms cook evenly and allows the filling to become golden and crisp. How do I know when the mushrooms are fully cooked? Mushrooms are done when they feel tender. The filling should also be golden brown on top. If you poke them gently, they should give a little but not be mushy. What can I use instead of feta cheese? If you want to replace feta cheese, try goat cheese or ricotta. These options will still give a creamy texture and enhance the flavor. Can I replace quinoa with rice or another grain? Yes, you can replace quinoa with rice or farro. Just make sure the grain is cooked before you mix it with the other ingredients. Each grain will bring a different taste and texture to the dish. For the full recipe, refer to the earlier sections. Stuffed portobello mushrooms are a fun and healthy dish. You learned about the key ingredients and step-by-step instructions to prepare them. I shared tips for texture, flavor, and even variations to suit any diet. Proper storage and reheating methods are vital for leftovers. Remember, customizing recipes adds your personal touch. Enjoy experimenting and making these mushrooms your own, whether you prefer a vegan option or a meaty twist! With this knowledge, you can impress friends and family at your next meal. Happy cooking!

Stuffed Portobello Mushrooms Savory and Simple Dish

Are you ready to elevate your dinner game? Stuffed Portobello mushrooms are not only savory but also simple to make.

The key to a tasty Garlic Parmesan Roasted Broccoli lies in its simple yet flavorful ingredients. Here’s what you need: - 1 large head of broccoli, cut into bite-sized florets - 4 tablespoons extra virgin olive oil - 4 cloves garlic, finely minced - 1/2 cup freshly grated Parmesan cheese - 1 teaspoon smoked paprika - Sea salt and freshly ground black pepper to taste - 1 tablespoon freshly squeezed lemon juice - Zest of 1 medium lemon - Optional: a pinch of red pepper flakes for heat These ingredients work together to create a dish that is both healthy and delicious. Broccoli is packed with vitamins and minerals, making it a great choice for a side dish. The olive oil adds healthy fats, while garlic brings a bold flavor. Parmesan adds a rich, savory note that perfectly complements the roasted broccoli. Feel free to adjust the spices to your taste. If you like heat, the red pepper flakes will give you a nice kick. For more flavor, consider adding your favorite herbs. This dish is all about making it your own! For the complete cooking instructions, check out the Full Recipe. - Preheat your oven to 425°F (220°C) for optimal roasting. - In a large bowl, mix broccoli florets with olive oil, garlic, smoked paprika, salt, and pepper. Toss it well so every piece gets coated. - Spread the broccoli in a single layer on a baking sheet. This helps it roast evenly and get crispy. - Roast the broccoli for 15-20 minutes. Toss it halfway through for even cooking. Look for crispy edges and tender bites. - After roasting, sprinkle the broccoli with Parmesan, lemon juice, and zest. Toss gently to combine. The heat will make the cheese melt just right. - Serve the warm broccoli right away for the best flavor. Garnish it with extra Parmesan if you like. Enjoy your Garlic Parmesan Roasted Broccoli as a tasty side dish! Check out the Full Recipe for more tips. To achieve crispy and tender broccoli, start by using high heat. Preheat your oven to 425°F (220°C). This temperature helps the broccoli roast quickly. Spread the florets in a single layer on your baking sheet. If they are too close, they will steam instead of roast. Toss the broccoli halfway through cooking. This action ensures even browning and crispiness. Look for dark edges and tender stems as signs of perfect roasting. When selecting broccoli, look for heads that are bright green. The florets should be tightly packed. Avoid any yellowing or wilting, as these are signs of age. The stems should be firm and not too woody. Fresh broccoli has a nice, earthy smell. This scent indicates that it is fresh and ready to cook. If you can, choose organic broccoli to reduce pesticide exposure. To enhance the flavor of your Garlic Parmesan Roasted Broccoli, consider adding extra spices. A pinch of red pepper flakes gives a nice kick. You can also try adding fresh herbs like thyme or rosemary. These herbs bring a lovely aroma and complexity to the dish. For a different twist, experiment with lemon zest or balsamic vinegar. Each of these can elevate the overall taste and make your dish even more exciting. For the complete recipe, check out the Full Recipe. {{image_4}} You can mix it up with cheese. Try using cheddar for a sharper taste. Feta adds a crumbly texture and a salty bite. Goat cheese gives a creamy richness. For a nutty flavor, opt for Gruyère. Each cheese brings a unique twist to your Garlic Parmesan Roasted Broccoli, making it fun to explore. If you want to try something different, consider air frying or steaming. For air frying, set it to 400°F (200°C) and cook for about 10-12 minutes. Shake the basket halfway through for even crispness. If you prefer steaming, bring water to a boil and steam the broccoli for about 5-7 minutes. Then, toss it with olive oil and cheese like in the full recipe to finish it off. You can play with spices for new flavors. Try adding a pinch of cayenne pepper for heat. Smoked paprika gives a deeper taste. For a fresh twist, sprinkle some lemon pepper on top. If you love herbs, mix in dried oregano or thyme. Each spice can change the dish and keep it exciting! To keep leftover roasted broccoli fresh, store it in an airtight container. Make sure it cools to room temperature first. This helps prevent moisture buildup. You can store it in the fridge for up to three days. If you want to enjoy it later, you can also wrap it tightly in plastic wrap. To reheat your broccoli, use the oven or a skillet. Preheat the oven to 350°F (175°C) for about 10 minutes. Place the broccoli on a baking sheet. Heat it for 5 to 10 minutes. If using a skillet, add a little olive oil and heat over medium. This keeps it crisp and tasty. If you want to freeze roasted broccoli, do so right after cooking. Let it cool completely, then spread it on a baking sheet. Freeze until solid, about 1 hour. After that, transfer it to a freezer bag. Keep in mind, freezing may change the texture. It might be softer when thawed. Use it in soups or casseroles for the best taste. Check out the Full Recipe for more details on making this delicious dish! Yes, you can use frozen broccoli! Just remember to thaw and drain it first. This step helps remove excess water. After that, toss it with the oil, garlic, and spices just like fresh broccoli. You might need to roast it a bit longer, around 20-25 minutes. Check for crispy edges to know it's done. To make this dish vegan, swap the Parmesan cheese for a plant-based option. Nutritional yeast is a great choice. It adds a cheesy flavor without dairy. You can also use vegan cheese that's designed for melting. The rest of the recipe stays the same, so it’s easy to make vegan! Roasted broccoli pairs well with many dishes. It complements grilled chicken or fish beautifully. You can also serve it with pasta or quinoa for a filling meal. Add some lemon slices to enhance the freshness. This dish also works well in a salad or as a side to a hearty stew. Check the broccoli after 15 minutes. Look for bright green color and crispy edges. The stems should feel tender but not mushy. If you want more crunch, roast for a few more minutes. The key is to find a balance between tender and crispy for the best texture. Roasting broccoli brings out its great taste and texture. You learned the best ingredients, from garlic to cheese. I shared steps for perfect roasting and tips for freshness. Consider variations to keep meals exciting. Whether you prefer air frying or trying new spices, explore options. Remember, fresh ingredients and proper techniques make all the difference. Enjoy your flavorful, roasted broccoli in many ways!

Garlic Parmesan Roasted Broccoli Healthy Side Dish

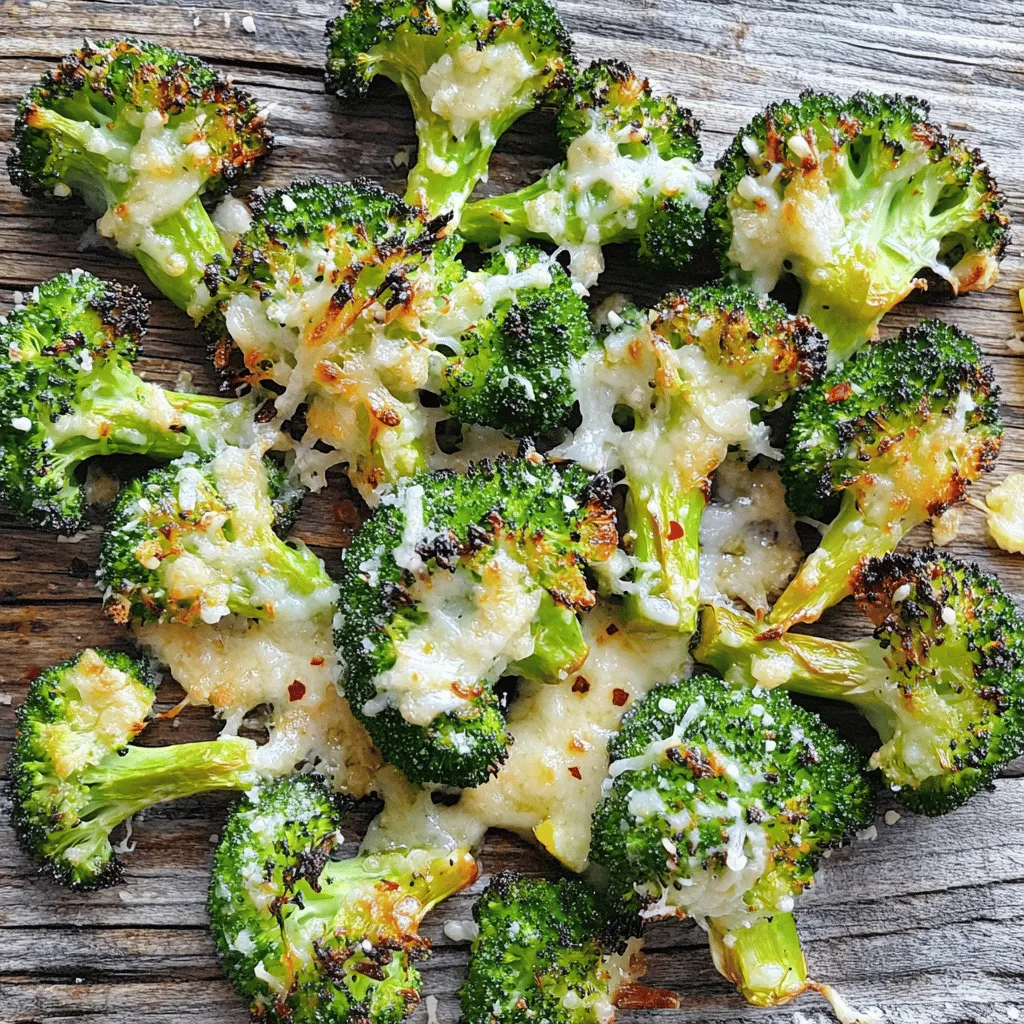
Looking for a healthy side dish that packs a punch? You’ve come to the right place! Garlic Parmesan Roasted Broccoli

Older posts
Page1 Page2 … Page38 Next →

dsad

© 2025 recipetorch • Built with GeneratePress

Our Policies

  • Copyright Policy
  • Cookie Policy
  • GDPR Policy
  • Privacy Policy
  • Disclaimer
  • Terms Of Use

More Information

  • Home
  • About
  • Contact
  • Appetizers
  • Dessert
  • Dinner
  • Drinks
©2025, recipetorch About Back To Top