Skip to content
DisclaimerTerms Of UseGDPR PolicyCookie Policy

recipetorch

  • Home
  • Drinks
  • Appetizers
  • Dinner
  • Dessert
  • About
  • Contact
  • Privacy Policy
DisclaimerTerms Of UseGDPR PolicyCookie Policy

Nicole

- 1 can (15 oz) chickpeas, thoroughly drained and rinsed - 1 large roasted red pepper - 2 tablespoons tahini - 2 tablespoons high-quality olive oil - 2 tablespoons freshly squeezed lemon juice - 1 garlic clove, finely minced - 1 teaspoon ground cumin - Salt and freshly cracked black pepper, to taste - 2-3 tablespoons cold water - Paprika and freshly chopped parsley for garnish Each serving contains about: - Calories: 120 - Protein: 4g - Carbohydrates: 10g - Dietary Fiber: 3g - Fat: 8g - Sugars: 1g This hummus fits well in many diets. It’s rich in fiber and protein. - Chickpeas: They are the base of the hummus. They add creaminess and protein. - Roasted Red Pepper: This ingredient gives the hummus a sweet, smoky flavor and bright color. - Tahini: This sesame paste adds a nutty taste and smooth texture. - Olive Oil: It adds richness and helps blend the hummus. - Lemon Juice: This ingredient brightens the flavor and adds acidity. - Garlic: Minced garlic gives a punch of flavor and aroma. - Cumin: This spice adds warmth and depth to the dip. - Salt and Pepper: These seasonings enhance all the flavors in the hummus. - Cold Water: Adding water helps achieve the desired smoothness. - Paprika and Parsley: These are for garnish. They add color and a hint of freshness. Together, these ingredients create a delicious and healthy dip. You can enjoy it with pita, veggies, or on a sandwich. {{ingredient_image_2}} To make roasted red pepper hummus, gather your ingredients first. You need: - 1 can (15 oz) chickpeas, drained and rinsed - 1 large roasted red pepper - 2 tablespoons tahini - 2 tablespoons olive oil - 2 tablespoons lemon juice - 1 garlic clove, minced - 1 teaspoon ground cumin - Salt and black pepper - 2-3 tablespoons cold water - Paprika and parsley for garnish Start with a clean kitchen and all your tools ready. A food processor is key for a smooth dip. Place the chickpeas in the food processor. Add the roasted red pepper, tahini, olive oil, lemon juice, minced garlic, and ground cumin. Turn the processor on high speed. Blend until smooth and creamy. You may need to scrape the bowl's sides with a spatula. If the hummus is thick, add water one tablespoon at a time. Blend again until you reach your desired texture. Season with salt and black pepper to taste. Blend once more to mix in the flavors. Transfer your hummus to a serving bowl. Use the back of a spoon to make a small well in the center. Drizzle olive oil into the well for added richness. Dust the top with paprika and sprinkle chopped parsley for color. Serve your hummus with warm pita bread and fresh veggies like carrot sticks and cucumber slices. Create a colorful platter for a fun and inviting experience. To get the best texture for your roasted red pepper hummus, start with the chickpeas. Use a can of chickpeas, rinse, and drain them well. This helps remove extra salt. When blending, if the hummus is too thick, add water slowly. Use one tablespoon at a time until you like the smoothness. It should be creamy but not runny. You can boost flavors by using fresh ingredients. Fresh lemon juice adds brightness. A minced garlic clove gives a nice kick. Adjust salt and pepper to your taste. For extra depth, try adding a pinch of smoked paprika or a dash of cayenne pepper. These spices will make each bite pop with flavor. Having the right tools makes the process easier. Use a good food processor to blend the hummus smoothly. A spatula helps scrape the sides of the bowl. A measuring spoon is handy for accurate ingredient amounts. For serving, a nice bowl and some pita bread or fresh veggies are perfect for dipping. Pro Tips Use Fresh Ingredients: For the best flavor, opt for fresh lemon juice and high-quality olive oil. These ingredients can significantly enhance the taste of your hummus. Adjust Smoothness: If you prefer a creamier texture, keep adding cold water gradually while blending until you reach your desired consistency. Experiment with Flavors: Feel free to add spices like smoked paprika or even a pinch of cayenne for a spicy kick, or incorporate herbs like cilantro for a fresh twist. Chill Before Serving: For the best flavor, refrigerate your hummus for at least 30 minutes before serving. This allows the flavors to meld beautifully. {{image_4}} You can spice up your roasted red pepper hummus easily. Try adding paprika for warmth. A pinch of cayenne pepper adds heat. Fresh herbs like basil or cilantro can brighten it up. Mixing in smoked paprika gives a nice smoky flavor. Experiment with spices to find your favorite blend. Don't have tahini? Use sunflower seed butter instead. This makes it nut-free. You can swap the olive oil for avocado oil if you want a different taste. For a creamier texture, add Greek yogurt. You can also use different beans like black beans for a twist. Serve your hummus with warm pita bread for a classic touch. Add fresh veggies like carrots, cucumbers, or bell peppers for crunch. You can also spread hummus on sandwiches or wraps. For a fun party bite, use it as a dip for chips or crackers. Present it in a bowl, drizzled with olive oil and topped with herbs for color. To keep your roasted red pepper hummus fresh, store it in an airtight container. Glass jars work well for this. Make sure to cover the hummus with a layer of olive oil before sealing. This helps lock in flavor and moisture. If you have leftovers, try to keep them in the fridge right away. Roasted red pepper hummus lasts about 4 to 7 days in the fridge. If you notice any change in smell or color, it's best to toss it. Always check for freshness before eating. You can freeze hummus for up to 3 months. First, spoon it into a freezer-safe container. Leave some space at the top, as it will expand when frozen. To thaw, place it in the fridge overnight. Stir well before serving to bring back the creamy texture. Roasted red pepper hummus is a creamy dip made from chickpeas and roasted red peppers. It has a rich, smoky flavor that adds excitement to any meal. This dip is perfect for snacking, spreading, or serving at parties. The blend of tahini, olive oil, and spices enhances the taste, making it a favorite among many. Yes, you can make hummus without tahini. If you skip it, the dip will still taste good. You can replace tahini with Greek yogurt for creaminess. You can also add a bit more olive oil to keep it smooth. The flavor will change, but it will still be a tasty dip. To make your hummus spicier, add a pinch of cayenne pepper or red pepper flakes. You can also blend in a small amount of fresh jalapeño for a kick. Start with a little spice and taste as you go. This way, you can control the heat level to your liking. Roasted red pepper hummus pairs well with many foods. Here are some great options: - Warm pita bread - Fresh veggie sticks like carrots and cucumbers - Crackers or chips - Grilled meats or fish - Sandwiches and wraps These pairings make for a fun and tasty spread. Yes, you can use dried chickpeas instead of canned. If you choose dried ones, soak them overnight. Then, cook them until soft before making hummus. This method takes more time, but it can give a fresher taste. Just remember, canned chickpeas save time and are very convenient! We explored the key ingredients of roasted red pepper hummus, noting their nutrition and importance. I shared easy steps to prepare and blend your hummus for perfect texture. We discussed tips to enhance flavor and offered creative serving suggestions. Lastly, we covered storage methods and answered common questions. Roasted red pepper hummus is simple to make and enjoy. Try making your own for a tasty, healthy snack!

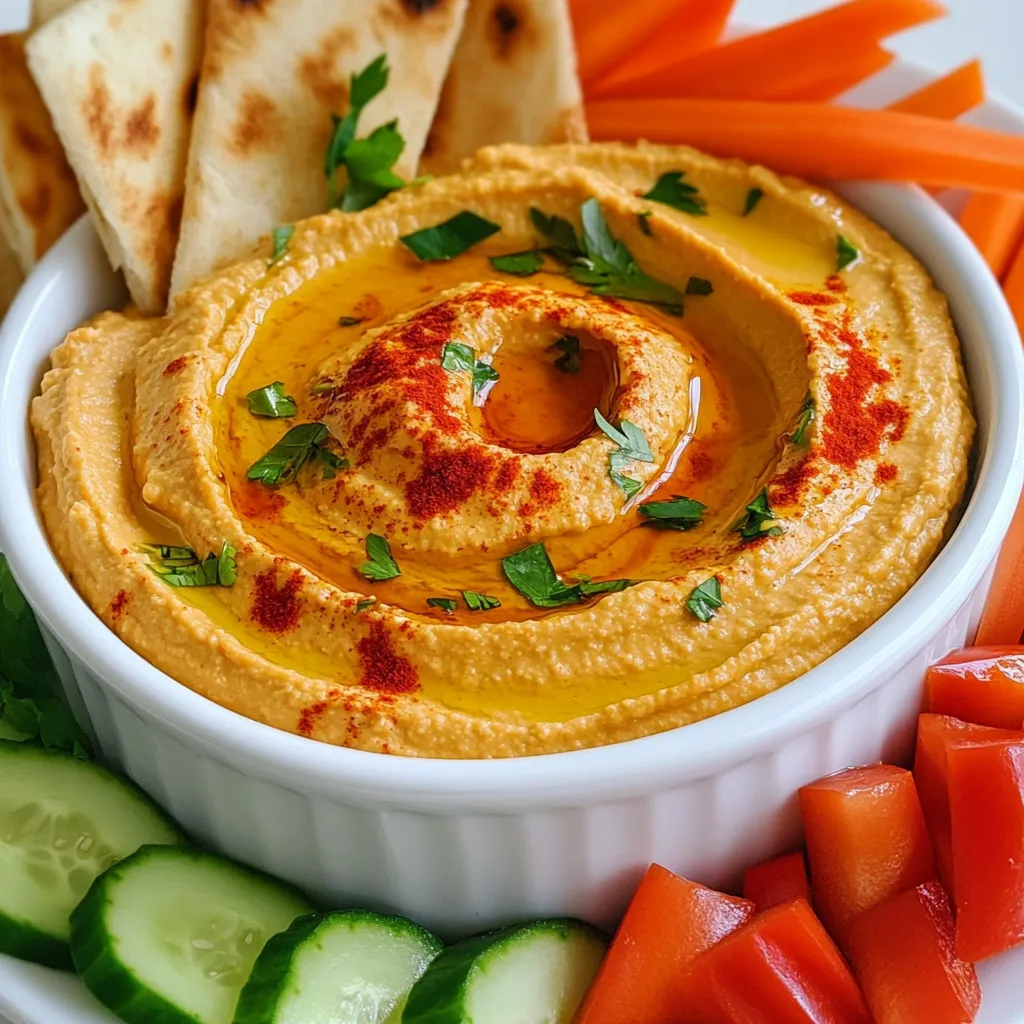
Roasted Red Pepper Hummus Simple and Flavorful Dip

Looking for a simple and tasty dip? Roasted red pepper hummus is your answer! This vibrant blend packs in flavor

- 4 boneless, skinless chicken breasts - Sea salt and freshly ground black pepper - 3 tablespoons extra virgin olive oil - Juice of 2 fresh lemons - Zest of 1 lemon - 3 cloves garlic, finely minced - 1 teaspoon dried oregano - 1 teaspoon dried thyme - 2 medium zucchinis, sliced into half-moons - 1 red bell pepper, sliced into strips - 1 cup cherry tomatoes, halved For the Lemon Herb Chicken, you need fresh chicken breasts. They add great taste and stay juicy. You also need some sea salt and black pepper to season the chicken. The marinade is key. It includes olive oil, fresh lemon juice, and lemon zest. The garlic adds a nice kick. Oregano and thyme give it that classic herb flavor. Don’t forget the veggies! Zucchini, red bell pepper, and cherry tomatoes roast nicely. They soak up the marinade and taste amazing alongside the chicken. Gather these ingredients, and you are ready to make a tasty one-pan meal. Enjoy the vibrant flavors and fresh colors on your plate! {{ingredient_image_2}} First, preheat your oven to 425°F (220°C). This heat will make the chicken juicy and the veggies tender. For easy cleanup, line a large baking sheet with parchment paper. This step keeps the pan clean and helps the food cook evenly. In a small bowl, mix together 3 tablespoons of extra virgin olive oil, the juice of 2 fresh lemons, and the zest of 1 lemon. Add 3 cloves of minced garlic, 1 teaspoon of dried oregano, and 1 teaspoon of dried thyme. Then, sprinkle in some sea salt and black pepper to taste. Whisk it all together until well combined. This marinade will add lots of flavor to your meal. Next, take your 4 boneless, skinless chicken breasts and pat them dry with paper towels. This helps them brown better. Place the chicken on one side of the baking sheet. Drizzle half of your marinade over the chicken, making sure each piece is well coated. In a separate bowl, combine 2 sliced zucchinis, 1 sliced red bell pepper, and 1 cup of halved cherry tomatoes. Pour the remaining marinade over the veggies and toss gently to coat them evenly. Spread the veggies on the other side of the baking sheet in a single layer. Now, place the baking sheet in the preheated oven. Roast for about 25-30 minutes. You want the chicken to reach an internal temperature of 165°F (75°C). The vegetables should be tender and lightly caramelized. Once done, take the sheet pan out and let it rest for 5 minutes. This waiting time allows the juices to settle, making each bite more flavorful. Finish off by sprinkling freshly chopped parsley over the dish for a fresh touch. Slice the chicken and enjoy it with the roasted veggies! To get the best flavor from your chicken, use a good marinade. Start by mixing olive oil, lemon juice, zest, garlic, oregano, and thyme. This blend adds taste and moisture. Let the chicken soak in the marinade for at least 30 minutes. If you can, marinate it overnight. This helps the chicken soak up the flavors deeply. Roasting is simple but needs care. First, preheat your oven to 425°F (220°C). This high heat makes the chicken golden and the veggies crispy. Spread the chicken and vegetables out on the sheet pan. Don’t crowd them. Leave space for air to flow. This helps everything cook evenly. Check the chicken’s internal temperature after 25 minutes. It should reach 165°F (75°C). Serving is key to a great meal. Use warm plates to keep food hot. Arrange the chicken slices on top of the colorful veggies. This makes the dish pop. Add a sprinkle of fresh parsley for color. You can also add lemon wedges on the side. This adds a fresh touch and looks lovely on the table. Pro Tips Marinate for Extra Flavor: Allow the chicken to marinate for at least 30 minutes or even overnight in the fridge for deeper flavor absorption. Use Seasonal Vegetables: Feel free to swap in your favorite seasonal vegetables for a personalized touch; options like asparagus or broccoli work beautifully. Check for Doneness: Always use a meat thermometer to ensure your chicken reaches an internal temperature of 165°F (75°C) for safety and optimal juiciness. Make it a Complete Meal: Serve with a side of quinoa or brown rice to turn this dish into a wholesome, balanced meal. {{image_4}} You can change the veggies in this dish for fun. Try using broccoli, asparagus, or carrots. Each option brings a new flavor and texture. Just remember to cut them into similar sizes. This way, they cook evenly with the chicken. Feel free to switch up the herbs too. Instead of oregano and thyme, use rosemary or basil. If you enjoy a spicy kick, add red pepper flakes. You can even use fresh herbs if you have them. Just chop them finely and mix them into the marinade. If you want a low-carb meal, skip the tomatoes and bell peppers. Add more zucchini or cauliflower instead. This keeps the dish light and healthy. Use chicken thighs for added flavor and fat. They are juicy and perfect for a keto diet. After enjoying your Lemon Herb Chicken, store any leftovers in an airtight container. This helps keep the chicken moist and the veggies fresh. Let the dish cool to room temperature before sealing it. You can keep it in the fridge for up to three days. If you want to save it longer, freezing is a great option. To reheat, use your oven for best results. Preheat the oven to 350°F (175°C). Place the chicken and veggies on a baking sheet. Cover them with foil to keep moisture in. Heat for about 15-20 minutes or until warm. You can also use a microwave, but this may make the chicken less juicy. If you plan to freeze your Lemon Herb Chicken, slice the chicken first. This allows it to thaw and heat evenly. Use freezer-safe bags or containers. Remove as much air as possible to prevent freezer burn. It can last up to three months in the freezer. When ready to enjoy, thaw in the fridge overnight before reheating. Cook the chicken for 25-30 minutes at 425°F (220°C). Use a meat thermometer to check. The chicken should reach an internal temperature of 165°F (75°C) to be safe to eat. The time may vary based on thickness, so check it to avoid overcooking. Enjoy juicy chicken every time with this simple timing. Yes, you can use bone-in chicken for this recipe. Just know it may need more time to cook. Bone-in pieces usually require an extra 10-15 minutes compared to boneless breasts. Ensure the internal temperature still reaches 165°F (75°C). The bone adds flavor and moisture, making it a tasty option. Lemon Herb Chicken pairs well with many sides. Here are some ideas: - Rice or quinoa for a hearty base - A fresh garden salad for crunch - Garlic bread for a warm touch - Roasted potatoes for added flavor - Steamed green beans for a healthy option These sides will balance the meal and enhance the lemon and herb flavors. Feel free to mix and match! This blog post covered the key steps to make Lemon Herb Chicken. You learned about the main ingredients, how to create a tasty marinade, and the best veggies to pair. I shared tips to boost flavor, perfect roasting methods, and great serving ideas. Cooking should be fun and tasty. Use these tips to try your own twists. Enjoy your meal prep and share this delicious dish with friends and family!

Lemon Herb Chicken Sheet Pan Flavorful One-Pan Meal

Looking for a simple yet tasty dinner? The Lemon Herb Chicken Sheet Pan is your answer! This one-pan meal is

Newer posts
← Previous Page1 … Page89 Page90

dsad

© 2025 recipetorch • Built with GeneratePress

Our Policies

  • Copyright Policy
  • Cookie Policy
  • GDPR Policy
  • Privacy Policy
  • Disclaimer
  • Terms Of Use

More Information

  • Home
  • About
  • Contact
  • Appetizers
  • Dessert
  • Dinner
  • Drinks
©2025, recipetorch About Back To Top