Skip to content
DisclaimerTerms Of UseGDPR PolicyCookie Policy

recipetorch

  • Home
  • Drinks
  • Appetizers
  • Dinner
  • Dessert
  • About
  • Contact
  • Privacy Policy
DisclaimerTerms Of UseGDPR PolicyCookie Policy

Nicole

- 1 cup rolled oats - 2 cups unsweetened almond milk - 2 tablespoons pure maple syrup - 1 teaspoon ground cinnamon - 1/2 teaspoon vanilla extract - 1/4 cup Greek yogurt - 1/4 cup chopped nuts (walnuts or pecans) - 1/2 cup diced apples To create maple cinnamon overnight oats, I use simple and wholesome ingredients. The rolled oats form the base. They soak up the almond milk, becoming soft and creamy by morning. I usually choose unsweetened almond milk, but any milk works well. Next, I add pure maple syrup to sweeten the oats naturally. It brings a rich flavor. A teaspoon of ground cinnamon adds warmth and spice. I also add a touch of vanilla extract for depth. For extra texture and flavor, I consider optional add-ins. A quarter cup of Greek yogurt makes the oats creamier. I love mixing in chopped nuts, like walnuts or pecans, for a satisfying crunch. Finally, I often add diced apples for freshness and sweetness. You can use fresh apples or cook them lightly for a softer bite. {{ingredient_image_2}} - In a medium bowl, combine 1 cup of rolled oats and 2 cups of unsweetened almond milk. - Add 2 tablespoons of pure maple syrup, 1 teaspoon of ground cinnamon, 1/2 teaspoon of vanilla extract, and a pinch of salt. - Whisk gently until well blended. This step is key to getting all the flavors mixed well. - If you want extra creaminess, stir in 1/4 cup of Greek yogurt now. This makes your oats rich and smooth. - Next, fold in 1/4 cup of chopped nuts and 1/2 cup of diced apples. This adds a nice crunch and sweetness to your oats. - Carefully portion the mixture into mason jars or airtight containers. Fill them to your liking. - Seal the jars tightly and place them in the refrigerator. Let them chill overnight. This allows the oats to soak up the flavors and become soft. When you wake up, your oats will be ready to enjoy! To get the best texture for your overnight oats, soak them for at least 4 hours. Overnight is even better. This lets the oats soak up the almond milk fully. When you wake up, give the oats a good stir. This makes them creamy and smooth. If you like them lighter, add a bit more milk while stirring. Layer your oats and toppings in jars for a fun look. Start with oats, then add diced apples, and top with nuts. This not only tastes good but also looks great. For a nice touch, add a fresh mint sprig or a sprinkle of extra chopped nuts on top. You can make your oats sweeter by adding more maple syrup. Taste as you go. If you want to try something different, use honey or agave syrup. These options can change the flavor and sweetness level to fit your taste. Pro Tips Use Old-Fashioned Rolled Oats: They absorb the liquid better and give a chewier texture compared to instant oats, making your overnight oats more satisfying. Experiment with Toppings: Feel free to switch up the nuts and fruits based on what’s in season or your personal preferences for a new flavor experience each time. Make Ahead in Batches: Prepare several jars at once to save time during busy mornings. They can last in the fridge for up to 5 days! Customize Sweetness: Adjust the amount of maple syrup to suit your taste. If you prefer less sweetness, start with one tablespoon and add more if needed. {{image_4}} You can change the flavor of your maple cinnamon overnight oats easily. Adding fruits like berries or bananas can give your oats a fresh taste. Simply mix in your favorite fruit when you prepare the oat mixture. The sweetness from the fruits pairs well with maple syrup. You can also add nut butters like almond or peanut. Just stir in a tablespoon or two when mixing the oats. This step not only adds a nutty taste but also boosts the protein content. If you want a dairy-free option, you have many choices. You can swap unsweetened almond milk for oat milk, coconut milk, or soy milk. Each type of milk brings its own unique flavor and texture. For Greek yogurt, you can use coconut yogurt or a nut-based yogurt. This change keeps the creamy texture while making it dairy-free. Using seasonal fruits can make your oats even more special. In the fall, try adding chopped pears or spiced pumpkin. In the summer, fresh peaches or strawberries can brighten your breakfast. You can also play with spices. During the holidays, add nutmeg or ginger for a festive twist. These small changes will make your oats feel new and exciting all year round. Overnight oats can last in the fridge for up to five days. This makes them perfect for meal prep. To tell if your oats have spoiled, check for an off smell or a change in texture. If they look slimy or have mold, it’s best to toss them out. You can freeze overnight oats for later use. To freeze, place your oats in an airtight container. Make sure to leave space at the top for expansion. When you’re ready to eat, thaw them in the fridge overnight. For the best texture, add a splash of milk after thawing. This helps restore creaminess. Making overnight oats in bulk saves time. You can prepare several servings at once. Portion them into individual jars for easy grab-and-go breakfasts. This way, you have a healthy meal ready whenever you need it. Top with fresh fruit or nuts just before eating for extra flavor. To make your overnight oats creamier, use these tips: - Add Greek yogurt for rich texture. - Use full-fat or creamier plant-based milk. - Blend the oats with milk before mixing. - Let them soak longer, up to 24 hours. These methods help the oats absorb more liquid, creating a smooth and silky blend. Yes, you can easily make these oats vegan. Here are some substitutions: - Replace Greek yogurt with a plant-based yogurt. - Choose almond milk or any nut milk. - Use maple syrup as the only sweetener. These swaps keep the oats tasty while maintaining a plant-based diet. Overnight oats offer several health benefits: - They are high in fiber, aiding digestion. - Oats contain protein, keeping you full longer. - They are rich in vitamins and minerals, supporting overall health. - Adding fruits boosts antioxidants, which are great for your body. Each serving provides a balanced breakfast, making it a smart choice for anyone. Overnight oats are easy to make and full of flavor. We covered the key ingredients like rolled oats and almond milk. You learned how to enhance flavors with maple syrup, cinnamon, and vanilla. Plus, you saw options for add-ins like Greek yogurt, nuts, and fruits. Final thoughts: With simple tweaks, overnight oats can suit your taste. They save time and result in a nutritious breakfast. Enjoy experimenting with flavors and textures. Your mornings will be brighter and more delicious!

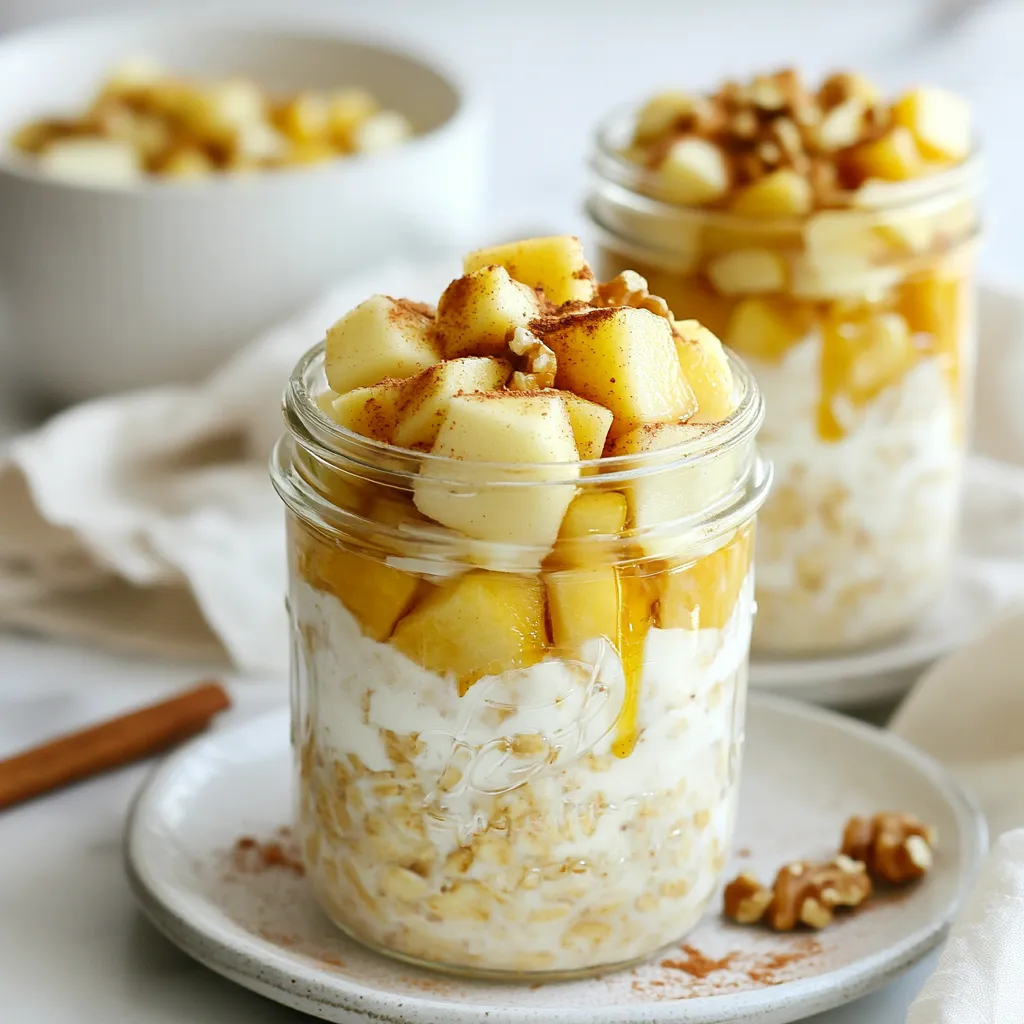
Maple Cinnamon Overnight Oats Tasty and Simple Recipe

Start your day right with my simple Maple Cinnamon Overnight Oats! Packed with flavor and nutrition, this quick recipe uses

- 2 cups cooked chicken, shredded - 1 cup salsa verde (store-bought or homemade) - 1 cup black beans, drained and rinsed - 1 cup corn (frozen or canned) - 1 teaspoon ground cumin - 1 teaspoon garlic powder - 8 small corn tortillas - 1 cup shredded cheese (cheddar or Monterey Jack) - ¼ cup fresh cilantro, chopped - 1 tablespoon olive oil - Salt and pepper to taste - Optional for serving: Sour cream and slices of avocado When I make salsa verde chicken enchiladas, I start with fresh, quality ingredients. The chicken gives the dish protein, while the black beans and corn add texture. I love the zing from salsa verde; it brings everything together. The spices like cumin and garlic powder boost the flavors. I choose corn tortillas for their soft bite. The cheese binds the enchiladas and makes them creamy. A sprinkle of cilantro brings a fresh finish that I adore. To elevate your enchiladas, consider these garnishes: - Chopped fresh cilantro - Slices of avocado - A dollop of sour cream - Lime wedges for a zesty touch These garnishes add color and flavor to the dish. I like to add creamy avocado and a squeeze of lime. It brightens each bite and enhances the salsa verde’s flavors. For the best flavor, I recommend: - Cheddar cheese - Monterey Jack cheese - A blend of both Cheddar adds a sharp taste, while Monterey Jack melts beautifully. Mixing both gives a great balance. Feel free to get creative! Try adding pepper jack for some heat or a sprinkle of queso fresco for a fresh twist. {{ingredient_image_2}} Set your oven to 375°F (190°C). This helps the enchiladas bake evenly. Preheating is key for a perfect dish. In a large bowl, mix the shredded chicken, black beans, and corn. Add ground cumin, garlic powder, half the salsa verde, and half the cheese. Season with salt and pepper. Stir it all together well. This filling packs flavor and texture. Heat olive oil in a skillet over medium heat. Fry each corn tortilla for about 10-15 seconds on each side. Look for them to become soft and flexible. Transfer them to paper towels to drain extra oil. Soft tortillas make rolling easier. Take one tortilla and add 2-3 tablespoons of the chicken filling in the center. Roll it tightly around the filling. Place it seam-side down in a greased 9x13 inch baking dish. Repeat for all tortillas. This assembly creates the base of your enchiladas. Pour the remaining salsa verde evenly over the rolled tortillas. Make sure they are well coated. Next, sprinkle the rest of the shredded cheese on top. Cover the dish with aluminum foil. Bake for 20 minutes. Remove the foil and bake for another 10 minutes. Look for melted cheese and a golden hue. Once out of the oven, let the enchiladas cool for a few minutes. Before serving, sprinkle chopped cilantro on top. This adds freshness and color. Serve with optional sour cream and avocado for extra creaminess. Enjoy your flavorful meal! To make soft tortillas, you need to heat them right. I use a skillet for this. Heat a bit of olive oil over medium heat. Fry each tortilla for about 10-15 seconds on both sides. This step is key to keeping them pliable. After frying, place them on paper towels to soak up any extra oil. This method keeps them soft and ready to roll. Shredding chicken can be easy if you know how. I suggest using two forks. Hold one fork in each hand. Grab the chicken and pull it apart with the forks. This method works well for warm or cold chicken. You can also use a stand mixer with a paddle attachment for quick shredding. Just mix on low speed for about 30 seconds. Both methods give you nice, even shreds for your enchiladas. You can change the filling to match your taste. Adding different spices can give your dish a new twist. Try adding smoked paprika for a smoky flavor. For some heat, add diced jalapeños or a pinch of chili powder. You can also swap black beans for pinto or add diced bell peppers for extra crunch. Mixing in fresh herbs like oregano or thyme can also boost the flavor. Experiment and find the perfect blend for you. Pro Tips Warm Tortillas: Warming the tortillas makes them more pliable and easier to roll without tearing. Customize Your Fillings: Feel free to add other vegetables like bell peppers or zucchini for extra flavor and nutrition. Cheese Variations: Mix different types of cheese, such as pepper jack for a spicy kick or mozzarella for a gooey texture. Make Ahead: Assemble the enchiladas in advance and refrigerate them. Just add a few extra minutes to the baking time when ready to serve. {{image_4}} You can easily make a vegetarian version of these enchiladas. Swap out the chicken for 2 cups of cooked quinoa or lentils. This keeps the dish filling and tasty. Add black beans and corn just like in the original recipe. You can also add diced bell peppers or spinach for extra flavor and nutrients. If you like heat, try spicy salsa verde chicken enchiladas. Use a zesty salsa verde with jalapeños or add diced fresh jalapeños to the filling. You can also sprinkle some crushed red pepper flakes on top before baking. This adds a nice kick that spice lovers will enjoy. There are many protein options for these enchiladas. You can use shredded turkey or even ground beef. For a seafood twist, try crab or shrimp. Just make sure to season nicely to enhance the flavor. This allows you to customize the dish to fit your tastes and dietary needs. Store leftover enchiladas in an airtight container. Make sure to let them cool first. Keep them in the fridge for up to three days. You can also cover them with plastic wrap if you prefer. To reheat, preheat your oven to 350°F (175°C). Place the enchiladas in a baking dish. Add a splash of salsa verde or water to keep them moist. Cover with foil and bake for about 15-20 minutes. Check if they are heated through before serving. You can freeze enchiladas for a quick meal later. Wrap each enchilada in foil or plastic wrap. Place them in a freezer-safe bag. They will stay good for up to three months. To reheat, thaw in the fridge overnight. Then, bake at 350°F (175°C) until hot. Yes, you can use flour tortillas. They will be softer and easier to roll. However, corn tortillas add a nice texture and flavor. If you prefer a gluten-free option, stick with corn. To make Salsa Verde, blend together tomatillos, garlic, jalapeños, lime juice, and cilantro. Add salt to taste. Roast the tomatillos for a smokier flavor. This fresh salsa enhances your enchiladas. Some great sides are Mexican rice, refried beans, or a fresh salad. You can also serve with tortilla chips and guacamole. These options balance the flavors and add more fun to your meal. Leftovers can last up to three days in the fridge. Store them in an airtight container to keep them fresh. Reheat in the oven or microwave for best results. Yes, you can prepare them a day ahead! Assemble the enchiladas and cover them tightly. Store in the fridge. Bake them right before serving for a warm, delicious meal. This article covered all you need to know about making delicious enchiladas. We explored key ingredients and garnishes, ensuring tasty fillings and cheese options. You learned simple steps for prepping and baking. Tips helped create soft tortillas and tasty flavors. Variations offer choices for everyone, while storage tips keep leftovers fresh. Embrace these ideas and make your next meal a hit! Enjoy the process and share your dishes with friends and family.

Salsa Verde Chicken Enchiladas Flavorful and Easy Meal

Looking for a quick and tasty dinner? You’ve found it with Salsa Verde Chicken Enchiladas! This dish packs bold flavors

- 1 whole head of garlic - 12 ounces fettuccine pasta - 1 cup heavy cream - 2 tablespoons unsalted butter - Salt and freshly ground black pepper - Fresh parsley, finely chopped - 2 tablespoons olive oil - Grated Parmesan cheese When I make Creamy Roasted Garlic Alfredo, I love using fresh ingredients. The garlic brings a sweet and rich flavor. Roasting it adds depth that makes this dish shine. Fettuccine pasta is my go-to choice because it holds the sauce well. The heavy cream creates a smooth and rich base. I always use unsalted butter for a clean taste. Salt and black pepper enhance the flavors. Fresh parsley adds a pop of color and freshness. The olive oil is essential for roasting the garlic. Finally, grated Parmesan cheese ties everything together. It adds umami and creaminess. Each ingredient contributes to the dish's richness and flavor. Keep them fresh for the best results. Enjoy the process of cooking this delightful meal! {{ingredient_image_2}} First, preheat your oven to 400°F (200°C). This step is key for roasting garlic. Next, take a whole head of garlic. Carefully slice off the top to reveal the cloves. Drizzle 2 tablespoons of olive oil over the exposed cloves. Wrap the garlic in aluminum foil. This keeps it from burning while roasting. While the garlic roasts, fill a large pot with water. Add a generous pinch of salt and bring it to a boil. Once boiling, add 12 ounces of fettuccine pasta. Cook it until it is al dente, which means firm to the bite. Before draining, reserve 1 cup of the starchy pasta water. Then, drain the pasta in a colander. Roasting garlic is simple. Place the wrapped garlic in the preheated oven. Roast it for about 30 to 35 minutes. The cloves should feel soft and caramelized. When done, take it out and let it cool for a few minutes. Cooling makes it easier to squeeze the roasted garlic from its skin. In a large skillet, melt 2 tablespoons of unsalted butter over medium heat. Once melted, squeeze the roasted garlic cloves into the skillet. Discard the skins. Use a fork to mash the garlic into a paste. This paste adds great flavor to the sauce. Gradually pour in 1 cup of heavy cream. Stir well to mix it with the garlic. Bring this mixture to a gentle simmer. Then, slowly whisk in 1 cup of grated Parmesan cheese. Stir until it melts and the sauce is smooth. If the sauce is too thick, add some reserved pasta water. Do this a little at a time until you reach the right creamy consistency. Now it's time to combine everything. Add the cooked fettuccine to the skillet with the sauce. Toss the pasta gently but thoroughly. Make sure each strand is coated in that rich, creamy sauce. Taste your sauce and add salt and freshly ground black pepper as needed. For a finishing touch, sprinkle finely chopped fresh parsley on top. This adds color and a hint of freshness. Serve your Creamy Roasted Garlic Alfredo right away for the best taste. You can use homemade stock to deepen the taste. Stock adds a rich layer that store-bought broth may lack. Try vegetable or chicken stock for a unique twist. For cheese, consider alternatives like Pecorino Romano or Asiago. These cheeses provide different flavors that can make your dish stand out. You can mix and match cheeses for even more fun. To adjust the thickness of your sauce, use the reserved pasta water. This starchy water helps thin the sauce without losing flavor. Add a little at a time until you reach your desired creaminess. Avoid lumps in your cheese sauce by whisking constantly as you add the cheese. This keeps the sauce smooth and silky. If lumps form, keep whisking vigorously until they disappear. When plating, twirl the fettuccine into nests. This creates a beautiful presentation. Top with a sprinkle of fresh parsley for color and freshness. For wine pairings, a crisp white like Sauvignon Blanc works well. It balances the rich flavors of the sauce. You can also serve it with a side salad or garlic bread for a complete meal. Pro Tips Use Fresh Garlic: Fresh garlic will provide a more robust flavor compared to pre-minced varieties. Roasting it enhances its sweetness and mellows the sharpness. Adjust the Creaminess: If the sauce is too thick, gradually add the reserved pasta water until you reach your desired consistency, ensuring a silky texture. Mix Cheese Types: For a more complex flavor, consider mixing Parmesan with other cheeses like Pecorino Romano or Asiago. Garnish with Citrus: A squeeze of lemon juice or a sprinkle of lemon zest before serving can brighten the flavors and add a refreshing contrast to the rich sauce. {{image_4}} You can easily change the pasta for this dish. If you prefer gluten-free options, try rice or chickpea pasta. Both work well in this recipe. You can also add vegetables for extra flavor and nutrition. Spinach and mushrooms are great choices. They pair nicely with the creamy sauce and roasted garlic. To make your Alfredo unique, think about adding herbs or spices. Fresh basil or thyme can add a fresh twist. You can also include proteins like chicken or shrimp. These additions make the dish heartier and more satisfying. Just cook the protein separately and mix it in with the pasta. You can create a white wine Alfredo by adding a splash of white wine while making the sauce. This addition gives a nice depth of flavor. If you want to try alternatives, consider using a mix of ricotta cheese and cream. This option can lighten the dish while keeping it creamy and delicious. To store leftover Alfredo, let it cool to room temperature first. Then, place it in an airtight container. This helps keep it fresh. I recommend using glass containers or plastic ones that seal tightly. These containers prevent air exposure and keep the sauce creamy. To reheat without losing creaminess, use the stove. Heat over low heat, stirring often. This gentle method warms the sauce evenly. If it seems too thick, add a splash of milk or reserved pasta water. This helps restore its smooth texture. You can freeze Alfredo sauce, but it may change in texture. To freeze, cool the sauce completely. Then, pour it into freezer-safe bags or containers. Leave some space for expansion. When ready to use, thaw it in the fridge overnight. Reheat gently on the stove, adding a bit of cream or water to help it blend smoothly again. Fettuccine is the classic choice for Alfredo. Its flat shape holds the sauce well. However, you can use other types of pasta like penne or rigatoni. These shapes also work great and add a fun twist to the dish. Using light cream will change the flavor and texture. The sauce may be less rich and creamy. Heavy cream gives a smooth, luxurious feel. If you want a lighter sauce, consider mixing light cream with a bit of butter for added richness. Creamy Roasted Garlic Alfredo lasts about three to four days in the fridge. Look for signs of spoilage, like changes in smell or texture. If you see any mold, it's best to toss it. Store it in an airtight container for the best results. Yes, you can make the sauce ahead of time. Just store it in the fridge after cooling. When you're ready to eat, reheat it gently on the stove. Add a splash of reserved pasta water to help restore its creamy texture. This blog post shared a simple recipe for Creamy Roasted Garlic Alfredo. We covered key ingredients, preparation steps, and tips for perfecting the sauce. Remember to roast garlic for flavor and use reserved pasta water for texture. Variations and storage tips make this dish flexible. Try different cheeses or proteins for a twist. You can enjoy this dish now or save it for later. Making Alfredo should be easy and fun. Happy cooking!

Creamy Roasted Garlic Alfredo Rich and Savory Dish

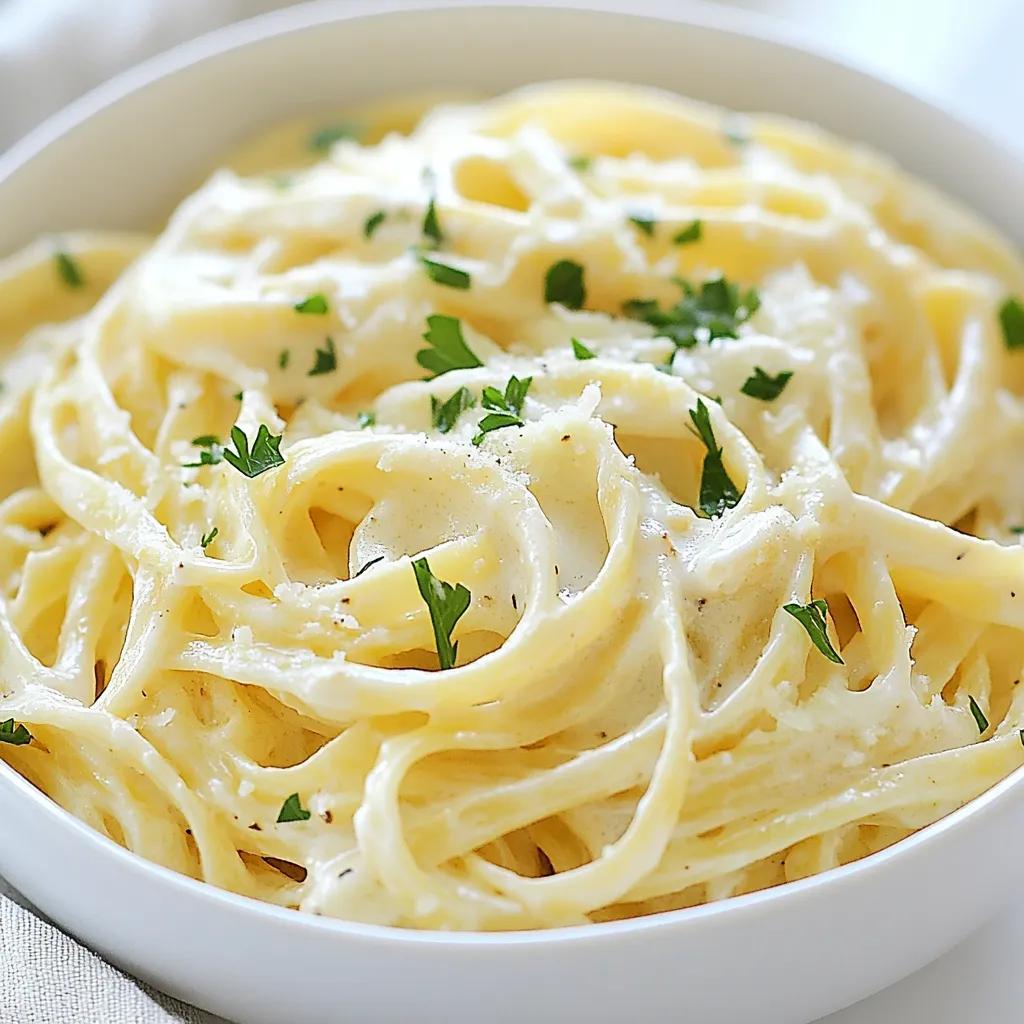
Are you ready to dive into a dish that wraps you in comfort? Creamy Roasted Garlic Alfredo is not just

- 1 lb ground chicken - 1 tablespoon vegetable oil - 2 cloves garlic, minced - 1 tablespoon fresh ginger, finely grated - 1 red bell pepper, finely diced - 1 medium carrot, grated - 1/2 cup green onions, finely chopped - 1/4 cup unsweetened creamy peanut butter - 2 tablespoons soy sauce (or tamari) - 1 tablespoon fresh lime juice - 1 tablespoon honey or maple syrup - 1 teaspoon sriracha - Salt and pepper to taste - 1 head of Bibb or iceberg lettuce - Fresh lime wedges - Additional sriracha - Chopped green onions To make these spicy peanut chicken lettuce wraps, you need some fresh and tasty ingredients. Ground chicken gives you a great base for protein. The garlic and ginger add a nice kick. You can’t forget the red bell pepper and carrot for crunch and color. Green onions bring a fresh flavor that ties it all together. The creamy peanut butter is the star. It adds richness and depth. Soy sauce or tamari brings a salty element. Lime juice brightens the mix, while honey or maple syrup adds a hint of sweetness. Lastly, sriracha gives it that spicy punch. You can also top your wraps with lime wedges and extra sriracha. Chopped green onions make for a lovely garnish. Each ingredient works together to create a flavorful and satisfying dish. {{ingredient_image_2}} 1. In a large skillet, heat 1 tablespoon of vegetable oil over medium heat. 2. Add 2 cloves of minced garlic and 1 tablespoon of grated fresh ginger. Sauté for about 30 seconds until they smell great. 3. Next, add 1 lb of ground chicken. Use a spatula to break it apart. Cook for 5-7 minutes until it turns brown and is cooked through. 4. Stir in 1 diced red bell pepper and 1 grated medium carrot. Cook for an extra 3-4 minutes until the veggies are tender but still crunchy. 1. In a separate bowl, whisk together 1/4 cup of creamy peanut butter, 2 tablespoons of soy sauce, and 1 tablespoon of fresh lime juice. 2. Add 1 tablespoon of honey and 1 teaspoon of sriracha to the bowl. Mix until everything is smooth. 1. Pour the peanut sauce over the chicken and veggies in the skillet. Stir well to coat all the ingredients. 2. Season with salt and pepper to taste. 3. Remove from heat and gently fold in 1/2 cup of chopped green onions for a fresh kick. 4. To serve, spoon the mix into the lettuce leaves. Fold them around the filling and enjoy your tasty wraps! To ensure your chicken is cooked thoroughly, break it apart while it cooks. This helps it brown evenly. Use a meat thermometer to check that it reaches 165°F. When sautéing vegetables, keep them on medium heat. This helps them soften without losing their crunch. Stir frequently to prevent burning. To assemble your lettuce wraps, take a leaf from the Bibb or iceberg lettuce. Spoon a generous amount of the spicy chicken mixture into the center. Fold the sides over the filling and then roll it up. For presentation, arrange the wraps on a colorful platter. Add fresh lime wedges and extra sriracha on the side for guests who love heat. You can adjust the sriracha to suit your taste. Start with a small amount and add more if you want extra heat. If you want a different kick, try using crushed red pepper or chili paste. These can add a unique flavor while keeping the dish spicy. Pro Tips Use Fresh Ingredients: Fresh vegetables and herbs enhance the flavor and texture of your wraps, making them more enjoyable. Adjust Spice Level: Modify the amount of sriracha to suit your taste. Start with a small amount and add more as needed for heat. Make It Ahead: Prepare the chicken mixture in advance and store it in the refrigerator. Assemble the wraps just before serving for best results. Experiment with Fillings: Feel free to add other ingredients like shredded cabbage, diced cucumbers, or even chopped nuts for added texture and flavor. {{image_4}} You can swap ground chicken for turkey or tofu. Turkey gives a leaner taste, while tofu suits vegans. Both options keep the wraps tasty and satisfying. You can also switch veggies in the mix. Try using zucchini, mushrooms, or snap peas. Each offers unique flavors and crunch. Feel free to play with nut butters. Almond or cashew butter can add new tastes. For a vegan twist, use tahini or sun butter. These options keep the wraps creamy while staying plant-based. Just remember to adjust seasonings to match your choice of nut butter. If you want a fun twist, turn wraps into bowls. Just layer the chicken mix over rice or quinoa. This style makes it easy to eat and enjoy. You can also fill lettuce leaves with grains for added texture. Each bite becomes a crunchy delight you can’t resist! To store your spicy peanut chicken lettuce wraps, place them in an airtight container. This keeps them fresh and prevents strong odors from other foods in the fridge. You can enjoy the wraps for up to three days. However, the lettuce may lose its crispness over time. So, it’s best to separate the filling and the lettuce if you plan to keep them longer. You can freeze the chicken mixture for later use. Let it cool completely before packing it into a freezer-safe bag. Remove air to prevent freezer burn. This mixture can be frozen for up to three months. When you’re ready to eat, thaw it in the fridge overnight. For quicker thawing, you can use the microwave on low heat. To reheat your spicy peanut chicken, use a skillet on medium heat. This method helps keep the chicken juicy. Stir occasionally until it's hot. You can also use a microwave, but be sure to cover it to keep moisture in. If you notice it’s dry, add a splash of water or soy sauce. Enjoy your wraps fresh and tasty! Yes, you can prep these wraps ahead of time. To make meal prep easy, cook the chicken mixture and store it in an airtight container. You can keep it in the fridge for up to three days. When you're ready to serve, just reheat the mixture on the stove. This keeps the flavors fresh. Prepare the lettuce leaves right before serving. This way, they stay crisp and crunchy. These lettuce wraps pair well with many side dishes. Consider serving them with: - Jasmine rice or brown rice for a hearty touch - A side of fresh cucumber salad for a cool crunch - Edamame for a protein boost - Pickled vegetables for a tangy contrast These sides will enhance the flavors of the wraps and create a balanced meal. Absolutely! This recipe is quite flexible. To make it gluten-free, simply use tamari instead of soy sauce. For a vegan option, swap the ground chicken for crumbled tofu or tempeh. You can also replace honey with maple syrup for sweetness. Feel free to get creative with vegetables, too! Use any mix of your favorite veggies to suit your taste. This blog post walked you through making tasty Spicy Peanut Chicken Lettuce Wraps. We looked at the main ingredients, like ground chicken and peanut butter. You learned step-by-step how to cook the chicken and make the sauce. I shared tips for serving and storing leftovers, too. These wraps offer flavor and fun. You can adjust the spice, try different meats, or even go plant-based. Enjoy experimenting with this recipe. It’s a great way to get dinner on the table quickly and deliciously.

Spicy Peanut Chicken Lettuce Wraps Crunchy Delight

If you’re craving a dish that bursts with flavor and crunch, you’ve come to the right place! My Spicy Peanut

- 1 cup frozen pineapple chunks - 1 ripe banana - 1/2 cup coconut milk (or other milk of your choice) - 1/2 cup Greek yogurt (or dairy-free yogurt for a vegan alternative) - 1 tablespoon honey or agave syrup (optional for sweetness) For this delightful smoothie bowl, frozen pineapple chunks are key. They give a sweet, tropical taste and a creamy texture when blended. A ripe banana adds natural sweetness and creaminess, making each bite smooth. Coconut milk adds richness, but feel free to use almond or oat milk if you prefer. Greek yogurt boosts creaminess and protein, but you can swap it for dairy-free yogurt to keep it vegan. If you like it sweeter, honey or agave syrup is an easy option. - Freshly sliced fruits (such as kiwi, strawberries, and banana) - Crunchy granola - Chia seeds for added nutrition - Shredded coconut for a tropical flair - Fresh mint leaves for garnish Toppings make your smoothie bowl fun and tasty. You can slice fresh fruits like kiwi, strawberries, and banana for color and flavor. Crunchy granola adds a nice texture and fills you up. Chia seeds pack in extra nutrition and are great for your health. Shredded coconut gives a tropical vibe, while mint leaves add a fresh touch. Use your favorite toppings to make your smoothie bowl your own! {{ingredient_image_2}} To make the perfect smoothie base, start by adding the frozen pineapple chunks, ripe banana, coconut milk, Greek yogurt, and honey or agave syrup to a high-speed blender. Blend on high speed. You want it smooth and creamy. If the texture feels too thick, add more coconut milk gradually. This helps adjust the consistency. Scrape down the sides of the blender as needed. Now for the fun part! Pour your smoothie mixture into a bowl. Make sure you create a thick base. For toppings, get creative! Arrange sliced fresh fruits like kiwi and strawberries. Add a sprinkle of crunchy granola and a dash of chia seeds. Don’t forget the shredded coconut for that tropical flair. Serve your smoothie bowl right away. This keeps it fresh and maintains the best texture. Using a decorative bowl can make it look even better. Enjoy it with a colorful spoon for a delightful meal! To make the perfect smoothie bowl, you can adjust the sweetness. I suggest using honey or agave syrup. These sweeteners blend well and add a nice touch to your bowl. Start with one tablespoon and taste it. If you want it sweeter, add a bit more. Achieving the right thickness is key. You want a creamy and thick base. If your mix is too thick, add more coconut milk. Blend until smooth and creamy. If it's too thin, you can add more frozen pineapple. This helps keep it cold and thick. Choosing a decorative bowl makes a big difference. A bright or fun bowl adds joy to your meal. Pair it with a colorful spoon for an extra fun touch. The best time to enjoy your smoothie bowl is in the morning or as a snack. It is refreshing and energizing. You can also share it with friends. Smoothie bowls are a great way to start the day or cool off in the afternoon. Enjoy! Pro Tips Use Frozen Fruits: Frozen pineapple and banana not only enhance the creaminess but also keep your smoothie bowl chilled and refreshing. Adjust Sweetness: Taste the smoothie before serving; you can always add more honey or agave syrup if you prefer a sweeter flavor. Experiment with Toppings: Don’t be afraid to mix and match different fruits, nuts, or seeds to create a unique flavor profile that suits your taste! Serve Immediately: For the best texture and taste, enjoy your smoothie bowl right after preparation to prevent it from becoming too runny. {{image_4}} To make a vegan tropical pineapple smoothie bowl, simply substitute Greek yogurt with dairy-free yogurt. This keeps the creamy texture while making it vegan. You can find many options like almond, coconut, or cashew yogurt. Each type adds its own flavor to the bowl. If you want more dairy alternatives, try using almond milk or oat milk as a base. Both options blend well with pineapple and banana. They offer a light flavor and creamy consistency without dairy. You can also use coconut yogurt for a richer taste. If you want to boost your smoothie bowl with protein, adding protein powder is a great choice. Choose a flavor that works well with pineapple, like vanilla or unflavored. This way, you keep the tropical taste while gaining extra nutrition. Another way to add protein is through nut butter. Almond butter or peanut butter mixes well with the smoothie base. Just one tablespoon makes your bowl richer and more filling. Nut butter will also add healthy fats, enhancing the flavor and texture. If you have leftover smoothie mixture, you can store it in a sealed container. It will stay fresh in the fridge for up to two days. To keep it nice and thick, stir it well before serving. You can also freeze the smoothie mixture. Pour it into ice cube trays or freezer bags. This way, you can use it later in smoothies or bowls. Just blend it again when you want to enjoy it. To keep fruits fresh, store them in the fridge. Bananas can ripen quickly, so keep them on the counter. Pineapple chunks should be in an airtight container in the fridge if they are fresh. Coconut milk should also be stored in the fridge. Once opened, use it within a week. If you buy frozen produce, check for a strong seal. Always choose bags without ice crystals for the best quality. To make your smoothie bowl thicker, follow these tips: - Use more frozen fruits. Frozen pineapple and banana work great. - Blend less. This helps keep some texture. - Add chia seeds. They expand when wet and thicken your bowl. - Use less liquid. Start with a small amount of coconut milk. If it's still too thin, add more frozen fruit and blend again. Yes, you can use fresh pineapple, but it will change the texture. Frozen pineapple gives a creamier, colder feel. Fresh pineapple adds brightness and flavor. If you use fresh, add ice cubes. This keeps your bowl chilled and thick. You can try these milk options: - Almond milk: It’s light and has a mild taste. - Oat milk: Creamy and works well for smoothies. - Soy milk: Offers protein and a thicker texture. - Cashew milk: Rich and smooth, perfect for a creamy bowl. Choose based on your taste and dietary needs. This blog post covered how to make a tasty tropical pineapple smoothie bowl. We discussed main ingredients, like frozen pineapple and ripe bananas, and how to blend them for a smooth base. I shared tips on choosing toppings and presenting your bowl. You learned easy variations for vegan needs and protein boosts. Finally, we explored storage tips to keep your ingredients fresh. Enjoying this bowl boosts your mood and makes healthy eating fun. Dive in and create your own unique smoothie bowl!

Tropical Pineapple Smoothie Bowl Fresh and Healthy Treat

Are you ready to whip up a Tropical Pineapple Smoothie Bowl that’s fresh and healthy? I’m excited to share this

For these tasty tacos, you need: - 1 lb boneless, skinless chicken breast - 8 small corn tortillas - 1 ripe avocado, thinly sliced - 1 cup red cabbage, finely shredded - Fresh cilantro, roughly chopped, for garnish - 2 limes (1 for juice, 1 cut into wedges for serving) These main ingredients create a strong base for the dish. The chicken gives protein and flavor, while the tortillas hold everything together. You will also need: - 2 tablespoons chili powder - 1 teaspoon ground cumin - 1 teaspoon smoky paprika - 3 tablespoons extra virgin olive oil - 1 teaspoon garlic powder - Salt and freshly cracked black pepper, to taste These seasonings add depth and heat to the chicken. The olive oil helps the spices stick and keeps the meat juicy. For a perfect taco, gather: - Fresh lime wedges for serving - Your favorite salsa for dipping The lime juice brightens the dish. Salsa adds an extra layer of flavor and pairs well with the grilled chicken. With these ingredients, you set the stage for a delicious taco experience that bursts with flavor and freshness. {{ingredient_image_2}} To start, you need to make a tasty marinade. In a medium bowl, mix together 2 tablespoons of chili powder, 1 teaspoon of ground cumin, 1 teaspoon of smoky paprika, and 1 teaspoon of garlic powder. Squeeze the juice from one lime into the bowl. Add 3 tablespoons of olive oil and a pinch of salt and pepper. Whisk this all together until it blends well. Now, take your 1 pound of chicken breast and place it in the bowl. Use your hands or a spoon to coat the chicken fully in the marinade. Cover the bowl with plastic wrap and put it in the fridge. Let it sit for at least 30 minutes. If you have time, marinate it for up to 2 hours. This makes the chicken even tastier. When you are ready to grill, preheat your grill to medium-high heat. Make sure the grates are clean and lightly oiled, so the chicken does not stick. Take the chicken out of the marinade and place it directly onto the hot grill. Be sure to throw away any leftover marinade. Grill the chicken for about 5 to 7 minutes on each side. You want the internal temperature to reach 165°F (75°C). Look for nice grill marks on the chicken. After grilling, move the chicken to a cutting board and let it rest for 5 minutes. This resting time helps keep the juices inside. Then, slice the chicken into thin strips. While the chicken is resting, warm the corn tortillas on the grill. Place them for about 30 seconds on each side. You want them warm with slight char marks. Now, it’s time to assemble your tacos. Take a warmed tortilla and lay a few strips of grilled chicken on top. Add a handful of shredded red cabbage and a few slices of avocado. Finish with a sprinkle of freshly chopped cilantro. Serve your tacos with lime wedges for squeezing and a bowl of your favorite salsa for dipping. Enjoy the burst of flavors in every bite! Grilling chicken can be fun and easy. First, make sure your grill is clean. A clean grill helps the chicken not stick. Preheat the grill to medium-high heat. This gets the grill hot enough for good sear marks. Place the chicken on the grill for 5 to 7 minutes per side. Use a food thermometer to check for doneness. The chicken should reach 165°F (75°C). Let the chicken rest for 5 minutes after grilling. This keeps the juices inside, making it more tender. Marinading the chicken is key for flavor. You can let it sit for as little as 30 minutes. But if you have time, try to marinate it for 2 hours. The longer the chicken sits in the marinade, the more flavor it absorbs. Use a mix of chili powder, cumin, and lime juice for a punchy taste. Make sure to coat the chicken well. This ensures every bite is packed with flavor. Presentation makes food more appealing. For tacos, use a bright platter. Arrange the tacos neatly, with extra cilantro on top. Add lime wedges for a pop of color. Serve with a colorful salsa on the side. It makes the dish look fun and inviting. Warm the corn tortillas on the grill for better taste. This adds a nice char and makes them easier to fold. A great presentation makes everyone excited to dig in! Pro Tips Marinate Longer for Flavor: For the best flavor, marinate the chicken for at least 2 hours, or even overnight, to allow the spices to fully penetrate the meat. Check Grill Temperature: Ensure your grill is preheated to medium-high heat. This helps achieve those beautiful grill marks and prevents the chicken from sticking. Rest the Chicken: Allowing the grilled chicken to rest for 5 minutes before slicing helps retain its juices, resulting in a more succulent taco filling. Customize Your Toppings: Feel free to add additional toppings like diced tomatoes, jalapeños, or a drizzle of creamy chipotle sauce for extra flavor and texture. {{image_4}} If you need to swap ingredients, here are some easy ideas: - Chicken: Use boneless thighs for a juicier option. - Spices: If you lack chili powder, try taco seasoning instead. - Olive Oil: You can use avocado oil for a different taste. - Tortillas: Flour tortillas work well if you prefer them over corn. Tacos are fun because you can add many toppings. Here are some tasty picks: - Cheese: Crumbled feta or shredded cheddar add creaminess. - Greens: Use arugula or spinach for a fresh crunch. - Salsa: Fresh pico de gallo or mango salsa can brighten each bite. - Sour Cream: A dollop can balance the heat from the chili. You can still enjoy these tacos even without a grill. Here's how: - Oven: Preheat to 400°F (200°C). Place marinated chicken on a baking sheet. Bake for 20-25 minutes until cooked through. - Stovetop: Heat a skillet over medium heat. Add olive oil, then cook chicken for about 6-7 minutes per side. These methods give you flexibility while keeping the flavor strong. Enjoy the process of making these tacos your own! To keep leftover chicken fresh, let it cool first. Place it in an airtight container. Seal it tightly and store it in the fridge. You can keep it for up to three days. When reheating, use low heat. This helps keep the chicken juicy and tasty. For meal prep, store the chicken and taco fillings separately. Wrap tortillas in plastic wrap or foil. Keep them in the fridge for up to two days. When ready to eat, warm the tortillas on a grill or skillet. This makes them soft and easy to fill. You can freeze leftover grilled chicken too! Cool the chicken, then slice it. Place it in freezer bags. Squeeze out as much air as possible and seal. It can last up to three months. For tortillas, wrap them in foil and freeze. You can also freeze shredded cabbage and avocado slices. Just remember, avocado may brown, so use it quickly once thawed. To keep your grilled chicken juicy, marinate it well. Use a mix of lime juice, olive oil, and spices. The acid in lime helps tenderize the meat. Let the chicken sit in the marinade for at least 30 minutes. For better results, marinate for up to 2 hours. Grill the chicken over medium-high heat. Cooking it too long makes it dry. Always check the internal temperature; it should reach 165°F (75°C). Let the chicken rest for 5 minutes after grilling. This step keeps the juices inside. Yes, you can use other proteins for these tacos. Chicken is a favorite, but many options work well. Try shrimp for a seafood twist. Pork or beef also adds great flavor. Just adjust the cooking time based on the protein you choose. For example, shrimp cooks faster than chicken. Tofu is a nice option for a plant-based taco. The key is to season it well, just like the chicken. Great sides for grilled chicken tacos include rice and beans. They complement the flavors nicely. A fresh salad adds crunch and color. Consider a corn salad or a simple green salad. Chips with salsa or guacamole are also popular. These sides make the meal more filling and fun. You can also serve grilled vegetables for extra nutrition. In this blog post, we explored how to make delicious chili lime grilled chicken tacos. We covered the main ingredients, marinade tips, grilling steps, and perfect taco assembly. I shared ways to enhance taste, suggested variations, and provided storage tips for leftovers. Remember, juicy chicken comes from proper marination and grilling techniques. Get creative with toppings and cooking methods. Enjoy your yummy tacos and impress everyone with your skills!

Chili Lime Grilled Chicken Tacos Flavorful and Fun

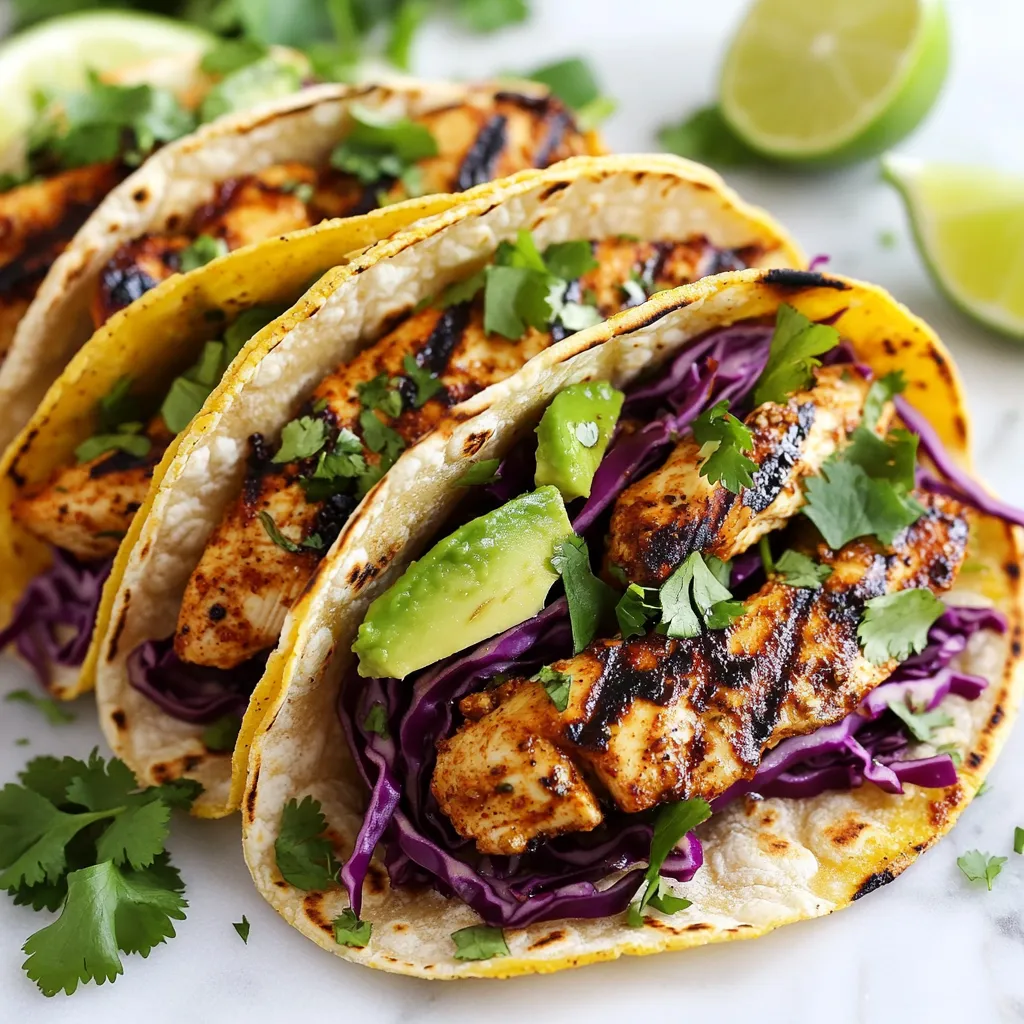
If you’re craving something fresh and exciting, look no further! These Chili Lime Grilled Chicken Tacos pack a punch of

- 2 cans of young green jackfruit in brine or water, drained and rinsed - 1 tablespoon of olive oil - 1 medium onion, finely chopped - 3 cloves of garlic, minced - 1 teaspoon of smoked paprika - 1 teaspoon of ground cumin - 1/2 teaspoon of cayenne pepper (adjust for spice) - 1 cup of BBQ sauce (your choice) - Salt and pepper to taste - 4 whole grain sandwich buns To make these BBQ jackfruit sandwiches, you need young green jackfruit. It’s not sweet and has a meaty texture. You can find this in cans at most supermarkets. The other key ingredients are olive oil, onion, garlic, and spices. These add flavor and depth to the dish. - Coleslaw (for serving) - Pickles (for garnish) Coleslaw adds crunch and creaminess. The pickles bring a nice tang. You can customize your toppings to fit your taste. You can use any BBQ sauce you like. Some popular options include: - Sweet and smoky BBQ sauce - Spicy chipotle BBQ sauce - Homemade BBQ sauce Choose a sauce that matches your flavor preferences. A good BBQ sauce makes the jackfruit rich and tasty. {{ingredient_image_2}} Start by draining and rinsing the jackfruit. Open two cans of young green jackfruit. Use a sharp knife to cut the jackfruit into smaller chunks. Remove any hard pieces and seeds. Next, shred the jackfruit using your fingers or forks. You want it to look like pulled meat. Set the shredded jackfruit aside for later. Grab a large frying pan and heat a tablespoon of olive oil over medium heat. Add one finely chopped medium onion. Sauté it for about five minutes until the onion turns soft and see-through. Then, add three minced garlic cloves. Stir and cook for one more minute. This step makes the base of your dish smell amazing. Now it's time for the jackfruit! Add the shredded jackfruit to the pan with the onions and garlic. Sprinkle in a teaspoon of smoked paprika and a teaspoon of ground cumin. If you like heat, add half a teaspoon of cayenne pepper. Stir well to coat the jackfruit in spices. Cook this mixture for about ten minutes. Stir it every few minutes until the jackfruit is tender and starts to brown. Next, pour in one cup of your favorite BBQ sauce. Mix it well with the jackfruit. Let it simmer gently. Lower the heat and cover the pan. Cook for another 15 to 20 minutes. Stir occasionally. Taste and add salt and pepper as needed. If it looks too thick, add a splash of water to thin it out. To get the best texture, use young green jackfruit. Make sure you drain and rinse it well. Cut it into small chunks. Remove any hard core and seeds. Shred the jackfruit with your hands or forks. This gives it a pulled meat look. Cook it well in your pan. The flavors will blend nicely, and it will get tender. Spice levels can change how you enjoy your sandwich. Start with the cayenne pepper. Use half a teaspoon for a mild kick. You can always add more if you like it spicy. Taste the jackfruit mixture while cooking. If it needs more heat, add a pinch of cayenne. You can also try adding hot sauce or chili powder to mix things up. Toasting your buns makes a big difference. It adds crunch and warmth. You can toast them in a toaster or a skillet. If using a skillet, heat it on medium and lightly coat it with oil. Toast the buns until they are golden brown. This step helps prevent sogginess from the BBQ sauce. Enjoy that perfect bite with each sandwich! Pro Tips Choosing the Right Jackfruit: Use young green jackfruit packed in brine or water for the best texture. Avoid ripe jackfruit as it has a sweet flavor and mushy texture, which won't work for savory dishes. Customize Your BBQ Sauce: Feel free to experiment with different BBQ sauces to find your perfect flavor. You can also mix in spices or hot sauce to elevate the taste even further! Perfectly Toasted Buns: Toast the sandwich buns until golden brown to add a delightful crunch and enhance the overall flavor of the sandwich. Make Ahead: The jackfruit filling can be made ahead of time and stored in the refrigerator for up to 3 days. Reheat before serving for a quick meal option! {{image_4}} You can switch up the BBQ sauce to change the taste. Try a spicy sauce for more heat. A tangy vinegar-based sauce adds a nice twist. You can also use a sweet sauce with honey or maple for a fun flavor. Each sauce brings out a different side of the jackfruit. Experiment to find your favorite! You can make your BBQ jackfruit sandwiches even better by adding veggies. Try adding bell peppers, corn, or sautéed mushrooms. These will add texture and flavor. For those who want more protein, consider adding tofu, tempeh, or beans. These options make the meal heartier without losing that great taste. If you need gluten-free options, don’t worry! Many stores sell gluten-free buns. You can also use lettuce wraps for a fresh twist. They add a nice crunch and keep things light. With these choices, everyone can enjoy BBQ jackfruit sandwiches! If you have leftover jackfruit filling, store it in an airtight container. Let it cool down first. Place it in the fridge. It will stay fresh for up to four days. If you notice any change in smell or color, it’s best to toss it out. To reheat your sandwiches, I suggest using the oven. Preheat it to 350°F (175°C). Wrap each sandwich in foil to keep it moist. Heat for about 10-15 minutes. You can also use a skillet. Heat it over medium heat and toast each side for three to five minutes. This method keeps the bread crispy. Freezing is a great option for meal prep. For the best results, freeze the jackfruit filling on its own. Use a freezer-safe bag or container. It can last up to three months. When ready to eat, thaw in the fridge overnight. Reheat it on the stove or in the microwave. You can also freeze assembled sandwiches, but the bread may get soggy. To avoid this, freeze the filling separately and assemble when ready to eat. Jackfruit is a large tropical fruit. It grows on trees in warm climates. Young green jackfruit has a meaty texture. This makes it a popular choice for vegan dishes. You can use jackfruit to make pulled "pork" sandwiches, tacos, and curries. When cooked, it absorbs flavors well. This makes it perfect for BBQ sauces and spices. Yes, you can make BBQ jackfruit sandwiches ahead of time. Prepare the jackfruit filling and store it in the fridge. You can keep it for up to three days. When you're ready to eat, reheat the filling on the stove. Toast the buns just before serving for the best taste. This saves time and lets you enjoy the meal later. BBQ jackfruit sandwiches go well with many sides. Here are some great options: - Coleslaw for crunch - Sweet potato fries for sweetness - Potato salad for creaminess - Grilled corn for a smoky taste - Pickles for a tangy kick These sides add color and flavor, making your meal even better! In this blog post, we explored how to make delicious BBQ jackfruit sandwiches. We covered key ingredients, step-by-step instructions, and helpful tips for the best texture. I shared fun variations and easy storage methods. BBQ jackfruit sandwiches are tasty and versatile. They offer a satisfying meal for everyone. Enjoy experimenting with flavors and making this dish your own. Trust me, you won't be disappointed!

BBQ Jackfruit Sandwiches Quick and Flavorful Recipe

If you’re craving a delicious plant-based meal, BBQ jackfruit sandwiches are the answer! This quick and flavorful recipe packs a

- 1 cup all-purpose flour - 1/2 cup granulated sugar - 1/2 cup packed brown sugar - 1 teaspoon baking powder - 1/2 teaspoon baking soda - 1/2 teaspoon salt - 1 tablespoon pumpkin spice mix - 1/2 cup unsweetened pumpkin puree - 1/4 cup brewed coffee, cooled - 1/4 cup vegetable oil - 2 large eggs - 1 teaspoon vanilla extract - For the Frosting: - 1/2 cup cream cheese, softened - 1/4 cup unsalted butter, softened - 1 cup powdered sugar - Additional pumpkin spice for garnish Using high-quality ingredients makes a big difference. Fresh spices bring out the best flavor. Use pure pumpkin puree, not pumpkin pie filling. Good quality coffee enhances the latte flavor. Always check the dates on your baking items. Fresh eggs will help the cupcakes rise well. You can swap all-purpose flour with gluten-free flour for a gluten-free option. If you need a sugar alternative, try coconut sugar. For a dairy-free version, use vegan cream cheese and margarine. You can replace brewed coffee with strong brewed tea if you want a different flavor. If pumpkin spice is not available, mix cinnamon, nutmeg, and cloves in equal parts. {{ingredient_image_2}} First, preheat your oven to 350°F (175°C). This heat is key for a great bake. While the oven warms, line a 12-cup muffin tin with paper liners. This keeps the cupcakes from sticking and makes for easy cleanup. In a large mixing bowl, add these dry ingredients: - 1 cup all-purpose flour - 1/2 cup granulated sugar - 1/2 cup packed brown sugar - 1 teaspoon baking powder - 1/2 teaspoon baking soda - 1/2 teaspoon salt - 1 tablespoon pumpkin spice mix Whisk them together well until they blend fully. This step adds air and helps the cupcakes rise. In a separate bowl, combine the following wet ingredients: - 1/2 cup unsweetened pumpkin puree - 1/4 cup brewed coffee, cooled to room temperature - 1/4 cup vegetable oil - 2 large eggs - 1 teaspoon vanilla extract Whisk these until the mixture is smooth. This will add moisture and flavor to your cupcakes. Now, gently pour the wet mixture into the bowl with the dry ingredients. Use a spatula to fold the mixtures together. Do this carefully; you want to keep some lumps. Over-mixing can make the cupcakes tough. Once mixed, fill each muffin cup about two-thirds full with the batter. Place the muffin tin in your preheated oven. Bake for 20-25 minutes. Check for doneness by inserting a toothpick into the center of a cupcake. If it comes out clean, they are ready. Let them cool in the pan for about 5 minutes, then move them to a wire rack to cool completely. While the cupcakes cool, prepare the frosting. In a mixing bowl, beat together these ingredients: - 1/2 cup cream cheese, softened - 1/4 cup unsalted butter, softened - 1 cup powdered sugar Mix until creamy and smooth. Once the cupcakes are cool, frost each one generously with the cream cheese frosting. For a special touch, sprinkle a bit of pumpkin spice on top as a garnish. Enjoy your delightful fall treat! To keep your cupcakes moist, use fresh ingredients. Old flour or expired baking powder can ruin the texture. Measure your flour correctly. Spoon it into the cup and level it off. Don't pack it down. Adding pumpkin puree helps too. It adds moisture and flavor. Use brewed coffee at room temperature. This helps blend the flavors well. One common mistake is over-mixing the batter. Mix just until wet and dry ingredients combine. A few lumps are okay. Another mistake is not checking your oven temperature. Use an oven thermometer to ensure it is accurate. Baking too long can dry out your cupcakes. Always check for doneness with a toothpick around 20 minutes. Let your cupcakes cool in the pan for five minutes. This helps them set before moving them. After that, transfer them to a wire rack. It allows air to circulate around them. Wait until they cool completely before frosting. Use a piping bag for neat frosting. Sprinkle extra pumpkin spice on top for a lovely finish. Pro Tips Use Fresh Spices: Ensure your pumpkin spice mix is fresh for maximum flavor. Ground spices can lose potency over time, so consider grinding your own for a more vibrant taste. Test for Doneness: Instead of just relying on the baking time, use a toothpick to check for doneness. If it comes out clean, your cupcakes are ready to come out of the oven! Cool Completely: Allow your cupcakes to cool completely before frosting them. This prevents the frosting from melting and ensures a beautiful finish. Experiment with Toppings: Feel free to get creative with toppings! Consider adding caramel drizzle, chocolate chips, or even crushed nuts for added texture and flavor. {{image_4}} You can make these cupcakes even better by adding chocolate or nuts. Mix in 1/2 cup of chocolate chips for a sweet twist. The chocolate pairs well with the pumpkin spice. If you prefer nuts, add 1/2 cup of chopped walnuts or pecans. This adds a nice crunch and flavor. Mix these into your batter right before you fill the muffin cups. To make dairy-free or vegan pumpkin spice latte cupcakes, swap a few ingredients. Use almond or oat milk instead of regular milk. Replace the eggs with flaxseed meal. Mix 1 tablespoon of flaxseed with 2.5 tablespoons of water. Let it sit for five minutes until it thickens. You can also use dairy-free cream cheese for the frosting. These changes keep the flavor rich and delicious. You can change the flavor of your cupcakes easily. To add a maple flavor, use maple syrup instead of sugar. This gives a nice sweetness and a warm taste. For a caramel twist, drizzle caramel sauce over the frosting. You can also mix caramel into the batter. These flavors make each bite special. Feel free to get creative with your favorite flavors! Store your pumpkin spice latte cupcakes at room temperature. Place them in an airtight container. This keeps them fresh and moist. Cupcakes can stay good for up to three days. If your kitchen is warm, try to eat them sooner. If your cupcakes are frosted, you should refrigerate them. Put the cupcakes in a sealed container. This helps the frosting stay firm and fresh. They will last about five days in the fridge. Just remember to let them sit out for a few minutes before eating. This will bring back their soft texture. You can freeze cupcakes if you want to save some for later. Wrap each cupcake in plastic wrap. Then place them in a freezer bag. They can stay good for up to three months in the freezer. To thaw, take them out and leave them at room temperature. This keeps them tasty and moist. You can use applesauce as a substitute for pumpkin puree. It keeps the cupcakes moist and adds a subtle sweetness. Mashed bananas also work well, but they change the flavor a bit. If you need a lighter option, try using sweet potato puree. This gives a nice texture and taste too. These cupcakes last about three days at room temperature. Store them in an airtight container to keep them fresh. If you refrigerate them, they can last up to a week. Just note that cold storage can dry them out, so enjoy them as soon as you can. Yes, you can use a chocolate frosting for a rich twist. A maple buttercream also pairs well with the pumpkin spice flavor. If you want something lighter, a whipped cream topping is a great choice. Get creative and find what you love best! Serve these cupcakes warm or at room temperature. They taste best after they cool down completely. You can also add a dollop of whipped cream on top for extra flair. Enjoy them with a hot drink for the perfect fall treat! You learned how to make delicious cupcakes with our easy steps and tips. We covered key ingredients, quality notes, and useful substitutions. The step-by-step guide ensures perfect baking every time. Don't forget the tips to keep your cupcakes moist and tasty. You can even try fun variations like chocolate or vegan options! Lastly, storing your cupcakes right helps maintain their flavor. Now you can bake and enjoy cupcakes that impress everyone. Happy baking!

Pumpkin Spice Latte Cupcakes Delightful Fall Treat

Are you ready to enjoy the taste of fall with a sweet twist? These Pumpkin Spice Latte Cupcakes are perfect

- 2 boneless, skinless chicken breasts, diced into bite-sized pieces - 1 tablespoon sesame oil - 1/4 cup low sodium soy sauce - 2 tablespoons honey - 1 tablespoon rice vinegar - 1 teaspoon fresh ginger, finely minced - 2 cloves garlic, finely minced - 1/2 cup green bell pepper, finely chopped - 1/2 cup carrot, grated - 1/4 cup green onions, sliced (plus extra for garnish) - 1 tablespoon toasted sesame seeds (plus extra for garnish) - 1 head of butter or romaine lettuce, leaves carefully separated - Salt and freshly ground black pepper, to taste To make these wraps, start with your chicken. You want them diced small for easy eating. The sesame oil adds a great flavor. For the teriyaki sauce, mix soy sauce, honey, rice vinegar, minced ginger, and garlic. This sauce is key for that sweet and salty kick. Next, gather your veggies. Green bell pepper and carrot add color and crunch. Don't forget the green onions and sesame seeds for garnish. These not only taste great but also make the dish look pretty. Finally, you'll need fresh lettuce leaves. Butter or romaine works well. They hold everything together and make for a fun wrap. The mix of flavors and textures in these Teriyaki Chicken Lettuce Wraps is truly delightful! {{ingredient_image_2}} Start by heating the sesame oil in a large skillet over medium heat. The oil will get hot quickly. Once it’s hot, add the diced chicken breasts. Cook them for about 5 to 7 minutes. Stir often to brown all sides. Make sure there is no pink left in the center. This means the chicken is fully cooked. While the chicken cooks, grab a mixing bowl. Here, you will make the teriyaki sauce. Whisk together the low sodium soy sauce, honey, rice vinegar, minced ginger, and minced garlic. Mix until everything is well combined. This sauce is what makes the chicken so tasty! When the chicken is cooked, pour the teriyaki sauce over it. Stir well to coat every piece of chicken. Allow this mix to simmer for 3 to 4 minutes. This helps thicken the sauce a bit. Next, add the chopped green bell pepper and grated carrot. Cook for another 2 to 3 minutes. You want the veggies to be tender but still crisp. Finally, season with salt and black pepper to taste. Turn off the heat and gently fold in the sliced green onions and toasted sesame seeds. Now, you are ready to assemble! Take a lettuce leaf and spoon in the teriyaki chicken mixture. Fold it up like a wrap, and enjoy! To make the best teriyaki chicken, start with fresh chicken breasts. Dice them evenly for quick cooking. Use a hot skillet to sear the chicken. This gives it a nice brown color. Cook it until there is no pink left inside. This usually takes about 5-7 minutes. When making the sauce, whisk the soy sauce, honey, rice vinegar, minced ginger, and garlic well. This ensures every bite is full of flavor. Simmer the chicken in the sauce for 3-4 minutes. This helps thicken it and blend the flavors perfectly. Presentation matters. For a beautiful display, arrange the filled lettuce wraps on a big platter. Sprinkle some sesame seeds on top for a nice crunch. Add sliced green onions as a bright garnish. You can also serve extra teriyaki sauce on the side. This adds fun for dipping and keeps things exciting. One mistake is overcooking the chicken. This can make it dry and chewy. Always check that it’s cooked through but still juicy. Another mistake is not seasoning the mixture. A pinch of salt and black pepper can enhance the taste. Lastly, avoid filling the lettuce too much. This can cause the wraps to tear. Keep it simple and enjoy each bite! Pro Tips Use Fresh Ingredients: Fresh vegetables and herbs will enhance the flavor of your teriyaki chicken wraps, making them more vibrant and delicious. Customize Your Veggies: Feel free to substitute or add your favorite vegetables like cucumbers or shredded cabbage for additional crunch and flavor. Make It Spicy: Add a dash of red pepper flakes or a drizzle of sriracha to the teriyaki sauce if you prefer a spicier kick to your wraps. Choose the Right Lettuce: Butter lettuce is ideal for wraps, but you can also use iceberg for a crunchier texture or romaine for a sturdier option. {{image_4}} You can swap chicken for other proteins. Try diced tofu for a lighter meal. Ground turkey also works well. It cooks quickly and absorbs flavors. Shrimp is another tasty choice. Just stir-fry until it's pink and cooked through. To make this dish vegetarian, use tempeh or seitan. Both mimic the texture of chicken. For a vegan option, replace honey with maple syrup or agave. Ensure that soy sauce is vegan. You can add more veggies like mushrooms or zucchini for extra texture. Spice up your teriyaki chicken with a dash of sriracha. This adds heat and depth. You can also include fresh herbs like cilantro or basil. These herbs bring freshness to the wraps. Another idea is to sprinkle in some lime juice for a zesty kick. Don't forget to experiment with different nuts like cashews for crunch! To store leftovers, let the teriyaki chicken cool. Place it in an airtight container. You can keep it in the fridge for up to three days. Keep the lettuce leaves separate to stay fresh. This helps prevent sogginess. When you are ready to eat, reheat the chicken. You can use a microwave or a skillet. If using a microwave, heat for 1-2 minutes. Stir halfway to heat evenly. If using a skillet, cook on low heat until warm. Add a splash of water if it seems dry. To freeze, place the cooled chicken in a freezer bag. Squeeze out as much air as possible. It can stay frozen for up to three months. Thaw it in the fridge overnight before reheating. Avoid freezing the lettuce; it will become limp. Yes, you can use other types of lettuce. Iceberg and romaine are great options. They both add crunch and freshness. You can also try cabbage leaves for a different taste. Each lettuce adds its own flavor and texture. To make this dish gluten-free, swap regular soy sauce for gluten-free soy sauce or tamari. Be sure to check the honey and sesame oil labels. Most brands are gluten-free, but it’s good to confirm. This small change keeps the taste while making it safe for everyone. Teriyaki Chicken Lettuce Wraps pair well with several sides. Serve them with steamed rice or quinoa for a filling meal. A light salad can add freshness and crunch. You might also enjoy some sliced cucumbers or edamame on the side. These options balance the flavors and enhance your meal. This blog post guided you through making Teriyaki Chicken Lettuce Wraps. We covered essential ingredients, including chicken, sauce, and veggies. You learned the steps to cook the chicken, prepare the sauce, and combine it all. I shared tips to perfect your dish and avoid common mistakes. We explored variations like using different proteins and vegan options. Proper storage tips ensure your leftovers stay fresh. Now, you can enjoy this delicious meal anytime! Embrace your cooking journey and create your own tasty twists.

Teriyaki Chicken Lettuce Wraps Quick and Tasty Meal

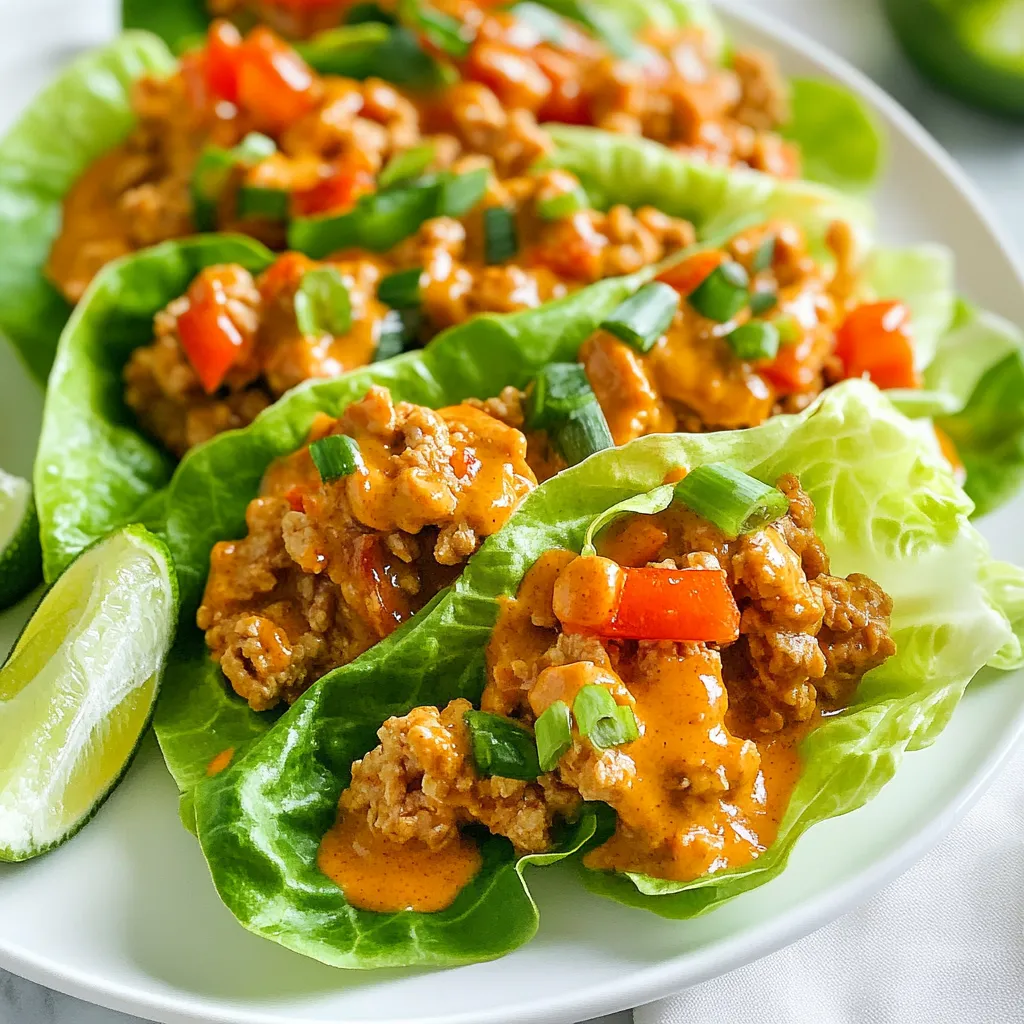
Looking for a quick and tasty meal? Teriyaki Chicken Lettuce Wraps are your answer! These wraps pack flavor, fun, and

To make honey mustard chicken thighs, you will need the following ingredients: - 4 bone-in chicken thighs, skin-on - 1/4 cup honey - 1/4 cup Dijon mustard - 2 tablespoons olive oil - 2 cloves garlic, minced - 1 teaspoon fresh thyme leaves (or 1/2 teaspoon dried thyme) - Salt and black pepper, to taste - Fresh parsley, chopped (for garnish) These simple ingredients create a rich and tangy flavor. The honey adds sweetness, while the Dijon mustard gives a nice kick. You can elevate your dish with these optional enhancements: - Citrus Zest: Add lemon or orange zest for a fresh twist. - Hot Sauce: Mix in a few drops for some heat. - Brown Sugar: A teaspoon can enhance the sweetness. - Other Herbs: Consider rosemary or oregano for different flavor notes. These tweaks can personalize your chicken thighs to match your taste. Gather these tools to make cooking easier: - Baking dish - Medium mixing bowl - Whisk or fork - Measuring cups and spoons - Paper towels - Oven mitts Having the right tools helps streamline the cooking process. You’ll enjoy making this dish even more! {{ingredient_image_2}} First, heat your oven to 400°F (200°C). This step is key for crispy skin. While the oven warms up, grab your chicken thighs. Use paper towels to dry them well. This helps the skin get nice and crispy when cooking. Place the thighs in a baking dish in one layer. In a medium bowl, combine 1/4 cup honey and 1/4 cup Dijon mustard. Adding 2 tablespoons of olive oil will make it smooth. Next, add 2 minced garlic cloves and 1 teaspoon of fresh thyme leaves. Season with salt and black pepper to taste. Whisk everything together until it blends well. Pour the honey mustard marinade over the chicken thighs. Make sure each piece gets a good coating. For the best flavor, cover the dish and place it in the fridge. Marinate for at least 30 minutes. If you have time, let it sit overnight for a richer taste. Once marinated, take the baking dish out of the fridge. Place the dish in the preheated oven. Bake for 35-40 minutes. You want the chicken skin to be golden brown. Use a meat thermometer to check. The chicken should reach 165°F (75°C) to be safe to eat. About halfway through baking, open the oven. Carefully baste the chicken with the sauce in the dish. This adds extra juiciness and flavor to the chicken. After baking, let the chicken rest for 5 minutes. This allows the juices to spread throughout the meat. Just before serving, sprinkle chopped fresh parsley on top. It adds a nice color and fresh taste. For a great meal, serve the chicken on a wooden platter with seasonal roasted vegetables. To get that perfect crispy chicken skin, start with dry thighs. Pat them down with paper towels before you marinate. This removes extra moisture that can make the skin soggy. Use a hot oven set to 400°F (200°C). High heat helps crisp the skin quickly. Basting halfway through with the marinade also adds flavor and keeps the skin from drying out. For the best flavor, marinate the chicken thighs for at least 30 minutes. If you can, let them soak overnight. This allows the honey and Dijon mustard to soak into the meat. Make sure to coat each thigh well with the marinade. Consider using a zip-top bag for easy mixing and marinating. Just toss the chicken in, seal, and give it a good shake. It’s key to cook your chicken to the right temperature. Use a meat thermometer to check. The internal temperature should reach 165°F (75°C) for safe eating. Insert the thermometer into the thickest part of the thigh, avoiding the bone. Let the chicken rest for about 5 minutes after baking. This helps the juices stay inside, making your chicken juicy and tender. Pro Tips Pat Dry for Crispiness: Make sure to thoroughly pat the chicken thighs dry with paper towels before marinating. This helps to achieve a crispy skin when baked. Marinate Longer for Flavor: For the best flavor, marinate the chicken thighs for longer, ideally overnight. This allows the honey mustard to penetrate the meat for a more intense taste. Use a Meat Thermometer: To ensure perfectly cooked chicken, use an instant-read meat thermometer. The internal temperature should reach 165°F (75°C). Baste for Juiciness: Basting the chicken halfway through the cooking process with the marinade keeps the meat juicy and enhances the flavor. {{image_4}} You can switch up the sweetener in this recipe. Instead of honey, try maple syrup or agave nectar. Each sweetener adds a distinct taste. Maple syrup brings a rich, earthy flavor. Agave nectar is lighter and less intense. You can even use brown sugar for a caramelized touch. Just mix it with the mustard and other ingredients like usual. Adjust the amount to suit your taste. Adding herbs can make a big difference. Fresh herbs like rosemary or basil can elevate your dish. You can replace thyme with these herbs for a new twist. For a spicier kick, add crushed red pepper flakes or fresh chili. Even a little smoked paprika can add depth. Experiment with what you like best. This way, you can enjoy honey mustard chicken in new ways. You can cook honey mustard chicken thighs in the oven or on the grill. Baking gives a nice, even cook. It keeps the chicken juicy and tender. When grilling, you get great char and flavor. Just watch the temperature so it cooks through. Both methods work well, so choose what suits your taste. Each method offers a unique flavor, making your meal exciting every time. To store leftover chicken thighs, let them cool first. Place the thighs in an airtight container. You can keep them in the fridge for up to 3 days. Make sure they are covered well to prevent drying out. If you plan to eat them later, consider slicing them for easier use. When you want to reheat, preheat your oven to 350°F (175°C). Place the chicken thighs in an oven-safe dish. Add a splash of chicken broth or water to keep them moist. Cover with foil to trap the heat. Heat for about 20 minutes, or until they reach 165°F (75°C). This helps keep the chicken juicy and tasty. If you want to freeze honey mustard chicken, wrap each thigh tightly in plastic wrap. Then, place them in a freezer bag. Remove as much air as possible to avoid freezer burn. You can freeze them for up to 3 months. When ready to eat, thaw in the fridge overnight before reheating. This keeps the flavor and texture intact. Yes, you can use boneless chicken thighs. They will cook faster than bone-in thighs. Just keep an eye on the time. Bake boneless thighs for about 25 to 30 minutes, or until they reach 165°F. This will help you serve juicy and tender chicken. I recommend marinating the chicken for at least 30 minutes. For more flavor, marinate it overnight. This gives the honey mustard mix time to soak into the meat. The longer it sits, the tastier it gets! Here are some great sides to serve with your chicken: - Roasted vegetables - Mashed potatoes - Steamed green beans - Quinoa salad These sides will balance the flavors of the dish and make your meal complete. Absolutely! Making honey mustard sauce is easy. Mix equal parts honey and Dijon mustard in a bowl. Adjust the amount to suit your taste. You can add a splash of vinegar for a tangy kick. This homemade sauce is great for dipping or drizzling! Honey mustard chicken thighs are easy and fun to make. We covered the key ingredients, optional enhancements, and all the tools you need. The step-by-step process ensures you bake the chicken to a perfect taste and texture. I shared tips for crispy skin, great marinating, and cooking temperature. Remember, you can mix in your favorite herbs or use grilling methods for a twist. Store leftovers properly, and enjoy them later with simple reheating. With this guide, you can create a delicious meal the whole family will love. Happy cooking!

Honey Mustard Chicken Thighs Flavorful and Easy Recipe

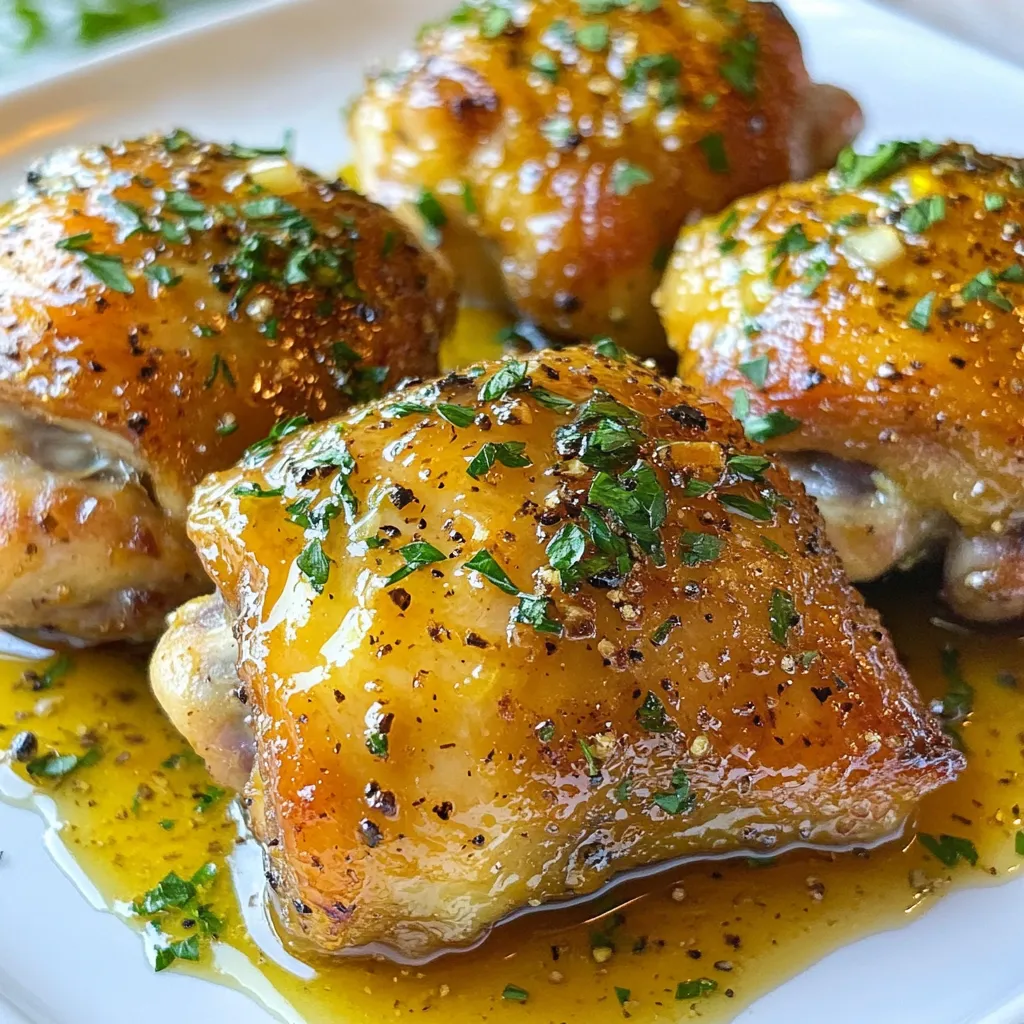
Looking for a tasty dish that’s quick and easy? You’ve come to the right place. My Honey Mustard Chicken Thighs

Older posts
Newer posts
← Previous Page1 … Page87 Page88 Page89 Page90 Next →

dsad

© 2025 recipetorch • Built with GeneratePress

Our Policies

  • Copyright Policy
  • Cookie Policy
  • GDPR Policy
  • Privacy Policy
  • Disclaimer
  • Terms Of Use

More Information

  • Home
  • About
  • Contact
  • Appetizers
  • Dessert
  • Dinner
  • Drinks
©2025, recipetorch About Back To Top