Skip to content
DisclaimerTerms Of UseGDPR PolicyCookie Policy

recipetorch

  • Home
  • Drinks
  • Appetizers
  • Dinner
  • Dessert
  • About
  • Contact
  • Privacy Policy
DisclaimerTerms Of UseGDPR PolicyCookie Policy

Nicole

sdfsa

dasdas

- 1 large flatbread or pita bread - 1/4 cup vibrant basil pesto sauce - 1/2 cup cherry tomatoes, halved - 1/2 cup mixed bell peppers, sliced - 1/2 cup zucchini, thinly sliced - 1/4 cup red onion, paper-thin slices - 1/2 cup mozzarella cheese, freshly shredded - 1 tablespoon extra-virgin olive oil - Salt and freshly cracked black pepper, to taste - Fresh basil leaves for garnish - Optional: Balsamic glaze for a tangy finish The main ingredients make this flatbread a delight. The flatbread serves as a base for our toppings. I like using large flatbreads or pita bread for their texture. The basil pesto sauce adds a rich flavor. You only need a little, but it packs a punch! I love cherry tomatoes for their sweetness. Halving them allows their juice to blend well. Mixed bell peppers add color and crunch. Red and yellow peppers work best for a bright look. Zucchini slices are tender and complement the other veggies. Red onion gives a zing that balances the dish. Lastly, mozzarella cheese melts beautifully. It creates a lovely, gooey topping. For seasonings and extras, I recommend extra-virgin olive oil. It enhances the veggies' flavors. Salt and fresh black pepper are must-haves for seasoning. I always use fresh basil leaves for garnish. They add a pop of color and freshness. If you want to elevate the taste, try balsamic glaze. It brings a tangy twist to each bite! {{ingredient_image_2}} - Preheat the oven to 400°F (200°C). - Prepare a baking sheet with parchment paper. - Spread 1/4 cup of basil pesto sauce across the flatbread. - In a bowl, combine 1/2 cup halved cherry tomatoes, 1/2 cup mixed bell peppers, 1/2 cup zucchini rounds, and 1/4 cup thin red onion slices. - Drizzle with 1 tablespoon of extra-virgin olive oil and season with salt and black pepper. Toss well. - Distribute the vegetable mixture evenly on the flatbread. - Sprinkle 1/2 cup freshly shredded mozzarella cheese on top. - Bake the flatbread for 10-12 minutes until the cheese bubbles and the edges turn golden. - Once done, remove it from the oven and let it cool for a few minutes. - Slice into wedges and garnish with fresh basil leaves. Optionally, drizzle with balsamic glaze before serving. To get the best crust, always preheat your oven to 400°F. This heat helps the edges crisp nicely. Use a baking sheet lined with parchment paper. This prevents sticking and makes cleanup easy. For even cheese melting, shred your mozzarella fresh. Pre-shredded cheese has additives that can affect melting. Want to boost flavor? Try adding a pinch of garlic powder or crushed red pepper. These spices give your flatbread a tasty kick. If you don't have balsamic glaze, use a drizzle of lemon juice. It adds a nice tang and complements the veggies. Slice your flatbread into wedges for easy serving. Arrange them on a rustic wooden board for a cozy feel. Garnish with fresh basil leaves on top. You can even add a sprinkle of extra cheese for a beautiful touch. Serve a small bowl of balsamic glaze on the side. This allows guests to dip and enjoy! Pro Tips Use Homemade Pesto: For an extra burst of flavor, consider making your own basil pesto at home. Freshly made pesto can elevate this dish to new heights. Cheese Variations: Experiment with different types of cheese like feta or goat cheese for a unique twist. Each will bring a distinct flavor profile to your flatbread. Veggie Options: Feel free to add or substitute any seasonal vegetables you have on hand, such as spinach, artichokes, or olives, for even more variety. Perfect Crispiness: If you prefer a crunchier flatbread, try broiling it for the last 1-2 minutes of baking for a golden-brown finish, but watch closely to avoid burning. {{image_4}} You can change the veggies based on the season. In summer, use fresh zucchini, tomatoes, and bell peppers. They taste great and look bright on your flatbread. In winter, try root veggies like sweet potatoes or carrots. They bring warmth and earthiness to your meal. Check local farmers’ markets for fresh, in-season produce. This choice supports local farms and gives you the best flavors. If you need gluten-free options, look for gluten-free flatbread or use corn tortillas. They hold up well and taste good. For those avoiding dairy, vegan cheese works great. Many brands offer tasty plant-based cheese that melts well. Check the ingredients to find one you love. Want to add protein? Try grilled chicken, chickpeas, or tofu. They make the flatbread more filling. You can also explore different pesto types. Sun-dried tomato or spinach pesto can change the flavor. Each type adds a unique twist, making your dish exciting every time! To keep your flatbread fresh, first let it cool. Wrap the flatbread in plastic wrap or foil. Place it in an airtight container. Store it in the fridge for up to three days. If you want to store it longer, freeze it. Wrap it tightly in plastic wrap and then in foil. This helps prevent freezer burn. Frozen flatbread can last up to three months. When it's time to eat, you can reheat your flatbread. The best method is to use an oven. Preheat your oven to 350°F (175°C). Place the flatbread directly on the rack for about 5-7 minutes. This keeps the crust crispy. If you use a microwave, place a paper towel under the flatbread. This helps absorb moisture and prevents sogginess. Heat for about 30 seconds, but check often. Your pesto veggie flatbread stays fresh for about three days in the fridge. After that, it may lose flavor and texture. Signs of spoilage include a sour smell or slimy texture. If you see any mold, throw it away. Always trust your senses when it comes to food safety. If you don’t have pesto, you can use hummus. Hummus adds creaminess and flavor. You can also try sun-dried tomato spread or olive tapenade. These options give a tasty twist to the flatbread. Try to choose spreads with a similar texture. Yes, you can prepare flatbread in advance. Just bake it and store it in the fridge. When ready to eat, reheat it in the oven for a few minutes. This keeps it warm and crispy. You can also prep the veggies ahead and store them separately. The best vegetables for flatbread are colorful and flavorful. Try using cherry tomatoes, bell peppers, zucchini, and red onion. Other good options include spinach, mushrooms, or artichokes. Choose veggies you love to eat. Mix and match for variety and texture. To make a gluten-free flatbread, use gluten-free pita bread or tortillas. Many brands offer great options that taste good. Always check the label for gluten-free certification. You can also make your own flatbread using gluten-free flour. This option gives you control over the ingredients. In this article, I covered how to make a delicious Pesto Veggie Flatbread. You learned about the main ingredients, step-by-step instructions, and tips to make it perfect. I also shared variations to customize your flatbread and storage tips to keep it fresh. Remember, this dish is easy to adapt and fun to make. Enjoy experimenting with seasonal veggies or adding your favorite proteins. With simple steps, you can create a tasty meal that everyone will love.

Pesto Veggie Flatbread Tasty and Simple Meal Idea

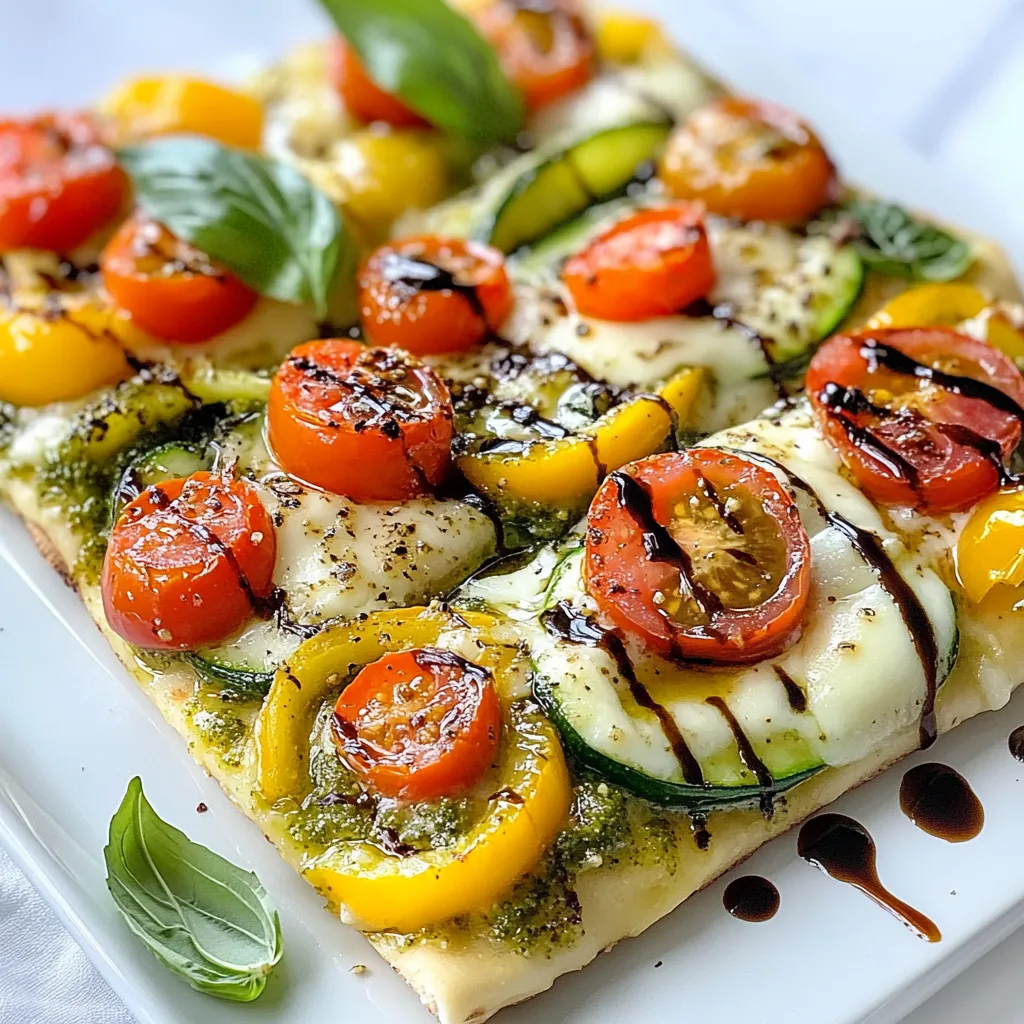
Looking for a quick and tasty meal? My Pesto Veggie Flatbread is just what you need! This dish combines fresh

- 12 oz pasta (penne, fusilli, or your preferred shape) - 4 cups fresh spinach, roughly chopped - 1 cup creamy ricotta cheese - 2 cups low-sodium vegetable broth - 1 cup cherry tomatoes, halved - 1 medium onion, diced - 3 cloves garlic, minced - 1 teaspoon dried oregano - 1/2 teaspoon red pepper flakes (optional) - Salt and black pepper to taste - 2 tablespoons extra virgin olive oil - Fresh basil leaves for garnish To make One Pot Spinach Ricotta Pasta, gather these simple ingredients. The pasta can be any shape you like. I often choose penne or fusilli, but you can try others too. Fresh spinach adds a nice touch, while creamy ricotta cheese brings richness to the dish. We use low-sodium vegetable broth for flavor without too much salt. Cherry tomatoes add sweetness and color. Diced onion and minced garlic create a tasty base. Dried oregano gives a hint of herb flavor, and red pepper flakes can spice things up if you want. You need salt and black pepper to season the dish. Extra virgin olive oil adds healthy fat and flavor. Finally, fresh basil leaves make a lovely garnish. Grab these ingredients, and you're ready to cook a delicious meal! {{ingredient_image_2}} 1. Start by heating 2 tablespoons of extra virgin olive oil in a large pot over medium heat. 2. Once the oil shines, add 1 medium diced onion. Sauté for 3-4 minutes until soft and clear. 3. Next, add 3 minced garlic cloves to the pot. Cook for 1-2 minutes until fragrant. 4. Now, introduce 1 cup of halved cherry tomatoes. Stir gently for about 2-3 minutes until they soften. 5. Carefully pour in 2 cups of low-sodium vegetable broth. Stir and bring the mixture to a gentle boil. 1. Once boiling, add 12 oz of your favorite pasta. You can use penne or fusilli. 2. Season with 1 teaspoon of dried oregano, 1/2 teaspoon of red pepper flakes (if you like heat), salt, and black pepper. Stir well to coat the pasta. 3. Cover the pot with a lid and reduce heat to medium-low. Cook for 8-10 minutes. Stir occasionally to keep it from sticking. 1. When the pasta is al dente and most liquid is absorbed, remove the pot from heat. 2. Gently fold in 4 cups of chopped spinach and 1 cup of creamy ricotta cheese. Mix until the spinach wilts and everything combines well. 3. Taste the dish. Adjust the salt and pepper if needed. 4. Serve warm, garnished with fresh basil leaves for a burst of flavor. Enjoy! - How to ensure pasta cooks evenly: Always stir the pasta right after adding it to the pot. This keeps it from clumping and helps it cook evenly. - Tips for preventing sticking: Use enough broth for the pasta. Stir it every few minutes while cooking. This will stop the pasta from sticking together. - Adjusting liquid for desired consistency: If you want a creamier dish, add more broth. For a thicker sauce, let it cook longer until more liquid absorbs. - Suggestions for additional herbs and spices: Try adding fresh basil or thyme. A pinch of nutmeg can also add a lovely warmth. - Best practices for seasoning to taste: Always taste your dish before serving. Add salt or pepper as needed. This helps you find the perfect balance of flavors. Pro Tips Use Fresh Ingredients: Always opt for fresh spinach and ripe cherry tomatoes to enhance the flavor and nutritional value of your dish. Customize Your Pasta: Feel free to swap in whole grain or gluten-free pasta for a healthier or dietary-specific option. Creamier Texture: For an even creamier dish, consider adding a splash of heavy cream or a bit more ricotta cheese at the end. Leftover Makeover: This pasta dish is perfect for leftovers! Reheat with a splash of broth to maintain moisture and flavor. {{image_4}} You can easily swap out some ingredients for this dish. Here are a few great options: - Alternative cheeses: If you want a different taste, try cottage cheese or feta. Both add a nice creaminess. - Leafy greens: Instead of spinach, use kale or Swiss chard. Both give the dish a tasty twist. - Pasta choices: If you need a gluten-free option, look for gluten-free pasta. It cooks well and tastes great. Add some protein or veggies for extra flavor. Here are some ideas: - Adding protein: Chicken, shrimp, or chickpeas make it more filling. Just cook them before adding to the pot. - Different vegetables: Try adding bell peppers or zucchini. They not only taste good but also add color to your dish. These variations help you customize your One Pot Spinach Ricotta Pasta to fit your taste and dietary needs. Enjoy experimenting! To keep your One Pot Spinach Ricotta Pasta fresh, store it in an airtight container. This will help prevent air from drying it out. I recommend eating leftovers within three to four days. The pasta will remain tasty, and the flavors will blend nicely. When reheating, the microwave works well. Start with medium heat for about one to two minutes. Stir halfway through to heat evenly. You can also use a skillet on low heat. Add a splash of vegetable broth or water to keep it moist. This helps maintain the texture and flavor of the dish. Enjoy it warm, just like when you first made it! Can I use frozen spinach instead of fresh? Yes, you can use frozen spinach. Just thaw and drain it first. Frozen spinach makes this meal quick and easy. It cuts down prep time, making dinner a breeze. How can I make this dish dairy-free? To make this dish dairy-free, swap ricotta for a plant-based cheese. You can also use cashew cream for a creamy texture. Nutritional yeast adds a cheesy flavor too. What to serve with One Pot Spinach Ricotta Pasta? This pasta pairs well with a simple green salad. Garlic bread is another great side. You can also serve it with a light soup for a complete meal. Can I prepare this dish in advance? Yes, you can prepare this dish in advance. Cook it, let it cool, and store it in the fridge. It keeps well for about three days. Just reheat it on the stove or in the microwave. Is it possible to double the recipe for larger gatherings? Absolutely! You can double the recipe for larger gatherings. Just ensure your pot is big enough to hold it all. Adjust cooking time slightly if needed. Enjoy sharing this dish with friends and family! This blog covered a simple and tasty dish: One Pot Spinach Ricotta Pasta. I shared key ingredients, easy steps to make it, and tips to boost flavor. You learned about fun variations and how to best store leftovers. In the end, this dish is flexible and straightforward. With a few tweaks, you can make it your own. Enjoy cooking, and don’t hesitate to experiment to find your perfect blend of flavors!

One Pot Spinach Ricotta Pasta Quick and Easy Meal

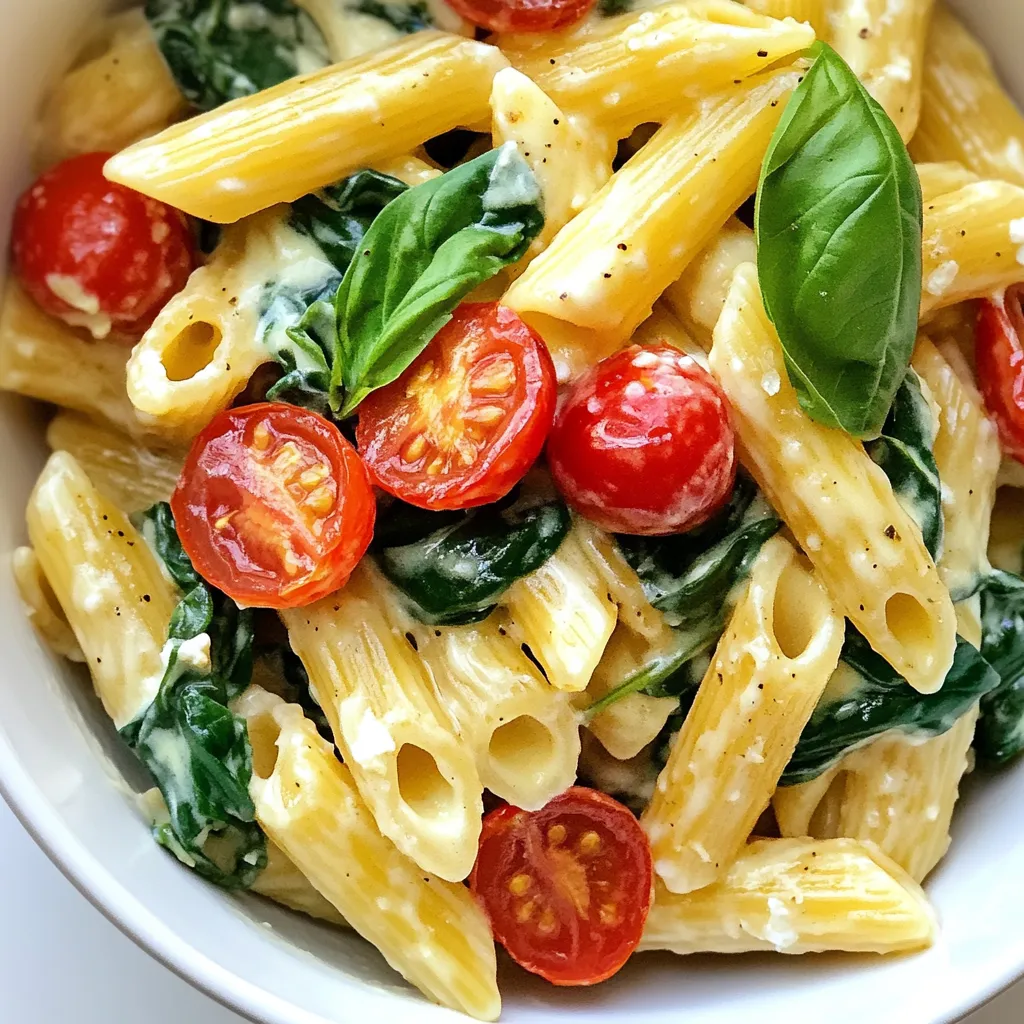
Looking for a quick and easy meal? One Pot Spinach Ricotta Pasta is your answer! This tasty dish combines pasta,

- 1 cup unsalted butter, softened - 1 cup granulated sugar - 1 cup packed brown sugar - 2 large eggs, at room temperature - 2 teaspoons vanilla extract - 3 cups all-purpose flour - 1 teaspoon baking soda - 1 teaspoon salt - 1 cup semi-sweet chocolate chips - 1 package (12 cookies) Oreo cookies, crushed - 8 oz cream cheese, softened - 1/4 cup powdered sugar - 1 teaspoon vanilla extract (for filling) - Additional crushed Oreo crumbs for garnish To make these Oreo cheesecake stuffed cookies, you need some simple and tasty ingredients. First, use unsalted butter for the best flavor. The butter should be softened to mix well with the sugars. Granulated sugar and brown sugar give the cookies a sweet touch. Next, you will need large eggs. Make sure they are at room temperature for the best mixing. Vanilla extract adds a lovely aroma and flavor. For the dough, you'll need all-purpose flour, baking soda, and salt. These help the cookies rise and give them structure. Semi-sweet chocolate chips add rich chocolate flavor. Don't forget the star of the show: Oreo cookies! Crush them into small pieces to mix into the dough. For the creamy filling, use softened cream cheese and powdered sugar. Add a touch of vanilla extract for extra flavor. Finally, keep some crushed Oreo crumbs aside. You will use them for a pretty garnish. With these ingredients, you are ready to create a delicious treat that everyone will love! {{ingredient_image_2}} 1. Preheat the oven: Set your oven to 350°F (175°C). 2. Prepare the baking sheet: Line a baking sheet with parchment paper. This helps the cookies not stick. 3. Cream together butter and sugars: In a large bowl, combine 1 cup of softened unsalted butter, 1 cup of granulated sugar, and 1 cup of packed brown sugar. Use a mixer to beat them until smooth and creamy, about 2-3 minutes. 1. Incorporate eggs and vanilla: Add 2 large eggs and 2 teaspoons of vanilla extract. Mix on low speed until fully combined. 2. Combine dry ingredients: In another bowl, whisk together 3 cups of all-purpose flour, 1 teaspoon of baking soda, and 1 teaspoon of salt. Slowly mix this into the wet ingredients until just combined. 3. Fold in mix-ins: Gently fold in 1 cup of semi-sweet chocolate chips and 1 package of crushed Oreo cookies. Make sure they are evenly spread in the dough. 1. Mix cream cheese, powdered sugar, and vanilla: In a bowl, blend 8 oz of softened cream cheese, 1/4 cup of powdered sugar, and 1 teaspoon of vanilla extract. Mix until smooth and creamy. 1. Shape the cookie balls: Take about 2 tablespoons of cookie dough and flatten it in your hand. Place 1 tablespoon of cheesecake filling in the center. Carefully encase the filling with the dough, rolling it into a ball shape. Make sure the filling is sealed. 2. Place on baking sheet: Arrange the stuffed cookie balls on the prepared baking sheet, leaving about 2 inches between each. 3. Bake the cookies: Bake in the oven for 12-15 minutes. The edges should be lightly golden, and the centers may look a bit soft. 1. Cooling time: Let the cookies cool on the baking sheet for about 5 minutes. 2. Transferring to wire rack: Carefully move the cookies to a wire rack to cool completely. 3. Garnishing: Before serving, dust the cookies with crushed Oreo crumbs for a tasty and fun presentation. To get the best cookie texture, you must avoid overmixing the dough. When you mix too much, the cookies can turn out tough. Mix until just combined, then stop. This keeps them soft and chewy. Best practices for baking include preheating your oven to the right temperature. Make sure it is set to 350°F (175°C). This helps your cookies bake evenly. Place the cookies about two inches apart on the baking sheet so they have space to spread. Adding a chocolate drizzle can make your cookies look stunning. Melt some semi-sweet chocolate and drizzle it over the cooled cookies. This makes them even more tempting and delicious. To make cookies extra chewy, use more brown sugar than white sugar. For a crispier cookie, bake them a minute longer. Keep an eye on them to avoid burning. One common mistake is not sealing the filling properly. Make sure the dough fully covers the cheesecake filling. If not, it can leak out while baking. Timing and temperature are key. Bake your cookies for 12 to 15 minutes. If they look underbaked in the center, that’s okay. They will firm up while cooling. Always let them cool on the baking sheet for five minutes before moving them. This helps them hold their shape. Pro Tips Chill the Dough: For even thicker cookies, chill the cookie dough for at least 30 minutes before baking. This helps prevent spreading and keeps the cookies chewy. Use Room Temperature Ingredients: Ensure all your ingredients, especially butter and cream cheese, are at room temperature. This helps create a smooth batter and evenly baked cookies. Customize the Filling: Feel free to add flavors to the cheesecake filling, such as lemon zest or a splash of almond extract, to elevate the taste even further. Storage Tips: Store the cookies in an airtight container at room temperature for up to a week, or freeze them for up to three months. Just thaw before enjoying! {{image_4}} You can add fun flavors to your Oreo cheesecake stuffed cookies. Try adding peanut butter for a nutty twist. It gives the cookies a rich, creamy taste. You can mix in crushed nuts or even swirl in some caramel. You can also use different types of Oreos. Double-stuffed Oreos give more creaminess. Seasonal varieties like pumpkin spice or peppermint can change the vibe of your cookies too. Be creative and explore! If you want a gluten-free version, swap all-purpose flour for almond or coconut flour. This change keeps the cookies tasty while being kind to your tummy. For a dairy-free option, use vegan cream cheese. There are many brands that taste great! If you want to cut sugar, use sugar substitutes. Erythritol or monk fruit sweetener can work well. They keep the sweetness without all the calories. You can enjoy your cookies guilt-free! These cookies are perfect for sharing! Serve them warm with a scoop of vanilla ice cream on the side. The hot and cold combo is a delight. You can also add whipped cream for extra flair. Another fun idea is to make dessert sandwiches. Take two cookies and add a layer of ice cream or cream cheese filling in between. This makes a fun treat for parties or family gatherings. Enjoy your delicious creations! To keep your Oreo cheesecake stuffed cookies fresh, store them in an airtight container. Layer parchment paper between the cookies to prevent sticking. They will stay fresh for up to five days at room temperature. If you want them to last longer, keep them in the fridge for about a week. You can freeze unbaked cookie dough for later use. To do this, scoop the cookie dough balls onto a baking sheet and freeze them until firm. Once frozen, store the dough in a freezer bag. They will stay good for about three months. For baked cookies, let them cool completely before placing them in an airtight container. They will last up to three months in the freezer. To reheat your cookies, place them in the microwave for about 10-15 seconds. This will keep them soft and warm. Make sure to check the filling to keep it intact. Avoid overheating, as that can affect the creamy cheesecake center. If you want a crispier cookie, reheat in the oven at 350°F for 5 minutes. Yes, you can use low-fat cream cheese. It will still give you a creamy filling. The taste may change slightly but the cookies will remain delicious. If you choose low-fat cream cheese, ensure it is softened well. This helps keep the filling smooth and easy to mix. To stop cookies from spreading, chill the dough for 30 minutes. This firms up the butter and makes it less likely to spread. Also, make sure you measure your flour correctly. Too little flour can cause excess spreading. Lastly, don’t skip lining your baking sheet. These cookies are tasty on their own, but you can pair them with ice cream. Vanilla or chocolate ice cream complements the rich flavors. Whipped cream or a drizzle of chocolate sauce adds a fun touch too. For a unique twist, serve them with a glass of cold milk. Yes, you can make the dough ahead of time. After mixing, cover it tightly and refrigerate for up to 3 days. This lets the flavors blend nicely. When ready to bake, let the dough sit at room temp for about 10 minutes. This makes it easier to shape the cookie balls. You now have a clear guide to making delicious Oreo Cheesecake Stuffed Cookies. From gathering ingredients to mixing the dough and baking, each step is easy to follow. Remember the tips for perfect texture and how to avoid common mistakes. You can also try fun variations and storage methods to keep cookies fresh. Experiment with flavors and enjoy these treats with friends or family. Baking is all about sharing joy, so get started today!

Oreo Cheesecake Stuffed Cookies Irresistible Delight

Are you ready to indulge in a truly decadent treat? These Oreo Cheesecake Stuffed Cookies combine two favorites into one

- 4 large russet potatoes, thinly sliced into fries - 3 tablespoons of extra virgin olive oil - 4 cloves of garlic, finely minced - 1 teaspoon of garlic powder - ½ teaspoon of smoked paprika - ½ cup of freshly grated Parmesan cheese - Sea salt and freshly cracked black pepper, to taste - Fresh parsley, finely chopped (for garnish) You can switch out russet potatoes for Yukon Gold potatoes. They offer a creamy texture. If you want a lighter option, try sweet potatoes. They add a nice sweetness. For the cheese, any hard cheese like Pecorino works well. You can use garlic powder instead of fresh garlic if you’re short on time. I suggest using extra virgin olive oil for frying. It gives a rich flavor. You can also use avocado oil or canola oil. Both provide a high smoke point and work well in the air fryer. {{ingredient_image_2}} Start by washing four large russet potatoes. Slice them into thin fries. Soak the fries in a big bowl of cold water. Let them soak for at least 30 minutes. This step helps remove excess starch. Removing starch makes the fries crispier. After soaking, drain the fries well. Use a clean kitchen towel to pat them dry. Dry fries are key to a crisp finish. In a large mixing bowl, add your dried fries. Pour in three tablespoons of extra virgin olive oil. Add four cloves of finely minced garlic. Then, sprinkle in one teaspoon of garlic powder and half a teaspoon of smoked paprika. Season with sea salt and freshly cracked black pepper. Toss everything together well. Make sure each fry gets a good coating of oil and seasoning. Preheat your air fryer to 400°F (200°C). This heat is perfect for a golden crunch. Place the seasoned fries in the air fryer basket. Spread them out in a single layer. Avoid overcrowding the basket for even cooking. Air fry the fries for 15 to 20 minutes. Halfway through, stop and shake the basket. This helps cook the fries evenly. When they look golden brown and crispy, take them out. Immediately sprinkle half a cup of freshly grated Parmesan cheese on top. The heat will slightly melt the cheese. Toss the fries gently so they are well-coated. For a final touch, add finely chopped parsley right before serving. To make your Garlic Parmesan Air Fryer Fries super crispy, start by soaking the cut fries in cold water for at least 30 minutes. This step removes extra starch. Next, dry the fries well with a clean towel. Moisture is the enemy of crispiness. Coat the fries evenly with olive oil and seasonings. This ensures every fry gets flavor and crunch. When you air fry, set the temperature to 400°F (200°C). This heat creates a perfect golden crust. Remember to arrange the fries in a single layer. This allows hot air to circulate, making them crisp all around. One mistake is not soaking the fries. Skipping this step leads to soggy fries. Another error is overcrowding the air fryer. If fries touch, they won't cook evenly. Always shake the basket halfway through cooking. This helps fry the fries on all sides. Lastly, don’t forget to season right after cooking. Hot fries absorb flavors better, so sprinkle that Parmesan cheese while they're fresh out of the fryer. To boost flavor, add more garlic! Use roasted garlic for a sweeter taste. You can also mix in different cheeses, like cheddar or feta, for a unique twist. For a spicy kick, sprinkle in some cayenne pepper or red pepper flakes. Fresh herbs like rosemary or thyme can add a nice touch, too. Serve with dipping sauces like aioli or marinara for extra flavor. Enjoy experimenting with these ideas to create your perfect Garlic Parmesan Air Fryer Fries! Pro Tips Soak for Crispiness: Soaking the cut fries in cold water for at least 30 minutes helps remove excess starch, which is key for achieving that perfect crispy texture. Dry Thoroughly: After soaking, make sure to dry the fries completely with a kitchen towel to avoid steam during cooking, which can make them soggy. Single Layer Cooking: Arrange the fries in a single layer in the air fryer basket. This allows for proper air circulation, ensuring even cooking and maximum crispiness. Toss with Cheese: Sprinkle the Parmesan cheese over the hot fries immediately after cooking. Tossing them helps the cheese melt evenly, enhancing every bite. {{image_4}} You can switch up the cheese for more fun. Cheddar adds a sharp taste. Try feta for a tangy kick. For a creamy texture, use mozzarella. Each cheese brings a new flavor twist. Feel free to mix cheeses for a special blend. You can change the seasoning too. Instead of garlic powder, try onion powder. Paprika can be swapped for cayenne for heat. Add Italian herbs like oregano for a fresh touch. You can also use ranch seasoning for a zesty flavor. Experiment with what you have at home. Make your fries more colorful by adding veggies. Toss in thin slices of zucchini or bell peppers. Carrots can add sweetness and crunch. You can even mix in broccoli florets for a healthy boost. Just make sure they cook evenly with the fries. To keep your leftover Garlic Parmesan fries fresh, place them in an airtight container. This helps maintain their flavor and texture. Make sure to store them in the fridge. They can last up to three days this way. If you find yourself with a lot of leftovers, it’s best to keep them in smaller portions. This makes it easier to grab just what you need later. When it’s time to enjoy your leftover fries, reheating them right is key. I suggest using the air fryer to bring back their crunch. Preheat the air fryer to 350°F (175°C). Spread the fries in a single layer. Heat them for about 5-7 minutes. This will help them regain their crispy texture. You can also use a skillet over medium heat for a quick option. Just toss them for a few minutes until they are hot and crisp. If you want to save some fries for a later date, you can freeze them. First, let the fries cool completely. Then, place them in a freezer-safe bag. Try to remove as much air as possible before sealing. This helps prevent freezer burn. You can freeze them for up to two months. When you’re ready to eat, just reheat from frozen in the air fryer at 400°F (200°C) for about 10-12 minutes. Enjoy that crispy goodness again! Yes, you can use sweet potatoes! Sweet potatoes offer a different taste and texture. They are naturally sweeter, which pairs well with the garlic and Parmesan. Just slice them thinly like regular potatoes. You may need to adjust the cooking time. Keep an eye on them as they cook to get that perfect crisp. To make your fries extra crispy, soak them in cold water. This helps remove starch. After soaking, dry them well with a towel. Moisture will make them soggy. Coat them well with olive oil and seasoning. Make sure to spread them in a single layer in the air fryer. Shake the basket halfway through cooking for even crispiness. Garlic Parmesan fries taste great with many dipping sauces. Marinara sauce adds a nice tangy flavor. Aioli gives a creamy touch that matches well. You can also try ranch dressing or a spicy ketchup. Each sauce adds a different twist to your fries, so feel free to experiment! In this blog post, we explored how to make Garlic Parmesan Fries, from ingredients to storage. I shared essential tips for crispiness and ways to mix up the flavors. You can use different cheeses or even add vegetables for a tasty twist. Storing leftovers and reheating them is easy, too. Finding the right balance of flavors and textures can elevate your dish. Enjoy your delicious fries, and don’t forget to share your own experiences!

Garlic Parmesan Air Fryer Fries Crispy and Flavorful

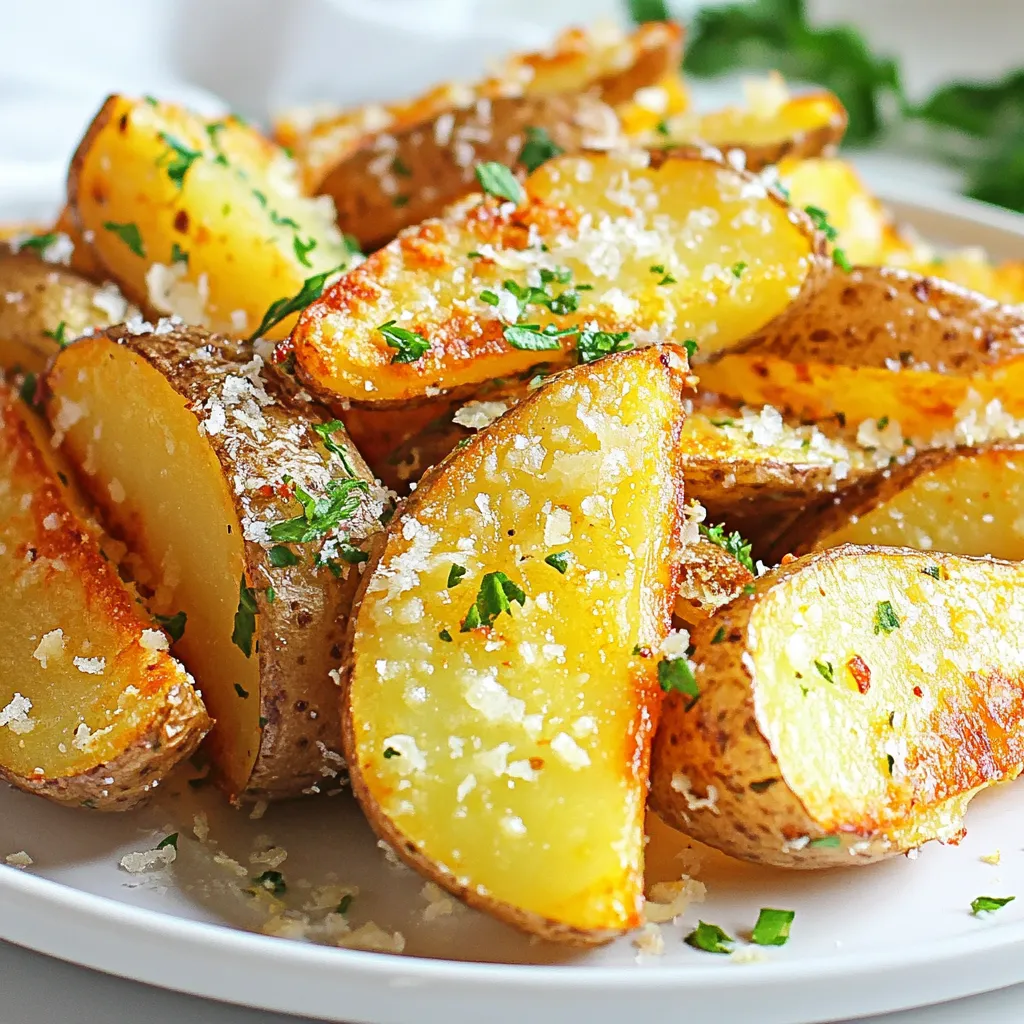
Are you ready to elevate your snacking game? These Garlic Parmesan Air Fryer Fries are simple to make and pack

To make these tasty tacos, gather these key ingredients: - 1 pound large shrimp, peeled and deveined - 8 small corn tortillas - 1 ripe mango, finely diced - 1/4 red onion, finely chopped - 1 jalapeño pepper, deseeded and minced - 1/4 cup fresh cilantro, chopped - Juice of 1 fresh lime - Ripe avocado, sliced for topping These fresh items bring bright flavors and a colorful look to your meal. For the shrimp, you'll need these simple seasonings: - 1 tablespoon extra virgin olive oil - 1 teaspoon chili powder - 1 teaspoon ground cumin - 1/2 teaspoon smoked paprika - Sea salt and freshly cracked black pepper, to taste These spices add depth and warmth to the shrimp. The olive oil helps the spices stick and keeps the shrimp juicy. You can add extra flavors with these optional toppings: - Creamy sour cream or Greek yogurt for serving These toppings give your tacos a creamy contrast. They also cool the heat from the jalapeño if you want a milder bite. Feel free to serve these tacos with lime wedges on the side. They add a zesty kick to every bite. {{ingredient_image_2}} Start by marinating the shrimp. In a medium bowl, mix the shrimp with olive oil, chili powder, ground cumin, smoked paprika, sea salt, and black pepper. Use your hands to coat the shrimp well with the spices. This step adds flavor and keeps the shrimp tender. Next, heat a large skillet over medium-high heat. Once hot, add the shrimp in a single layer. Cook for about two to three minutes on each side. Look for the shrimp to turn bright pink and opaque. Once cooked, remove the skillet from the heat. While the shrimp cook, prepare the spicy mango salsa. In another bowl, combine diced mango, chopped red onion, minced jalapeño, chopped cilantro, and lime juice. Stir well to mix the ingredients. Let the salsa sit for a few minutes, so the flavors blend nicely. To warm the corn tortillas, place them in a dry skillet over medium heat. Heat each tortilla for about 30 seconds on each side. They should be warm and easy to fold. This step helps to enhance their flavor. Now it's time to assemble the tacos. Take a warm tortilla and lay it flat on a plate. Add a generous portion of the cooked shrimp on top. Then, spoon on a hearty amount of the fresh mango salsa. For extra creaminess, add a slice of avocado on each taco. To make your tacos look amazing, stack them neatly on a colorful platter. Garnish with extra cilantro leaves for a bright touch. Serve lime wedges on the side for an extra splash of freshness. This presentation makes the dish pop and invites everyone to dig in! To cook shrimp just right, heat your skillet until it's hot. Add the shrimp in a single layer. Cook for about 2-3 minutes on each side. The shrimp should turn bright pink and opaque when done. This quick cooking keeps them tender and juicy. Yes, you can marinate shrimp ahead of time. Combine the shrimp with olive oil and spices. Let them sit for 15-30 minutes. This allows the flavors to soak in. You can prepare the shrimp a few hours before cooking, but avoid marinating them overnight. This keeps them fresh and tasty. When serving your tacos, stack them neatly on a colorful platter. Add lime wedges for a zesty kick. You can also top them with extra cilantro. For a rich touch, add creamy avocado slices. If desired, serve with sour cream or Greek yogurt for a cool contrast. Enjoy! Pro Tips Perfect Shrimp Cooking Time: Keep a close eye on the shrimp while cooking; they only need about 2-3 minutes per side. Overcooking can make them rubbery. Fresh Ingredients for Salsa: Use ripe, fresh mango and fresh cilantro for the best flavor in your salsa. This will elevate the taste of your tacos. Customize the Heat: Adjust the amount of jalapeño in the salsa according to your heat preference. You can also add more spices to the shrimp for an extra kick. Warm Tortillas Properly: Make sure the tortillas are warm and pliable before assembling the tacos. This prevents them from cracking and enhances the overall texture. {{image_4}} You can swap shrimp for chicken or fish. Chicken thighs work well and stay juicy. Fish like tilapia or cod also suit the tacos. If you want a vegetarian option, try black beans or grilled veggies. These choices add new flavors and textures. The key is to season them well to match the spice of the shrimp. You can change the mango salsa to suit your taste. Try adding diced pineapple for a sweet twist. For a spicier kick, add more jalapeño or even serrano peppers. You can also mix in diced bell peppers or cucumber for crunch. If you want a zing, add a splash of orange juice. Each variation keeps it fresh and fun. For gluten-free tortillas, look for corn tortillas. They are naturally gluten-free and work great. You can also find many brands of gluten-free flour tortillas. Just check the label to ensure they are safe. These options let everyone enjoy the tacos without worries about gluten. Store leftover tacos in an airtight container. Keep the shrimp and salsa separate from the tortillas. This helps keep everything fresh. Place the shrimp and salsa in the fridge. They will stay good for up to two days. Wrap the tortillas in foil or plastic wrap. They can last about one day in the fridge. You can freeze the shrimp and salsa too. Place the shrimp in a freezer-safe bag. Remove as much air as possible. Label the bag with the date. The shrimp can freeze for up to three months. For the salsa, use a separate container. It can also freeze for about three months. Just remember to leave some space in the container. The salsa may expand when frozen. To reheat shrimp, place them in a skillet. Heat over medium heat for about five minutes. Stir often until they are warm. For salsa, let it thaw in the fridge overnight. You can warm it gently in a pan if you prefer it warm. Warm tortillas can be made in a dry skillet. Heat them for about 30 seconds on each side. This keeps them soft and tasty. Enjoy your tacos fresh again! The best way to cook shrimp is in a hot skillet. First, marinate the shrimp in olive oil and spices. Then, heat your skillet over medium-high heat. Add the shrimp in a single layer. Cook for 2-3 minutes on each side. Look for bright pink and opaque shrimp when done. This method gives you juicy shrimp full of flavor. Yes, you can use frozen shrimp. Just make sure to thaw them first. Place the shrimp in cold water for about 15 minutes. After thawing, pat them dry before marinating. Frozen shrimp can taste great, too, if cooked right. The key is to ensure they are not overcooked. You can use many fruits in salsa. Pineapple adds sweetness and a tropical twist. Peaches bring a juicy, fresh flavor. Mango is sweet, but berries like strawberries work well too. Each fruit gives a unique taste. Mix and match to find your favorite blend. To make the tacos spicier, add more jalapeño to the salsa. You can also try some hot sauce. Another option is to use spicy chili powder in the marinade. If you like heat, feel free to experiment with different peppers. Adjust the spice level to your taste! In this blog post, we explored how to make spicy mango salsa shrimp tacos. We covered the main ingredients, step-by-step cooking instructions, and tips for perfect shrimp. You learned about fun variations, how to store leftovers, and answers to common questions. Making these tacos is easy and fun. You'll impress your friends and family with fresh flavors. Try different toppings and enjoy all the tasty options. Happy cooking!

Spicy Mango Salsa Shrimp Tacos Flavorful and Fresh

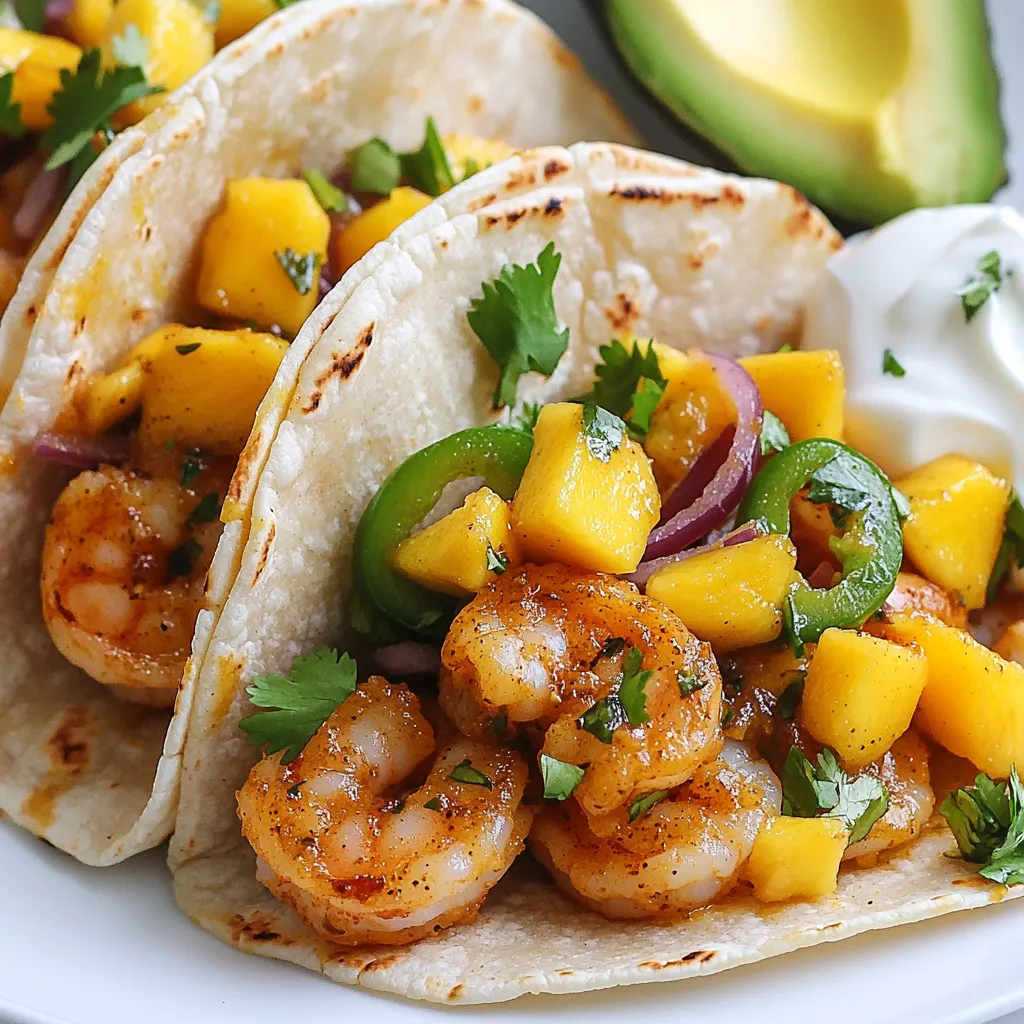
Are you ready for a flavor burst? Spicy Mango Salsa Shrimp Tacos are a must-try! I’ll guide you through fresh

- 1 cup rolled oats - 2 cups almond milk - 1 ripe banana, mashed - 1/4 cup creamy peanut butter - 2 tablespoons honey or maple syrup These main ingredients make your peanut butter banana overnight oats creamy and tasty. Rolled oats are key to the dish. They soak up the almond milk, making them soft and smooth. Almond milk adds a nutty flavor while keeping it light. A ripe banana gives natural sweetness and creaminess. Creamy peanut butter brings richness and protein. Use honey or maple syrup for extra sweetness if you like. - Chopped walnuts or almonds - Sliced banana Toppings add texture and flavor. Chopped walnuts or almonds give a nice crunch. They also add healthy fats. Sliced banana on top looks nice and adds freshness. You can mix and match toppings to your taste. Toppings are a great way to personalize your oats. {{ingredient_image_2}} Start by mixing 1 cup of rolled oats with 2 cups of almond milk. Stir well until the oats soak in the milk. Next, add 1 ripe banana, mashed, and 1/4 cup of creamy peanut butter. Mix these into the oat mixture. Make sure the peanut butter blends fully with the oats and banana for a creamy texture. Now it’s time to sweeten the deal! Add 2 tablespoons of honey or maple syrup to the mix. This gives your oats a lovely sweetness. Then, pour in 1/2 teaspoon of vanilla extract and a pinch of salt. Sprinkle in 1/2 teaspoon of ground cinnamon for warmth. Mix everything thoroughly until it's well combined. Next, it’s time to portion the mixture. Divide it into two mason jars or airtight containers. Leave a little space at the top for any toppings you may want to add later. Seal the jars tightly and place them in the fridge. Let them chill overnight or for at least 4–6 hours. This soaking time allows the oats to soften and absorb the milk. In the morning, take your jars out of the fridge. Give the oats a gentle stir. If the mixture feels too thick, add a splash of milk to reach your preferred consistency. Before you dig in, top your oats with chopped walnuts or almonds for a nice crunch. You can also add sliced banana on top for a fresh touch. Enjoy your delicious breakfast! - Best types of oats: Use rolled oats for the best texture. They soak up liquid well and create a creamy base. Instant oats can become mushy, while steel-cut oats need longer cooking times. - Milk alternatives: Almond milk works great, but feel free to try oat milk or soy milk. Each brings a unique flavor. You can also use regular cow's milk if you prefer. - Adjusting thickness: If your oats are too thick, add a splash of milk. This will help reach your perfect consistency. For creamier oats, let them soak longer. - Soaking time recommendations: Aim for at least 4-6 hours in the fridge. Overnight is best! The oats will soften and absorb the flavors well. - Experimenting with spices: Ground cinnamon adds warmth. You can also try nutmeg or cocoa powder for a twist. A pinch can change the taste. - Alternate sweeteners: Honey and maple syrup are great, but feel free to use agave nectar or stevia for a low-calorie option. Adjust to your taste preference. Pro Tips Use Ripe Bananas: The riper the banana, the sweeter and more flavorful your overnight oats will be. Look for bananas with brown spots for the best taste. Experiment with Nut Butters: While peanut butter is delicious, try swapping it for almond butter or sunflower seed butter for a unique twist on flavor. Customize Your Sweetness: Adjust the amount of honey or maple syrup according to your taste preference. You can also try adding a splash of vanilla extract for extra flavor. Make It Ahead: These overnight oats can be made in batches and stored in the refrigerator for up to 5 days. Perfect for a quick breakfast during a busy week! {{image_4}} You can mix things up with flavors. Try chocolate peanut butter banana by adding cocoa powder. Just one tablespoon will give you a rich taste. You can also add mini chocolate chips for extra sweetness. For a berry twist, swap some banana for berries. Blueberries or strawberries work great. Just mash them in or mix them whole. This gives your oats a fruity flair. If you want vegan options, use maple syrup instead of honey. Make sure your milk is plant-based too. Almond, oat, or soy milk are good choices. For gluten-free alternatives, always check your oats. Some oats can be cross-contaminated with gluten. Look for brands labeled gluten-free to keep it safe. When meal prepping, you can adjust servings easily. Double the recipe for four servings. You can also make a family-sized batch. Just mix in a big bowl and store in jars. This way, you have breakfast ready for the whole week. For storing your peanut butter banana overnight oats, I recommend using mason jars or airtight containers. These containers keep your oats fresh and tasty. Airtight containers work best because they block air and moisture. Non-airtight containers may let in air, which can dry out your oats quickly. In the fridge, these oats last for about 3 to 5 days. If you notice any change in color or a sour smell, it’s time to toss them. Always check for signs of spoilage, like a watery layer on top or a strange texture. Trust your senses; they will guide you! You can freeze overnight oats for up to 3 months. To freeze, fill your containers, leaving some room at the top for expansion. When you want to eat them, move the jars to the fridge for a night to thaw. If you need them faster, use the microwave on low heat. Just stir well and enjoy your easy breakfast delight! Yes, you can use quick oats. They cook faster and absorb liquid quickly. This may change the texture. Quick oats will be softer than rolled oats. If you prefer a creamier texture, quick oats work well. To make your oats dairy-free, simply use almond milk or any plant-based milk. You can also try oat milk or coconut milk for different flavors. Just ensure your chosen milk fits your taste and dietary needs. Absolutely! You can make a batch for up to five days. Just store them in airtight containers. Keep them in the fridge, and they will stay fresh and tasty. Each day, stir before eating and add toppings. If you need an alternative to peanut butter, try almond butter or sunflower seed butter. These options offer similar creaminess and flavor. You can also use tahini for a unique twist. Each choice will change the taste slightly. Yes, overnight oats are very healthy! They are rich in fiber and protein. The oats provide long-lasting energy. Adding bananas and nuts boosts vitamins and healthy fats. This combo makes for a balanced breakfast option. To make more servings, simply double or triple the ingredients. Use a larger bowl to mix the oats and milk. You can portion them into more jars or containers. Just make sure you have enough fridge space for all the jars. In this blog post, we explored the tasty world of overnight oats. You learned the main ingredients like rolled oats, almond milk, and ripe banana. We discussed how to prepare them step by step and shared tips for great texture and flavor. Variations included fun combinations like chocolate and berry options. Lastly, we covered storage tips to keep your oats fresh. Now it's time to create your own batch! Enjoy your delicious, nutritious breakfasts with ease.

Peanut Butter Banana Overnight Oats Easy Breakfast Delight

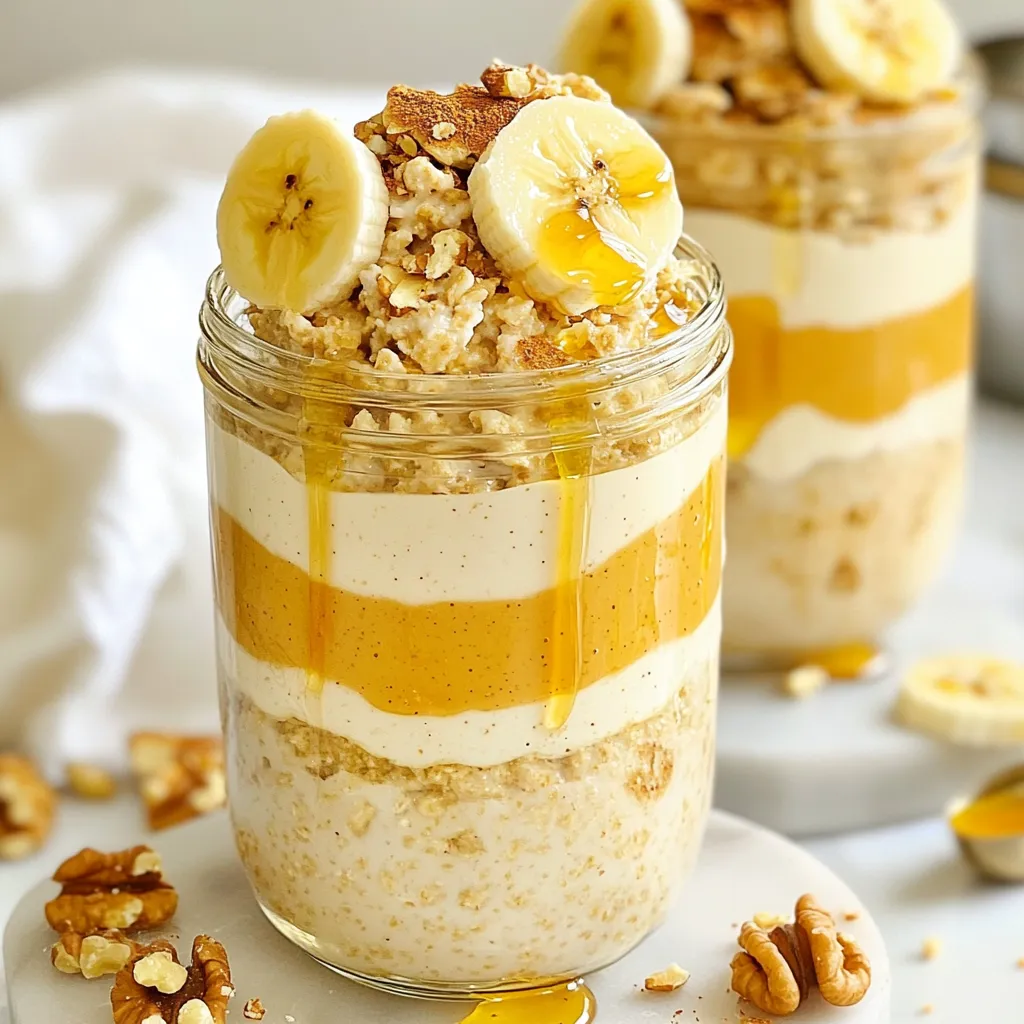
Start your day with a fun and tasty twist! Peanut Butter Banana Overnight Oats are simple to make and full

- 3 cups all-purpose flour - 2 teaspoons baking powder - 1 teaspoon baking soda - 1 teaspoon salt - 1 teaspoon ground cinnamon - 1/2 teaspoon ground nutmeg - 1/2 teaspoon ground ginger You need the right dry mix for great bread. All-purpose flour gives it structure. Baking powder and baking soda help it rise. Salt adds flavor. Spices like cinnamon, nutmeg, and ginger bring warmth. They make your kitchen smell amazing. - 1 cup pumpkin puree (canned or homemade) - 1/2 cup milk - 1/4 cup unsalted butter, melted - 1 large egg - 1 teaspoon vanilla extract For the wet mix, pumpkin puree is key. It adds moisture and flavor. Milk and melted butter make it rich. The egg binds everything together. Lastly, vanilla extract adds a sweet touch. - 1/2 cup granulated sugar - 1/2 cup brown sugar, packed - 1 teaspoon pumpkin pie spice - Optional: 1/2 cup chopped walnuts Sweetness comes from granulated and brown sugar. Brown sugar adds depth and moisture. Pumpkin pie spice is a great flavor boost. If you want crunch, add walnuts. They give your bread a nice texture. {{ingredient_image_2}} Start by greasing a 9x5 inch loaf pan with butter. You can also line it with parchment paper for easy removal later. Then, preheat your oven to 350°F (175°C). This step is key for baking the bread evenly. In a large bowl, combine 3 cups of all-purpose flour with 2 teaspoons of baking powder and 1 teaspoon of baking soda. Add 1 teaspoon of salt, 1 teaspoon of ground cinnamon, 1/2 teaspoon of ground nutmeg, and 1/2 teaspoon of ground ginger. Finally, include 1/2 cup of granulated sugar. Whisk these dry ingredients together until there are no clumps. In a separate bowl, whisk together 1 cup of pumpkin puree, 1/2 cup of milk, 1/4 cup of melted unsalted butter, 1 large egg, and 1 teaspoon of vanilla extract. Mix until the mixture is smooth and well combined. This blend will add moisture and flavor to your bread. Gently pour the wet mixture into the dry bowl. Use a spatula to fold the two mixtures together. Be careful not to over-mix; it's fine if a few lumps remain. Next, take small pieces of dough, about 1-2 inches in size. Roll each piece into a ball between your palms. Now, arrange your dough balls in the greased loaf pan. Between each layer, sprinkle a mix of brown sugar and pumpkin pie spice. If you like, add some chopped walnuts for a crunchy texture. Continue layering until all the dough balls are used up. Bake your bread in the preheated oven for 30-35 minutes. Check for doneness by inserting a toothpick into the center. If it comes out clean, your bread is ready. Once baked, cool it in the pan for about 10 minutes. Then, transfer it to a wire rack to cool completely. This step helps keep the bread's texture perfect. Over-mixing can ruin your bread. When you mix too much, the dough gets tough. Instead, fold the wet and dry ingredients together gently. You want to mix just until you see no dry flour. A few lumps are okay! This keeps your bread light and fluffy. Want to tweak the flavor? Start by adding more spices. You can increase cinnamon, nutmeg, or ginger for a stronger taste. If you want a sweeter bread, add a bit more brown sugar. To change the dough's texture, adjust the milk. Add a splash more if it's too thick. A softer dough makes for a softer bread. What should you drink with your bread? A hot cup of coffee or tea pairs wonderfully. It warms you up and enhances the spices. For serving, place your warm bread on a rustic wooden board. Dust some powdered sugar on top, and drizzle with maple syrup for extra sweetness. This makes it look great and taste even better! Pro Tips Use Fresh Pumpkin: If possible, use fresh pumpkin puree instead of canned for a richer flavor and better texture. Roast the pumpkin until tender, then blend until smooth. Don’t Overmix: When combining wet and dry ingredients, mix just until incorporated. Overmixing can lead to a dense bread texture. Layering Technique: For a more visually appealing loaf, ensure the dough balls are evenly distributed and well-layered. This creates beautiful pockets of flavor throughout the bread. Storage Tips: To keep the bread fresh, store it in an airtight container at room temperature for up to 3 days. For longer storage, wrap tightly and freeze for up to 2 months. {{image_4}} You can enjoy this bread without dairy. Simply swap out the milk and butter. Use almond milk or oat milk instead of regular milk. For butter, try coconut oil or a dairy-free margarine. These substitutes keep the flavor rich and the texture soft. If you need a gluten-free bread, you have options. Use gluten-free all-purpose flour. This type of flour mixes well with other ingredients. Look for brands that include xanthan gum for better texture. You can also try almond flour or coconut flour, but you may need to adjust the liquid. Want to mix things up? Add chocolate chips or dried cranberries for a sweet twist. These ingredients add depth and flavor. You can adjust spices too. If you like more heat, add extra ginger or cinnamon. For a milder taste, reduce the pumpkin pie spice. You can create a version just for you! To keep your pumpkin spice pull apart bread fresh, store it at room temperature. Place it in a bread box or wrap it in plastic wrap. This keeps the bread soft and moist. It will stay fresh for about three days. If you notice it getting stale, simply toast a piece for a warm treat. If you want to save some for later, freezing is a great option. Wrap the bread tightly in plastic wrap, then place it in a freezer bag. This helps prevent freezer burn. You can freeze it for up to three months. When you are ready to enjoy it, remove it from the freezer. Let it thaw in the fridge overnight or at room temperature for a few hours. This keeps the flavor intact. For the best taste, reheat your bread before serving. Preheat your oven to 350°F (175°C). Wrap the bread in foil and heat it for about 10-15 minutes. This method keeps the outside crisp and the inside soft. You can also use a microwave, but it may make the bread a bit chewy. Heat it in short bursts of 10 seconds. Enjoy your warm, flavorful bread! Yes, you can use fresh pumpkin. To do this, cut a pumpkin in half and remove the seeds. Roast the halves until soft. Let it cool, then scoop out the flesh. Blend it until smooth. One cup of fresh pumpkin will replace one cup of canned pumpkin. Just remember, fresh pumpkin might have a bit more water. You may need to adjust the flour slightly to get the right dough. Check for doneness by looking for a golden brown top. You can also do the toothpick test. Insert a toothpick into the center of the bread. If it comes out clean, the bread is ready. The sides should pull away slightly from the pan. If it’s not done, bake for a few more minutes. The baking time is usually 30-35 minutes. Yes, you can prepare the dough a day in advance. After mixing, cover it with plastic wrap and store it in the fridge. When you are ready to bake, let it sit at room temperature for about 30 minutes. This helps the dough rise again. You can also bake the bread and store it. Just wrap it well and keep it at room temperature for up to three days. Pumpkin spice pull apart bread uses basic ingredients and steps. You mix dry and wet items, shape the dough, and bake. Each step brings rich flavor and fun texture. Perfect it with tips on mixing and serving. You can even try variations like gluten-free options. Store it well for fresh enjoyment. This recipe is flexible for all tastes. Dive in and create your bread masterpiece!

Pumpkin Spice Pull Apart Bread Irresistible Delight

Fall flavors are here, and there’s nothing quite like Pumpkin Spice Pull Apart Bread to celebrate the season! Imagine tender,

- 1 lb shrimp, peeled and deveined - 2 ripe avocados, halved and pitted - 1 cup cherry tomatoes, halved - 1/4 cup red onion, finely chopped - 1 jalapeño, deseeded and minced - 2 tablespoons fresh cilantro, chopped - 2 tablespoons lime juice The shrimp serves as the star of this dish. It brings a sweet and light taste. Avocados add a rich creaminess. They also provide healthy fats that make this meal satisfying. The vegetables for pico de gallo give color and crunch. Cherry tomatoes offer freshness, while red onion and jalapeño add a bite. Cilantro brightens it all up, and lime juice ties the flavors together. - 1 teaspoon garlic powder - 1 teaspoon ground cumin - Salt and pepper to taste - Optional toppings: crumbled feta cheese, dollop of sour cream, lime wedges Seasonings are key to making the shrimp shine. Garlic powder and cumin add warmth and depth. Salt and pepper enhance the natural flavors, while lime juice adds zesty brightness. For those who want extra flavor, try crumbled feta cheese or a dollop of sour cream. Lime wedges on the side give you a fresh squeeze when serving. These simple options make your taco boats even better! {{ingredient_image_2}} First, season the shrimp. In a bowl, mix the peeled and deveined shrimp with garlic powder, ground cumin, salt, and pepper. Toss the shrimp well so they are coated evenly. This step adds great taste to our dish. Next, cook the shrimp in a skillet. Heat a splash of olive oil in a pan over medium-high heat. When the oil shimmers, add the shrimp. Cook them for about 2-3 minutes on each side. The shrimp should turn pink and opaque when done. Once cooked, take the shrimp off heat and set them aside. Now, let’s make the pico de gallo. In another bowl, mix the halved cherry tomatoes, chopped red onion, and minced jalapeño. Add chopped fresh cilantro for flavor. Then, drizzle lime juice over the mixture. Stir everything well to combine. Taste it and adjust seasoning with salt and pepper to your liking. It’s time to assemble the taco boats. Take each avocado half and carefully scoop out some flesh. This makes room for our filling. Be careful not to break the skin. Fill each avocado half with the cooked shrimp. Then, top them with a generous amount of the pico de gallo mixture. For extra flavor, you can add optional toppings like crumbled feta cheese or a dollop of sour cream. Serve the taco boats right away, with lime wedges on the side for a zesty kick. To cook shrimp just right, aim for a cooking time of 2-3 minutes per side. This short time keeps the shrimp tender and juicy. Cook them until they turn pink and opaque. If you leave them too long, they will become tough. Use medium-high heat for cooking. This helps the shrimp cook evenly and quickly. I always watch them closely to prevent overcooking. As soon as they look pink, take them off the heat. When selecting ripe avocados, look for ones that yield slightly to gentle pressure. Avoid ones that feel mushy or have dark spots. A ripe avocado should have a dark green skin and feel firm yet soft. To prevent browning, squeeze fresh lime juice over any cut avocado. This juice acts as a barrier to slow oxidation. If you have leftover avocado, wrap it tightly in plastic wrap to keep air out. For serving, arrange the taco boats on a colorful platter. This makes them eye-catching and fun. Place lime wedges around the platter for guests to use. Garnish with fresh cilantro leaves for a pop of color. You can also sprinkle crumbled feta cheese on top for added flavor. A well-presented dish makes every meal feel special. Enjoy your beautiful and tasty shrimp avocado taco boats! Pro Tips Best Shrimp Selection: Opt for wild-caught shrimp for superior flavor and texture. Check for a slight sheen and firm texture when purchasing. Ripeness of Avocados: Make sure your avocados are perfectly ripe. They should yield slightly to gentle pressure but not be overly soft. Enhancing Flavor: Marinate the shrimp in lime juice and spices for at least 15 minutes before cooking to deepen the flavors. Serving Suggestion: Serve the taco boats on a bed of shredded lettuce or cabbage for added crunch and a colorful presentation. {{image_4}} You can switch shrimp for chicken or fish in this dish. Both options work well. Simply season them like you do with shrimp. Cook chicken until it reaches 165°F. For fish, choose a firm type, like tilapia or cod. If you want a vegetarian or vegan option, try black beans or jackfruit. Both add great flavor and texture. For a meat-like feel, use seasoned tofu. Cook until golden brown to enhance taste. To add a kick, mix spices or hot sauce into your shrimp. Chipotle powder or cayenne pepper can really elevate the flavor. If you love heat, add more minced jalapeño or a hotter variety. Changing toppings can also change the dish. Try adding fresh corn, diced mango, or even pickled onions. Crumbled feta cheese or sour cream can add creaminess. Lime wedges give a zesty touch, too. For side dishes, consider serving with rice or quinoa. A fresh green salad pairs well, too. You could also add tortilla chips and salsa for crunch. To make this a full meal, serve with grilled veggies or a hearty soup. This way, you create a vibrant dining experience that everyone will love. To keep your shrimp avocado taco boats fresh, store them in an airtight container. This helps prevent air from getting in and drying them out. For the shrimp and pico de gallo, you can store them separately. Keep the avocado halves in the fridge, but they might brown. Use lemon or lime juice on the avocado flesh to slow this process. You can keep the shrimp in the fridge for up to three days. The pico de gallo lasts about two days. However, try to eat them soon for the best taste. Yes, you can freeze shrimp avocado taco boats, but it takes some care. The shrimp can be frozen, but avocado does not freeze well. It turns mushy when thawed. If you want to freeze the shrimp, cook it first. Cool it down, then place it in a freezer-safe bag. Remove as much air as possible. You can freeze it for up to three months. For the pico de gallo, freeze the tomatoes and onions separately. Avoid freezing the avocado. When you're ready to serve, simply thaw the shrimp and pico de gallo in the fridge overnight. To cook shrimp for tacos, start with fresh or thawed shrimp. Season them well for flavor. I like to use garlic powder and cumin. Heat a skillet over medium-high heat and add olive oil. When the oil is hot, add the shrimp. Cook them for about 2-3 minutes on each side. They should turn pink and opaque. This method keeps the shrimp tender and juicy. Yes, you can use frozen shrimp! First, thaw them in the fridge overnight or under cold water for about 15 minutes. After thawing, peel and devein if needed. Then, follow the same cooking steps as fresh shrimp. This way, you’ll still enjoy tasty shrimp in your taco boats. To keep avocados fresh, use lime juice. Squeeze some lime juice over the cut avocado. This helps slow down browning. You can also store them in an airtight container. If you want to use the avocado later, leave the pit in the unused half. This can help too. Enjoy your bright green avocado in the taco boats! This guide covers how to create delicious shrimp avocado taco boats. You learned about the key ingredients, like shrimp and fresh pico de gallo. I shared step-by-step cooking instructions, helpful tips, and storage guides. Don’t forget the fun variations to try. Enjoy your cooking journey. These taco boats can impress everyone at your table. They are simple, tasty, and full of fresh flavors. Get creative and make them your own!

Shrimp Avocado Taco Boats Fresh and Flavorful Dish

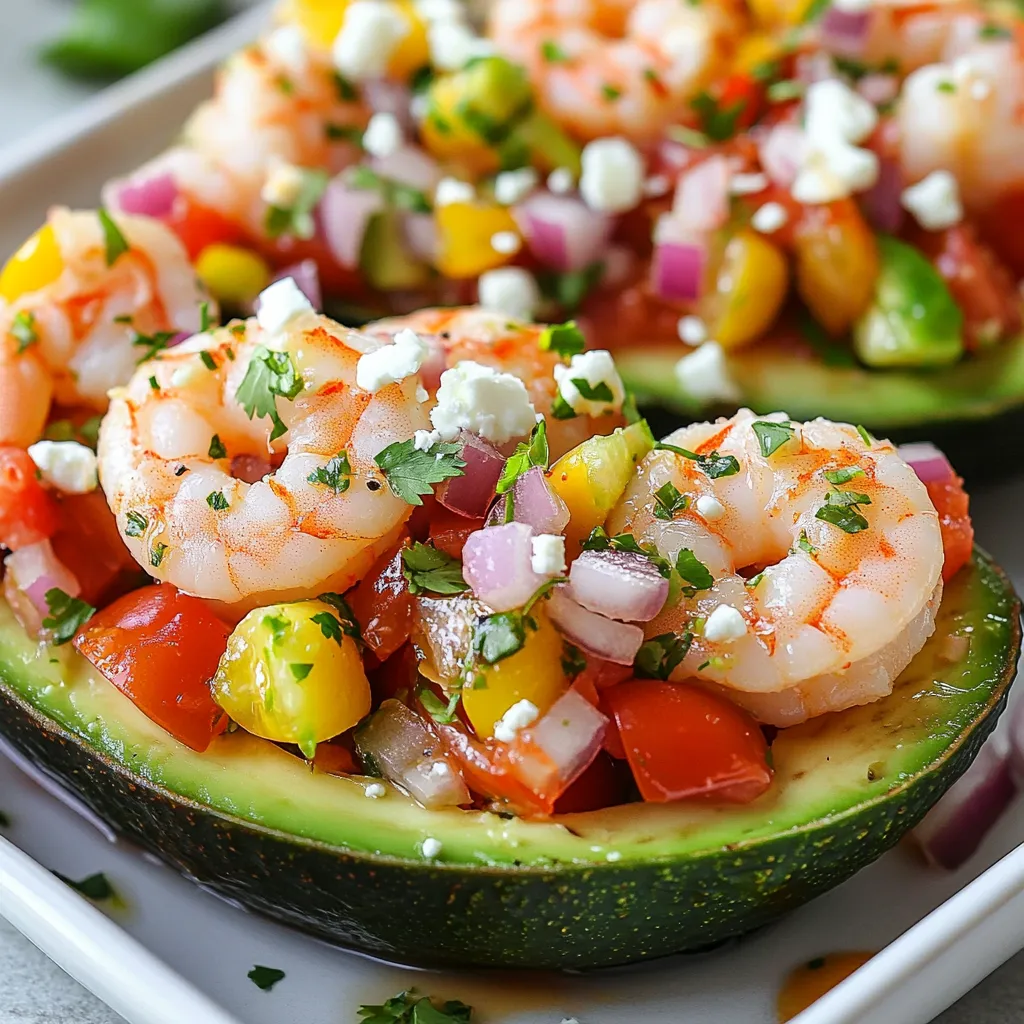
Discover the fresh and vibrant world of Shrimp Avocado Taco Boats! This dish is quick to make and packed with

To make Creamy Garlic Mushroom Orzo, gather these simple ingredients: - 1 cup orzo pasta - 2 tablespoons extra virgin olive oil - 1 medium onion, finely chopped - 4 cloves garlic, minced - 8 ounces mushrooms, sliced (cremini or button variety) - 1 cup vegetable broth (low-sodium recommended) - 1 cup heavy cream (or a dairy-free alternative such as coconut cream or cashew cream) - 1/2 cup grated Parmesan cheese (substitute with nutritional yeast for a vegan option) - 1 teaspoon dried thyme - Sea salt and freshly ground black pepper, to taste - Fresh parsley, chopped, for garnish You might not have every ingredient at home. Here are some easy swaps: - Use any pasta if you’re out of orzo. - Swap heavy cream with coconut cream for a dairy-free dish. - If you want a vegan option, replace Parmesan cheese with nutritional yeast. - Dried thyme can be replaced with fresh thyme. Just double the amount. Having the right tools makes cooking easier. Here’s what you need: - A large skillet for cooking the orzo and sauce. - A wooden spoon for stirring. - A knife and cutting board for chopping the onion and mushrooms. - Measuring cups and spoons for accurate portions. - A serving platter or shallow bowls for presentation. This list keeps it simple and helps you create a tasty dinner. Enjoy your cooking! {{ingredient_image_2}} Start by gathering all your ingredients. This makes cooking easier and faster. You will need: - 1 cup orzo pasta - 2 tablespoons extra virgin olive oil - 1 medium onion, finely chopped - 4 cloves garlic, minced - 8 ounces mushrooms, sliced - 1 cup vegetable broth - 1 cup heavy cream - 1/2 cup grated Parmesan cheese - 1 teaspoon dried thyme - Sea salt and freshly ground black pepper - Fresh parsley, chopped Chop the onion and mince the garlic. Slice the mushrooms. This step helps them cook well. Heat the olive oil in a large skillet over medium heat. Add the chopped onion and sauté it until it becomes soft and clear. This takes about 3 to 4 minutes. Next, add the minced garlic. Stir it for 1 to 2 minutes until it smells great. Be careful not to burn the garlic. Then, add the sliced mushrooms to the skillet. Sauté them until they turn soft and brown, which should take 5 to 7 minutes. This step brings out their rich flavor. Now, stir in the orzo pasta. Toast it lightly for about 2 minutes. This will add a deeper flavor to the dish. After that, pour in the vegetable broth. Increase the heat a bit to bring it to a gentle simmer. Cook until the orzo is tender and absorbs most of the liquid. This takes about 10 to 12 minutes. Stir occasionally to keep it from sticking. Once the orzo is cooked, lower the heat. Stir in the heavy cream, Parmesan cheese, dried thyme, salt, and pepper. Mix well until everything is creamy and combined. Let it warm for an extra 2 to 3 minutes. Taste it and adjust the seasoning if needed. Remove the skillet from the heat. Sprinkle the orzo with chopped parsley. This adds a fresh look and flavor. For an elegant serving, place the orzo in shallow bowls or on a platter. Drizzle any leftover creamy sauce over the top. You can add more Parmesan or nutritional yeast for extra flair. A lemon wedge on the side adds a nice touch too. Enjoy your delicious meal! To make orzo just right, follow these steps: - Toast the Orzo: Lightly toast the orzo in the skillet. This adds a nice, nutty flavor. Just a couple of minutes is all you need. - Watch the Liquid: Use enough broth so the orzo cooks well. Stir often to avoid sticking. You want it creamy, not dry. - Cook to Al Dente: Check the orzo often. It should be tender but still have a slight bite. This makes the dish more enjoyable. Boost the taste of your orzo: - Herbs and Spices: Add herbs like thyme or rosemary for depth. A pinch of red pepper flakes can add heat. - Umami Boost: Use a splash of soy sauce or a dash of Worcestershire sauce. This can deepen the flavor. - Cheese Options: Try different cheeses like feta or goat cheese. Each cheese gives a unique taste. Avoid these pitfalls for a perfect dish: - Overcooking the Garlic: Garlic burns easily. Stir it quickly and keep an eye on it. - Skipping the Sauté: Don’t skip sautéing the mushrooms. This step adds great flavor and texture. - Not Tasting: Always taste your dish before serving. Adjust salt and pepper as needed for the best flavor. Pro Tips Use Fresh Ingredients: Fresh mushrooms, garlic, and herbs will enhance the flavor of your dish significantly compared to dried or pre-packaged options. Toasting Orzo: Briefly toasting the orzo in the skillet before adding liquid adds a deeper, nuttier flavor to your final dish. Adjusting Creaminess: For a lighter dish, you can reduce the amount of heavy cream or substitute it with a blend of vegetable broth and a splash of almond milk. Garnishing: Fresh parsley not only adds color but also brightens the dish’s flavors. Consider adding a squeeze of lemon juice for extra freshness just before serving. {{image_4}} You can easily make this dish vegan. Use coconut cream or cashew cream instead of heavy cream. For cheese, swap Parmesan with nutritional yeast. This gives a nice cheesy flavor without dairy. Make sure your vegetable broth is vegan too. The dish stays creamy and delicious with these swaps. For extra protein, add cooked chicken or shrimp. Cooked chicken breast works well. Just cut it into bite-sized pieces. For shrimp, sauté them in the skillet until they turn pink. Stir them in with the cream for a hearty meal. These options make the dish more filling and satisfying. Feel free to add more veggies! Spinach is a great choice; just stir it in at the end. It wilts quickly and adds color. You can also use peas for a sweet burst. Fresh or frozen peas work perfectly. These changes not only boost nutrition but also add fun flavors and textures to the orzo. Store your leftover Creamy Garlic Mushroom Orzo in an airtight container. Let it cool first, then seal it well. This keeps it fresh for several days. You can keep it in the fridge for up to three days. If you want to keep it longer, freezing is a great option. To reheat, use a skillet for best results. Add a splash of vegetable broth or cream to help it warm evenly. Heat on low and stir often. This way, the orzo stays creamy and delicious. You can also use a microwave if you're in a hurry. Just heat in short bursts and stir in between. For freezing, place the cooled orzo in a freezer-safe container. It can last for up to three months in the freezer. When you're ready to eat it, thaw it in the fridge overnight. Reheat it as described above, adding a bit of liquid if needed. Enjoy your tasty meal again! Creamy Garlic Mushroom Orzo lasts about 3 to 4 days in the fridge. Make sure to store it in an airtight container. The flavors will deepen as it sits, making it even tastier! However, the creamy texture might change a little after chilling. Yes, you can use different pasta shapes! Try using penne, fusilli, or even rice. Each shape gives a unique texture. Just adjust the cooking time according to the pasta you choose. Keep an eye on it to ensure it is perfectly cooked. Creamy Garlic Mushroom Orzo pairs well with many dishes. You can serve it with grilled chicken or fish for a hearty meal. A fresh salad adds a nice crunch. Garlic bread or a side of roasted veggies will complement the flavors too. Enjoy exploring different pairings! In this blog post, we explored creamy garlic mushroom orzo. We covered the key ingredients, substitutions, and tools needed. The step-by-step guide detailed how to cook and present your dish. I shared tips to avoid mistakes and enhance flavor. We also discussed variations for all tastes and how to store leftovers properly. Enjoy experimenting with this dish, and make it your own. Happy cooking!

Creamy Garlic Mushroom Orzo Flavorful Dinner Delight

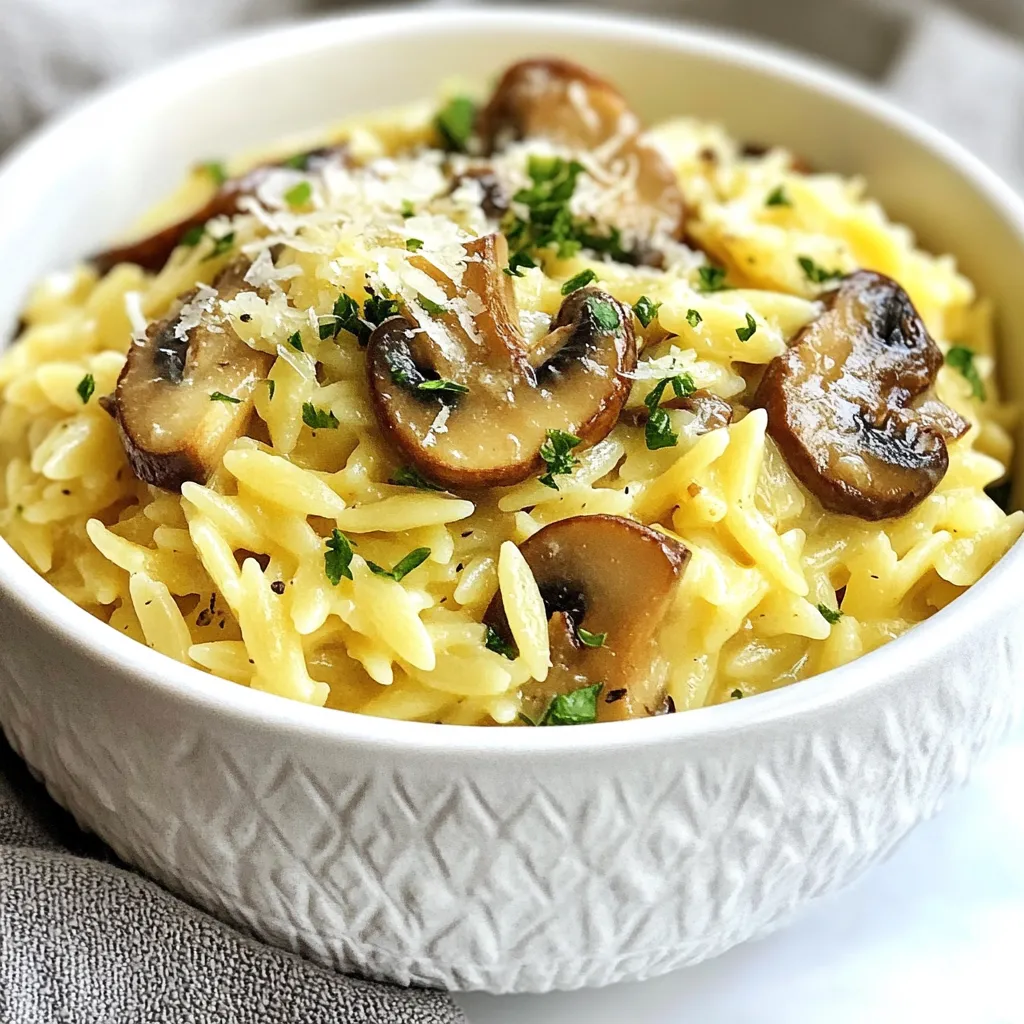
If you’re craving a rich and comforting dish, you need to try Creamy Garlic Mushroom Orzo. This delightful recipe combines

Older posts
Newer posts
← Previous Page1 … Page86 Page87 Page88 … Page90 Next →

dsad

© 2025 recipetorch • Built with GeneratePress

Our Policies

  • Copyright Policy
  • Cookie Policy
  • GDPR Policy
  • Privacy Policy
  • Disclaimer
  • Terms Of Use

More Information

  • Home
  • About
  • Contact
  • Appetizers
  • Dessert
  • Dinner
  • Drinks
©2025, recipetorch About Back To Top