Skip to content
DisclaimerTerms Of UseGDPR PolicyCookie Policy

recipetorch

  • Home
  • Drinks
  • Appetizers
  • Dinner
  • Dessert
  • About
  • Contact
  • Privacy Policy
DisclaimerTerms Of UseGDPR PolicyCookie Policy

Nicole

To make these tasty bowls, you need the following main ingredients: - 1 pound large shrimp, peeled and deveined - 4 cloves garlic, finely minced - 2 tablespoons extra virgin olive oil - Juice and zest of 1 large lemon - 2 cups cooked quinoa or brown rice - 1 cup cherry tomatoes, halved - 1 cup fresh spinach, roughly chopped - Salt and freshly ground black pepper to taste - Fresh parsley, finely chopped for garnish These ingredients come together to create a bright and fresh dish. The shrimp bring protein and flavor, while the garlic and lemon add zest. If you want to add some extra taste, consider these optional ingredients: - 1 teaspoon red pepper flakes for a spicy kick - Additional lemon wedges for serving These extras can make your dish even more exciting. The red pepper flakes give a nice heat, while lemon wedges add a refreshing touch. You can easily adjust this recipe to fit different diets. Here are some substitutions: - Use tofu or chickpeas instead of shrimp for a plant-based option. - Quinoa can be swapped with brown rice or cauliflower rice for lower carbs. - For a gluten-free dish, ensure the soy sauce (if used) is gluten-free. These swaps allow everyone to enjoy the meal, no matter their dietary needs. Start by heating 2 tablespoons of extra virgin olive oil in a large skillet. Use medium-high heat until the oil shimmers. Add 4 cloves of finely minced garlic and sauté for about 30 seconds. You want it to smell great but not brown. Next, add 1 pound of peeled and deveined shrimp. Season the shrimp with salt, black pepper, and red pepper flakes if you like spice. Cook the shrimp for 2 to 3 minutes. Turn them often until they turn pink and opaque. Once cooked, drizzle in the juice and zest of 1 large lemon. Gently stir to coat the shrimp. Let it cook for one more minute to blend the flavors. While your shrimp are cooking, grab a separate bowl. Combine 2 cups of cooked quinoa or brown rice with 1 cup of roughly chopped fresh spinach and 1 cup of halved cherry tomatoes. Toss everything gently. The heat from the quinoa or rice will slightly wilt the spinach, making it tender and tasty. Now it's time to build your bowls! Divide the quinoa or rice mixture evenly into 4 serving bowls. Top each bowl with the lemon garlic shrimp. Make sure to include all the tasty juices from the skillet. For a fresh touch, sprinkle some finely chopped parsley on top. You can also add a lemon wedge on the side for extra zest. Enjoy your meal! To cook shrimp well, start with a hot skillet. I heat the olive oil until it shimmers. This helps the shrimp cook evenly. Add minced garlic and sauté until fragrant. Do not let it brown. Next, add the shrimp to the skillet. Cook for 2-3 minutes. They should turn pink and opaque. If you overcook them, they become rubbery. Keep an eye on the color change to know when they are done. Seasoning makes a big difference in taste. I use salt, black pepper, and red pepper flakes for a kick. Feel free to adjust the red pepper flakes based on your spice level. The lemon juice and zest add a fresh flavor. Mix the seasonings well with the shrimp. This ensures every bite is packed with taste. Experiment with herbs like thyme or parsley for a unique twist. How you serve the dish matters too. I like to use colorful bowls for a vibrant display. A lemon wedge on the side adds a nice touch. It gives a pop of color and more flavor when squeezed. Sprinkle fresh parsley on top for a finishing touch. It makes the dish look fancy. Consider adding extra red pepper flakes for those who enjoy heat. This way, everyone can customize their bowl. {{image_4}} You can easily boost the nutrition of your lemon garlic shrimp bowls. Try adding more veggies. Bell peppers, zucchini, or broccoli work great. Simply chop them into bite-sized pieces. Sauté them in the skillet before adding the shrimp. This gives them a nice crunch and color. You can also stir in frozen peas or corn. They add sweetness and bright flavors too. Don't be afraid to mix and match your favorite veggies! If you want a change from shrimp, you have options. Chicken breast or tofu can take its place. For chicken, cut it into small pieces and cook until golden. Use the same method as for shrimp. For tofu, use firm tofu and cut it into cubes. Make sure to press the tofu to remove excess water. This helps it crisp up nicely. Both options soak up the lemon and garlic flavors well. Switching up the grain base can change the whole dish. Quinoa and brown rice are great choices, but why stop there? Try using farro, barley, or even cauliflower rice. Each grain has its own taste and texture. Farro adds a nutty flavor, while cauliflower rice is low in carbs. Cook your chosen grain according to package instructions. Mix it with the veggies and enjoy a new twist on your shrimp bowl. To store leftovers, let the shrimp bowls cool down first. Place the shrimp, quinoa or rice, and veggies in an airtight container. Make sure to separate the shrimp from the grains and veggies to keep them fresh. Store in the fridge for up to three days. This way, you can enjoy this tasty dish again! To reheat, simply take out your leftovers from the fridge. You can use a microwave or a skillet. If using a microwave, heat on medium for about 1-2 minutes. Stir halfway to heat evenly. For a skillet, add a splash of water and cover. Heat over low for about 5 minutes. This keeps your shrimp juicy and tender. You can freeze the shrimp bowls too! First, cool the dish completely. Then, pack the shrimp and grains in a freezer-safe bag or container. Remove as much air as you can. This helps prevent freezer burn. Store for up to three months. When you’re ready to eat, thaw overnight in the fridge before reheating. This makes meal prep easy and fun! Cooking shrimp is quick. It takes about 2-3 minutes. You want them to turn pink and opaque. Overcooking makes them tough. Watch closely when cooking shrimp. Yes, you can use frozen shrimp. Just thaw them first. Place them in cold water for a few minutes. Pat them dry before cooking. This keeps the shrimp from getting watery. You can serve many things with shrimp bowls. Try a fresh salad or steamed veggies. A side of crusty bread works well too. You could also add avocado for creaminess. Pairing with a light white wine adds a nice touch. Lemon garlic shrimp bowls are easy to make and full of flavor. You learned about the key ingredients, cooking steps, and ways to customize your meal. Try adding veggies or switching the protein for a new twist. Proper storage keeps your dish fresh for later. Remember, cooking shrimp takes just a few minutes. Enjoy your flavorful bowls and impress your friends!

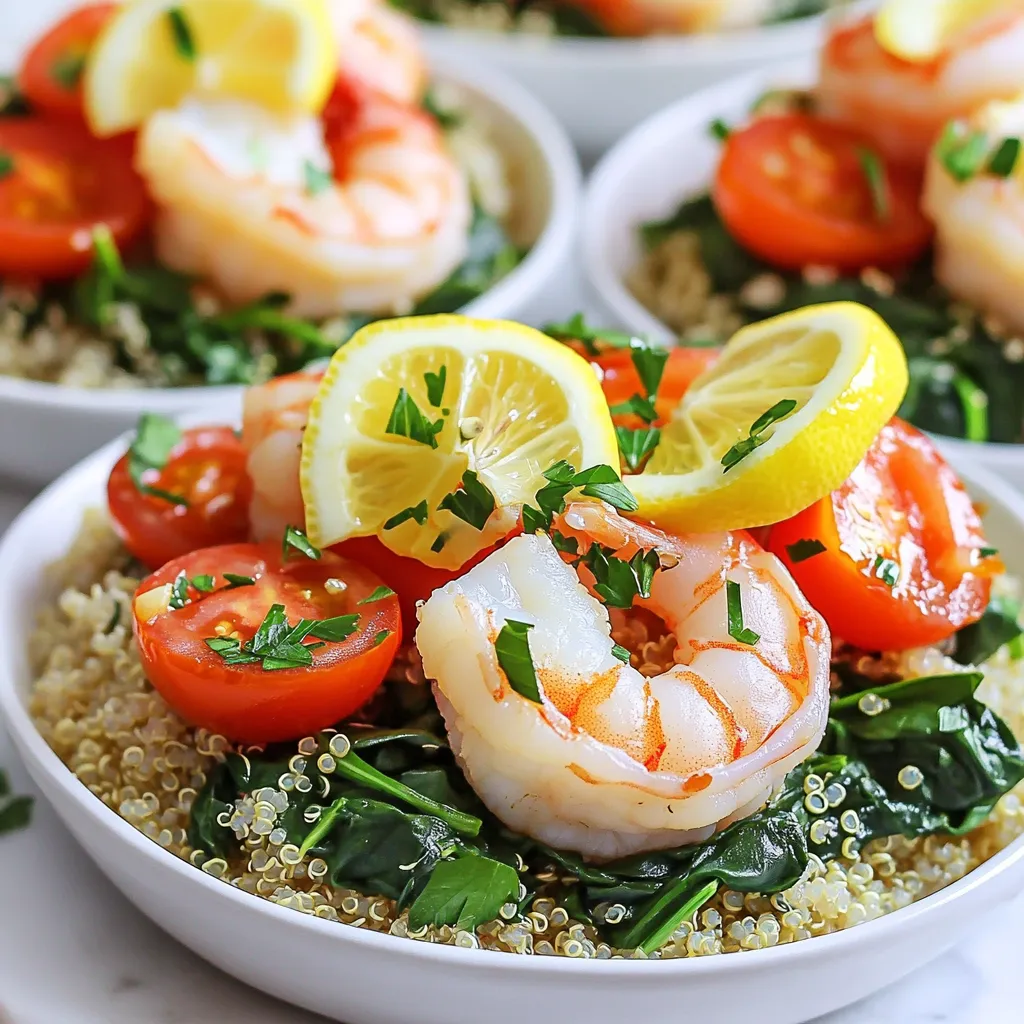
Minute Lemon Garlic Shrimp Bowls Simple and Tasty Dish

If you crave a quick, tasty meal that impresses, Minute Lemon Garlic Shrimp Bowls are for you. In just a

- 2 cups all-purpose flour - 1 cup packed brown sugar - 1 tablespoon baking powder - ½ teaspoon baking soda - ½ teaspoon salt - 1 teaspoon ground cinnamon - ½ teaspoon freshly grated nutmeg - 1 large egg, at room temperature - ¾ cup buttermilk, at room temperature - ½ cup pure maple syrup - 3 tablespoons unsalted butter, melted and slightly cooled - Oil for frying (vegetable or canola oil) - Optional powdered sugar for dusting Gathering these ingredients is the first step to making bakery-style maple brown sugar donut holes. Each one plays a key role in flavor and texture. The all-purpose flour gives the donut holes their structure. The brown sugar adds rich sweetness and a hint of caramel. Baking powder and baking soda help them rise. Salt, cinnamon, and nutmeg bring warmth and depth to each bite. You will need a large egg and buttermilk to create a moist batter. Pure maple syrup gives that wonderful maple flavor. Melted butter adds richness and helps keep the donut holes tender. Lastly, you'll fry them in hot oil, which creates that crispy outer layer. You can dust them with powdered sugar if you want an extra sweet touch. Make sure you have everything on hand before you start. This ensures a smooth cooking experience. The right ingredients lead to donut holes that are fluffy, sweet, and oh-so-delicious! First, grab a large mixing bowl. In it, whisk together the all-purpose flour and brown sugar. Make sure to break up any lumps. Then, add the baking powder, baking soda, and salt. Next, sprinkle in the ground cinnamon and freshly grated nutmeg. Whisk until everything is well mixed. You want no dry spots left behind. This blend gives your donut holes their yummy base. In a separate bowl, beat the large egg. You want it to be frothy. Then, add the buttermilk, pure maple syrup, and melted butter. Mix these liquids until they are smooth. This mixture should be well combined and creamy. A smooth mix helps keep your batter consistent, which is very important. Now, it’s time to combine the two mixtures. Carefully pour the wet ingredients into the dry mix. Use a spatula or wooden spoon to fold the mixtures together. Be gentle! You do not want to overmix. The batter should be slightly lumpy. If you overmix, the donut holes may turn out tough instead of fluffy. To fry the donut holes, heat oil in a deep fryer or heavy pot. You need about 2 inches of oil. Heat the oil to 350°F (175°C). This temperature is key for fluffy donut holes. Once hot, use a small cookie scoop or tablespoon to drop batter into the oil. Fry them in batches, leaving space for them to float. Cook each donut hole for 2-3 minutes on each side. Look for a golden brown color. Once done, use a slotted spoon to transfer them onto a plate lined with paper towels. This helps drain any extra oil. After a short cool, you can toss them in powdered sugar or drizzle with extra maple syrup for a sweet touch! Using room temperature ingredients is key to achieving the right texture. Cold eggs or buttermilk can make the batter tough. Let them sit out for about 30 minutes before you start. This small step makes a big difference. To avoid greasy donut holes, make sure your oil is hot enough. Heat the oil to 350°F (175°C) before frying. If the oil is not hot, the donut holes will soak up too much oil. Fry them in small batches, giving each piece space to cook evenly. For serving, arrange your donut holes on a pretty plate or a tiered stand. This makes them look more inviting. Dust them with powdered sugar right before serving for that classic bakery look. If you want to add flair, drizzle some extra maple syrup over the top. This adds shine and a boost of flavor. You can even sprinkle some chopped nuts for a crunchy touch. These small details turn a simple treat into something special. {{image_4}} You can tweak the flavor of your donut holes to make them your own. Adding chocolate chips gives a sweet surprise in every bite. Use semi-sweet or dark chocolate for a rich taste. If you like crunch, toss in some chopped nuts. Walnuts or pecans work great and add texture. Spices can change the whole vibe of your donut holes. Try adding cloves for a warm, cozy flavor. Cardamom or ginger can also spice things up. Just a pinch can make a big difference. Experiment with your favorite spices to find your perfect blend. Glazes can elevate your donut holes to a new level. Maple syrup drizzled on top adds a nice touch. You can also use honey or agave syrup for a different flavor. Use a light hand when drizzling to avoid overpowering the donut holes. For chocolate lovers, creating a chocolate glaze is a must. Melt chocolate chips and mix them with a bit of cream. Dip the cooled donut holes into this rich glaze. Let them sit for a few minutes to set. This adds a delicious layer of flavor that pairs well with the maple and brown sugar. To keep leftover donut holes fresh, place them in an airtight container. This helps prevent them from drying out. Make sure to let them cool completely before storing. Keeping them at room temperature works best for a few days. You can also place a paper towel in the container to absorb any moisture. This keeps your donut holes soft and tasty. If you want to save some for later, freezing is a great option. First, let the donut holes cool fully. Then, arrange them in a single layer on a baking sheet. Freeze them for about one hour. Once frozen, transfer them to a freezer-safe bag. Remove as much air as you can from the bag. This prevents freezer burn and keeps them fresh. When you're ready to enjoy them, take the donut holes out of the freezer. Let them sit at room temperature for about 30 minutes. For the best results, reheat them in the oven at 350°F (175°C) for about 5 to 7 minutes. This will make them warm and soft again. Enjoy your delightful treat! Yes, you can bake these donut holes. To do this, preheat your oven to 350°F (175°C). Use a mini muffin tin to hold the batter. Fill each cup about halfway. Bake for 10-12 minutes. Check for a golden color on top. They will not be as fluffy as fried ones, but they will still taste great! If you don’t have buttermilk, you can make a quick substitute. Mix one cup of milk with one tablespoon of vinegar or lemon juice. Let it sit for about five minutes. This will create a tangy milk that works well in the recipe. To check if the oil is ready, you can use a thermometer. Aim for 350°F (175°C). If you don’t have one, drop a small piece of batter into the oil. If it bubbles and rises, the oil is hot enough. If it sinks, wait a bit longer. Yes, you can make these donut holes gluten-free! Use a gluten-free all-purpose flour blend instead of regular flour. Make sure it has a binding agent like xanthan gum. This will help keep the donut holes light and fluffy. This blog post covers all you need to make delicious donut holes. We explored key ingredients, like flour and spices, and how to mix them. You learned the steps to prepare and fry, ensuring great texture and flavor. We also discussed fun variations and storage tips. In summary, follow these steps for perfect donut holes every time. Experiment with flavors to suit your taste. With practice, you’ll impress everyone with your baking skills. Enjoy making and sharing these treats!

Bakery-Style Maple Brown Sugar Donut Holes Delight

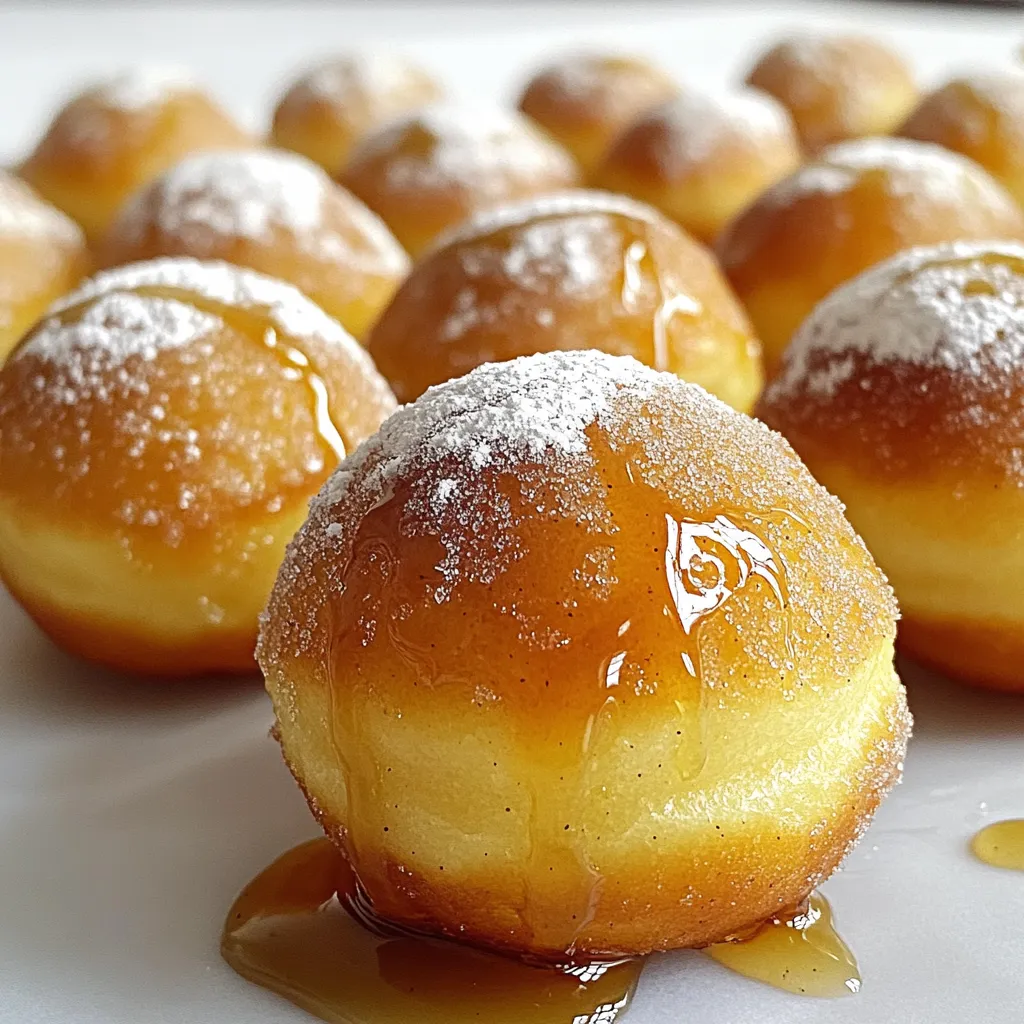
If you’re craving a sweet treat that takes you straight to a cozy bakery, look no further! My Bakery-Style Maple

- 4 bone-in, skin-on chicken thighs - 4 medium potatoes, diced into 1-inch cubes - 6 cloves of garlic, finely minced - 3 tablespoons extra virgin olive oil - 2 teaspoons dried thyme - 2 teaspoons dried rosemary - 1 teaspoon smoked paprika - Sea salt and freshly cracked pepper, to taste - 1 lemon, zested and juiced - Fresh parsley, chopped, for garnish This recipe brings together simple, yet bold flavors. The chicken thighs have skin that crisps up nicely, giving a satisfying crunch. The medium potatoes add hearty texture. And don't forget the garlic! Its rich aroma fills the kitchen and makes your mouth water. For the seasonings, I use extra virgin olive oil as a base. It enhances the taste and helps the spices stick. Dried thyme and rosemary bring an earthy touch. Smoked paprika adds a smoky flavor that makes each bite exciting. The garnishes finish the dish beautifully. Sea salt and freshly cracked pepper add depth. The lemon zest and juice brighten the flavors. Finally, fresh parsley gives a burst of color and freshness, making your plate look inviting. When you gather these ingredients, you set the stage for a comforting meal that warms both the heart and the tummy. Preheating your oven is key. It helps cook your meal evenly. I recommend setting your oven to 425°F (220°C). This high heat gives the chicken and potatoes a crisp finish. Start by dicing the potatoes into 1-inch cubes. This size cooks well and gets tender. In a large bowl, mix the diced potatoes with minced garlic, olive oil, dried thyme, rosemary, salt, and pepper. Use your hands to toss everything together. Make sure each potato is coated well. This ensures every bite is full of flavor. Next, grab a separate bowl for the chicken. Add the chicken thighs and pour in the lemon juice and zest. Sprinkle a pinch of salt and pepper on top. Use your hands to rub the marinade all over the chicken. This step is crucial for even flavor. You want the chicken to taste amazing. Now it’s time to assemble. Spread the seasoned potatoes evenly on a large sheet pan. Place the marinated chicken thighs on top, skin side up. This helps the skin get crispy while cooking. Make sure to space them out a bit. This allows hot air to circulate around the food. Put the sheet pan in your preheated oven. Roast everything for about 30 to 35 minutes. To know if it’s done, check the chicken’s internal temperature. It should reach 165°F (75°C). The potatoes should look golden brown and be tender. Once cooked, take the sheet pan out of the oven. Let it rest for about 5 minutes. This resting period is important. It allows the juices to settle back into the chicken. Before serving, sprinkle freshly chopped parsley on top. This adds a nice pop of color and freshness. To get that perfect crispy skin on your chicken, start with a hot oven. Preheat your oven to 425°F (220°C). This high heat helps render the fat from the skin, leading to crispiness. - Make sure the chicken skin is dry. Pat it with paper towels before seasoning. - Arrange the chicken on the sheet pan with space between each piece. This allows hot air to circulate, making the skin crispy. To achieve tender potatoes, cut them into 1-inch cubes. This size cooks evenly and quickly. - Toss the diced potatoes with olive oil and seasonings. This ensures they soak up all the flavors. - If you want to switch up the potatoes, use sweet potatoes instead. They offer a nice sweetness and a different texture. You can take this dish to another level by adding herbs. Try oregano or basil for a fresh twist. - For extra flavor, sprinkle some chili flakes for heat or a dash of cumin for warmth. - Adding colorful veggies like bell peppers or carrots can make the dish more vibrant and nutritious. Just toss them on the sheet pan with the potatoes. {{image_4}} You can swap chicken thighs for other cuts. Chicken breasts or drumsticks work well too. Each cut brings a different taste and texture. For potatoes, try sweet potatoes. They add a nice touch of sweetness and color. Mix up the herbs for a new taste. Oregano and basil are great choices. They offer a fresh twist. You can also switch the lemon for lime. The lime adds a zesty kick that brightens the whole dish. If you want a hands-off option, try a slow cooker. Just add the chicken and potatoes with the seasonings. Cook on low for several hours. This method makes everything tender and full of flavor. For summer days, grilling is a fun choice. You can grill the chicken and roast the potatoes separately. This gives you that smoky flavor everyone loves. Plus, it keeps your kitchen cool! To keep your Garlic Herb Chicken and Potatoes fresh, store leftovers in an airtight container. Place the container in the fridge. It will stay fresh for up to three days. If you want to enjoy it later, you can freeze it. You can reheat your leftovers in two ways: the microwave or the oven. If you use the microwave, heat it in short bursts, stirring in between. If you prefer the oven, preheat it to 350°F (175°C) and place the chicken and potatoes on a baking sheet. Cover them with foil to keep the chicken crispy. Heat for about 15-20 minutes. To freeze your dish, let it cool completely. Then, place portions in freezer-safe bags or containers. Squeeze out as much air as you can to prevent freezer burn. When you're ready to eat, thaw the chicken and potatoes overnight in the fridge. Reheat them in the oven for the best taste and texture. You can serve many sides with Garlic Herb Chicken and Potatoes. Here are some ideas: - Steamed broccoli: Bright and healthy, it adds color. - Green salad: A simple mix of greens is refreshing. - Roasted carrots: Their sweetness pairs well with the chicken. - Garlic bread: A tasty option to soak up juices. For drinks, consider: - White wine: A crisp Sauvignon Blanc works great. - Lemonade: A fresh and zesty non-alcoholic choice. Yes, you can use boneless chicken. However, you need to adjust the cooking time. Boneless thighs cook faster than bone-in. Check the chicken at 25 minutes. You want it to reach 165°F (75°C). The flavor might change slightly. Boneless chicken won't have the same richness from the bone and skin. The best way is to check the internal temperature. Use a meat thermometer. The chicken should reach 165°F (75°C) to be safe to eat. You can also look for visual cues. The juices should run clear, not pink. The meat should look opaque and firm. Absolutely! This dish is great for meal prep. Here are some tips: - Portioning: Divide the chicken and potatoes into containers. This helps with easy meals later. - Storing: Keep them in the fridge for up to four days. For reheating, the oven is best. It keeps the chicken crispy. Heat at 350°F (175°C) for about 10-15 minutes. If using the microwave, cover it to keep the moisture in, but it may not stay crispy. You’ve learned how to make a tasty garlic herb chicken and potatoes. We covered the main ingredients, the steps for cooking, and some helpful tips. Now you can enjoy a juicy meal that is easy to prep. Remember, you can swap ingredients or try new flavors to keep it fresh. Whether you’re cooking for yourself or a crowd, this dish is sure to impress. Now it’s time to put your skills to the test. Happy cooking!

Garlic Herb Chicken and Potatoes Sheet Pan Delight

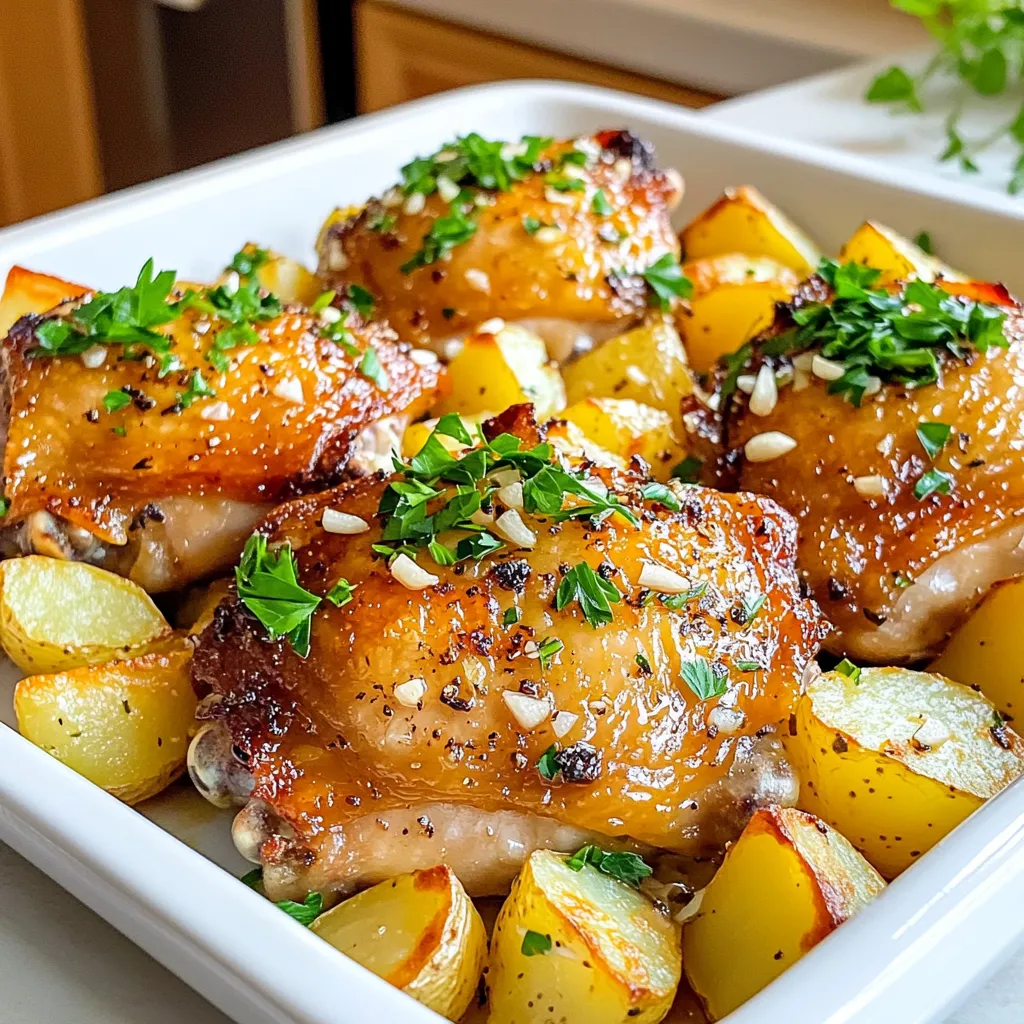
Looking for an easy and delicious dinner? My Garlic Herb Chicken and Potatoes Sheet Pan Delight has you covered! This

- 1 ½ cups all-purpose flour - 1 teaspoon baking powder - 1 teaspoon baking soda - ½ teaspoon salt - 1 teaspoon ground cinnamon - ½ teaspoon ground nutmeg - ½ teaspoon ground ginger - ½ cup granulated sugar - ½ cup packed brown sugar - ½ cup vegetable oil - 3 large eggs - 1 cup pumpkin puree - 1 teaspoon vanilla extract - 8 oz cream cheese - ½ cup unsalted butter - 3 cups powdered sugar - 1 teaspoon vanilla extract - A pinch of salt To make these pumpkin cream cheese cupcakes, you need a mix of dry and wet ingredients. The dry ingredients give the cupcakes their structure and flavor. You will whisk together flour, baking powder, baking soda, salt, and spices like cinnamon, nutmeg, and ginger. The wet ingredients bring moisture and sweetness. You will mix granulated sugar, brown sugar, and vegetable oil, then add eggs, pumpkin puree, and vanilla extract. This mixture gives the cupcakes a rich flavor. For the cream cheese frosting, you’ll need softened cream cheese and butter. Mixing these with powdered sugar and vanilla creates a sweet and creamy topping. A pinch of salt adds balance to the frosting, making it truly delicious. Gather these ingredients, and you are ready to bake! - Set oven to 350°F (175°C) - Line muffin tin with cupcake liners First, I set my oven to 350°F (175°C). This helps the cupcakes bake evenly. Next, I line my muffin tin with cupcake liners. This makes it easy to take out the cupcakes later. - Whisk together all dry ingredients in a medium mixing bowl In a medium bowl, I whisk together 1 ½ cups of all-purpose flour, 1 teaspoon of baking powder, 1 teaspoon of baking soda, ½ teaspoon of salt, 1 teaspoon of ground cinnamon, ½ teaspoon of ground nutmeg, and ½ teaspoon of ground ginger. Mixing these dry ingredients well gives the cupcakes their tasty flavor. - Mix sugars and vegetable oil - Add eggs, pumpkin puree, and vanilla extract In a large bowl, I mix ½ cup of granulated sugar and ½ cup of packed brown sugar with ½ cup of vegetable oil. I whisk them together until smooth. Then, I add 3 large eggs, one at a time, mixing each in well. Next, I stir in 1 cup of pumpkin puree and 1 teaspoon of vanilla extract. This mix should be creamy and combined perfectly. - Gradually fold dry ingredients into the wet mixture Now, I take the dry mix and gradually fold it into the wet mixture. I use a spatula to gently combine them. I only mix until I no longer see dry flour. It's okay if there are small lumps. This step helps keep the cupcakes fluffy. - Fill liners with batter and bake for 18-20 minutes Next, I carefully spoon the batter into the lined muffin tin. I fill each liner about two-thirds full. This helps them rise nicely. I bake them in the oven for 18 to 20 minutes. I check by poking a toothpick in the center. If it comes out clean, they are ready! - Mix cream cheese and butter - Add powdered sugar and frost cooled cupcakes After the cupcakes cool, I make the frosting. I mix 8 oz of softened cream cheese with ½ cup of softened unsalted butter until smooth. Then, I slowly add 3 cups of sifted powdered sugar, mixing on low speed. Finally, I add 1 teaspoon of vanilla extract and a pinch of salt. Once fluffy, I frost each cooled cupcake with this tasty cream cheese frosting. To make the best pumpkin cream cheese cupcakes, avoid overmixing the batter. When you combine the wet and dry ingredients, mix just until you see no dry flour. A few lumps are okay! This keeps your cupcakes light and fluffy. Make sure your oven is at the right temperature. Preheat it to 350°F (175°C) before baking. A good oven ensures even baking. Always use an oven thermometer to check if your oven temperature is accurate. For the cream cheese frosting, make sure both the cream cheese and butter are at room temperature. This helps create a smooth and creamy texture. Beat them together until they are well combined before adding powdered sugar. You can have fun with frosting designs. Use a spatula for swirls or a piping bag for fancy shapes. Try different tips to create unique looks. For a lovely touch, sprinkle a bit of ground cinnamon or nutmeg on top after frosting. This adds flavor and looks great. You can also decorate with seasonal elements. Place small pumpkins or colorful leaves around your cupcakes. This enhances the autumn vibe and makes them more inviting! {{image_4}} You can easily change the taste of your pumpkin cream cheese cupcakes. Adding chocolate chips gives a sweet touch. Just fold in half a cup of your favorite chocolate chips into the batter. You can also add nuts for a crunchy bite. Try using chopped walnuts or pecans for a tasty twist. For those needing gluten-free options, substitute all-purpose flour with a gluten-free blend. This keeps the cupcakes just as fluffy and delicious. The frosting is a key part of these cupcakes. You can play with different flavors of cream cheese frosting. Add cocoa powder for a chocolate version or pumpkin spice for extra warmth. If you want something lighter, try whipped cream. Whipped cream gives a fluffy texture. You can also use meringue for a sweet and airy topping. Each option brings a unique taste to your cupcakes. Pair your cupcakes with a warm drink for the best experience. A nice cup of coffee complements the pumpkin flavor well. If you prefer tea, a spiced chai works great too. For dessert lovers, serve these cupcakes with a scoop of vanilla ice cream. This adds a creamy touch that balances the spices. Enjoy experimenting with flavors and pairings to make your treat even more special! To keep your pumpkin cream cheese cupcakes fresh, use airtight containers. Glass or plastic containers work well. This helps maintain moisture and flavor. If you have many cupcakes, layer them with parchment paper to avoid sticking. You can store cupcakes at room temperature for up to two days. Just make sure they are in a cool, dry place. If you want them to last longer, place them in the fridge. They will stay good for about a week in the fridge. If you want to save cupcakes for later, freezing is a great option. First, let them cool completely. Next, wrap each cupcake tightly in plastic wrap. This prevents freezer burn and keeps them tasting fresh. Place the wrapped cupcakes in a freezer-safe bag or container. You can freeze them for up to three months. When you're ready to enjoy them, take a cupcake out and let it thaw at room temperature. This usually takes about an hour. When stored properly, these pumpkin cream cheese cupcakes last long. At room temperature, they are best for about two days. In the fridge, they last up to a week. As for signs of spoilage, watch for mold or a change in smell. If the frosting looks dry or hard, it's time to toss it. Always trust your senses to decide if a cupcake is still good to eat! Yes, you can use fresh pumpkin. To prepare it, choose a small sugar pumpkin. Cut it in half, remove seeds, and roast the halves face down at 350°F for about 45 minutes. Once soft, scoop out the flesh and puree it in a blender until smooth. This fresh puree adds a great taste and texture to your cupcakes. Just make sure to measure out 1 cup for the recipe. You can easily make these cupcakes vegan. Here are some simple swaps: - Replace the eggs with flax eggs (1 tablespoon ground flaxseed mixed with 2.5 tablespoons water for each egg). - Use a neutral oil, like coconut or canola, instead of vegetable oil. - Make sure to use a vegan cream cheese for the frosting. These changes keep the flavor and texture rich and tasty! Adding more spices can really boost the flavor. Here are some ideas: - Allspice: Offers a warm, aromatic taste. - Cloves: Adds a strong, warm flavor but use sparingly. - Cardamom: Gives a sweet and spicy note. Experiment with these spices to find your perfect blend! You now have all the ingredients, steps, and tips to make perfect pumpkin cupcakes. You can impress friends and family with your tasty treats. Remember to mix well but not too much, and try different flavors and frostings. Store your extras properly to keep them fresh longer. With this guide, you'll bake with confidence. Enjoy your baking journey and savor every bite of your delicious creations!

Pumpkin Cream Cheese Cupcakes Delightful Fall Treat

Fall is here, and that means it’s time to enjoy Pumpkin Cream Cheese Cupcakes! These simple treats blend warm spices

To make the High-Protein Chocolate Chunk Banana Smoothie, gather these items: - 2 ripe bananas, peeled and frozen - 1 cup unsweetened almond milk (or your preferred milk alternative) - 1 scoop chocolate protein powder - 2 tablespoons natural almond butter (or creamy peanut butter) - 1 tablespoon unsweetened cocoa powder - 1 tablespoon chia seeds - 1 tablespoon honey or maple syrup (optional) - 1/4 cup dark chocolate chunks - Ice cubes (optional) - Bananas: They give natural sweetness and potassium for energy. - Almond Milk: This is low in calories and dairy-free. It keeps the smoothie light. - Chocolate Protein Powder: This adds protein, helping with muscle recovery. - Almond Butter: It offers healthy fats and keeps you full longer. - Cocoa Powder: This adds rich flavor and is high in antioxidants. - Chia Seeds: They are packed with fiber and omega-3 fatty acids for heart health. - Honey or Maple Syrup: These sweeten the drink naturally and add some vitamins. - Dark Chocolate Chunks: They provide a tasty burst of flavor and antioxidants. - Ice Cubes: They help thicken the smoothie and make it cold and refreshing. You can switch ingredients based on your taste or needs: - Use Greek yogurt instead of almond milk for extra creaminess and protein. - Swap almond butter for peanut butter if you prefer a different nut flavor. - Replace chia seeds with flaxseeds for a different source of healthy fats. - Choose any protein powder you like, such as vanilla or plant-based. - For a vegan option, stick with maple syrup and plant-based protein. - If you want a sweeter smoothie, use dates or agave syrup instead of honey. To start, gather your ingredients. You will need: - 2 ripe bananas, peeled and frozen - 1 cup unsweetened almond milk - 1 scoop chocolate protein powder - 2 tablespoons natural almond butter - 1 tablespoon unsweetened cocoa powder - 1 tablespoon chia seeds - 1 tablespoon honey or maple syrup - 1/4 cup dark chocolate chunks - Ice cubes (optional) Ensure your bananas are ripe for added sweetness. Freezing them makes the smoothie creamy. If you prefer, you can use regular milk or other milk alternatives. Now it’s time to blend! First, place the frozen bananas in your blender. Add the almond milk, chocolate protein powder, almond butter, cocoa powder, chia seeds, and honey or maple syrup. Blend on high speed until the mix is smooth and creamy. If you like your smoothie thick, add a few ice cubes. Blend again until smooth. This will give your smoothie a nice, frosty texture. Once your smoothie is silky, stop the blender. Carefully fold in the dark chocolate chunks with a spoon. This creates delightful pockets of chocolate in each sip. If you want more sweetness, taste your smoothie. Add a little more honey or maple syrup and pulse for a few seconds to mix. Serve your smoothie in a tall glass or a bowl. To make it look fancy, sprinkle a little cocoa powder or add extra chocolate chunks on top. Enjoy your tasty treat! To get a creamy texture, use ripe bananas. Frozen bananas work best. They give a thick, smooth base. Add your choice of milk slowly. Start with one cup and blend. If it feels too thick, add a bit more milk. For an extra boost of creaminess, add almond butter. It blends well and adds a nice flavor. Sweetness can vary by preference. Start with one tablespoon of honey or maple syrup. Blend the smoothie and then taste it. If it needs more sweetness, add a little more. Blend again for a few seconds. This way, you get the perfect taste every time. Remember, the chocolate chunks also add some sweetness. Serve your smoothie in a tall glass or bowl. This makes it look extra special. For a fun twist, top it with a sprinkle of cocoa powder or chocolate chunks. Pair your smoothie with a handful of nuts or whole-grain toast. This adds protein and fiber, making it a great meal. Enjoy it as a quick breakfast or a tasty snack! {{image_4}} You can add spinach to this smoothie for a green twist. Spinach is full of vitamins and minerals. It blends well and tastes great. Just toss in a handful of fresh spinach with the bananas. You won't even notice it! This addition boosts the nutrition without changing the taste. You get more fiber and iron, making your smoothie even healthier. If you prefer a vegan option, it's easy to adapt. Use plant-based protein powder and almond milk. Replace honey with maple syrup for sweetness. This keeps the smoothie creamy and delicious. You won’t lose any flavor or protein. It's a great choice for vegan diets, and it still tastes amazing! Not all protein powders are the same. You have many choices! You can use whey, pea, or hemp protein. Each gives a different flavor and texture. Whey protein makes the smoothie creamy. Pea protein is great for vegans. Hemp protein adds a nutty flavor. Choose what you like best and adjust the amount as needed. This way, you can enjoy your smoothie just how you want it! If you have leftover smoothie, store it right away. Pour it into a container. Seal the container tightly to keep it fresh. Place it in the fridge. Drink it within one day for the best taste. Smoothies can separate, so shake or stir before drinking. Freezing is a smart way to save your smoothie. Pour your leftover smoothie into ice cube trays. Once frozen, transfer the cubes into a freezer bag. This method lets you use small portions later. When you want a smoothie, blend a few cubes with some milk. It’s quick and easy! Use glass jars or BPA-free plastic containers. They keep your smoothie fresh and safe. Choose containers with tight lids to prevent spills. If you freeze, ensure the container can handle low temperatures. This way, you can enjoy your smoothie whenever you like! A high-protein smoothie offers many health benefits. First, it helps build and repair muscles. Protein supports your body after exercise. It also keeps you full longer, which helps with weight control. The bananas provide potassium, which is good for your heart. Almond butter adds healthy fats and fiber, promoting good digestion. Chia seeds bring omega-3 fatty acids, great for brain health. Overall, this smoothie packs a nutritional punch that fuels your day. Yes, you can make this smoothie ahead of time. Just blend all the ingredients, then pour it into a jar. Seal it tightly and store it in the fridge. It stays fresh for up to 24 hours. If the smoothie thickens in the fridge, simply stir or shake it well before drinking. However, for the best taste and texture, I recommend enjoying it right after blending. You can customize this smoothie with many extra ingredients. Here are some ideas: - Spinach or kale for a boost of greens. - Flaxseeds for more fiber and healthy fats. - Oats for added carbohydrates and energy. - Greek yogurt for extra protein and creaminess. - Berries for a touch of sweetness and antioxidants. Feel free to mix and match based on your taste and nutrition needs! In this blog post, we covered key ingredients for a delicious smoothie. Each ingredient offers unique health benefits. I shared tips on prepping, blending, and achieving the perfect consistency. Different variations cater to all diets. Plus, I included storage tips to keep leftovers fresh. Smoothies are easy, tasty, and healthy. You can customize them to fit your needs. Enjoy experimenting with new flavors and ingredients. Your smoothie journey starts now!

High-Protein Chocolate Chunk Banana Smoothie Delight

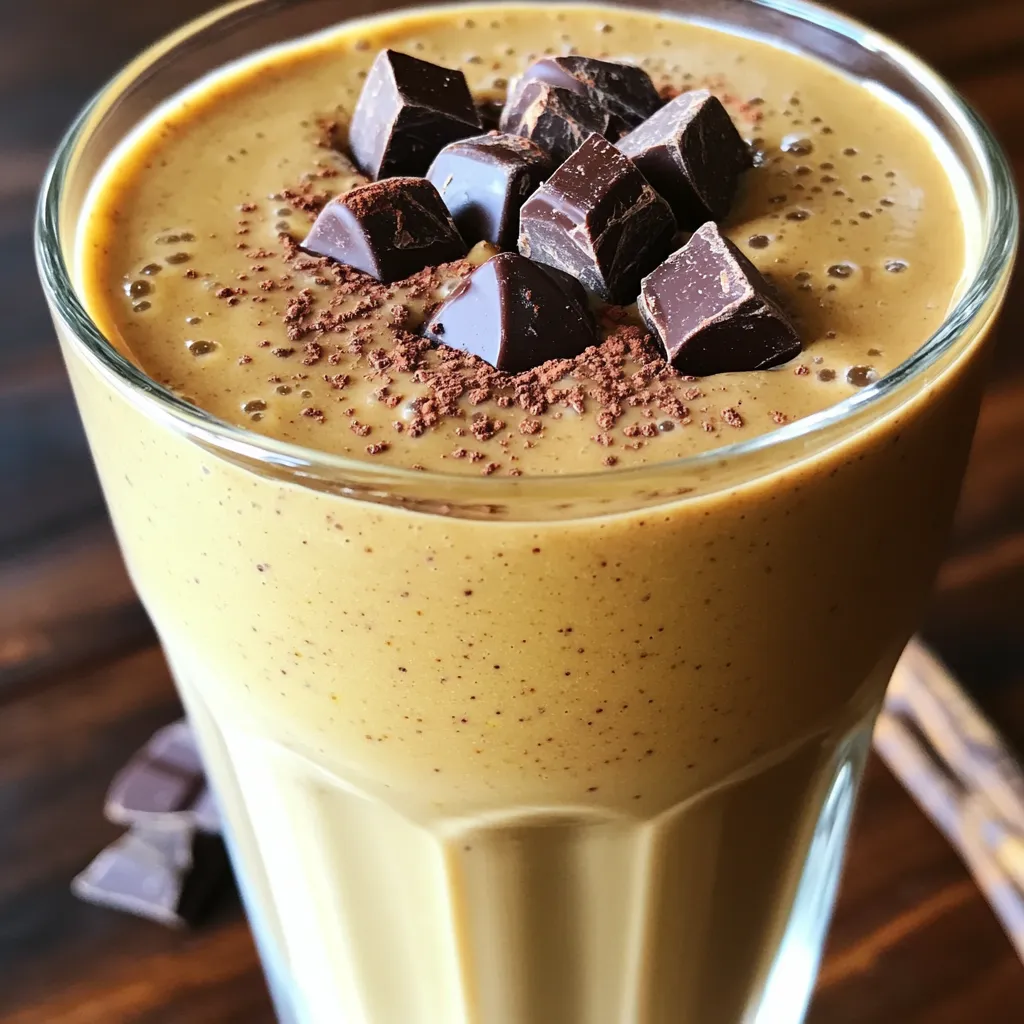
Looking to fuel your day with a tasty treat? Try my High-Protein Chocolate Chunk Banana Smoothie! This delight blends the

To make this tasty dish, you need the following key items: - 1 tablespoon olive oil - 1 small onion, diced - 3 cloves garlic, minced - 1 teaspoon dried oregano - 1 teaspoon dried basil - 1 can (14 oz) crushed tomatoes - 4 cups vegetable broth - 12 oz cheese tortellini (fresh or frozen) - 1 cup heavy cream - 1 cup fresh spinach, roughly chopped - Salt and pepper to taste - Grated Parmesan cheese for serving These ingredients create a rich and creamy sauce. The tortellini adds a wonderful texture. The spices give it a nice flavor that everyone loves. You can add some extra ingredients for more flavor. Consider using: - Fresh basil for garnish - A pinch of red pepper flakes for heat - A splash of balsamic vinegar for depth - Sun-dried tomatoes for sweetness These options let you customize your dish. They can take your creamy tomato tortellini to the next level. If you have dietary needs, there are simple swaps you can make. For a vegan version, try these: - Use coconut cream instead of heavy cream - Replace cheese tortellini with vegan pasta - Use vegetable broth that is free from animal products These substitutions keep the dish delicious while meeting your needs. You can enjoy creamy tomato tortellini no matter your diet! Start by setting your Instant Pot to 'Sauté' mode. Add one tablespoon of olive oil and let it heat. When the oil shimmers, add one small diced onion. Cook the onion for about three to four minutes. You want the onion to become soft and see-through. Next, stir in three cloves of minced garlic, one teaspoon of dried oregano, and one teaspoon of dried basil. Cook for one more minute. This step fills your kitchen with a lovely smell. Now, pour in one can of crushed tomatoes and four cups of vegetable broth. Mix everything well until it looks combined. After that, press 'Cancel' to stop the sauté mode. Gently add twelve ounces of cheese tortellini. Make sure the tortellini is evenly submerged in the liquid. This helps them cook well. Secure the lid on the Instant Pot. Ensure the steam release valve is set to sealing. Set the pot to 'Manual' and cook on high pressure for four minutes. This short cook time makes the tortellini tender. When the timer goes off, turn the valve to venting for a quick release. Be careful of the hot steam. A kitchen towel can protect your hands. After the steam escapes, open the lid slowly. Stir in one cup of heavy cream and one cup of roughly chopped fresh spinach. Mix until the spinach wilts and the sauce turns creamy. Finally, taste your dish and add salt and pepper to your liking. Enjoy this warm and comforting meal! To get that perfect creamy texture, I recommend using heavy cream. It blends well and gives richness to the dish. Add the cream after cooking, not before. This keeps it from curdling. Stir the cream in gently after the pressure cooking. The heat will warm it up and make everything smooth. If you want an extra touch, add a bit of grated Parmesan cheese. It melts nicely and adds flavor. Using your Instant Pot saves time. To speed up prep, chop your onion and garlic ahead of time. You can store them in the fridge until you're ready. If you use frozen tortellini, there's no need to thaw. Just toss them in directly. This cuts down on prep time. Also, use the quick release method for steam. It saves about 10 minutes compared to natural release. One common mistake is overcooking the tortellini. Stick to the 4-minute cooking time. The tortellini will cook perfectly during that time. Another mistake is not sealing the lid correctly. Always check that the steam valve is in the sealing position. This ensures the pot builds pressure. Lastly, be careful when releasing steam. Use a kitchen towel to protect your hands from hot steam. {{image_4}} You can easily make this dish vegetarian. Simply swap the heavy cream with a plant-based cream. Almond or coconut cream works well. For a vegan option, ensure your tortellini is also vegan. Many brands now offer great choices. If you want to add protein, consider cooked chicken or shrimp. You can stir these in after cooking your dish. For a plant-based option, add chickpeas or lentils. They boost protein and pair well with the flavors. To give your dish a twist, try adding different herbs. Fresh basil or parsley can brighten the flavors. You can also add crushed red pepper for heat. A sprinkle of smoked paprika adds depth. Experiment with flavors to find your favorite combination. After enjoying your Instant Pot Creamy Tomato Tortellini, let any leftovers cool down. Then, transfer them to an airtight container. Store the container in the fridge. Your dish will stay fresh for up to three days. Make sure to keep the sauce and tortellini together for the best taste. When you’re ready to enjoy leftovers, use the stove or microwave. If using the stove, warm the dish in a pan over low heat. Stir often to prevent sticking. If using a microwave, place the tortellini in a bowl. Cover it with a damp paper towel. Heat in short bursts, stirring in between, until hot. Enjoy every creamy bite! You can freeze this dish if you want to save some for later. First, let it cool completely. Then, scoop it into freezer-safe bags or containers. Be sure to remove as much air as possible. Label each bag with the date. You can freeze the tortellini for up to three months. When you’re ready to eat, thaw it overnight in the fridge and reheat it as described above. Yes, you can use frozen tortellini in this recipe. Just add the frozen tortellini directly to the pot. No need to thaw them first. The cooking time remains the same. They will cook perfectly and absorb the flavors. To add spice, you can include red pepper flakes. Start with a pinch and taste as you go. You can also add diced jalapeños or a dash of hot sauce. Mix these in when you sauté the onions and garlic. Adjust the heat level to suit your taste. This dish pairs well with garlic bread or a fresh salad. A side of steamed vegetables also works nicely. For a hearty meal, consider serving it with grilled chicken or shrimp. Each option adds a delightful touch to your dining experience. This blog covered a delicious Instant Pot Creamy Tomato Tortellini recipe. We looked at key ingredients you need and how to add more flavor. The step-by-step guide makes cooking easy and fun. I shared tips to keep your dish creamy and how to save time. You can try variations to suit your taste, and I even outlined storage methods. Enjoy this meal your way, and feel free to share it with others! Happy cooking!

Instant Pot Creamy Tomato Tortellini Dream Dish

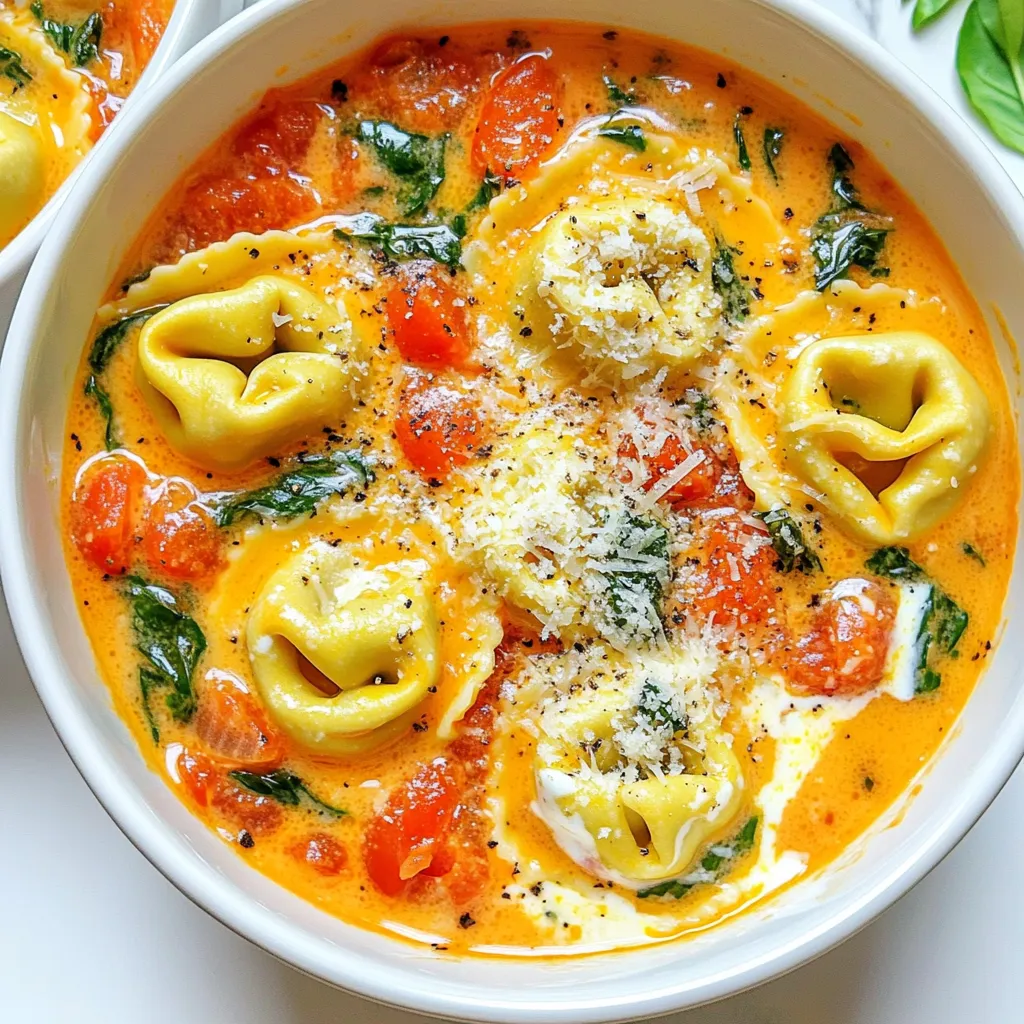
Looking for a quick and tasty meal? This Instant Pot Creamy Tomato Tortellini Dream Dish is just for you! With

To make my Pumpkin Spice Granola, gather the following ingredients: - 2 cups rolled oats - 1 cup pumpkin puree - 1/2 cup honey or maple syrup - 1/2 cup almonds, roughly chopped - 1/2 cup pecans, roughly chopped - 1/4 cup sunflower seeds - 1/4 cup flaxseeds - 2 teaspoons pumpkin pie spice - 1 teaspoon pure vanilla extract - 1/2 teaspoon sea salt - 1/2 cup raisins or dried cranberries (optional) This mix brings together flavors that warm your soul. The rolled oats provide a hearty base. The pumpkin puree adds a creamy texture and rich taste. Honey or maple syrup sweetens the granola, while nuts and seeds give you crunch. Pumpkin pie spice is key; it adds warmth and sweetness. The vanilla extract rounds out the flavors. Sea salt enhances everything and balances the sweetness. If you want a touch of sweetness, toss in raisins or cranberries. Each ingredient plays a role. Together, they create a tasty, crunchy breakfast you will love. 1. Preheat the oven to 350°F (175°C). This step gets your oven ready for baking. A hot oven helps your granola get that perfect crunch. 2. Prepare the baking sheet with parchment paper. Line your sheet with parchment. This makes cleanup easy and helps the granola not stick. 3. Mix dry ingredients in a bowl. In a large bowl, combine: - 2 cups rolled oats - 1/2 cup almonds, roughly chopped - 1/2 cup pecans, roughly chopped - 1/4 cup sunflower seeds - 1/4 cup flaxseeds - 2 teaspoons pumpkin pie spice - 1/2 teaspoon sea salt Stir them well. You want every piece to be coated in those tasty spices. 4. Combine wet ingredients in a separate bowl. In another bowl, whisk together: - 1 cup pumpkin puree - 1/2 cup honey or maple syrup - 1 teaspoon pure vanilla extract Mix until it is smooth. This creates a sweet and creamy base. 5. Combine wet and dry mixtures. Pour the wet mix into the dry ingredients. Stir gently until everything is well coated. This is where the magic happens! 6. Bake the granola. Spread the mixture evenly on your prepared baking sheet. Bake for 25-30 minutes. Stir halfway through to help it brown evenly. When it turns golden, it’s almost ready. 7. Cool the granola and add optional ingredients. Once baked, take it out and let it cool completely on the sheet. This step is key for crunch. If you like, mix in 1/2 cup raisins or dried cranberries for extra sweetness. 8. Store your granola. After cooling, transfer your granola to an airtight container. This keeps it fresh and delicious for days. By following these steps, you will have a crunchy and flavorful pumpkin spice granola. Enjoy it with yogurt or as a quick snack! - Ensure even coating of the oats and nuts: Start by mixing the dry and wet ingredients well. This step makes sure all the oats and nuts get a nice pumpkin flavor. Use a spatula to mix them. - Importance of stirring halfway through baking: When baking, stir the granola halfway. This helps it brown evenly and prevents burning. Give it a good toss to mix up the layers. - Cooling techniques for maximum crunch: Let the granola cool on the baking sheet after baking. This cooling helps it get crispy. Don't rush this step; it makes a big difference in texture! - Serving suggestions in jars or over yogurt: I love serving granola in clear jars. You can see the beautiful layers. It's also great on yogurt or oatmeal for breakfast. - Garnishing ideas for visual appeal: Add dried fruit or fresh berries on top. This makes your granola look even more inviting. A sprinkle of extra pumpkin spice can add a nice touch, too! {{image_4}} You can easily switch some ingredients in this granola recipe. If you want to use different nuts or seeds, you can. Try walnuts, hazelnuts, or even pumpkin seeds. Each nut adds its own flavor and texture. For sweeteners, honey and maple syrup are both great. Honey gives a rich taste, while maple syrup adds a subtle sweetness. You can also use agave syrup or brown sugar if you prefer. When it comes to spices, pumpkin pie spice is a must, but you can add more. A sprinkle of cinnamon or nutmeg can boost the flavor. Just remember, a little goes a long way! Do you want to make your granola sweeter? Add coconut flakes! They bring a wonderful texture and sweetness. You can also mix in chocolate chips or pieces. This adds a fun treat to your breakfast. Just fold them in after baking for a little indulgence. To keep your pumpkin spice granola fresh, follow these tips: - Use an airtight container: This helps prevent air and moisture from getting in. You can use glass jars, plastic containers, or resealable bags. - Store in a cool, dry place: A pantry or cupboard is perfect. Avoid warm areas like near the stove. - Keep it away from sunlight: Light can make the granola stale faster. Homemade granola can last about two weeks when stored properly. If you like, you can freeze it for longer storage. Just make sure to use an airtight container. It can stay fresh for up to three months in the freezer. If your granola becomes stale, don’t worry! You can easily rejuvenate it. - Spread it on a baking sheet: Preheat your oven to 350°F (175°C). Bake it for about 5-10 minutes. This will help it regain its crunch. - Let it cool: After baking, let it cool before storing again. You can also use leftover granola in various ways. - Sprinkle it on yogurt or oatmeal: This adds flavor and texture. - Mix it into smoothies: It makes a great addition to your morning blend. Enjoy your delicious pumpkin spice granola in new and fun ways! Pumpkin spice granola is a crunchy breakfast mix made with oats, nuts, and pumpkin puree. It has warm spices that give it a cozy, fall flavor. This granola is perfect for adding to yogurt or enjoying with milk. Yes, you can use gluten-free oats! Just check the label to ensure they are certified gluten-free. This way, everyone can enjoy the pumpkin spice goodness. It takes about 40 minutes to make pumpkin spice granola. This includes 10 minutes for prep and 25-30 minutes for baking. You get a tasty breakfast in no time! Absolutely! Pumpkin spice granola is great for meal prep. You can make a big batch and store it in an airtight container. It stays fresh for weeks, making breakfast easy during busy mornings. Here are some fun topping ideas: - Fresh fruit like bananas or berries - A drizzle of yogurt - A sprinkle of chia seeds - A dollop of nut butter Mix and match for your perfect breakfast! Yes, you can freeze granola! Place it in a freezer-safe bag or container. It can last for up to three months in the freezer. Just thaw it in the fridge when you're ready to enjoy it again. You now know how to make delicious pumpkin spice granola. We covered the tasty ingredients, easy steps to prepare it, and helpful tips for great results. You can adjust flavors and store your granola for fresh snacks later. Enjoy your crunchy treat with yogurt or as a topping. Get creative with mix-ins and flavors. Making granola is fun and rewarding. Try making it today!

Pumpkin Spice Granola Crunchy and Flavorful Breakfast

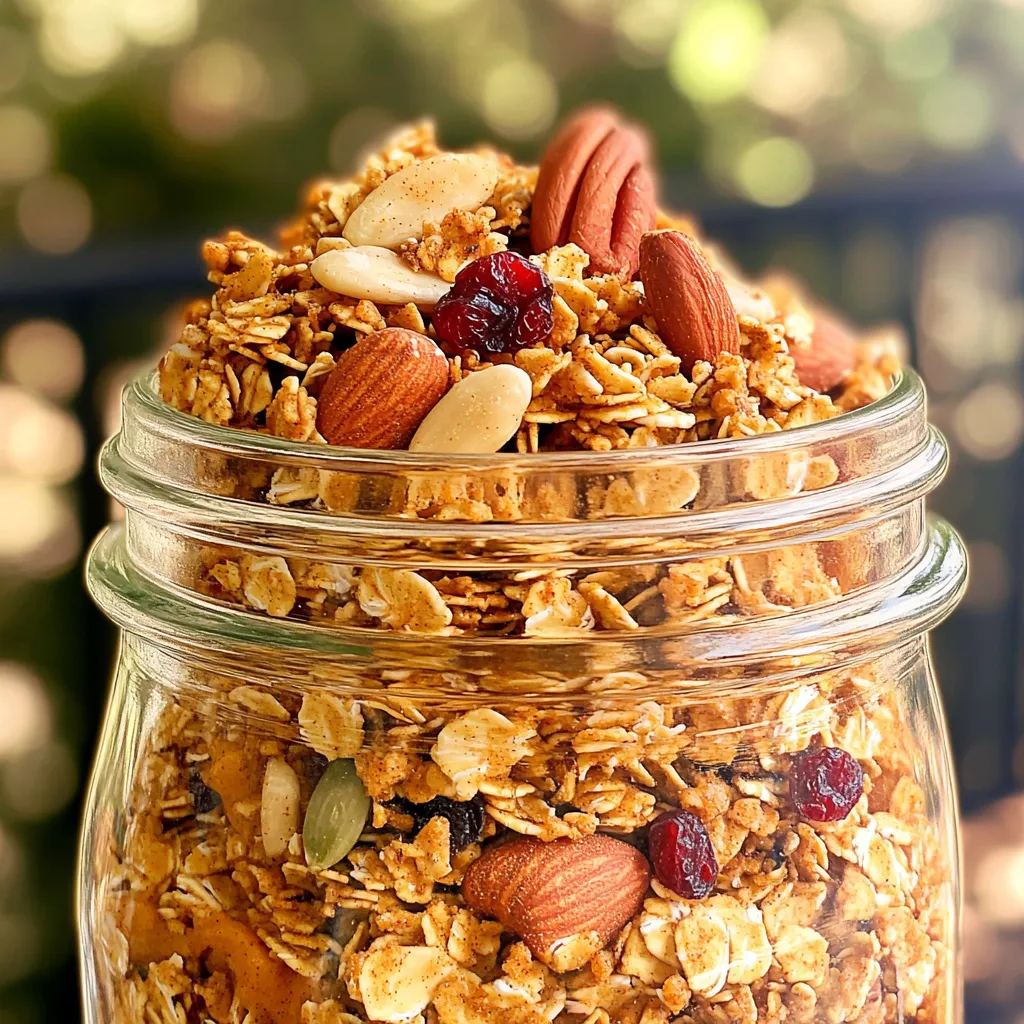
Start your mornings with a delicious twist by making your own pumpkin spice granola! This crunchy, flavorful breakfast combines wholesome

- Large shrimp: 1 lb, peeled and deveined - Butter: 4 tablespoons, unsalted - Garlic: 4 cloves, minced - Red pepper flakes: 1 teaspoon, adjust for spice level - Lemon juice: 1 tablespoon, freshly squeezed - Parsley: 1 tablespoon, fresh and finely chopped - Seasonings: Sea salt and freshly cracked black pepper - Serving options: Cooked rice or pasta In my kitchen, I love to keep it simple and fresh. Each ingredient plays a key role in the taste of garlic butter shrimp. The shrimp must be large and fresh for the best bite. Always peel and devein them before cooking. I use unsalted butter, as it lets the other flavors shine. Garlic is a must! I recommend fresh cloves, finely minced, for the best flavor. Red pepper flakes add a nice kick. You can adjust the amount based on your heat preference. Fresh lemon juice brightens the dish. A good squeeze balances the richness of the butter. Don't skip the parsley; it adds color and freshness. Lastly, season with sea salt and cracked black pepper for a perfect finish. When serving, I love pairing the shrimp with cooked rice or pasta. The buttery sauce soaks in, making every bite delicious. Enjoy cooking! - Step 1: Melting the Butter Start by placing a large skillet on medium heat. Add 4 tablespoons of unsalted butter. Let it melt slowly. Watch for the bubbles; you want it to bubble without browning. This step brings out the rich flavor of the butter. - Step 2: Sautéing the Garlic Once the butter is bubbling, add 4 cloves of finely minced garlic. Sauté the garlic for about 1 minute. You want it to smell amazing but not burn. The scent of garlic adds depth to our dish. - Step 3: Adding Spice with Red Pepper Flakes Now, add 1 teaspoon of red pepper flakes. Stir them into the bubbling garlic butter. This will give your dish a nice kick. Adjust the amount based on your heat preference. - Step 4: Cooking the Shrimp in Skillet Add 1 pound of peeled and deveined shrimp to the skillet. Spread them out in a single layer. Cook for about 2-3 minutes on each side. They should turn pink and opaque when done. This shows they are fully cooked. - Step 5: Finishing with Lemon Juice and Seasoning After cooking, drizzle 1 tablespoon of fresh lemon juice over the shrimp. Gently stir to mix in the flavors. Season with sea salt and freshly cracked black pepper to taste. This brightens the dish and enhances the flavors. - Step 6: Garnishing with Parsley Remove the skillet from heat. Sprinkle 1 tablespoon of finely chopped fresh parsley on top. This adds color and freshness, making your dish pop visually. - Step 7: Plating the Dish To serve, scoop the shrimp and garlic butter sauce over cooked rice or pasta. Make sure to drizzle any remaining sauce over the dish for extra flavor. For a nice touch, add lemon wedges and a bit more parsley on top. This makes your meal look inviting and tasty. Using fresh shrimp gives the best taste. Fresh shrimp has a sweet flavor and firm texture. If you must use frozen shrimp, thaw it fully before cooking. This helps it cook evenly. To get the best texture, don't overcrowd the skillet. Cook shrimp in a single layer. This allows each piece to sear perfectly. High heat helps create a golden crust. You can add herbs for more flavor. Fresh basil or thyme pairs well with shrimp. Try using different types of butter, too. Garlic herb butter can add a rich taste. You could even use spicy butter for a kick. A splash of white wine can also boost the sauce. It adds depth and brightness to the dish. Garnish your dish for a pop of color. Lemon wedges and parsley look great. Serve the shrimp in a wide bowl. This style makes it easy for guests to dig in. Drizzle extra garlic butter on top for a nice touch. It not only looks good but also gives a burst of flavor. {{image_4}} You can easily switch up the protein in this dish. If you want a different taste, try using scallops or chicken instead of shrimp. Scallops cook quickly and have a sweet flavor. Chicken adds a hearty touch and is widely loved. For herbs, you can choose cilantro or basil. Cilantro gives a fresh, bright flavor. Basil adds a sweet, aromatic note that works well with garlic and butter. Just chop the herbs finely and sprinkle them in at the end. If you need gluten-free options, serve this dish over rice instead of pasta. Rice is naturally gluten-free and pairs well with the garlic butter sauce. You can also use quinoa for a nutty flavor and added protein. For a low-carb option, try zucchini noodles. These noodles are made from zucchini and are a great way to cut carbs while enjoying the dish. You can spiralize the zucchini and cook it briefly in a skillet to soften. To spice things up, consider adding a lemon garlic chili sauce. It gives the dish a nice kick and enhances the flavor. Just drizzle it over the shrimp before serving. For a Mediterranean twist, add olives and capers. These ingredients bring briny and tangy notes to the dish. They complement the garlic and butter well, creating a unique flavor profile. To keep your garlic butter shrimp fresh, store it in an airtight container. This helps keep out air and moisture. Place it in the fridge right after it cools. Properly stored shrimp will last for 2 to 3 days. After this time, the shrimp may lose flavor and quality. When it’s time to enjoy your leftovers, use low heat to reheat the shrimp. You can use a skillet or microwave. If using a skillet, add a tiny bit of butter to keep it moist. Heat it gently for about 2 to 3 minutes. Avoid high heat to keep the shrimp tender. If you use a microwave, heat it in short bursts. This helps to avoid overcooking. You can also freeze garlic butter shrimp for later. Place the cooked shrimp in a freezer-safe bag. Try to remove as much air as possible before sealing. Frozen shrimp can last up to 2 months. To thaw, move it to the fridge overnight. You can also thaw it in cold water for a quicker option. Once thawed, reheat the shrimp gently to keep its taste and texture. I recommend using large shrimp. They cook evenly and taste great. Look for shrimp that are fresh, peeled, and deveined. This saves you time and makes cooking easier. Yes, you can prepare the garlic butter sauce ahead of time. Just keep it in the fridge. Cook the shrimp fresh for the best taste. Reheating shrimp can make them tough, so cook them right before serving. To serve more people, simply double the ingredients. Use 2 pounds of shrimp and increase the butter and spices. Make sure your skillet is large enough. You may need to cook in batches for even cooking. Garlic butter shrimp pairs well with cooked rice or pasta. You can also serve it with crusty bread to soak up the sauce. A fresh salad or steamed veggies adds a nice touch too. This recipe for garlic butter shrimp uses simple ingredients and easy steps. You can make it spicy or mild based on your taste. Feel free to switch proteins and herbs for fun flavors. Plus, there are handy tips for storage and reheating. In the end, cooking shrimp at home can be rewarding and tasty. Try it out and impress your family or guests! Enjoy this delightful dish and make it your own.

Easy Garlic Butter Shrimp Skillet Tasty and Quick Meal

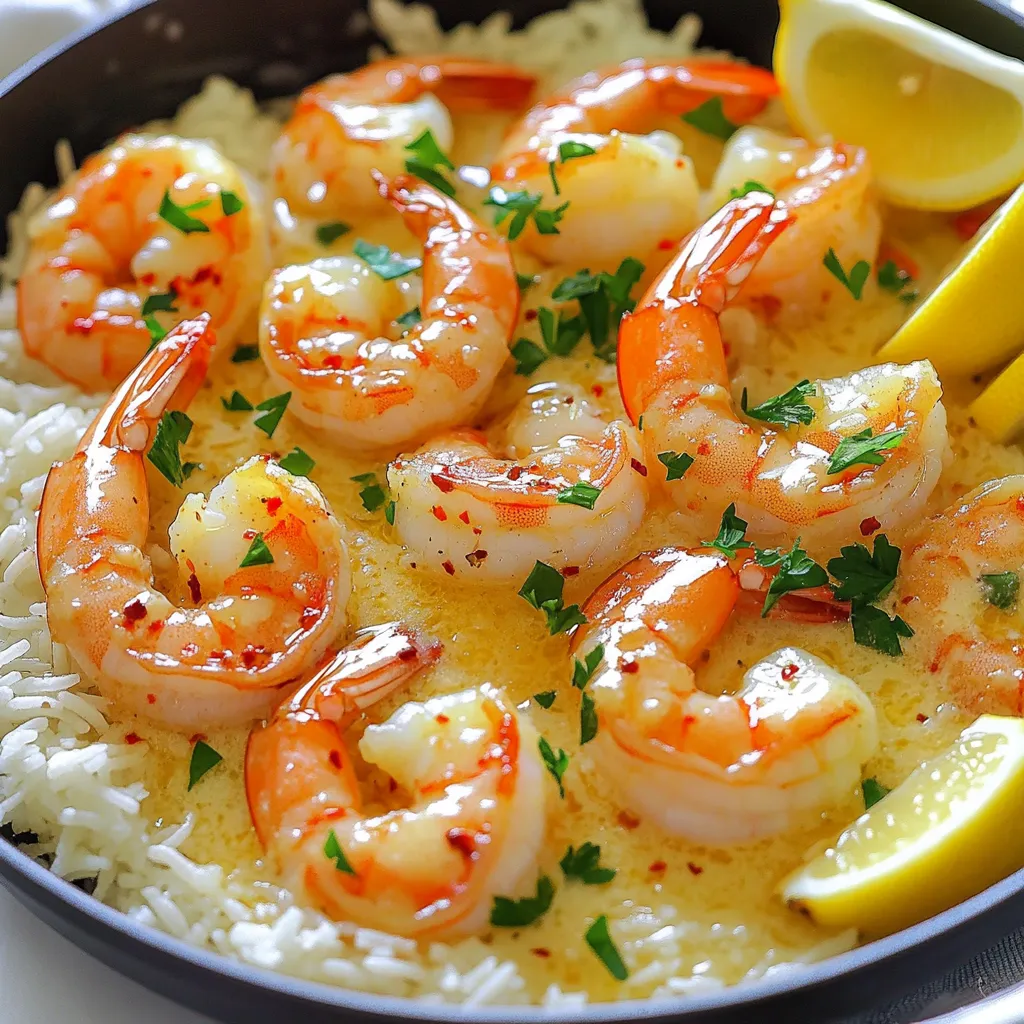
Looking for a quick and tasty meal? My Easy Garlic Butter Shrimp Skillet is your answer! You’ll delight in juicy

To make your Strawberry Lemon Icebox Cake, gather these fresh ingredients: - 2 cups fresh strawberries, hulls removed and sliced - 1 cup tangy lemon curd - 2 cups heavy whipping cream - 1/2 cup powdered sugar (plus an extra tablespoon for strawberries) - 1 teaspoon pure vanilla extract - Zest of 1 lemon (about 1 tablespoon) - Fresh mint leaves for garnish These ingredients bring bright flavors and textures to your cake. The strawberries add sweetness, while the lemon curd brings a nice zing. You will need some basic kitchen tools: - A medium mixing bowl - A large mixing bowl - An electric mixer - A serving platter - A spatula - Plastic wrap These tools help you mix, whip, layer, and serve your cake with ease. Not all ingredients need to be set in stone. Here are a few ideas for swaps: - Use other berries like blueberries or raspberries for a different flavor. - Try using whipped coconut cream for a dairy-free option. - If you don’t have lemon curd, make a simple lemon mousse instead. These substitutions can change the taste or make it fit your needs, while still keeping it delicious! {{ingredient_image_2}} Start by slicing the fresh strawberries. Remove the hulls first. Place them in a bowl. Add one tablespoon of powdered sugar. Gently toss the strawberries to coat them. This helps bring out their sweetness. Let them sit for 10-15 minutes. You will see a lovely syrup form at the bottom. This syrup adds flavor to your cake. In a large bowl, pour in the heavy whipping cream. Add the remaining half cup of powdered sugar. Next, add the vanilla extract and lemon zest. Using an electric mixer, whip the mixture on high speed. It takes about 2-3 minutes to reach stiff peaks. Be careful not to over-whip. If you do, the cream may become grainy. On a serving platter, lay out a single layer of graham crackers. Ensure they cover the bottom completely. Next, spread a layer of lemon curd on top of the crackers. Use a spatula to smooth it out evenly. Then, add a generous layer of the whipped cream mixture. Spread it evenly across the surface. Now, take half of the macerated strawberries. Arrange them over the whipped cream layer. Let some syrup puddle for added flavor. Repeat the layering. Add another layer of graham crackers, followed by lemon curd and whipped cream. Top this with the remaining strawberries. Finally, add a last layer of whipped cream on top. Smooth it out nicely. You can create peaks for a fancy look. Cover the cake with plastic wrap. Chill it in the fridge for at least four hours. If you can, chill it overnight. This helps the graham crackers soften and absorb moisture. To make good whipped cream, start cold. Chill your mixing bowl and beaters before use. Use heavy whipping cream for the best results. Add powdered sugar and vanilla for flavor. Beat until stiff peaks form, which takes about 2-3 minutes. Avoid over-whipping, or it may turn grainy. Perfect whipped cream makes a big difference in your cake. Lemon zest is a game-changer for this cake. Use a microplane to grate the lemon peel, avoiding the bitter white pith. The zest adds a bright, fresh taste that pairs well with strawberries. Mix the zest into your whipped cream for an extra zing. It enhances the lemon curd too, making flavors pop. Presentation matters for your icebox cake. After chilling, smooth the top layer of whipped cream. Create peaks for a fun look. Scatter fresh mint leaves on top for color and aroma. A sprinkle of lemon zest adds a nice touch. Cut neat slices for serving, showing off those beautiful layers. These steps will impress your guests! Pro Tips Perfect Whipped Cream: To achieve the best whipped cream, make sure your mixing bowl and beaters are chilled. This helps the cream whip faster and increases volume. Macerating Strawberries: Allowing the strawberries to sit with sugar for longer than 15 minutes can enhance the syrupiness. You can macerate them for up to an hour for a richer flavor. Layering Technique: For a more visually appealing cake, alternate your layering by spreading lemon curd and whipped cream in a zig-zag pattern. This adds a beautiful marbled effect to each slice. Chilling Time: If possible, chill the cake overnight. This not only allows the flavors to meld together beautifully but also ensures that the graham crackers soften perfectly. {{image_4}} You can switch up the strawberries in this cake. Use any fresh fruit you like. Blueberries, raspberries, or peaches work great. Each fruit adds its own flavor. Mix and match to find your favorite. If using other berries, be sure to adjust the sugar. Some fruits are sweeter, while others need a bit more sugar. Try different combos for a fun twist! If you want a lighter version, use Greek yogurt instead of heavy cream. It gives a nice tang and cuts some fat. You can also use coconut cream for a dairy-free option. Just chill it well before whipping. This makes it fluffy and creamy like the original. No matter what you choose, the cake stays delicious and fresh. For a gluten-free option, you can find gluten-free graham crackers at many stores. They taste similar to regular ones. If you can’t find them, crush gluten-free cookies to use instead. Just make sure they are sweet and firm. This way, you can enjoy this tasty dessert without worry. Your guests will love it! To keep your Strawberry Lemon Icebox Cake fresh, store it in the fridge. Cover it well with plastic wrap. This helps to keep the moisture in and prevents other odors from the fridge from affecting the cake. It can stay fresh for up to three days in the fridge. You can freeze your Strawberry Lemon Icebox Cake if you want to enjoy it later. First, cut the cake into slices. Wrap each slice in plastic wrap tightly. Then put the wrapped slices in an airtight container or a freezer bag. The cake can last up to two months in the freezer. Just remember to thaw it in the fridge before serving. For any leftover cake, follow the same refrigeration guidelines. Place any uneaten pieces in a container with a lid. Be sure to enjoy your leftovers within three days for the best taste and texture. If you freeze leftovers, label the container with the date to keep track of freshness. Yes, you can use store-bought lemon curd. It saves time and is tasty. Just make sure it is fresh and of good quality. This helps your cake taste great without extra effort. Also, if you want, you can try making your own lemon curd. It’s simple and lets you control the flavors. The cake lasts about 3 to 5 days in the fridge. Make sure to cover it well with plastic wrap. The graham crackers will soften, making it easier to cut and serve. This dessert stays fresh and delicious, so enjoy it within that time! Yes, you can make this dessert ahead of time! It is best to prepare it a day before you plan to serve it. This allows the flavors to blend well. Plus, the graham crackers will have time to soak up the moisture. Just remember to chill it for at least 4 hours before serving. This blog post covered everything you need for a delicious dessert. We talked about fresh ingredients, the right tools, and smart swaps. Next, I shared easy steps for preparing strawberries, whipping cream, and layering the cake. You learned tips for perfect textures, flavor boosts, and great looks. I also explored fun variations and how to store leftovers. In closing, making this treat can be simple and fun. Try it out to impress family and friends!

Strawberry Lemon Icebox Cake Refreshing Summer Treat

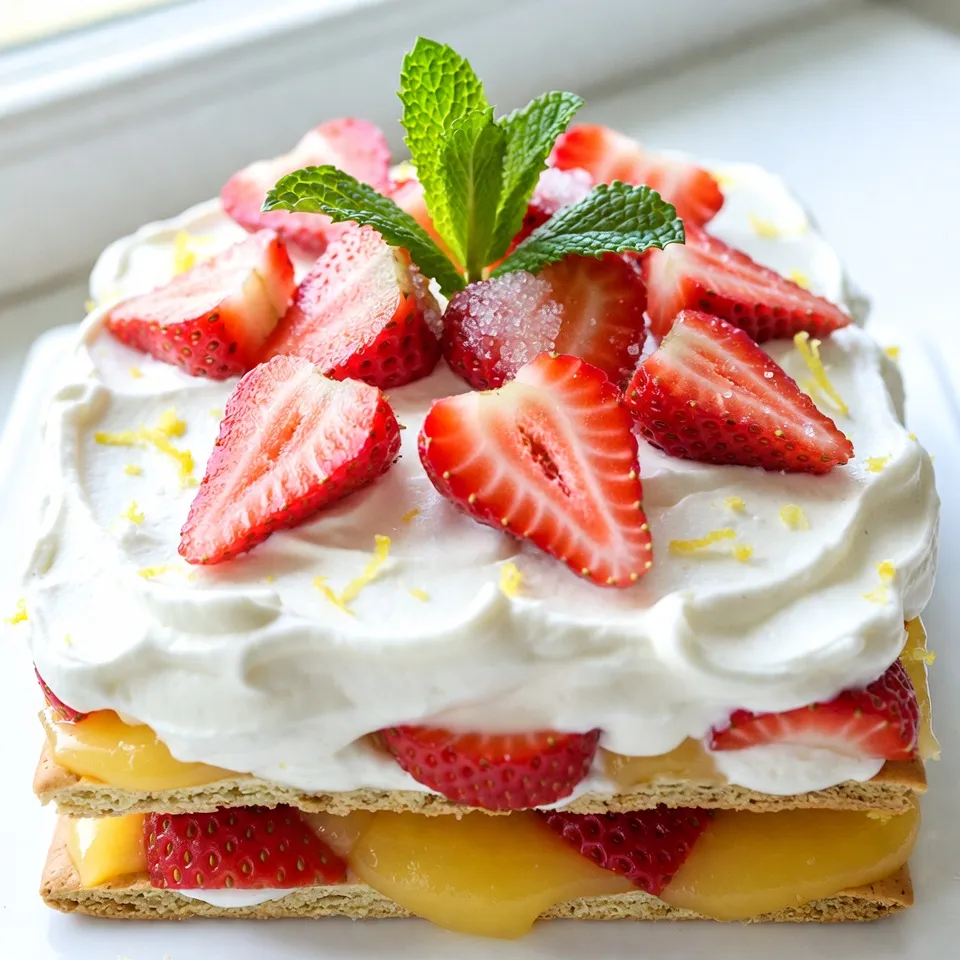
Looking for a treat that screams summer? Let me introduce you to the Strawberry Lemon Icebox Cake! This dessert combines

- 4 ears of fresh corn, husked - 1 vibrant red bell pepper, diced - 1/2 cup finely chopped red onion - 1 cup juicy cherry tomatoes, halved - 1 ripe avocado, diced - 1/2 cup crumbled creamy feta cheese - 1/4 cup fresh cilantro, roughly chopped - Juice of 2 zesty limes - 2 tablespoons extra virgin olive oil - 1 teaspoon smoky chili powder - Salt and freshly ground pepper to taste You may want to swap some ingredients. If you can’t find fresh corn, use frozen corn. It’s easy and still tasty. For the feta cheese, try goat cheese for a different flavor. If red onion is too strong for you, use green onions instead. You can also replace avocado with diced cucumber for a refreshing crunch. When you pick corn, look for husks that are bright green. The silk should be slightly sticky and brown. Gently peel back a part of the husk to check the kernels. They should be plump and yellow or white. Avoid corn with dry or dark spots. Fresh corn tastes the best in your salad! {{ingredient_image_2}} Start by husking the corn. Remove all the green leaves and silk. Rinse the ears under cold water to clean them. It is best to use fresh corn for the best flavor. You can find it at the store or local market. Fresh corn gives the salad a sweet crunch. Preheat your grill to medium-high heat. If you don’t have a grill, a grill pan works too. Place the corn directly onto the grill. Grill the corn for about 10 to 12 minutes. Turn the corn every few minutes. Look for nice char marks. When it feels tender, take it off the grill. Let it cool for a few minutes. Once cool, cut the kernels off the cob with a sharp knife. Make sure to get every last kernel! In a large bowl, add the grilled corn kernels. Next, add the diced red bell pepper, chopped red onion, halved cherry tomatoes, and diced avocado. Each adds flavor and color. In a small bowl, whisk lime juice, olive oil, and chili powder. Add a pinch of salt and pepper. Pour this dressing over the corn and veggies. Toss gently until everything is well mixed. Finally, fold in the crumbled feta cheese and chopped cilantro. This gives the salad a creamy and fresh finish. Enjoy your vibrant dish! To get great grill marks on your corn, start by preheating your grill. Aim for a medium-high heat. Place the husked corn directly on the grill. Rotate it every few minutes. This will help create those beautiful char marks. Grill for about 10-12 minutes. You want the corn to be tender and have nice browning. If you’re using a grill pan, the same rules apply. Just keep an eye on it to avoid burning. Chopping vegetables for your salad can be fun. Use a sharp knife for clean cuts. Start with the red bell pepper. Cut it in half, remove the seeds, and dice it. Next, take your red onion and cut off both ends. Slice it thinly for a great flavor. For cherry tomatoes, simply cut them in half. Lastly, dice your avocado gently to keep it intact. This adds creaminess to your salad. You can prepare your salad ahead of time. Grill the corn and chop the veggies a few hours before serving. Store the corn and veggies separately in the fridge. This keeps them fresh and crisp. Mix them together just before serving. Don’t forget to add the dressing and feta at the last moment. This will keep your salad vibrant and tasty. Enjoy the fresh flavors whenever you’re ready! Pro Tips Grilling Corn Perfectly: To achieve the best char and flavor, soak the corn in water for about 30 minutes before grilling. This helps to keep it moist and prevents burning. Choosing the Right Avocado: Look for avocados that yield slightly to pressure but are not overly soft. This ensures your avocado is ripe and creamy without being mushy. Enhancing Flavor with Lime: For an extra zing, consider adding lime zest to the dressing. This will intensify the citrus flavor and give your salad a refreshing kick. Fresh Herbs for More Flavor: If cilantro isn't your favorite, try substituting with fresh parsley or mint for a different herbaceous note that complements the salad beautifully. {{image_4}} To spice things up, add jalapeños or hot sauce. Diced jalapeños give heat and crunch. You can also use a spicy chili powder blend for depth. Mix in cayenne pepper to the dressing for a kick. Adjust the spice to your taste. This version adds excitement and flavor to every bite. If you want a vegetarian twist, skip the feta cheese. Replace it with a vegan cheese or creamy avocado. You can also add black beans for protein and texture. They boost the nutrition without losing flavor. Try adding corn chips for a crunchy surprise. These swaps keep the dish fresh and tasty. You can make this salad heartier by adding protein. Grilled chicken, shrimp, or tofu all work well. Just chop them into bite-sized pieces before mixing. For a quick option, use canned chickpeas or black beans. These add protein and fiber to the salad. This way, you can enjoy a filling meal that still tastes great. To keep your Mexican street corn salad fresh, place it in an airtight container. Make sure to remove any excess air to avoid spoilage. You can store it in the fridge for up to three days. If you want to keep it longer, consider freezing it. However, the texture of the avocado may change after freezing. Use glass or BPA-free plastic containers. Glass containers are great because they don’t stain and are easy to clean. If you choose plastic, ensure it is food-safe and airtight. This helps maintain the salad's freshness and flavor. When you are ready to eat the salad, it's best served cold or at room temperature. If you need to reheat it, do so gently. Place it in a pan on low heat for just a few minutes. Be careful not to overheat, especially if it has avocado, as it can become mushy. If you don't have feta cheese, try crumbled goat cheese. It offers a similar creaminess. You can also use queso fresco for a milder flavor. For a dairy-free option, try vegan feta made from nuts. This will keep the salad tasty and fresh! Yes, you can make this salad ahead of time! Prepare the corn and mix the veggies. Add the dressing and feta right before serving. This keeps the flavors bright and the ingredients crisp. If left too long, the salad may lose its zing. Mexican street corn salad lasts about 3 days in the fridge. Store it in an airtight container to keep it fresh. You may notice some ingredients soften over time, especially the avocado. Enjoy it within a few days for the best taste! This blog post covered all the steps to make a great corn salad. We discussed key ingredients, substitutes, and tips for selecting fresh corn. You learned how to prep corn and grill it to perfection. We shared tricks for perfect grill marks and how to chop veggies well. You saw ways to spice up the salad and options for storage. Remember, with a few easy steps, you can enjoy this tasty dish. Keep experimenting to find your favorite version!

Mexican Street Corn Salad Flavorful and Fresh Dish

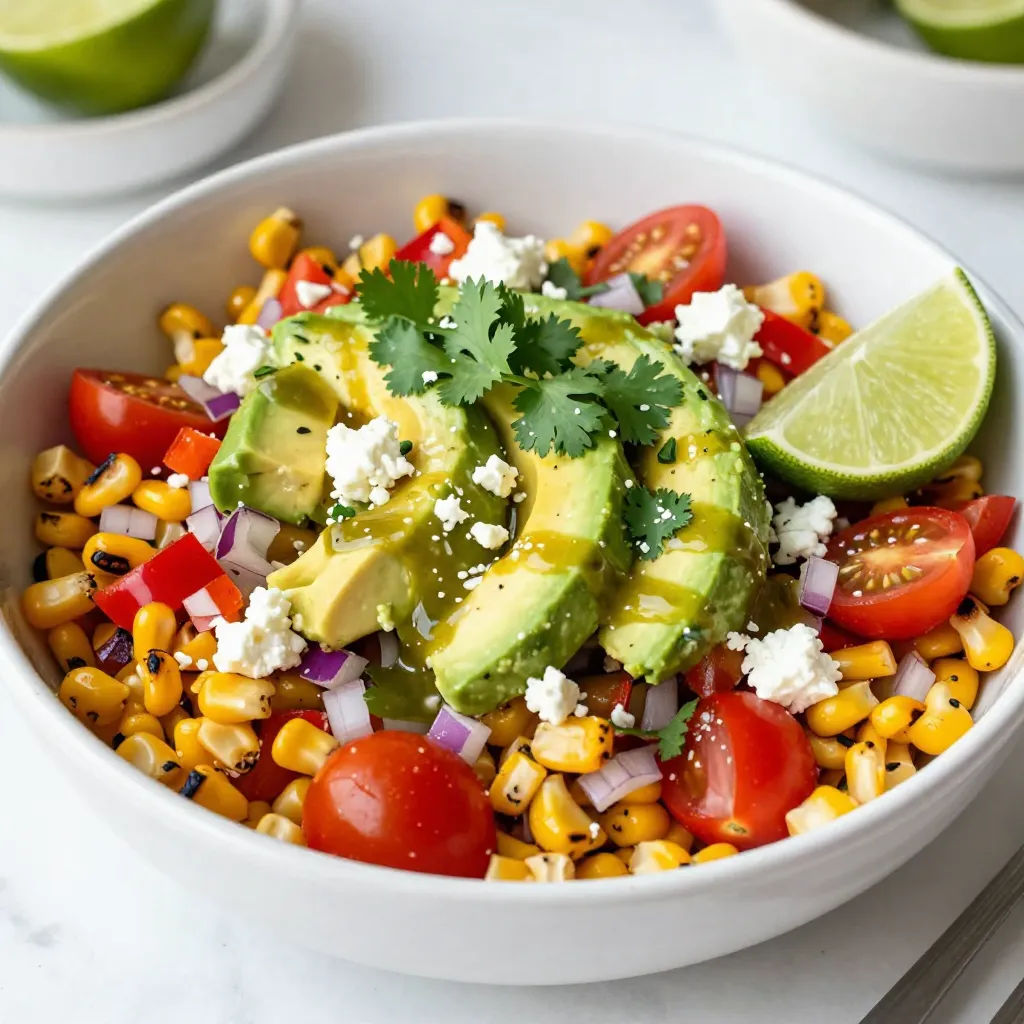
Are you ready to elevate your salad game? This Mexican Street Corn Salad packs vibrant flavors and is incredibly fresh,

Older posts
Newer posts
← Previous Page1 … Page7 Page8 Page9 … Page120 Next →

dsad

© 2026 recipetorch • Built with GeneratePress

Our Policies

  • Copyright Policy
  • Cookie Policy
  • GDPR Policy
  • Privacy Policy
  • Disclaimer
  • Terms Of Use

More Information

  • Home
  • About
  • Contact
  • Appetizers
  • Dessert
  • Dinner
  • Drinks
©2026, recipetorch About Back To Top