![- 12 string cheese sticks - 1 cup all-purpose flour - 2 large eggs, beaten - 1 cup breadcrumbs (use seasoned or panko for extra crunch) - 1 teaspoon garlic powder - 1 teaspoon onion powder - 1 teaspoon dried oregano - 1/2 teaspoon paprika - Salt and pepper to taste - Oil for frying (vegetable or canola) - Marinara sauce for dipping If you're out of string cheese, try mozzarella balls or cubes. You can also swap all-purpose flour for gluten-free flour. For a richer flavor, use whole eggs instead of beaten eggs. If you prefer a vegan option, check for vegan cheese and use a plant-based egg substitute. Always choose fresh cheese for the best taste. Look for cheese that is firm and not overly soft. When selecting breadcrumbs, pick those with no added sugars or preservatives. Opt for high-quality oil, as it directly affects the frying process. The oil should be fresh for the best flavor and frying results. Start by slicing each string cheese stick in half. You will get 24 shorter sticks. Lay them out on a baking sheet. Place this sheet in the freezer for about 30 minutes. Freezing the cheese helps it keep its shape when frying. While the cheese sticks freeze, prepare your breading area. Use three bowls for this: - In the first bowl, add the all-purpose flour. - In the second bowl, pour in the beaten eggs. - In the last bowl, mix breadcrumbs with garlic powder, onion powder, dried oregano, paprika, salt, and pepper. This mix gives a tasty coating. Once the cheese sticks freeze, remove them from the freezer. Follow this three-step breading method: - First, cover each stick in flour. - Next, dip it into the beaten eggs. - Lastly, roll it in the breadcrumb mix, pressing gently to stick well. Repeat this for all cheese sticks. For extra crunch, you can double-dip. Just coat them in egg and breadcrumbs again. In a deep skillet, heat oil over medium heat until it reaches 350°F (175°C). You can test the oil by sprinkling in a few breadcrumbs. If they sizzle, it’s ready. Fry the mozzarella sticks in batches. Do not overcrowd the pan. Cook each side for about 1-2 minutes, or until golden brown. Once fried, use a slotted spoon to lift them out. Place the sticks on a paper towel-lined plate to drain excess oil. Serve warm with marinara sauce for dipping. Enjoy your crispy and cheesy delight! [Full Recipe] To get that perfect crispy crust, choose the right breadcrumbs. I prefer using panko breadcrumbs. They add extra crunch and texture. Make sure to coat each stick well. Press the breadcrumbs onto the sticks gently. This helps them stick better. Fry in hot oil; the temperature should be around 350°F. If the oil is too cool, the sticks will soak up grease. The key to a gooey inside is freezing the cheese sticks before frying. Freezing allows the cheese to hold its shape. Slice your string cheese sticks in half and freeze them for 30 minutes. This way, the cheese melts slowly, giving you that cheesy pull when you bite in. Don’t rush this step! Many people skip the freezing step, which is a big mistake. It leads to messy frying and burnt cheese. Another common mistake is overcrowding the pan. Fry in small batches to keep the oil temperature steady. Also, remember to use a slotted spoon to drain excess oil. This helps keep them crispy. For more details, check the Full Recipe. {{image_4}} You can enjoy mozzarella sticks without frying. Baking them makes them lighter. Preheat your oven to 400°F (200°C). After breading the sticks, place them on a baking sheet. Use parchment paper for easy cleanup. Spray the sticks lightly with cooking oil. Bake for 10-12 minutes. This method gives you a crispy texture with less oil. Want to spice things up? Add some heat! Mix cayenne pepper into your breadcrumbs. Or, try adding red pepper flakes. For a fresh twist, mix in dried herbs like basil or thyme. You can even use Italian seasoning for more flavor. These variations keep the dish fun and exciting. While mozzarella is classic, you can try other cheeses. Cheddar gives a sharp taste, while pepper jack adds heat. Gouda melts beautifully and adds a rich flavor. If you're vegan, use plant-based cheese sticks. Each cheese brings a unique twist to your sticks. Choose what you love! For the full recipe, check out the Irresistible Mozzarella Sticks section. To keep your mozzarella sticks fresh, cool them first. Place them in an airtight container. Store them in the fridge for up to three days. If you plan to eat them later, avoid stacking them to keep them from sticking together. When you reheat mozzarella sticks, you want them crispy again. Preheat your oven to 375°F (190°C). Place the sticks on a baking sheet. Bake for 10–12 minutes. This method helps keep them crunchy and gooey inside. Avoid microwaving, as it can make them soggy. If you want to store mozzarella sticks longer, freezing is a great option. After breading, lay the sticks on a baking sheet in a single layer. Freeze them for about 1 hour until firm. Then, transfer them to a freezer bag. They can stay frozen for up to three months. When ready to cook, fry them straight from the freezer for the best results. You can make these mozzarella sticks healthier by baking them instead of frying. Use a baking sheet lined with parchment paper. Spray the sticks lightly with cooking oil for a crispy finish. You can also use whole wheat flour and whole grain breadcrumbs for better nutrition. Adding herbs to the breadcrumb mixture boosts flavor without extra calories. Yes, you can freeze the cheesy sticks before frying. Freezing them helps the cheese hold its shape during cooking. After breading, place the sticks on a baking sheet and freeze for about 30 minutes. This step is key to avoiding gooey messes in the oil. You can fry them directly from the freezer for extra convenience. Marinara sauce is a classic choice for dipping. It adds a nice tangy contrast to the cheesy sticks. You can also try ranch dressing, garlic aioli, or even spicy marinara for a kick. For a unique twist, use pesto or a creamy cheese sauce. Choose your favorite, and enjoy every gooey bite! In this article, we explored how to make delicious mozzarella sticks. I covered the key ingredients, preparation steps, and cooking techniques. You learned tips for the perfect crunch and gooey inside. I also shared healthier baking options and tasty flavor twists. Finally, I provided storage tips to keep your treats fresh. Making mozzarella sticks is fun and easy. These tips ensure satisfying results every time. Enjoy your cheesy creations!](https://recipetorch.com/wp-content/uploads/2025/05/65b06ded-2d9b-4641-a723-399e17247166.webp)
Irresistible Mozzarella Sticks Crispy and Cheesy Delight
Are you ready to take your snack game to the next level? These Irresistible Mozzarella Sticks are the ultimate treat:
Are you ready to take your snack game to the next level? These Irresistible Mozzarella Sticks are the ultimate treat:
. To start, you need to preheat your oven to 400°F (200°C). This temperature is key. It helps the meatballs cook evenly and get that nice brown color. While the oven heats, line a baking sheet with parchment paper. This step makes cleanup easy and stops the meatballs from sticking. Next, let’s prepare the meatball mixture. In a large bowl, combine the ground beef or turkey, chopped green onions, minced garlic, and ginger. Add breadcrumbs, soy sauce, brown sugar, sesame oil, gochujang, and black pepper. Mix everything well using your hands or a spatula. Aim for a sticky texture. This stickiness helps the meatballs hold together when you bake them. Now it's time to form the meatballs. Moisten your hands lightly to prevent sticking. Take a small portion of the mixture and roll it into a ball about 1 inch in size. Place each meatball on the lined baking sheet, keeping space between them. Bake the meatballs in the preheated oven for 18 to 20 minutes. They are done when they turn slightly brown and are cooked through. Enjoy the lovely aroma that fills your kitchen as they bake! For the complete recipe, check out the Full Recipe. To make sure your meatballs are just right, aim for an internal temperature of 160°F. You can check this with a meat thermometer. This ensures they are safe to eat and juicy. Overcooking can lead to dry meatballs. To avoid this, keep an eye on the time. Baking for 18-20 minutes usually works well. Want to kick up the flavor? You can adjust the spices. Add more gochujang for heat or extra garlic for a stronger taste. If you prefer some sweetness, mix in more brown sugar. A little honey can also add a nice touch. Balancing the heat and sweetness gives the meatballs depth. Serve your meatballs on a large platter. This makes them look inviting and fun to eat. Garnish with sesame seeds and chopped green onions for color. For dipping, you can pair them with more spicy mayo or soy sauce. If you want to get creative, serve them on skewers or in lettuce wraps. This adds a fun twist and makes them easy to grab! For the full recipe, check the link provided. {{image_4}} You can switch up the meat in Korean BBQ meatballs. Ground chicken or pork works great. Both have a mild taste, letting the spices shine. If you want a lighter option, try ground turkey. It pairs well with the flavors too. For a vegetarian or vegan twist, consider using lentils or chickpeas. You can mash them to form a meatball-like texture. Another option is using store-bought plant-based meat. These options let everyone enjoy the delicious flavors. Want to change the taste? You can add extra ingredients. Try incorporating chopped bell peppers or mushrooms for added texture. You could also mix in some grated carrot for a hint of sweetness. For an international twist, think about using different spices. Thai red curry paste adds a unique kick. Or, try Italian herbs for a fusion flavor. Each addition opens up exciting new possibilities. How you serve these meatballs can change the experience. You can place them on skewers for easy eating. This makes them a fun finger food for parties. Alternatively, serve the meatballs in crisp lettuce wraps. This gives a fresh crunch and is perfect for a lighter meal. You can also choose to serve them as an appetizer or a main dish. Pair them with rice or noodles for a full meal. For the full recipe, check out the complete instructions to make these delightful meatballs. To keep your Korean BBQ meatballs fresh, use airtight containers. Glass or plastic containers work well. You can also use heavy-duty freezer bags. Store the meatballs in the fridge for up to three days. After that, they may lose their flavor. When reheating, keep the meatballs moist. Use a microwave or oven for even heating. If using a microwave, cover the meatballs with a damp paper towel. This helps trap steam. For the oven, preheat it to 350°F (175°C). Heat for about 10 minutes until warmed through. To freeze meatballs, let them cool completely first. Then, place them in a single layer on a baking sheet. Freeze for about an hour. After that, transfer them to a freezer bag. Remove as much air as possible. When ready to eat, thaw them overnight in the fridge. You can also use the microwave for quick thawing. To make Korean BBQ meatballs gluten-free, swap out the soy sauce. Use gluten-free soy sauce or tamari instead. Substituting Ingredients You can also replace plain breadcrumbs with gluten-free breadcrumbs. This keeps the meatballs tasty and safe for those with gluten allergies. Recommended Brands I recommend brands like San-J for gluten-free soy sauce. Their products taste great and work well in recipes. Yes, you can make spicy mayo ahead of time. This will save you time on busy days. Storage Tips Store the spicy mayo in an airtight container in the fridge. It stays fresh for up to a week. Flavor Development Over Time Making it in advance allows the flavors to blend. This can make the mayo taste even better when you use it. You have many options for sides and drinks to enjoy with Korean BBQ meatballs. Side Dish Suggestions Serve these meatballs with rice, steamed vegetables, or a fresh salad. You could also add kimchi for a traditional touch. Beverage Pairings Pair them with a cold beer, sweet iced tea, or even a light red wine. These drinks enhance the flavors of the dish. For the complete details on making Korean BBQ meatballs with spicy mayo, check out the [Full Recipe](#). This blog post covered all you need to make tasty Korean BBQ meatballs. We explored the main ingredients, steps to prepare, and helpful tips for perfect results. You learned about spicy mayo, variations, and smart storage techniques. Enjoy making this dish your own with different meats and flavors. Remember, cooking is about fun and creativity! Happy cooking, and savor those delicious bites!](https://recipetorch.com/wp-content/uploads/2025/05/54b87b9b-89cd-44a9-b03c-e5172616781d.webp)
Are you ready to take your taste buds on an exciting journey? My Korean BBQ Meatballs with Spicy Mayo will
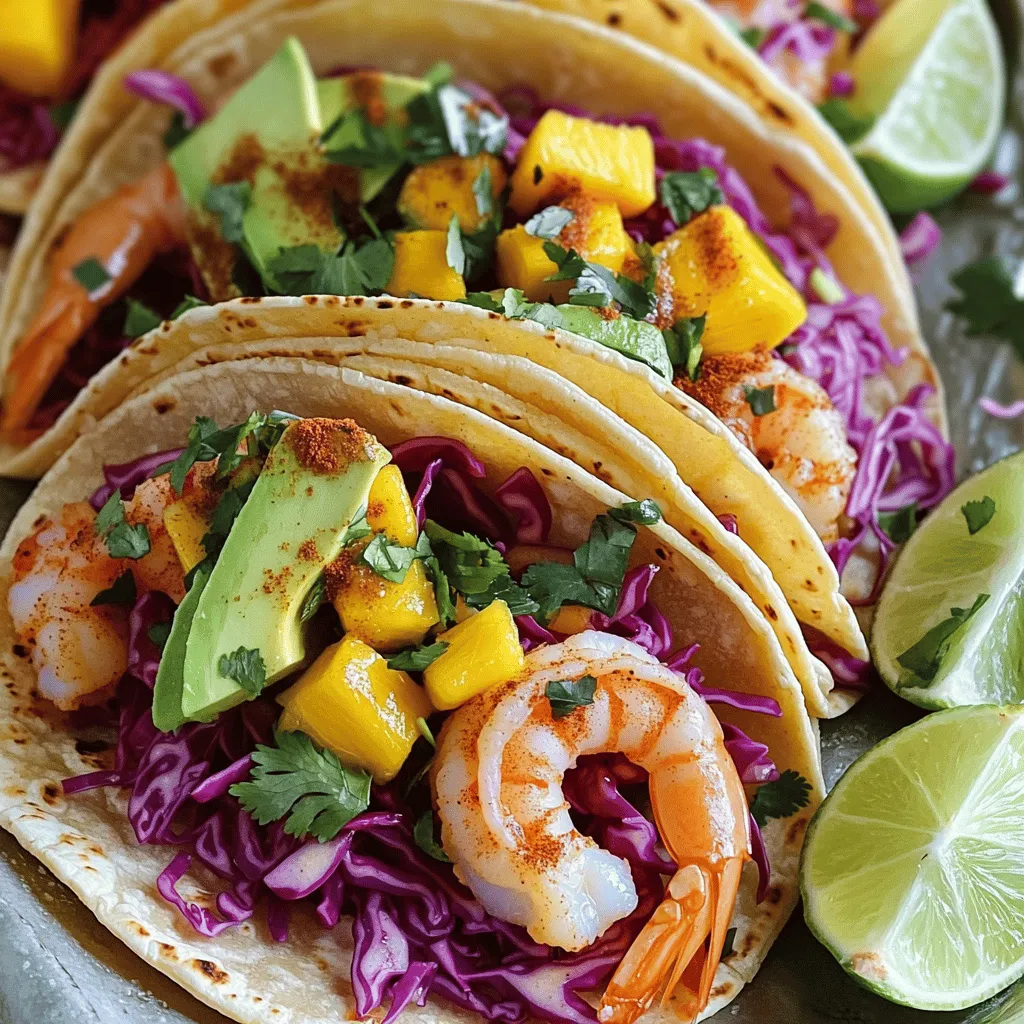
If you’re craving a quick and tasty meal, you’ve come to the right place! This popular shrimp recipe will transform
![For this tasty dessert, you need fresh ingredients. Here’s a quick list: - 2 cups fresh strawberries, hulled and sliced - 1 cup cream cheese, softened to room temperature You will also need some pantry staples. These are easy to find: - 1 cup granulated sugar, divided - 1 teaspoon pure vanilla extract - 1 cup all-purpose flour - 1 cup whole milk - 1/2 cup unsalted butter, melted - 2 teaspoons baking powder - 1/4 teaspoon salt To make your cake even better, consider these toppings: - Whipped cream, for serving (optional) - Fresh mint leaves, for garnish (optional) Each ingredient plays a big role in the flavor and texture of the cake. Fresh strawberries add a sweet and juicy touch. Cream cheese gives a rich and creamy layer. The sugar and vanilla enhance the sweetness. The flour, milk, and butter create a soft, fluffy cake. Baking powder helps it rise. You can find the full recipe for this dish [Full Recipe]. Enjoy making this delightful treat! First, you need to preheat your oven. Set it to 350°F (175°C). While the oven heats, grab a 9x13 inch baking dish. Lightly grease it with non-stick spray or butter. This step stops the cake from sticking. Now, let’s prepare the strawberries. Take 2 cups of fresh strawberries, hull, and slice them. In a medium-sized bowl, mix the strawberries with 1/4 cup of sugar. Toss them gently to coat. Set them aside for about 10 minutes. This lets the strawberries release their sweet juice. Next, we’ll make the cream cheese layer. In another bowl, beat 1 cup of softened cream cheese. Use an electric mixer or a whisk until it’s smooth. Gradually add the remaining 3/4 cup of sugar and 1 teaspoon of vanilla extract. Mix until everything is well blended and creamy. For the cake batter, take a large mixing bowl. Whisk together 1 cup of all-purpose flour, 2 teaspoons of baking powder, and 1/4 teaspoon of salt. Slowly pour in 1/2 cup of melted butter. Then, add 1 cup of whole milk while stirring. Mix until just combined. Be careful not to overmix, so your cake stays light and fluffy. Now comes the fun part: layering! Pour the cake batter into the greased baking dish. Smooth it out with a spatula. Next, spoon dollops of the cream cheese mixture over the batter. After that, layer the sugared strawberries on top. Don’t stir or mix; let the layers sit on each other. Finally, place the baking dish in the preheated oven. Bake for 45 to 55 minutes. The cake is ready when the top turns golden brown and a toothpick comes out clean. Once baked, let it cool for a few minutes. Enjoy it warm or at room temperature! To make your Strawberry Cheesecake Dump Cake fluffy, follow these tips. Mix the batter just until combined. If you overmix, the cake can become tough. Use room temperature butter and cream cheese. This helps them blend smoothly, creating a light texture. Bake until the top is golden brown. A toothpick should come out clean when inserted. Layering is key to a great dump cake. You can spread your cake batter in the dish first. Then, dollop the cream cheese mixture and strawberries on top. Another method is to mix the strawberries into the cream cheese layer. This gives you a marbled effect. Both methods taste great, so choose what you prefer. You can swap ingredients if needed. Use Greek yogurt instead of cream cheese for a lighter option. You can also use almond milk instead of whole milk for a dairy-free version. For a gluten-free cake, substitute all-purpose flour with a gluten-free blend. These swaps keep the cake tasty while meeting your dietary needs. For the complete preparation details, check out the Full Recipe. {{image_4}} You can switch up the fruit to fit your taste. Blueberries, raspberries, or even peaches work well. Just use the same amount as strawberries. They add a fresh burst of flavor. Each fruit gives a unique twist to the cake. Mix and match to find your favorite! Cream cheese is key in this recipe. But you can play with flavors! Try adding lemon zest for a bright note. Or mix in some chocolate for a rich taste. You can even use strawberry-flavored cream cheese. Each option changes the cake's vibe. Feel free to get creative here! If you need gluten-free, swap the all-purpose flour for a gluten-free blend. Many brands work great in cakes. For a dairy-free version, use vegan cream cheese. Coconut milk can replace whole milk. These changes keep the taste and texture yummy. You don’t have to miss out on this dessert! For the full recipe, check out the details above. After enjoying your Strawberry Cheesecake Dump Cake, store leftovers in an airtight container. Make sure to keep it in the fridge. It can last for up to three days. If you want to keep it longer, consider freezing it. This way, you can enjoy it later! To freeze the cake, first let it cool completely. Then, slice it into portions for easy serving. Wrap each piece in plastic wrap, then place them in a freezer-safe container. This will help keep the cake fresh. It can stay frozen for up to three months. Just label the container with the date. When you're ready to enjoy your frozen cake, remove it from the freezer. Let it thaw in the fridge overnight. If you want to serve it warm, you can reheat it in the oven. Preheat the oven to 350°F (175°C) and place the slices in for about 10-15 minutes. You can also use a microwave for quick reheating. Heat each slice for about 30 seconds. Enjoy it warm with whipped cream for the best flavor! A dump cake is a simple dessert. You mix ingredients and "dump" them into a pan. It usually has layers of fruit and cake mix. This cake is easy to make and requires no special skills. Just like the name suggests, you pour everything in without much fuss. This makes it perfect for busy days when you want something sweet. Yes, you can use frozen strawberries. Just thaw them first and drain any extra juice. This helps keep the cake from getting too soggy. The flavor will still be great, and your dump cake will taste delicious. Frozen fruit is also a handy option when fresh strawberries are not available. To make this cake ahead, follow the steps but do not bake it. Prepare the layers and place them in the baking dish. Cover it tightly with plastic wrap and store it in the fridge. You can bake it later when you are ready. Just remember to add a few extra minutes to the baking time if it’s cold from the fridge. This cake pairs well with whipped cream or vanilla ice cream. You can also add fresh mint leaves for a nice touch. If you like a crunch, sprinkle some crushed nuts on top. All these options will enhance the dessert's flavor and make it even more enjoyable. You now know how to make a delicious strawberry cheesecake dump cake, starting with fresh ingredients and pantry staples. I shared step-by-step instructions for a perfect bake. Remember to try my tips for texture and alternative methods to customize your cake. Don't forget the variations and storage tips for leftovers! Enjoy this sweet treat any time. Making this cake can be fun and easy, and I hope you feel ready to try it yourself!](https://recipetorch.com/wp-content/uploads/2025/05/3a3ee2c5-00cd-4203-90eb-e01f9009d6ff.webp)
If you love easy desserts that taste amazing, you’ll adore this Strawberry Cheesecake Dump Cake! This simple recipe combines rich
![- 12 oz linguine or fettuccine pasta - 1 lb large shrimp, peeled and deveined - 2 tablespoons extra virgin olive oil - 4 cloves garlic, minced - 1 teaspoon red pepper flakes (adjust more or less to your preference) - 1 cup cherry tomatoes, halved - 1 cup heavy cream - 1 cup grated Parmesan cheese, plus extra for serving - 1 tablespoon fresh lemon juice - Salt and freshly cracked black pepper to taste - Fresh basil leaves, chopped (for garnish) The key to my Marry Me Shrimp Pasta lies in these fresh ingredients. I always choose large shrimp. They add a delightful bite and absorb flavor well. I prefer linguine for its ability to hold the creamy sauce. You can also use fettuccine for a thicker noodle. Extra virgin olive oil brings a rich taste. Garlic adds warmth and depth. The red pepper flakes provide a lovely kick. Adjust the amount to fit your spice level. Cherry tomatoes bring sweetness and color. Heavy cream creates a luscious sauce. Grated Parmesan adds saltiness and creaminess. Fresh lemon juice brightens the dish. Don't forget salt and cracked black pepper to taste. Lastly, fresh basil leaves give it a beautiful finish. For the complete recipe, check out the Full Recipe link. It has all the steps and tips to make this dish shine! First, bring a large pot of salted water to a rolling boil. Add 12 ounces of linguine or fettuccine. Cook it until al dente, which usually takes about 8 to 10 minutes. Once done, drain the pasta but save about 1 cup of the pasta water for later. This water will help adjust the sauce later. In a large skillet, heat 2 tablespoons of extra virgin olive oil over medium-high heat. Add 1 pound of peeled and deveined shrimp to the pan. Season them with salt and freshly cracked black pepper. Cook the shrimp for about 2 to 3 minutes on each side. They should turn pink and opaque. Once cooked, take them out and set them on a plate. Now, we move on to the sauce! In the same skillet, lower the heat to medium. Add 4 cloves of minced garlic and 1 teaspoon of red pepper flakes. Sauté for about 1 minute, stirring often. This step is vital for flavor. You want the garlic to smell great but not brown. Next, toss in 1 cup of halved cherry tomatoes and cook for 2 more minutes until they soften a bit. Slowly pour in 1 cup of heavy cream while stirring. Let it simmer gently. Gradually mix in 1 cup of grated Parmesan cheese until it melts and thickens the sauce. Once your sauce is ready, it’s time to combine! First, gently fold the drained pasta into the skillet. Then, add the cooked shrimp and a tablespoon of fresh lemon juice. Toss everything together gently to coat the pasta and shrimp with the sauce. If the sauce seems too thick, add a splash of the reserved pasta water until it reaches your desired texture. Taste and adjust with extra salt and pepper if needed. After combining, remove the skillet from the heat. Serve the pasta in individual bowls. Garnish with chopped fresh basil for a pop of flavor and color. Enjoy your Marry Me Shrimp Pasta right away for the best taste. To get shrimp just right, cook them quickly. Heat your skillet over medium-high heat. Add shrimp and season with salt and pepper. Cook for 2-3 minutes on each side. They should turn pink and opaque. Don't walk away! Overcooked shrimp can get tough and rubbery. For pasta, aim for al dente. Bring salted water to a boil. Cook linguine or fettuccine as per package directions, usually 8-10 minutes. Before draining, save about a cup of that pasta water. It helps adjust the sauce later. To adjust spice levels, use red pepper flakes. Start with a teaspoon, and taste as you go. You can always add more if you like heat. This adds a nice kick without overpowering the dish. For depth in your sauce, think about adding a splash of white wine. It adds brightness and pairs well with shrimp. You can also toss in some chopped herbs like parsley or basil. They will enhance the overall flavor. Garnishing makes your dish pop! Top each serving with fresh basil and extra Parmesan cheese. It adds color and flavor. Place a lemon wedge on the side. This gives a touch of freshness and looks lovely. For a romantic dinner, serve the pasta in pretty bowls. Dim the lights and add candles. A nice side salad or garlic bread pairs well and rounds out the meal. If you want the full recipe, check out the detailed cooking steps mentioned earlier. {{image_4}} You can change up the main protein in this dish. If you want a different flavor, use chicken instead of shrimp. You can also use vegetables like bell peppers or zucchini for a lighter option. Both choices taste great in the sauce. For pasta, you can switch from linguine or fettuccine to whole wheat or gluten-free options. This way, you make the dish fit your needs while keeping it delicious. If you want a lighter sauce, try using less cream. You can substitute with milk or even a non-dairy option like almond milk. This still gives you creaminess without the heaviness. For more flavor, consider adding a splash of white wine. It adds a nice depth to the sauce. Just make sure to let it cook down a bit so the alcohol cooks off. Use seasonal veggies for a fresh twist. In spring, add asparagus or peas. In fall, try adding butternut squash or kale. This not only enhances flavor but also makes the dish colorful. If you have a special occasion, you can adapt the recipe too. Consider adding a sprinkle of truffle oil or a fancy cheese on top for a gourmet touch. These small changes can make your dinner feel extra special. To keep Marry Me Shrimp Pasta fresh, use airtight containers. Glass or plastic containers work well. Place the pasta in the fridge if you plan to eat it within three days. For longer storage, freeze it. In the freezer, it stays good for about two months. The quality may drop after this time, so enjoy it soon! When reheating, you want to keep the pasta moist. The best way is to use a skillet or a microwave. If using a skillet, add a splash of water or broth. Heat it over low heat, stirring often. For the microwave, cover the dish with a damp paper towel. This helps steam the pasta and keeps it from drying out. If the sauce thickens too much, add a little pasta water when reheating. This keeps the dish creamy and delicious. Yes, you can prep this dish ahead. Cook the pasta and shrimp separately. Store them in the fridge. Keep the sauce in an airtight container. When ready to eat, simply reheat each part. Combine them in a skillet on low heat. This way, you keep the flavors fresh. You have many tasty options. Try a simple green salad for a crunchy side. Garlic bread pairs well too. For wine, a crisp white like Pinot Grigio works great. It complements the flavors of the shrimp and cream nicely. If you love heat, add more red pepper flakes. You could also mix in diced jalapeños. Another option is to drizzle hot sauce over the finished dish. Adjust the spice to fit your taste. Just remember to start small, then add more if needed. The name comes from the dish's reputation. Many say it’s so good, it might inspire a proposal! It’s a fun way to describe how delicious it is. The dish has become popular for romantic dinners. For the complete recipe, check out the [Full Recipe]. It's easy to follow and will make your cooking fun! This blog post shared a simple and tasty recipe for Marry Me Shrimp Pasta. We covered key ingredients like shrimp, pasta, and spices. You now know how to cook pasta perfectly and create a flavorful sauce. You also learned tips for variations and storage. For your next dinner, try this dish to impress someone special. Cooking should be fun, so enjoy every step in the kitchen. Use fresh ingredients to make it shine! Happy cooking!](https://recipetorch.com/wp-content/uploads/2025/05/0cf186f0-d15c-4296-806c-99e022026677.webp)
If you’re looking for a meal that impresses, Marry Me Shrimp Pasta is the answer! This dish combines juicy shrimp,
![Sno Ball Brownies - 1 cup unsalted butter, melted - 2 cups granulated sugar - 4 large eggs - 2 teaspoons vanilla extract - 1 cup all-purpose flour - ¾ cup unsweetened cocoa powder - ½ teaspoon salt - 1 teaspoon baking powder - 1 cup mini marshmallows - ½ cup shredded coconut (choose between sweetened or unsweetened) - 1 cup chocolate frosting (store-bought or homemade) - Additional shredded coconut for garnish You can make these brownies gluten-free. Use a gluten-free flour blend instead of all-purpose flour. This swap keeps the texture nice. For a vegan version, replace the butter with a plant-based butter. You can also use flax eggs. Mix 1 tablespoon of ground flaxseed with 3 tablespoons of water for each egg. Let it sit for a few minutes to thicken. These substitutions let everyone enjoy the joy of Sno Ball Brownies! First, you need to preheat your oven. Set it to 350°F (175°C). While the oven heats up, grab a 9x13 inch baking pan. Lightly grease it with cooking spray or butter. Next, line the bottom with parchment paper. Make sure the paper hangs over the sides. This helps when you want to take the brownies out later. Now, let’s mix the batter. In a large bowl, pour in the melted unsalted butter. Add the granulated sugar and stir well. You want it to be smooth. Then, add the four large eggs one at a time. Mix well after each egg. This step adds richness. Next, pour in two teaspoons of vanilla extract for flavor. In another bowl, whisk together the dry ingredients. Combine one cup of all-purpose flour, three-quarters cup of unsweetened cocoa powder, half a teaspoon of salt, and one teaspoon of baking powder. Whisk until everything is mixed well. Now, slowly add the dry mix to the wet mix. Stir gently until just combined. A few flour streaks are okay. Now, fold in one cup of mini marshmallows. Make sure they are spread evenly in the batter. This will give you that gooey texture. Pour the batter into the prepared pan. Use a spatula to spread it evenly. Place the pan in the preheated oven. Bake for 25 to 30 minutes. To check if they are done, insert a toothpick in the center. If it comes out with a few moist crumbs, they are ready. Once baked, take the pan out and let the brownies cool completely on a wire rack. Cooling is key for the perfect texture. When they are cool, you can start frosting. Spread chocolate frosting generously across the top. Finally, sprinkle shredded coconut on top, pressing it gently to stick. For more details, check the [Full Recipe]. To get the best brownie texture, start with room temperature ingredients. This helps them mix well. Use melted butter, not too hot, to avoid cooking the eggs. Mix the wet and dry ingredients gently. Overmixing can make them tough. When baking, check them a few minutes early. A toothpick should have moist crumbs, not clean. One common mistake is not measuring ingredients correctly. Use a kitchen scale for accuracy. Also, don’t skip the cooling step. It helps the brownies set and makes cutting easier. If you forget the baking powder, the brownies may not rise. Lastly, make sure your oven is preheated. An unheated oven leads to uneven baking. For frosting, use a spatula to spread chocolate evenly. Start in the center and move outwards. If the frosting is too thick, warm it slightly. This makes it easier to spread. When adding coconut, press it down gently. This helps it stick to the frosting. For a fun touch, dip the edges in more coconut. It adds flair and flavor. For the full recipe, check the above section. {{image_4}} To make gluten-free Sno Ball Brownies, swap the all-purpose flour. Use a gluten-free blend instead. This blend usually works well in baked goods. Just be sure to check the label for the right mix. You can also add a bit of xanthan gum. This helps give the brownies a nice texture. For vegan Sno Ball Brownies, replace the eggs with flax eggs. Mix one tablespoon of ground flaxseed with three tablespoons of water. Let it sit for five minutes to thicken. Use a plant-based butter in place of unsalted butter. You can also choose a vegan chocolate frosting. This keeps the recipe fully plant-based while still delicious. You can add fun flavors to your brownies! For a minty twist, mix in mint extract. Start with half a teaspoon and taste as you go. For a fruity version, add raspberry puree to the batter. This adds a lovely tartness and color. You can even fold in peanut butter for a nutty flavor. Each change gives you a new treat! Check out the Full Recipe for all the details on how to make these yummy brownies. To keep your Sno Ball Brownies fresh, store them in an airtight container. Place parchment paper between layers to avoid sticking. Keep your brownies at room temperature for up to four days. If you want to keep them longer, refrigeration can help, but it may change their texture. You can freeze these brownies for up to three months. Cut them into squares and wrap each piece tightly in plastic wrap. Then, place them in a freezer-safe bag. When you are ready to enjoy them, just remove them from the freezer. Let them thaw in the fridge or at room temperature. For a warm treat, reheat brownies in the microwave. Heat them for about 10-15 seconds. Check to ensure they are not too hot. You can also warm them in the oven at 350°F for about 5-10 minutes. Enjoy them with a scoop of ice cream or a drizzle of chocolate sauce for extra fun! To check if your brownies are ready, insert a toothpick into the center. If it comes out with a few moist crumbs, they are done. If it has wet batter, they need more time. Bake for 25-30 minutes. The edges should look set, but the center may still look soft. This ensures a fudgy texture. Absolutely! You can use any frosting you like. Cream cheese frosting adds a nice tang. Peanut butter frosting gives a rich flavor. You can even use a simple glaze for a lighter touch. Just make sure it pairs well with the coconut and chocolate. When stored in an airtight container, these brownies last about 4 to 5 days at room temperature. For longer storage, you can freeze them. Wrap each brownie in plastic wrap and then place them in a freezer bag. They will stay fresh for up to 3 months. You learned how to make delicious brownies using essential ingredients and simple steps. We covered substitutions for gluten-free and vegan options. I shared tips for the perfect texture and how to avoid mistakes. You can also explore flavor variations and storage tips. Brownies are fun to bake and share. Now, it’s your turn to try these recipes. Enjoy your baking journey and treat yourself to sweet rewards!](https://recipetorch.com/wp-content/uploads/2025/05/11a9fce6-93d4-4576-b261-c7de428301e4.webp)
Craving a sweet treat that’s both chewy and fluffy? You’ll fall in love with my Sno Ball Brownies! This dessert
![To make Huli Huli Chicken, gather the following fresh ingredients: - 4 boneless, skinless chicken thighs - 1/4 cup soy sauce - 1/4 cup brown sugar - 2 tablespoons ketchup - 2 tablespoons apple cider vinegar - 2 tablespoons freshly grated ginger - 3 cloves garlic, minced - 1 teaspoon sesame oil - 1/2 teaspoon freshly ground black pepper - 1/4 teaspoon cayenne pepper (optional, for a spicy kick) - 1/4 teaspoon cayenne pepper (adds heat) - 1 fresh pineapple, cut into rings - 2 green onions, finely chopped (for garnish) This combination of ingredients creates a sweet and tangy marinade that pairs perfectly with the chicken. The optional cayenne pepper adds a nice kick if you enjoy some spice. The fresh pineapple adds a tropical touch and balances the flavors beautifully. You can find the complete preparation details in the Full Recipe provided above. Enjoy the grilling process and the delightful aromas that will fill your kitchen! Marinating the Chicken First, grab a medium bowl. Combine the soy sauce, brown sugar, ketchup, apple cider vinegar, grated ginger, minced garlic, sesame oil, black pepper, and cayenne pepper if you want it spicy. Whisk these ingredients until the sugar dissolves. Place your chicken thighs in a resealable bag or a shallow dish. Pour half the marinade over the chicken. Make sure every piece is coated. Seal the bag or cover the dish with plastic wrap. Refrigerate for at least one hour or up to overnight. The longer it sits, the better the flavor. Preparing the Marinade You’ll want to save the remaining marinade. This will go on your grilled chicken later for more flavor. Just set it aside for now. Remember, it’s important to discard any used marinade that touched raw chicken. Grill Setup and Cooking Preheat your grill or grill pan to medium heat. Clean and lightly oil the grill grates to prevent sticking. Once the grill is hot, take the chicken out of the marinade. Discard the used marinade. Place the chicken thighs on the grill. Cook for about 6-7 minutes on one side. Then flip and cook for another 6-7 minutes. The chicken is ready when it reaches an internal temperature of 165°F (75°C). Grilling the Pineapple While the chicken grills, prepare the pineapple. Brush the pineapple rings lightly with oil. Place them on the grill for about 2-3 minutes on each side. Look for nice grill marks and caramelization. This adds sweetness and flavor to your dish. Plating Tips Once both the chicken and pineapple are done, take them off the heat. Let the chicken rest for a few minutes. This keeps it juicy. Slice the grilled chicken into bite-sized pieces. Arrange the chicken on a serving platter. Place the grilled pineapple rings around it. Drizzling Additional Marinade Now, drizzle the reserved marinade over the chicken. This adds an extra layer of flavor. For a fresh touch, garnish with finely chopped green onions. They add a nice crunch and color to your dish. Enjoy your Huli Huli Chicken! For the complete recipe, check the [Full Recipe]. Recommended Marinade Time I suggest marinating chicken thighs for at least one hour. For the best flavor, try to marinate overnight. This helps the chicken soak up all those tasty ingredients. How to Enhance Flavor To boost flavor, add some fresh herbs like cilantro or basil. You can also mix in some lime or orange juice for a zesty kick. This will give your Huli Huli chicken a bright and fresh taste. Avoiding Sticking on the Grill Make sure your grill is hot and clean. Before adding chicken, brush the grates with oil. This simple step keeps the chicken from sticking and helps create those beautiful grill marks. Ensuring Proper Cooking Temperature Aim for a medium heat when grilling. This ensures the chicken cooks evenly. Use a meat thermometer to check the internal temperature. It should reach 165°F (75°C) for safety. If you don’t have one, cut into the chicken to check it’s no longer pink inside. Remember to let the chicken rest for a few minutes after grilling. This keeps it juicy and tender. For the full recipe, check out the detailed instructions above! {{image_4}} Alternative Proteins If you want to try different proteins, use pork or tofu. Both absorb the marinade well. For a lighter option, chicken breasts work too. They may cook faster, so keep an eye on them. Different Marinade Options Feel free to mix up the marinade! You can use honey instead of brown sugar for sweetness. Try adding lime juice for a zesty twist. Switch soy sauce for coconut aminos if you want a soy-free option. Oven-Baked Version You can bake Huli Huli chicken if you can't grill. Preheat your oven to 400°F (200°C). Place the marinated chicken on a baking sheet. Bake for 25-30 minutes, turning halfway for even cooking. Always check the internal temperature; it should reach 165°F (75°C). Skillet Cooking for Indoor Preparation A skillet is a great indoor choice. Heat a bit of oil in a large skillet over medium heat. Add the marinated chicken and cook for 6-7 minutes on each side. The chicken will get nice and brown. Don't forget to check the temperature for doneness! To keep your Huli Huli chicken tasty, store it right. - Use airtight containers for storage. - Let the chicken cool to room temperature before sealing. - Refrigerate within two hours after cooking. - It lasts up to four days in the fridge. When it's time to enjoy leftovers, reheating matters. - Use a skillet to keep the chicken juicy. - Heat over medium-low heat for about 5-7 minutes. - Add a splash of water or broth to keep it moist. Avoid overcooking by checking the temperature. Aim for 165°F (75°C). You can also use a microwave. Cover the chicken with a damp paper towel. This helps keep moisture in. This way, your Huli Huli chicken stays delicious, just like the first time! For more details, check the Full Recipe. What is the origin of Huli Huli Chicken? Huli Huli Chicken comes from Hawaii. It was created by a man named Ernest Morgado in the 1950s. He cooked chicken over an open flame, using a special sauce. The word "huli" means "to turn" in Hawaiian. This refers to turning the chicken while it cooks. The dish became popular at local events and luaus. Can I make this recipe ahead of time? Yes, you can make this recipe ahead of time. Marinate the chicken the night before. This helps the flavors soak in well. You can also grill the chicken and pineapple early, then store them in the fridge. Reheat when ready to serve. Can I use chicken breasts instead of thighs? Yes, you can use chicken breasts. They are leaner than thighs, so they may dry out faster. Keep an eye on the cooking time. Cook them for about 5-6 minutes on each side. What can I serve with Huli Huli Chicken? You can serve many sides with Huli Huli Chicken. Here are a few ideas: - Steamed rice - Grilled vegetables - Coleslaw - Coconut rice - Fresh salad Is Huli Huli Chicken spicy? Huli Huli Chicken is not very spicy. The recipe includes cayenne pepper, but it is optional. You can skip it if you want a milder flavor. The sweetness from the brown sugar and pineapple balances the taste. Is this dish gluten-free? Huli Huli Chicken can be gluten-free. Simply use gluten-free soy sauce instead of regular soy sauce. This small change makes it safe for those avoiding gluten. Always check labels for any hidden gluten ingredients. For the complete recipe, you can refer to the Full Recipe section above. This blog post covered everything you need for perfect Huli Huli Chicken. We talked about the ingredients, from the marinade to garnishes. I shared step-by-step instructions for marinating, grilling, and serving. You also learned tips for optimal marinating and grilling techniques, plus variations for cooking and storing. In closing, cooking this dish can be fun and tasty. Try different ingredients and methods to find your favorite. Enjoy making this delicious meal!](https://recipetorch.com/wp-content/uploads/2025/05/e27c0502-5b6e-41d9-ab06-25acd6d678b7.webp)
Are you ready to elevate your grilling game? Huli Huli Chicken is a tasty and fun dish everyone loves. In
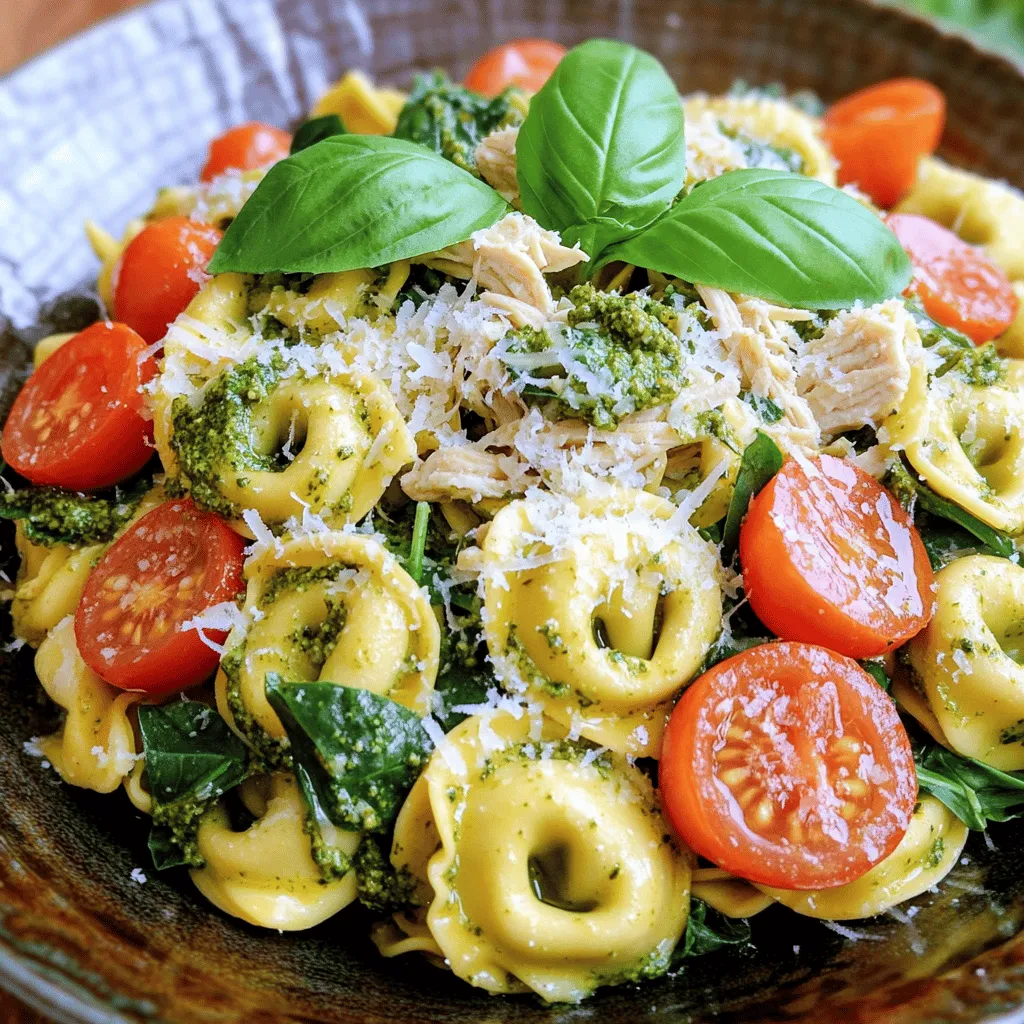
Looking for a quick and tasty meal? Let me introduce you to Pesto Chicken Tortellini. This dish combines tender tortellini
![- 8 oz cream cheese, softened - 1/2 cup sour cream - 1/4 cup honey - 2 tablespoons hot honey - 1 tablespoon lemon juice - 1 teaspoon garlic powder - 1/2 teaspoon smoked paprika - Salt and black pepper to taste - Chives or parsley for garnish - Assorted dippers (pretzels, crackers, apple slices) In this recipe, I use cream cheese as the base. It gives a rich, smooth texture. Sour cream adds a bit of tang, balancing the sweetness. Honey and hot honey bring a sweet and spicy kick that is hard to resist. The lemon juice brightens all the flavors. For seasonings, garlic powder adds depth. Smoked paprika gives a hint of smokiness. Adjust salt and pepper to your taste. You want a mix that feels right for your palate. Garnishing with chives or parsley is a great idea. It makes the dip look fresh and inviting. Choose dippers like pretzels or apple slices. They complement the dip well. You can find the full recipe with all these details to help you create this delicious dip! Start by taking 8 oz of softened cream cheese and 1/2 cup of sour cream. Place them in a medium mixing bowl. Use a hand mixer or a sturdy whisk to beat them together. Mix until the cream cheese and sour cream become smooth and creamy. Make sure there are no lumps left. This step sets a solid base for your dip. Next, it’s time to add flavor. Slowly mix in 1/4 cup of honey and 2 tablespoons of hot honey. Then squeeze in 1 tablespoon of fresh lemon juice. Sprinkle in 1 teaspoon of garlic powder and 1/2 teaspoon of smoked paprika. Blend these ingredients together at a low speed. Keep mixing until everything is silky smooth and well combined. Now, taste your dip! Add salt and freshly cracked black pepper to suit your liking. If you want it sweeter or spicier, add more honey or hot honey. Once seasoned, transfer the dip to a serving bowl. Use a spatula to smooth the top for a polished look. For a fresh touch, sprinkle chopped chives or parsley on top. Finally, arrange your assorted dippers around the bowl for a fun and inviting presentation. Enjoy your hot honey cream cheese dip! For the full recipe, check the detailed instructions above. To get that perfect creamy texture, let your cream cheese sit out. Make sure it is at room temperature before mixing. Cold cream cheese can leave lumps in your dip. Softening it helps everything blend smoothly. This small step makes a big difference. You can play with the honey levels to match your taste. If you want more sweetness, add extra honey. For a spicier kick, use more hot honey. Taste as you go. This way, you create a dip that suits your palate just right. Make your dip look as good as it tastes! Use fresh herbs like chives or parsley as a garnish. This adds color and freshness. Arrange your dippers in a fun way around the dip. Create a platter that invites everyone to enjoy. For the full recipe, check out the earlier section. {{image_4}} You can boost the flavor of your dip in simple ways. Try adding chopped jalapeños for extra heat. This spice gives the dip a nice kick. If you prefer a fresh taste, incorporate herbs like dill. Dill adds a unique flavor and makes the dip more interesting. If you need a vegan option, substitute cream cheese with vegan alternatives. There are many great brands that taste amazing. You can also use Greek yogurt for a lighter dip. Greek yogurt keeps the creaminess but reduces calories. Think outside the box for serving this dip! Serve with seasonal veggies or pita chips for a crunchy contrast. Fresh veggies like carrots or bell peppers work great. For a sweet twist, pair with fruits like pears. The sweet and spicy mix is truly delightful. For the full recipe, be sure to check out the [Full Recipe]. After you enjoy this hot honey cream cheese dip, store any leftovers in an airtight container in the fridge. This keeps it fresh and tasty for later snacking. The dip is best consumed within 3-5 days. This timeframe ensures you enjoy it at its peak flavor and texture. If you want to serve the dip warm again, simply warm it gently in the microwave. Make sure to do this in short bursts, stirring in between. This keeps it creamy and delicious. Hot honey is honey infused with heat. It blends sweetness with a spicy kick. You can buy it or make it at home. To make your own, add red pepper flakes to honey and let it sit. This process gives the honey a rich flavor that pairs perfectly with many dishes. Yes, you can make this dip ahead of time. Prepare the dip and store it in an airtight container. Keep it in the fridge for up to three days. When you are ready to serve, just take it out and let it sit at room temperature for a bit. You have many options for dippers! Here are a few ideas: - Pretzels - Crackers - Apple slices - Carrot sticks - Celery sticks - Pita chips These dippers enhance the creamy dip and create fun flavor pairings. Enjoy! This blog covered a simple and tasty hot honey cream cheese dip. We talked about the main ingredients, key seasonings, and how to prepare it step by step. I shared tips for creamy texture and flavor adjustments, plus ideas for different dippers. Remember, you can make this dip your own with fresh herbs or spicy add-ins. Store any leftovers well, but enjoy it within a few days. This dish is sure to impress at any gathering!](https://recipetorch.com/wp-content/uploads/2025/05/ffd65ee9-6dcb-475d-9430-09cd56929ba1.webp)
Looking for a new crowd-pleaser? This Hot Honey Cream Cheese Dip is your answer! It’s creamy, sweet, and just the
![- 1 lb (450g) fresh shrimp, peeled and deveined - 3 tablespoons unsalted butter - 4 cloves garlic, finely minced - 1 cup heavy cream - 1/2 cup grated Parmesan cheese - 1/2 cup shredded mozzarella cheese - 1/4 cup seasoned breadcrumbs - Salt and black pepper to taste - 2 tablespoons fresh parsley, finely chopped - Lemon wedges, for serving Fresh shrimp is key for this dish. I love using shrimp that is sweet and fresh. The unsalted butter gives a rich flavor. Garlic adds a nice kick and aroma. Use fresh garlic for the best taste. For the creamy sauce, heavy cream is essential. It binds all the flavors together perfectly. Parmesan cheese adds a salty depth, while mozzarella gives a gooey texture. The seasoned breadcrumbs create a crunchy topping that contrasts well with the creamy shrimp. Don’t forget the seasonings! A little salt and black pepper can enhance all the flavors. If you love spice, add red pepper flakes to the shrimp when cooking. As for garnish, fresh parsley brightens the dish. Lemon wedges serve as a zesty finish. A squeeze of lemon right before eating takes this dish to another level. For the complete guide to making this dish, check out the Full Recipe. - Preheat the oven to 400°F (200°C). - Grease the baking dish with cooking spray or butter. - In a large skillet, melt 3 tablespoons of butter over medium heat. - Add 4 cloves of minced garlic and 1/2 teaspoon of red pepper flakes. Sauté for 1-2 minutes. - Next, add 1 pound of peeled and deveined shrimp. Cook until pink, about 3-4 minutes. - Season lightly with salt and black pepper to taste. - Stir in 1 cup of heavy cream, letting it simmer for 2-3 minutes. - Gradually add 1/2 cup of grated Parmesan cheese until melted. - Transfer the shrimp and cream mixture into the greased baking dish. - In a small bowl, mix 1/4 cup of seasoned breadcrumbs and 1/2 cup of shredded mozzarella cheese. Sprinkle this on top. - Place the baking dish in the preheated oven. Bake for 15-20 minutes until golden brown and bubbly. - Cool slightly before garnishing with 2 tablespoons of freshly chopped parsley. Enjoy your flavorful Garlic Shrimp Gratin using this step-by-step guide! For the complete recipe, check [Full Recipe]. To make your Garlic Shrimp Gratin even better, try some flavor swaps. You can use different cheeses to change the taste. For example, swapping mozzarella for Gouda adds a nice twist. Fresh herbs also boost the flavor. Try parsley, basil, or thyme. They will add a fresh touch to your dish. Cooking shrimp properly is key. Overcooking makes shrimp tough and chewy. Cook them just until they turn pink and opaque. This usually takes about 3-4 minutes. You can also adjust the spice level with red pepper flakes. If you want it spicier, add more flakes. For a milder version, use less. Serving is half the fun! Add lemon wedges for a bright, tangy finish. The squeeze of lemon really brightens the dish. Use a colorful serving dish to make it pop. This adds visual appeal and makes your meal feel special. For the full recipe, check the main article. {{image_4}} You can switch up the seafood in this dish. Try using scallops or lobster for a seafood medley. Both options add a rich taste. You can also sneak in some veggies. Incorporate spinach or artichokes for added nutrients and color. If you need to make it gluten-free, swap regular breadcrumbs for gluten-free ones. This keeps the dish tasty and safe for everyone. For a lighter version, consider using low-fat cream options. This small change makes a big difference without losing flavor. To mix up the flavors, experiment with different herbs. Basil or cilantro can add fresh notes. A splash of white wine can elevate the dish too. This simple addition brings a gourmet twist that will impress your guests. Store leftovers in an airtight container in the fridge. This keeps the dish fresh. It tastes best within 2-3 days. If you try to save it longer, the shrimp might lose its flavor. You can freeze this dish before baking. It lasts for up to 2 months. To cook, thaw it in the fridge overnight. This helps maintain the texture of the shrimp. To reheat, set your oven to 350°F (175°C). Place the dish inside until it warms through. Avoid using the microwave. This keeps the bread topping crispy and delicious. Enjoy the great taste of garlic shrimp gratin every time you heat it! Want the full recipe? Check out the details above! Prep time is 15 minutes. Cook time is 20 minutes. Total time is 35 minutes. Yes, you can prepare the dish up to the baking step. Just refrigerate or freeze it. You can pair it with crusty bread, rice, or a fresh salad. This makes a complete meal. Yes, you can use frozen shrimp. Just make sure they are thawed thoroughly before cooking. For more details, check the Full Recipe. This blog post shared a delicious recipe for Garlic Shrimp Gratin. You learned about fresh ingredients, cooking methods, and tips for great flavor. You can swap proteins, try new cheeses, or adjust for dietary needs. Remember to store leftovers properly and enjoy them later. With these insights, you can impress friends and family with your cooking skills. Simple steps make this dish easy and fun. Now, gather your ingredients and start cooking!](https://recipetorch.com/wp-content/uploads/2025/04/cda93a2a-94f1-4833-a708-4004bcd0a42a.webp)
Are you ready to impress your family or friends with a dish that shines? My Delicious Garlic Shrimp Gratin is
