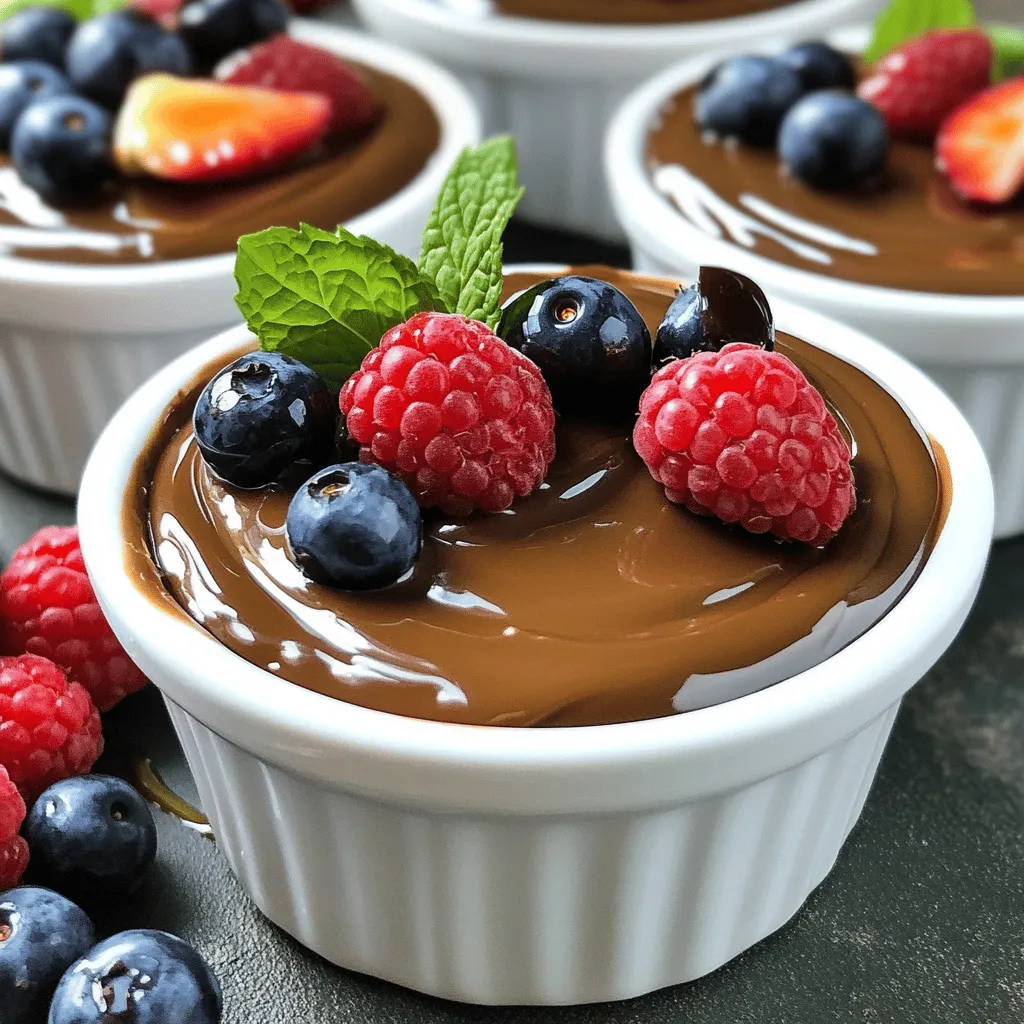
Vegan Chocolate Avocado Mousse Rich and Creamy Delight
Are you ready to indulge in a rich, creamy delight that’s good for you? This Vegan Chocolate Avocado Mousse combines
Are you ready to indulge in a rich, creamy delight that’s good for you? This Vegan Chocolate Avocado Mousse combines
![To make cheesy stuffed bell peppers, gather these main ingredients: - 4 large bell peppers (your choice of color) - 1 cup cooked quinoa or rice - 1 cup black beans, drained and rinsed - 1 cup corn (can be fresh, frozen, or canned) - 1 cup diced tomatoes (either canned or fresh) - 1 teaspoon ground cumin - 1 teaspoon chili powder - 1 teaspoon garlic powder - Salt and pepper to taste - 1 ½ cups shredded cheese (such as cheddar, Monterey Jack, or a flavorful blend) - 2 tablespoons extra virgin olive oil - Fresh cilantro or parsley for garnish (optional) These ingredients create a hearty and delicious meal. The quinoa or rice adds a nice base, while black beans and corn bring texture. You can customize your stuffed peppers with these optional ingredients: - Cooked ground beef or turkey for added protein - Chopped onions or bell peppers for extra flavor - Spinach or kale for some greens - Avocado or sour cream for a creamy topping - Hot sauce for a spicy kick Feel free to mix and match based on what you have at home. This makes each meal unique and fun! Choosing the right cheese is key for a great melt. Here are some recommended types: - Cheddar: Sharp and melty, perfect for flavor. - Monterey Jack: Mild and creamy, great for melting. - Mozzarella: Stretchy and gooey, adds a nice texture. - Pepper Jack: Adds a spicy twist with its pepper bits. Using a blend of these cheeses can enhance the flavor and texture of your stuffed peppers. Enjoy experimenting to find your favorite combination! For the complete recipe, check out the Full Recipe. First, you need to get your bell peppers ready. Choose four large bell peppers in any color you like. Cut off the tops carefully, and remove the seeds and membranes inside. This step helps the peppers cook evenly and makes room for the tasty filling. Brush the outside of each pepper lightly with olive oil. This adds flavor and helps them brown nicely. Place the peppers upright in a baking dish, waiting for their cheesy stuffing. Now, let's create the filling. In a large mixing bowl, combine one cup of cooked quinoa or rice, one cup of black beans (drained and rinsed), one cup of corn, and one cup of diced tomatoes. Add one teaspoon of ground cumin, one teaspoon of chili powder, one teaspoon of garlic powder, and salt and pepper to taste. Mix it all together well. To make it cheesy, stir in half of the shredded cheese. This mixture is both hearty and full of flavor. Next, it's time to stuff those peppers. Generously fill each pepper with the cheesy quinoa mixture. Press down gently to pack it in. After that, sprinkle the remaining shredded cheese on top of each pepper. Cover the baking dish tightly with aluminum foil. Bake in your preheated oven at 375°F for 25 minutes. After that, remove the foil and continue baking for another 10 to 15 minutes. This helps the peppers become tender, and the cheese will melt into a bubbly, golden topping. Once done, let them cool for a bit before you dig in. Enjoy your cheesy stuffed bell peppers! For the full recipe, check out the earlier section. To get the best texture, choose firm bell peppers. They hold up better when baked. You want them to be soft but not mushy. Before you stuff them, brush the outside with olive oil. This helps them roast nicely. Bake them covered for the first part. This traps steam, making them tender. Uncover them at the end to let the cheese brown. One big mistake is overcooking the peppers. Keep an eye on the baking time. You don’t want them to fall apart. Another mistake is not seasoning well. Always add salt and pepper to your stuffing. Taste it before you stuff the peppers. If you skip this step, the flavors may not pop. Don’t forget to pack the filling tightly. This keeps everything together during cooking. Using fresh herbs can make a huge difference. Try adding chopped cilantro or parsley for a bright touch. You can also mix in some fresh basil or oregano. They add depth to your dish. For a kick, consider some crushed red pepper flakes. A squeeze of lime juice can brighten the flavors too. Spice it up to suit your taste. These little tweaks make your Cheesy Stuffed Bell Peppers stand out. For the full recipe, check the earlier section. {{image_4}} Cheesy stuffed bell peppers are great as a vegetarian dish. You can use beans and grains for protein. If you want meat, try ground beef or turkey. Cook the meat first, then mix it with the other stuffing. This adds flavor and heartiness to the dish. You can also mix meats with beans for a tasty twist. This recipe is easy to make gluten-free. Use quinoa or rice as your base. Both are naturally gluten-free. Make sure your cheese does not contain gluten. Most shredded cheeses are safe, but check the label. You can also add gluten-free sauces for extra flavor. You can give your stuffed peppers an international flair. For a Mexican twist, add taco seasoning and corn. Top with avocado and salsa after baking. For a Mediterranean flavor, try using olives and feta cheese. You can even add herbs like oregano or basil. These flavors change the dish while keeping it fun. For more details on how to make these tasty variations, check the Full Recipe. After enjoying your cheesy stuffed bell peppers, store leftovers in an airtight container. Place them in the fridge if you plan to eat them within three days. This keeps them fresh and tasty. Make sure the peppers are cool before sealing the container. To reheat your cheesy stuffed bell peppers, use the oven for the best results. Preheat your oven to 350°F (175°C). Place the peppers in a baking dish and cover them with foil. Heat for about 15 minutes until warm. You can also use a microwave for quick reheating. Just place a pepper on a plate and heat for 1-2 minutes. You can freeze cheesy stuffed bell peppers if you want a meal for later. Wrap each pepper in plastic wrap. Then, place them in a freezer-safe bag or container. They can last up to three months in the freezer. When you're ready to eat, thaw them in the fridge overnight. Then, reheat in the oven or microwave as mentioned above. For more details, check the full recipe. Yes, you can use other grains! Barley, farro, or couscous work well as substitutes. Each grain offers a unique taste and texture. For a twist, try using lentils or bulgur. These options add more protein and fiber. Experiment with what you have on hand. To keep your stuffed peppers firm, follow these tips: - Pre-cook the filling: This helps remove excess moisture. - Use less liquid: Drain canned tomatoes or any wet ingredients well. - Bake uncovered: This allows steam to escape, keeping peppers crisp. - Don’t overstuff: Fill them just right to avoid overflow. These steps will help you achieve that perfect texture. Cheesy stuffed bell peppers pair well with a variety of sides. Consider these options: - Simple salad: A fresh green salad adds crunch. - Rice or quinoa: Serve a small portion on the side for extra grains. - Salsa: A zesty salsa brings extra flavor. - Guacamole: Creamy guacamole complements the dish nicely. These sides enhance the meal and add variety to your plate. For the full recipe, check out [Full Recipe]. Cheesy stuffed bell peppers are fun to make and tasty to eat. This blog covers all you need: main and optional ingredients, steps to prepare, tips for the best results, and ways to customize. You can even explore vegetarian and gluten-free options for a personal touch. Remember, using the right cheese and avoiding common mistakes will make your dish shine. Always store leftovers properly. With these tricks and ideas, you’ll enjoy making and sharing delicious stuffed peppers with everyone. Happy cooking!](https://recipetorch.com/wp-content/uploads/2025/05/fc094153-7d17-40c4-87af-52f95fe65047.webp)
Looking for an easy and tasty meal? Cheesy stuffed bell peppers are your answer! They are fun to make and

Are you ready to bake up some joy? Peanut Butter Chocolate Chip Cookies are one of my favorite treats. They’re
![To make a delightful creamy mushroom risotto, you will need: - 1 ½ cups Arborio rice - 4 cups vegetable broth - 1 cup fresh mushrooms (cremini and shiitake), sliced - 1 small onion, finely chopped - 2 cloves garlic, minced - 1 cup heavy cream - ½ cup Parmesan cheese, grated - 2 tablespoons olive oil - 2 tablespoons unsalted butter - Salt and pepper to taste - Fresh parsley, chopped (for garnish) Using fresh ingredients makes a big difference. Fresh mushrooms add rich flavor and depth. They bring an earthy, umami taste that dried mushrooms simply cannot match. The flavor of fresh garlic and onion enhances the dish. Fresh herbs like parsley give a burst of color and brightness. They make your risotto not only taste amazing but look good too. Fresh ingredients mean better taste and texture. It’s worth the trip to the market or store. You can make this risotto your own by swapping ingredients. Don’t have Arborio rice? Try Carnaroli or Vialone Nano; they work well too. For a lighter version, use half-and-half instead of heavy cream. If you want a vegan option, swap the cream and cheese for plant-based alternatives. Use vegetable broth that is low-sodium to control salt levels. Feel free to mix in any mushrooms you like, such as portobello or button mushrooms. Make this dish fit your taste and pantry! For the full recipe, check out the [Full Recipe]. Start by heating your vegetable broth. Pour it into a medium saucepan. Place it on low heat. You want to keep it warm without boiling. This keeps the risotto cooking at a steady temperature. Grab a large skillet and add olive oil and one tablespoon of butter. Heat it on medium until the butter melts. Next, add the finely chopped onion. Sauté for about three to four minutes until it turns soft and clear. Then, stir in minced garlic and sliced mushrooms. Cook this mix for five to seven minutes. Stir often until the mushrooms are soft and their liquid is gone. Season with salt and pepper to boost the flavors. Now, it’s time to add the Arborio rice. Stir it in, making sure every grain gets coated with the mushroom mix. Toast the rice for one to two minutes until it looks a bit clear. Begin adding the warm broth, one ladle at a time. Stir often and let the rice soak up the broth before adding more. Keep this up for about 15 to 20 minutes until the rice is creamy and al dente. Once your rice is cooked, take the skillet off the heat. Gently mix in the heavy cream and grated Parmesan cheese. Add the last tablespoon of butter for extra creaminess. Stir until everything is smooth and velvety. Adjust the seasoning if needed. Let the risotto sit for a couple of minutes to thicken before you serve. Enjoy the full recipe to make this creamy mushroom risotto. To make your risotto creamy, you need to stir it often. This helps release starch from the rice. Use Arborio rice, as it holds moisture well and creates that desired creaminess. Gradually add warm broth to the rice. This keeps it cooking evenly. Don't rush this step; patience is key. One common mistake is adding all the broth at once. This can make your risotto mushy. Only add one ladle of broth at a time. Let the rice absorb it fully before adding more. Another mistake is not stirring enough. Stirring helps the rice cook evenly and become creamy. Lastly, don’t skip resting the risotto after cooking. Letting it sit allows the flavors to meld. Serve your risotto warm in shallow bowls. This presentation looks nice and helps keep it creamy. Garnish with fresh parsley and extra Parmesan cheese for a pop of color and flavor. Pair it with a crisp green salad or roasted vegetables for a balanced meal. Enjoy the comforting flavors and creamy texture as you savor each bite. For the complete recipe, check out the Full Recipe. {{image_4}} You can make your creamy mushroom risotto heartier by adding protein. Chicken and shrimp are great choices. If you choose chicken, use diced breast or thighs. Sauté the chicken in the skillet before adding the onions. Cook until golden and cooked through. For shrimp, add them after the mushrooms. Cook until pink and firm. Both options boost flavor and make your dish more filling. To make a vegetarian risotto, simply omit any meat. Use vegetable broth and keep all other ingredients the same. For a vegan version, swap the heavy cream for coconut milk or a cashew cream. Replace Parmesan cheese with nutritional yeast. This keeps the dish rich and creamy while staying plant-based. These adaptations ensure everyone can enjoy creamy mushroom risotto. You can add herbs and spices to enhance your risotto's flavor. Fresh thyme or rosemary pairs well with mushrooms. Add these herbs when you sauté the onions. A pinch of nutmeg adds warmth and depth. If you like a little heat, try red pepper flakes. Don't forget to adjust your salt and pepper to balance the added flavors. These enhancements can elevate your dish and make it even more delicious. To store leftover creamy mushroom risotto, follow these steps: - Cool it down: Let the risotto cool at room temperature for about 30 minutes. - Use airtight containers: Transfer the cooled risotto into airtight containers. This keeps it fresh and prevents drying. - Label the containers: Write the date on the container. This helps you track how long it's been stored. Storing risotto properly can keep it fresh for up to three days in the fridge. When reheating risotto, I want it to stay creamy, not dry. Here’s how to do it: - Add liquid: Pour a little broth or water into the risotto before reheating. This adds moisture back in. - Use low heat: Heat the risotto in a saucepan over low heat. Stir often to ensure even warming. - Microwave method: If using a microwave, add liquid and cover the bowl. Heat in short bursts, stirring in between. These methods help keep the risotto smooth and creamy. Freezing risotto is not the best option, but it can be done. Here’s what I suggest: - Cool it down: Just like with leftovers, let the risotto cool first. - Portion it: Divide the risotto into smaller portions. This makes it easier to thaw only what you need. - Use freezer-safe bags: Transfer the portions into freezer-safe bags. Remove as much air as possible to prevent freezer burn. When ready to eat, thaw in the fridge overnight. Reheat as mentioned above for the best texture. To make risotto creamy, you need to stir it often. This movement helps to release the starch from the Arborio rice. The starch mixes with the broth to create a smooth texture. Always add warm broth a little at a time. This slow process helps the rice absorb the liquid fully. After cooking, stir in heavy cream and cheese for extra creaminess. You can use regular rice, but it won't be the same. Arborio rice has more starch, which gives risotto its creamy texture. If you use regular rice, the dish may be less creamy and more watery. Stick with Arborio for the best results in this creamy mushroom risotto. You can store leftover risotto for about three days. Keep it in an airtight container in the fridge. When reheating, add a splash of broth or water to bring back the creamy texture. This helps avoid dry, clumpy risotto. The best mushrooms for risotto are cremini and shiitake. They add a rich, earthy flavor. You can also use button mushrooms for a milder taste. Mixing different types of mushrooms can enhance the dish. Feel free to experiment with your favorites! In this post, you learned how to make creamy mushroom risotto. We covered the ingredients, the step-by-step process, and tips for perfect texture. Always use fresh ingredients for the best taste. We also explored ways to customize your risotto with protein or herbs. Remember, proper storage keeps leftovers tasty. Try these ideas to impress your friends and family. With practice, you'll master this dish. Enjoy every creamy, delicious bite.](https://recipetorch.com/wp-content/uploads/2025/05/189d344a-e805-45ba-a103-83e4b081d56b.webp)
Craving a warm bowl of creamy mushroom risotto? You’ve come to the right place! This easy recipe combines rich flavors
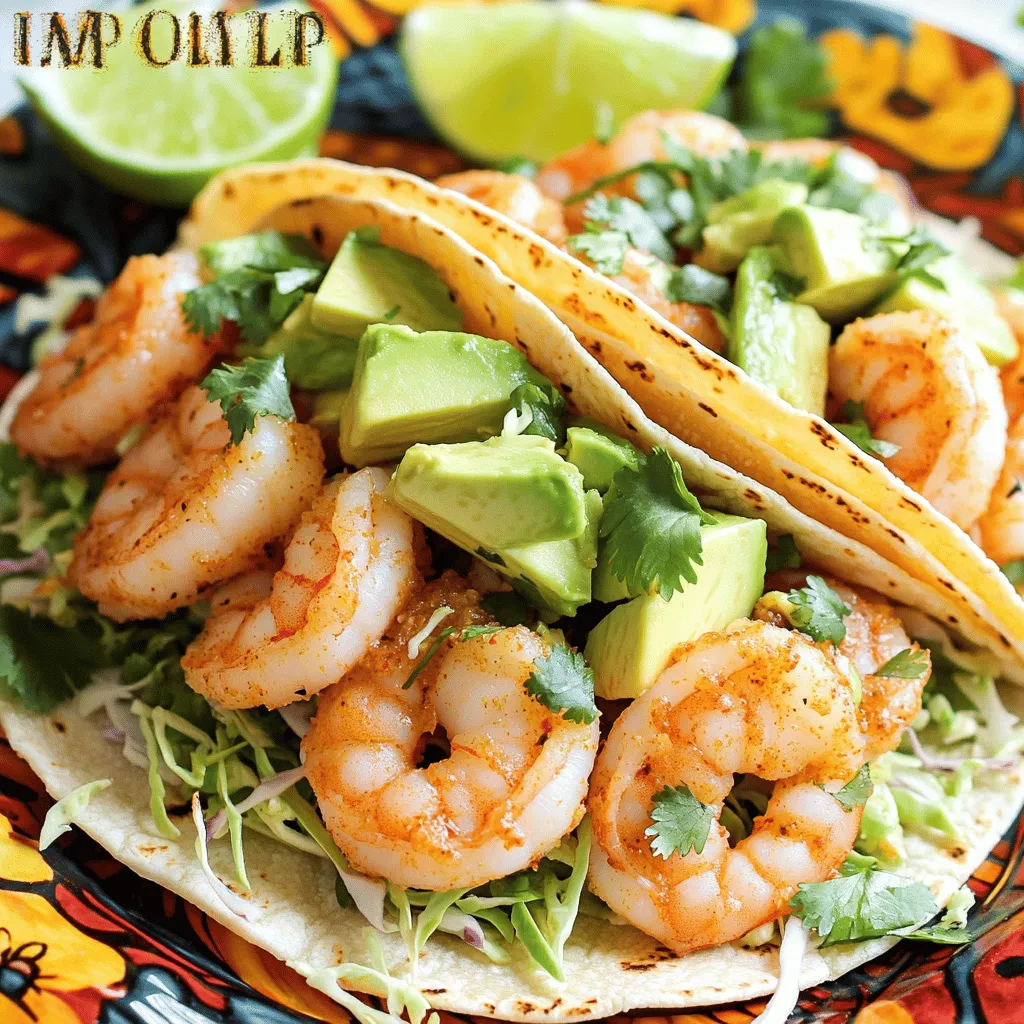
Are you ready to spice up your taco night? This Spicy Garlic Shrimp Tacos recipe packs a punch of flavor

Are you ready to make a dessert that’s both simple and delicious? My No-Bake Strawberry Shortcake is the perfect treat

Love creamy, spicy flavors? You’re in the right place! This Jalapeño Popper Dip brings together smooth cream cheese, sharp cheddar,
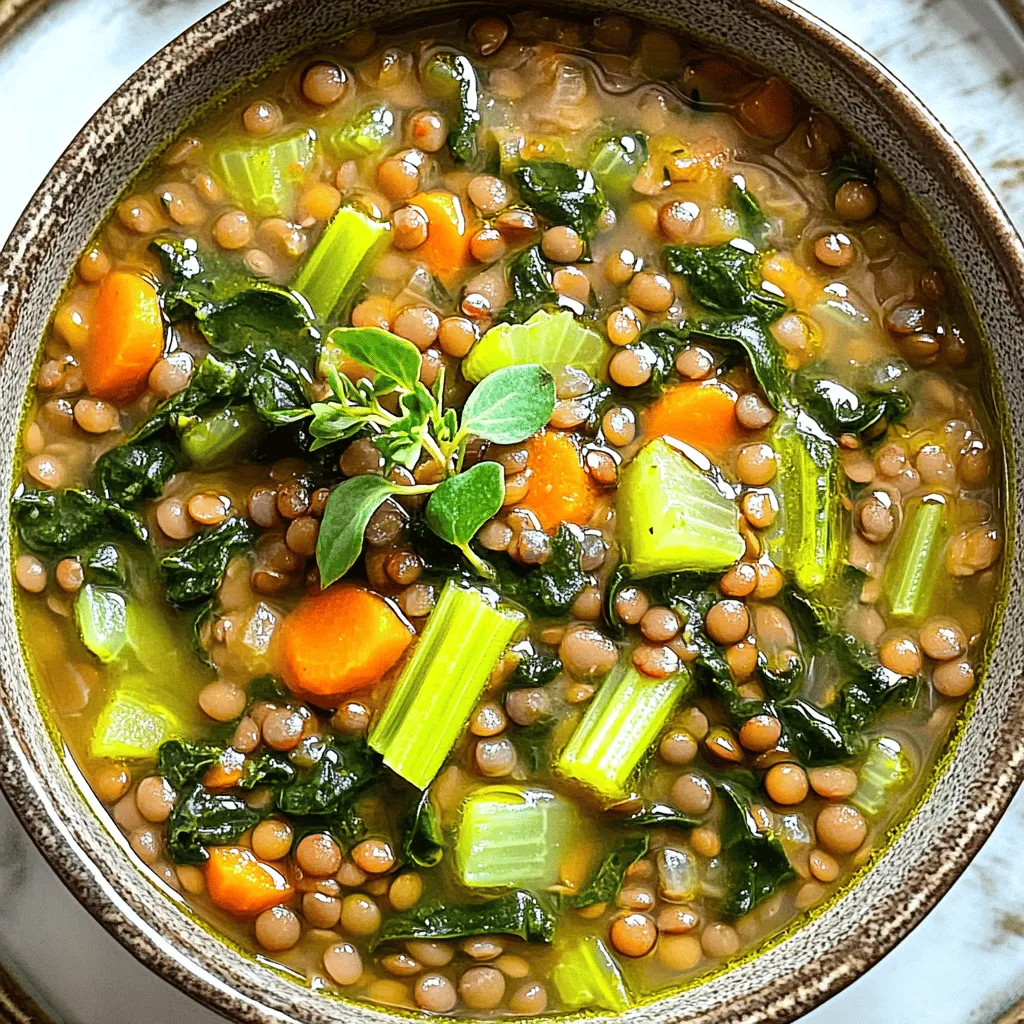
Are you looking for a healthy and simple recipe? Lentil Soup with Spinach is just the dish! It’s packed with
![- 1 can (15 oz) chickpeas, thoroughly drained and rinsed - 2 tablespoons extra-virgin olive oil - 1 teaspoon smoked paprika - 1/2 teaspoon garlic powder - Sea salt and freshly ground black pepper to taste - 6 cups fresh baby spinach, meticulously washed and dried - 1/2 cup cherry tomatoes, halved for a pop of color - 1/4 red onion, paper-thin slices for a zesty crunch - 1 ripe avocado, diced into bite-sized pieces - 1/4 cup crumbled feta cheese (optional, for a tangy finish) - 2 tablespoons freshly squeezed lemon juice - Baking sheet - Mixing bowl - Measuring spoons Chickpeas are full of protein and fiber. They help keep you full and satisfied. A serving of chickpeas has about 120 calories. They also have healthy carbs and fats. Spinach is low in calories but rich in vitamins. It contains iron, which helps your blood. Together, chickpeas and spinach make a great meal for your health. First, preheat your oven to 400°F (200°C). This heat makes the chickpeas nice and crispy. Next, take a mixing bowl and add the drained and rinsed chickpeas. Pour in the olive oil, smoked paprika, garlic powder, and a good pinch of sea salt and pepper. Toss the chickpeas well. Each one should get a nice coat of spice. Now, spread the chickpeas in a single layer on a lightly greased baking sheet. This helps them roast evenly. Place them in the preheated oven for 25 to 30 minutes. Halfway through, shake the pan to ensure all sides get crispy. You want them to be golden brown and crunchy. While the chickpeas roast, it’s time to make the salad. In a large mixing bowl, add the fresh baby spinach, halved cherry tomatoes, thin slices of red onion, and diced avocado. This mix is not only colorful but also full of flavor. Once the chickpeas are done roasting, let them cool for a few minutes. Then, gently fold them into the salad. This adds a delightful crunch to each bite. To finish, drizzle the freshly squeezed lemon juice over the salad. Toss everything together lightly to mix the flavors. If you like, sprinkle crumbled feta cheese on top for a creamy touch. For the full recipe, check out the detailed instructions. To get crispy chickpeas, start by drying them well. Drain and rinse a can of chickpeas. Use a clean kitchen towel to pat them dry. The drier they are, the crispier they will become. When roasting, spread the chickpeas in a single layer on the baking sheet. This even spacing helps them cook well. Roast at 400°F (200°C) for 25-30 minutes. Shake the pan halfway through to ensure they roast evenly. Spice up your chickpeas with smoked paprika, garlic powder, or cumin. You can mix and match these spices for a unique taste. For the salad dressing, consider lemon juice or a light vinaigrette. These options brighten the flavors and add freshness. You can also add a dash of honey for sweetness. Serve your salad in a large, shallow bowl for a stunning look. You can also plate it individually for a personal touch. Garnish with extra crispy chickpeas on top. Add a lemon wedge on the side for color and freshness. This way, your salad looks as good as it tastes! {{image_4}} You can switch out spinach for other greens. Try kale, arugula, or mixed greens. Each green adds a unique taste. For a vegetarian or vegan twist, skip the feta cheese. You can use a vegan cheese or avocado for creaminess. This makes it plant-based and just as tasty. If you want to add protein, consider chicken or tofu. Grilled chicken can give a nice flavor. Tofu works well when marinated in soy sauce. You can also add beans for protein. Chickpeas already offer some, but black beans or kidney beans are great options. For a hearty salad, mix in cooked quinoa or farro. These grains add texture and make the meal more filling. Using seasonal veggies makes your salad fresh. In summer, add cucumbers and bell peppers. In winter, try roasted carrots or beets. Adjust the recipe based on what is in season. This keeps the salad vibrant and exciting. You can use the [Full Recipe] as a base and adapt it based on your favorite seasonal finds. To keep your salad fresh, store each component separately. Place the spinach, tomatoes, and avocado in a sealed container. This way, they stay crisp and tasty. The roasted chickpeas should go in a different container. Use an airtight jar to keep them crunchy. If you mix everything, the salad gets soggy fast. You can prepare most parts ahead of time. Roast the chickpeas a day before. They will stay good for a few days. Wash and dry the spinach, and cut the tomatoes and onion. Keep these in your fridge. Assemble the salad just before you plan to eat. This keeps it fresh and full of flavor. Store the roasted chickpeas for about four days. The other salad components can last about three days. If you see any signs of spoilage, like mushy spinach or brown avocado, it’s best to toss them out. Always check for freshness before you enjoy your salad. For the complete recipe, check out the [Full Recipe]. To make your chickpeas crispier, try these steps: - Dry them well: After rinsing, pat the chickpeas completely dry with a towel. - Use higher heat: Roast them at 425°F (220°C) for a crunchier texture. - Spread them out: Give them space on the baking sheet to ensure they don't steam. - Shake the pan: Halfway through roasting, shake the pan to help them cook evenly. These tips can help you achieve a perfect crunch every time. Yes, you can prep this salad ahead of time! Here’s how: - Store ingredients separately: Keep the chickpeas, spinach, and other veggies in different containers. - Mix just before serving: Combine everything right before you eat to maintain freshness and crispness. - Dressing on the side: Keep the lemon juice separate until serving to avoid sogginess. This way, you can enjoy a fresh salad even on busy days. For a low-carb salad, consider these swaps: - Use leafy greens: Try kale or arugula instead of spinach. - Skip the chickpeas: Replace them with grilled chicken or tofu for protein. - Add nuts: Use almonds or walnuts for crunch without the carbs. These changes can give you a tasty salad while keeping carbs low. For the full recipe, check out the Crispy Chickpeas & Spinach Salad. This blog post offered a simple chickpea salad recipe with amazing tips. You learned about ingredients, how to roast chickpeas, and ways to add flavor. Remember to store the leftovers correctly to keep them fresh. Feel free to customize your salad with seasonal veggies or protein options. I hope this inspires you to create a tasty meal that is both healthy and fun! Enjoy experimenting with flavors and sharing with friends!](https://recipetorch.com/wp-content/uploads/2025/05/e2a5d03c-43d2-4ae5-9aaa-6cdbaae4a0f8.webp)
Are you ready to enjoy a fresh and flavorful salad that’s fun to make? This Crispy Chickpeas and Spinach Salad

Are you ready to elevate your grilling game? My Lemon Herb Grilled Chicken recipe brings vibrant flavors together with simple
