Skip to content
DisclaimerTerms Of UseGDPR PolicyCookie Policy

recipetorch

  • Home
  • Drinks
  • Appetizers
  • Dinner
  • Dessert
  • About
  • Contact
  • Privacy Policy
DisclaimerTerms Of UseGDPR PolicyCookie Policy

Nicole

- 4 large bell peppers (choose a variety of colors for a vibrant dish) - 1 cup quinoa, thoroughly rinsed - 2 cups vegetable broth (or water) - 1 can (15 oz) black beans, drained and rinsed well - 1 cup frozen or canned corn (drained if canned) - 1 cup diced tomatoes (fresh or canned, with juices included) - 1 small red onion, finely chopped - 2 cloves garlic, minced - 1 teaspoon ground cumin - 1 teaspoon smoked paprika - ½ teaspoon chili powder (adjust based on spice preference) - Salt and pepper, to taste - 1 avocado, diced (for garnish) - Fresh cilantro, chopped (for garnish) - Lime wedges (for serving) When selecting bell peppers, look for ones that are firm and smooth. They should feel heavy for their size. Avoid any with soft spots or wrinkles. Feel free to swap quinoa for rice or farro. You can also use chickpeas instead of black beans. Fresh ingredients make a big difference in flavor. Choose ripe tomatoes for the best taste. If you can, buy organic vegetables. They often have better flavor and nutrients. This recipe is versatile, so make it your own with any ingredients you love. Check out the Full Recipe to see how to bring all these flavors together! 1. Preheat your oven to 375°F (190°C). This step gets the oven ready for baking. 2. Take 4 large bell peppers. Cut the tops off each pepper and remove the seeds. Rinse them well to get rid of any dirt. 3. Lightly coat the outside of the peppers with olive oil. This helps them roast nicely. 4. Place the peppers upright in a baking dish. Make sure they stand steady. 1. In a medium saucepan, combine 1 cup of rinsed quinoa with 2 cups of vegetable broth. Bring this to a boil. 2. Once boiling, lower the heat and cover the pan. Let it simmer for about 15 minutes. The quinoa should be soft and the liquid gone. 3. In a large skillet, heat a splash of olive oil over medium heat. Add 1 small chopped red onion and 2 minced garlic cloves. Sauté for 3-4 minutes until soft and fragrant. 4. Stir in 1 can of black beans, 1 cup of corn, and 1 cup of diced tomatoes. Add 1 teaspoon of ground cumin, 1 teaspoon of smoked paprika, and ½ teaspoon of chili powder. Don’t forget salt and pepper to taste. 5. Let this mixture cook for 5 minutes. Stir it now and then to blend the flavors. 6. Mix in the cooked quinoa. Stir well to combine everything. Taste the filling and adjust the seasoning if needed. 1. Fill each bell pepper with the quinoa mixture. Pack it in tightly so they hold their shape. Place any leftover filling in the baking dish around the peppers. 2. Cover the baking dish tightly with aluminum foil. This keeps the moisture in while baking. 3. Bake for 25 minutes. Then, remove the foil and bake for another 10-15 minutes. The peppers should be soft and a bit caramelized. 4. Once done, take them out and let them cool for a few minutes. Serve hot, topped with diced avocado and fresh cilantro. Include lime wedges for extra zest. Follow these steps, and you'll enjoy a delicious meal! For the full recipe, check out the detailed instructions above. Using the right tools makes cooking easier. Here are some kitchen tools I suggest: - Sharp knife for cutting bell peppers. - Cutting board for safe chopping. - Medium saucepan for cooking quinoa. - Large skillet for sautéing veggies. - Baking dish to hold the stuffed peppers. Avoid these common mistakes when making stuffed peppers: - Don’t overcook the quinoa. It should be fluffy, not mushy. - Make sure to season the filling well. Taste as you go! - Pack the filling tightly into the peppers. This helps them keep their shape while baking. - Cover the baking dish with foil for the first part of cooking. This keeps the peppers moist. Pair your stuffed peppers with the right sides. Here are some tasty options: - A fresh green salad adds crunch and color. - Serve with rice or quinoa for a hearty meal. - Cornbread complements the flavors nicely. Make your dish look great with these presentation tips: - Use a colorful platter to show off the peppers. - Drizzle a little olive oil or balsamic reduction over them. - Add lime wedges around the dish for a zesty touch. For the full recipe, check out Vegan Fiesta Stuffed Bell Peppers. {{image_4}} You can change the grains or beans in your stuffed peppers. Instead of quinoa, try brown rice or farro. These grains add a nice texture. For beans, substitute black beans with kidney beans or chickpeas. Each swap gives a new taste. You can also add more veggies to the filling. Try mixing in chopped spinach, zucchini, or mushrooms. These veggies add color and nutrients. If you want more protein, consider adding tofu or tempeh. Just crumble it into the mix. To spice up your filling, add some heat. Consider using cayenne pepper or crushed red pepper flakes. If you enjoy herbs, mix in fresh basil, oregano, or parsley. Each herb will bring a new layer of flavor. For a non-vegan twist, you can add cheese. Vegan cheese works well, but regular cheese adds richness. Top your peppers with shredded cheese before baking for a golden finish. You can also drizzle with a creamy sauce for extra flavor. For the full recipe, you can refer to the Vegan Fiesta Stuffed Bell Peppers. To keep your vegan stuffed bell peppers fresh, place them in an airtight container. They stay good in the fridge for about 3 to 4 days. If you want to reheat your stuffed peppers, use the oven. Preheat it to 350°F (175°C). Place the peppers in a baking dish with a splash of vegetable broth. Cover with foil to retain moisture. Heat for about 20 minutes or until warm. This method keeps the peppers tender and tasty. If you want to save some for later, freezing is a great option. First, let the stuffed peppers cool completely. Wrap each one in plastic wrap or aluminum foil. Place them in a freezer-safe bag. They can last up to 3 months in the freezer. When you're ready to eat, take a pepper out and let it thaw in the fridge overnight. To reheat, use the oven again at 350°F (175°C). Cover with foil and warm for 25 minutes. This way, you enjoy the same great flavor as when they were fresh. How long do stuffed peppers last in the fridge? Stuffed peppers last about 3 to 5 days in the fridge. Make sure to store them in an airtight container. This keeps them fresh and easy to grab for a quick meal. Can I make vegan stuffed peppers ahead of time? Yes! You can prepare the filling a day in advance. Just store it in the fridge. You can also stuff the peppers and keep them covered until you're ready to bake. This makes dinner stress-free. What can I use instead of quinoa in stuffed peppers? You can use rice, farro, or couscous instead of quinoa. Each offers a unique taste and texture. Choose what you enjoy most or what you have on hand. What is the best way to cook quinoa? The best way to cook quinoa is to rinse it first under cold water. Then, use a 1:2 ratio of quinoa to liquid, like vegetable broth. Bring it to a boil, then lower the heat and cover. Let it simmer for about 15 minutes until the liquid absorbs. Can I grill stuffed peppers instead of baking them? Yes, grilling stuffed peppers adds a smoky flavor. Cut the peppers in half and fill them. Grill over medium heat for about 10-15 minutes. Watch them closely so they don’t burn. Are vegan stuffed peppers healthy? Yes, vegan stuffed peppers are very healthy. They are packed with nutrients from veggies, beans, and quinoa. They are low in fat and high in fiber, making them filling and good for your body. How many calories are in one stuffed bell pepper? One stuffed bell pepper has about 250-300 calories. This can vary based on the ingredients used. They are a tasty way to enjoy a nutritious meal without a lot of calories. Stuffed peppers are a great way to enjoy healthy meals. We discussed the key ingredients and how to select fresh options. You learned the step-by-step process for prepping, cooking, and baking perfect stuffed peppers. I shared tips to enhance flavors and avoid common mistakes. You can also store leftovers safely or make variations to suit your taste. Remember, stuffed peppers are versatile and fun. Enjoy making them your own! Get creative with flavors and enjoy each bite.

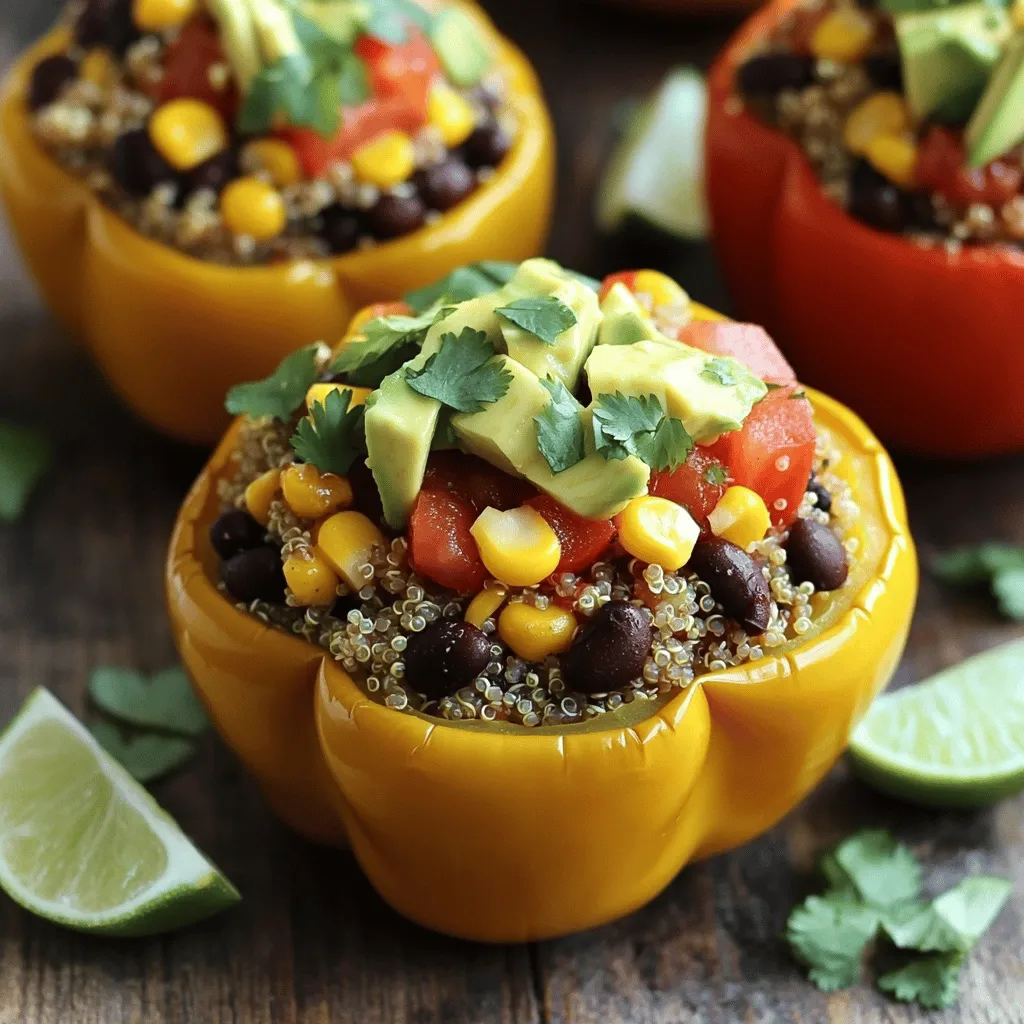
Vegan Stuffed Bell Peppers Simple and Flavorful Dish

Are you looking for a healthy and delicious meal? Vegan stuffed bell peppers are the perfect solution! This simple and

- 4 boneless, skinless chicken breasts - 1 ripe mango, peeled and diced - 1 small red onion, finely chopped - 1 red bell pepper, diced - 3 tablespoons freshly squeezed lime juice - 2 tablespoons extra virgin olive oil - 1 tablespoon pure honey - 1 teaspoon ground cumin - Sea salt and freshly cracked black pepper to taste - Fresh cilantro, chopped, for garnish The main ingredients make this dish fresh and vibrant. The chicken breasts provide a juicy base. The ripe mango adds sweetness and tropical flair. Red onion and bell pepper give crunch and color. Lime juice brightens the flavors, while olive oil and honey tenderize the meat. Ground cumin adds warmth and depth. Salt and pepper enhance all the tastes. - Jalapeño for heat - Additional herbs and spices For a spicy kick, add jalapeño to the salsa. It gives the dish a nice heat that balances the sweetness of the mango. You can also try herbs like mint or basil for extra flavor. Spices like chili powder or paprika can add a smoky note. Feel free to play with these to suit your taste. - Serve with rice or quinoa - Pair with fresh salad or grilled veggies I love serving Mango Salsa Chicken with fluffy rice or quinoa. They soak up the juice and make a filling meal. A fresh salad adds crunch and freshness. Grilled veggies like zucchini or corn are perfect side dishes too. They complement the flavors and make the meal colorful. For a beautiful presentation, serve the chicken on a wooden platter with extra salsa on the side. You can find the full recipe [here](#). 1. Preheating the grill Start by turning on your grill to a medium-high heat. This is key for getting nice grill marks. Let it warm up while you prepare everything else. 2. Preparing the mango salsa In a large bowl, combine these ingredients: - 1 ripe mango, peeled and diced - 1 small red onion, finely chopped - 1 red bell pepper, diced - 1 jalapeño pepper, minced (optional for heat) - 3 tablespoons freshly squeezed lime juice - Sea salt and freshly cracked black pepper to taste Gently mix them together. This salsa will add a fresh burst of flavor to your chicken. 1. How to mix marinade and coat chicken breasts In another bowl, whisk together: - 2 tablespoons extra virgin olive oil - 1 tablespoon pure honey - 1 teaspoon ground cumin - Sea salt and freshly cracked black pepper to taste Coat each chicken breast with the marinade. Make sure to cover every part. Let the chicken sit for at least 15 minutes. If you can, marinate for an hour for extra flavor. 1. Cooking times and temperature guidelines Place the marinated chicken on the preheated grill. Cook each side for about 6-7 minutes. You want the chicken to reach an internal temperature of 165°F (75°C). This ensures it is safe to eat. 2. Resting period before slicing After cooking, take the chicken off the grill. Let it rest for 5 minutes. This step helps keep the chicken juicy. After resting, slice the chicken into thick strips. Top it with your fresh mango salsa for a colorful and tasty dish. For the full recipe, check out the complete instructions and tips for this delightful dish! For the best taste, marinate your chicken for at least 15 minutes. If you have time, let it sit for up to an hour. This extra time helps the flavors soak in. You can also try adding spices like smoked paprika or chili powder for extra warmth. Fresh herbs like basil or mint can brighten the dish, too. You can grill the chicken, but baking or pan-searing also works well. If you grill, preheat your grill to medium-high heat. This step is key for those perfect grill marks. Flip the chicken only once during cooking. This helps you get nice sear lines and keeps the meat juicy. Serve your Mango Salsa Chicken on a large wooden platter. This gives a rustic, inviting look. Place extra salsa in a small bowl on the side. Add lime wedges for a pop of color. For garnishing, sprinkle freshly chopped cilantro over the top. It adds a fresh touch and looks great! If you want more ideas, check out the Full Recipe for more details on creating this dish. {{image_4}} You can change up your mango salsa for fun. - Try adding other fruits like pineapple or kiwi. - Use veggies like corn or cucumber for more crunch. These swaps keep your dish exciting and fresh. The sweetness of pineapple pairs well with mango. Kiwi adds a zesty kick that brightens the salsa. Corn gives a nice bite and color. Cucumber adds a cool crunch. Chicken is great, but you can switch it up. - Use pork or shrimp for different flavors. - Tofu is a perfect choice for a meat-free meal. Pork works well with the sweet salsa. Shrimp cooks fast and tastes fantastic on the grill. For a vegetarian option, firm tofu absorbs flavors well. Just marinate it like chicken for the best taste. You can make the salsa your own by adjusting flavors. - Want it spicier? Add more jalapeño or a dash of hot sauce. - Fresh herbs like mint or basil can change the taste nicely. Adjusting spice levels lets you control heat. More jalapeño means more kick. Herbs bring a fresh taste that brightens the dish. Try mixing in cilantro with your mango salsa for an added layer of flavor. To store leftovers, let the chicken cool down first. Place it in an airtight container. This keeps it fresh and tasty. For the mango salsa, use a separate container. You can store both in the fridge. Make sure to eat within three to four days for best flavor. You can freeze mango salsa chicken if you want to save it for later. Wrap the chicken tightly in plastic wrap. Then, put it in a freezer bag. This helps prevent freezer burn. For the mango salsa, freeze it in a container without extra air. Thaw chicken in the fridge overnight before reheating. To reheat, warm it in a skillet or oven. In the fridge, mango salsa chicken lasts three to four days. If frozen, it can stay good for up to three months. Always check for signs of spoilage. If it smells off or looks strange, throw it away. Enjoy your meal safely! To grill chicken perfectly, start with a clean grill. Preheat it to medium-high heat. This helps the chicken cook evenly. Use a meat thermometer to check the temperature. The chicken should reach 165°F (75°C). To keep the chicken juicy, marinate it well. Let it rest for five minutes after grilling. This step helps lock in the juices. Yes, you can make the salsa ahead of time. It tastes better when the flavors mix. Store it in the fridge in a sealed container. The salsa will stay fresh for up to three days. Just remember to give it a stir before serving. This will help combine the flavors again. Yes, you can serve Mango Salsa Chicken cold. It makes a great option for leftovers. Just slice the chicken and top it with salsa. You can enjoy it in a salad or a wrap. Cold chicken with mango salsa is refreshing and tasty. It's perfect for warm days or picnics. This post covered the key ingredients for mango salsa chicken, its preparation steps, and serving tips. I shared optional add-ins to boost flavor and variations for different tastes. I also offered storage guidelines to help keep leftovers fresh. In conclusion, this dish is versatile and simple. With creativity, you can make it your own. Enjoy your cooking adventure with mango salsa chicken!

Mango Salsa Chicken Flavorful and Easy Grilled Dish

If you’re on the hunt for a dish that packs a punch in flavor and is easy to make, you’re

- 4 medium zucchinis, spiralized - 1 ripe avocado - 1 cup fresh basil leaves - 2 cloves garlic, finely minced - 1/4 cup pine nuts (or walnuts) - 2 tablespoons fresh lemon juice - 3 tablespoons extra virgin olive oil - Salt and freshly cracked black pepper - Cherry tomatoes, halved (for garnish) - Grated Parmesan cheese (optional) The key to making great zucchini noodles with pesto lies in the fresh ingredients. Start by choosing firm, medium zucchinis. They should feel heavy for their size and have smooth skin. For the avocado, pick one that yields slightly when pressed. This shows it’s ripe and perfect for a creamy pesto. Basil is essential for that fresh, vibrant flavor. Make sure to wash the leaves thoroughly before using them. The garlic adds a nice bite, so don’t skip it! Pine nuts give a lovely richness but feel free to swap them for walnuts if you want a different taste. When it comes to olive oil, use high-quality extra virgin. It enhances the dish’s flavor. Lastly, the lemon juice brightens the pesto, giving it a zesty kick. - Calories per serving: About 300 - Macronutrient breakdown: - Carbohydrates: 16g - Protein: 5g - Fat: 25g This dish is not just tasty but also nutritious. Zucchini is low in calories and high in water. It helps keep you full without adding many calories. The avocado provides healthy fats, while the basil and garlic add antioxidants. Enjoy this meal while knowing it's good for you! To start, you need to prepare the zucchini noodles. I love using a spiralizer for this task. It creates beautiful, long noodles. You can find spiralizers online or at kitchen stores. If you don’t have one, you can use a vegetable peeler. Just peel thin strips of zucchini to make flat noodles. Both methods work great! Now, let’s make the avocado pesto. Here’s what you need: - 1 ripe avocado - 1 cup fresh basil leaves - 2 cloves garlic, finely minced - 1/4 cup pine nuts (or walnuts for a different flavor) - 2 tablespoons fresh lemon juice - 3 tablespoons extra virgin olive oil In a food processor, combine the avocado, fresh basil, garlic, and pine nuts. Then, add lemon juice and olive oil. Blend until creamy. If it’s too thick, you can add a little water or more olive oil. This will help you get the perfect creamy texture. Next, transfer the spiralized zucchini noodles into a big mixing bowl. Pour the avocado pesto over the noodles. Toss gently to coat every noodle with pesto. This step is key for a tasty dish! Then, season the noodles with salt and freshly cracked black pepper to taste. Mix again to distribute the flavors evenly. If you like warm noodles, you can sauté them. Heat a non-stick skillet over medium heat. Add the coated zucchini noodles to the pan. Cook for 2-3 minutes while stirring gently. You want them to be slightly softened but not mushy. This adds a nice warmth to your dish. Finally, you can serve your zesty zucchini noodles, garnished with cherry tomatoes or Parmesan cheese. Enjoy your fresh and flavorful meal! For the full recipe, check out the details above. To make great pesto, start by choosing ripe avocados. A ripe avocado should feel slightly soft when you press it. If it’s too hard, wait a few days for it to ripen. After you make your pesto, store it in the fridge. To keep it fresh, place plastic wrap directly on the surface of the pesto. This helps prevent browning. It can last for about three days in the fridge. For the best texture, use fresh zucchinis. Look for ones that feel firm and heavy. When spiralizing, avoid overcooking your noodles. This keeps them crisp. To prevent sogginess, do not salt the zucchini before cooking. Salting draws out moisture. Instead, toss the noodles with pesto right before serving. If you sauté them, cook for just a few minutes to keep them crunchy. When plating, think about color and shape. Serve the noodles in shallow bowls, making a nest shape. This adds height and interest to your dish. For garnish, use halved cherry tomatoes. Their bright color pops against the green of the zucchini. You can also sprinkle grated Parmesan cheese for a touch of creaminess. Drizzle a bit of olive oil around the plate for added flavor and visual appeal. For the full recipe, check out the Zesty Zucchini Noodles with Avocado Pesto. {{image_4}} You can switch up the pesto to make it your own. One tasty option is spinach pesto. Just replace the basil with fresh spinach. This gives a nice green color and a mild flavor. You can still use avocado for creaminess. Another choice is a nut-free pesto. Instead of pine nuts, try using sunflower seeds or pumpkin seeds. This works well for allergies and still tastes great. Want to make your dish heartier? Add grilled chicken or shrimp. These proteins pair well with the flavors in the pesto. Simply grill them, slice, and mix in with the zucchini noodles. For a vegetarian twist, consider chickpeas or tofu. They soak up the pesto's flavor and add good protein. You can also play with seasonal veggies. In spring, try adding asparagus or peas for a fresh crunch. In summer, mix in fresh herbs like parsley or dill for a bright taste. These additions keep the dish exciting and flavorful all year long. For the full recipe, check out the Zesty Zucchini Noodles with Avocado Pesto. To keep your zucchini noodles fresh, store them in an airtight container. This helps prevent moisture from making them soggy. If you plan to eat them within three days, this method works great. After that, they may start to lose their texture and flavor. - Best practices for freshness: - Use a clean, dry container. - Layer paper towels between noodles to absorb excess moisture. - How long they last in the fridge: Zucchini noodles typically last about three days in the fridge. Keep an eye on them. If they start to look slimy, it’s time to toss them. Pesto is easy to store and can be used later. You can freeze it in ice cube trays. This way, you can use small amounts when needed. Once frozen, transfer the cubes to a freezer bag for easy access. - Freezing pesto for later use: - Pour pesto into ice cube trays. - Freeze until solid, then pop out the cubes and store in a bag. - Refrigeration guidelines: If you plan to use pesto soon, store it in a jar with a thin layer of olive oil on top. This keeps it fresh for about a week. Always check for color or smell changes before using. Yes, you can make zucchini noodles ahead of time. To prep, spiralize the zucchinis and store them in a sealed bag. Keep them in the fridge. They will stay fresh for up to three days. When you're ready to eat, toss them with pesto for a quick meal. To keep zucchini noodles from getting watery, you can salt them. Salt draws out moisture. After spiralizing, sprinkle salt on the noodles and let them sit for about 10 minutes. Then, pat them dry with a paper towel. You can also cook them lightly in a pan for a minute or two. This helps reduce moisture further. If you don’t have pine nuts, you can use other nuts or seeds. Walnuts are a great choice for a rich flavor. Almonds also work well, adding a bit of crunch. For a nut-free option, try sunflower seeds or pumpkin seeds. Each choice gives the pesto a unique twist. Yes, zucchini is low in calories. One medium zucchini has about 33 calories. It is a great choice for a light meal. Zucchini is also high in water, keeping you full without adding many calories. Plus, it has vitamins and minerals like vitamin C and potassium, making it a healthy option. In this post, we covered how to create a delicious zucchini noodle dish with avocado pesto. You learned about the key ingredients, nutritional facts, and step-by-step instructions. This simple meal can be made in different ways to suit your taste and needs. It's easy to store leftovers and enhance flavors with tips we discussed. I hope this guide inspires you to try making zucchini noodles at home. Enjoy fresh, healthy meals that excite your taste buds!

Zucchini Noodles with Pesto Flavorful and Fresh Dish

Craving a light and tasty meal? Zucchini noodles with pesto offer a fresh twist on classic pasta. This vibrant dish,

- 1 can (15 oz) chickpeas, drained and rinsed - 1 cup cherry tomatoes, halved - 1 medium cucumber, peeled and diced - 1/4 cup feta cheese, crumbled - Fresh parsley, chopped - 3 tablespoons extra-virgin olive oil - 2 tablespoons freshly squeezed lemon juice - 1 teaspoon dried oregano The heart of this Mediterranean chickpea salad lies in its vibrant, fresh ingredients. You begin with chickpeas, which are protein-packed and filling. Their nutty flavor forms a great base. Cherry tomatoes add brightness and sweetness. I love their juicy pops in every bite. Cucumbers give a nice crunch and refreshment. You can choose to add feta cheese for a creamy touch. Fresh parsley not only looks good but also brings fresh flavor. The dressing is simple yet key to this salad. Extra-virgin olive oil gives richness and depth. Fresh lemon juice brightens all the flavors. Dried oregano adds a hint of earthiness. Together, these ingredients create a delightful balance. You can find the full recipe linked above for detailed steps on how to assemble this dish. Enjoy creating this tasty and refreshing salad! 1. In a large mixing bowl, combine the following main ingredients: - 1 can (15 oz) chickpeas, drained and rinsed - 1 cup cherry tomatoes, halved - 1 medium cucumber, peeled and diced - 1/2 medium red onion, finely chopped - 1/2 cup Kalamata olives, pitted and sliced - 1/4 cup feta cheese, crumbled (optional) - 1/4 cup fresh parsley, chopped Use a spatula to gently fold these ingredients together. Make sure everything is mixed well. 2. In a separate bowl, prepare the dressing. Whisk together: - 3 tablespoons extra-virgin olive oil - 2 tablespoons freshly squeezed lemon juice - 1 teaspoon dried oregano - Salt and pepper to taste This dressing adds flavor and richness to your salad. 3. Drizzle the dressing over the salad mixture. Use a large spoon to toss everything together. Make sure each bite gets dressing, but be gentle to keep the chickpeas intact. - After mixing, taste the salad. Adjust the seasoning by adding more salt, pepper, or lemon juice as needed. This step helps balance the flavors perfectly. - Allow the salad to rest for about 10-15 minutes. This lets the flavors meld, creating a delicious taste. - Serve the salad chilled or at room temperature. It’s great for picnics or parties! - If you want, garnish with extra parsley on top for a fresh look and added flavor. You can find the full recipe linked above to make this tasty Mediterranean chickpea salad. Enjoy! Rinsing chickpeas is key for a fresh taste. Drain them well and rinse under cold water. This removes excess salt and helps keep the salad crisp. You want clean, plump chickpeas for your salad. When choosing olives, look for Kalamata for a rich flavor. Select ones that are firm and dark. If using feta, find a quality brand. A good feta adds creaminess and tang to your dish. If you're dairy-free, skip the feta and add more veggies. Feel free to swap chickpeas for other beans, like black beans or white beans. This change still keeps the salad hearty. For those who need gluten-free options, this salad is naturally gluten-free! Adding extra veggies boosts flavor and nutrition. Try bell peppers, radishes, or even avocados. If you're in the mood for protein, grilled chicken or tuna work great, too. Serve this salad in a large, vibrant bowl to draw attention. A clear glass bowl shows off the colorful layers. You can also use individual cups for a fun twist at parties. For garnishes, sprinkle extra parsley or add lemon zest on top. A few whole olives can also look nice. You might even drizzle a bit more olive oil for an elegant touch. For the full experience, check out the Full Recipe to bring this dish to life! {{image_4}} You can add different vegetables to your Mediterranean chickpea salad. Try bell peppers for crunch or grated carrots for sweetness. You can also toss in some artichoke hearts or radishes for extra flavor. If you want to make this dish quicker, use canned chickpeas, which are great for busy days. Just rinse and drain them well before adding to your salad. You can also use cooked beans like black beans or kidney beans if you want to mix it up. The dressing is key to making this salad pop. While the classic lemon-olive oil dressing is great, you can switch it up. A balsamic vinaigrette adds a sweet tang. You can also add a pinch of cumin or paprika for a kick. If you love heat, try a bit of crushed red pepper flakes. This will give your salad a fun twist. You can serve the salad in many ways. It makes a great wrap filling. Just take a tortilla, add the salad, and roll it up. You can also use it as a topping for grilled meats like chicken or fish. It adds freshness and color to your plate. If you want a hearty meal, serve it over rice or quinoa. You will find endless ways to enjoy this tasty salad. For the complete recipe, check out the Full Recipe. To keep your Mediterranean chickpea salad fresh, store leftovers in the fridge. Use an airtight container to lock in flavor. Glass containers work great. They help you see what’s inside and won’t stain. If you want to keep the salad longer, you can separate the dressing. Store it in a small jar or container. This will keep the salad crisp and fresh when you are ready to eat it. For optimal flavor and texture, eat the salad within 3 days. After that, it might lose its crunch. Look for signs of spoilage. If the salad smells off or has a slimy texture, do not eat it. Check for any discoloration as well. If the tomatoes or cucumbers look mushy, throw the salad away. Always trust your senses! You can freeze Mediterranean chickpea salad, but it may change in texture. If you want to freeze it, do not add the dressing first. To freeze, put the salad in a freezer-safe container. Leave some space at the top for expansion. When you're ready to eat, thaw it in the fridge overnight. After thawing, add your dressing again for the best taste. This helps bring back some of the original flavor. Enjoy your meal! For the complete recipe, check out the Full Recipe. You can use several alternatives for chickpeas. If you need a different legume, try black beans or lentils. For a lighter option, use cooked quinoa or diced tofu. Each choice adds a unique taste and texture. This salad stays fresh for about three days in the fridge. Store it in an airtight container to keep it crisp. After three days, the veggies may get soggy. Yes, you can make this salad ahead of time. Prepare it a day before serving for the best flavor. Just keep the dressing separate until ready to eat. This keeps the salad fresh and crunchy. Yes, this salad is very healthy! Chickpeas are high in protein and fiber. They help keep you full and satisfied. Fresh veggies add vitamins and minerals. Olive oil provides healthy fats, while lemon juice adds flavor without extra calories. To make this salad vegan, simply omit the feta cheese. You can also add avocado for creaminess. This keeps the dish flavorful and still creamy without dairy. Enjoy the vibrant taste of the fresh ingredients! This post outlined how to make a tasty Mediterranean chickpea salad. I covered ingredients, step-by-step instructions, and tips for the best flavors. You can customize this salad to fit your taste and dietary needs. Remember, fresh ingredients are key. Keeping leftovers stored properly will maintain flavor and texture. Enjoy this healthy salad as a side dish or main meal. It’s simple and satisfying, perfect for any occasion.

Mediterranean Chickpea Salad Flavorful and Refreshing

Are you craving a dish that’s both tasty and healthy? My Mediterranean Chickpea Salad is the answer! Packed with fresh

- 1 cup cornmeal - 1 cup all-purpose flour - 1 tablespoon baking powder - 1/2 teaspoon baking soda - 1 teaspoon salt - 1/4 cup sugar (optional for a touch of sweetness) - 1 cup buttermilk (or substitute with milk and 1 tablespoon vinegar) - 1 large egg, at room temperature - 1/4 cup unsalted butter, melted and slightly cooled - 1/4 cup finely chopped fresh herbs (such as rosemary, thyme, and parsley) - 1/2 cup shredded sharp cheddar cheese - 1/4 cup green onions, finely sliced These ingredients come together to create a delightful muffin with rich flavors. Cornmeal provides a fine texture and slight sweetness. The all-purpose flour gives structure to the muffins. Baking powder and baking soda help the muffins rise and stay fluffy. Salt enhances all the flavors, while sugar adds a hint of sweetness if you choose to use it. The buttermilk keeps the muffins moist and adds tang. The egg binds everything together and helps with rising. Melted butter adds richness and flavor. Fresh herbs boost the taste and aroma, making each bite special. Sharp cheddar cheese adds a creamy texture and deep flavor. Lastly, green onions give a fresh crunch that contrasts well with the softness of the muffin. For the full recipe, check the details above. Each ingredient plays a key role in making savory herb cornbread muffins a tasty treat! - Preheat your oven to 400°F (200°C). - Prepare the muffin tin with paper liners or grease each muffin cup. - Combine cornmeal, all-purpose flour, baking powder, baking soda, salt, and optional sugar in a large mixing bowl. - Whisk until thoroughly blended and free of lumps. - In a separate bowl, whisk buttermilk, egg, and melted butter until creamy. - Pour wet mixture into dry ingredients and gently stir. - Fold in herbs, cheese, and green onions carefully. - Fill muffin cups about 2/3 full with batter. - Bake for 15-20 minutes until tops are golden and a toothpick comes out clean. - Cool in the pan for 5 minutes, then transfer to a wire rack. For the full recipe, check the details above to gather your ingredients and get started on these tasty muffins! - Avoid over-mixing the batter to keep muffins tender. - Use room temperature ingredients for better blending. Mixing your batter too much makes muffins tough. Stir just until combined. This keeps them light and fluffy. Always use room temperature ingredients. It helps everything mix well and rise nicely. - Serve warm with extra herbs for garnish. - Great pairing with chili or warm soup. I love serving these muffins warm. Add extra herbs on top for color and flavor. They taste amazing with chili or warm soup. The flavors complement each other perfectly. - Drizzle honey for a delightful contrast to savory flavors. - Add spices like cayenne for a kick. For a fun twist, drizzle honey on top. The sweetness balances the savory herbs. If you want a kick, add a bit of cayenne pepper. This gives the muffins a nice heat. For more details, check the Full Recipe. {{image_4}} You can easily make these muffins fit your diet. If you need a gluten-free option, use a gluten-free flour blend instead of all-purpose flour. This swap keeps the taste while making it safe for those with gluten sensitivities. For a dairy-free alternative, replace buttermilk with almond milk and use coconut oil instead of butter. This change keeps the muffins moist and flavorful. Get creative with herbs! Try different ones like basil or dill. Each herb gives a unique taste. You can also add fun ingredients like jalapeños for heat or sun-dried tomatoes for a sweet twist. These additions change the flavor profile and make the muffins exciting. You can adjust the size of your muffins. For mini muffins, bake them for just 10-12 minutes. This size is perfect for snacks or parties. If you want a big, hearty muffin, use a larger muffin tin. Just remember to watch the baking time closely. The center should still be cooked through for the best results. Keep your savory herb cornbread muffins in an airtight container. They will stay fresh at room temperature for 2-3 days. If you want them to last longer, refrigerate them. They will be good for up to a week in the fridge. To freeze the muffins, place them in a freezer-safe bag. They can last up to 3 months in the freezer. When you’re ready to eat, you can thaw them at room temperature or reheat them in the oven. For the best taste, reheat the muffins in the oven at 350°F (175°C). Just a few minutes will warm them nicely. If you need a quick warm-up, the microwave works too. Heat them for 15-20 seconds. Enjoy them warm for the best flavor! You can tell when cornbread muffins are done by looking for a golden brown top. Another way is to do the toothpick test. Insert a toothpick into the center of a muffin. If it comes out clean, your muffins are ready. Yes, you can make these muffins a day in advance. Just allow them to cool, then store them in an airtight container. If you want to keep them longer, you can freeze them. Just thaw and reheat when you're ready to enjoy. If you don’t have buttermilk, you can easily make a substitute. Mix one cup of milk with one tablespoon of vinegar. Let it sit for a few minutes to sour. You can also use yogurt in place of buttermilk. Both options work well in this recipe. For the full recipe, check out the details above. These cornbread muffins are easy to make and tasty. You need simple ingredients like cornmeal and all-purpose flour. Mixing wet and dry ingredients takes no time, and you can add your favorite herbs. You can also adjust them for diets or add unique flavors. Remember to store leftover muffins to enjoy later. With this guide, you can create your own delicious batch. Now, get baking and enjoy your homemade muffins!

Savory Herb Cornbread Muffins Simple Bake Recipe

If you’re craving a warm, savory treat, try my Savory Herb Cornbread Muffins! These tender muffins blend cornmeal with fresh

For this mango salsa chicken, you will need a few key items: - 4 boneless, skinless chicken breasts - 1 ripe mango, diced into small cubes - 1/2 medium-sized red onion, finely chopped - 1 red bell pepper, diced into small pieces - 1 jalapeño pepper, minced (seeds removed for milder flavor) - 2 tablespoons fresh cilantro, finely chopped - Juice of 1 freshly squeezed lime - 2 tablespoons extra virgin olive oil - 1 teaspoon ground cumin - Salt and freshly cracked black pepper to taste Each ingredient adds flavor and texture. The chicken is lean and juicy. The mango brings sweetness, while the jalapeño adds a zesty kick. Fresh herbs like cilantro make the dish vibrant. The lime juice brightens everything up. Using fresh ingredients makes a big difference. They enhance the taste and make your dish look great. Enjoy the full recipe for detailed steps to make this delightful meal. To start, you need to dice the ripe mango. Cut it into small cubes. This brings out its sweetness. Next, chop the red onion and red bell pepper. Keep these pieces small to mix well. For some heat, mince the jalapeño pepper. Remove the seeds if you want a milder taste. Add all these fresh ingredients into a mixing bowl. Toss in the chopped cilantro and squeeze some lime juice. Mixing brings all the flavors together. A pinch of salt enhances the taste, too. Set the salsa aside to let the flavors meld. Now, let’s move to the chicken. Coat the boneless, skinless chicken breasts with extra virgin olive oil. This helps the spices stick. In a bowl, mix ground cumin and a good amount of salt and black pepper. Rub this spice mix on each chicken breast. Make sure each piece is evenly coated. This is key to getting a great flavor in every bite. Preheat your grill to medium heat. This step is crucial for even cooking. Place the seasoned chicken on the hot grill. Cook each breast for 6-7 minutes on one side. Flip it over and grill for another 6-7 minutes. Check the internal temperature. It should reach 165°F (75°C) for safety. Look for nice char marks; they add flavor. After cooking, let the chicken rest for 5 minutes. This keeps it juicy and tender. Enjoy your grilled chicken topped with the vibrant mango salsa you made earlier. For the full recipe, check below! What if you don’t have mango? You can use other fruits like peach or pineapple. Both add a nice sweet touch to your chicken. You can also try using apple or papaya for a different twist. To balance the salsa flavors, mix sweet, salty, and spicy. You can add a pinch of sugar if the salsa is too sour. If it’s too sweet, a dash of lime juice can help. Always taste as you mix! To get perfect grill marks, make sure your grill is hot. Place the chicken on the grill and don’t move it for a few minutes. This helps create those nice lines we all love. To avoid dry chicken, use a meat thermometer. Cook the chicken until it reaches 165°F. Also, let the chicken rest for five minutes after grilling. This keeps the juices inside, making it tender and juicy. For the complete cooking process, check the Full Recipe. {{image_4}} You can get creative with your mango salsa chicken. Adding zucchini or corn can give it a fun twist. These veggies add texture and flavor. Just chop them up and mix them in with the salsa. They enhance the dish without overpowering the mango. You can also use different types of chicken. While boneless, skinless chicken breasts are great, try chicken thighs for a richer taste. Thighs are juicier and can add depth to the dish. You can even use grilled shrimp or tofu for a tasty twist. Pairing your mango salsa chicken with sides makes it a complete meal. Rice or beans work well to soak up the salsa's juices. A fluffy jasmine rice or black beans adds protein and fiber. It's a great way to balance flavors on your plate. You can create a mango salsa chicken salad for a fresh take. Just chop the chicken into bite-sized pieces. Toss it with greens, avocado, and extra salsa. This salad is colorful and bursting with flavor. It’s a perfect dish for warm days. For the full recipe, check out the details above! After you enjoy your mango salsa chicken, store the leftovers right away. Place the chicken and salsa in airtight containers. This keeps out air and moisture, helping to maintain freshness. You can keep it in the fridge for up to three days. If you want to reheat, warm it gently in a pan. This helps keep the chicken juicy. The salsa can stay fresh for about two days. Always check for any off smells before eating. To freeze your mango salsa chicken, start by letting it cool completely. Once cool, place the chicken and salsa in separate freezer-safe bags. Remove as much air as possible. This prevents freezer burn. You can freeze them for up to three months. When you want to eat it, take the chicken out and place it in the fridge overnight. For the salsa, you can thaw it in the fridge or at room temperature. For the best taste, use it within a month after thawing. This keeps the flavors fresh and bright. To make mango salsa milder, simply reduce the amount of jalapeño. You can also remove the seeds and membranes from the jalapeño. This will cut down on the heat. Another great tip is to add more diced mango or even some diced cucumber. Both help balance the heat and add a nice crunch. Mango salsa chicken pairs well with many sides. You can serve it with fluffy rice or warm tortillas. A fresh green salad with lime dressing is also a great choice. If you want something heartier, try black beans or grilled corn on the cob. These sides enhance the tropical flavors of the dish. Yes, you can use frozen mango for this recipe. Just make sure to thaw it first and drain any excess liquid. This helps keep the salsa from becoming too watery. Frozen mango is a great option when fresh mango is out of season. It still adds that sweet flavor you love. For the full recipe, check out the details above. This blog post covered how to make a delicious mango salsa chicken. We explored key ingredients, from fresh chicken to ripe mango. I shared step-by-step instructions, tips for flavor, and variations for creativity. You learned proper storage to keep your meal fresh. In closing, don’t shy away from trying new ingredients or techniques. Each dish can bring joy and flavor to your table. Enjoy your cooking, and let your creativity shine!

Mango Salsa Chicken Flavorful Grilled Delight

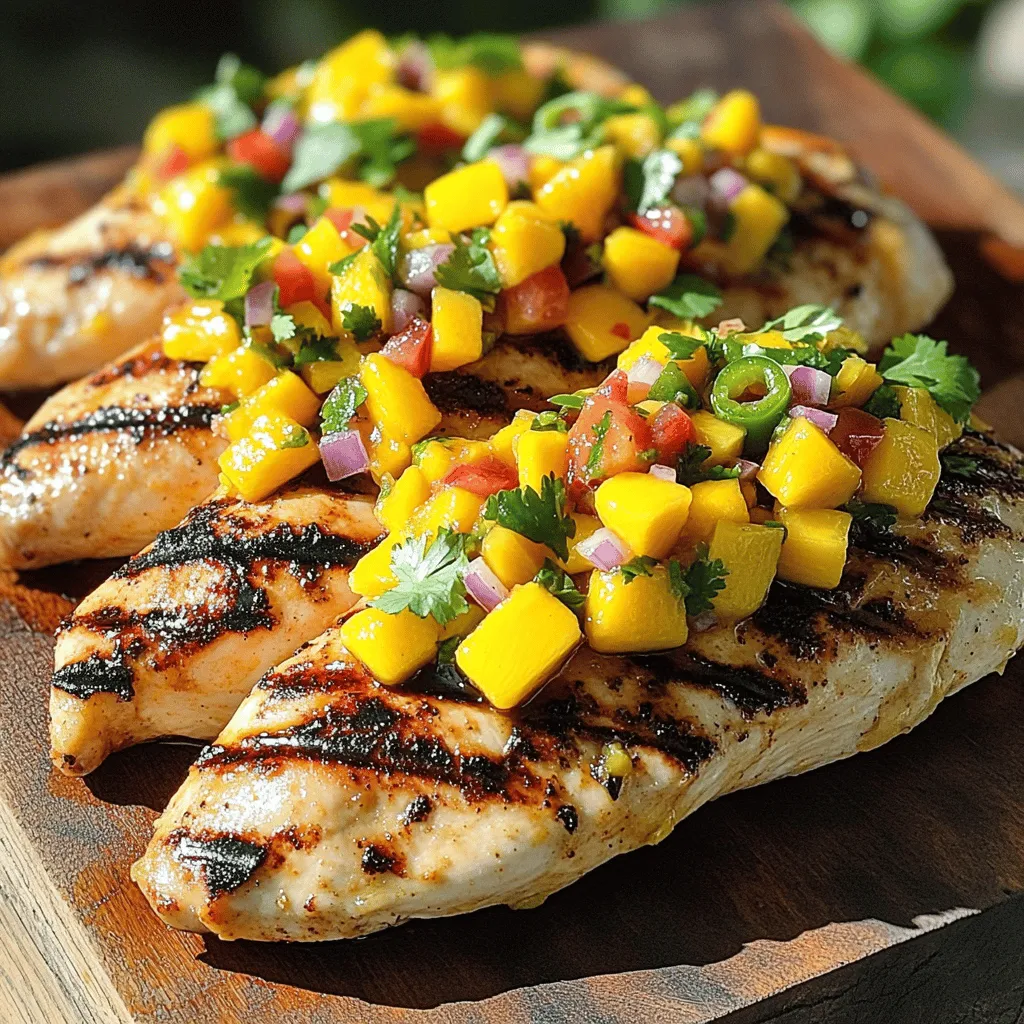
Get ready to take your grilled chicken to the next level with my vibrant Mango Salsa Chicken! This recipe combines

To make a Chocolate Chip Cookie Skillet, you need the right ingredients. Here's what you'll need: - 1 cup unsalted butter, softened - 1 cup packed brown sugar - 1/2 cup granulated sugar - 2 large eggs - 2 teaspoons pure vanilla extract - 3 cups all-purpose flour - 1 teaspoon baking soda - 1/2 teaspoon fine sea salt - 2 cups semi-sweet chocolate chips - 1/2 cup chopped nuts (optional) These ingredients create a rich, gooey cookie that everyone loves. The butter gives it a creamy texture. The brown sugar adds a deep flavor, while the granulated sugar makes it sweet. Eggs help bind everything together. Vanilla brings out the best in the chocolate. All-purpose flour is the base for your dough. Baking soda helps it rise. Fine sea salt balances the sweetness. Chocolate chips are the star, giving that melty goodness. You can add nuts for crunch, but they are optional. To follow this list, check out the Full Recipe for detailed steps on how to use these ingredients. Set your oven to 350°F (175°C). Preheating helps the cookie cook evenly. This step is important for a great texture. In a large bowl, mix the softened butter, brown sugar, and granulated sugar. Use an electric mixer on medium speed for about 2-3 minutes. The mixture should be light and fluffy. This step creates a nice base for your cookie. Add the eggs one at a time. Mix well after each egg. This helps the dough stay smooth. Then, add the pure vanilla extract and mix until well blended. This step adds flavor and moisture. In a separate bowl, whisk together the flour, baking soda, and salt. Gradually add this mix to your wet ingredients. Mix on low speed until just combined. Don’t over-mix, or your cookies may be tough. Use a spatula to gently fold in the chocolate chips. If you want, add chopped nuts, too. Make sure they are spread evenly throughout the dough. This ensures each bite is full of flavor. Grease your skillet with butter or cooking spray. Spoon the cookie dough into the skillet. Spread it evenly and press down slightly. Bake for 25-30 minutes. Look for golden-brown edges and a center that is set but still a bit doughy. Remember, it will firm up as it cools. For the full recipe, check the detailed instructions provided above. Enjoy your delicious chocolate chip cookie skillet! To get the best texture in your cookie skillet, aim for a balance. For chewy cookies, bake for about 25 minutes. For a crispier cookie, add an extra 5 minutes. If you live at a high altitude, reduce the flour by a few tablespoons. Humidity can also change your dough. On humid days, add a touch more flour if the dough seems too sticky. Serving your cookie skillet warm is key. Scoop some vanilla ice cream on top right when it comes out of the oven. The hot cookie will melt the ice cream just right. For added flavor, drizzle some chocolate or caramel sauce over the top. A sprinkle of sea salt enhances the sweet notes and adds a nice crunch. A cast-iron skillet is perfect for this recipe. It heats evenly and gives a nice crust. If you don’t have one, any oven-safe skillet will work. Use a sturdy mixing bowl that won’t tip over easily. A spatula for folding in the chocolate chips is also a must. Having a good electric mixer makes creaming your butter and sugars much easier. For the full recipe, check out the detailed instructions. {{image_4}} You can change up the flavor of your cookie skillet in fun ways. Try using different types of chocolate. Dark chocolate gives a rich taste, while milk chocolate adds sweetness. White chocolate can bring a creamy touch. You can mix them all together for a unique blend. Adding fruits can also be a great idea. Bananas add moisture and sweetness. Dried cranberries give a tart flavor that balances the cookie's sweetness. You can also try nuts, like walnuts or pecans, to add crunch. If you need gluten-free options, you can use alternative flours. Almond flour or oat flour works well in this recipe. They give a nice texture and flavor without gluten. Ensure that your chocolate chips are also gluten-free. For a vegan version, swap eggs for flax eggs. Mix one tablespoon of flaxseed meal with three tablespoons of water. Let it sit for a few minutes to thicken. Replace butter with coconut oil or vegan butter for a creamy texture. Make your cookie skillet festive for holidays! You can add colorful sprinkles for parties. For a Halloween treat, mix in candy corn or chocolate-covered pretzels. For Christmas, use peppermint extract and sprinkle crushed candy canes on top. Themed toppings can enhance the fun. For a movie night, add popcorn or caramel. For a birthday, top it with whipped cream and fresh fruits. These variations make your cookie skillet a showstopper at any gathering. For the full recipe, check the detailed instructions to create your own Chocolate Chip Cookie Skillet Delight. To keep your cookie skillet fresh, store it in the fridge. First, let it cool completely. Then, cover it tightly with plastic wrap or foil. This keeps it from drying out. You can also place it in an airtight container. It will stay fresh for up to five days. If you want to keep it longer, freeze it! Cut the cookie into slices. Wrap each piece in plastic wrap. Then, put the wrapped pieces in a freezer bag. This way, you can enjoy a slice whenever you want! In the fridge, your cookie skillet lasts about five days. If you freeze it, it can last up to three months. Always check for signs of spoilage. If it smells off or has a strange texture, throw it away. You want to enjoy your dessert, not risk a bad bite! When reheating, don't dry out your cookie. You can use the oven or microwave. If using the oven, preheat it to 350°F (175°C). Cover the skillet with foil to keep moisture in. Heat for about 10 minutes or until warm. If you choose the microwave, place a slice on a plate. Add a small cup of water next to it. This helps keep it soft. Heat for about 20 seconds. Check and heat more if needed. Enjoy it warm and gooey, just like when it was fresh! To achieve a gooey cookie skillet, watch your baking time closely. Bake for 25 minutes, then check. If the edges are golden but the center is soft, it’s perfect. If you bake too long, it will become hard. Cooling time is also key. Let your skillet cool for about 10 minutes after baking. This helps the center set while keeping it soft. If you cut too soon, it may fall apart. Yes, you can prepare your cookie skillet ahead of time. Make the dough and store it in the fridge. It will stay fresh for up to two days. To bake, simply let it sit at room temperature for 15 minutes before spreading in the skillet. If you want to bake it early, that works too! Bake it, then allow it to cool. Store leftovers in an airtight container. Before serving, reheat in the oven at 350°F for about 10 minutes. If you don’t have a cast-iron skillet, don’t worry! Any oven-safe skillet will do. You can use a stainless steel or ceramic skillet. Just make sure to grease it well to avoid sticking. If you use a different pan, baking time may change. Check for doneness a few minutes earlier than the recipe says. The goal is golden edges and a soft center. For the complete recipe, check out the [Full Recipe]. It includes all the steps and tips you need to make this delicious treat! This blog post covers everything you need to create the perfect cookie skillet. From the right ingredients and detailed steps to helpful tips and fun variations, you have the tools to impress. Don’t forget to store your leftovers properly to keep them fresh. Enjoy experimenting with flavors and make this recipe your own. Baking should be fun, so get creative and serve it warm for a delicious treat! Your cookie skillet is sure to be a hit. Happy baking!

Chocolate Chip Cookie Skillet Delightful and Easy Recipe

When you crave a warm, gooey dessert, nothing beats a Chocolate Chip Cookie Skillet. This delightful, easy recipe requires just

- 1 lb large shrimp, peeled and deveined - 4 tablespoons unsalted butter - 4 cloves garlic, finely minced - 1 teaspoon smoked paprika - 1/2 teaspoon cayenne pepper (optional) - Salt and freshly cracked black pepper to taste - Juice of 1 fresh lime - 8 small corn tortillas - 1 cup shredded red cabbage - 1 ripe avocado, sliced - Fresh cilantro leaves, for garnish - Lime wedges, for serving When cooking garlic butter shrimp tacos, you need fresh, high-quality ingredients. The shrimp should be large, sweet, and firm. I prefer to use unsalted butter, as it lets me control the salt. Garlic adds depth and flavor, so use fresh cloves. The spices are key. Smoked paprika brings warmth without heat. If you love spice, cayenne pepper is a great choice. Always season with salt and pepper to taste. This ensures a balanced flavor in every bite. For toppings, fresh lime juice brightens the dish. Corn tortillas are soft and perfect for holding the filling. Shredded red cabbage adds crunch and color. A ripe avocado gives a creamy texture, while cilantro adds freshness. The lime wedges are a must for serving. This combination creates a tasty meal that is easy to prepare. For the full recipe, you can refer to the Garlic Butter Shrimp Tacos section above. - Melt the butter in a skillet over medium heat. - Sauté garlic until fragrant, about one minute. Be careful not to burn it. - Add smoked paprika and cayenne pepper to the sautéed garlic. - Cook shrimp until they turn pink and opaque, which takes about 3-4 minutes. - Warm corn tortillas in a dry skillet for about 30 seconds on each side. - Layer shredded cabbage, garlic butter shrimp, and avocado in each tortilla. You can find the full recipe for these delicious tacos in the original article. Enjoy your cooking! - Avoid overcooking shrimp for tenderness. Cook them just until they turn pink. - Use fresh lime juice for better flavor. It brightens the dish and adds zest. - Neatly stack tacos on a serving platter. This makes them look inviting and organized. - Use colorful plates to enhance presentation. Bright plates make your shrimp tacos pop! - Pair with a side salad or rice. This adds variety and makes the meal heartier. - Use additional garnishes like radishes or jalapeños. These add crunch and spice to your tacos. For the full recipe, check out Garlic Butter Shrimp Tacos! {{image_4}} To add some heat, adjust the cayenne pepper in the recipe. If you love spice, add sliced jalapeños right on top. These changes make the tacos fiery and fun. You can enjoy the rich garlic butter flavor with a spicy kick. Want to make it more colorful? Add toppings like corn or bell peppers. They add a sweet crunch. You can even swap the shrimp for grilled veggies. This makes it a tasty choice for vegetarians. It’s a great way to enjoy the same flavor with a twist. You can make it lighter without losing taste. Use whole wheat tortillas instead of corn ones. This gives you more fiber. If you want to cut down on fat, substitute butter with olive oil. It keeps the flavor while giving you a healthier option. For the full recipe, check out the details above and enjoy these delicious tacos! To keep your leftover shrimp fresh, store it in an airtight container. This helps prevent any strong odors from spreading in your fridge. I recommend eating the shrimp within 1-2 days for the best taste and texture. If you wait too long, the shrimp may lose its flavor and become rubbery. If you want to save shrimp for later, you can freeze it. Place the shrimp in a freezer-safe bag and remove as much air as possible. You can freeze the shrimp for up to 3 months. When you’re ready to enjoy your tacos again, reheat the shrimp gently on the stove. This keeps the shrimp tender and juicy. When reheating shrimp, use low heat. This method helps maintain its tenderness, so you don’t end up with chewy shrimp. For the tortillas, warm them separately in a skillet. This makes them soft and pliable, perfect for holding all the delicious fillings from your Garlic Butter Shrimp Tacos. For the full recipe, click here. - Yes, make sure to thaw and pat dry before cooking. Using frozen shrimp can save you time. Just remember to thaw it first. Place the shrimp in a bowl of cold water for about 15-20 minutes. After that, dry them well with a paper towel. This helps the shrimp cook evenly and absorb the garlic butter flavor. - Olive oil or vegan butter works well as alternatives. If you're looking for a healthier option, olive oil is a great choice. It adds a nice depth of flavor too. Vegan butter is an excellent choice for those who avoid dairy. Both will give you a tasty result without the creaminess of regular butter. - Marinate shrimp before cooking for enhanced flavor. Marinating shrimp is a fun way to add layers of taste. Try using lime juice, garlic, and herbs for a fresh twist. Let the shrimp sit in the marinade for about 15-30 minutes. This will deepen the flavor and make your tacos shine. - Yes, if using corn tortillas, ensure they are labeled gluten-free. Most corn tortillas are gluten-free. Just check the package to be sure. This makes it easy for those who need to avoid gluten. Pair them with fresh toppings for a delicious meal that everyone can enjoy. - Prepare shrimp and toppings ahead, but assemble just before serving for best results. To save time, you can cook the shrimp and prep your toppings in advance. Store them in the fridge. When you're ready to eat, just warm the shrimp and tortillas, then assemble your tacos. This keeps everything fresh and tasty. Garlic Butter Shrimp Tacos offer a simple and tasty dish. In this blog post, we covered key ingredients, step-by-step instructions, and storage tips. I shared cooking and presentation tricks to improve your meal. You can even explore variations for added fun. Remember, these tacos are easy to make and great for any occasion. Enjoy the blend of flavors, and don’t hesitate to try new toppings. Whether you keep it simple or get creative, these tacos will impress everyone at your table.

Garlic Butter Shrimp Tacos Flavorful and Easy Meal

Are you ready to spice up dinner with a quick and tasty meal? Garlic Butter Shrimp Tacos are here to

- 2 ripe avocados, halved and pitted - 1 cup cherry tomatoes, quartered - 1 cup fresh mozzarella balls, halved - 1/4 cup fresh basil leaves, chopped - 2 tablespoons balsamic glaze - 1 tablespoon extra virgin olive oil - 1 teaspoon sea salt - 1/2 teaspoon freshly ground black pepper - 1/2 teaspoon garlic powder (optional) To make Caprese stuffed avocados, you need fresh ingredients. Start with ripe avocados. They should feel slightly soft when you gently press them. This ensures they are creamy when you eat them. Next, cherry tomatoes add sweetness. Quarter them for easy mixing. Fresh mozzarella brings rich flavor and a nice texture. Halve the mozzarella balls for bite-sized pieces. Chop fresh basil leaves for a burst of flavor and color. Balsamic glaze gives a tangy sweetness. Extra virgin olive oil adds richness. Finally, sea salt and black pepper enhance all the flavors. Garlic powder is optional but adds depth. This blend of ingredients creates a delicious and vibrant dish. You can find the full recipe to guide you through the steps. To start, slice each avocado in half. Use a sharp knife and be careful. Remove the pit gently. Next, take a spoon and scoop out a little flesh from each half. This extra space will let you add more filling later. Keep the scooped avocado flesh aside for later use. In a mixing bowl, add the quartered cherry tomatoes, halved mozzarella balls, and chopped basil leaves. This mix creates the fresh Caprese flavor. Next, drizzle olive oil and balsamic glaze over the mixture. Sprinkle in the sea salt, black pepper, and garlic powder if you like. Gently toss everything together. Be careful not to mash the mozzarella; you want it to stay whole. Now it's time to bring it all together. Fold the reserved avocado flesh into the bowl with the tomato mix. Mix gently so you keep some chunks for texture. Then, spoon this vibrant filling into each avocado half. Pack it in well and let it overflow a bit to make it look pretty. Serve right away to enjoy the fresh flavors of these stuffed avocados! For the complete recipe, check the [Full Recipe]. To make your Caprese stuffed avocados shine, arrange them on a platter. Place each avocado half neatly. This makes serving easy and looks great. Drizzle some balsamic glaze on top. The glaze adds shine and flavor. For a fresh touch, garnish with fresh basil leaves. Their green color pops against the avocado and tomatoes. Adjust the salt and pepper to fit your taste. Start with the amounts in the recipe. You can always add more if needed. If you want to kick up the flavor, try adding garlic. Use garlic powder for a mild taste. Fresh garlic gives a stronger flavor. Experiment and find what you like best. For more ideas, check out the Full Recipe for Caprese Stuffed Avocados. {{image_4}} To make Caprese stuffed avocados your own, consider changing some ingredients. You can swap the mozzarella for other cheeses. Use feta or goat cheese for a tangy twist. They add a different flavor and texture that can surprise your taste buds. Adding proteins like chicken or shrimp can make this dish heartier. Simply grill or sauté the chicken or shrimp and mix it into the stuffing. You can even use canned tuna for a quick option. This way, you create a more filling meal. If you're aiming for vegan options, replace the cheese with vegan alternatives. Many brands offer plant-based mozzarella that melts well and tastes great. Use avocado oil instead of olive oil for a similar flavor. For those needing gluten-free meals, you're already in luck! The ingredients in Caprese stuffed avocados are naturally gluten-free. Just ensure any additional items, like balsamic glaze, do not contain gluten. This dish suits various diets while still being delicious. For the full recipe, check out the Caprese Stuffed Avocados section. To keep leftover stuffed avocados fresh, I suggest using an airtight container. This helps prevent browning and keeps the flavors intact. If you want to extend their life, add a squeeze of lemon juice to the exposed avocado flesh. This will slow down oxidation. Make sure to store them in the fridge. The cool temperature helps maintain their taste and texture. Reheating stuffed avocados can be tricky. I recommend enjoying them cold as a salad. This keeps the avocado creamy and the flavors vibrant. If you prefer warmth, you can use a microwave. Heat them for about 20 to 30 seconds. Be careful not to overheat, as this can make the avocado mushy. Alternatively, you can place them in an oven at 350°F for about 10 minutes. This option keeps the filling warm without losing the avocado's texture. Want to try making them? Check out the Full Recipe for all the details! You can prepare Caprese Stuffed Avocados ahead of time, but it's best to serve them fresh. If you want to prep, cut the avocados and make the filling. Store the filling in the fridge. Just before serving, scoop the filling into the avocados. This keeps the avocados from browning and losing texture. Caprese Stuffed Avocados pair well with many dishes. Here are some ideas: - Grilled chicken or shrimp for added protein - A crisp green salad for crunch - Garlic bread for a comforting touch - Quinoa or rice for a heartier meal Stuffed avocados stay good in the fridge for about one day. After that, the avocado can brown and lose its taste. To keep them fresh, store them in an airtight container. Enjoy them soon for the best flavor and texture. For the full recipe, check out the earlier section! In this blog post, we covered how to make tasty Caprese stuffed avocados. We started with the fresh, simple ingredients you'll need. Next, we walked through easy steps to prepare and fill the avocados. I shared tips for a gorgeous presentation and flavorful tweaks, plus variations for dietary needs. In closing, this dish is fun and unique. It’s perfect for any meal or snack. Enjoy your cooking and share these delicious avocados with friends!

Caprese Stuffed Avocados Fresh and Flavorful Delight

Looking for a fresh and tasty meal that’s easy to whip up? Look no further than Caprese Stuffed Avocados! This
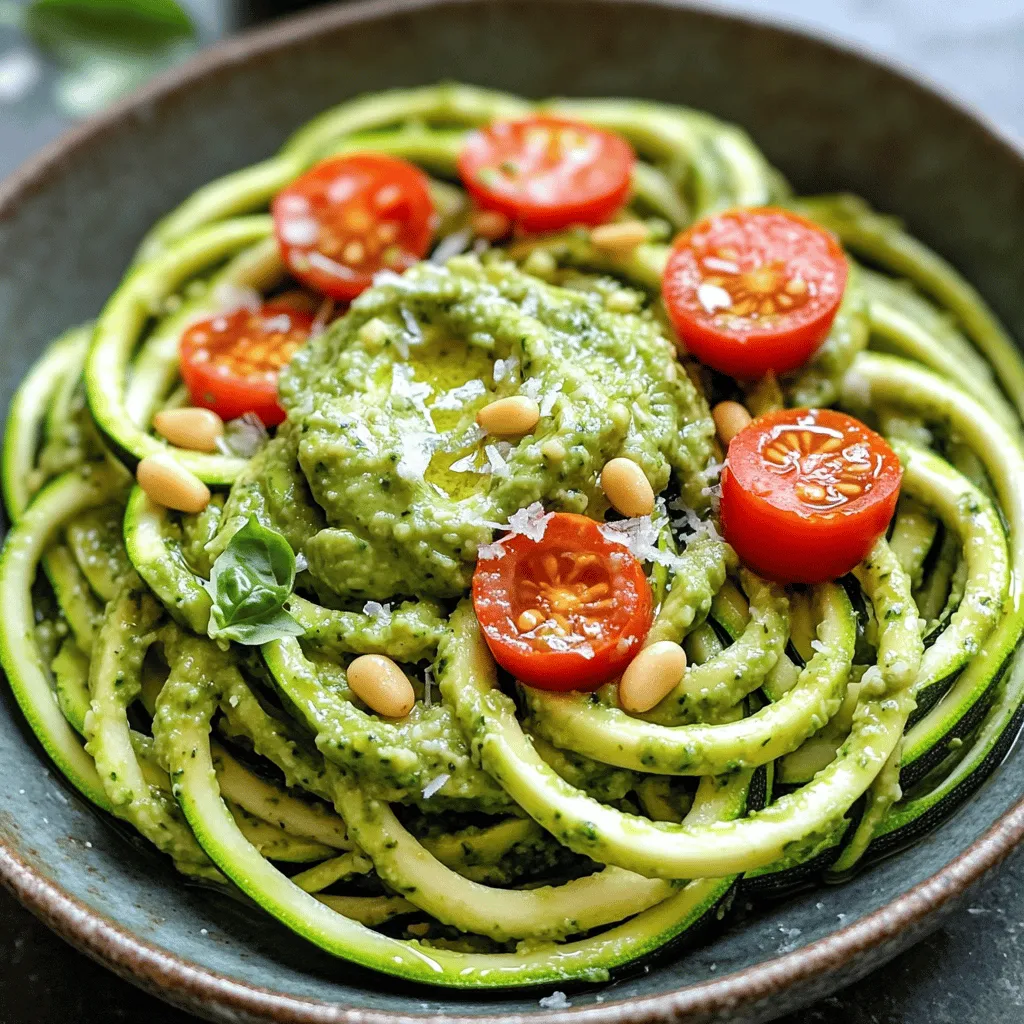
- 3 medium zucchini - 1 cup fresh basil leaves - 1/4 cup pine nuts or walnuts - 1/4 cup grated Parmesan cheese or nutritional yeast - 2 garlic cloves, minced - 1/4 cup high-quality olive oil - Salt and freshly ground black pepper to taste - Handful of cherry tomatoes, halved (for garnish) - Crushed red pepper flakes (optional) For this dish, you need fresh ingredients. Start with medium zucchini. They should be firm and bright. Fresh basil leaves add a fragrant touch. Pine nuts or walnuts give a nutty flavor and crunch. If you want a vegan option, use nutritional yeast instead of Parmesan. Garlic adds depth to the pesto. High-quality olive oil gives richness. Don’t forget salt and pepper to enhance all flavors. Cherry tomatoes add a pop of color. If you like heat, sprinkle some crushed red pepper flakes on top. - Caloric content per serving: Approximately 250 calories - Macronutrient breakdown: - Protein: 8g - Fat: 20g - Carbohydrates: 12g - Fiber: 4g This meal is low in carbs, making it a great choice. It’s light yet satisfying. The zucchini noodles provide a healthy base. Each serving has a good amount of healthy fats from olive oil and nuts. This balance keeps your meal tasty and nutritious. You can enjoy this dish guilt-free while getting essential nutrients. To start, you need to make zucchini noodles. You can use a spiralizer, a julienne peeler, or even a sharp knife. If you use a knife, cut the zucchini into thin strips. Once you have your noodles, place them in a colander. Sprinkle a little salt over them. This step is key. Salting will help pull out extra water, keeping your dish from being soggy. Let the zucchini rest for about 10 minutes. Now, let's make the pesto. You'll need a few simple ingredients: - 1 cup fresh basil leaves - 1/4 cup pine nuts or walnuts - 1/4 cup grated Parmesan cheese or nutritional yeast - 2 garlic cloves, minced - Salt and freshly ground black pepper to taste In a food processor, add the basil leaves, nuts, cheese, and minced garlic. Add a pinch of salt and pepper, too. Pulse it until everything is finely chopped. Next, with the food processor running, slowly pour in 1/4 cup of high-quality olive oil. Keep blending until the pesto is smooth. Taste it. You can add more salt or pepper if you want. It’s time to cook the zucchini noodles. Heat a little olive oil in a large skillet over medium heat. Add the zucchini noodles to the skillet. Sauté them for about 2-3 minutes. You want them to soften a bit but still have a nice crunch. Don’t overcook them! Once the noodles are just right, take the skillet off the heat. Add the pesto to the noodles. Toss everything together gently. Make sure the noodles are well coated in the sauce. Now, you can serve your zesty zucchini noodles in bowls. Garnish with halved cherry tomatoes. If you like some heat, sprinkle a few crushed red pepper flakes on top. Enjoy your vibrant and fresh dish! For the full recipe, check out the section above. To keep your zucchini noodles from getting soggy, you must salt them. After spiralizing, place them in a colander and sprinkle with salt. Let them sit for about 10 minutes. This draws out moisture. After resting, gently pat them dry with a paper towel. For perfect texture, cook the noodles for just 2-3 minutes. Heat a small amount of olive oil in a skillet over medium heat. Add the noodles and sauté until they soften but stay slightly crunchy. This way, they retain a nice bite. You can change up your pesto by adding different nuts. Pine nuts work great, but walnuts add a nice twist. You might also try almonds for a unique flavor. Each nut brings out a different taste in your dish. For cheese, Parmesan is classic, but you can swap it for nutritional yeast if you want a vegan option. You can also try feta or goat cheese for a tangy twist. These variations keep your dish exciting and fresh. When you plate your zucchini noodles, think about colors and shapes. Use a rustic bowl for a cozy feel. Add a drizzle of olive oil on top for shine. You can also sprinkle fresh basil leaves for a pop of green. To enhance flavors, consider adding toppings. Cherry tomatoes add color and sweetness. Crushed red pepper flakes give heat. You could also add toasted nuts for crunch. Each topping brings new layers of flavor and texture to your dish. For more ideas, check out the [Full Recipe]. {{image_4}} You can make your zucchini noodles even better by adding protein. Grilled chicken or shrimp works great. Both options add flavor and keep you full. You can also mix in other veggies. Bell peppers add a sweet crunch, while spinach gives a nice color. Try tossing in some chopped onions or mushrooms too. These extra ingredients make your dish more colorful and tasty. Pesto does not have to be just basil. You can try other herbs like parsley or cilantro for a fresh twist. Each herb brings its own unique flavor to the dish. Want more zing? Add lemon juice to your pesto. It gives a nice tang and brightens the sauce. You can also sprinkle in some red pepper flakes for heat. This simple change can take your dish from good to amazing. For the full recipe, you can check the detailed instructions above. To keep zucchini noodles fresh, store them in an airtight container. Place a paper towel inside to absorb moisture. This helps prevent sogginess. Store them in the fridge for up to two days. If you have leftover pesto, transfer it to a jar. Pour a thin layer of olive oil on top to keep it vibrant. Seal it tightly and store in the fridge for about a week. Reheat zucchini noodles gently to avoid mushiness. Use a pan on low heat. Add a splash of olive oil and stir often. Heat them for about two to three minutes. For pesto, heat it separately on low heat. Stir it often to keep the flavor intact. You can also add a splash of water if the pesto thickens too much. Enjoy your meal as if it were fresh! You can make zucchini noodles without a spiralizer using a few simple tools: - Julienne Peeler: This tool creates thin, noodle-like strips from zucchini. - Sharp Knife: You can cut the zucchini into thin, long slices. Aim for a size similar to spaghetti. - Box Grater: Grate the zucchini using the long side of the grater. You will get thinner noodles, which work well too. Each method gives a slightly different texture, but all are delicious! Yes, you can make pesto ahead of time. Here’s how to store it: - Refrigeration: Keep your pesto in an airtight container. It will last for about a week. - Freezing: For longer storage, freeze pesto in small containers or ice cube trays. It can last for several months this way. When you need some, just thaw what you need! This makes it easy to enjoy fresh pesto anytime. Yes, zucchini noodles are low-carb. Here are some key points: - One medium zucchini has about 4 grams of carbs. - They are a great alternative to pasta, which has many more carbs. - This dish is perfect for those on low-carb or ketogenic diets. Zucchini noodles provide a light and healthy option for meals, allowing you to enjoy pasta flavors without the carbs. We explored making delicious zucchini noodles with fresh pesto. You learned which ingredients to use and how to prepare them step-by-step. Cooking tips can help you achieve the best texture. Variations let you customize the dish to your taste. Lastly, proper storage keeps your leftovers fresh. Enjoy your healthy meal, and don’t hesitate to experiment with flavors! This dish is not just tasty; it's also a great way to eat better.

Zucchini Noodles with Pesto Flavorful Low-Carb Dish

Are you ready to enjoy a tasty, low-carb dish? Zucchini noodles with pesto deliver fresh flavor in every bite. This

Older posts
Newer posts
← Previous Page1 … Page60 Page61 Page62 … Page90 Next →

dsad

© 2025 recipetorch • Built with GeneratePress

Our Policies

  • Copyright Policy
  • Cookie Policy
  • GDPR Policy
  • Privacy Policy
  • Disclaimer
  • Terms Of Use

More Information

  • Home
  • About
  • Contact
  • Appetizers
  • Dessert
  • Dinner
  • Drinks
©2025, recipetorch About Back To Top