Skip to content
DisclaimerTerms Of UseGDPR PolicyCookie Policy

recipetorch

  • Home
  • Drinks
  • Appetizers
  • Dinner
  • Dessert
  • About
  • Contact
  • Privacy Policy
DisclaimerTerms Of UseGDPR PolicyCookie Policy

Nicole

To make Easy Caprese Salad Skewers, gather these simple ingredients: - 1 pint cherry tomatoes, halved - 8 oz fresh mozzarella balls (bocconcini) - 1 bunch fresh basil leaves - 2 tablespoons balsamic glaze - 1 tablespoon extra virgin olive oil - Salt and freshly cracked pepper to taste - Skewers (either wooden or metal) I suggest using ripe cherry tomatoes for the best flavor. Look for bright, firm tomatoes. For mozzarella, use fresh bocconcini. These small balls have a soft texture and a mild taste. Fresh basil leaves should be vibrant and fragrant. This adds a nice herbal note to the skewers. Balsamic glaze gives a sweet touch. Use quality extra virgin olive oil for richness. If you're vegan, replace mozzarella with plant-based cheese. Cherry tomatoes can be swapped with diced bell peppers for a crunch. For gluten-free needs, make sure your skewers are gluten-free. If you want to avoid oil, skip the olive oil and season with lemon juice instead. These swaps keep the dish tasty and enjoyable for everyone. You can find the full recipe linked above. First, gather your ingredients. You need cherry tomatoes, mozzarella balls, and fresh basil. Rinse the cherry tomatoes and basil under cold water. Pat them dry with a clean kitchen towel. This step keeps your ingredients fresh. Make sure your mozzarella is at room temperature. This helps it taste better. Take a skewer and start with a half cherry tomato. Next, add a fresh basil leaf. Follow this with a mozzarella ball. Repeat this pattern until the skewer is almost full. Aim for 3 to 4 sets of ingredients on each skewer. Leave an inch of space at both ends. This makes it easy to hold and eat. Keep the arrangement colorful and fun! Drizzle extra virgin olive oil over the assembled skewers. This adds a rich flavor. Sprinkle salt and freshly cracked pepper for seasoning. For a sweet touch, drizzle balsamic glaze on top. This makes the skewers look beautiful and shiny. Finally, arrange the skewers on a nice platter. You can add extra basil around them for color. For a fun idea, serve them upright in a tall glass. This makes a great display. For the full recipe, check the earlier section. To keep your Caprese salad skewers fresh, start with the best ingredients. Choose ripe cherry tomatoes; they should feel firm and bright. Look for mozzarella that is soft and slightly springy. Fresh basil leaves should be vibrant and fragrant. Store your ingredients in the fridge until you’re ready to use them. This keeps them at their peak freshness. You can make these skewers ahead of time. Assemble them a few hours before your event. Just drizzle the olive oil and balsamic glaze right before serving. This keeps the flavors bright. If you need to store them, place them in an airtight container. Keep them in the fridge for no more than 4 hours to enjoy the best taste. When serving these skewers, presentation matters. You can place them in a tall glass for a fun touch. Adding extra basil around them makes a colorful display. Consider pairing the skewers with a small bowl of extra balsamic glaze for dipping. This adds extra flavor and lets everyone customize their bites. These tips will help you impress your guests with ease! {{image_4}} You can switch up the ingredients based on what is fresh. In summer, add grilled zucchini or eggplant slices. In fall, try roasted butternut squash cubes. You can also use different herbs like mint or arugula for a new taste. Each season brings unique flavors that can make your skewers exciting. If you want a vegan version, swap mozzarella with marinated tofu or avocado cubes. You can find great plant-based cheeses that mimic mozzarella. This way, you keep the taste but remove dairy. Make sure to check the ingredients to ensure they are dairy-free and vegan-friendly. Serving your skewers creatively can impress your guests. Try placing them upright in a glass jar filled with rice or beans for a fun look. You can also lay them flat on a platter with fresh herbs around. Adding a small bowl of balsamic glaze for dipping makes it interactive and fun. These ideas add flair and charm to your dish. Store leftover skewers in an airtight container. Keep them in the fridge. They stay fresh for up to two days. If you use wooden skewers, be careful not to bend them. For best results, eat them soon after making. Store cherry tomatoes at room temperature. They taste better that way. Keep mozzarella balls in their liquid until ready to use. This keeps them moist and fresh. Fresh basil should stay in water, like a bouquet. Change the water daily to keep it vibrant. You can enjoy leftover skewers cold. They make a great snack! If you want warmth, put them in a pan on low heat for a few minutes. You can also chop leftovers and mix them into pasta salad. This gives a new twist to your meal. For the full recipe, check the earlier section. To make Caprese salad skewers, gather your ingredients first. You need cherry tomatoes, fresh mozzarella balls, basil leaves, balsamic glaze, olive oil, salt, and pepper. Rinse the tomatoes and basil under cold water, then pat them dry. Next, take a skewer and slide on a half cherry tomato, a basil leaf, and a mozzarella ball. Repeat this pattern until the skewer is nearly full. Drizzle olive oil over the skewers and season with salt and pepper. Finally, drizzle balsamic glaze for a tasty finish. This is how you create a fresh and vibrant dish. Yes, you can mix in other veggies! Bell peppers, zucchini, and cucumbers work well. These veggies add color and crunch. Feel free to experiment! Just make sure they pair nicely with the cheese and basil. Cut them into bite-sized pieces to fit on the skewer easily. Mixing flavors not only adds fun but also keeps each bite interesting. The best balsamic glaze is thick and sweet. Look for one made with quality balsamic vinegar. It should have a rich flavor and a nice sheen. Some brands add sugar or thickeners, but pure glaze is best. You can also make your own by simmering balsamic vinegar until it reduces. This homemade version can enhance your skewers even more. For a special touch, try flavored glazes like fig or raspberry. They can add a unique twist to your dish. For the full recipe, check out the details above. This blog post covered key elements for making delicious Caprese salad skewers. We explored the ingredients needed, focusing on freshness and possible substitutes. I provided step-by-step instructions to guide you through preparation and assembly. We also shared helpful tips for serving at gatherings and ideas for variations. Finally, I included storage tips to keep your skewers fresh. Enjoy experimenting with this recipe and making it your own! Your skewers will impress everyone at the table.

Easy Caprese Salad Skewers Fresh and Tasty Snack

If you’re looking for a fresh and tasty snack, these Easy Caprese Salad Skewers are perfect for you. They combine

- 1 lb pork shoulder, thinly sliced - 1/2 cup pineapple juice - 12 small corn tortillas - 2 tablespoons apple cider vinegar - 2 tablespoons chipotle in adobo sauce - 2 cloves garlic, minced - 1 tablespoon ground cumin - 1 tablespoon dried oregano - 1/2 teaspoon smoked paprika - Salt and black pepper to taste - 1/2 cup finely diced onion - 1/2 cup freshly chopped cilantro - Lime wedges, for serving Tacos Al Pastor burst with flavor and joy. The main ingredients are simple but key to taste. You start with tender pork shoulder. It is rich and juicy. Pineapple juice adds a sweet twist. Corn tortillas hold it all together. They are soft and warm, perfect for tacos. Next comes the marinade. This is where magic happens. Mix apple cider vinegar with chipotle in adobo. Add minced garlic and spices like cumin and oregano. These flavors blend and create a punchy sauce. Salt and pepper help bring it all together. For toppings, keep it fresh! Diced onion adds crunch. Chopped cilantro brings brightness. Finally, lime wedges give a zesty kick. You can squeeze the lime over your tacos for extra flavor. This recipe truly shines with each bite. Check out the [Full Recipe] for detailed steps on making these tacos at home. To create the marinade, mix the following ingredients in a large bowl: - 1/2 cup pineapple juice - 2 tablespoons apple cider vinegar - 2 tablespoons chipotle in adobo sauce - 2 cloves garlic, minced - 1 tablespoon ground cumin - 1 tablespoon dried oregano - 1/2 teaspoon smoked paprika - Salt and black pepper to taste Whisk them together until well blended. This marinade packs a punch and gives your pork great flavor. Combining these ingredients is key. The pineapple juice adds sweetness while the chipotle gives it a nice kick. Once your marinade is ready, it’s time to marinate the pork. Take 1 lb of thinly sliced pork shoulder and place it in the bowl with the marinade. Make sure every piece is coated. Cover the bowl with plastic wrap or a lid. Place it in the fridge. For the best flavor, marinate for at least 2 hours, but overnight is even better. This allows the pork to soak up all that delicious flavor. When you’re ready to cook, preheat your grill or skillet over medium-high heat. Lay the marinated pork slices on the grill. Cook them for about 4-5 minutes on each side. You want the pork to be fully cooked and slightly charred. This adds a smoky flavor. While the pork cooks, grill the pineapple rings for about 2-3 minutes on each side. They should caramelize nicely. Once grilled, chop the pineapple into small pieces to add to your tacos. After cooking, transfer the pork to a cutting board. Let it rest for a few minutes. This helps keep it juicy. Then, slice the pork into bite-sized pieces. Warm your corn tortillas on the grill or in a dry skillet for about 30 seconds on each side. This makes them soft and easy to fold. Now it’s time to assemble your tacos! Place a generous spoonful of the chopped pork on each tortilla. Top with diced onions, fresh cilantro, and pieces of grilled pineapple. Serve them with lime wedges for a zesty squeeze over the top. Enjoy your mouthwatering tacos al pastor! For more details, check the Full Recipe. For mouthwatering tacos al pastor, the marinade is key. To help the pork soak up flavor, marinate it for at least two hours. For best results, try marinating overnight. This allows the spices to penetrate deeply. If you lack some ingredients, don’t fret! You can use lime juice instead of apple cider vinegar. You could also swap chipotle with regular chili powder for a milder taste. When grilling pork, pay attention to the temperature. Preheat your grill or skillet to medium-high heat. This helps achieve a nice char. Cook the pork for about 4-5 minutes on each side. Look for a golden-brown crust—that’s where the flavor hides! If you want to avoid drying out the pork, let it rest after cooking. This keeps it juicy and tender. How you plate your tacos can make them even more inviting. Use a colorful platter to showcase the tacos. Garnish with extra cilantro and lime wedges for a fresh look. Consider serving a side of salsa or guacamole for added flavor. A simple side of chips can also create a fun taco night! {{image_4}} You can switch up the meat in tacos al pastor. Chicken is a great choice if you want a lighter option. Use boneless, skinless chicken thighs for juicy results. For beef lovers, flank steak works well. Just marinate and cook it like pork. If you prefer a meat-free meal, try using jackfruit. It shreds nicely and soaks up flavor. Adding fresh fruit can take your tacos to another level. Mango or peach adds sweetness. You can even try adding grilled jalapeños for heat. Adjust the spice level by adding more or less chipotle in adobo. If you love heat, throw in some fresh chili peppers. You can also mix in lime juice for a bright zing. If you need gluten-free options, use corn tortillas. They are delicious and safe for those with gluten issues. For a low-carb alternative, lettuce wraps work great. Just fill crisp lettuce leaves with your pork and toppings. They give a nice crunch without the carbs. Enjoy your tacos with no worries about dietary needs! To keep your tacos fresh, place leftovers in an airtight container. This keeps them safe from air and moisture. Store them in the fridge for up to three days. After three days, the taste may fade and the texture may change. You can freeze leftover pork and tacos. Wrap the pork tightly in plastic wrap, then place it in a freezer bag. For tacos, store them in an airtight container. Use them within three months for the best flavor. For reheating, thaw the pork in the fridge overnight. Heat it in a skillet over medium heat until warm. If you freeze tortillas, warm them in a dry skillet before adding the pork. Enjoy your meal like it’s fresh! Tacos Al Pastor come from Mexico. They blend flavors from the Middle East and Mexico. The dish has roots in Lebanese cuisine, brought by immigrants in the 1920s. They used a cooking method called "trompo," which means "spinning top." The pork is marinated and cooked on a vertical spit, much like shawarma. This method gives the meat a unique taste and texture. Yes, you can make Tacos Al Pastor without a grill. You can use a stovetop skillet instead. Just heat a pan over medium-high heat. Add the marinated pork and cook until done. It will still taste great! For a nice char, you can use a broiler as well. To enhance flavor, consider adding more spices. You can try a dash of cinnamon or a pinch of allspice. Fresh lime juice adds brightness, too. Pair your tacos with fresh salsas or pickled onions. They add a nice crunch and tang. The best Tacos Al Pastor can often be found at local taquerias. Look for places that cook meat on a vertical spit. Ask locals for their favorite spots. Authentic tacos will have fresh ingredients and bold flavors. You now have the tools to make tasty Tacos Al Pastor. We covered key ingredients, marinade tips, and cooking steps. You learned ways to store leftovers and explore variations. Remember, the right marinade and cooking techniques make a big difference. Tacos can fit many diets, so get creative! With this guide, you'll impress everyone at your next meal. Enjoy tasty tacos and share your success!

Mouthwatering Tacos Al Pastor Easy and Flavorful Meal

Do you crave a tasty meal that’s easy to make? Tacos Al Pastor is the answer! This dish brings together

- 4 boneless, skinless chicken thighs - 1 bunch of asparagus, trimmed - 4 cloves of garlic, minced - Zest and juice of 1 large lemon - 2 tablespoons extra virgin olive oil - 1 teaspoon dried oregano - 1 teaspoon smoked paprika - Salt and freshly ground black pepper, to taste - Fresh parsley, finely chopped, for garnish For this dish, I love using fresh chicken thighs. They stay juicy and tender. Asparagus adds a nice crunch and bright color. The garlic and lemon bring a zesty punch that wakes up all the flavors. I recommend using a good-quality olive oil. It makes a big difference in taste. Dried oregano adds a warm, herbaceous note. Smoked paprika gives a mild, sweet smokiness that enhances the dish. Don’t forget the salt and pepper. They help balance the flavors. Fresh parsley is not just for looks. It adds freshness and a hint of earthiness to the final dish. For the complete recipe, check out the Zesty Lemon Garlic Chicken & Asparagus Delight . Enjoy your cooking! - Preheat oven to 400°F (200°C). - Prepare the marinade in a mixing bowl. Start by heating your oven. This step is key for a tasty dish. Gather your mixing bowl and add the olive oil, minced garlic, lemon zest, and lemon juice. Next, toss in the dried oregano, smoked paprika, salt, and pepper. Whisk it well until all the flavors blend together. - Coat the chicken thighs with the marinade. - Let the chicken marinate for 15 minutes. Take the chicken thighs and coat them in the marinade. Make sure each piece is covered. Set the chicken aside for about 15 minutes. This time allows the flavors to soak in. You can use this time to get ready for the next steps. - Arrange asparagus in an oven-safe pan and season. - Nestle marinated chicken on top. While the chicken marinates, grab your asparagus. Place the trimmed spears in a large oven-safe pan. Drizzle with a little olive oil and sprinkle with salt and pepper. Toss the asparagus gently to coat. Now, carefully nestle the marinated chicken thighs on top of the asparagus. This creates a lovely mix of flavors. - Bake for 25-30 minutes until chicken is cooked. - Broil for an additional 2-3 minutes for a golden crust. Once everything is arranged, slide the pan into the preheated oven. Bake for 25-30 minutes. Check the chicken for a golden color and an internal temperature of 165°F (75°C). For an extra touch, turn on the broiler for 2-3 minutes. This gives the chicken a nice, crispy crust. Keep an eye on it so it doesn’t burn! - Allow to rest and garnish before serving. After baking, remove the pan from the oven. Let the dish rest for a few minutes. This helps the juices settle. Before serving, sprinkle fresh parsley on top for a burst of color. Enjoy this delightful dish with family or friends! For the best taste, let your chicken marinate for at least 15 minutes. This time helps the flavors soak in well. If you have extra time, marinating for up to 2 hours in the fridge can add even more depth to the dish. When seasoning, balance is key. Use a mix of salt and black pepper to enhance the chicken's flavor. The lemon juice adds brightness, so don’t skip it. The smoked paprika gives a warm touch that complements the garlic and lemon. Adjust the spices to match your taste. To bake chicken perfectly, preheat your oven to 400°F (200°C). This temperature ensures even cooking. Arrange the chicken thighs in a single layer to avoid steam. This method helps the chicken become golden and juicy. As for asparagus, avoid overcooking it. Bake it for only 20 minutes with the chicken. This keeps it tender yet crisp. If you like a bit of crunch, toss the asparagus in just a splash of oil and season well before baking. For sides, consider serving this dish with fluffy rice or crusty bread. Both options soak up the tasty juices well. A light salad with fresh greens pairs well too, adding a nice contrast. For presentation, serve on a large platter. Arrange the chicken and asparagus neatly. Drizzle any leftover pan juices over the dish for extra flavor. Garnish with lemon wedges and chopped parsley for a bright touch. This will make your meal look as great as it tastes! {{image_4}} You can easily swap chicken thighs for chicken breasts. Breasts cook faster, so adjust your time. If you want a leaner cut, go for breasts. They still stay juicy with the marinade. You can also change the veggies. Broccoli, green beans, or bell peppers work great. Each gives a new twist to the dish. Just make sure to cut them into similar sizes for even cooking. Try adding fresh herbs like thyme or rosemary. They bring a nice aroma and flavor. You can also use spices like cumin or chili powder for heat. These small changes can make a big difference. If you love cheese, sprinkle some feta or parmesan on top. Adding cheese can make the dish creamy and rich. Just remember to add it near the end of baking for the best melt. To make it gluten-free, ensure your spices have no gluten. Most spices are safe, but check the labels. This dish is also low-carb, so it fits many diets. If you want a vegetarian option, use chickpeas or tofu instead of chicken. Both options soak up the marinade well. Cook them until they are golden and crispy for the best taste. To store leftovers, let the dish cool. Place it in an airtight container. Make sure to cover it well. This helps keep the flavors fresh. Store it in the fridge for up to three days. You can freeze the chicken and asparagus together. First, let the dish cool completely. Then, put it in a freezer-safe container. Press out as much air as you can. This prevents freezer burn. You can freeze it for up to three months. To reheat, thaw it overnight in the fridge. Then, heat it in the oven at 350°F (175°C) until warm. Adding a splash of water helps keep it moist. Cover the dish with foil to avoid drying out. In the fridge, the dish lasts for three days. In the freezer, it stays good for three months. For the best taste, eat it within these times. Enjoy your meal again without losing flavor! Can I use frozen chicken for this recipe? Yes, you can use frozen chicken. Just thaw it first. Thawing ensures even cooking. I recommend marinating the chicken after it is fully thawed. This adds flavor and helps keep it juicy. What is the recommended internal temperature for chicken? The safe internal temperature for chicken is 165°F (75°C). Use a meat thermometer for accuracy. It ensures the chicken is cooked through and safe to eat. What can I use instead of fresh garlic? If you don’t have fresh garlic, garlic powder is a good swap. Use 1/8 teaspoon of garlic powder for each clove needed. This gives a nice garlic flavor, though it won’t be as strong. Can I use other citrus fruits instead of lemon? Yes, other citrus fruits work well. Try lime or orange for a different taste. Each fruit will change the flavor, but they will still taste great with chicken and asparagus. How many servings does this recipe yield? This recipe serves four. It’s perfect for a family meal or dinner with friends. You can easily double the recipe for larger gatherings. What is the approximate calorie count per serving? Each serving has about 350 calories. This makes it a healthy choice for dinner. Pair it with a salad for a balanced meal. For the complete recipe and details, refer to the Zesty Lemon Garlic Chicken & Asparagus Delight . You now have a fun and easy recipe for Zesty Lemon Garlic Chicken and Asparagus. We covered fresh ingredients, a simple marinade, and easy steps for cooking. I shared tips to keep the flavors perfect and ideas for variations that suit your taste. Remember, balancing flavors is key. Enjoy each bite and don’t hesitate to make it your own. This dish is not just tasty but also great for any meal. Get cooking, and impress your friends and family!

One-Pan Lemon Garlic Chicken and Asparagus Delight

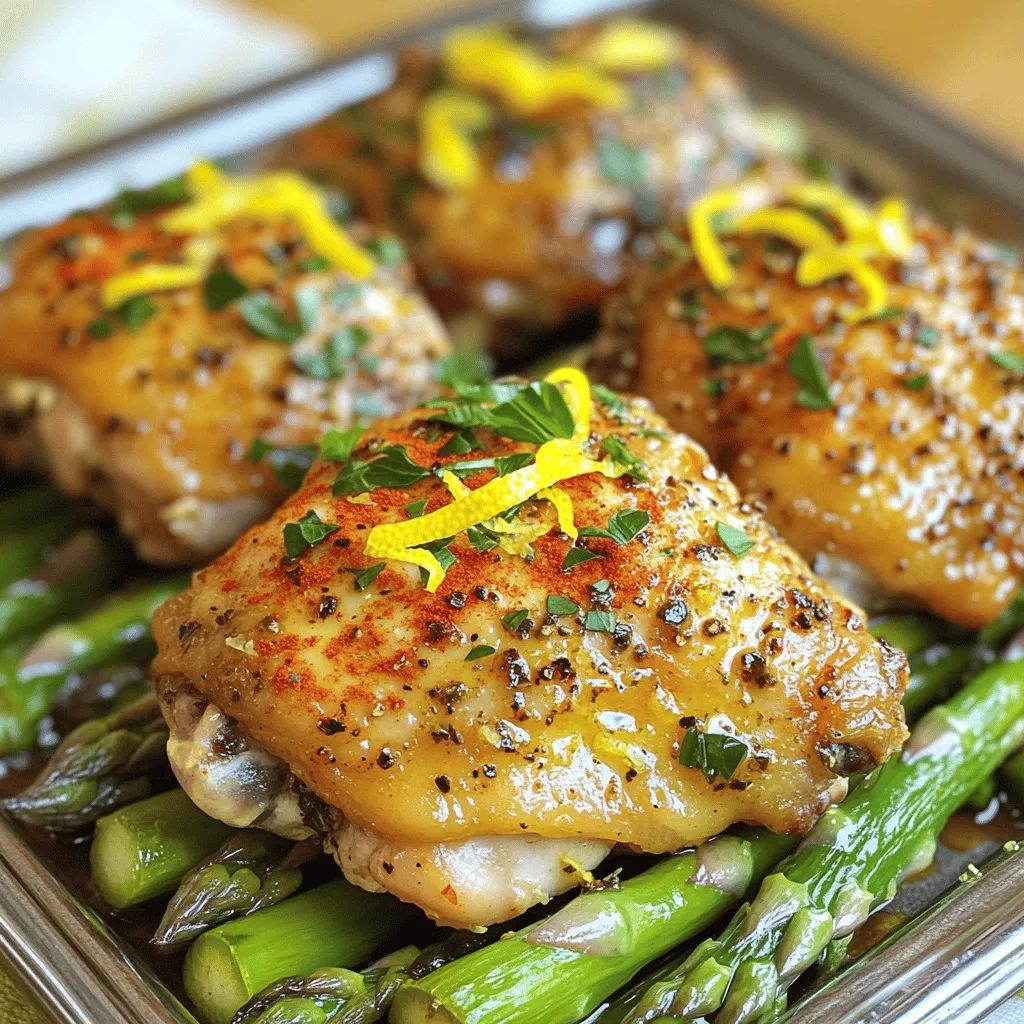
Are you ready to whip up a quick and tasty dish? Get excited about One-Pan Lemon Garlic Chicken and Asparagus

- 1 can chickpeas - Tahini, Dijon mustard, and lemon juice The star of this sandwich is the chickpeas. They bring a creamy texture and are packed with protein. I love using a can of chickpeas. It’s quick and easy. Just rinse and drain them well. Next, I mix in tahini, Dijon mustard, and fresh lemon juice. This blend adds a rich, tangy flavor that makes the salad shine. - Red onion, celery, cucumber - Fresh parsley, salt, and pepper Adding fresh veggies is crucial. I often use red onion for a nice bite. Celery provides some crunch, while diced cucumber adds a refreshing touch. I chop these finely to mix well into the chickpea base. Fresh parsley brightens the dish, making it look and taste vibrant. Don’t forget to season with salt and pepper. This step makes all the flavors pop. - Whole grain or gluten-free bread - Crisp lettuce and fresh tomato Choosing the right bread is key. Whole grain adds fiber and taste. If you need gluten-free, there are many options available. I like to layer crisp lettuce and fresh tomato on the sandwich. The lettuce adds a nice crunch, while the tomato brings sweetness. Together, they create a balanced and tasty meal. For the full recipe, check out the details above. First, you need to rinse and drain the chickpeas. Use a can of chickpeas and place them in a strainer. Rinse them under cold water until they are clean. This step removes extra salt and helps keep the salad fresh. Next, we will mash the chickpeas. You can use a fork or a potato masher. Gently mash the chickpeas. Leave some chunks intact. This gives a nice texture to the sandwich. Now, it's time to mix the ingredients. In a medium bowl, combine the mashed chickpeas with tahini and Dijon mustard. Add one tablespoon of freshly squeezed lemon juice. Mix everything well. You want a creamy and tasty base for your salad. Next, fold in the vegetables. Add finely diced red onion, minced celery, and diced cucumber. Sprinkle in the chopped fresh parsley. Stir everything until well combined. This mix adds crunch and flavor. Finally, season your mixture with salt and freshly ground black pepper. Taste it to make sure the flavors are balanced. Adjust the seasoning as needed. To assemble your sandwich, you can toast the bread if you like. Preheat a skillet or toaster. Toast the slices until golden brown and crispy. Now, layer the sandwich. Spread a generous amount of the chickpea mixture on two slices of bread. Add crisp lettuce leaves and fresh tomato slices on top. These add freshness and color. Top each sandwich with the remaining slices of bread. Press down gently. If you want, slice the sandwiches in half for easier eating. Serve immediately for the best taste and texture. For the full experience, check out the Full Recipe. Enjoy your flavorful Vegan Chickpea Salad Sandwich! To get the best texture for your chickpea salad, start by mashing the chickpeas. Use a fork or potato masher to gently crush them. Aim for a mix of mashed chickpeas and some whole ones. This gives your salad a nice bite and keeps it interesting. Spices can take your chickpea salad to the next level. Try adding garlic powder or smoked paprika for depth. You can also experiment with different mustards. A spicy brown mustard offers a nice kick, while a sweet mustard can add a fun twist. When serving, think about how it looks. Place your sandwiches on a wooden board for a rustic feel. Add a side of crunchy pickles for a nice contrast. A sprig of parsley on top adds a pop of color. For a full experience, serve with a side salad or some baked chips for crunch. Check out the Full Recipe for a tasty meal that is as beautiful as it is delicious. {{image_4}} You can make your vegan chickpea salad even better by adding a few things. Try mixing in diced avocado for creaminess. It gives the salad a rich texture. Another great option is olives. They add a salty kick and a nice bite. You can also play with herbs. Fresh dill or cilantro can change the flavor. They add a zesty note that brightens the salad. Experiment with what you like best! If you need a gluten-free choice, there are many options. You can use gluten-free bread that you enjoy. Many types are now available at stores. Another fun idea is to turn the salad into wraps. Use lettuce leaves or gluten-free wraps. This is great for a light meal or snack. Just spoon the chickpea salad into the wrap, roll it up, and enjoy! Want to spice things up? Add some jalapeños! They give your sandwich a nice heat. You can adjust the amount to match your taste. For a sweeter touch, try adding diced bell peppers. They bring a nice crunch and a pop of color. This makes your chickpea salad sandwich even more appealing. For the full recipe, check out the Chickpea Delight Sandwich 🥪. To keep your Vegan Chickpea Salad Sandwich fresh, store any leftovers in an airtight container. This helps prevent drying out. Place the salad mixture in one container and the bread in another. This keeps the bread from getting soggy. - Use glass or BPA-free plastic containers for storage. - Label the container with the date for easy tracking. The salad can last in the fridge for about 3 to 4 days. If you want to keep it longer, consider freezing the chickpea salad mixture. However, I do not recommend freezing the assembled sandwiches. They may lose their texture and flavor when thawed. - Store in the fridge for 3-4 days. - Freeze the salad mixture for up to 3 months. You can serve the sandwich cold straight from the fridge. If you prefer it warm, reheat the chickpea salad in a pan over low heat. Be careful not to overheat, as this can change the texture. - Avoid microwaving assembled sandwiches; they may become soggy. - Toast the bread separately if you want a warm sandwich. For the complete recipe, check out the Full Recipe. To make this sandwich, start with one can of chickpeas. Rinse and drain them well. In a medium bowl, mash the chickpeas with a fork, leaving some pieces whole. This gives the sandwich a nice texture. Next, mix in two tablespoons of tahini, one tablespoon of Dijon mustard, and the juice of one lemon. Stir until it’s smooth and creamy. Now, add in chopped red onion, minced celery, diced cucumber, and fresh parsley. Season with salt and pepper to taste. Spread the mixture on your bread. You can toast the bread if you want it crispy. Layer with lettuce and tomato. Enjoy your meal! Yes, you can! Feel free to add your favorite veggies. Some great options are: - Avocado slices for creaminess - Bell peppers for sweetness - Spinach for extra greens - Shredded carrots for crunch These add-ins can make your sandwich even more colorful and tasty! Absolutely! This sandwich is great for meal prep. You can make the chickpea salad ahead of time. Store it in an airtight container in the fridge for up to three days. Keep the bread separate to avoid sogginess. When you're ready to eat, just grab the salad and bread, and assemble your sandwich. This makes lunch quick and easy, even on busy days! For the full recipe, check out the Chickpea Delight Sandwich. In this blog post, I covered how to make a tasty Vegan Chickpea Salad Sandwich. We looked at key ingredients, like chickpeas, tahini, and fresh veggies. I also shared tips on prepping, mixing, and assembling your sandwich. Finally, try adding your favorite flavors or vegetables to make it unique. This sandwich is easy to customize and perfect for meal prep. Enjoy your cooking adventure!

Vegan Chickpea Salad Sandwich Packed with Flavor

Ready to spice up your lunch? This Vegan Chickpea Salad Sandwich is packed with flavor and goodness. With a simple

- 1 block firm tofu - 1 red bell pepper - 1 cup broccoli florets - 1 cup snap peas - 1 medium carrot - 1 cup baby corn - 2 cloves garlic - 1 teaspoon freshly grated ginger For this recipe, I always choose firm tofu. It holds its shape well and absorbs flavors nicely. Fresh vegetables make a big difference too. I love using colorful bell peppers, crunchy snap peas, and bright broccoli for their taste and texture. Carrots add sweetness, while baby corn gives a fun crunch. - 2 tablespoons soy sauce - 1 tablespoon sesame oil - 2 tablespoons cornstarch - Salt and pepper Soy sauce adds a rich flavor to the stir-fry. I use sesame oil for its nutty taste. Cornstarch is key for crispy tofu. Just a pinch of salt and pepper brings all the flavors together. - Cooked rice - Noodles I like to serve my vegetable stir-fry over fluffy rice or warm noodles. Both choices soak up the sauce well. You can customize your meal by adding extra toppings, like green onions or sesame seeds. For the full recipe, you can check my detailed instructions. First, cut the pressed tofu into bite-sized cubes. You want them small enough to cook well. Next, use a paper towel to pat the tofu dry. This step is key to getting a crispy texture. Then, toss the tofu cubes gently in cornstarch until they are fully coated. This coating helps to crisp up the tofu when cooked. In a large non-stick skillet or wok, heat 1 tablespoon of sesame oil over medium-high heat. Wait until the oil starts to shimmer. Add the coated tofu cubes to the hot oil. Fry the tofu, turning it every few minutes. Cook until all sides are golden brown and crispy, about 8 to 10 minutes. Once done, take the tofu out and set it aside on a plate. In the same skillet, add a little more sesame oil if needed. Add the minced garlic and freshly grated ginger. Sauté them for about 30 seconds. You want to release their wonderful aroma. Next, toss in all your prepared vegetables: red bell pepper strips, broccoli florets, snap peas, julienned carrot, and sliced baby corn. Stir-fry this mix for about 5 to 7 minutes. You want the vegetables to stay bright and tender-crisp. Keep moving them around to maintain their color. Now, it’s time to bring everything together! Return the cooked tofu to the skillet. Pour in the soy sauce evenly over the stir-fry. Gently toss all the ingredients together. Make sure everything is well-coated and heated through. Cook for another 2 to 3 minutes. Finally, taste your stir-fry and add salt and pepper as needed. Before serving, sprinkle the chopped green onions on top for a fresh touch. For the full experience, you can check the [Full Recipe]. Enjoy your vibrant and tasty vegetable stir-fry with tofu! To get crispy tofu, start with drying it well. When tofu holds water, it won’t crisp up. Use paper towels to pat the tofu cubes dry. After this, coat them with cornstarch. This thin layer helps create a crunchy crust. Make sure to toss the tofu gently in the cornstarch. Even coverage is key for that perfect crispiness. To keep vegetables bright and crunchy, stir-fry them quickly on high heat. It allows them to cook but stay fresh. Try using a mix of colorful vegetables like bell peppers, broccoli, and snap peas. Carrots and baby corn add sweet notes and fun textures. Each vegetable brings something special to your dish. Seasoning can make a big difference. Soy sauce adds a salty depth, but you can adjust it to your taste. If you like heat, try adding red pepper flakes or a dash of hot sauce. For a fresh kick, add a squeeze of lime juice right before serving. This little change can brighten up the whole dish. For more ideas, check out the Full Recipe. {{image_4}} You can switch out tofu for other proteins. Chicken is a popular choice. It adds a different flavor and texture. You can also use tempeh for a plant-based option. Tempeh has a nutty taste and is high in protein. When you swap proteins, consider their nutritional value. Chicken has more protein but fewer fibers. Tempeh offers good protein and healthy fats. Each option can change the dish's taste, so choose what you like best. Feel free to change the veggies based on the season. In spring, try asparagus or peas. In fall, use squash or Brussels sprouts. Seasonal veggies are fresh and flavorful. You can also use frozen vegetables. They are quick and easy. Look for frozen stir-fry mixes; they often have a good mix of colors and flavors. Soy sauce is great, but you can explore other sauces. Teriyaki sauce adds a sweet, savory taste. Peanut sauce brings in a nutty flavor that pairs well with the veggies. If you want to make your own sauce, combine soy sauce, peanut butter, and a bit of lime juice. This mix is simple and tasty. You can find the full recipe to try different sauce ideas. To keep your vegetable stir-fry fresh, cool it down quickly. Spread the stir-fry on a plate to let heat escape. Once cooled, transfer it to an airtight container. I recommend glass containers as they keep food fresh and are easy to clean. For the best taste, reheat your stir-fry on the stove. Add a splash of water or soy sauce to keep it moist. Heat over medium heat for about 5 minutes, stirring often. This helps maintain the texture and flavor of the vegetables and tofu. You can freeze your vegetable stir-fry, but it's best to freeze it without the rice or noodles. Separate the tofu and veggies into portions. Use freezer bags or airtight containers. To thaw, place it in the fridge overnight. Reheat on the stove for fresh results. To make this dish, you follow simple steps. First, cut firm tofu into cubes. Pat the tofu dry and coat it with cornstarch. Next, heat sesame oil in a pan and fry the tofu until crispy. Remove it from the pan. Then, add garlic and ginger to the hot pan. After that, toss in your choice of vegetables and stir-fry them until bright and tender. Finally, return the tofu to the pan, add soy sauce, and mix everything well. This quick method gives you a tasty and colorful meal. You can find the full recipe in earlier sections. Yes, you can swap out vegetables. Feel free to use what you have at home. Some great options are bell peppers, zucchini, mushrooms, or asparagus. Seasonal vegetables work well too. Just remember to cut them into similar sizes for even cooking. This flexibility keeps your stir-fry fresh and exciting. Yes, but you need to choose the right soy sauce. Regular soy sauce contains gluten. Look for tamari or gluten-free soy sauce to keep it safe. These options give you the same flavor without the gluten. Always check the label to be sure. This stir-fry pairs nicely with rice or noodles. Both give you a filling meal. You can also serve it with a side salad for extra crunch. If you want more protein, consider adding edamame or grilled chicken on the side. These options enhance your meal's nutrition and taste. Vegetable stir-fry can last in the fridge for about three to four days. Always store it in an airtight container. Make sure to cool it down before putting it away. When reheating, use a skillet or microwave to warm it gently. This helps keep the veggies crisp and the flavors bright. In this blog post, I covered how to make a tasty vegetable stir-fry with tofu. We explored the main ingredients, step-by-step cooking instructions, and helpful tips. You can add your favorite vegetables or sauces to make it your own. Remember to store leftovers properly for future meals. This dish is easy to customize and always satisfying. Enjoy making it your way and share it with friends. Simple steps lead to great meals!

Flavorful Vegetable Stir-Fry with Tofu Recipe

Are you craving a quick and healthy meal? This Flavorful Vegetable Stir-Fry with Tofu recipe is the answer! Packed with

- 1 cup quinoa, rinsed thoroughly - 2 cups vegetable broth or water - 1 cup cherry tomatoes, halved - 1 cucumber, diced into small cubes - 1/2 red onion, finely chopped - 1 red bell pepper, diced - 1 cup canned chickpeas, rinsed and drained - 1/2 cup kalamata olives, pitted and sliced - 1/4 cup fresh parsley, finely chopped - 1/4 cup feta cheese, crumbled (optional) - 3 tablespoons extra virgin olive oil - 2 tablespoons fresh lemon juice - 1 teaspoon dried oregano - Salt and freshly ground pepper to taste The ingredients for the Mediterranean Quinoa Bowl are simple yet vibrant. Each one adds a unique flavor. The quinoa serves as the hearty base, providing protein and fiber. I love using vegetable broth for cooking it; it adds depth to the flavor. The cherry tomatoes burst with sweetness. The cucumber offers a refreshing crunch. The red onion and red bell pepper lend their distinct tastes. The chickpeas pack in more protein, making this meal filling. Kalamata olives introduce a salty, briny kick. Fresh parsley brightens the dish with its herbal notes. If you like cheese, add feta for creaminess. The dressing is where the magic happens. Extra virgin olive oil provides richness while lemon juice adds a zesty touch. Dried oregano brings a hint of earthiness. Don’t forget salt and pepper; they enhance all the flavors. For the complete recipe and instructions, check out the [Full Recipe]. - Bring vegetable broth or water to a boil. - Add rinsed quinoa and reduce heat to low. - Let simmer until the liquid is absorbed and quinoa is fluffy. Cooking quinoa is simple. Start by boiling your vegetable broth or water in a medium pot. Once it's bubbling, add the rinsed quinoa. Remember to reduce the heat to low. Cover the pot and let it simmer for about 15 minutes. This allows the quinoa to absorb the liquid. When done, fluff it with a fork for that perfect texture. - Combine cherry tomatoes, cucumber, red onion, bell pepper, chickpeas, and olives in a bowl. - Stir gently to mix the ingredients. While the quinoa cooks, chop your vegetables. In a large mixing bowl, add the halved cherry tomatoes, diced cucumber, finely chopped red onion, diced bell pepper, rinsed chickpeas, and sliced kalamata olives. Stir gently to mix everything together. This mix brings fresh flavors and colors to your bowl. - Whisk together olive oil, lemon juice, oregano, salt, and pepper. - Taste and adjust seasoning if needed. For the dressing, grab a small bowl. Whisk together olive oil, fresh lemon juice, dried oregano, salt, and pepper. This creates a zesty dressing that ties everything together. Taste it and adjust the seasoning if needed. You can add more lemon or salt to suit your taste. - Add cooked quinoa to the vegetable mixture. - Drizzle dressing and toss until evenly combined. Now that everything is ready, add the cooked quinoa to your bowl of veggies. Drizzle your freshly made dressing over the top. Toss all the ingredients together gently until everything is well mixed. This step ensures that every bite is flavorful. - Fold in parsley and feta cheese. - Adjust seasoning to taste. For the final touches, fold in the chopped parsley and crumbled feta cheese if you’re using it. This adds a fresh burst and creamy texture. Taste the mixture and adjust the seasoning again if necessary. A little more salt or lemon juice can enhance the flavors even more. Now you’re ready to enjoy your Mediterranean Quinoa Bowl! For the detailed recipe, check out the Full Recipe. - Prepare ingredients in advance to save time during the week. - Store cooked quinoa and chopped vegetables separately for better freshness. Meal prep helps you enjoy this dish easily. Cook quinoa on Sunday and use it all week. Chop your veggies in advance. This makes assembly quick and easy on busy days. - Experiment with fresh herbs like mint or dill for added flavor. - Use lemon zest for an extra citrusy aroma. Herbs can change the flavor. Mint adds freshness, while dill gives a nice twist. Lemon zest brightens the dish. Just a little can make a big impact. - Rinse quinoa thoroughly to remove bitterness. - Let quinoa sit covered off the heat to enhance its fluffiness. Rinsing quinoa is key. It removes saponins that can taste bitter. After cooking, let it sit covered for five minutes. This step makes it fluffy and light. For the full recipe, check out the Mediterranean Quinoa Bowl. {{image_4}} When you make a Mediterranean quinoa bowl, there are many ways to change it up. Here are some fun ideas to try. You can boost the protein in your bowl easily. - Add grilled chicken or shrimp for extra protein. - Substitute chickpeas with black beans for a different flavor profile. These additions can make your meal heartier and more filling. Grilled chicken offers a smoky taste, while shrimp adds a sweet flavor. Black beans can give a rich, earthy taste that pairs well with other ingredients. Want a twist? You can switch some ingredients for dietary needs. - Use vegan feta or omit cheese for a dairy-free version. - Swap olive oil with avocado oil for a different taste and health benefits. These changes can help you enjoy the bowl while sticking to your diet. Vegan feta is creamy and delicious, while avocado oil adds a fresh taste. Both keep your meal healthy and tasty. Make your bowl vibrant with seasonal veggies! - Incorporate seasonal vegetables like zucchini, asparagus, or bell peppers. - Use fresh herbs aligned with the season for a vibrant twist. Using seasonal veggies not only tastes great but also supports local farming. Fresh herbs like basil or mint can brighten up your dish. This way, your Mediterranean quinoa bowl stays exciting all year! Feel free to explore these variations and make the dish your own. For the full recipe, check out the Mediterranean Quinoa Bowl recipe. Store your Mediterranean Quinoa Bowl in an airtight container. It stays fresh in the refrigerator for up to 4 days. This makes it easy to enjoy tasty meals throughout the week. You can freeze the quinoa bowl in individual portions. This helps you grab meals on busy days. Just make sure to eat it within 2-3 months for the best flavor and texture. To reheat, thaw your bowl in the refrigerator overnight. This keeps it from getting soggy. You can warm it in a microwave or on the stovetop. Add a splash of water while reheating to keep it moist. You want to avoid a dry meal! Check out the Full Recipe for more details on making the Mediterranean Quinoa Bowl. A Mediterranean Quinoa Bowl is a nutritious dish. It features quinoa and many Mediterranean-inspired vegetables. You get a mix of colors and flavors that are both tasty and healthy. This bowl is perfect for lunch or dinner. You can customize it with your favorite toppings. To make quinoa fluffy, start by rinsing it well. This removes any bitterness. Then, cook it in water or broth. After cooking, let it sit covered for a few minutes. This steaming step helps it become light and fluffy. Yes, you can make this recipe ahead of time. Cook the quinoa and prepare the vegetables. Then, store them in the fridge. This makes it easy to grab a quick meal later in the week. You can use vegan feta or cottage cheese instead. If you prefer a lighter version, simply omit the cheese. This keeps the flavors bright and fresh without losing taste. Yes, quinoa is naturally gluten-free. This makes the Mediterranean Quinoa Bowl a great option for those with gluten sensitivities. You can enjoy it without worry. This blog post covered how to make a tasty Mediterranean quinoa bowl from scratch. You learned about key ingredients, step-by-step instructions, and storage tips. This dish is nutritious, easy to prepare, and perfect for meal prep. Don’t hesitate to try different vegetables, proteins, or dressings to suit your taste. Enjoy the fresh flavors and health benefits of this versatile recipe. You will impress friends and family with your cooking skills while enjoying a delicious meal.

Mediterranean Quinoa Bowl Flavorful and Healthy Dish

Are you looking for a tasty and healthy meal? The Mediterranean Quinoa Bowl is just what you need! Packed with

- Chickpeas: Start with a can of chickpeas. Drain and rinse them well. Rinsing removes excess sodium and improves flavor. Spread them on a towel to dry. This helps them get crispy when roasted. - Fresh Vegetables: Use a mix of colorful veggies for a vibrant salad. I like cherry tomatoes, cucumber, and red onion. They add sweetness, crunch, and zest. You can also use your favorite greens, like spinach or arugula, to lift the dish. - Dressing Components: The dressing is simple yet rich. Mix tahini with fresh lemon juice. This blend adds a nutty and tangy flavor. If the dressing is thick, add a splash of water to help it drizzle nicely. - Spicy Elements: Want some heat? Add cayenne pepper to the chickpeas. Start with a little, then adjust to your taste. This spice brings warmth and depth to the salad. - Extra Enhancements: For added texture, sprinkle cheese or seeds on top. Feta cheese adds creaminess, while sunflower seeds give a nice crunch. These additions make the salad more filling and fun! Check out the Full Recipe for more details on preparing this delightful dish! First, preheat your oven to 400°F (200°C). This high heat helps the chickpeas get nice and crispy. Next, grab a medium bowl. Add the rinsed chickpeas, olive oil, smoked paprika, garlic powder, and cayenne pepper. Sprinkle in a pinch of salt and pepper. Mix everything well so each chickpea gets coated in the spices. This step is key for flavor. Spread the seasoned chickpeas on a baking sheet. Make sure they are in a single layer. This helps them roast evenly. Roast them for 25-30 minutes. Stir them halfway through the cooking time. This ensures all sides get that perfect golden-brown color. You want them crunchy, not burnt, so watch them closely. While the chickpeas roast, it’s time to build your salad base. In a large bowl, layer your mixed greens first. Then add the halved cherry tomatoes, diced cucumber, and thinly sliced red onion. Each veggie adds color and crunch. Once the chickpeas are done, let them cool for a few minutes. Then, gently add them to your salad. For the dressing, whisk together tahini and fresh lemon juice in a small bowl. If it's too thick, just add a splash of water. Drizzle this creamy dressing over the salad. Finally, gently toss everything to mix. Be careful not to mash the avocado if you add it. This salad is not just tasty, it’s also beautiful. Enjoy each bite of this crispy chickpea salad! For the full recipe, check out the ingredients and steps above. To make your chickpeas crispy, avoid a few common mistakes. First, make sure you drain and rinse the chickpeas well. This helps remove excess starch. If you skip this step, they might not get crispy. Next, spread the chickpeas out on the baking sheet. Overcrowding them will trap steam and make them soggy. Aim for a single layer to allow air to circulate. You can also try alternative cooking methods. Air frying the chickpeas gives them a crunchy texture with less oil. Just set the air fryer to 400°F and cook for 15-20 minutes. Stir halfway through for even cooking. If you prefer, you can cook them on the stovetop. Heat a non-stick pan over medium heat and add the seasoned chickpeas. Stir often for about 10-15 minutes until they are crispy. The tahini dressing can make or break your salad. To get the right consistency, combine tahini with fresh lemon juice. If it feels too thick, add a splash of water. This helps create a smooth and creamy dressing that coats the salad well. Don't be afraid to experiment with flavors. Try adding garlic or herbs to the tahini for a twist. You can also mix in a bit of honey for sweetness or a dash of soy sauce for a savory kick. These variations can enhance the overall taste of your crispy chickpea salad. For the full recipe, check out the section above. Enjoy your cooking! {{image_4}} You can switch up the greens in your crispy chickpea salad. Instead of mixed greens, try spinach or kale. They add great nutrition and flavor. You can also use romaine or arugula for a fresh twist. For toppings, think outside the box. You can add: - Grated carrots for sweetness - Bell peppers for crunch - Radishes for a peppery bite - Nuts or seeds for texture These additions keep the salad exciting and fun! Want to shake things up? Try adding other legumes or proteins. Black beans or lentils are great choices. They boost the protein and add new flavors. You could even mix in grilled chicken or shrimp for a hearty meal. Dressings also offer a chance for creativity. Instead of tahini, use balsamic vinaigrette for a tangy taste. Or try a creamy yogurt dressing to add smoothness. These changes can make your salad feel new and special. For the full recipe, check out the Crispy Chickpea Salad Delight. To keep your crispy chickpea salad fresh, store it in the fridge. Use airtight containers to keep out air and moisture. This way, your salad stays crisp and tasty. - Containers: Choose glass or BPA-free plastic containers. They seal well. You can also use a mason jar for easy storage and serving. - Separation: Keep the chickpeas and salad base separate if you can. This helps the chickpeas stay crispy longer. If you have leftover chickpeas, you can reheat them. But, be careful not to lose that crunch. - Oven Method: Preheat your oven to 400°F (200°C). Spread chickpeas on a baking sheet. Heat for about 5 to 10 minutes. This will bring back their crispiness. - Refreshing the Salad: Before serving, add fresh greens or a little more dressing. This brings life back to your salad. Toss gently to mix without mashing the ingredients. For the full recipe, check out the Crispy Chickpea Salad Delight! To make chickpeas crispy, start by rinsing and draining them well. Dry them completely with a towel. This step is key! The less water, the crispier they will be. Next, toss them in olive oil and seasonings. I love using smoked paprika, garlic powder, and a pinch of cayenne for a kick. Spread them on a baking sheet in a single layer. Bake at 400°F for 25-30 minutes. Stir them halfway to ensure even crispiness. Yes, you can prep this salad in advance. Cook the chickpeas and store them in an airtight container. They will stay crispy if you keep them separate from the veggies. Chop your vegetables and store them in the fridge. Mix the tahini dressing and keep it in a jar. When you're ready to eat, combine everything for a fresh meal. If you need a substitute for tahini, try using Greek yogurt or almond butter. Both add creaminess and flavor. You can also make a simple lemon vinaigrette with olive oil, lemon juice, and a bit of mustard. These options will give your salad a unique twist while keeping it delicious. Absolutely! This salad is great for meal prep. Store the chickpeas, veggies, and dressing separately. This way, the salad stays fresh and crunchy. You can enjoy it throughout the week. Just mix it up when you’re ready to eat. For a full recipe, check the crispy chickpea salad instructions. Crispy chickpea salad is a delicious and healthy choice. We explored essential ingredients, like well-prepared chickpeas and fresh veggies. Roasting chickpeas correctly gives them that perfect crunch. We discussed tips for storing leftovers and reheating methods to keep them crispy. Try different add-ins for extra flavor and texture. With these ideas, you can make this salad your own. Enjoy discovering the many ways to customize this dish while benefiting from its nutritious qualities.

Crispy Chickpea Salad Flavorful and Nourishing Dish

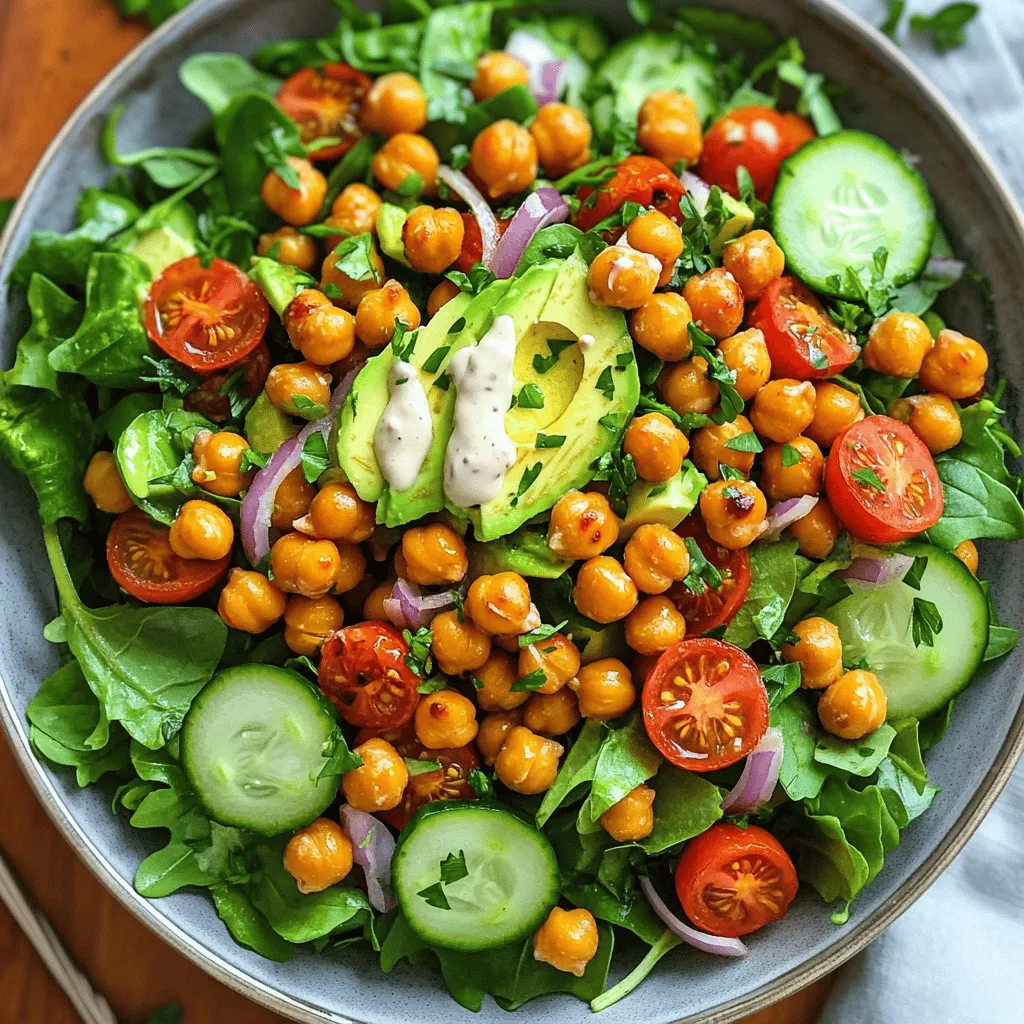
Are you looking for a meal that’s both tasty and healthy? Look no further! This Crispy Chickpea Salad is packed

Savory stuffed sweet potatoes are a delight to make and eat. Here’s what you need to get started: - Sweet Potatoes - 4 medium-sized sweet potatoes - Stuffing Components - 1 cup cooked quinoa - 1 can (15 oz) black beans, rinsed and drained - 1 cup corn kernels (fresh or frozen) - 1 red bell pepper, diced into small cubes - Seasonings and Garnishes - 1 teaspoon ground cumin - 1 teaspoon smoked paprika - ½ teaspoon garlic powder - ½ teaspoon onion powder - Salt and freshly ground black pepper to taste - 1 ripe avocado, diced (for topping) - Fresh cilantro, finely chopped (for garnish) - Lime wedges (for serving) These ingredients come together to create a meal that is both tasty and good for you. The blend of sweet potatoes, quinoa, and beans packs a punch of nutrients. Each bite bursts with flavor while keeping things simple. You can find the full recipe above for detailed steps and tips. Enjoy this healthy dish at any meal! - Washing and Poking Holes Rinse the sweet potatoes under cold water. Scrub off any dirt with your hands. Pat them dry with a paper towel. Use a fork to poke several holes in each potato. This helps steam escape while they roast. - Roasting in the Oven Preheat your oven to 400°F (200°C). Place the sweet potatoes on a baking sheet lined with parchment paper. Make sure they do not touch each other. Roast for 45 to 50 minutes. They should be tender when pierced with a fork. - Mixing the Quinoa Mixture In a large bowl, mix 1 cup of cooked quinoa with one can of black beans. Add 1 cup of corn kernels and 1 diced red bell pepper. Stir in 1 teaspoon ground cumin, 1 teaspoon smoked paprika, ½ teaspoon garlic powder, and ½ teaspoon onion powder. - Seasoning the Filling Add salt and freshly ground black pepper to taste. Mix all the ingredients well. This filling is full of flavor and nutrients. - Slicing and Opening the Potatoes When the sweet potatoes are done, take them out of the oven. Let them cool for a few minutes. Slice each potato lengthwise down the center. Be careful not to cut all the way through. Gently squeeze the ends to open the cavity. - Filling Technique Use a spoon to fill each potato with the quinoa mixture. Pack it generously into the opening. This makes for a hearty meal. Enjoy the colors and textures of your stuffed sweet potatoes. For the full recipe, check [here](#). - Choosing the Right Sweet Potatoes Select medium-sized sweet potatoes. Look for ones that are smooth and firm. Avoid any with soft spots or blemishes. They should feel heavy for their size. This means they are fresh and full of flavor. - Ensuring Even Cooking Poke several holes in each sweet potato with a fork. This allows steam to escape during cooking. Arrange them on a baking sheet so they are not touching. This helps them cook evenly and stay tender. - Recommended Seasonings Use ground cumin and smoked paprika for a warm flavor. Garlic powder and onion powder add depth. Salt and black pepper elevate all the flavors. Adjust these seasonings to your taste for the perfect dish. - Additional Toppings Suggestions Top your stuffed sweet potatoes with diced avocado. Fresh cilantro adds a nice touch, too. You can also sprinkle feta cheese for a salty bite. Lime wedges on the side brighten every bite. - Plating Techniques Use a colorful serving platter to showcase your sweet potatoes. Place each one in a way that shows off the filling. This makes your dish look inviting and fun. - Garnishing Ideas Garnish with extra cilantro sprigs for a fresh look. Scatter lime wedges around the platter for color. This adds a playful touch and invites guests to add some zest. For the full recipe, check out Savory Stuffed Sweet Potatoes. {{image_4}} Savory stuffed sweet potatoes are a great base for many flavors. You can change them up easily. Here are some fun variations. Alternative Vegetables You can swap out some veggies in your stuffing. Try using spinach, kale, or zucchini. These add color and taste. They also boost nutrition. Each option pairs well with sweet potatoes. Cheese Additions Add cheese for a creamy touch. Feta, goat cheese, or cheddar work well. Mix cheese into the filling or top the potatoes after baking. This adds rich flavor and protein. Adding Ground Meat For meat lovers, ground meat is a great choice. Use beef, turkey, or chicken. Brown the meat before adding it to the filling. This adds heartiness and makes the dish filling. Including Tofu or Tempeh For a plant-based option, try tofu or tempeh. Cube and sauté them with spices. Both options take on flavors well and add protein. They help make the meal more balanced. Spicy Options Want some heat? Add jalapeños or hot sauce to the filling. You can also use spicy seasoning blends. This gives your sweet potatoes a kick and makes them exciting. Mediterranean Twist For a fresh twist, think Mediterranean. Use olives, sun-dried tomatoes, or fresh herbs like parsley and oregano. This gives a bright, zesty flavor. It’s a tasty way to change up your dish. Explore these variations to find your favorite style! Each option makes your savory stuffed sweet potatoes unique and delightful. For the complete cooking guide, check out the Full Recipe. After enjoying your savory stuffed sweet potatoes, store leftovers properly. Place them in an airtight container. These can last in the fridge for up to four days. Make sure they cool down before sealing. This helps keep the flavor fresh. For long-term storage, freezing is a great option. Wrap each stuffed sweet potato tightly in plastic wrap. Then, place them in a freezer-safe bag. They can stay in the freezer for up to three months. When you’re ready to eat, just thaw in the fridge overnight. The best methods for reheating stuffed sweet potatoes are the oven or microwave. Using the oven keeps them crispy. Preheat your oven to 350°F (175°C). Place the stuffed sweet potatoes on a baking sheet. Heat them for about 15-20 minutes, or until warm. If you’re short on time, the microwave works too. Place one potato on a microwave-safe plate. Heat on high for about 2-3 minutes. Check to see if it’s hot. If not, heat in 30-second intervals until ready. Following these tips will keep your savory stuffed sweet potatoes delicious and nutritious! To reheat stuffed sweet potatoes, I recommend using the oven. Heat your oven to 350°F (175°C). Place the stuffed sweet potatoes on a baking sheet. Cover them with foil to keep moisture in. Heat for about 20 minutes or until warm. This method keeps the sweet potatoes soft and tasty. You can also use a microwave. Simply place one stuffed sweet potato on a plate and heat for 1-2 minutes. Check that it is hot all the way through. Yes, you can make stuffed sweet potatoes ahead of time. You can prepare the filling and roast the sweet potatoes a day in advance. Store the sweet potatoes in the fridge after they cool. Keep the filling in a separate container. When you are ready to eat, reheat both. Stuff the sweet potatoes just before serving. This method saves time and keeps flavors fresh. You can use many different ingredients to stuff sweet potatoes. Here are some ideas: - Cooked rice or farro - Sautéed spinach or kale - Diced tomatoes or zucchini - Feta cheese or goat cheese - Cooked ground turkey or beef These options add new flavors and textures to your dish. Don't be afraid to get creative with your stuffing! Cooking sweet potatoes takes about 45 to 50 minutes in the oven at 400°F (200°C). The time may vary based on the size of the potatoes. To check if they are done, pierce them with a fork. If it goes in easily, they are ready. You can also boil or microwave sweet potatoes if you need a quicker option. Cooking them in the microwave takes about 8-10 minutes, depending on their size. Stuffed sweet potatoes are delicious and versatile. We covered ingredients like sweet potatoes, stuffing components, and seasonings. I walked you through prepping, filling, and cooking them. You learned tips for cooking, enhancing flavor, and presenting these dishes. Plus, we explored variations and how to store leftovers. In closing, stuffed sweet potatoes make a tasty meal. They are fun to customize. Enjoy making these for yourself or to share!

Savory Stuffed Sweet Potatoes Delicious and Nutritious

Sweet potatoes are not just sweet; they can be savory, too! In this post, I’ll share my delicious and nutritious

- 1 pound boneless, skinless chicken breasts, cut into thin strips - 1 large red bell pepper, sliced into thin strips - 1 large yellow bell pepper, sliced into thin strips - 1 large green bell pepper, sliced into thin strips - 1 medium red onion, sliced into thin wedges The main ingredients for sheet pan fajitas are simple and fresh. I love using chicken for its mild taste. The bell peppers add color and sweetness. Red onion gives a nice bite, making each bite exciting. - 3 tablespoons extra virgin olive oil - 2 teaspoons chili powder - 1 teaspoon ground cumin - 1 teaspoon smoked paprika - 1 teaspoon garlic powder - 1 teaspoon onion powder - Salt and freshly ground black pepper to taste Seasoning brings life to your fajitas. Olive oil helps the spices stick to the chicken. Chili powder and cumin add warmth and depth. Smoked paprika gives a lovely smoky flavor. Garlic and onion powder round out the flavors. Always taste and season with salt and pepper until it’s just right. - 8 small flour tortillas - Fresh cilantro, chopped, for garnish - Lime wedges, for serving Don't forget the serving essentials! Warm tortillas hold the fajita filling perfectly. Fresh cilantro adds a burst of freshness. A squeeze of lime before you eat brightens every bite. For the full recipe, check out the details above. Enjoy your cooking adventure! Start by preheating your oven to 400°F (200°C). This heat is key for cooking. Next, take a large sheet pan and line it with parchment paper. This makes cleanup easy and stops food from sticking. In a big mixing bowl, add the chicken strips. Pour in the olive oil and sprinkle the spices: chili powder, ground cumin, smoked paprika, garlic powder, onion powder, and a bit of salt and pepper. Mix well until all the chicken is coated with the spices. Now, spread the seasoned chicken in the center of your lined sheet pan. Grab the sliced bell peppers and red onion. Arrange them around the chicken. Make sure they are spread out so they cook evenly. Drizzle a tablespoon of olive oil over the veggies. Add a light sprinkle of salt and pepper, then toss them gently with your hands. Place your sheet pan in the oven and bake for 25-30 minutes. Halfway through, take it out and stir the chicken and veggies. This helps them brown evenly. You want the chicken cooked through and the veggies tender. When done, carefully take the pan out and let it cool for a few minutes. Now, you’re ready to enjoy your delicious Sheet Pan Fajitas! For the full recipe, check out the earlier section. Ensuring Tender Vegetables To keep your veggies tender, cut them into even strips. This helps them cook at the same rate. Use fresh bell peppers and onions for the best taste. Toss them with a little olive oil and salt before baking. This makes them sweeter and more flavorful. Checking Chicken Doneness To check if the chicken is done, use a meat thermometer. Insert it into the thickest part of the chicken. It should read 165°F (75°C). If you don't have a thermometer, cut into a piece. The meat should be white, not pink. Let it rest for a few minutes for the juices to settle. Serving Suggestions for an Attractive Meal Arrange the fajitas on a large platter. Place the chicken and veggies in the center. Add warm tortillas on the side. You can also use a colorful cloth napkin to line the basket. This gives your meal a cozy feel and makes it more inviting. Colorful Topping Options Add colorful toppings to enhance your dish. Diced avocado, sliced jalapeños, and chopped tomatoes work well. A dollop of sour cream or guacamole adds creaminess. Fresh lime wedges brighten the flavors and make it fun. Adjusting Spice Levels If you like it hot, add more chili powder or some cayenne. For a milder taste, cut back on the spices. You can also use sweet bell peppers to balance heat. This way, you can make the fajitas just right for your taste. Substituting Proteins or Veggies You can swap chicken for beef or shrimp. Tofu or mushrooms are great for vegetarian fajitas. Use any veggies you like, such as zucchini or corn. This keeps your meals fresh and exciting. For the full recipe, check out the details above. {{image_4}} You can change up the protein in your fajitas. Beef or shrimp works great. For beef, use flank steak or skirt steak. Just slice it thinly and marinate it for flavor. Shrimp cooks fast, so add it during the last few minutes of baking. If you prefer a vegetarian option, consider using tofu or portobello mushrooms. For tofu, press it to remove water, then cube it. Marinate for extra taste before adding it to the pan. Portobello mushrooms add a meaty texture. Slice them thick and toss them with the veggies. Want to kick up the flavor? Try adding marinades! A simple lime juice and garlic mix works well. Let your protein soak in the marinade for at least 30 minutes. You can also use store-bought marinades for quick prep. Incorporating different spices can also change the dish. Try adding cayenne for heat. You could also use oregano or coriander for a new twist. Mix and match spices until you find your favorite. When it comes to tortillas, flour and corn have their perks. Flour tortillas are soft and chewy. They hold fillings well. Corn tortillas are gluten-free and have a nice corn flavor. You can also serve fajitas with a side salad or rice. A fresh salad brightens up the meal. Rice adds heartiness and makes it filling. Experiment and find what you enjoy most with your fajitas. For more delicious ideas, check out the Full Recipe. To store leftover fajitas, let them cool first. Place them in an airtight container. This keeps them fresh and tasty. Leftovers last about three days in the fridge. You can freeze fajitas for later use. First, let them cool completely. Then, place portions in freezer bags or containers. Remove as much air as possible. They can last up to three months in the freezer. When you’re ready to eat, thaw the fajitas in the fridge overnight. To reheat, warm them in a skillet over medium heat. Stir them often until heated through. You can also microwave them for quick meals. Prepping fajitas in advance is a great time-saver. You can chop the veggies and chicken a day ahead. Store them in separate containers in the fridge. For portion control, consider using small containers. This makes it easy to grab a meal. You can even prepare tortillas in advance. Store them wrapped in foil or a zip-top bag. This way, you have a quick meal ready to go! For the full recipe, check out the Sizzling Sheet Pan Fajitas . Yes, you can make Sheet Pan Fajitas ahead of time. Prepare the chicken and veggies and store them in the fridge. You can season them the night before. This saves you time on busy days. When you're ready, just bake them. Follow the full recipe for best results. Fajitas pair well with many sides. Here are some ideas: - Mexican rice - Refried beans - Corn on the cob - Chips with salsa or guacamole - A fresh salad These sides add color and flavor to your meal. To spice up your fajitas, try these tips: - Add more chili powder. - Use fresh jalapeños or serrano peppers. - Mix in some cayenne pepper. - Serve with hot sauce. These options will bring more heat to your dish. Yes, frozen vegetables work great! They save time and are easy to use. Just be sure to thaw them first. This helps them cook evenly. You may need to adjust the cooking time slightly. Great toppings can enhance your fajitas. Here are some favorites: - Sliced avocado - Chopped cilantro - Shredded cheese - Sour cream - Fresh lime juice These toppings add flavor and texture to each bite. In this blog post, we covered how to make delicious sheet pan fajitas. We discussed the main ingredients like chicken, bell peppers, and spices. I shared a step-by-step guide for seasoning, baking, and serving. You learned tips for cooking well and making your meal look great. Plus, we explored different variations, storage tips, and FAQs. Remember, customizing fajitas can make cooking fun. Enjoy your tasty dish and share it with others!

Sheet Pan Fajitas Flavorful and Easy Dinner Idea

Looking for a quick and tasty dinner? Sheet Pan Fajitas are your answer! This easy recipe packs bold flavors with

To make honey garlic butter shrimp, you need simple ingredients. Here’s what you will need: - 1 pound large shrimp, peeled and deveined - 3 tablespoons unsalted butter - 1/4 cup honey - 4 cloves garlic, minced - 1 tablespoon soy sauce - 1 teaspoon fresh ginger, grated - 1/4 teaspoon red pepper flakes (optional for spice) - Salt and freshly ground black pepper, to taste - 2 green onions, finely chopped (for garnish) - Fresh parsley, finely chopped (for garnish) - Cooked rice or noodles (for serving) Using fresh ingredients makes a big difference in taste. Choose shrimp that smells like the ocean, not fishy. Look for firm shrimp with a slight sheen. Garlic should be firm and not sprouted. Fresh ginger should feel smooth and firm, not dry. Use real honey for the best flavor. Fresh herbs like green onions and parsley should look bright and crisp. If you lack some ingredients, don't worry! You can use these swaps: - Use shrimp from the freezer if fresh is not available. - Swap unsalted butter with olive oil for a lighter dish. - Instead of honey, maple syrup adds a sweet touch. - Use shallots if you don’t have garlic. They add a nice flavor too. - Try lemon juice instead of soy sauce for a zesty kick. These alternatives keep your dish tasty and easy to make. For the full recipe, check out the complete instructions to enjoy this dish! To make honey garlic butter shrimp, start with a large skillet. Melt 3 tablespoons of unsalted butter over medium heat. Wait until the butter is bubbly and foamy. Then, add 4 minced garlic cloves and 1 tablespoon of grated ginger. Stir for about 1-2 minutes. The garlic should smell good but not burn. Next, pour in 1/4 cup of honey and 1 tablespoon of soy sauce. If you like spice, add 1/4 teaspoon of red pepper flakes. Stir everything together and let it simmer for 2-3 minutes. This helps thicken the sauce and boost the flavors. Now, season 1 pound of shrimp with salt and fresh black pepper. Add the shrimp to the skillet. Make sure they are coated in the sauce. Cook the shrimp for 2-3 minutes on each side. They should turn pink and opaque when done. Once cooked, remove the skillet from heat. Sprinkle 2 chopped green onions and some fresh parsley on top. This adds color and freshness. - Use fresh shrimp for the best taste. - Do not overcook the shrimp. They can become rubbery. - Cook shrimp until they are just pink and firm. - Always season shrimp before adding them to the pan. Watch for the shrimp to change color. They should go from gray to pink as they cook. The shrimp will also curl slightly when done. This should take around 2-3 minutes on each side. To check for doneness, poke a shrimp. It should feel firm but not hard. Follow these cues to ensure perfect shrimp every time. For more details, check the Full Recipe. To enhance the taste of your honey garlic butter shrimp, start with fresh shrimp. Fresh shrimp taste better and have a firmer texture. Sauté the garlic gently. This brings out the sweet, nutty flavor without burning it. Use medium heat to keep it fragrant. When you add the honey and soy sauce, let it simmer. This thickens the sauce and blends the flavors. For a more complex taste, try adding a splash of lime juice. This adds brightness and balances the sweetness. One common mistake is overcooking the shrimp. Shrimp cook fast; just a few minutes on each side is enough. Avoid using low-quality honey. Natural honey adds depth to the sauce. Don’t skip the salt and pepper. Seasoning boosts flavor and brings the dish to life. Lastly, don’t let the garlic brown too much. If it burns, it makes the dish bitter. Serve your honey garlic butter shrimp with fluffy rice or tender noodles. Both soak up the sauce well. For veggies, steamed broccoli or snap peas add color and crunch. They also balance the dish with freshness. Pair with a light white wine or sparkling water. A crisp drink complements the rich sauce. Lastly, a simple green salad with lemon vinaigrette adds a refreshing bite. Check the [Full Recipe] for more details on making this dish shine! {{image_4}} If you like heat, try the spicy honey garlic butter shrimp. To make this dish spicy, add more red pepper flakes. You can even use fresh chili peppers for a fresh kick. Start with the full recipe, then adjust the spice level to your taste. This adds a fun twist while keeping the sweet and savory flavors intact. You can make this dish even better by adding vegetables. Try bell peppers, snap peas, or broccoli. Just toss them in the skillet after you sauté the garlic. Cook them for a few minutes before adding the shrimp. This gives a nice crunch and freshness to your meal. Plus, you’ll get more nutrients from the veggies. For a low-carb option, swap rice with zoodles—zucchini noodles. To make zoodles, spiralize fresh zucchini. Cook them briefly in a skillet until just tender. Add the shrimp on top of the zoodles and pour the sauce over them. This keeps your meal light and adds a lovely flavor. You still enjoy all the goodness of honey garlic butter shrimp without the carbs. After cooking, let the honey garlic butter shrimp cool down to room temperature. Store them in an airtight container. This keeps the shrimp fresh and tasty. Place the container in the fridge. They will stay good for up to three days. To reheat the shrimp, use a skillet over medium heat. Add a splash of water or broth to keep them moist. Stir gently until they are warm. You can also use a microwave. Heat them in short bursts, checking often. This keeps the shrimp from getting rubbery. If you want to freeze the shrimp, place them in a freezer-safe bag. Remove as much air as possible before sealing. This helps prevent freezer burn. You can freeze them for up to three months. When ready, thaw them in the fridge overnight before reheating. Enjoy your honey garlic butter shrimp later! For the full recipe, check out the main article. It takes about 4 to 6 minutes to cook shrimp. You want them to turn pink and opaque. Cooking them too long makes shrimp tough. Keep an eye on them and remove them when done. Yes, you can use frozen shrimp! Just make sure to thaw them first. You can do this overnight in the fridge or quickly in cold water. After thawing, pat them dry before cooking. This helps the shrimp get a nice sear. Honey garlic sauce is very versatile! You can use it for chicken, pork, or veggies. It also works great in stir-fries or as a glaze for roasted items. The sweet and savory blend adds flavor to many meals. Yes, this recipe is great for meal prep! You can cook the shrimp and store them in the fridge for up to 3 days. Just reheat gently in a skillet. Serve with rice or noodles for quick meals throughout the week. You can find the full recipe above for easy reference. In this post, we explored how to make honey garlic butter shrimp. We covered ingredients, cooking steps, tips, and variations. Remember to choose fresh ingredients for the best taste. Cooking shrimp is quick, so watch the timing carefully. Avoid common mistakes to ensure great results. Feel free to add your favorite veggies or spices for a unique twist. With the right storage, you can enjoy leftovers, too. Dive in and make this dish your own; it's sure to impress!

Honey Garlic Butter Shrimp Easy and Flavorful Recipe

Get ready for a burst of flavor with my easy Honey Garlic Butter Shrimp recipe! You’ll love this dish for

Older posts
Newer posts
← Previous Page1 … Page59 Page60 Page61 … Page90 Next →

dsad

© 2025 recipetorch • Built with GeneratePress

Our Policies

  • Copyright Policy
  • Cookie Policy
  • GDPR Policy
  • Privacy Policy
  • Disclaimer
  • Terms Of Use

More Information

  • Home
  • About
  • Contact
  • Appetizers
  • Dessert
  • Dinner
  • Drinks
©2025, recipetorch About Back To Top