Honey Mustard Glazed Salmon Tasty and Simple Recipe
Are you ready to impress your family with a simple yet delicious meal? My Honey Mustard Glazed Salmon recipe is
Are you ready to impress your family with a simple yet delicious meal? My Honey Mustard Glazed Salmon recipe is
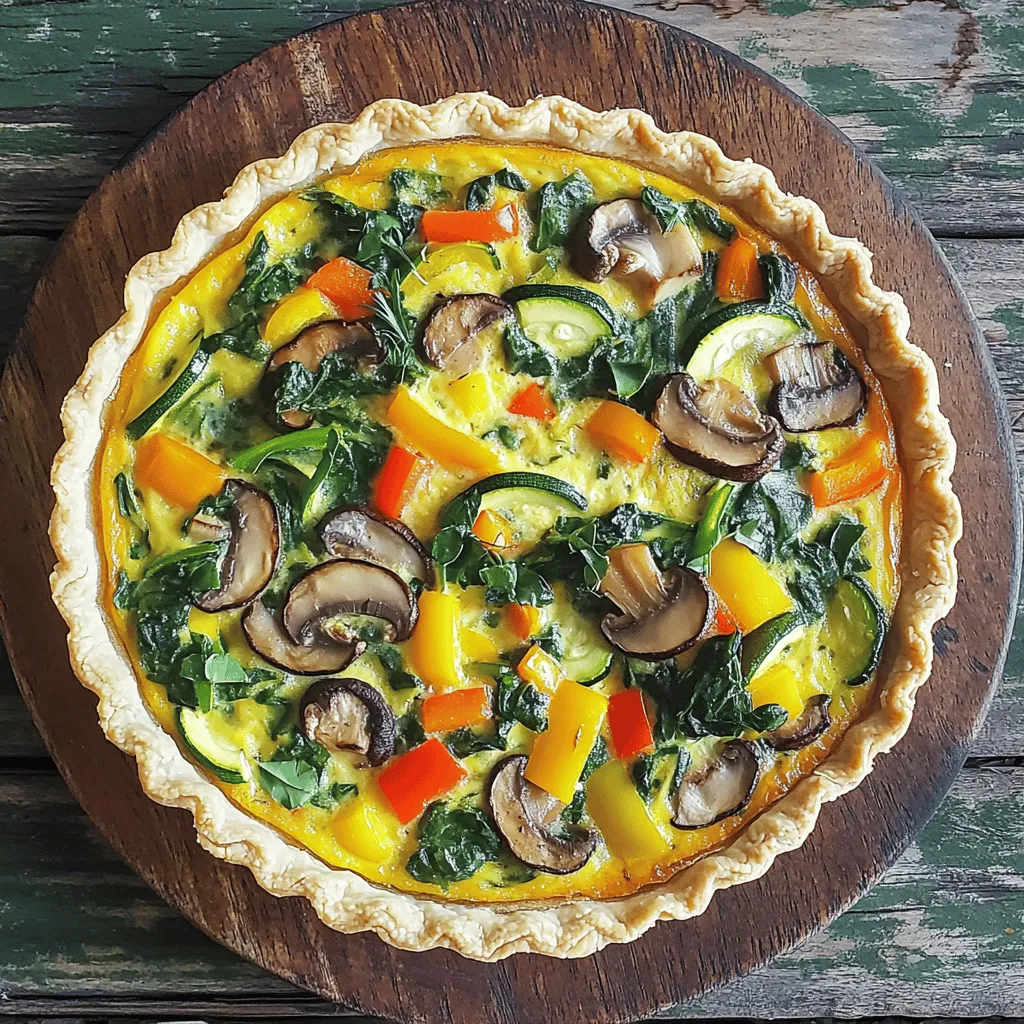
Looking for an easy, delicious meal that everyone will love? My savory vegetable quiche is the perfect choice! Packed with
![- Ripe peaches - Fresh basil leaves - Arugula - Feta cheese Peach and basil salad shines with its main ingredients. Ripe peaches provide sweetness and juiciness. Fresh basil leaves add a fragrant herb taste. Arugula gives a peppery bite, while feta cheese offers a creamy texture. Each ingredient plays a role in making this dish fresh and vibrant. - Sliced almonds - Balsamic glaze - Extra virgin olive oil Adding sliced almonds brings a nice crunch. They also have a nutty flavor that complements the peaches. Balsamic glaze adds sweetness and tang. Extra virgin olive oil gives the salad richness and depth. Together, these components enhance the overall taste. - Salt - Freshly ground pepper Seasoning is key to a flavorful salad. A pinch of salt brings out the natural flavors. Freshly ground pepper adds a subtle heat. These simple seasonings make a big difference. Use them wisely to elevate your peach and basil salad. For the full recipe, check out the [Full Recipe]. 1. Start by preparing your ingredients. Slice three ripe peaches into wedges. Wash and drain two cups of fresh arugula. Tear one cup of fresh basil leaves into smaller pieces. This helps release their fragrant oils. Toast one-fourth cup of sliced almonds in a dry skillet over medium heat. Stir them for about three to four minutes until they turn golden brown. This step adds a nice crunch. 2. In a large salad bowl, create the salad base. Combine the fresh arugula with the torn basil leaves. The arugula gives peppery notes, while basil adds a fresh, herbal flavor. This mix sets the stage for your salad. 1. Carefully fold in the peach slices and crumbled feta cheese. Use a gentle touch to keep the peaches intact. You want the flavors to mix, but not to mush everything together. 2. Drizzle two tablespoons of balsamic glaze and one tablespoon of extra virgin olive oil over the salad. The glaze adds sweetness and acidity. The olive oil brings richness, balancing the flavors beautifully. 1. Season the salad lightly with salt and freshly ground pepper. This step enhances all the flavors. Toss everything together gently, making sure not to bruise the peaches. Each bite should burst with flavor. 2. Just before serving, sprinkle the toasted almonds on top. This adds a satisfying crunch and nutty flavor. You’ll love how this simple salad comes together. For the full recipe, check it out [here](#). To choose ripe peaches, look for a few signs. First, they should feel slightly soft when you press gently. Next, check for a sweet aroma; this shows they are ready to eat. The skin should have a rich color, often a mix of yellow and red. Avoid peaches with blemishes or dark spots. For storing peaches, keep them at room temperature if they are not ripe. Once ripe, place them in the fridge to slow down the ripening process. Use them within a few days for the best taste. To store fresh basil, place it in a glass of water like a bouquet. Cover the leaves loosely with a plastic bag. This method helps keep the leaves fresh for longer. You can also store basil in the fridge, but it may lose some flavor. Using basil creatively can add a twist to many dishes. Try adding it to pasta, pizza, or even smoothies for a fresh taste. You can also make a basil pesto for a rich sauce. For this salad, I recommend a few seasonings. A pinch of salt and fresh pepper will brighten the flavors. You might also try a sprinkle of red pepper flakes for a kick. If you want to play with dressings, consider alternatives like lemon vinaigrette or honey mustard. These options can enhance the sweetness of the peaches and the richness of the feta. For the full recipe, check out the Peach Basil Bliss Salad for more ideas! {{image_4}} You can boost your Peach and Basil Salad with add-ons. Try adding nuts for crunch. Sliced almonds bring a lovely nutty taste. Walnuts or pecans also work well. Each nut adds its own charm to the salad. You can also explore different cheeses. Feta cheese gives a creamy touch. If you want a stronger flavor, try goat cheese. For a milder taste, use mozzarella. Each cheese choice offers a new experience. Seasonal fruits can change the salad's vibe. In summer, ripe peaches shine. In fall, try apples or pears instead. These fruits add a different sweetness and texture. You can also substitute greens based on the season. Arugula works great in summer. In cooler months, use spinach or kale. Each green offers a unique flavor and nutrition profile. Making this salad vegan is simple. Just skip the feta cheese. You can add avocado for creaminess instead. It brings a rich texture that compliments the other flavors. For gluten-free options, check your balsamic glaze. Most brands are safe, but it’s good to read the label. This salad is naturally gluten-free, so it’s a perfect choice for everyone. Try the Full Recipe for a delicious experience! To keep your Peach and Basil Salad fresh, store it in the fridge. Use an airtight container to prevent air from wilting the greens. Make sure to add the almonds just before serving. This keeps them crunchy. If you have leftovers, eat them within two days for the best taste. You can prepare this salad in advance. Slice the peaches and store them in a bowl with some lemon juice. This keeps them from browning. Wash and dry the arugula and basil ahead of time. For storage, use glass containers. They help keep your salad fresh and allow you to see the colors. Remember to layer the ingredients carefully. Keep the dressing separate until you're ready to eat. This way, your salad stays crisp and delicious. For the [Full Recipe], revisit the ingredients and steps to enjoy this salad at its best! To make your salad vegan, swap feta cheese for tofu. You can also use a cashew cream or a vegan cheese that melts well. For dressings, choose a vegan balsamic glaze. It adds the same great taste without any animal products. Balsamic vinaigrette works great with this salad. It balances the sweet peaches and basil flavor. You can also try a lemon vinaigrette for a fresh twist. Another option is a honey mustard dressing, but skip this if you want it vegan. Yes, you can prep the ingredients the night before. Keep the arugula and basil separate from the peaches. Mix it all together just before serving. This keeps everything fresh and crisp. Peaches are rich in vitamins A and C. They help boost your immune system. Basil has antioxidants that fight inflammation. It also adds a nice flavor with few calories. Together, they make a healthy and tasty salad. You can check the Full Recipe for more detailed steps and tips! This blog post detailed how to make a Peach and Basil Salad. We explored key ingredients, like ripe peaches, fresh basil, and feta. I shared step-by-step instructions to combine these flavors perfectly. Helpful tips on choosing the best peaches and enhancing flavors added value. Variations allow you to tailor the dish to your taste, and storing leftovers is easy. Try this salad for a refreshing dish that offers great taste and nutrition. Enjoy the burst of flavors with every bite!](https://recipetorch.com/wp-content/uploads/2025/05/679c380f-c40f-4dce-b283-f52f9d99525c.webp)
Get ready to taste summer with my Peach and Basil Salad! Fresh, juicy peaches, fragrant basil, and creamy feta come
![- 1 lb Brussels sprouts, trimmed and halved - 3 tablespoons high-quality olive oil - 4 cloves fresh garlic, finely minced - Zest of 1 medium lemon - Juice of 1 medium lemon - 1 teaspoon smooth Dijon mustard - Sea salt and freshly ground black pepper to taste - ¼ teaspoon red pepper flakes (optional for a spicy kick) - 2 tablespoons finely grated Parmesan cheese (optional) - Large baking sheet - Parchment paper - Mixing bowl - Sharp knife - Cutting board - Measuring spoons Each serving of Lemon Garlic Roasted Brussels Sprouts provides a healthy mix of nutrients. They are low in calories but high in fiber, Vitamin C, and antioxidants. The olive oil adds healthy fats, while garlic gives immune support. If you include Parmesan, it adds protein and calcium. This dish is a great side that complements many meals. Enjoy without guilt! Start by rinsing your Brussels sprouts under cold water. Trim off the tough ends and slice each sprout in half. This helps them cook evenly. Aim for uniform sizes to ensure consistent roasting. After cutting, place them in a mixing bowl. In your bowl of Brussels sprouts, add the olive oil, minced garlic, lemon zest, and lemon juice. Next, include the Dijon mustard. Season with sea salt and black pepper. If you want heat, add red pepper flakes. Toss everything well, coating each sprout in the mixture. This step is key for flavor and helps them crisp up nicely. Preheat your oven to 400°F (200°C). Line a baking sheet with parchment paper. Spread the coated Brussels sprouts on the sheet, cut sides down. This helps them get crispy. Roast in the oven for 20-25 minutes. Halfway through, stir them for even cooking. They should be golden brown and tender when done. If you like, add Parmesan cheese for the last 5 minutes. This will melt and create a cheesy crust. Remove from the oven and let cool slightly before serving. For a fresh touch, add more lemon zest or juice. You can find the full recipe above for all the details! To get your Brussels sprouts crispy, start with dry sprouts. Wash them, then pat them with a towel. Make sure you cut them in half. This helps them roast evenly. Lay them cut side down on the baking sheet. This will give you that lovely brown crust. Roasting at 400°F is key. This temperature creates a perfect balance of heat. Keep an eye on them. Stir halfway to ensure they cook evenly. For a flavor boost, add more lemon zest than the recipe calls for. You can also mix in herbs like thyme or rosemary. A sprinkle of smoked paprika adds a nice twist. If you love cheese, try feta or goat cheese instead of Parmesan. You can also add a drizzle of balsamic glaze after roasting. This brings a sweet and tangy flavor that pairs well. Ovens can vary in temperature. If yours runs hot, check the sprouts a bit sooner. If they are not browning, leave them a bit longer. Most ovens will cook these in 20-25 minutes. Use a fork to test if they are tender. If you want a heartier side, cook them longer. Just keep stirring to avoid burning. For more tips, check the Full Recipe to ensure perfect results every time! {{image_4}} You can spice up your lemon garlic roasted Brussels sprouts with different seasonings. Try adding a pinch of cumin or smoked paprika for a warm flavor. For a fresh twist, mix in some thyme or rosemary. These herbs work well with the lemon and garlic. Experiment with flavors to find your favorite combination! If you don't have Brussels sprouts, you can use green beans or broccoli. Both vegetables roast well and soak up flavors nicely. You can also swap the Dijon mustard for honey mustard if you want a sweeter taste. For a vegan option, skip the Parmesan cheese. This dish remains tasty with or without it! Serve your Brussels sprouts alongside grilled chicken or fish. They also pair well with quinoa or brown rice for a complete meal. For a fun twist, toss them in a salad with arugula and feta. Add some toasted nuts for crunch! These sprouts are a versatile side dish perfect for any dinner. To find the full recipe, check out the [Full Recipe]. After cooking, let the Brussels sprouts cool down. Place them in an airtight container. They will stay fresh in the fridge for up to 3 days. Always check for any signs of spoilage before eating. If you want to save leftovers, freezing is a great option. First, allow the Brussels sprouts to cool completely. Spread them in a single layer on a baking sheet. Freeze until solid, then transfer to a freezer-safe bag. They can last up to 2 months. However, keep in mind that freezing may change their texture. To enjoy your Brussels sprouts again, heat them in the oven. Preheat to 350°F (175°C). Spread the sprouts on a baking sheet and roast for about 10-15 minutes. This method helps maintain their crispiness. You can also reheat them in a skillet over medium heat for 5-7 minutes, stirring often. For added flavor, drizzle a bit of olive oil before reheating. For the full recipe, check out the earlier section. If you can’t find Brussels sprouts, try using broccoli or cauliflower. Both have a similar texture and cook well. You can also use green beans or asparagus. These veggies will soak up the lemon and garlic flavors beautifully. Roast Brussels sprouts for 20 to 25 minutes at 400°F (200°C). This cooking time gives them a nice crisp outside and a tender inside. Remember to stir them halfway through. This helps them roast evenly and become golden brown. Yes, you can prepare Brussels sprouts ahead of time. Trim and halve them, then store in the fridge for up to two days. You can also roast them in advance. Just reheat them in the oven for 10 minutes at 350°F (175°C) before serving. Enjoy the full recipe for more detailed steps! This blog post guided you through making delicious Brussels sprouts. We covered the ingredients, tools, and key nutritional info. Then, I shared step-by-step instructions for prepping, mixing, and roasting. I also provided tips to get them crispy and flavorful. You learned about variations and how to store them. Now, it’s your turn to enjoy cooking! Good food brings joy and health. Happy cooking!](https://recipetorch.com/wp-content/uploads/2025/05/d0bcdc7e-0bf8-4050-914d-919d78e9d147.webp)
Looking for an easy side dish that packs flavor? You’re in the right place! Lemon Garlic Roasted Brussels Sprouts are

Looking to impress your friends at your next game night? You’ve landed at the right place! This Savory Sweet and
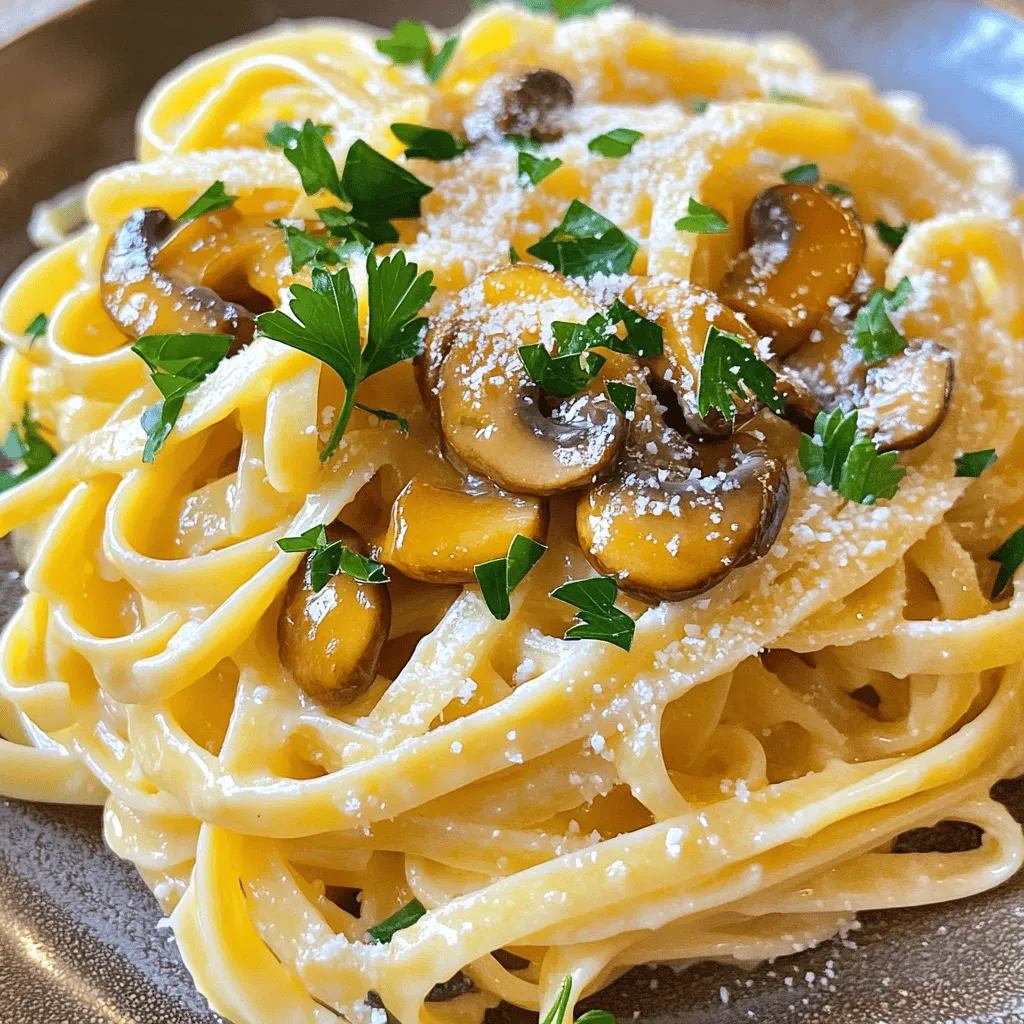
Craving a quick, tasty meal? Look no further than Garlic Butter Mushroom Pasta! This simple recipe is perfect for busy
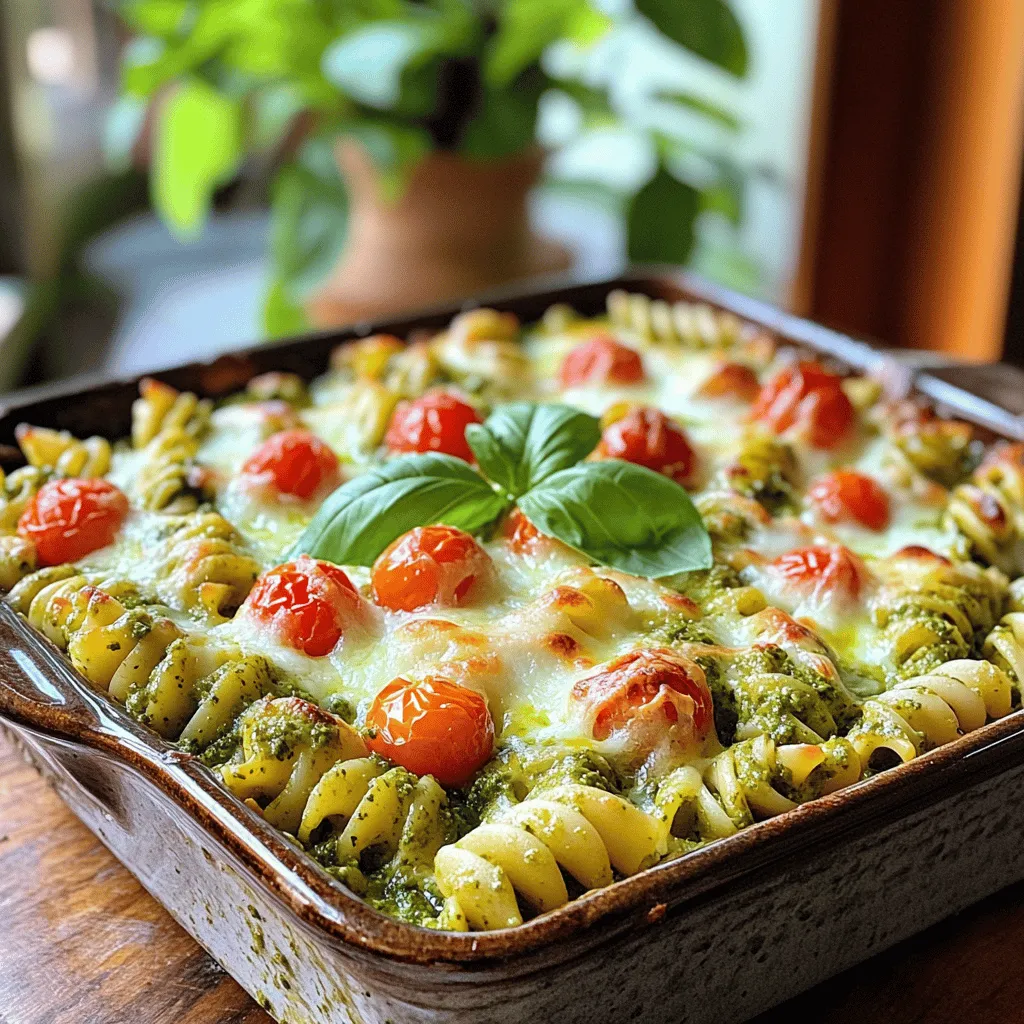
Are you ready to elevate your dinner game with a dish that screams comfort food? My Pesto Chicken Pasta Bake
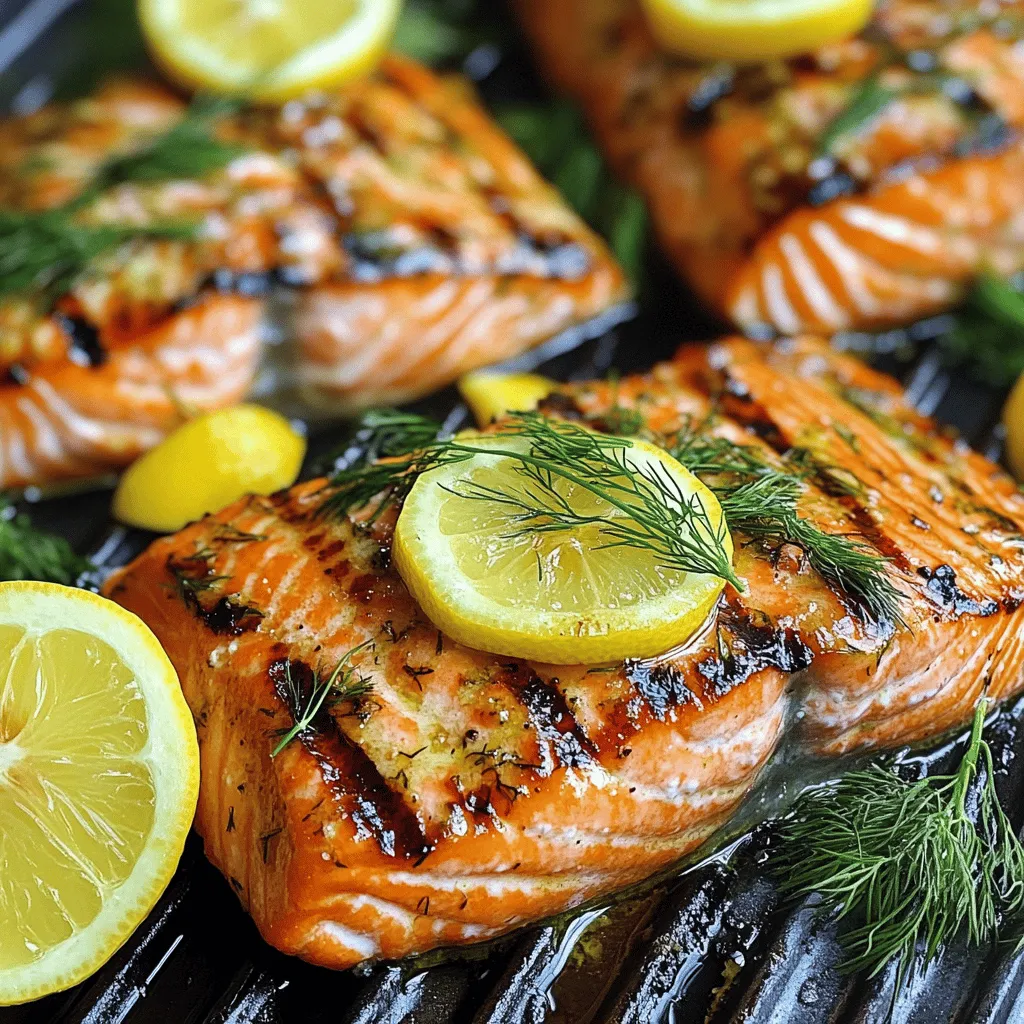
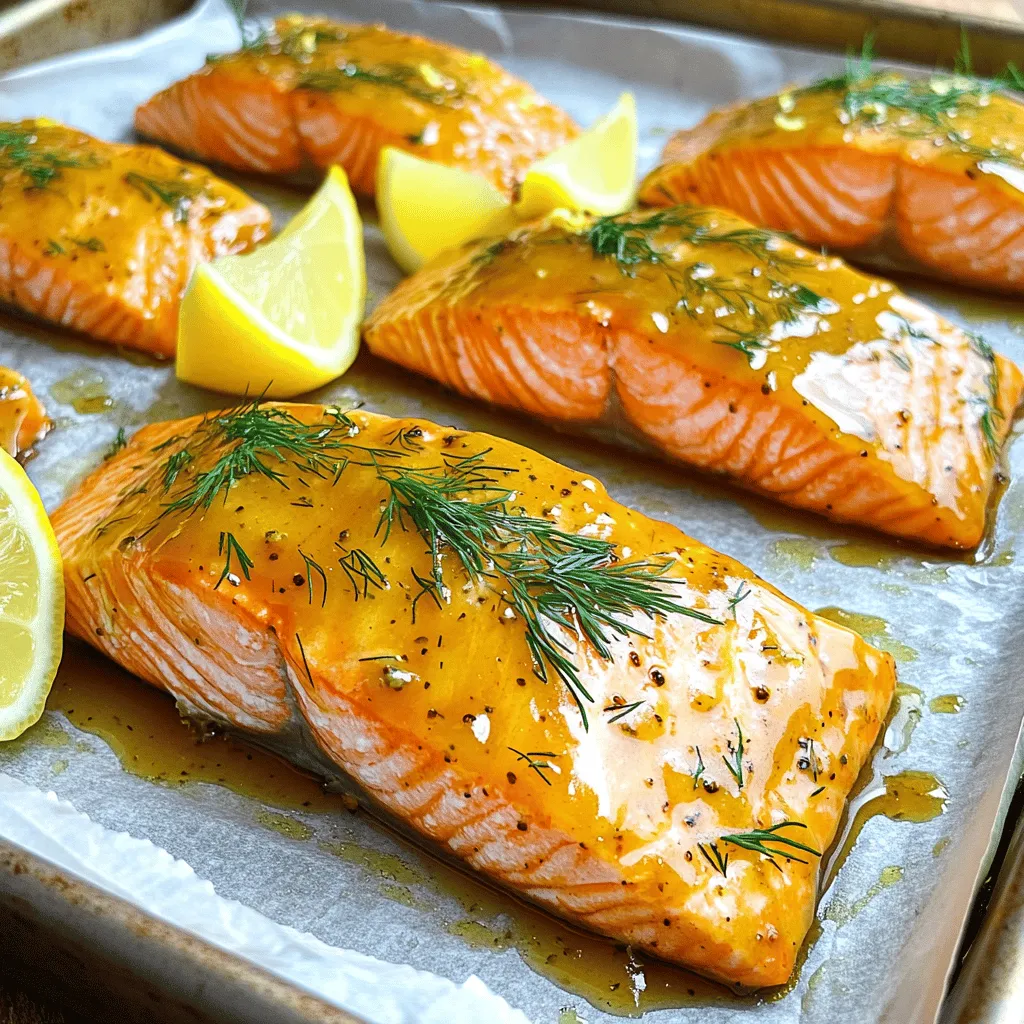
If you love fresh, flavorful dishes, you’re in the right place! This Lemon Dill Grilled Salmon recipe brings a burst

Get ready to enjoy a warm, delicious treat that combines two breakfast favorites! My Cinnamon Roll French Toast Casserole is
![- 1 lb (450g) boneless, skinless chicken thighs - 2 tablespoons honey - 3 tablespoons soy sauce - 1 tablespoon rice vinegar - 4 cloves garlic, minced - 1 tablespoon fresh ginger, grated - 2 cups mixed vegetables (bell peppers, broccoli, and carrots) - 2 tablespoons sesame oil - 1 tablespoon cornstarch (dissolved in 2 tablespoons water) - Salt and pepper to taste - 2 green onions, chopped - Sesame seeds When making honey garlic chicken stir fry, you need fresh and high-quality ingredients. The chicken thighs give you juicy meat, while honey adds sweetness. Soy sauce brings depth, and rice vinegar adds a nice tang. For flavor, minced garlic and grated ginger are key. They fill your dish with warmth. The mixed vegetables add color and crunch. I like bell peppers, broccoli, and carrots for a balanced bite. Sesame oil gives a rich, nutty finish. The cornstarch helps thicken the sauce, making it cling to your chicken and veggies. Finally, salt and pepper bring everything together. The green onions and sesame seeds add a pop of freshness and texture. For the full recipe, check out the details above. Enjoy crafting this tasty dish! To start, grab a mixing bowl. In it, mix 2 tablespoons of honey, 3 tablespoons of soy sauce, and 1 tablespoon of rice vinegar. Then, add 4 minced garlic cloves and 1 tablespoon of grated ginger. Whisk all these ingredients together. This creates a sweet and tangy sauce that adds flavor to your dish. Next, heat 2 tablespoons of sesame oil in a large skillet or wok over medium-high heat. Once the oil is hot, add 1 pound of boneless, skinless chicken thighs cut into bite-sized pieces. Season with salt and pepper. Sauté the chicken for about 5 to 7 minutes. Stir occasionally until the chicken turns golden brown and is fully cooked. After the chicken is cooked, it’s time for the veggies. Add 2 cups of mixed vegetables, like bell peppers, broccoli, and carrots, to the skillet. Stir-fry these for another 3 to 4 minutes. You want the vegetables to stay tender-crisp, adding color and nutrition to your meal. Now, pour the prepared sauce over the chicken and vegetables. Toss everything together gently. Make sure all the ingredients get a nice coat of sauce. This will help blend the flavors and make the dish shine. To thicken the sauce, mix 1 tablespoon of cornstarch with 2 tablespoons of water. Gradually add this mixture to the stir-fry. Stir continuously for 1 to 2 minutes. This will help the sauce become glossy and thick. You can adjust the thickness to your liking. Finally, remove the skillet from the heat. Transfer the stir-fry to a serving dish. For a nice touch, garnish with 2 chopped green onions and a sprinkle of sesame seeds. This adds a pop of color and extra flavor. Enjoy your Honey Garlic Chicken Stir Fry as a quick and tasty meal. For the complete recipe, check the Full Recipe section. Using a large skillet or wok is key for this stir fry. A wok’s shape helps heat spread evenly. If you use a skillet, choose one with a heavy bottom. This helps prevent burning. Stir-frying requires high heat, so turn your burner to medium-high. This high heat gives the chicken a nice sear and keeps veggies crisp. To make your dish even better, try adding spices like red pepper flakes or black pepper. You can also toss in some chopped fresh herbs like cilantro or basil for freshness. If you want a sweeter taste, add a little more honey. For saltiness, splash in more soy sauce. Taste as you go to find the right balance. If you want a different protein, swap chicken for shrimp or beef. Tofu is a great option for a vegan dish. Just make sure to press it to remove excess water. For vegetables, use your favorites like snap peas or zucchini. You can really mix it up based on what you have on hand. This makes the recipe flexible and fun! For the full recipe, check out the [Full Recipe]. {{image_4}} You can switch chicken for shrimp or tofu. Shrimp cooks fast, just like chicken. It adds a nice texture. Tofu is great for a vegan option. Press the tofu to remove water, then cut it into cubes. Sauté it until golden brown before adding the sauce. Both options give you a tasty twist on this dish. Feel free to mix in other vegetables. Snow peas, bok choy, or zucchini work well. Broccoli and bell peppers bring crunch and color. You can use whatever you have on hand. This makes the dish more nutritious and colorful. Try adding spinach or kale for extra vitamins. You can spice things up with a hot sauce or chili flakes. For a different taste, try a teriyaki-style sauce. Just mix soy sauce, honey, and a splash of mirin. This gives a sweet and savory flavor. Experimenting with sauces can change the whole dish. Check the Full Recipe for more ideas and tips! To keep your Honey Garlic Chicken Stir Fry fresh, store leftovers in an airtight container. Make sure to cool it to room temperature before sealing. Place it in the fridge within two hours of cooking. This way, your stir fry can stay fresh and tasty for up to three days. It’s best to reheat it in a skillet for even warmth. If you want to save the stir fry for later, freezing is a great option. Let it cool completely, then transfer it to a freezer-safe bag or container. Remove as much air as possible to prevent freezer burn. You can freeze the stir fry for up to three months. To reheat, simply thaw it in the fridge overnight. Warm it in a skillet over medium heat until it’s hot throughout. When stored properly, your Honey Garlic Chicken Stir Fry can last in the fridge for about three days. If you freeze it, the quality stays good for three months. After that, it’s still safe to eat, but the taste may not be as great. Always check for any signs of spoilage before eating. Enjoy your flavorful meal again with confidence! For the complete cooking method, refer to the Full Recipe. To add heat to your dish, try these ideas: - Add red pepper flakes for instant spice. - Mix in some fresh sliced jalapeños. - Use a spicy soy sauce for extra kick. - Drizzle sriracha or chili paste into the sauce. These tips will give your stir fry a flavorful boost without losing its essence. Yes, you can use frozen vegetables! Here are some tips: - Thaw them before adding to the stir fry. - Cook them a bit longer to ensure they heat through. - Fresh veggies are crispier, but frozen saves time. Using frozen veggies is a great shortcut for busy days. Here are some tasty side dish ideas: - Serve over steamed rice for a classic pairing. - Try quinoa for a healthy option. - Pair with a fresh green salad for some crunch. - Noodles are also a fun way to enjoy the meal. These sides will complement the flavors of your stir fry beautifully. This blog post detailed a tasty Honey Garlic Chicken Stir Fry. We covered key ingredients, from chicken thighs to mixed veggies. You learned simple steps for cooking and tips for perfecting flavors. We also explored variations, ingredient swaps, and storage tips to keep meals fresh. In closing, this dish is quick, adaptable, and satisfying. Give it a try and enjoy a meal that pleases everyone at the table.](https://recipetorch.com/wp-content/uploads/2025/05/97211c29-14ac-4201-be95-2a47bac69868.webp)
Looking for a quick and delicious meal that packs a flavor punch? Honey Garlic Chicken Stir Fry is your answer!
