
16. Indian Butter Chicken Flavorful and Creamy Delight
Indian Butter Chicken is a rich and creamy dish that packs a flavorful punch. If you’ve ever craved a warm
Indian Butter Chicken is a rich and creamy dish that packs a flavorful punch. If you’ve ever craved a warm
![- 2 medium eggplants, sliced into 1/2-inch rounds - 1 teaspoon salt - 2 cups marinara sauce - 1 1/2 cups shredded mozzarella cheese - 1/2 cup grated Parmesan cheese - 1 cup all-purpose flour - 2 large eggs, beaten - 1 cup breadcrumbs (preferably panko for extra crunch) - 1 teaspoon dried oregano - 1 teaspoon dried basil - Fresh basil leaves for garnish - Olive oil for drizzling Baked Eggplant Parmesan needs simple yet flavorful ingredients. For eggplants, you want medium, firm ones. The salt helps draw out moisture and bitterness, making them taste better. Use any good brand of marinara sauce; homemade works too! For cheese, I love mozzarella for its meltiness and Parmesan for its sharp taste. If you want to make it lighter, you can try using low-fat cheese. You can swap all-purpose flour for whole wheat flour if you prefer. Breadcrumbs can be regular, but panko gives that extra crunch. Each serving of Baked Eggplant Parmesan has about 350 calories. There are 18 grams of fat and 15 grams of protein. This dish also offers a good amount of vitamins from the eggplants and herbs. To reduce calories, you can use less cheese or add more vegetables. If you have allergens, use gluten-free breadcrumbs and check your marinara sauce for any hidden ingredients. To start, you must prepare the eggplants. Slice them into 1/2-inch rounds. Next, sprinkle 1 teaspoon of salt over the slices. This step draws out moisture and bitterness. Let them sit for 30 minutes. After that, rinse them under cold water and pat them dry with paper towels. Next, set up your breading station. You need three shallow dishes. One should hold 1 cup of all-purpose flour. The second dish will have 2 large beaten eggs. In the third dish, mix 1 cup of breadcrumbs with 1 teaspoon of dried oregano and 1 teaspoon of dried basil. Now, it's time to fry the breaded eggplant slices. Heat a thin layer of olive oil in a large skillet over medium heat. Fry the eggplant in batches. Do not overcrowd the pan. Cook for about 3-4 minutes on each side until golden brown and crispy. Once cooked, transfer the fried slices to a paper towel-lined plate. Next, layer the eggplant and sauce in the baking dish. Spread a thin layer of marinara sauce in a 9x13 inch baking dish. Place half of the fried eggplant slices on top. Spoon half of the remaining marinara sauce over the eggplant. Then, sprinkle half of the shredded mozzarella and half of the grated Parmesan cheese. Repeat this layering process with the rest of the fried eggplant. Finish with the remaining sauce, mozzarella, and Parmesan. Drizzle a little olive oil over the top layer. Cover the dish with aluminum foil. Now, bake the dish in the preheated oven at 375°F (190°C). Bake for 25 minutes. After this, carefully remove the foil. Continue baking for 15-20 minutes until the cheese is bubbly and golden brown. Let the dish cool for a few minutes after baking. Slice into portions and garnish with fresh basil leaves. This adds a nice touch to your dish. For a restaurant-style presentation, serve on individual plates. You can also pair this with crispy garlic bread for a delightful meal. - To keep the eggplant crispy, ensure oil is hot before frying. - For a healthier dish, use whole wheat flour and low-fat cheese. - Add garlic powder and red pepper flakes for a kick. - Try using ricotta or goat cheese for a creamy twist. - Don’t overcrowd the frying pan; this makes the eggplant soggy. - Always let the eggplant drain well; this prevents excess moisture. {{image_4}} You can easily make Baked Eggplant Parmesan plant-based. Replace the cheese with almond or cashew cheese. You can add extra veggies too. Think about mushrooms, zucchini, or bell peppers. Layering these with eggplant boosts flavor and nutrition. If you need a gluten-free version, swap regular breadcrumbs for gluten-free ones. You can also use crushed rice cakes or cornmeal for the breading. These options keep the crunch while avoiding gluten. Using different cheeses can change the dish's flavor. Try gouda, provolone, or fontina for a unique twist. You can also use vegan cheese if you want a dairy-free option. This keeps the dish creamy and delicious without the dairy. For the complete recipe, check out the [Full Recipe]. To keep your Baked Eggplant Parmesan fresh, store leftovers in the fridge. Use airtight containers to prevent moisture loss. I suggest using glass containers for their durability. Make sure to let the dish cool before sealing it. This helps avoid sogginess. When stored properly, it lasts about 3-5 days in the fridge. Freezing is a great option if you want to save some for later. First, let the dish cool completely. Then, cut it into portions for easy reheating. Wrap each piece tightly in plastic wrap and place it in a freezer-safe container. This way, you can enjoy it later without losing flavor. It can last up to three months in the freezer. When you’re ready to eat, thaw the dish in the fridge overnight. To reheat, place the portions in a baking dish. Cover with foil to maintain moisture, then reheat at 350°F (175°C) for about 20-30 minutes. This keeps the texture nice and the cheese bubbly. For the best taste, you can add a splash of marinara sauce before reheating. For the full recipe, check the ingredients and instructions earlier in the article. Enjoy your leftovers! Baked Eggplant Parmesan can last about 3 to 5 days in the fridge. Make sure to store it in an airtight container. This helps keep it fresh and tasty. If you see any signs of spoilage, like a bad smell or mold, toss it out. Yes, you can prepare Baked Eggplant Parmesan ahead of time. You can bread the eggplant and layer the dish, then cover it and keep it in the fridge. Bake it later when you’re ready to enjoy. This makes it a great option for busy days or gatherings. Baked Eggplant Parmesan has some healthy aspects. Eggplants are low in calories and high in fiber. They also contain antioxidants. However, it can be high in cheese and sauce, so watch your portions. You can make it lighter by using less cheese or whole-grain breadcrumbs. For the full recipe, check out the details above. We covered how to make a delicious Baked Eggplant Parmesan. You learned about the key ingredients, their nutritional facts, and how to modify them. I shared step-by-step instructions to achieve perfect layers with tips for serving. We explored various cooking methods and ways to avoid common mistakes. Lastly, I gave you ideas for storage and answered frequent questions. With these insights, you can create a tasty dish that suits your needs and preferences. Enjoy your cooking journey!](https://recipetorch.com/wp-content/uploads/2025/06/caf80733-fb02-4002-845c-1adb0ff7da5f.webp)
If you’re craving a warm, comforting dish that bursts with flavor, Baked Eggplant Parmesan is the answer. This dish combines
![- 1 cup jasmine rice - 1 can (400ml) coconut milk - 1 cup vegetable broth Jasmine rice is fragrant and fluffy. It absorbs the creamy coconut milk well. Coconut milk gives the dish its rich, tropical flavor. Vegetable broth adds depth and enhances the taste. - 1 can (400g) black beans, rinsed and drained - 1 small red onion, finely chopped - 2 cloves garlic, minced - 1 teaspoon ground cumin - 1 teaspoon smoked paprika Black beans add protein and a hearty texture. Red onion brings sweetness and color. Garlic adds a savory punch. Cumin and smoked paprika give the dish warmth and earthiness. - Juice of 1 lime - Fresh cilantro, chopped - 1 tablespoon olive oil Lime juice brightens the dish with acidity. Fresh cilantro adds a pop of color and freshness. Olive oil helps sauté the onion and gives a nice finish. You can find the full recipe to try this delightful dish yourself! 1. To start, heat the olive oil in a medium-sized saucepan over medium heat. 2. Add the finely chopped red onion. Sauté for 3-4 minutes. You want it soft and translucent. 3. Next, stir in the minced garlic. Cook for about one minute. This makes the kitchen smell amazing. 4. Now, add the jasmine rice to the pan. Toast the rice by stirring it for 2 minutes. This step adds a nutty flavor to the dish. 1. Carefully pour in the coconut milk and vegetable broth. 2. Season the mix with salt, pepper, ground cumin, and smoked paprika. 3. Stir everything well to combine. 4. Bring the mixture to a gentle simmer. Then, lower the heat, cover the pan, and cook for 15-18 minutes. The rice should be tender and absorb all the liquid. 1. While the rice cooks, take a separate saucepan. Combine the rinsed black beans with lime juice and a pinch of salt. 2. Heat the beans over low heat for 5-7 minutes. Stir occasionally until they are warmed through. Once the rice is done, fluff it with a fork. Let it rest for a few minutes. This makes it perfect for serving. For the full recipe, check the section above. - Perfecting rice texture: Use jasmine rice for that fluffy and fragrant finish. Always rinse it well before cooking. This removes excess starch, preventing it from becoming sticky. When cooking, keep the lid on the pot. This traps steam and helps the rice cook evenly. - Avoiding garlic browning: Garlic can quickly go from golden to burnt. To keep it light and fresh, cook it for just a minute. Stir it often to prevent it from browning. This way, it stays flavorful without overpowering the dish. - Recommended seasoning adjustments: If you love spice, add a pinch of cayenne or chili powder. For more depth, try adding a bay leaf during cooking. This little change can elevate the dish's flavor. - Suggestions for garnishing: Fresh cilantro adds a bright touch. A squeeze of lime on top adds zest. You can even sprinkle some toasted coconut for a crunchy finish. - Plating ideas: Serve the coconut rice in colorful bowls for a fun look. Place the rice slightly off-center, then add a scoop of black beans. This creates a beautiful contrast on the plate. - Pairing with proteins or sides: This dish goes well with grilled chicken or shrimp. You can also serve it with a side of sautéed vegetables for a complete meal. It’s a great way to enjoy a balanced plate. For the full recipe, click here: [Full Recipe]. {{image_4}} You can add coconut flakes for extra texture. I love using unsweetened flakes. They give a nice crunch and a stronger coconut taste. Another great idea is mixing in vegetables. Peas, corn, or bell peppers can brighten up the dish. Just toss them in when the rice is cooking. They will soak up all the delicious flavors. This recipe is easy to make vegan. Just ensure the broth is vegetable-based. For gluten-free options, stick with the right broth and check labels. Both choices keep the dish tasty and safe for all diets. Coconut rice and black beans pair well with many dishes. Try grilled chicken or fish for a complete meal. You can also add a fresh salad on the side. It adds color and crunch. For sides, plantain chips or avocado slices work well. They add more flavor and texture to your plate. After you enjoy your coconut rice and black beans, store any leftovers in an airtight container. This keeps them fresh. Your dish will last in the fridge for about 3 to 4 days. If you want to eat it later, make sure to cool it completely before placing it in the fridge. To freeze coconut rice and beans, pack them in a freezer-safe container. Leave some space at the top for expansion. You can freeze them for up to 3 months. When you are ready to eat, just take the container out of the freezer. Thaw the rice and beans in the fridge overnight. If you need it fast, use the microwave at a low power setting. This way, your dish will stay nice and moist. For reheating, use the stovetop for the best flavor and texture. Add a splash of water or broth to keep it from drying out. Heat over low until warm. You can also use the microwave. Just cover it to trap steam, and heat in short bursts. This helps keep your dish delicious! If you don’t have jasmine rice, you can use other types of rice. Here are some great options: - Basmati rice: This rice has a nice aroma and fluffy texture. - Long-grain white rice: This is a simple, easy-to-find choice. - Brown rice: This option is heartier and healthier but takes longer to cook. - Quinoa: A gluten-free grain that adds a nutty flavor. Each option brings a different taste and texture, so feel free to experiment! Adding protein makes this dish more filling. Here are some easy suggestions: - Grilled chicken: Tender and juicy, it pairs well with the rice. - Shrimp: Quick to cook, shrimp adds a nice touch of seafood flavor. - Tofu: A great plant-based option, just sauté until crispy. - Ground beef or turkey: Cook it with spices to blend flavors. - Lentils: For a vegetarian choice, add cooked lentils for extra protein. These additions can make your meal heartier and more satisfying. Yes, you can make this recipe ahead. Here are some tips: - Cook the rice and beans separately and store them in the fridge. - Keep each in airtight containers to maintain freshness. - They can last about 3-4 days in the fridge. - Reheat before serving; add a splash of coconut milk for creaminess. Making it ahead saves time and lets the flavors blend nicely. No, this recipe is not spicy. Here’s why: - The main flavors come from coconut, black beans, and spices. - Ground cumin and smoked paprika add warmth but no heat. - If you want spice, you can add diced jalapeños or chili powder. This dish is perfect for those who prefer milder flavors. Enjoy it as is or spice it up to your liking! In this guide, we explored the tasty world of coconut rice and black beans. We covered key ingredients like jasmine rice and coconut milk, plus some great spices and garnishes. You learned step-by-step instructions to prepare and cook the dish, along with helpful tips for flavor and texture. We also shared variations and storage tips, making it easy to customize and enjoy. Now, you have the tools to create a delicious meal that suits your taste. Your kitchen adventures await!](https://recipetorch.com/wp-content/uploads/2025/06/ca436853-9394-4e99-bbda-1d95656da168.webp)
Coconut Rice and Black Beans is a flavorful, easy meal you can whip up today! This dish combines creamy coconut
![Gathering the right ingredients is key for a great Rustic Tomato Basil Soup. Here’s what you need: - 3 cups ripe tomatoes, diced (fresh or canned) - 1 medium onion, finely chopped - 3 cloves garlic, minced - 1 carrot, finely diced - 2 cups vegetable broth - 1 cup fresh basil leaves, roughly torn - 1 tablespoon extra virgin olive oil - 1 teaspoon sugar (to balance acidity) - Sea salt and freshly ground black pepper, to taste - Crunchy croutons for topping (optional) - A drizzle of balsamic glaze for garnish (optional) Each ingredient plays a role. The tomatoes bring rich flavor. The onion and garlic add depth. Carrots add a natural sweetness. Fresh basil gives a vibrant touch. Extra virgin olive oil enriches the soup. Sugar helps balance the acidity of the tomatoes. Sea salt and black pepper enhance taste. Finally, optional toppings like croutons and balsamic glaze can elevate the soup. For the complete recipe, check the Full Recipe section. This soup is not just food; it’s comfort in a bowl! 1. Sautéing Vegetables Start by heating the olive oil in a large pot over medium heat. Add the finely chopped onion and diced carrot. Sauté these for about five minutes. You want them soft and the onion to look clear. 2. Cooking Tomatoes Next, add the minced garlic to the pot. Cook it for one to two minutes. Stir it often so it does not brown. Now, toss in the diced tomatoes and the teaspoon of sugar. This sugar helps balance the soup's acidity. Cook this mix for ten minutes. Stir occasionally. Let the tomatoes soften and release their juices. 3. Adding Broth and Simmering Pour in the vegetable broth. Bring the mixture to a gentle simmer. Let it cook uncovered for about twenty minutes. This allows all the flavors to blend well. 4. Blending the Soup After simmering, remove the pot from heat. Stir in the torn basil leaves for a fresh taste. Use an immersion blender to puree the soup. Blend until smooth. If you like some chunks, blend only half. 5. Seasoning and Final Touches Season your soup with sea salt and black pepper to taste. If needed, gently reheat the soup before serving. Serve it hot, topped with crunchy croutons and a drizzle of balsamic glaze. This adds a nice contrast to the rich flavors. For the full recipe, check the details above. - Balancing Acidity with Sugar: Fresh tomatoes can be quite tangy. Adding sugar helps balance this acidity. Use just one teaspoon of sugar in your soup. It lifts the flavors without making it sweet. - Choosing the Right Tomato Varieties: For the best flavor, use ripe, fresh tomatoes. Heirloom and vine-ripened tomatoes offer great taste. Canned tomatoes are also a good option. Look for high-quality brands with no added sugar. - Fresh vs. Dried Basil: Fresh basil adds a bright, herbal note. Use it right before serving for the best flavor. Dried basil can work too, but use less. Start with one teaspoon, as it’s more potent. - Using an Immersion Blender vs. Regular Blender: An immersion blender is handy for soups. It lets you blend right in the pot and avoids spills. A regular blender works well too, but blend in batches for safety. - How to Achieve Desired Consistency: If you like smooth soup, blend until creamy. For a chunkier texture, blend just half and leave some pieces whole. Adjust to your taste! Experiment with these tips to make your Rustic Tomato Basil Soup even better. For the full experience, check the Full Recipe for all steps and details. {{image_4}} Using fresh tomatoes gives your soup a bright taste. Ripe, juicy tomatoes will shine in this dish. If fresh ones are not available, canned tomatoes work well, too. They can save time and still taste great. Just pick a brand with no added sugar or salt for the best results. Adding other vegetables can also boost flavor and nutrition. You might try adding bell peppers, zucchini, or even spinach. These veggies add color and depth. Just chop them small and sauté them with the onion and carrot. Introducing spices can take your soup to the next level. A pinch of red pepper flakes adds heat. If you want a warm flavor, try a dash of smoked paprika. Each spice brings its own taste and character. Adding cheese or cream can make the soup creamy and rich. Stir in a bit of heavy cream for a silky finish. A handful of grated Parmesan cheese adds salty depth. Both options enhance the soup’s comfort factor. For the full recipe, check out the Rustic Tomato Basil Soup section above. Refrigeration Tips To store leftover Rustic Tomato Basil Soup, let it cool first. Pour the soup into an airtight container. Seal it tightly and place it in the fridge. The soup stays fresh for up to three days. If you want to enjoy it later, consider freezing it. Freezing Guidelines For long-term storage, you can freeze the soup. Use freezer-safe bags or containers. Leave some space at the top, as the soup expands when frozen. Label the bags with the date. The soup can last up to three months in the freezer. When you’re ready to eat, thaw it in the fridge overnight. Best Methods for Retaining Flavor When reheating your soup, use a pot on low heat. Stir it often to keep it from sticking. This method helps maintain the soup's rich flavors. You can also use a microwave. Place the soup in a microwave-safe bowl. Cover it loosely and heat it in short bursts. Stir in between to ensure even heating. Enjoy your warm, comforting soup again! For the full recipe, check out the Rustic Tomato Basil Soup section. How can I make the soup thicker? To thicken your Rustic Tomato Basil Soup, you have a few options. You can add more diced tomatoes for extra body. A splash of tomato paste also works well. If you prefer, blend in some cooked rice or potatoes. Each option adds texture and depth. Can I use chicken broth instead of vegetable broth? Yes, you can use chicken broth in place of vegetable broth. This swap gives the soup a richer flavor. It’s a great choice if you enjoy a heartier taste. Just make sure to adjust the salt, as chicken broth may be saltier. What can I serve with Rustic Tomato Basil Soup? This soup pairs well with many dishes. Grilled cheese sandwiches are a classic choice. You could also serve it with a fresh salad or crusty bread. These sides enhance your meal and create a comforting dining experience. Is this soup suitable for a vegan diet? Yes, Rustic Tomato Basil Soup is vegan-friendly. All the ingredients, like tomatoes and basil, are plant-based. It is a perfect dish for those who follow vegan diets. Enjoy it without any worries about animal products. Can I make it in advance? Absolutely! You can make this soup ahead of time. Store it in the fridge for up to three days. For longer storage, freeze it in airtight containers. When ready to serve, just reheat it on the stove or in the microwave. This makes meal prep easy and delicious. For the complete recipe, check out the [Full Recipe]. This blog post covers how to make Rustic Tomato Basil Soup from scratch. We looked at key ingredients, like ripe tomatoes and fresh basil. I shared step-by-step instructions, helpful tips, and variations to suit your taste. Remember, balance flavors and don’t hesitate to experiment. Proper storage tips help you enjoy leftovers later. With these methods, you can create a delicious soup that's simple and satisfying. Enjoy your cooking journey!](https://recipetorch.com/wp-content/uploads/2025/06/9df0c0a7-5841-4eaf-a2d7-95a0ec6fb18e.webp)
Nothing says comfort like a warm bowl of Rustic Tomato Basil Soup. Bursting with fresh flavors, this soup transforms simple

Are you ready for a meal that’s easy to make and full of flavor? This Teriyaki Chicken Stir-Fry is your

Looking for a delicious and healthy meal? You’ll love these Vegan Lentil Tacos! Packed with flavor and nutrients, they make

If you’re looking for a tasty, crowd-pleasing dish, BBQ Pulled Pork Sliders are the answer! These sliders are packed with
![To make Zucchini Noodles with Pesto, you need fresh and simple ingredients. Here they are: - 3 medium zucchinis, spiralized - 1 cup fresh basil leaves - 1/4 cup toasted pine nuts - 1/4 cup grated Parmesan cheese (or nutritional yeast for a vegan option) - 2 cloves garlic, minced - 1/4 cup extra virgin olive oil - Salt and freshly ground black pepper, to taste - Handful of cherry tomatoes, halved (for garnish) - Optional: Pinch of red pepper flakes for a spicy kick These ingredients blend perfectly to create a dish that is both quick and tasty. Using fresh basil gives your pesto a bright flavor. The pine nuts add a rich texture. You can choose Parmesan or nutritional yeast based on your diet. When you spiralize the zucchinis, they turn into fun, noodle-like shapes. This makes your dish look exciting and colorful. The cherry tomatoes add a pop of freshness at the end. For a complete recipe, check the Full Recipe. Enjoy the process of making this fun dish! - Start by spiralizing your zucchinis. Use a spiralizer or a julienne peeler. - Once you have your noodles, set them aside on a plate or in a bowl. - In a food processor, combine fresh basil leaves, toasted pine nuts, grated Parmesan cheese, and minced garlic. - Pulse the mix until everything is coarsely chopped and well combined. - While blending, slowly drizzle in the extra virgin olive oil. This helps achieve a smooth consistency. - Taste your pesto. Adjust the flavor with salt and freshly ground black pepper. If you like it spicy, add a pinch of red pepper flakes. - Heat a large skillet over medium heat. - Add the spiralized zucchini noodles to the skillet. Sauté them gently for 2-3 minutes. You want them tender but still firm. - Remove the skillet from heat. Add half of the pesto to the noodles. Toss them gently to coat evenly. You can add more pesto if you prefer! - For serving, place the zucchini noodles in bowls. Top them with halved cherry tomatoes for a colorful finish. Enjoy this quick and tasty dish! For the complete preparation details, check the Full Recipe. - Choosing the right zucchini: Pick firm, medium-sized zucchinis. Avoid soft or watery ones. Thicker zucchinis yield better noodles. Look for a smooth skin and vibrant color. - Techniques for perfect noodles: Use a spiralizer for long, thin strands. If you don’t have one, a julienne peeler works too. Aim for even thickness to cook evenly. Don't force the zucchini; let it turn naturally. - Tips for fresh basil preservation: Store fresh basil in a glass of water. Cover the leaves with a plastic bag. This keeps it fresh for days. You can also freeze basil in ice cube trays with olive oil. - Alternatives for nut allergies: Substitute pine nuts with seeds like sunflower or pumpkin. These keep the pesto creamy and tasty. You can also skip nuts entirely and use more cheese or nutritional yeast. - Presentation ideas for an appealing dish: Serve zucchini noodles in a bowl with a swirl design. This makes it look fancy. Drizzle extra pesto on top for color and flavor. - Pairing with additional garnishes: Add halved cherry tomatoes for freshness. A sprinkle of extra cheese can enhance the dish. Fresh basil leaves add a nice touch too. For the full recipe, check out the Zesty Zucchini Noodles with Pesto. {{image_4}} You can boost your zucchini noodles with protein. Grilled chicken or shrimp are great choices. They add flavor and make the meal filling. You can also mix in more veggies. Try bell peppers, spinach, or mushrooms. They add color and nutrients to your dish. Get creative with your pesto! Swap basil for spinach or arugula. This twist gives a new flavor. If you're vegan, use nutritional yeast instead of cheese. You can even add nuts like walnuts for a different taste. Experiment with herbs to find your favorite mix. Zucchini noodles are naturally gluten-free. You can serve them without traditional pasta. For pesto, use sunflower seeds instead of pine nuts if needed. This makes it nut-free too. You can also try avocado for creaminess in your pesto. It’s a fun and tasty twist! For more details, check out the Full Recipe to dive deeper into making this dish your own. To keep your zucchini noodles and pesto fresh, store them separately. Use airtight containers. Place the noodles in one container and the pesto in another. This helps prevent sogginess. You can keep them in the fridge for up to three days. Check for any signs of spoilage before using. If you want to save zucchini noodles for later, you can freeze them. Lay the noodles flat on a baking sheet. Freeze them for about an hour until firm. Then, transfer them to a freezer bag. For the pesto, pour it into an ice cube tray. Once frozen, pop the cubes into a freezer bag. This keeps the pesto fresh for about three months. To reheat zucchini noodles, place them in a skillet over low heat. Add a splash of water to steam them lightly. This helps keep them from becoming mushy. Stir gently for a few minutes until warmed through. If reheating pesto, do it in a microwave for 30 seconds. Mix well and check the temperature. Enjoy your delicious meal with all its flavors intact. For the full recipe, visit the [Full Recipe] section. Yes, you can prepare zucchini noodles in advance. Spiralize the zucchinis and store them in a sealed container. Keep them in the fridge for up to two days. However, they may release some water. To reduce this, pat them dry before using. Look for medium-sized zucchinis. They should be firm and free from blemishes. Smaller zucchinis are often sweeter and less seedy, making them great for noodles. Choose organic if possible for a cleaner taste. Homemade pesto can last up to one week in the fridge. Store it in an airtight container. To keep it fresh, drizzle a thin layer of olive oil on top before sealing. This helps prevent browning. Yes, zucchini noodles are lower in calories and carbs than regular pasta. They are high in vitamins A and C. This makes them a great choice for anyone looking to eat healthier. They also add more vegetables to your diet. Absolutely! Store-bought pesto saves time and still adds great flavor. Look for a high-quality brand with simple ingredients. It can be a perfect shortcut when you're short on time. For the best flavor, choose one without preservatives. For the full recipe, check out the Zesty Zucchini Noodles with Pesto. This blog post covered how to make delicious zucchini noodles with fresh pesto. You learned about the ingredients and steps needed for preparation. I also shared tips to perfect your noodles and pesto, along with storage info for leftovers. Zucchini noodles are nutritious and easy to prepare. With variations, you can customize this dish to your taste. Try different ingredients and enjoy this healthy option. Get creative, and make it your own!](https://recipetorch.com/wp-content/uploads/2025/06/3a7af9b8-baeb-434d-9d7f-44b22b2b06d7.webp)
Looking for a quick and tasty dish that’s healthy too? Zucchini noodles with pesto are here to save your dinner!
![To make a great beef stroganoff, you need these main ingredients: - 1.5 lbs beef sirloin, thinly sliced - 1 medium onion, finely chopped - 3 cloves garlic, minced - 8 oz mushrooms, sliced - 2 cups beef broth - 1 cup sour cream - 2 tablespoons Dijon mustard - 3 tablespoons all-purpose flour - 3 tablespoons olive oil - 1 tablespoon Worcestershire sauce - Salt and freshly ground black pepper - Fresh parsley, chopped (for garnish) - 8 oz egg noodles These ingredients create a rich and tasty sauce that pairs well with tender beef and noodles. You can add some optional ingredients to boost the flavor: - Fresh thyme or dill for extra herbs - A splash of white wine for depth - A pinch of paprika for warmth These additions can enhance the dish and make it your own. If you have dietary needs or preferences, consider these substitutions: - Swap beef sirloin with chicken or tofu for a different protein. - Use Greek yogurt instead of sour cream for a lighter option. - Replace egg noodles with zucchini noodles for a low-carb choice. These swaps let you enjoy stroganoff in a way that suits your taste and needs. For the complete recipe, check out the [Full Recipe]. Start with a large pot of salted water. Bring it to a rolling boil. Add 8 oz of egg noodles. Cook them according to the package directions until al dente. Once done, drain the noodles and set them aside. This step is key for a great beef stroganoff. Take 1.5 lbs of beef sirloin and slice it thinly. Season it well with salt and pepper. Heat 2 tablespoons of olive oil in a large skillet over medium-high heat. Add the beef in batches. Cook for 2-3 minutes on each side. You want it browned but not fully cooked. Once done, remove the beef and place it on a plate. In the same skillet, lower the heat a bit. Add 1 tablespoon of olive oil. Sauté 1 finely chopped onion for about 3 minutes. It should become soft and translucent. Then, add 3 minced garlic cloves and cook for another minute. The smell will be great! Next, add 8 oz of sliced mushrooms. Cook for 5-7 minutes until they are golden brown. Sprinkle 3 tablespoons of flour over this mixture and stir well. Slowly pour in 2 cups of beef broth while stirring. This will help prevent lumps. Let the mix come to a simmer for about 5 minutes. Your sauce will thicken a bit. Now, turn the heat to low and return the beef to the skillet. Stir in 1 tablespoon of Worcestershire sauce and 2 tablespoons of Dijon mustard. Let everything simmer for another 5 minutes. This ensures the beef cooks fully and absorbs all those rich flavors. After that, remove the skillet from heat and gently mix in 1 cup of sour cream. Stir until the sauce is creamy. Taste and adjust the seasoning if needed. Finally, add the cooked egg noodles to the beef stroganoff sauce. Toss them until they are fully coated. Serve it warm, topped with freshly chopped parsley. Enjoy your meal! For a complete guide, check the Full Recipe. To cook beef just right, start with good cuts. I like sirloin for its flavor and tenderness. Slice it thinly against the grain. This helps keep it tender. Season with salt and pepper before cooking. Sear it in hot oil for a nice crust. Don't overcrowd the pan. Cook in batches if needed. This ensures even cooking. Remember, the beef will finish cooking in the sauce. To make the sauce creamy, use full-fat sour cream. Add it off the heat. This stops it from curdling. Mix it in gently for a smooth texture. For more flavor, add Dijon mustard. It balances the richness of the sour cream. If you want a thicker sauce, sprinkle in a bit more flour. Just make sure to mix it well to avoid lumps. When serving beef stroganoff for eight, use wide, shallow bowls. This allows you to show off the creamy sauce. Garnish with chopped parsley for a fresh look. Serve with crusty bread on the side. It’s great for dipping into the sauce. For a side dish, consider a simple green salad. It adds a nice crunch and freshness to the meal. For the full recipe, check out the details above. {{image_4}} To make a healthier beef stroganoff, focus on lean cuts of meat. Use sirloin or flank steak instead of fatty cuts. You can also reduce the sour cream. Try Greek yogurt for a lower fat option. Swap out egg noodles for whole grain pasta or spiralized veggies. These changes keep the dish tasty while lowering calories. If you want a vegetarian twist, replace beef with mushrooms or lentils. Portobello mushrooms add a meaty texture. Use vegetable broth instead of beef broth. For a vegan option, choose coconut cream in place of sour cream. This keeps the dish creamy without dairy. Add plenty of herbs and spices to boost flavor. For a gluten-free beef stroganoff, switch the flour for cornstarch or a gluten-free blend. Ensure your beef broth is gluten-free too. Use gluten-free pasta or zucchini noodles for a fresh twist. These adjustments let everyone enjoy this comforting meal without worry. For the full recipe, visit the link above. To keep your beef stroganoff fresh, store it in an airtight container. Place it in the fridge within two hours of cooking. This helps prevent bacteria growth. It stays good for up to three days. If you have leftovers, make sure the dish cools before sealing. This keeps moisture from building up inside the container. When you are ready to enjoy your stroganoff again, reheat it gently. You can use the stovetop or microwave. If using the stovetop, heat on low. Stir often to heat evenly and avoid burning. If using a microwave, cover the dish loosely. Heat in short bursts, stirring in between. This keeps the sauce creamy and tasty. If you want to store stroganoff for longer, freezing is a great option. Place it in a freezer-safe container. It can last up to three months in the freezer. To thaw, place it in the fridge overnight. You can also use the microwave on a low setting. Make sure to reheat thoroughly before serving. Enjoy your creamy mushroom beef stroganoff even later! For the full recipe, check out the details above. The best cut of beef for stroganoff is beef sirloin. It is tender and cooks quickly. You can also use tenderloin or flank steak if you prefer. Choose thinly sliced pieces for quick cooking. This helps keep the meat juicy and soft. Yes, you can make beef stroganoff ahead of time. Cook it fully and cool it down. Place it in an airtight container in the fridge. It can last for up to three days. When ready to eat, simply reheat it on the stove or in the microwave. The flavors will blend even more, making it taste great! To enhance the flavor of your stroganoff, use fresh herbs like thyme or dill. Adding a splash of white wine gives it depth. You can also mix in some mustard or a hint of paprika for a kick. Always taste your sauce and adjust the seasoning with salt and pepper. Beef stroganoff is great with egg noodles or rice. You can also serve it with mashed potatoes for a hearty meal. A side of crusty bread is perfect for dipping in the sauce. Pair it with a simple salad for some freshness. For a complete meal, consider sautéed green beans or steamed broccoli. For a full recipe, check out the Creamy Mushroom Beef Stroganoff. In this article, we covered the key ingredients for beef stroganoff, from essentials to optional ones. I shared step-by-step instructions to cook it perfectly, along with tips to improve your dish. We explored variations for different diets and discussed how to store leftovers safely. Remember, making stroganoff can be simple and fun. You can adjust the recipe to fit your taste. Enjoy the process and share your creations with friends and family. Cooking is about having fun and making memories!](https://recipetorch.com/wp-content/uploads/2025/06/3787f0dd-6a39-4a3b-9490-01dc6bec5d32.webp)
Are you ready to bring a classic dish to your table? Classic Beef Stroganoff is a simple and flavorful meal
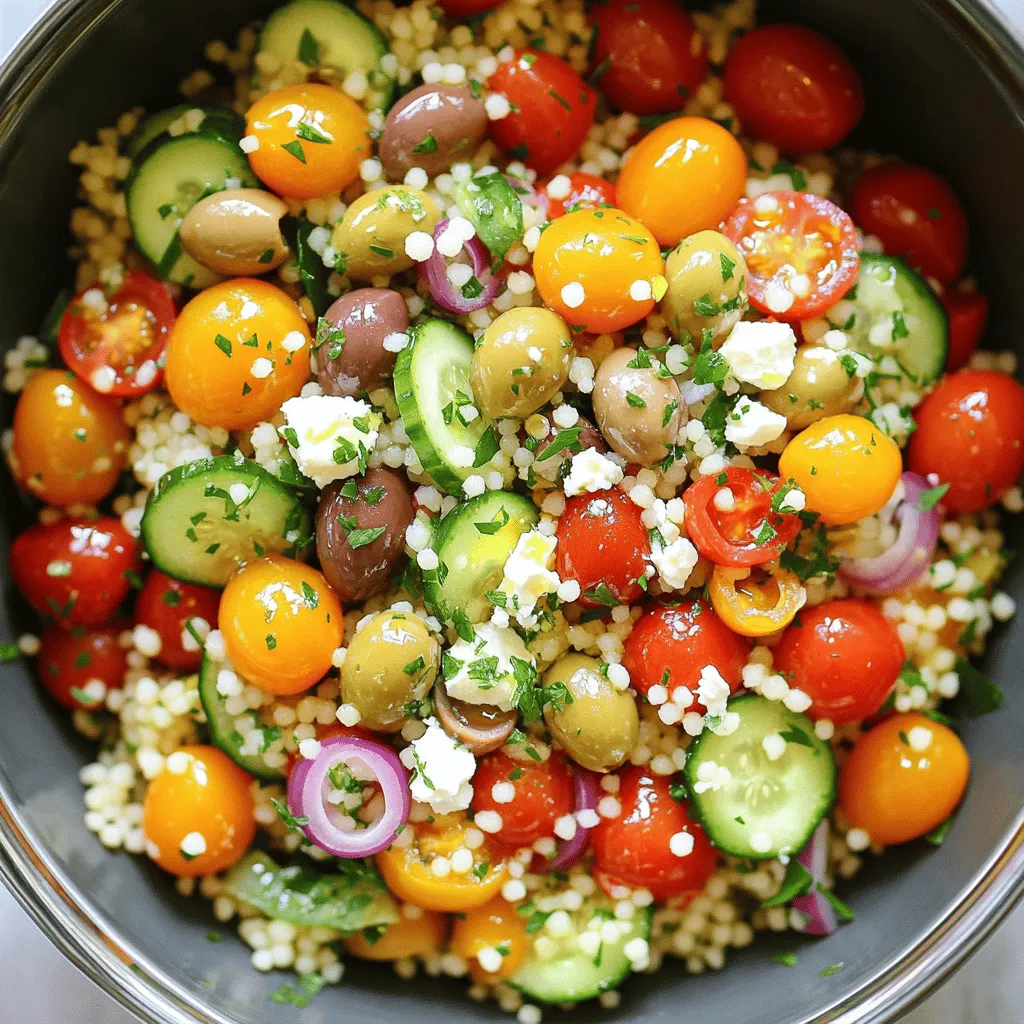
Looking to bring vibrant flavors to your table? My Savory Mediterranean Couscous Salad is just the dish for you! With
