
Spicy Grilled Pineapple Skewers Flavorful Summer Treat
Get ready to fire up your grill! Spicy Grilled Pineapple Skewers are the perfect summer treat that combines sweet, spicy,
Get ready to fire up your grill! Spicy Grilled Pineapple Skewers are the perfect summer treat that combines sweet, spicy,

Looking for a tasty and healthy snack? Try my Avocado Egg Salad Lettuce Wraps! This easy recipe combines creamy avocado
![- 1 cup finely grated zucchini - 1 cup whole wheat flour - 1/2 cup unsweetened cocoa powder - 1/2 cup almond milk - 1/3 cup pure maple syrup - 1/4 cup coconut oil The main ingredients in these muffins create a rich, chocolatey treat. The finely grated zucchini adds moisture without changing the flavor. Whole wheat flour provides fiber, making them a healthier choice. Cocoa powder gives them that deep chocolate taste we all love. Almond milk keeps the muffins light and dairy-free. Maple syrup adds natural sweetness, while coconut oil keeps them moist and delicious. - 1/2 cup chocolate chips - Nuts or seeds for added texture - Substitute sweeteners for personal preferences You can enhance your muffins by adding chocolate chips. Use dark chocolate for a richer taste or dairy-free chips for a vegan option. Nuts or seeds add a nice crunch. If you prefer, you can swap sweeteners. Honey or agave syrup works well if you want a different flavor. - Gluten-free flour alternatives - Dairy-free milk options - Alternatives to sugar If you need gluten-free muffins, try almond flour or oat flour. Both work well in this recipe. For dairy-free options, any plant-based milk will do. You can also replace sugar with coconut sugar or stevia if you want to cut calories. These substitutions keep the muffins healthy and tasty. For the full recipe, visit the link to explore all the details. 1. Preheat your oven to 350°F (175°C). This heat will help the muffins rise well. 2. Prepare your muffin tin. Line it with paper liners or lightly grease with cooking spray to keep the muffins from sticking. 3. In a large mixing bowl, combine the grated zucchini, melted coconut oil, maple syrup, brown sugar, eggs, and vanilla extract. Whisk until smooth. 1. In a separate bowl, sift together the whole wheat flour, cocoa powder, baking powder, baking soda, and salt. This step helps to break up clumps and mix evenly. 2. Gradually add the dry mix to the wet mix. Pour it in slowly while stirring. Alternate with almond milk. Mix gently until just combined. Avoid overmixing to keep your muffins fluffy. 1. Using a spoon or ice cream scoop, portion the batter into the prepared muffin tin. Fill each cup about 3/4 full. This allows space for rising. 2. Bake in the preheated oven for 18-20 minutes. Check with a toothpick. If it comes out clean or with a few moist crumbs, your muffins are ready. 3. Once baked, let the muffins cool in the pan for about 5 minutes. Then, move them to a wire rack to cool completely. This keeps their texture nice and light. For the full recipe, be sure to check out the details above! Zucchini plays a key role in keeping your muffins moist. When you grate zucchini, it releases water. This helps the muffins stay soft and tender. Make sure to remove excess water if your zucchini is very watery. Mixing techniques matter too. Combine wet and dry ingredients gently. Overmixing can lead to dense muffins. Mix just until you see no flour. That way, your muffins will rise beautifully. Choosing the right cocoa powder is important. I recommend using unsweetened cocoa powder. It gives you rich chocolate flavor without too much sweetness. Dark chocolate chips work great too. They add extra chocolate goodness. Balancing sweetness is key. Zucchini has natural sugars that can help. If you use maple syrup, adjust the amount. Taste the batter to find the right balance. Testing your muffins is simple. Insert a toothpick into the center. If it comes out clean or with a few moist crumbs, your muffins are ready. Avoid over-baking to keep them soft. Cooling is another step to get right. Let the muffins cool in the pan for about five minutes. Then, move them to a wire rack. This helps them maintain their texture and prevents sogginess. For the full recipe, check out the complete instructions above. {{image_4}} You can easily adapt these muffins to fit your diet. For a vegan version, use flaxseed eggs instead of regular eggs. To make flaxseed eggs, mix 1 tablespoon of ground flaxseed with 3 tablespoons of water. Let it sit for about 5 minutes until it thickens. If you need a gluten-free option, swap in alternative flours. Almond flour or coconut flour works well. Just remember to adjust the liquid to keep the batter moist. Want to kick up the flavor? Try adding spices like cinnamon or nutmeg. Just a teaspoon can change everything. You can also mix in other fruits. Mashed banana or applesauce adds sweetness and moisture. These simple changes can make your muffins unique every time. For a fun twist, create a marble effect by mixing in different batters. Pour some chocolate batter and some plain batter into each muffin cup. Swirl them with a knife for a lovely design. You can also add a scoop of peanut butter or almond butter. Swirl it into the batter before baking for a rich, nutty flavor. Try these variations to make your Healthy Chocolate Zucchini Muffins even more exciting! For the full recipe, check out the earlier section. To keep your healthy chocolate zucchini muffins fresh, store them in an airtight container. Place a piece of parchment paper between the muffins to prevent sticking. This method helps maintain moisture. You can store them at room temperature for up to three days. For longer storage, you can freeze them. To freeze muffins, wrap each one tightly in plastic wrap. Then place them in a freezer bag. This way, they stay fresh for up to three months. When you are ready to enjoy them, simply remove the desired number from the freezer. To reheat your muffins, preheat your oven to 350°F (175°C). Place the muffins on a baking sheet and cover them with foil. Heat for about 10 minutes. This keeps the muffins soft and warm. You can also warm them in the microwave for about 15-20 seconds. For serving suggestions, enjoy leftover muffins with a spread of nut butter or a drizzle of honey. They also pair well with yogurt. These muffins stay fresh for about three days at room temperature. In the fridge, they last up to a week. If you freeze them, they remain good for three months. Watch for signs that muffins have gone bad. If they smell sour or have mold, it’s time to toss them. Also, if they feel dry or hard, they may not taste good anymore. Enjoy your healthy chocolate zucchini muffins while they are fresh! Yes, you can use frozen zucchini. Make sure to defrost it first. Squeeze out extra moisture with a clean kitchen towel. This helps keep your muffins from getting soggy. Frozen zucchini works well and still keeps the flavor. Just use the same amount as fresh zucchini. If you don't have almond milk, you can try several options: - Soy milk - Oat milk - Coconut milk - Rice milk - Cashew milk All these choices work well in the recipe. Just pick one that you like or have on hand. To check if the muffins are done, use a toothpick. Insert it into the center of a muffin. If it comes out clean or with a few crumbs, they are ready. You can also look for a golden-brown top. The muffins should spring back if you press gently on them. Yes, you can make mini muffins! Just adjust the baking time. Bake them for about 10-15 minutes at the same temperature. Keep an eye on them to avoid over-baking. Enjoy your bite-sized treats! For the full recipe, click here: [Full Recipe]. This blog post covered tasty muffin recipes using simple ingredients. We explored main ingredients like zucchini and cocoa powder. I shared tips for baking, ensuring moist muffins, and perfecting flavor. You learned about variations and storage methods, plus helpful FAQs. Remember, these muffins are easy to customize and fun to make. With a few tweaks, you can create a treat that fits your taste. Enjoy baking and sharing these delicious muffins with friends and family!](https://recipetorch.com/wp-content/uploads/2025/06/1ace358d-af61-498c-8f97-07b4f49cfb0e.webp)
Craving a treat that’s both delicious and healthy? You’ve come to the right place! In this guide, I’ll show you
![- 1 can (15 oz) chickpeas - 2 tablespoons extra virgin olive oil - 1 teaspoon smoked paprika - 1 teaspoon garlic powder - 1/2 teaspoon ground cumin - 1/2 teaspoon fine sea salt - 1/4 teaspoon freshly ground black pepper - 1/4 teaspoon cayenne pepper (optional) - Fresh parsley for garnish Crispy roasted chickpeas are a simple yet tasty snack. You only need a few main ingredients. Chickpeas are the star here. They are packed with protein and fiber. I love using canned chickpeas for ease. Just rinse and drain them before cooking. I use extra virgin olive oil for flavor. It helps the spices stick and adds richness. The spices play a big role in taste. Smoked paprika gives them a nice depth. Garlic powder adds aroma, while cumin warms it up. Salt and pepper balance the flavors. If you like heat, cayenne adds a kick. Garnishing with fresh parsley brightens the dish. It adds color and a hint of freshness. - Different herbs and spices to try: oregano, thyme, or chili powder - Alternative oils for roasting: avocado oil or coconut oil - Suggestions for sweet versions: cinnamon and sugar You can switch things up with different herbs and spices. Try oregano or thyme for a fresh twist. Chili powder can add a smoky flavor too. If you want to change your oil, use avocado oil or coconut oil. Both can add unique tastes. For a sweet version, mix chickpeas with cinnamon and sugar. This gives a fun snack that’s different from the savory kind. - Preheat the oven to 400°F (200°C). - Drain, rinse, and dry the chickpeas. Start by preheating your oven. This step is key for getting that perfect crunch. Next, take your can of chickpeas. Drain them well and rinse under cold water. Spread them on a clean kitchen towel. Dry them gently; the less moisture, the crunchier they will be. - Mixing spices with olive oil. - Ensuring even coating of chickpeas. In a large bowl, add your dried chickpeas. Pour in the olive oil. Then, add the spices: smoked paprika, garlic powder, cumin, sea salt, black pepper, and cayenne if you want a kick. Mix well until every chickpea is coated. This adds flavor and helps them crisp up nicely. - Proper arrangement on baking sheet. - Cooking time and temperature tips. Spread the seasoned chickpeas on a baking sheet. Make sure they are in a single layer. This helps them roast evenly. Place the sheet in the oven for 20 to 25 minutes. Shake the pan halfway through. This ensures they brown nicely. When they are golden brown and crispy, they are ready to eat. Once they cool, taste them and adjust seasoning if needed. For a lovely touch, sprinkle some fresh parsley on top. Enjoy your tasty crispy roasted chickpea snack! For a full recipe, check out the [Full Recipe]. To get crispy roasted chickpeas, drying them is key. After rinsing, spread them on a towel. Pat them dry gently. This step helps remove moisture that can make them soft. For best results, place the baking sheet on the middle rack of your oven. This ensures even heat for perfect crispiness. You can boost flavor by adjusting spice levels. If you like more heat, add extra cayenne pepper. For a milder taste, skip it altogether. Fresh herbs, like parsley, add color and flavor. Try also using lemon zest or nutritional yeast for a unique twist. The garnish not only looks good but tastes great too. Crispy roasted chickpeas pair well with dips. Hummus or tzatziki are excellent choices. They add creaminess that contrasts with the crunch. Enjoy them as a snack or a fun appetizer. Serve them in a bowl or jar for a rustic touch. You can also try mixing them into salads for extra crunch. Explore these ideas to enjoy your crispy creation! {{image_4}} You can spice up your crispy roasted chickpeas in fun ways. For a sweet treat, try cinnamon and sugar. Just mix the sugar and cinnamon with a bit of olive oil. Coat your chickpeas in this mix and roast. The result is a crunchy, sweet snack that feels like dessert. Savory options are just as tasty. Taco seasoning adds a zesty kick. Simply toss your chickpeas with olive oil and taco spice for an easy flavor boost. You can also use Italian herbs or curry powder for a different twist. Each flavor makes chickpeas a versatile snack. These roasted chickpeas fit many diets. They are naturally gluten-free. This means you can enjoy them without worry if you avoid gluten. Just be sure to check any spice mixes for hidden gluten. This snack is also vegan-friendly. You won’t find any animal products in this recipe. Chickpeas are packed with protein, making them a great choice for plant-based eaters. Feel free to experiment with spices that suit your taste! If you want to change how you cook chickpeas, you can try air-frying. This method uses less oil and cooks faster. You will still get that crunchy texture. Set your air fryer to 400°F and cook for about 15-20 minutes. You can also use a stovetop method for a quick snack. Heat a pan over medium heat, add olive oil, and toss in the chickpeas. Stir them often until they are golden brown. This method is fast and great for last-minute cravings. For the full recipe, check out the guide above! To keep your crispy roasted chickpeas fresh, store them in an airtight container. This method helps maintain their crunch. I recommend using a glass jar or a plastic container with a tight lid. Avoid moisture by keeping them in a cool, dry place. If you leave them out, they may lose their texture. Crispy roasted chickpeas last about 1 week at room temperature. After that, they may become stale. Watch for signs of spoilage like a soft texture or off smell. If they feel chewy, it’s time to toss them out. To reheat without losing crispiness, use the oven. Preheat it to 350°F (175°C). Spread the chickpeas on a baking sheet for 5-10 minutes. You can also use an air fryer. This method works well, too! Leftover chickpeas can be added to salads, soups, or grain bowls. They boost flavor and add crunch. To make crispy roasted chickpeas, start by preheating your oven to 400°F (200°C). Drain and rinse one can of chickpeas. Pat them dry using a clean towel to remove moisture. In a bowl, mix the chickpeas with olive oil and your choice of spices. Spread them evenly on a baking sheet lined with parchment paper. Roast for 20-25 minutes, shaking halfway through. They should turn golden brown and crunchy. Yes, you can use dried chickpeas. Soak them overnight and then cook them until tender. After cooking, make sure to dry them well before seasoning and roasting. This method takes more time but adds a fresh taste. Chickpeas are packed with protein, fiber, and vitamins. They support digestion and help keep you full longer. They also contain iron, magnesium, and folate. Eating chickpeas can help maintain a healthy heart and regulate blood sugar. Yes, crispy roasted chickpeas are a healthy snack. They are low in calories and high in fiber. This combination makes them a great choice for satisfying hunger without the guilt. You can enjoy them as a snack or add them to salads for extra crunch. Absolutely! An air fryer works great for roasting chickpeas. Preheat the air fryer to 400°F (200°C). Follow the same steps for seasoning and drying the chickpeas. Cook them in the air fryer for about 15-20 minutes, shaking the basket halfway through. This method yields a deliciously crispy snack. To enhance the flavor of chickpeas, use bold spices. Options like smoked paprika, garlic powder, or cumin bring depth. Mixing in fresh herbs, like parsley, adds brightness. You can also try adding a splash of lemon juice or hot sauce for extra zing. For more details on the recipe, check the Full Recipe. Crispy roasted chickpeas are easy and delicious. We covered key ingredients and shared step-by-step tips. You can customize flavors and even try sweet versions. Proper storage helps maintain their crispiness. In conclusion, these chickpeas are a healthy snack choice. They bring flavor, crunch, and nutrition to your table. Get creative and enjoy them in many ways! Happy cooking!](https://recipetorch.com/wp-content/uploads/2025/06/167b7c42-da31-4370-a663-736add11e4bd.webp)
Looking for a tasty snack that’s healthy and satisfying? Crispy roasted chickpeas are your answer! With just a few simple
![To create my delicious pesto chicken stuffed peppers, you need the following: - 4 large bell peppers (any vibrant color you like) - 2 cups cooked chicken, shredded (rotisserie chicken works great) - 1/2 cup basil pesto (store-bought or homemade) - 1 cup quinoa, thoroughly cooked and cooled - 1/2 cup mozzarella cheese, freshly shredded - 1/4 cup sun-dried tomatoes, finely chopped - 1/4 cup pine nuts, lightly toasted - Salt and black pepper, to taste - Fresh basil leaves for garnish (optional, but adds nice color) You can add these ingredients if you want to boost the taste: - Garlic powder or minced garlic for extra flavor - Red pepper flakes for a little heat - Parmesan cheese for a cheesy topping - Olives, chopped, for a tangy twist - Fresh spinach, chopped, for added nutrition If you have dietary needs, here are some swaps: - Use cauliflower rice instead of quinoa for a low-carb option. - Replace chicken with chickpeas or black beans for a vegetarian dish. - Swap mozzarella for a dairy-free cheese alternative. - Use almond or sunflower seeds instead of pine nuts for nut-free diets. These ingredients make your pesto chicken stuffed peppers easy and full of flavor. For the full recipe, check the details above. Enjoy cooking! First, preheat your oven to 375°F (190°C). This step is key for even cooking. Next, take your bell peppers and cut the tops off. Carefully remove the seeds and membranes inside. Keep the peppers whole so you can fill them later. Set the tops aside or toss them if you don’t need them. In a large bowl, combine the shredded chicken, basil pesto, cooked quinoa, mozzarella cheese, sun-dried tomatoes, and toasted pine nuts. Stir the mixture gently until everything is well-coated with the pesto. This blend brings the flavors together. Add salt and black pepper to taste. Make sure it’s tasty! Now, it’s time to fill the peppers. Use a spoon to pack the chicken mixture into each pepper. Fill them to the top for maximum flavor. Place the stuffed peppers upright in a baking dish. If any peppers wobble, trim the bottom slightly to help them stand firm. Cover your baking dish tightly with aluminum foil. This helps keep the moisture in. Bake for 25 minutes in your preheated oven. After that, remove the foil and bake for another 10 to 15 minutes. Watch for the peppers to become tender and the tops to get a nice golden color. For the full recipe, check out the details above! To make your peppers tender, start by choosing the right ones. Look for large, fresh bell peppers with smooth skin. When you cut the tops off, make sure you remove all seeds and membranes. This helps the peppers cook evenly. Baking them covered with foil at first traps steam, softening the peppers. After 25 minutes, remove the foil to allow the tops to brown nicely. You can boost flavor easily! Try adding garlic powder or onion powder to the chicken mixture. A sprinkle of Italian herbs can add depth. If you like a bit of heat, add crushed red pepper flakes. Experiment with different cheeses, like feta or gouda, too. These small changes can elevate your dish. Using the right tools can make cooking easier. A sharp knife helps you cut the peppers cleanly. A sturdy baking dish is essential to hold the peppers upright. I recommend using a large mixing bowl for combining your filling. A spoon or spatula works well for mixing. Finally, don’t forget oven mitts for safe handling! For the complete recipe, check out the Full Recipe. {{image_4}} You can easily make these stuffed peppers vegetarian. Instead of chicken, use cooked lentils or black beans. They add protein and taste great. You can also use diced mushrooms for a meaty texture. If you want more flavor, add extra spices like cumin or paprika. Mix in more veggies like zucchini or spinach for added health benefits. If you want to switch up the protein, try ground turkey, beef, or tofu. Each protein adds a unique flavor. Ground turkey is light and healthy. Beef gives a rich taste. Tofu soaks up flavors well and is great for a plant-based option. Just make sure to season each protein well with salt and black pepper. Toppings can change the whole dish. Try adding sliced olives or jalapeños on top for a kick. A sprinkle of feta cheese or goat cheese adds creaminess. You can also drizzle balsamic reduction for a sweet touch. Fresh herbs like parsley or cilantro make it look pretty and fresh. Experiment with your favorite toppings to make it your own. For the full recipe, refer to the Pesto Chicken Stuffed Peppers section above. To store your pesto chicken stuffed peppers, first let them cool down. Once cool, wrap each pepper in plastic wrap or place them in an airtight container. This keeps them fresh and prevents any drying out. Store them in the fridge. They can last up to three days if stored properly. When you're ready to eat leftovers, preheat your oven to 350°F (175°C). Place the stuffed peppers in a baking dish. Add a splash of water to keep them moist. Cover the dish with foil to help them heat evenly. Bake for about 20-25 minutes, until they are hot throughout. You can also use a microwave. Heat them for about 2-3 minutes, checking often to avoid overcooking. If you want to freeze your stuffed peppers, do it before baking. Wrap each one tightly in plastic wrap and then place them in a freezer bag. They can stay frozen for up to three months. When you're ready to cook them, bake straight from the freezer. Just add about 10 extra minutes to the baking time. This way, you can enjoy a tasty meal anytime! For the full recipe, check back to make cooking these delicious stuffed peppers easy and fun. No, you should not use raw chicken. Raw chicken needs to cook fully. Stuffed peppers bake for a short time. Using raw chicken can lead to undercooked meat. Always use cooked chicken for safety and flavor. Stuffed peppers pair well with many sides. A simple salad adds freshness. Garlic bread can also complement the meal. You might try roasted vegetables for a healthy option. These sides enhance your dining experience. Stuffed peppers last about 3 to 5 days in the fridge. Store them in an airtight container for best results. Always check for any signs of spoilage before eating. Enjoy them within this time for fresh flavor. If you prefer a different grain, try brown rice or couscous. Both options work well in stuffed peppers. They provide a nice texture and flavor. Choose what fits your taste and diet. Yes, you can prepare the peppers in advance. Stuff them and store in the fridge. Bake them the next day for a quick meal. This makes dinner easy and convenient. Try it for busy weeknights. For the full recipe, visit the [Full Recipe]. We explored how to make delicious pesto chicken stuffed peppers. You learned about key ingredients, options for flavor, and smart substitutions for diets. The step-by-step guide gave clear instructions, while tips helped ensure perfect results. We even discussed fun variations and how to store leftovers. Now you have all the tools to make stuffed peppers your own. Get creative in the kitchen and enjoy each bite!](https://recipetorch.com/wp-content/uploads/2025/06/e4db532f-af17-49c9-83ec-81b95da8da80.webp)
Looking for a quick, tasty meal? Pesto Chicken Stuffed Peppers are easy to make and packed with flavor. You’ll love

If you love bright flavors that wake up your taste buds, you’ll adore these Lemon Poppy Seed Muffins! With their
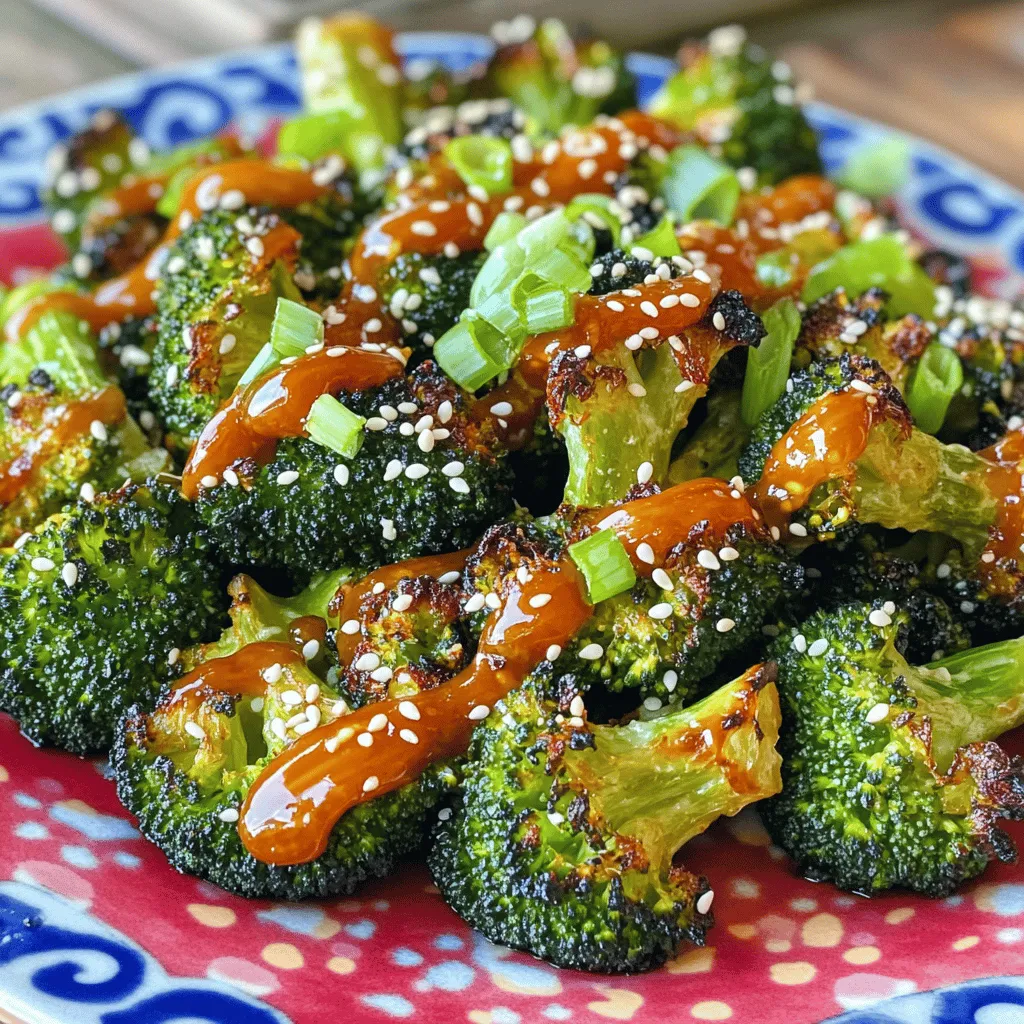
Are you ready to elevate your side dish game? Sweet Chili Roasted Broccoli is both tasty and easy to make!
![- 8 oz mixed mushrooms (such as cremini, shiitake, and oyster), cleaned and sliced - 2 tablespoons balsamic vinegar - 1 tablespoon extra virgin olive oil - 1 teaspoon fresh thyme leaves (or ½ teaspoon dried thyme) - 2 cloves garlic, finely minced - Salt and freshly cracked black pepper to taste - 4 slices of hearty crusty bread (like ciabatta or sourdough) - 4 oz goat cheese or a vegan alternative, softened to room temperature - Fresh parsley, chopped, for garnish These ingredients create a rich and tasty toast. The mushrooms bring umami flavor, while the balsamic vinegar adds a sweet tanginess. When you mix it all, you get a simple yet amazing dish. You can get creative with toppings! Here are some ideas: - Crumbled feta for a salty kick - Sliced avocado for creaminess - A drizzle of honey for sweetness - Microgreens for a fresh crunch These options let you personalize your toast. Try different combinations to find what you love! If you have dietary needs, don't worry. You can easily swap some ingredients: - Use gluten-free bread for a gluten-free option. - Replace goat cheese with hummus for a dairy-free choice. - Swap balsamic vinegar with lemon juice for a zesty twist. These substitutions ensure everyone can enjoy this tasty dish. You can make it your own while keeping the flavors vibrant. For the full recipe, check out [Full Recipe]. First, set your oven to 400°F (200°C). This heat helps the mushrooms roast well. Next, take a medium mixing bowl. Add the cleaned and sliced mushrooms. Pour in 2 tablespoons of balsamic vinegar and 1 tablespoon of olive oil. Add 1 teaspoon of fresh thyme leaves, or ½ teaspoon if using dried thyme. Then, add 2 finely minced garlic cloves. Sprinkle in salt and pepper to taste. Now, toss everything together. Make sure all mushrooms are coated with the mix. Spread the seasoned mushrooms onto a large baking sheet. Keep them in a single layer for even cooking. Place the baking sheet in the oven for 15 to 20 minutes. Halfway through, stir the mushrooms. This keeps them from sticking and helps them cook evenly. They should be tender and golden when finished. As the mushrooms roast, toast your 4 slices of hearty crusty bread. You want them golden brown and crispy. You can use a toaster or place them in the oven for the last few minutes of roasting. Once the mushrooms are done, let them cool for a couple of minutes. Spread softened goat cheese on each slice of warm toast. Pile the balsamic-roasted mushrooms on top. Let them overflow for a rustic look. Finally, garnish with freshly chopped parsley. This adds color and fresh flavor. For the full recipe, check the main section. For the best flavor, roast your mushrooms at 400°F (200°C). This high heat helps caramelize the mushrooms. Spread them out in a single layer on your baking sheet. If they are crowded, they will steam instead of roast. Stir them halfway through cooking to get even browning. Look for a golden color and a tender texture. This step makes all the difference in flavor. Select a hearty bread for this dish. Ciabatta or sourdough works best. Both types hold up well under the weight of the mushrooms and cheese. Toast the bread until it is golden and crisp. This texture gives a nice contrast to the soft mushrooms and cheese. If you prefer gluten-free options, look for gluten-free bread that is crusty. Store any leftover mushroom mixture in an airtight container. It will stay fresh in the fridge for up to three days. When you're ready to eat, reheat the mushrooms in a pan. Add a splash of water or broth to keep them moist. For leftover toast, avoid reheating it in the microwave, as this makes it soggy. Instead, use an oven or toaster oven to restore its crispness. {{image_4}} You can easily make this dish vegan. Instead of goat cheese, use a plant-based cream cheese. It gives a creamy texture without dairy. Look for brands that are rich and flavorful. You can also add nutritional yeast for a cheesy taste. It brings a nutty flavor that boosts the dish. Adding herbs and spices can change the taste a lot. Consider using rosemary or oregano to add depth. These herbs pair well with mushrooms and balsamic vinegar. For a bit of heat, sprinkle some red pepper flakes. You can also try smoked paprika for a unique twist. Each herb or spice adds its own charm to the dish. This toast can shine alone, but pairing it makes it special. A simple mixed green salad with lemon vinaigrette works well. The freshness of the greens balances the rich toast. For something heartier, serve it with a warm soup. Tomato soup or a creamy potato leek soup complements the flavors. You can enjoy this toast any time, making it a versatile dish. For the full recipe, click here. Store leftover toast in an airtight container. This keeps it fresh and prevents it from getting soggy. If you have leftover mushrooms, store them separately. Place them in a sealed container in the fridge. They will stay good for about three days. Remember to cool them down before sealing. To reheat, preheat your oven to 350°F (175°C). Place the toast on a baking sheet. Heat it for about 5-7 minutes. This helps the bread regain its crispness. For the mushrooms, use a pan on medium heat. Stir them for about 3-5 minutes until warm. This method keeps the flavors fresh. You can freeze the mushrooms if you want to prepare ahead. Spread them on a baking sheet and freeze until solid. Once frozen, place them in a freezer bag. They can last up to three months. When ready to use, thaw them in the fridge overnight. Toast the bread fresh for the best taste. For the full recipe, check the section above. I love using a mix of mushrooms for depth. Cremini, shiitake, and oyster mushrooms work best. They each bring a unique flavor and texture. Cremini mushrooms add a nice earthy taste. Shiitake mushrooms have a rich, savory flavor. Oyster mushrooms are soft and delicate. You can also try portobello mushrooms if you want a meatier bite. Feel free to use what you have on hand. Yes, you can easily adapt this recipe for gluten-free diets. Just swap the crusty bread for gluten-free bread. Look for brands that offer hearty options. You want a bread that can hold the toppings well. Many stores now carry tasty gluten-free bread that works great. Always check the labels to ensure there are no hidden gluten ingredients. To enhance the flavors, consider adding more herbs or spices. Fresh rosemary or parsley can brighten the dish. A dash of red pepper flakes adds heat. You can also drizzle a bit of balsamic reduction on top for extra sweetness. A sprinkle of freshly cracked black pepper will elevate the taste. Adding some toasted nuts, like pine nuts or walnuts, can give a nice crunch. For a twist, try different cheeses, like feta or ricotta. The Full Recipe has plenty of room for your creativity! Balsamic roasted mushroom toast is a tasty treat to enjoy. We explored its main ingredients, optional toppings, and substitutions. The step-by-step guide makes cooking easy and fun. Don’t forget the tips to roast mushrooms perfectly and pick the right bread. You can also try vegan versions and creative flavor combinations. Lastly, proper storage helps keep leftovers fresh. I hope you find this dish both simple and delicious. Enjoy making your own unique version!](https://recipetorch.com/wp-content/uploads/2025/06/977bd4ae-bc35-4bf1-bb37-b1e60b46f408.webp)
Are you ready to elevate your snack game? Balsamic Roasted Mushroom Toast is a savory treat that’s both simple and
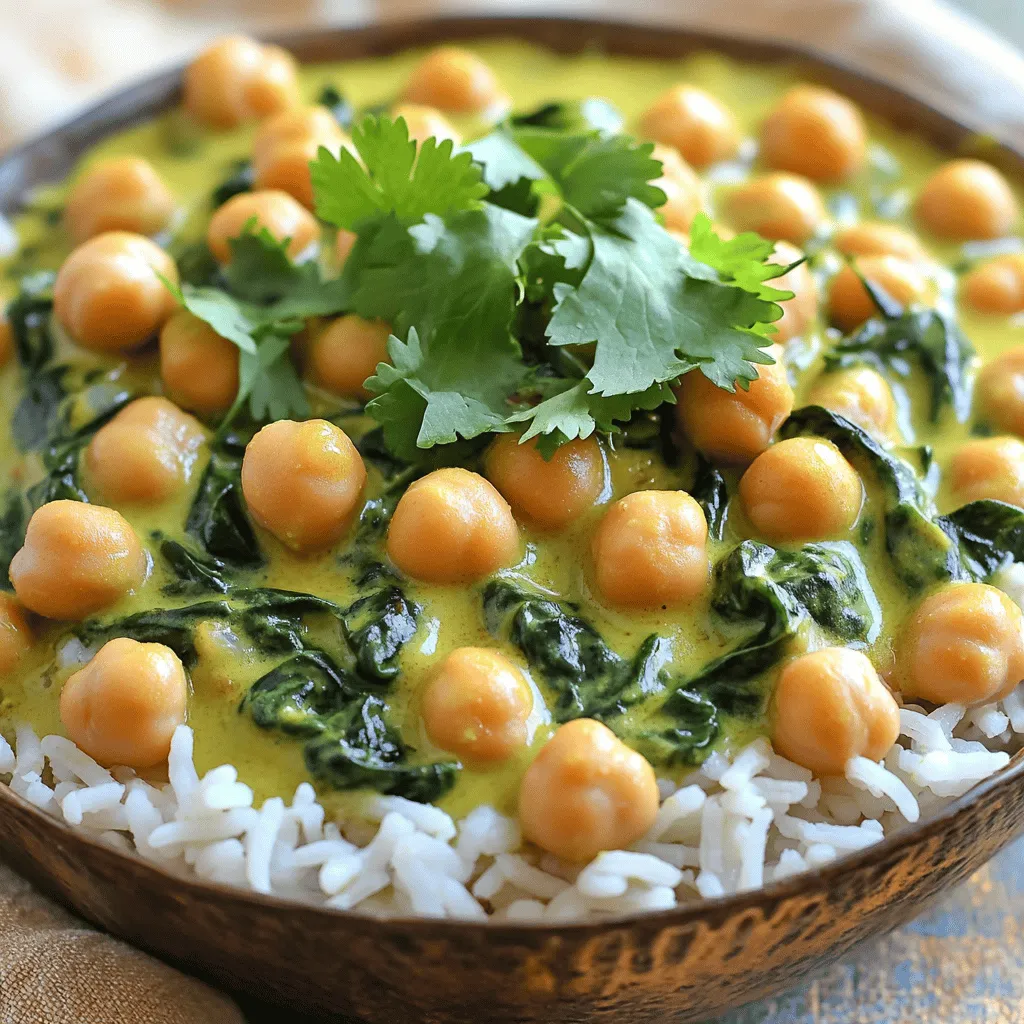
Looking for a quick and tasty meal? You’ll love this Easy Chickpea Spinach Curry! It’s packed with flavor, healthy, and
![- 1 cup unsweetened coconut milk - 1 ripe banana, peeled and chopped - 1 scoop vanilla whey protein powder - 2 tablespoons shredded unsweetened coconut, plus extra for garnish - 2 tablespoons freshly squeezed lemon juice - 1 teaspoon freshly grated lemon zest - 1 tablespoon honey (optional) - A pinch of sea salt - Ice cubes (as desired) When I make my Lemon Coconut Protein Shake, I love how simple the ingredients are. Each one adds something special to the shake. For instance, coconut milk gives it a creamy texture without adding a lot of calories. The banana adds natural sweetness and creaminess, making it smooth. Lemon juice and zest brighten the shake with a fresh zing. If you like it sweeter, you can add honey. The protein powder gives you a boost, helping you feel full and energized. Finally, a pinch of sea salt balances the flavors perfectly. This shake has about 300 calories per serving. Here’s a quick breakdown of the macronutrients: - Protein: 20g - Fats: 8g - Carbohydrates: 45g This makes it a great option for a meal or snack. The protein helps build muscle, while the carbs give you energy. - Coconut milk: This ingredient is rich in healthy fats. It helps keep your heart strong and can improve digestion. - Banana: Bananas are high in potassium. They help support your muscles and keep your energy up. - Lemon juice: It’s full of vitamin C. This boosts your immune system and keeps your skin healthy. - Protein powder: This helps you feel full and aids in muscle recovery after workouts. Using these ingredients creates a tasty and healthful drink. They work together to give you a refreshing energy boost. For the full recipe, check out the detailed instructions in the next section. 1. Start by blending the base ingredients. Add 1 cup of unsweetened coconut milk, 1 ripe banana, and 1 scoop of vanilla whey protein powder into your blender. Blend these until smooth. This forms a creamy base for your shake. 2. Next, add flavors and sweetening. Toss in 2 tablespoons of shredded unsweetened coconut, 2 tablespoons of freshly squeezed lemon juice, 1 teaspoon of grated lemon zest, and a pinch of sea salt. If you prefer it sweeter, include 1 tablespoon of honey. Blend again until everything mixes well. 3. Adjust thickness with ice. If you want a colder, thicker shake, add ice cubes. Blend until the ice is crushed and the shake reaches your desired thickness. 1. Pouring and serving tips. Once blended, pour the shake into a glass or a shaker bottle. This makes it easy to carry if you're on the go. 2. Garnishing with shredded coconut. For a special touch, sprinkle some shredded coconut on top. You can also add a slice of fresh lemon on the rim for a bright look. 1. Using a high-speed blender. A high-speed blender will make your shake super smooth. It really helps blend all the ingredients well. 2. Tips for achieving the perfect consistency. If your shake is too thick, add a little more coconut milk. If it’s too thin, add more ice or a banana. Adjust it until it feels just right for you. You can change the sweetness of your shake easily. Start with one tablespoon of honey. Taste it after blending. If you want more sweetness, add a little more honey. You can also use maple syrup or agave nectar instead of honey. If you have dietary needs, substitutions are simple. Use almond milk or oat milk instead of coconut milk. For a vegan option, try plant-based protein powder. This keeps the shake tasty for everyone! If you have leftovers, store your shake in a sealed container. Keep it in the fridge for up to 24 hours. The shake may separate, so shake or stir it before drinking. To keep your shake fresh, avoid adding ice if you plan to store it. Ice can melt and make the shake watery. Instead, add ice just before you drink it. Boost your shake’s flavor with extras. A splash of vanilla extract adds warmth. You can also toss in a handful of spinach for a green twist. It blends well without changing the taste. For a creamier texture, use frozen bananas. They chill the shake and make it thick. This simple change can make a big difference in how your shake feels! {{image_4}} You can swap regular protein powder for plant-based options. Look for pea, hemp, or brown rice protein. These choices work well with the shake's flavor. They also offer great nutrition. Choosing a different non-dairy milk can change the taste. Almond milk, oat milk, or cashew milk can be great alternatives. Each adds its unique twist while keeping it creamy. For a fun twist, try using lime or orange juice instead of lemon. This gives a bright, zesty kick to your shake. You can also mix in zest from these fruits for extra flavor. Adding tropical fruits like mango or pineapple makes it even better. Blend these with the shake ingredients. They add sweetness and a refreshing taste. You can feel like you’re sipping on a beach vacation. In summer, you might want something extra refreshing. Add ice cubes for a colder shake. You can also toss in some mint leaves. They enhance the tropical vibe and keep it cool. In winter, consider warming things up. Add a pinch of cinnamon or nutmeg for a cozy touch. This adds warmth and makes the shake feel more comforting. For the complete recipe, refer to the [Full Recipe]. You can use almond milk or oat milk as good substitutes for coconut milk. Both options are dairy-free and offer a light flavor. If you want a creamier texture, try cashew milk. Soy milk is another choice, but it has a stronger taste. Make sure to pick unsweetened versions to keep the shake balanced. Yes, you can prepare this shake in advance. Store it in an airtight container in the fridge. It will stay fresh for up to 24 hours. However, it may separate. Just give it a quick shake or stir before you drink it. For best taste and texture, enjoy it fresh. Yes, this shake is great for kids! To make it more appealing, use less lemon juice and honey for sweetness. You can also add a little extra banana for a sweeter flavor. If your child enjoys smoothies, they will love this shake. It packs energy and nutrients for active kids. To make the Lemon Coconut Protein Shake, gather these ingredients: - 1 cup unsweetened coconut milk - 1 ripe banana, peeled and chopped - 1 scoop vanilla whey protein powder - 2 tablespoons shredded unsweetened coconut, plus extra for garnish - 2 tablespoons freshly squeezed lemon juice - 1 teaspoon freshly grated lemon zest - 1 tablespoon honey (optional) - A pinch of sea salt - Ice cubes (as desired) Here’s how to prepare your shake: 1. Start by placing the coconut milk, banana, and protein powder in your blender. Blend until smooth. 2. Next, add the shredded coconut, lemon juice, lemon zest, honey, and sea salt. Blend until creamy. 3. If you like it thicker, add ice cubes and blend again until smooth. 4. Taste your shake. If you want it sweeter, add more honey and blend briefly. 5. Pour the shake into a glass or shaker bottle. 6. For a nice touch, sprinkle some shredded coconut on top and add a lemon slice for garnish. This refreshing shake takes just five minutes to prepare. Enjoy it as a post-workout drink or a quick breakfast. This blog post covered a refreshing Lemon Coconut Protein Shake, highlighting its simple ingredients and easy preparation. You learned about the health benefits of coconut milk, bananas, and protein powder. I also shared tips for customizing the shake to suit your taste and dietary needs. Remember, you can enjoy different flavors and even make it ahead of time. This shake not only tastes great but also fuels your body. Enjoy experimenting with this recipe to find your perfect blend!](https://recipetorch.com/wp-content/uploads/2025/06/4bff5b5f-588f-4a85-9406-e5cebcc042e1.webp)
Looking for a refreshing energy boost? The Lemon Coconut Protein Shake is your answer! With a creamy coconut base, zesty
