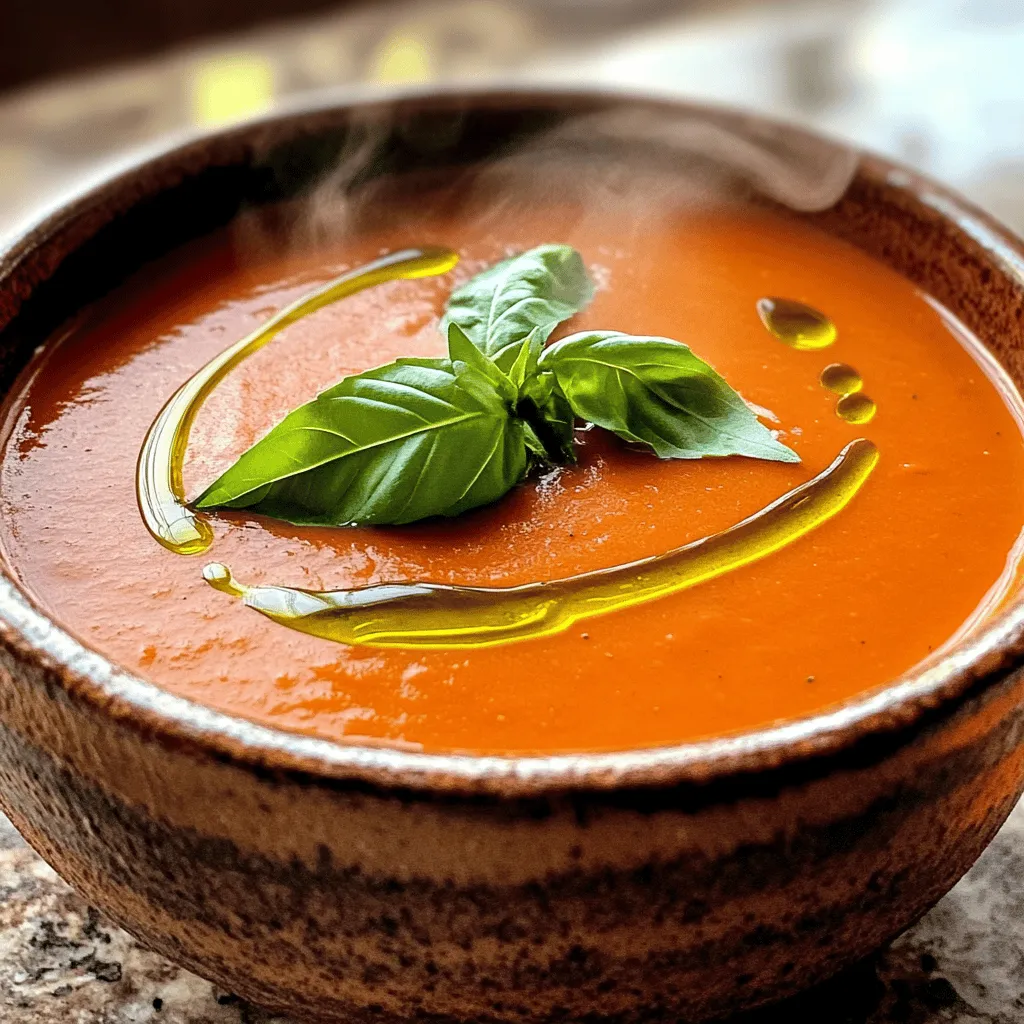
Easy Tomato Basil Soup Flavorful and Simple Recipe
Looking for a simple way to enjoy the classic taste of tomato basil soup? You’re in the right place! I’ll
Looking for a simple way to enjoy the classic taste of tomato basil soup? You’re in the right place! I’ll
![- Sweet potatoes and chickpeas: These are the base ingredients. Sweet potatoes add sweetness and creaminess. Chickpeas bring protein and a hearty texture. - Quinoa and spinach: Quinoa adds a nutty flavor and is rich in protein. Spinach gives a fresh and vibrant color to the dish. - Tahini dressing: This creamy dressing ties all flavors together. It combines tahini, lemon juice, and maple syrup for a delightful taste. - Selecting sweet potatoes: Choose firm sweet potatoes with vibrant skin. Look for a smooth surface and avoid any blemishes. - Choosing chickpeas: You can use canned or dried chickpeas. Canned chickpeas save time and need only rinsing. Dried chickpeas require soaking and longer cooking. - Fresh produce: Always pick ripe ingredients. Colorful and firm vegetables usually mean better flavor and nutrition. First, preheat your oven to 400°F (200°C). This high temperature is key for roasting. It helps the sweet potatoes get soft and caramelized. Next, take a large baking sheet and add the cubed sweet potatoes and drained chickpeas. Drizzle the olive oil over them. Then, sprinkle the smoked paprika, ground cumin, salt, and black pepper. Toss everything well. You want to ensure every piece is coated evenly. Spread the mixture in a single layer on the baking sheet. Place the baking sheet in the hot oven. Roast the sweet potatoes and chickpeas for about 25-30 minutes. Halfway through, turn them gently with a spatula. This step helps them cook evenly. When done, they should be tender and have a light brown color. While your sweet potatoes and chickpeas roast, it’s time to make the tahini dressing. In a small bowl, whisk the tahini, lemon juice, maple syrup, and water together. Start with 1/4 cup of water, but add more if needed. You want a smooth consistency. Taste the dressing and adjust the flavors to your liking. If you want it sweeter, add more maple syrup. For a tangy kick, add more lemon juice. After everything is ready, you will build your Buddha bowl with quinoa, roasted sweet potatoes, and chickpeas. Drizzle the tahini dressing on top for that nutty flavor. Don’t forget the sesame seeds for a delightful crunch! For the full recipe, check out [Full Recipe]. - Avoiding mushy sweet potatoes: Roast your sweet potatoes for 25-30 minutes. This gives them a soft texture without turning mushy. Check them halfway. If they need more time, let them roast a bit longer. - Quinoa cooking: For fluffy quinoa, use a 2:1 water-to-quinoa ratio. Bring it to a boil, then reduce heat and let it simmer for about 15 minutes. Let it rest with the lid on for five minutes after cooking. - Bowl assembly: Start with a base of quinoa. Then layer roasted sweet potatoes and chickpeas on top. Add fresh spinach and slices of avocado. This creates a colorful and inviting dish. - Garnishing ideas: Drizzle with tahini dressing and sprinkle sesame seeds on top. This not only adds flavor but also makes your bowl look beautiful. You can also use fresh herbs or a squeeze of lemon to brighten the dish. For the complete recipe, check the [Full Recipe]. {{image_4}} You can swap chickpeas for other legumes. Black beans or lentils work great too. They add a nice texture and flavor. If you want a nutty taste, try edamame. Each option brings something unique to the bowl. For the tahini dressing, you can mix in different flavors. Add garlic or ginger for a warm kick. A bit of spice from chili flakes can also wake it up. If you prefer sweetness, try honey instead of maple syrup. Each change can give your bowl a fresh vibe. Want more protein? Grilled chicken or tofu are tasty choices. Chicken adds a savory punch. Tofu, when grilled, offers a nice texture that pairs well. You can also boost flavors with toppings. Nuts like almonds or walnuts add crunch. Seeds such as pumpkin or sunflower seeds give a nice bite too. Fresh herbs like cilantro or parsley can brighten up your bowl. Mix and match as you like to make your bowl special! To keep your Sweet Potato Chickpea Buddha Bowl fresh, you should store it in the fridge. Place leftovers in an airtight container. This helps prevent moisture loss and keeps flavors intact. Enjoy your leftovers within three days for the best taste. If you want to keep it longer, freezing is a great option. You can freeze the sweet potatoes and chickpeas separately from the quinoa and fresh veggies. This way, you maintain texture when you reheat it. Make sure to use freezer-safe containers. Label everything with the date so you know when to use it. When it's time to enjoy your leftovers, reheating properly is key. The best way to reheat the bowl is in the oven. Preheat your oven to 350°F (175°C) and place the bowl on a baking sheet. Heat for about 15 minutes, or until everything is warm. This keeps the sweet potatoes and chickpeas crispy. If you want to use the microwave, do so carefully. Heat in short bursts of 30 seconds. Stir in between to avoid hot spots. To keep ingredients from getting soggy, avoid adding too much liquid when reheating. Enjoy your delicious meal just as you made it! What are the health benefits of this bowl? This bowl is packed with nutrients. Sweet potatoes provide fiber and vitamins. Chickpeas add protein and iron. Quinoa offers complete protein and healthy carbs. Spinach boosts vitamins A and C. The tahini dressing adds healthy fats. Overall, this bowl supports energy and wellness. Can I prepare this dish ahead of time? Yes, you can prep this dish in advance. Roast the sweet potatoes and chickpeas ahead. Store them in the fridge for up to three days. Cook the quinoa and keep it separate. Assemble your bowls when ready to eat. This makes meal prep quick and easy. How can I increase the protein content? To boost protein, add more chickpeas or quinoa. You can also mix in nuts or seeds. Grilled chicken or tofu are great options too. These additions keep the dish balanced and filling. Experiment with different proteins to find your favorite. What are some suitable sides to serve with this bowl? This bowl pairs well with a fresh salad. A tangy cucumber salad adds crunch. Roasted veggies enhance the meal’s flavor. You could also serve warm pita bread. These sides complement the bowl nicely and add variety to your plate. For more details, check out the [Full Recipe]. The Sweet Potato Chickpea Buddha Bowl is a healthy and tasty dish. We covered key ingredients like sweet potatoes, chickpeas, and quinoa. Choosing quality items can really boost your meal. I shared step-by-step tips for preparing and roasting. Don’t forget, variations and toppings can add your personal touch. Proper storage and reheating techniques help you enjoy leftovers later. This bowl is not only nutritious but easy to customize. Try these ideas to make your meals exciting and delicious. Enjoy every bite!](https://recipetorch.com/wp-content/uploads/2025/06/d1132386-1e3d-482b-a6e8-e1e101c82964.webp)
Are you ready to dive into a delicious, healthy meal? The Sweet Potato Chickpea Buddha Bowl is not just a
![To make Grilled Mexican Street Corn, you need: - 4 ears of fresh corn, husked - 1/2 cup mayonnaise - 1/2 cup crème fraîche (or substitute with sour cream) - 1 cup cotija cheese, crumbled - 1 tablespoon chili powder - 1 teaspoon garlic powder - 2 tablespoons fresh lime juice - Salt, to taste - Fresh cilantro, finely chopped (for garnish) - Lime wedges (for serving) If you can't find some fresh ingredients, don't worry! You can make easy swaps: - Use Greek yogurt instead of crème fraîche or sour cream. - For cotija cheese, try feta cheese or Parmesan. - If you want a different spice, use paprika or cayenne instead of chili powder. These swaps keep the dish tasty and fun! Fresh corn makes a big difference in flavor. It tastes sweet and crunchy. When you use fresh corn, you get that juicy bite. Canned or frozen corn won't have the same taste or texture. Fresh corn also cooks evenly on the grill. You want the kernels to char slightly, which adds depth. Always choose fresh corn when making this dish! First, preheat your grill to medium-high heat. A hot grill helps the corn cook evenly. While the grill heats, husk the corn. Remove all the silk strands to show the fresh kernels. This step ensures a clean bite. Once ready, place the corn on the grill. Grill it for about 8-10 minutes. Turn the corn every couple of minutes. This helps to get nice, even grill marks and prevents burning. You will know it’s done when the kernels are tender and slightly charred. In a medium bowl, mix mayonnaise and crème fraîche. If you don’t have crème fraîche, sour cream works too. Add the lime juice, chili powder, garlic powder, and salt. Whisk it all together until smooth. This mixture brings rich flavor to the corn. Make sure to coat every ear of corn well. You want every bite to burst with flavor! To get the best grill marks, make sure your grill grates are clean. Clean grates help prevent sticking. When you place the corn on the grill, do not move it too much. Let it sit for a couple of minutes before turning. This time allows those beautiful grill marks to form. If you want a bit more char, you can leave it for a little longer. Just watch closely to avoid burning! Feel free to dive deeper into the [Full Recipe] for all the details and tips you need! Grilling corn is all about heat and timing. First, preheat your grill to medium-high. Make sure the grates are clean. This helps prevent sticking and makes nice grill marks. Turn the corn every few minutes. This keeps it from burning and cooks it evenly. Aim for about 8-10 minutes of grilling. You want it tender with a bit of char for that smoky flavor. You can easily tweak the flavors of your grilled corn. Start with the mayonnaise mix. Add more lime juice for tang or extra chili powder for heat. If you love garlic, toss in more garlic powder. Try adding toppings like crumbled feta or diced jalapeños for a twist. You can even swap cotija cheese with a different cheese to change the flavor profile. Grilled Mexican street corn pairs well with many dishes. Consider serving it with tacos, grilled meats, or a fresh salad. For drinks, cold beverages work best. A chilled cerveza (beer) or a refreshing agua fresca complements the corn nicely. If you prefer non-alcoholic options, try a limeade or sparkling water with a splash of fruit juice. Explore the [Full Recipe] for more details to create this delicious dish! {{image_4}} You can switch up your grilled Mexican street corn with fun toppings. Try adding crumbled feta cheese for a tangy twist. It pairs well with the creamy sauce. You can also add sliced jalapeños for heat. They bring a nice crunch and spice to each bite. Just sprinkle these toppings on right after grilling for the best taste. If you're looking for non-dairy choices, I have great suggestions. Use cashew cream instead of mayonnaise and crème fraîche. Blend soaked cashews with lime juice and a bit of water until smooth. This gives you a rich and creamy sauce. You can also try avocado for a fresh flavor. Mash ripe avocado with lime and spices for a tasty dip. Both options work well and keep the dish light. Changing ingredients with the seasons can keep your grilled corn exciting. In summer, add fresh herbs like basil or mint. Their bright flavors lift the dish. In fall, try adding pumpkin spice to the sauce for a cozy taste. You can even toss in roasted red peppers for winter. They add sweetness and a pop of color. These seasonal tweaks let you enjoy grilled corn all year. For more inspiration, check the full recipe for ideas. To keep leftover grilled corn fresh, wrap each ear in plastic wrap. This protects the corn from drying out. You can also place the corn in an airtight container. Make sure to store it in the fridge. This method keeps the corn tasty for up to three days. To reheat grilled corn, use the grill or a stovetop. Heat your grill to medium. Place the corn on the grill for about five minutes. Turn it often for even heating. If using a stovetop, a skillet works well. Add a little butter for flavor. Heat on medium-low until warm. The shelf life of fresh corn is about one week in the fridge. Mayonnaise lasts about two months once opened. Crème fraîche stays fresh for about two weeks after opening. Cotija cheese can last up to two weeks in the fridge. Always check for signs of spoilage before using. You often serve Grilled Mexican Street Corn, or elote, on a stick. This keeps it easy to eat. You first coat the corn with a rich mix of mayo and crème fraîche. Next, you sprinkle crumbled cotija cheese on top. A dash of chili powder adds color and spice. Finally, garnish it with fresh cilantro and serve lime wedges on the side. This brightens up the flavors and gives a tangy kick. Yes, you can grill corn without husking it. This method keeps the corn moist and adds a smoky flavor. Start by soaking the corn in water for about 15-20 minutes. This prevents the husks from burning too quickly. Place the soaked corn directly on the grill. Grill it for about 20-25 minutes, turning it to cook evenly. Once cooked, husk it before serving to enjoy that tender corn. To spice up your Grilled Mexican Street Corn, add more chili powder to your mayo mixture. You can also sprinkle cayenne pepper for extra heat. For a fun twist, mix in diced jalapeños or hot sauce. Drizzle any spicy sauce over the corn once it's grilled. This allows you to control how spicy it gets. Adjust the flavors to match your taste, and enjoy! Grilled Mexican Street Corn is a delicious treat. We discussed the essential ingredients and the need for fresh corn. You learned how to grill corn perfectly and prepare a tasty mayo mix. We shared tips to customize flavors and pair with sides. Variations let you explore different toppings and seasonal ingredients. Proper storage helps you save leftovers and reheat without losing taste. Embrace these tips to enjoy this dish anytime. Experience the joy of grilling your corn and impress your friends!](https://recipetorch.com/wp-content/uploads/2025/06/6d1c7b00-7750-4990-a783-63bcd3a425ce-1.webp)
Grilled Mexican street corn is a summer favorite that packs a punch of flavor! With just a few fresh ingredients,

Are you ready to impress your friends and family with a classic hummus platter? This easy and delicious recipe will
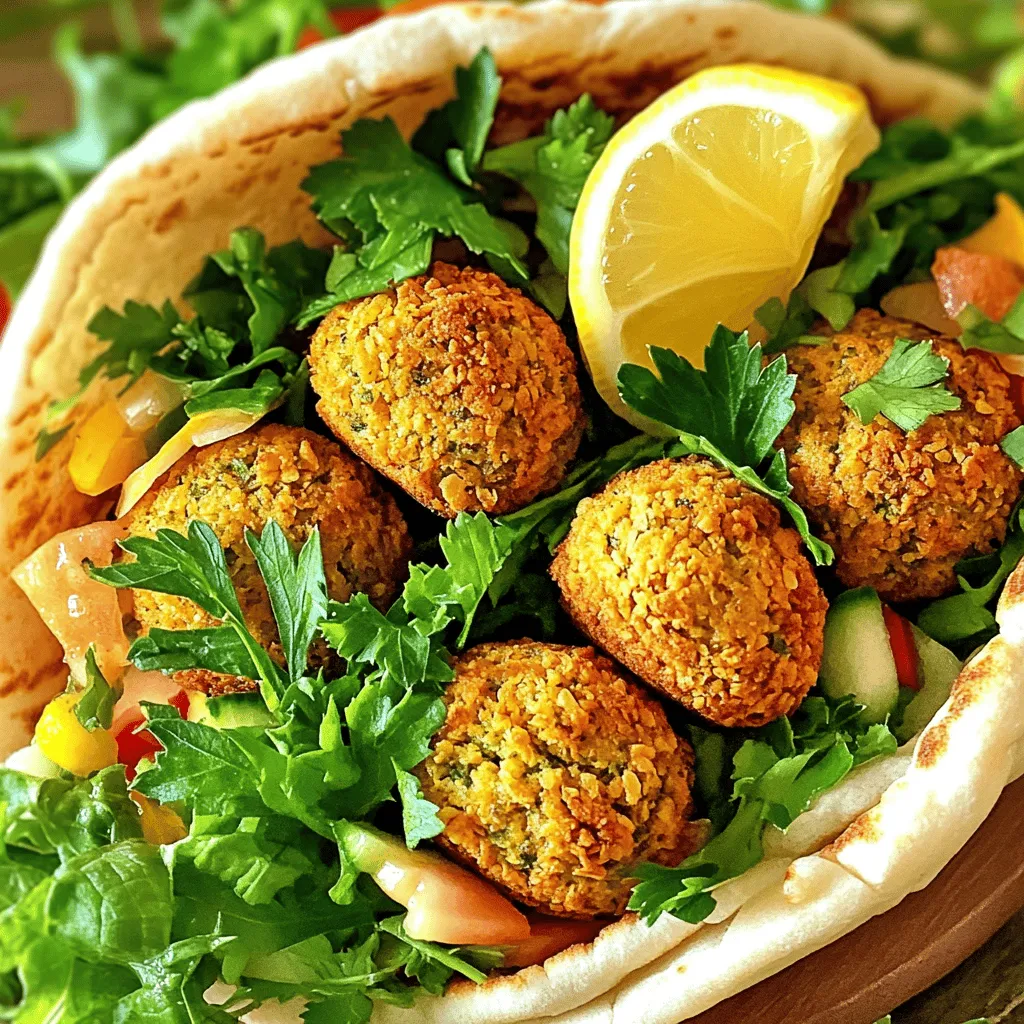
Are you ready to enjoy a tasty and healthy treat? Crispy Baked Falafel is the answer! This dish brings together
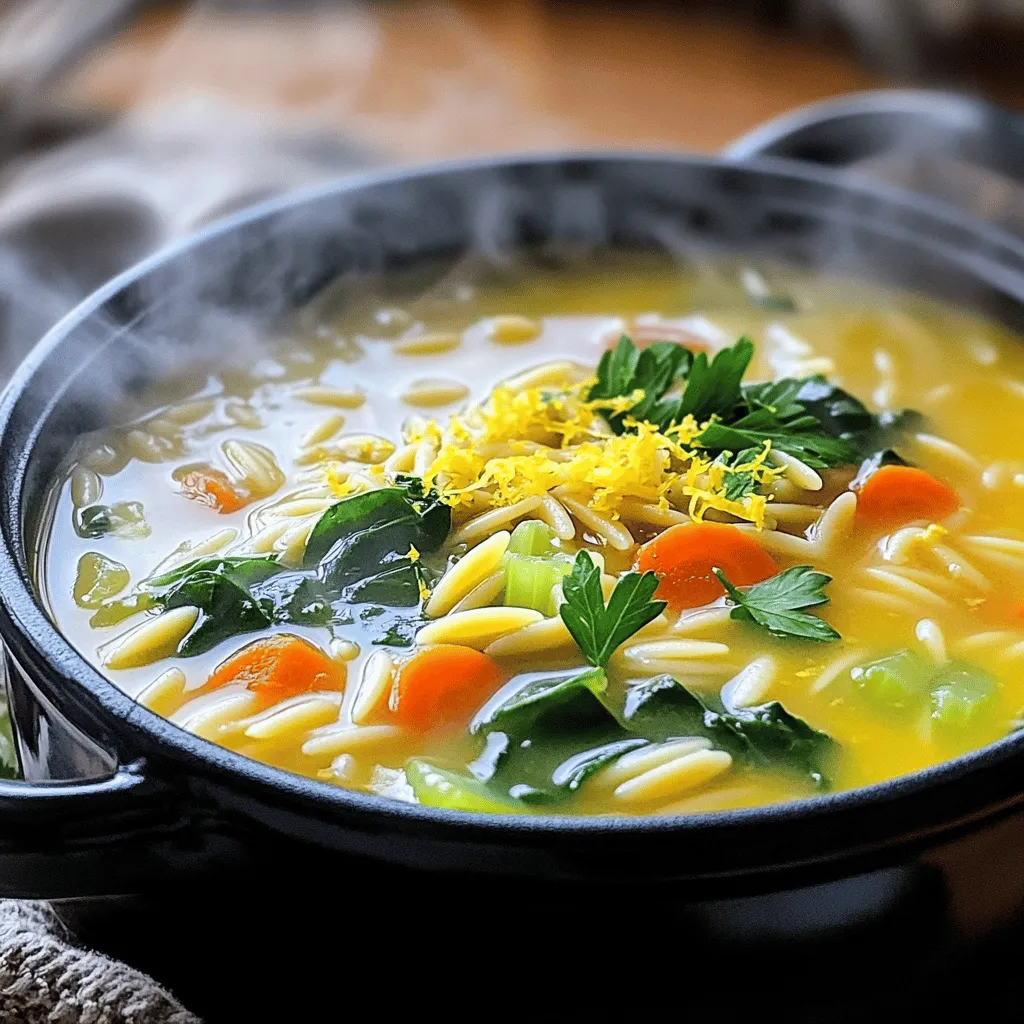
Warm, cozy meals are the best for any day, and this Savory One-Pot Lemon Orzo Soup is no exception. With
![To make these tasty no-bake s'mores bars, gather the following items: - 1 ½ cups graham cracker crumbs - ½ cup unsweetened cocoa powder - ½ cup powdered sugar - ½ cup unsalted butter, melted - 2 cups mini marshmallows - 1 cup semisweet chocolate chips - ½ cup creamy peanut butter - 1 teaspoon vanilla extract - A pinch of salt You can easily swap some ingredients if you need to. For graham cracker crumbs, use crushed cookies like digestive biscuits for a similar flavor. If you prefer a richer taste, try dark cocoa powder instead of unsweetened cocoa powder. You can use margarine if you don't have unsalted butter. For a nut-free version, skip the peanut butter. Instead, use sunbutter or almond butter if you are not allergic. If you want a different flavor, try flavored chocolate chips, like mint or caramel. For graham crackers, I like Honey Maid or Nabisco. They have a nice crunch and flavor. When it comes to chocolate chips, Ghirardelli or Nestlé are great choices. Their chips melt smoothly and taste amazing. For peanut butter, Jif or Skippy work well for this recipe. These ingredient choices help make your no-bake s'mores bars both simple and delicious. For detailed steps on making this treat, check the Full Recipe. 1. Mix Dry Ingredients: First, grab a large mixing bowl. Add 1 ½ cups of graham cracker crumbs, ½ cup of unsweetened cocoa powder, and ½ cup of powdered sugar. Use a whisk or fork to mix them well. This should take about 2 minutes. Make sure there are no clumps. 2. Incorporate Butter: Next, take ½ cup of melted unsalted butter. Pour it into the dry mix slowly. Use a spatula to fold it in. Keep mixing until it looks like wet sand. This step should take around 3 minutes. 3. Form the Base: Now, transfer the mixture into a greased 8x8 inch baking dish. Use the back of a spatula or your hands to press it down firmly. Aim for an even layer. This should take about 2 minutes. 4. Melt Chocolate and Peanut Butter: In a microwave-safe bowl, combine 1 cup of semisweet chocolate chips and ½ cup of creamy peanut butter. Heat this in the microwave for 30 seconds at a time. Stir after each round. This should take about 1-2 minutes. 5. Flavor the Chocolate: After melting, stir in 1 teaspoon of vanilla extract and a pinch of salt. Mix until smooth for the best taste. This part takes about 1 minute. 6. Layer the Chocolate Mixture: Pour the melted chocolate-peanut butter mix over the pressed graham cracker base. Use a spatula to spread it out evenly. 7. Add Marshmallows: Sprinkle 2 cups of mini marshmallows on top. Press them down gently into the chocolate layer. 8. Refrigerate to Set: Place the baking dish in the fridge. Let the bars chill for at least 2 hours. This helps the chocolate set properly. 9. Cut and Serve: After 2 hours, check if the bars are firm. If they are, remove them from the dish. You can use parchment paper edges to help lift them out. Cut into 16 equal squares and serve. To properly set the bars, make sure they are in the fridge for at least 2 hours. This allows the chocolate to firm up and makes cutting easier. When you’re ready to cut the bars, use a sharp knife. If you want neat cuts, dip the knife in hot water first. Wipe it clean between cuts for the best results. For serving, arrange the bars on a nice platter. Drizzle some melted chocolate over the top for that extra touch. You can also garnish with whole graham crackers or toasted marshmallows. This makes your dessert look fancy and fun! For the full recipe details, check out [Full Recipe]. Making No-Bake S'mores Bars can be fun, but some errors can spoil your treat. Here are some common mistakes: - Using too much butter: This can make the base too greasy. Stick to the ½ cup. - Not pressing the base firmly: If you don’t press it down, the bars may crumble when cut. Use a spatula or your hands to make it compact. - Skipping the refrigeration step: These bars need time to set. Skipping this step can lead to a gooey mess. Chill for at least 2 hours. If you run into issues, don’t worry. If the base crumbles, try adding a bit more melted butter and mix it well. If the chocolate layer is too thick, you can melt it again with a little butter to make it smoother. To get the best texture in your No-Bake S'mores Bars, follow these expert tips: - Use fresh ingredients: This includes your graham crackers, chocolate, and marshmallows. Fresh ingredients yield better flavor and texture. - Melt chocolate carefully: Heat it slowly in the microwave. Stir often to avoid burning. This step makes a huge difference in how the chocolate mixes with the peanut butter. - Layer evenly: When you pour the chocolate mixture over the base, spread it out evenly. This ensures every bite has a good balance of flavors. For storage, keep the bars in an airtight container in the fridge. This helps them stay fresh for up to a week. If you want to keep them longer, consider freezing them. Just wrap them tightly in plastic wrap before placing them in a freezer-safe container. {{image_4}} You can mix and match flavors for your no-bake s'mores bars. Here are some ideas: - Chocolate Types: Try using dark chocolate for a rich taste. Milk chocolate is sweeter and creamier. White chocolate adds a fun twist. Each type changes the flavor and texture. - Alternative Toppings: Nuts like almonds or pecans give a nice crunch. Fruits like sliced bananas or strawberries add freshness. Flavored marshmallows, such as chocolate or caramel, can enhance the taste. Experimenting with these options makes your bars unique and exciting! If you need to make dietary changes, here are some simple swaps: - Gluten-Free Options: Use gluten-free graham crackers or ground oats instead of regular crumbs. This keeps the bars tasty for everyone. - Vegan Substitutes: Replace the butter with coconut oil. Use dairy-free chocolate chips and marshmallows. Peanut butter is already vegan, making it a great choice for this recipe. These adjustments help you enjoy delicious no-bake s'mores bars while meeting your dietary needs! For the full recipe, check it out [here](#). To keep your No-Bake S'mores Bars fresh, refrigerate them. Use an airtight container to prevent drying out. You can also cover them with plastic wrap. This will keep the bars moist and tasty. These bars stay fresh in the fridge for about a week. For the best flavor, try to eat them within four days. If you want to enjoy these bars later, freezing works well. Start by cutting the bars into squares. Wrap each square in plastic wrap tightly. Then, place them in a freezer-safe bag or container. You can freeze them for up to three months without losing taste. When you’re ready to eat, take a square out and let it thaw in the fridge. This usually takes a few hours. For a quicker option, you can leave it at room temperature for about 30 minutes. Enjoy your tasty treat! No-Bake S'mores Bars are a fun dessert that combines the flavors of s'mores without needing an oven. These bars have a base made of graham crackers, cocoa, and butter. I mix melted chocolate and peanut butter for a creamy layer. Topped with mini marshmallows, they give you that classic campfire taste in a quick, easy form. You can enjoy them chilled, making them perfect for hot days. Yes, you can substitute some ingredients! Here are a few ideas: - Graham cracker crumbs: Use crushed cookies like Oreos for a chocolate twist. - Cocoa powder: Try carob powder for a different flavor. - Creamy peanut butter: Almond or cashew butter works well too. - Mini marshmallows: Use larger marshmallows, but cut them down to size. Substitutions may change the taste or texture, but they can also add fun variety. These bars can last about a week when stored properly. Keep them in an airtight container in the fridge. This helps maintain their texture and flavor. If you notice any moisture, place a paper towel inside the container to absorb it. This can help keep your bars fresh longer. Absolutely! You can make No-Bake S'mores Bars one to two days before your event. After making them, let them chill in the fridge. This allows the layers to set nicely. If you prepare them the night before, they will be ready to serve the next day. Just cut and place them on a platter when it's time to enjoy! For the full recipe, check out the detailed steps above. In this blog post, we explored how to make delicious no-bake s'mores bars. We covered the key ingredients, detailed steps, and tips to avoid common mistakes. You learned about variations and how to store and freeze your bars. For best results, follow each step carefully and experiment with flavors. Enjoy loving these treats with family and friends! Happy cooking!](https://recipetorch.com/wp-content/uploads/2025/06/c06ae8b6-7658-4ee8-869a-7730bbaa2810.webp)
Craving a sweet treat but want to skip the oven? I’ve got you covered with these mouth-watering No-Bake S’mores Bars!

Craving a refreshing and healthy breakfast? Try my easy Strawberry Banana Smoothie Bowl! With just a few simple ingredients, you
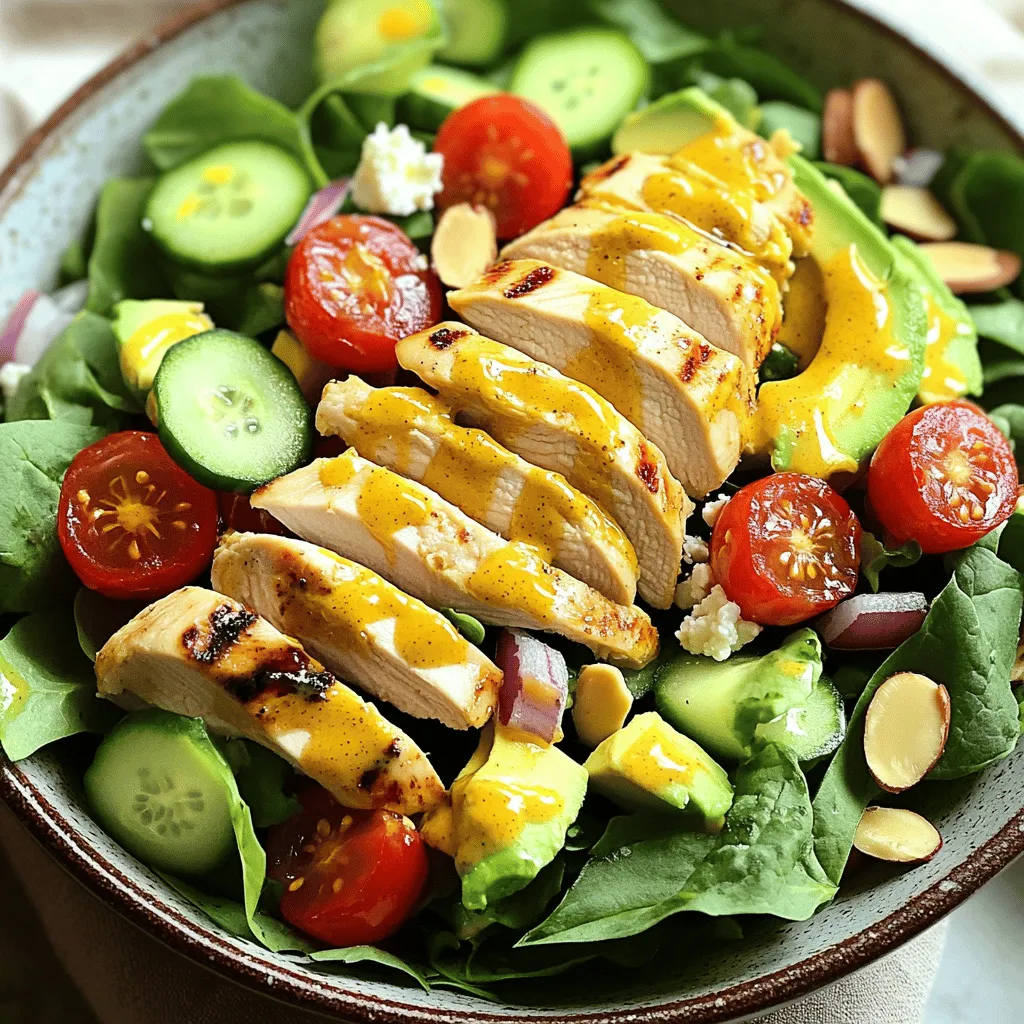
Craving a fresh and tasty meal? My Honey Mustard Chicken Salad blends tender chicken, crisp greens, and vibrant veggies with
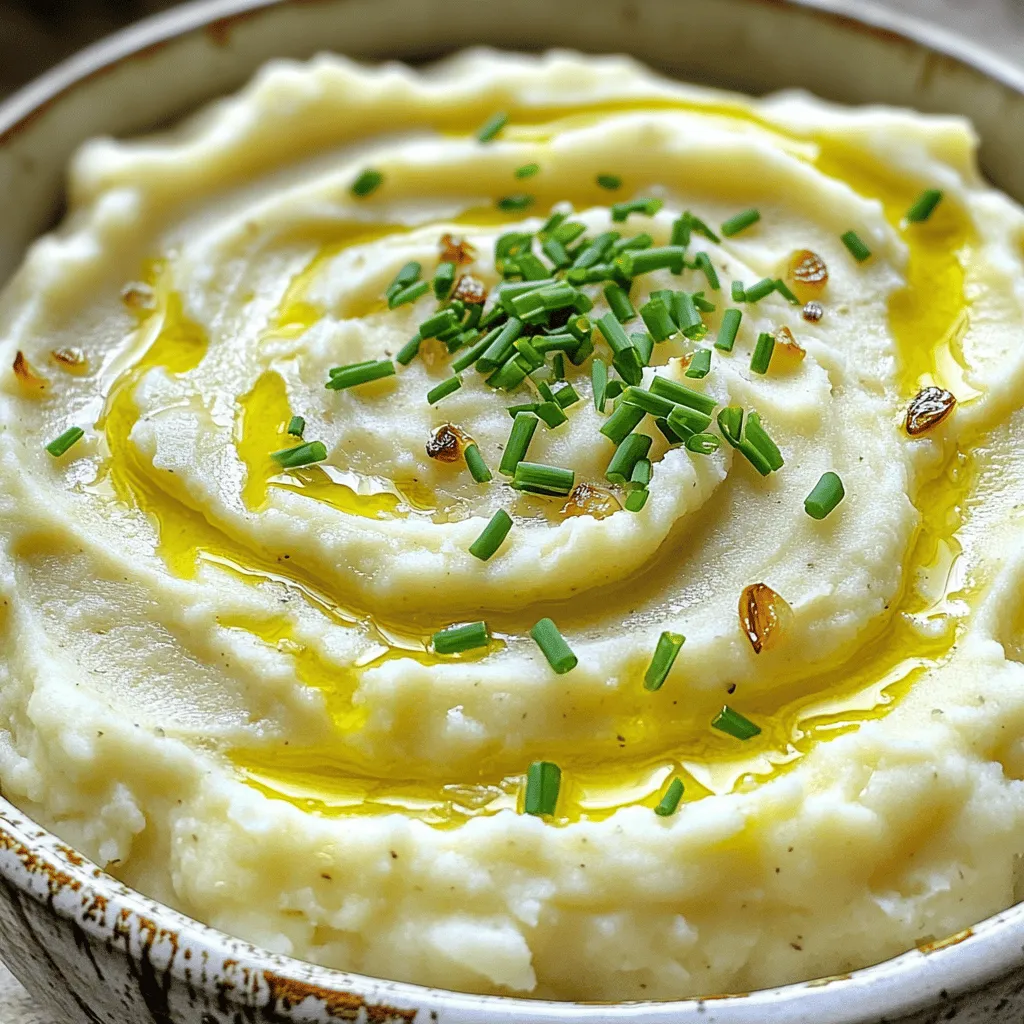
Are you ready to enjoy a creamy delight that’s a perfect swap for mashed potatoes? Roasted Garlic Mashed Cauliflower is
