![- 2 cups shredded cooked chicken - 1 cup black beans, rinsed and drained - 1 cup corn kernels (fresh or frozen) For a tasty filling, I love using shredded cooked chicken. It adds great flavor and texture. Black beans give fiber and protein to each bite. Corn kernels add a sweet crunch, making the taquitos even better. - Ground cumin - Garlic powder - Onion powder - Smoked paprika - Salt and freshly ground black pepper, to taste Spices are key to great flavor. Ground cumin gives warmth, while garlic and onion powders add depth. Smoked paprika brings a lovely smokiness. Don’t forget to season with salt and pepper. This step makes your taquitos burst with taste. - 10 small corn tortillas - 2 tablespoons extra virgin olive oil Soft corn tortillas are perfect for rolling. They hold the filling well. Extra virgin olive oil helps achieve a crispy finish. A light coating on top makes all the difference while baking. - Salsa of your choice for serving - Fresh cilantro leaves for garnish For serving, I recommend fresh salsa. It adds a zesty kick. Garnish with cilantro leaves for color and freshness. This final touch makes your taquitos look and taste amazing. For the full recipe, you can check out the [Full Recipe]. Enjoy making your crispy baked chicken taquitos! - Preheat the oven to 400°F (200°C). - In a bowl, mix 2 cups of shredded chicken, 1 cup of black beans, and 1 cup of corn. - Add 1 cup of shredded cheddar cheese and spices: 1 teaspoon of ground cumin, 1 teaspoon of garlic powder, 1 teaspoon of onion powder, and 1/2 teaspoon of smoked paprika. - Season with salt and black pepper to taste. Stir well until everything blends. - Warm 10 small corn tortillas in a microwave for 30 seconds. This makes them soft. - Take a tortilla and place about 2 tablespoons of filling in the center. - Roll the tortilla tightly, tucking in the ends as you go. This keeps the filling inside. - Line a baking sheet with parchment paper. Arrange the rolled taquitos seam-side down. - Brush the tops with 2 tablespoons of olive oil. This gives them a crispy finish. - Bake in the preheated oven for 20-25 minutes. Look for a golden-brown color. - After baking, let the taquitos cool for a few minutes. This helps with hot filling. - Garnish with fresh cilantro leaves and serve with salsa of your choice. Enjoy with a burst of flavor! To get that perfect crunch, start with a light coat of olive oil. This oil helps the taquitos crisp up nicely. I recommend using extra virgin olive oil for its rich flavor. After rolling them, brush the tops with oil. This step makes a huge difference. For baking, place your taquitos seam-side down. This helps them stay rolled during cooking. Keep space between each taquito on the baking sheet. This allows hot air to circulate and creates a golden finish. If you want to switch things up, use different proteins. You can swap the shredded chicken for cooked beef or even shredded pork. For a vegetarian option, try using black beans or lentils. If you're dairy-free, look for plant-based cheese. Many stores sell dairy-free cheese that melts well. This way, you can enjoy your taquitos without dairy. Rolling taquitos can be tricky, but I have some tips. First, warm your tortillas before using them. This keeps them from cracking and makes them easier to roll. Use a microwave or warm them in a pan. When adding filling, don’t overstuff. Use about two tablespoons for each tortilla. This helps prevent leaks. Roll the tortilla tightly around the filling and tuck in the ends. This keeps everything inside and makes for a neat taquito. For the full recipe, check out the complete guide to Baked Chicken Taquitos. {{image_4}} You can switch up the filling for your baked chicken taquitos. Try using ground beef or shredded pork for a different taste. If you prefer a vegetarian option, use sautéed veggies or beans instead of meat. Mix in cooked mushrooms or spinach for added flavor. Seasonings can change the whole dish. For a spicy kick, add chili powder or jalapeños. For a sweet twist, try some diced bell peppers or corn. Experiment with flavors until you find the perfect mix for your taste. If you need gluten-free options, look for gluten-free tortillas in stores. They taste great and keep your taquitos crispy. You can also use lettuce wraps as a fun twist. For low-carb choices, try using cauliflower tortillas. They are lower in carbs and still hold the filling well. This way, you can enjoy your taquitos while sticking to your diet. Serving your baked chicken taquitos with different dips makes them even more fun. Try salsa, sour cream, or guacamole. Each dip adds a unique flavor. Consider pairing your taquitos with a fresh salad or rice. A side of beans can also make a great addition. These sides not only complement the taquitos but also make your meal more filling. For the full recipe, check out [Full Recipe]. To keep your leftover taquitos fresh, follow these tips: - Place them in an airtight container. - Use a container that fits them snugly to reduce air exposure. - For extra protection, wrap them in plastic wrap first. Storing them properly helps maintain their flavor and texture. When reheating taquitos, you want to keep them crispy. Here’s how: - Preheat your oven to 375°F (190°C). - Place the taquitos on a baking sheet. - Heat for about 10-15 minutes until warm. This method helps the taquitos stay crispy, unlike the microwave, which can make them soggy. You can freeze taquitos both before and after baking: - Before Baking: Assemble the taquitos, then place them on a baking sheet. Freeze them until solid. Once frozen, transfer to a freezer bag. - After Baking: Let them cool completely before placing in a freezer-safe container. To cook frozen taquitos directly from the freezer: - Preheat your oven to 400°F (200°C). - Arrange the frozen taquitos on a baking sheet. - Bake for about 25-30 minutes until hot and crispy. This way, you can enjoy your taquitos anytime! For the full recipe, check the section above. To make your taquitos crispy, start with a good oil coating. Use extra virgin olive oil to brush the tops. This adds flavor and helps them crisp. Arrange the taquitos on a baking sheet with space between each one. Bake them at 400°F (200°C) for 20-25 minutes. Turn them halfway through for even crispiness. Yes, you can mix or match cheese types. Cheddar is great, but you can try Monterey Jack or pepper jack. For a fun twist, use a blend of cheeses. This adds depth to the flavor. You can also use vegan cheese if you prefer a dairy-free option. Baked Chicken Taquitos pair well with many sides. Consider serving them with a fresh salad or guacamole. You can also add rice or beans for a heartier meal. Chips and salsa make a nice crunchy side. For a bit of color, add some sliced veggies or corn salad. To add spice, mix diced jalapeños or hot sauce into the filling. You could also use pepper jack cheese for extra heat. For dipping, serve with spicy salsa or a chipotle sauce. These options will give your taquitos a nice kick. Great condiments for taquitos include salsa, guacamole, and sour cream. You can also try a creamy ranch or chipotle sauce. These dips add flavor and moisture, making each bite better. Don't forget to sprinkle some fresh cilantro for a pop of freshness. Baked chicken taquitos are fun to make and delicious to eat. We covered key ingredients like chicken, beans, and corn, plus essential spices. I shared steps to achieve crispy taquitos and ideas for storage and reheating. You can customize these with different fillings and sauces. Enjoy your cooking adventure! You'll impress friends and family with your tasty taquitos.](https://recipetorch.com/wp-content/uploads/2025/06/8c8f332c-a52b-4d68-9d20-0ef7a7bb397d.webp)
Baked Chicken Taquitos Crispy and Flavorful Snack
Looking for a crunchy and tasty snack? Baked Chicken Taquitos are your answer! They’re easy to make and packed with
Looking for a crunchy and tasty snack? Baked Chicken Taquitos are your answer! They’re easy to make and packed with
![To make these delicious Cinnamon Sugar Donut Muffins, you will need: - 1 ½ cups all-purpose flour - 1 tsp baking powder - ½ tsp baking soda - ½ tsp salt - ½ tsp ground cinnamon - ¼ cup unsalted butter, softened to room temperature - ¾ cup granulated sugar (plus extra for coating) - 1 large egg - 1 tsp vanilla extract - ½ cup buttermilk - ¼ cup granulated sugar (for coating) - 1 tbsp ground cinnamon (for coating) - 2 tbsp melted butter (for coating) You can swap some ingredients for others if needed: - Use whole wheat flour instead of all-purpose flour for a healthier option. - Replace buttermilk with regular milk mixed with a little vinegar or lemon juice. - If you're dairy-free, try coconut oil or a vegan butter for the unsalted butter. - For a lighter sweetener, use coconut sugar instead of granulated sugar. Accurate measuring is key to great muffins. Here are some tips: - Use a dry measuring cup for flour. Spoon flour into the cup and level it off with a knife. - For sugar, scoop it lightly and level it off without packing it down. - When measuring liquids, use a clear liquid measuring cup. Check the level at eye level to be precise. - Always sift dry ingredients if the recipe calls for it. This helps avoid lumps and ensures even mixing. Start by preheating your oven to 350°F (175°C). This ensures your muffins bake evenly. Next, prepare a standard muffin tin. You can grease it lightly with butter or use paper liners. This helps prevent sticking and makes cleanup easier. In a medium bowl, mix your dry ingredients. Combine 1 ½ cups of all-purpose flour, 1 teaspoon of baking powder, ½ teaspoon of baking soda, ½ teaspoon of salt, and ½ teaspoon of ground cinnamon. Whisk them together until well blended. In a larger bowl, cream together ¼ cup of softened unsalted butter and ¾ cup of granulated sugar. Beat this mixture for 2-3 minutes until it is light and fluffy. Add 1 large egg and 1 teaspoon of vanilla extract. Mix until everything is smooth. Gradually add the dry mixture and ½ cup of buttermilk, alternating between them. Mix gently until just combined. A few lumps are fine. Fill each muffin cup about ⅔ full with batter. Bake in your preheated oven for 15-18 minutes. To check for doneness, insert a toothpick into the center of a muffin. It should come out clean if the muffins are ready. While they bake, prepare your cinnamon sugar coating. In a small bowl, mix ¼ cup of granulated sugar with 1 tablespoon of ground cinnamon. When the muffins are done, let them cool in the tin for about 5 minutes. Brush the tops with melted butter, then dip them in the cinnamon sugar mix. Make sure they are well coated. Transfer them to a wire rack to cool completely. Enjoy the sweet smell as they cool! For the complete recipe, refer to the Full Recipe section. When baking cinnamon sugar donut muffins, avoid overmixing your batter. Overmixing makes muffins tough. Mix just enough to combine the wet and dry ingredients. Another mistake is skipping the cooling step before coating. If you coat them too soon, the sugar won't stick. To make your muffins fluffy, use fresh baking powder and baking soda. These ingredients help your muffins rise. Ensure your butter is at room temperature. Cold butter can lead to dense muffins. Lastly, don't forget to alternate adding the dry ingredients and buttermilk. This keeps your muffins light and airy. Having the right tools makes baking easier. Here are some must-haves: - Muffin tin: A standard 12-cup muffin tin works best. - Mixing bowls: Use at least two—one for dry and one for wet ingredients. - Electric mixer: This saves time and helps achieve a fluffy texture. - Measuring cups and spoons: Accurate measurements are key for great results. - Wire rack: This allows muffins to cool evenly after baking. With these tips, you're ready to bake perfect cinnamon sugar donut muffins. For the full recipe, refer to the earlier section. Enjoy your baking adventure! {{image_4}} You can switch up the flavors in your donut muffins. Here are some fun ideas: - Chocolate Chip: Add ½ cup of chocolate chips to the batter. This makes them rich and sweet. - Pumpkin Spice: Substitute ½ cup of flour with ½ cup of pumpkin puree. Add 1 teaspoon of pumpkin spice for a fall twist. - Lemon Zest: Mix in 1 tablespoon of lemon zest for a fresh taste. This adds a nice zing to your muffins. You can make these muffins fit different diets. Here’s how: - Gluten-Free: Use a 1:1 gluten-free flour blend. This keeps the texture light. - Vegan: Replace the egg with a flax egg. Mix 1 tablespoon of flaxseed meal with 2.5 tablespoons of water. Let it sit for 5 minutes. - Dairy-Free: Swap buttermilk with almond milk and add a splash of lemon juice. Serve these muffins warm for the best taste. Here are some ideas to enjoy them: - With Coffee: Pair the muffins with a cup of coffee. The cinnamon flavor complements the coffee well. - With Fruit: Serve with fresh fruit, like berries or bananas. This adds freshness to your snack. - With Ice Cream: For a treat, top them with a scoop of vanilla ice cream. This makes a fun dessert. For the complete recipe, check out the [Full Recipe]. Store your leftover muffins in an airtight container. This keeps them fresh for 2 to 3 days. You can also wrap each muffin in plastic wrap for extra protection. If you live in a humid place, add a paper towel to absorb moisture. To freeze these muffins, let them cool completely first. Then, wrap each muffin in plastic wrap. Place them in a freezer bag or airtight container. They will stay tasty for up to 3 months. When you’re ready to enjoy them, just thaw them in the fridge overnight. Reheat your muffins for the best taste. You can use a microwave or an oven. If using a microwave, heat for 10-15 seconds. For the oven, preheat to 350°F (175°C), and warm them for about 5-7 minutes. This keeps them soft and delicious. For added flavor, brush a little melted butter on top before reheating. Yes, you can make these muffins ahead of time. I often bake them in advance for busy mornings. Once they cool, store them in an airtight container. They stay fresh for about three days at room temperature. You can also freeze them for later. Just thaw them in the fridge overnight before serving. Donut muffins are lighter and fluffier than regular muffins. They often have a sweet glaze or coating, like cinnamon sugar. This gives them a taste similar to donuts, making them a special treat. Regular muffins tend to be denser and less sweet. The texture and flavor make donut muffins unique. To check if the muffins are done, insert a toothpick into the center of one. If it comes out clean, they are ready. This simple test works well. You can also look for a golden color on top and a springy feel when you touch them. Buttermilk adds moisture and tang to the muffins. This helps them rise and stay soft. If you don’t have buttermilk, you can make a substitute. Just mix one cup of milk with one tablespoon of vinegar or lemon juice. Let it sit for a few minutes before using. This will give your muffins a similar texture and flavor. For the full recipe, check the earlier section. The Cinnamon Sugar Donut Muffins taste like a warm hug. They have a soft, fluffy texture. Each bite is full of sweet cinnamon goodness. This recipe is simple and perfect for any time of day. You can whip these up in just 30 minutes. They make a fun breakfast or snack. You can also share them with friends. The best part? You only need one bowl for mixing! Each muffin has about 180 calories. They contain 6 grams of fat and 27 grams of carbs. You’ll also get 2 grams of protein from each muffin. This treat is not low in sugar, so enjoy it in moderation. If you want a healthier version, consider using whole wheat flour. You can also try using less sugar or a sugar substitute. People love these muffins! Many say they are easy to make and taste amazing. Users rave about how soft and moist they are. One home cook said, "These are my new favorite breakfast treat!" Another user commented, "The cinnamon sugar coating is a game changer!" You can find the full recipe on my blog to try these delightful muffins yourself! We explored key ingredients for making delicious muffins. I shared measuring tips and tasty substitutions. Next, we dove into proper mixing and baking methods. I highlighted common mistakes to avoid and tools you might need. We even discussed fun muffin variations and storage tips. Remember, baking is about enjoying the process. With these steps, you can create delightful muffins every time. Happy baking!](https://recipetorch.com/wp-content/uploads/2025/06/648724df-eb15-4734-b84d-4c0282ca69bb.webp)
If you love warm, sweet treats, you’ll adore these Cinnamon Sugar Donut Muffins! This easy recipe combines the soft, fluffy
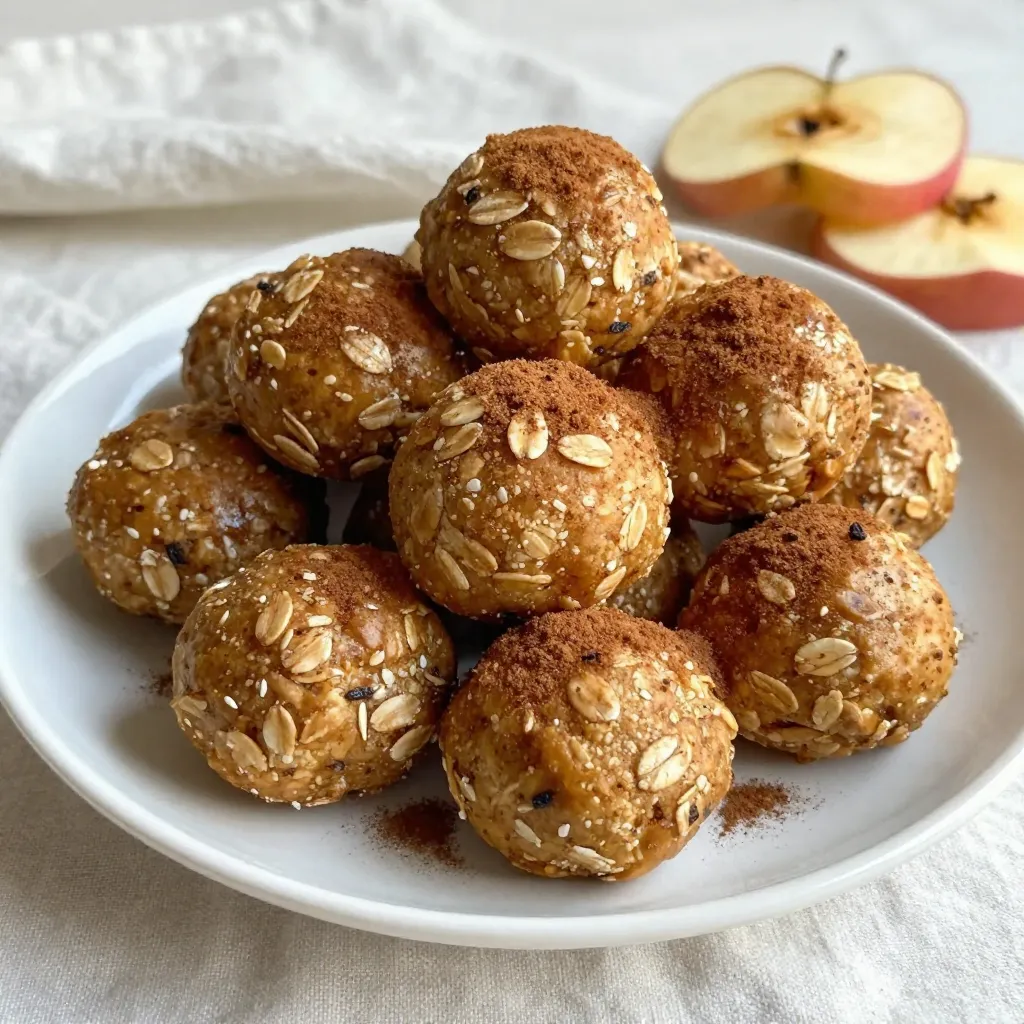
Looking for a tasty snack that packs a punch? Apple Cinnamon Energy Bites are your answer! These bites are easy
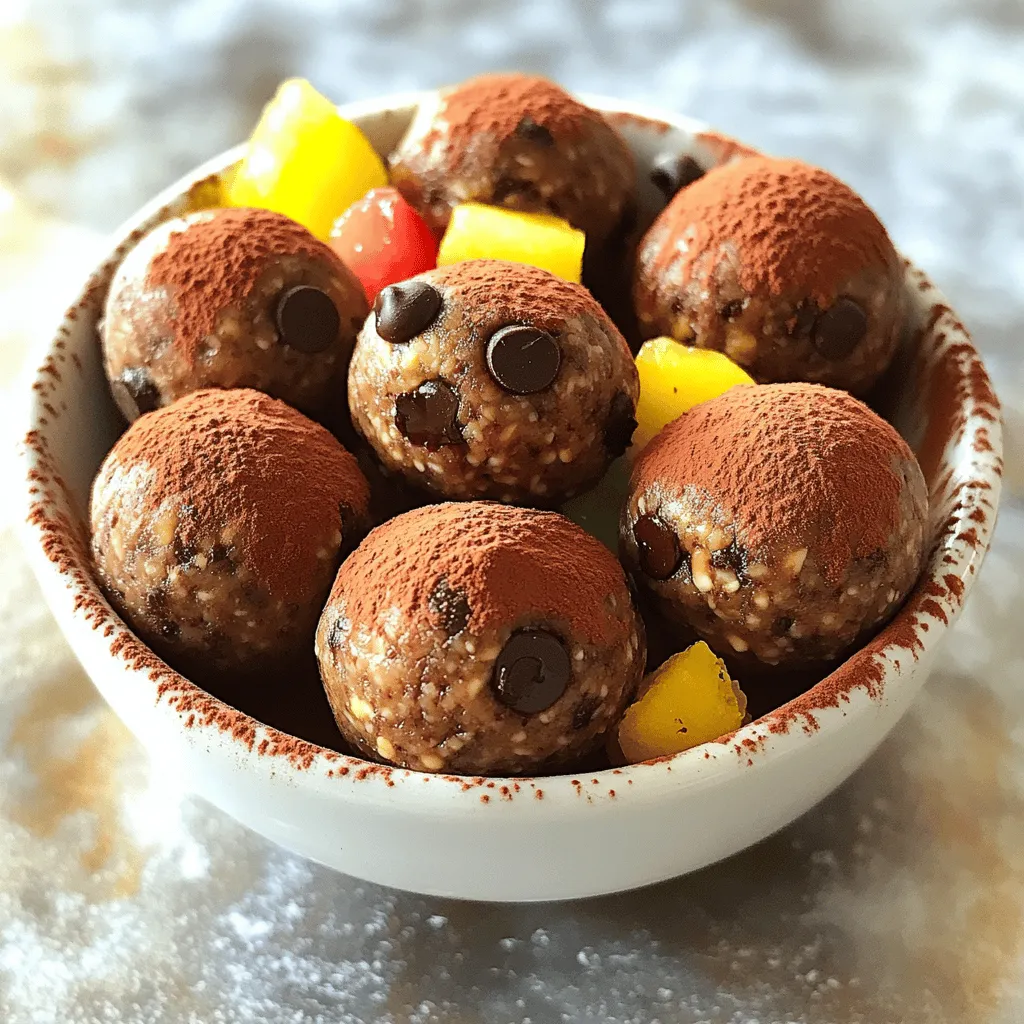
Craving a quick, tasty snack that packs a nutritious punch? Chocolate Peanut Butter Energy Balls are your answer! These little
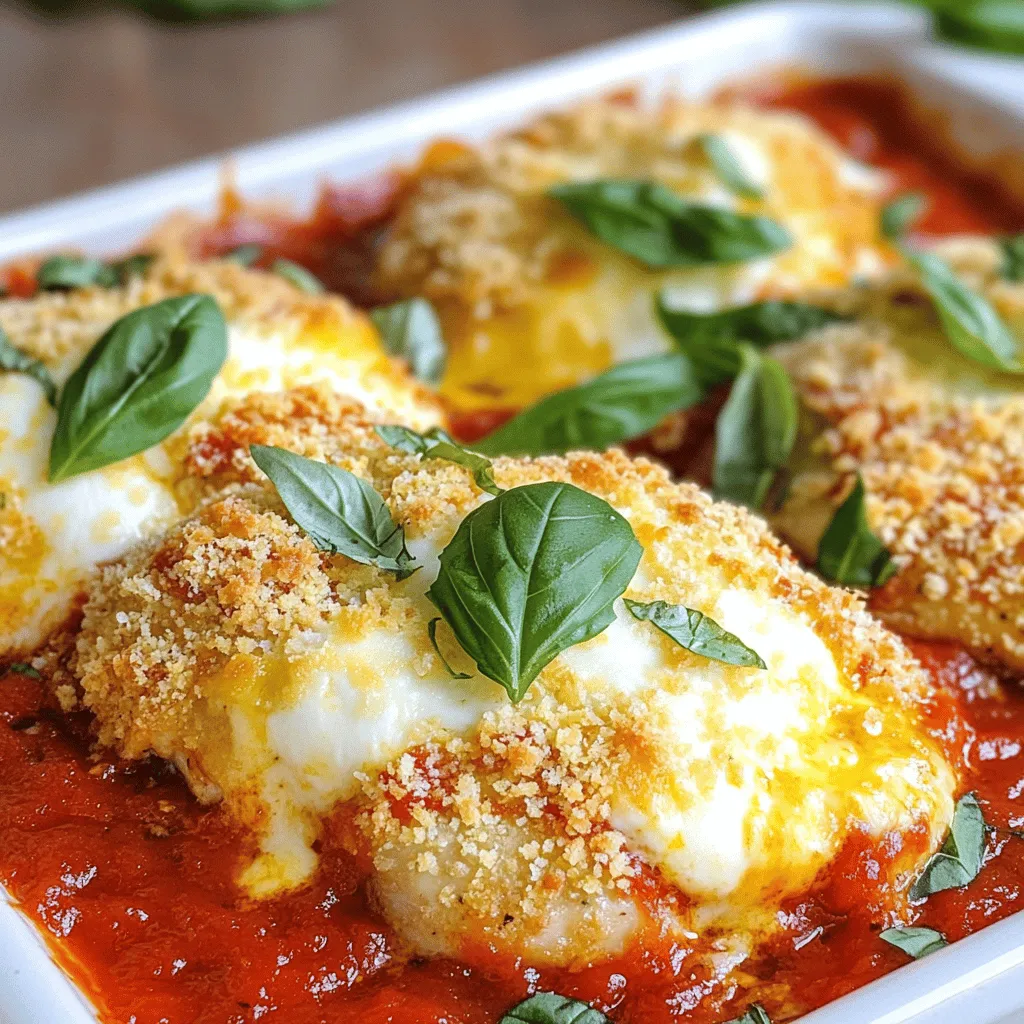
Are you ready for a delicious dinner that’s both easy and savory? Baked Chicken Parmesan is the perfect meal to
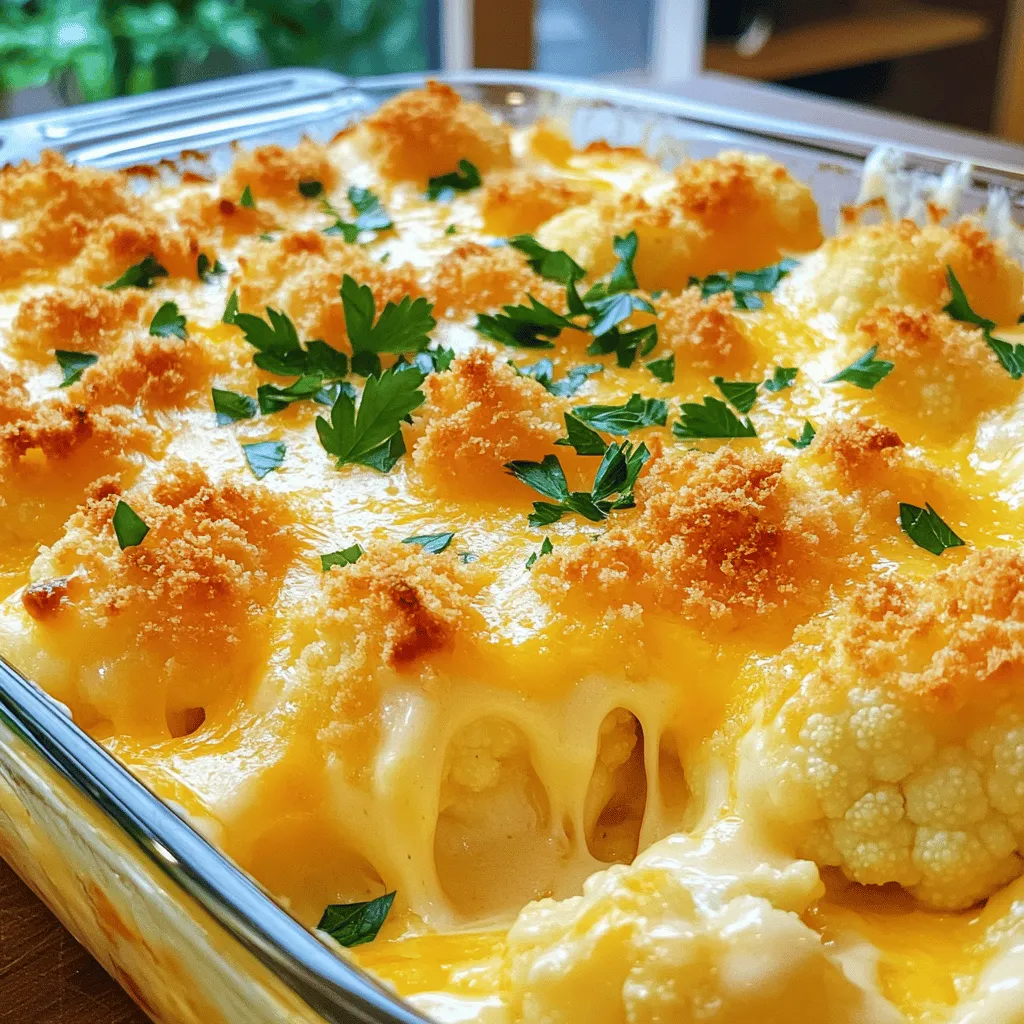
Are you ready to enjoy a dish that warms both the heart and the belly? My Cheesy Cauliflower Gratin combines
![- 2 boneless, skinless chicken breasts - 2 tablespoons extra-virgin olive oil - 2 tablespoons freshly squeezed lime juice - 1 tablespoon finely grated lime zest - 1-2 jalapeños, finely chopped (remove seeds for less heat) - 2 cloves garlic, minced - 1 teaspoon ground cumin - 1 teaspoon chili powder - Sea salt and freshly ground black pepper to taste To make tasty jalapeno lime chicken tacos, start with fresh chicken breasts. They provide a great base for flavor. Olive oil adds richness and helps the spices stick. Fresh lime juice and zest bring brightness. Jalapeños give a nice kick. You can adjust the heat by removing their seeds. Garlic adds depth. Ground cumin and chili powder balance the flavors. Salt and pepper round everything out. - 8 small corn or flour tortillas - 1 cup purple cabbage, finely shredded - 1 ripe avocado, sliced - Fresh cilantro leaves, for garnish - Optional: lime wedges for serving Next, gather your taco assembly ingredients. Corn or flour tortillas hold everything together. Purple cabbage adds crunch and color. Avocado offers creaminess, which pairs well with spicy chicken. Fresh cilantro brightens the dish. Lime wedges on the side add a zesty finish. - Lime wedges - Suggested side dishes When serving your tacos, include lime wedges. They enhance the flavor with a squeeze. Think about side dishes, too. Black beans or rice make a great addition. You can even serve tortilla chips with salsa for a fun twist. For the complete recipe and detailed cooking steps, check out the Full Recipe. Preparing the marinade To make the marinade, combine olive oil, lime juice, lime zest, chopped jalapeños, minced garlic, ground cumin, chili powder, sea salt, and black pepper in a medium bowl. Whisk until all the ingredients blend well. This mix adds a fresh and zesty flavor to your chicken. Coating the chicken Next, add your chicken strips to the bowl. Make sure each piece gets a good coat of the marinade. This step helps the chicken soak up all those amazing flavors. Cover the bowl with plastic wrap and place it in the fridge for at least 30 minutes. The longer you marinate, the better the taste. Grilling instructions While the chicken marinates, preheat your grill or a stovetop skillet on medium-high heat. Once hot, take the chicken strips out of the marinade, letting any extra drip off. Grill each strip for about 5 to 7 minutes on each side. Look for a nice golden color and slight char marks. The chicken should reach 165°F (75°C) inside. Checking doneness To ensure the chicken is ready, you can use a meat thermometer. This step is key for juicy chicken. If you don’t have one, cut into a piece to check that it's no longer pink inside. Heating tortillas Warm the tortillas on the grill or in a separate skillet for about 1 minute on each side. They should feel soft and pliable, not crispy. This makes it easier to fold them. Layering ingredients Now, it's time to build your tacos! Place a generous amount of grilled chicken on each tortilla. Next, top it with a handful of shredded purple cabbage and a few slices of creamy avocado. The crunch from the cabbage and creaminess from the avocado work perfectly together. For a final touch, add fresh cilantro leaves for a burst of flavor. Serve your tacos right away with lime wedges on the side for an extra zing. For the full recipe, see the section above. Enjoy every bite! To make the best jalapeno lime chicken, marinate the chicken for at least 30 minutes. This time allows the flavors to soak in. You can marinate it longer, even overnight, for a deeper taste. If you like it spicy, add more jalapeños or leave the seeds in. For a milder version, remove the seeds. Adjust the spice to fit your taste. You can grill the chicken or cook it on the stovetop. Both methods work well! If using a grill, preheat it to medium-high heat. This helps to get nice grill marks and a smoky flavor. If you cook on the stovetop, use a non-stick skillet. Make sure the chicken cooks evenly by leaving space between the pieces. This way, each piece gets a good sear. When serving these tacos, arrange them on a large platter. This makes a great display for gatherings. Nestle lime wedges around the tacos. Offer extra avocado slices and cilantro in small bowls. This lets guests customize their tacos. Don't forget to check out the Full Recipe for all the details! {{image_4}} You can change up the heat in your tacos. Try using serrano or habanero peppers for a hotter kick. These peppers add nice flavor and heat. If you want spice without jalapeños, use red pepper flakes or hot sauce. They can give your dish a punch without changing the main taste. Making your tacos gluten-free is easy. Just use corn tortillas instead of flour. They taste great and keep the dish light. For a vegetarian option, swap the chicken for grilled portobello mushrooms or chickpeas. Both options taste delicious with the same marinade. Want to add more flavor? Try adding fresh mango slices to your tacos. The sweet taste pairs well with the spicy chicken. You can also use fresh herbs like basil or mint instead of cilantro. These herbs can give your tacos a fresh twist. Add these fun details to your dish to make it unique. For the full recipe, click here [Full Recipe]. To keep your Jalapeno Lime Chicken fresh, store it properly. Place leftover chicken in an airtight container. It stays good in the fridge for up to four days. For tortillas, wrap them in plastic wrap or foil. This helps prevent them from drying out. Store fresh toppings like cabbage and avocado separately. This keeps them crisp and tasty. When you are ready to eat leftovers, reheat the chicken gently. Place it in a skillet over medium heat. Stir it often until it’s hot. You can also use the microwave. Heat in short bursts, checking often to avoid overcooking. For tortillas, warm them in a dry skillet. Heat them for about 30 seconds on each side. This keeps them soft and pliable, just like fresh ones. If you want to save your chicken for later, it freezes well. Place cooked chicken in a freezer-safe bag. Squeeze out all the air before sealing. It stays good for up to three months. For tacos, it’s best to freeze the chicken only. Assemble tacos fresh when you are ready to eat. This ensures the best taste and texture. To boost the flavor, add more spices. You can increase the chili powder or cumin. You can also add smoked paprika for a deeper taste. If you like heat, try more jalapeños or even a dash of cayenne pepper. Marinating the chicken longer will let the flavors soak in better. I recommend at least one hour for the best taste. Yes, you can grill the chicken ahead of time. Just cook it fully and let it cool. Then, store the chicken in an airtight container in the fridge. You can also marinate it the night before for extra flavor. Just make sure to reheat it gently. You want to keep it juicy and tender. The best toppings include shredded cabbage, avocado slices, and fresh cilantro. You can also add diced tomatoes or pickled onions for extra crunch. A squeeze of lime gives a fresh kick. For a creamy touch, try sour cream or a drizzle of yogurt. Mix and match to create your perfect taco. To make fewer tacos, simply halve the ingredients. Use one chicken breast instead of two. Adjust the spices and marinade to match. This way, you can still enjoy the great flavors without making too much. It’s a perfect way to make a quick meal for one or two. Yes, these tacos can be healthy. Chicken is a great source of protein. The toppings like cabbage and avocado add fiber and healthy fats. Using fresh ingredients helps you avoid processed foods. Just keep an eye on the amount of oil and any added sauces. Overall, they can fit nicely into a balanced diet. In this article, we explored how to create tasty Jalapeno Lime Chicken Tacos. You learned about the key ingredients, from chicken to toppings. We broke down step-by-step marinating and cooking instructions for juicy chicken. You discovered helpful tips for perfecting your tacos, plus fun variations and storage tips. Enjoying these tacos can be simple and fun, making them a perfect choice for any meal. Now you're ready to impress your friends and family with your delicious homemade tacos!](https://recipetorch.com/wp-content/uploads/2025/06/818d875b-ed58-4ab4-90b1-79d079a6c3be.webp)
Are you ready to spice up your taco night? My Jalapeno Lime Chicken Tacos are the perfect blend of zesty
. To get great roasted veggies, start with fresh, colorful produce. Cut them into similar sizes. This helps them cook evenly. I like to use a mix of zucchini, bell peppers, and cherry tomatoes. Toss them in olive oil and seasonings before roasting. Use garlic powder and smoked paprika for a tasty kick. Spread them out on the baking sheet. Don’t overcrowd them; give them space to brown. Roasting at 425°F makes them crispy outside and tender inside. Stir them halfway through to ensure all sides get that nice golden color. Cooking quinoa is simple, but there are some mistakes to avoid. First, always rinse the quinoa before cooking. This removes a bitter coating called saponin. Use a 2:1 ratio of liquid to quinoa. I prefer vegetable broth for extra flavor. Bring it to a boil, then lower the heat. Cover the pot and let it simmer for about 15 minutes. Let it rest after cooking. This step allows the quinoa to fluff up nicely. If you leave the lid off too soon, it can turn mushy. A beautiful presentation makes any meal special. Serve your roasted veggie quinoa bowl in bright bowls to highlight the colors. Layer the quinoa first, then add the roasted veggies on top. Slice fresh avocado and place it artfully on the bowl. For extra flavor, sprinkle crumbled feta cheese if you like. A sprinkle of parsley adds freshness and color. Consider drizzling balsamic reduction for a sweet-tart finish. This not only looks great but also enhances the dish’s flavor. For the full recipe, check the details above. {{image_4}} You can easily boost your Roasted Veggie Quinoa Bowl with protein. Here are a few great options: - Grilled Chicken: Add sliced grilled chicken for a hearty meal. - Chickpeas: Roasted chickpeas provide a tasty crunch and extra protein. - Tofu: Toss in cubed, pan-fried tofu for a vegan protein boost. - Beans: Black beans or kidney beans mix well and add fiber. These protein add-ins make your meal more filling and fun. Feel free to mix up the veggies in your bowl. Some tasty choices include: - Carrots: Cut them into sticks for sweet, crunchy bites. - Sweet Potatoes: Roast diced sweet potatoes for extra sweetness. - Cauliflower: Break it into florets for a unique texture. - Asparagus: Add asparagus spears for a fresh touch. Experiment with seasonal veggies for the best flavor and nutrition. Enhancing flavors can take your bowl to the next level. Consider these ideas: - Lemon Juice: A squeeze of fresh lemon brightens up the dish. - Tahini Dressing: Creamy tahini adds richness and depth. - Balsamic Glaze: Drizzle balsamic glaze for a sweet-tart finish. - Herbs: Fresh basil or cilantro adds a burst of flavor. These simple enhancements make your Roasted Veggie Quinoa Bowl even more exciting. For the complete recipe, check out the Full Recipe. To keep your Roasted Veggie Quinoa Bowl fresh, store it in an airtight container. Let the bowl cool down before sealing it. You can store it in the fridge for up to five days. If you want to freeze it, divide it into portions and use freezer-safe containers. It can last for about three months in the freezer. When you're ready to eat, you can reheat the quinoa bowl. If it’s in the fridge, heat it in the microwave for about two to three minutes. Stir halfway through heating for even warmth. If frozen, thaw it overnight in the fridge first, then reheat. You can also use a skillet over medium heat for a few minutes. Add a splash of water or broth to help it heat up without drying out. Meal prepping with this quinoa bowl is simple and fun. You can roast a big batch of veggies at once. Divide the veggies and quinoa into containers for easy lunches. Mix it up throughout the week by adding different toppings, like nuts or seeds. You can also swap out vegetables based on what's in season or what you have on hand. This keeps your meals interesting and fresh, while still being healthy. For the full recipe, check out the details above. To make the Roasted Veggie Quinoa Bowl vegan, simply omit the feta cheese. This dish is already plant-based, featuring wholesome veggies and quinoa. You can also add more toppings like nuts or seeds for extra crunch and flavor. Yes, you can use other grains like brown rice, farro, or bulgur. Each grain has a unique taste and texture. Just adjust the cooking time according to the grain you choose. For instance, brown rice takes longer to cook than quinoa. This dish is packed with nutrients. Quinoa is a complete protein, meaning it has all nine essential amino acids. The colorful veggies add vitamins and minerals. Here are some key benefits: - High in Fiber: Good for digestion and helps keep you full. - Rich in Antioxidants: Helps fight free radicals in your body. - Loaded with Vitamins: Veggies like bell peppers and broccoli provide Vitamin C and K. - Heart-Healthy Fats: The olive oil and avocado offer healthy fats that support heart health. Enjoy this Roasted Veggie Quinoa Bowl knowing you're eating a flavorful and nutritious meal! For the full recipe, check the recipe section. This blog post covered all you need to make a Roasted Veggie Quinoa Bowl. You learned about key ingredients, cooking steps, and helpful tips. We explored fun variations to suit your taste and how to store leftovers properly. These points will help you enjoy a healthy, delicious meal that fits into your routine. Remember, cooking is fun, and you can personalize this dish as you like. Now, it’s your turn to experiment in the kitchen!](https://recipetorch.com/wp-content/uploads/2025/06/3d207fae-d20c-42d3-831e-ac165d992638.webp)
Looking for a meal that’s both tasty and good for you? The Roasted Veggie Quinoa Bowl is your answer. Packed
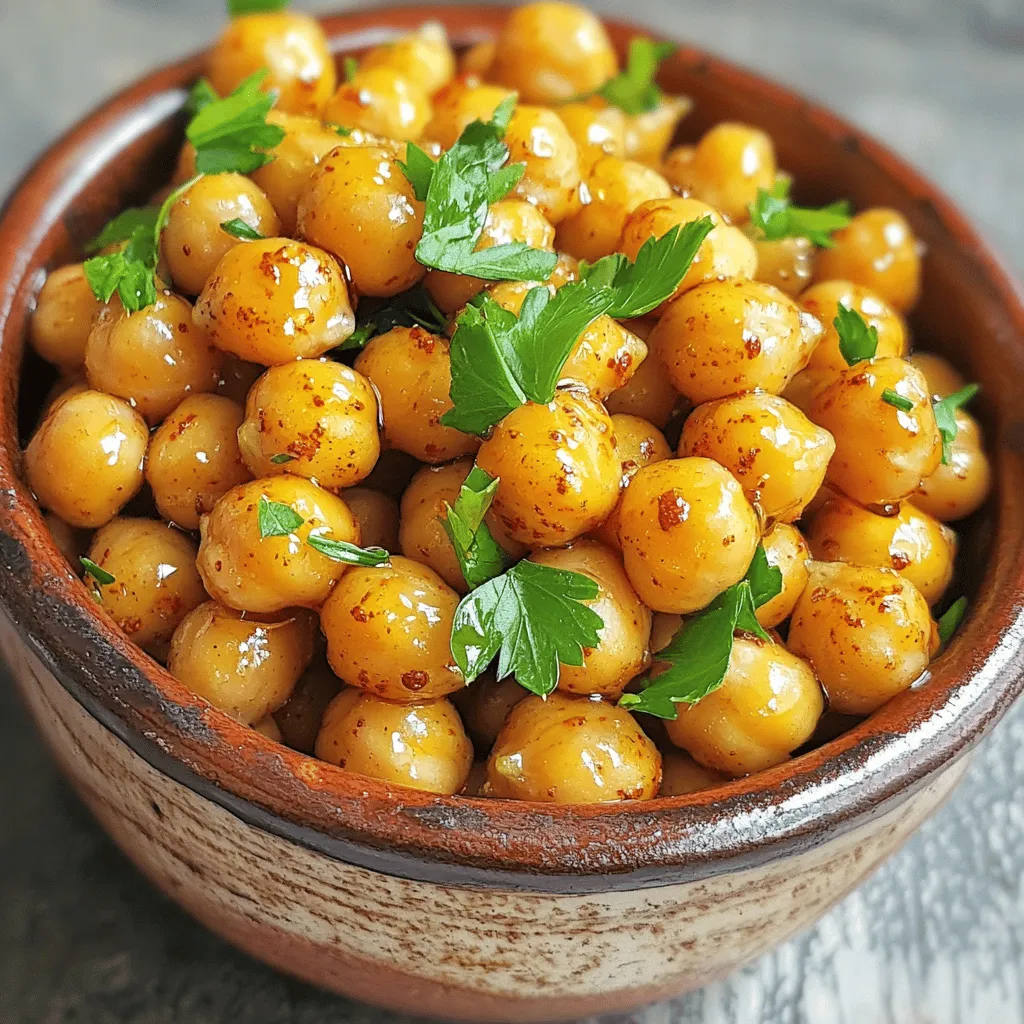
Looking for a crunchy snack that’s both tasty and easy to make? Honey Mustard Roasted Chickpeas are the perfect choice!
. - Use rotisserie chicken for convenience: It saves time and adds flavor. You can buy it pre-cooked and just shred it. Rotisserie chicken is juicy and tender, making it a great base for this dish. - Season to taste with herbs and spices: Don’t hold back here. Add salt, pepper, or your favorite herbs. Dill or parsley can give it a fresh lift. The right herbs make a big difference in flavor. - Allow chilling time for flavor enhancement: After mixing, let your salad chill in the fridge for at least 30 minutes. This helps the flavors blend beautifully. The wait is worth it! - Add walnuts and grapes for garnish: A sprinkle of walnuts adds crunch. Halved grapes bring a burst of sweetness. This not only looks good but adds more taste too. - Serve with whole-grain bread or crackers: Pairing your salad with whole-grain bread or crackers makes it more filling. It also gives a nice texture contrast to the creamy salad. Enjoy with your favorite sides! {{image_4}} You can easily change up this Greek yogurt chicken salad to fit your taste. Try swapping grapes for apples or dried cranberries. Apples add a crisp bite, while cranberries bring sweetness. Both options brighten the dish. You can also incorporate herbs like dill or parsley. Fresh herbs add a nice touch and a burst of flavor. Another fun option is using different nuts. Pecans or almonds can replace walnuts. They change the texture and add their unique taste. If you're looking for dairy-free options, use non-dairy yogurt instead of Greek yogurt. This keeps the creaminess while meeting dietary needs. To reduce calories, opt for low-fat yogurt. This still gives you that creamy texture without extra fat. These easy swaps make the salad more flexible for everyone. To store your Greek Yogurt Chicken Salad, follow these steps: - First, make sure the salad is cool. - Next, choose an airtight container to keep it fresh. - You can use glass or plastic containers. Both work well. - Fill the container but leave some space at the top. This helps prevent spills. - Seal the lid tightly to keep air out. Greek Yogurt Chicken Salad lasts about 3 to 5 days in the fridge. To know if it’s time to toss it, look for these signs: - Check for any off smell. It should smell fresh and creamy. - Look for changes in color or texture. If it seems slimy, throw it away. - If you see mold, do not eat it. Discard it immediately. Following these tips will help keep your meal safe and delicious. Enjoy your Greek Yogurt Chicken Salad for days! You can use sour cream or plain yogurt as a substitute for Greek yogurt. They both add creaminess. If you want a dairy-free option, try coconut yogurt. It has a nice texture and flavor. To make a low-carb version, skip the grapes and use diced cucumbers instead. You can also add more veggies like bell peppers. This keeps it fresh and crunchy while lowering the carbs. Yes, you can use canned chicken. It saves time and is easy to use. Just drain the chicken and shred it before mixing it with the other ingredients. You can enhance the flavor by adding herbs like dill or basil. A splash of hot sauce can also give it a kick. Don’t forget to taste and adjust the salt and pepper! For more details, you can check the Full Recipe. This Greek yogurt chicken salad is easy to make and tasty. You combine chicken, yogurt, and veggies for a light dish. Remember to chill it for more flavor. Use rotisserie chicken for a quick meal or add different fruits and nuts. Store leftovers in airtight containers to keep them fresh. Try this recipe next time you need a delicious meal. You’ll love how simple it is!](https://recipetorch.com/wp-content/uploads/2025/06/445a1076-cf9a-4101-958f-02c8cf1a6348.webp)
Looking for a tasty and healthy meal idea? My Greek Yogurt Chicken Salad is perfect! Made with shredded chicken, crisp
