![To make this rich and silky vegan chocolate mousse, you need a few key ingredients: - 1 cup silken tofu, well-drained - 1/2 cup unsweetened cocoa powder - 1/2 cup pure maple syrup (or agave syrup for a sweeter alternative) - 1/4 cup almond milk (or any preferred plant-based milk) - 1 teaspoon pure vanilla extract - A pinch of fine sea salt - 1/4 cup dairy-free dark chocolate chips These ingredients work together to create a smooth and creamy texture. Silken tofu serves as the base, giving the mousse its light and airy feel. Cocoa powder adds rich chocolate flavor, while maple syrup sweetens it naturally. The almond milk helps blend everything smoothly, and vanilla enhances the taste. You might want to add some optional ingredients for more depth: - A dash of espresso powder (to boost the chocolate flavor) - A few drops of peppermint extract (for a minty twist) - A sprinkle of cinnamon (for a warm spice note) These add-ins can change the taste profile. Espresso powder brings out the cocoa. Peppermint makes it fresh, while cinnamon adds warmth and comfort. To whip up this mousse, you'll need some basic kitchen tools: - A high-speed blender or food processor - A microwave-safe bowl or double boiler - Measuring cups and spoons - Serving cups or bowls These tools make the process easy. A blender helps achieve that creamy texture, while a microwave or double boiler melts the chocolate smoothly. To start, you need to melt the dairy-free dark chocolate chips. Place them in a microwave-safe bowl. Microwave them for 20 seconds. Stir after each interval. Keep doing this until the chocolate is smooth. If you prefer, use a double boiler on the stovetop. Just heat water in the bottom pot and place your chocolate in the top pot. Stir until melted. Once melted, let it cool slightly before using. Now, it’s time to blend the mousse base. Grab a high-speed blender or a food processor. Add the well-drained silken tofu, unsweetened cocoa powder, and pure maple syrup. Pour in the almond milk, vanilla extract, and a pinch of sea salt. Blend everything on high speed. You want it to be completely smooth and creamy. No lumps should remain for the best texture. After blending, it’s time to combine the chocolate. Pour the melted chocolate into the blender with the tofu mix. Blend again until the chocolate is well mixed in. Taste your mousse. If you want it sweeter, add more maple syrup and blend briefly. Next, pour the mousse into serving cups or bowls. Cover each with plastic wrap. Refrigerate for at least one hour. This will let the mousse set and become fluffy. Before serving, add fresh berries and mint leaves on top for a nice touch. Enjoy your rich and silky vegan chocolate mousse! For a smooth vegan chocolate mousse, use silken tofu. It blends well and gives a creamy feel. Make sure to drain the tofu well before blending. The right consistency is key. Blend until there are no lumps left. For a silkier texture, blend a bit longer. Sweetness is important in this recipe. Start with the amount of maple syrup listed. Taste the mousse before chilling. If it's not sweet enough for you, add more syrup. Blend again briefly to mix it in. Remember, you can always add more, but you can't take it out. Presentation makes your dessert stand out. Use clear glass cups for a beautiful display. Layer fresh berries at the bottom for color and flavor. Top with a sprig of mint for a pop of green. This adds freshness and makes the mousse look fancy. For extra flair, drizzle some melted chocolate on top before serving. Enjoy! {{image_4}} For a fresh twist, add mint flavor to your mousse. You can use mint extract or fresh mint leaves. If you use extract, start with just a few drops. Blend it in with the other ingredients for a minty kick. This variation pairs wonderfully with dark chocolate. Garnish with mint leaves for an extra touch. Raspberry-flavored mousse is another tasty choice. Mix in raspberry puree during blending. You can make the puree by blending fresh or frozen raspberries. Strain it to remove seeds if you prefer a smooth texture. This fruity addition brightens the chocolate flavor. Top with fresh raspberries for a stunning look. You can explore many other flavors. Consider adding a splash of espresso for a coffee kick. Almond extract gives a sweet and nutty note. You can also fold in crushed nuts for added texture. Experiment with spices like cinnamon or chili for a unique twist. The options are endless, so have fun with it! For the full recipe details, refer to the [Full Recipe]. To keep leftover mousse fresh, place it in airtight containers. You can use small jars or bowls with tight lids. Make sure to cover the surface with plastic wrap before sealing. This prevents air from getting in and keeps it creamy. Store the mousse in the fridge for up to three days. You can freeze vegan chocolate mousse, but it's best to do it right. First, spoon the mousse into freezer-safe containers. Leave some space at the top since mousse expands when frozen. Cover tightly with a lid or wrap well with plastic wrap. When ready to eat, thaw it in the fridge overnight before serving. The mousse stays fresh in the fridge for about three days. If you freeze it, it can last for up to two months. Always check for any changes in smell or texture before eating. If it seems off, it's best to toss it. Enjoy it as a quick snack or a fancy dessert. You can even layer it with fresh fruit for a fun treat. For the full recipe, check out the Vegan Chocolate Mousse section above! Yes, vegan chocolate mousse can be healthy. It uses silken tofu, which is rich in protein and low in fat. The cocoa powder provides antioxidants, and maple syrup is a natural sweetener. This dessert has fewer calories than traditional mousse. You can also adjust the sweetness to your liking. Absolutely! You can use any plant-based milk you like. Almond, soy, or oat milk all work well. Each type of milk gives the mousse a unique taste. Choose the one you enjoy most for the best flavor. The mousse needs about one hour to set in the fridge. This time helps it become fluffy and firm. If you can wait longer, letting it chill for a few hours makes it even better. Yes, you can make this mousse ahead of time. It stores well in the fridge for up to three days. Just cover it tightly with plastic wrap or a lid. This makes it a great dessert for parties or special meals. If you want to avoid tofu, you can use aquafaba. Aquafaba is the liquid from canned chickpeas. It whips up like egg whites and adds a light texture. You can also try using soaked cashews for a creamier mousse. Just blend them well to ensure a smooth consistency. For the complete recipe, check out the Full Recipe. Vegan chocolate mousse is easy and fun to make. We covered key ingredients, equipment, and step-by-step instructions. With tips for perfect texture and creative variations, you can impress anyone. Remember to store leftovers wisely and enjoy them later. This mousse can be a healthy dessert or a special treat. Try different flavors and add-ins to find your favorite. Get started today, and turn simple ingredients into a rich, creamy delight. Enjoy making vegan chocolate mousse!](https://recipetorch.com/wp-content/uploads/2025/06/c6b71a2a-7029-413c-ace1-f030c429279d.webp)
Vegan Chocolate Mousse Rich and Silky Dessert Delight
If you think vegan desserts can’t be rich and decadent, think again! This Vegan Chocolate Mousse is proof that plant-based
If you think vegan desserts can’t be rich and decadent, think again! This Vegan Chocolate Mousse is proof that plant-based

If you love tasty dips that wow your guests, you’re in for a treat! This Cheesy Spinach Artichoke Dip is

Craving something fresh and flavorful? You’re in the right place! My Zesty Taco Salad Bowls are packed with taste and

If you’re looking for a fun and tasty treat, you’re in the right place! Strawberry Yogurt Swirl Popsicles are not

Are you ready to whip up a dessert that sings summer? My Classic Peach Crisp is sweet, warm, and incredibly

Are you ready to impress friends with a colorful, tasty treat? Rainbow Veggie Sushi Rolls are not only a feast

Looking for a quick, tasty dinner option that’s packed with flavor? This Sausage and Veggie Sheet Pan Dinner is your

Are you ready to indulge in a warm, buttery delight? This Easy Garlic Butter Naan recipe will transform your meal.
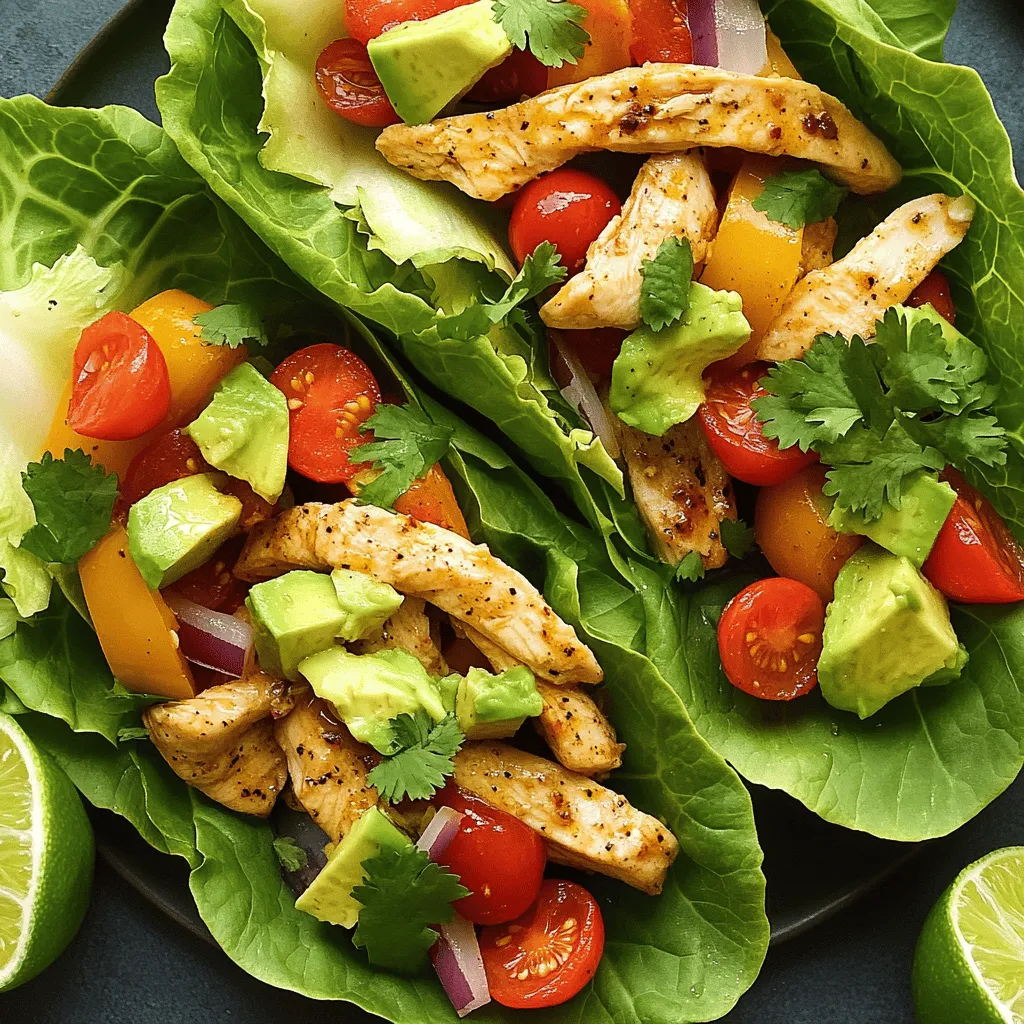
Craving a quick, healthy meal? You’ll love these savory Chicken Fajita Lettuce Wraps! They’re easy to make and packed with
![- 6 cups ripe tomatoes, halved - 1 large onion, cut into quarters - 4 cloves garlic, left unpeeled - 3 tablespoons olive oil - Salt and freshly ground black pepper, to taste - 1 cup fresh basil leaves, tightly packed - 3 cups vegetable broth - 1 tablespoon balsamic vinegar - 1 teaspoon sugar (optional) - 1/2 cup heavy cream (or substitute with coconut cream for a dairy-free option) I love using ripe tomatoes for this soup. They give the best flavor. Halving them helps them roast well. The large onion adds sweetness and depth. Leaving the garlic unpeeled keeps it mellow. Olive oil helps roast the veggies and adds richness. Fresh basil is a must. It brightens the soup and adds a lovely aroma. Vegetable broth gives the soup a nice body. Balsamic vinegar adds a touch of acidity, which balances the sweetness. The sugar is optional but can enhance the flavor. Heavy cream or coconut cream makes the soup creamy and smooth. - Fresh herbs (thyme, oregano) - Spices (red pepper flakes, smoked paprika) You can add fresh herbs like thyme or oregano for extra flavor. A pinch of red pepper flakes adds warmth, while smoked paprika gives it a nice smoky touch. - Caloric content - Key vitamins and minerals This soup is low in calories and packed with vitamins. Tomatoes are high in vitamin C and potassium. Basil provides vitamin K and adds to the soup's health benefits. Overall, this dish is both comforting and nutritious, making it a perfect choice for any meal. For the full recipe and more details, check out the [Full Recipe]. 1. Preheat your oven to 400°F (200°C). This heat is perfect for roasting. 2. On a large baking sheet, arrange the halved tomatoes and quartered onion. 3. Place the unpeeled garlic cloves among the veggies. 4. Drizzle everything with olive oil. 5. Sprinkle salt and black pepper to taste. 6. Toss the mix well with your hands or a spatula. 1. Place the baking sheet in the hot oven. 2. Roast for 30-35 minutes. You want the tomatoes to blister and become juicy. 3. Look for signs of proper roasting. The edges should caramelize lightly. 1. Once roasted, take the baking sheet out and let it cool for about 5 minutes. 2. Squeeze the roasted garlic out of its skins into a blender. Discard the skins. 3. Add the roasted tomatoes, onions, vegetable broth, basil, balsamic vinegar, and sugar into the blender. 4. Blend on high until smooth and creamy. 5. Pour the blended mixture into a large pot. 6. Bring it to a gentle simmer over medium heat for about 10 minutes. This helps the flavors meld together. 7. Stir in the heavy cream until fully mixed. 8. Taste the soup. Adjust the seasoning with salt and pepper if needed. 9. Heat through gently, but avoid boiling. 10. Serve hot, garnishing with extra basil leaves or a swirl of cream. This recipe makes a hearty and tasty roasted tomato basil soup. You can find the full recipe to explore all the details. To get the best flavor, roast your tomatoes evenly. Here’s how: - Arrange on a baking sheet: Spread the tomatoes, onions, and garlic in a single layer. This helps them roast evenly. - Use enough oil: Drizzle olive oil generously over the veggies. It aids in caramelization and enhances the flavor. - Don’t crowd the pan: Avoid stacking the veggies. Crowding leads to steaming instead of roasting. For a creamy soup, blending is key. Here are my tips: - Let the veggies cool slightly: This ensures you don’t burn yourself when blending. - Blend in batches if needed: This helps achieve a smooth texture without overloading the blender. - Add broth slowly: This allows for better blending and creaminess. To store leftover soup safely, follow these steps: - Cool before storing: Let the soup reach room temperature. This prevents condensation in the container. - Use airtight containers: Glass or BPA-free plastic works best. - Label containers: Write the date on each container to track freshness. If you want to keep it longer, freezing is a great option: - Use freezer-safe bags: Pour soup into bags, leaving space for expansion. - Lay bags flat: This saves space and helps them freeze faster. - Thaw in the fridge: This keeps the soup safe and helps maintain flavor. Garnishing your soup can take it to the next level: - Fresh basil leaves: Add a few on top for a burst of color and flavor. - Drizzle of olive oil: A light swirl adds richness and a gourmet touch. For different flavor profiles, try these bases: - Coconut cream: Use this as a dairy-free option. It adds creaminess with a hint of sweetness. - Vegetable stock: Swap in different stocks for unique flavors. You can use mushroom broth for an earthy taste. {{image_4}} You can switch up the tomatoes in your soup. I love using different types for various flavors. Roma tomatoes give a rich taste, while heirloom tomatoes add a unique sweetness. You can also try cherry tomatoes for a burst of flavor. If you want a dairy-free option, replace heavy cream with coconut cream. This swap keeps the soup creamy while adding a subtle sweetness. You can also use almond milk for a lighter touch. Adding roasted red peppers can give your soup a smoky twist. Simply toss them on the baking sheet with the other veggies. Carrots also add sweetness and depth. Just chop them into chunks and roast them along with the tomatoes. Spice infusions can elevate your soup. Try adding a teaspoon of curry powder for warmth or smoked paprika for a deeper flavor. These spices mix well with the tomatoes and basil, creating a unique taste experience. This soup pairs perfectly with crusty bread or a fresh salad. A slice of garlic bread complements the flavors well. You can also serve it with a crunchy green salad to balance the richness. Get creative with how you serve your soup. Try pouring it over rice for a hearty meal. You can even serve it in a bowl topped with fresh basil and a drizzle of olive oil. This adds a nice touch and makes it look inviting. For the full recipe, check out the sections above! Roasted tomato basil soup stays fresh in the fridge for about 5 days. Store it in an airtight container to keep it safe. Glass containers work best, as they do not absorb odors or stains. If you use plastic, make sure it’s BPA-free to avoid chemical leaching. You can freeze this soup for up to 3 months. To freeze, let it cool completely first. Then, pour it into freezer-safe bags or containers. Remove as much air as possible to prevent freezer burn. When ready to eat, thaw it overnight in the fridge. To reheat, use the stove on low heat. Stir often to avoid hot spots. You can also microwave it in short bursts, stirring in between. After thawing, you may want to enhance the flavor. Add a splash of balsamic vinegar or a handful of fresh basil. These add freshness and depth. If the soup thickens too much, stir in a bit of broth or water. Heat it gently until smooth. This soup is all about enjoying your meal, so make it just how you like! The best types of tomatoes for soup are Roma and heirloom. Roma tomatoes have fewer seeds and thicker flesh. They provide a rich, sweet flavor when roasted. Heirloom tomatoes add a unique taste and color. Both types will give your soup a great base. Yes, you can make this soup vegan. Simply replace the heavy cream with coconut cream or a plant-based cream. This keeps the soup creamy while making it dairy-free. Use vegetable broth to maintain the vegan profile. You can still enjoy a delicious meal without any animal products. To thicken your soup, you can add more tomatoes or use less broth. Another option is to blend in some cooked potatoes. This adds creaminess without changing the taste. You can also let the soup simmer longer to reduce its liquid content. Yes, you can use fresh basil instead of dried. Fresh basil has a brighter flavor and aroma. Use about three times more fresh basil than dried. Add it at the end of cooking for the best flavor. This keeps that fresh taste strong in your soup. Roasted Tomato Basil Soup pairs well with many sides. Consider serving it with crusty bread or a grilled cheese sandwich. A fresh salad can also complement the rich flavors. For a heartier meal, serve it over rice or alongside pasta. Enjoy experimenting with different pairings for a full dining experience! This blog post covered a tasty roasted tomato basil soup recipe. You learned about the key ingredients and optional flavor boosters. I also shared helpful tips for cooking, storage, and serving. Don't forget, you can make this soup your own with swaps and variations. As you prepare this dish, remember to enjoy the process. Cooking is fun and allows creativity. Get ready to impress your family and friends with a warm bowl of deliciousness!](https://recipetorch.com/wp-content/uploads/2025/06/250493d1-a28e-488f-9283-59f45ff28839.webp)
When you crave a warm, cozy meal, Roasted Tomato Basil Soup is your answer. This simple recipe bursts with rich
