![For this tasty dish, you will need: - 1 cup rolled oats - 2 ripe bananas, sliced - 1 cup almond milk (or any milk of your choice) - 1 tablespoon pure maple syrup - 1 teaspoon pure vanilla extract - 1 teaspoon ground cinnamon - 1 tablespoon unsalted butter - 2 tablespoons brown sugar - Pinch of salt These ingredients work together to create a creamy and sweet breakfast. The oats soak up the milk and flavors overnight. You can make this recipe your own. Here are some fun options: - 1/4 cup chopped walnuts (for garnish) - A dash of nutmeg for extra warmth - A drizzle of honey if you like it sweeter - Chia seeds for added fiber Feel free to mix and match these optional ingredients. They can add new textures and flavors to your oats. This recipe serves two people. Each serving has about: - Calories: 350 - Protein: 8g - Carbs: 60g - Fiber: 8g - Sugars: 12g These oats provide a good balance of energy and nutrients to start your day right. You get fiber from the oats and bananas, plus healthy fats if you add nuts. Enjoy a hearty breakfast that feels indulgent yet healthy. For the full recipe, check the section above! To start, grab a medium bowl or jar. Add 1 cup of rolled oats to it. Pour in 1 cup of almond milk, or any milk you like. Next, add 1 tablespoon of pure maple syrup. Then, mix in 1 teaspoon of pure vanilla extract and 1 teaspoon of ground cinnamon. Finally, add a pinch of salt. Stir everything until well combined. The oats should be nice and coated. Now, slice 1 ripe banana and layer half of it on the oat mix. Gently fold the bananas into the oats. This will help the flavors blend better. Next, take a small frying pan and set it over medium heat. Add 1 tablespoon of unsalted butter and let it melt. Once it’s melted, sprinkle in 2 tablespoons of brown sugar. Stir it well until the sugar dissolves completely. Now, add the remaining banana slices into the pan. Sauté them for about 1-2 minutes. You want them to soften and get a nice golden color. When they are ready, take them off the heat and let them cool for a moment. Now, it’s time to put everything together. Divide the oat mixture evenly into two serving jars. On top of the oats, spoon the warm banana mix. Make sure to drizzle any caramel sauce from the pan over the oats. If you want a crunch, sprinkle 1/4 cup of chopped walnuts on top. This adds texture and flavor. Seal the jars tightly and place them in the fridge. Let them chill overnight or for at least 4-6 hours. This soaking time helps the oats soften and soak up all the flavors. The next morning, stir the oats gently before enjoying. You can eat them cold or warm them in the microwave for a cozy treat. To make your oats extra creamy, use more milk. I suggest adding an extra half cup of almond milk. This will give a soft texture. You may also blend the oats with the milk before mixing. Blending creates a smooth base that feels rich. Mixing in yogurt can also enhance creaminess. Greek yogurt adds protein and flavor. When sautéing bananas, choose ripe ones for the best taste. Start with medium heat to avoid burning. Melt the butter fully before adding sugar. This helps the sugar dissolve evenly. Stir gently to coat the bananas without mashing them. Cook for just 1-2 minutes. You want them soft but still intact. This step creates a lovely caramel flavor. Serve your Banana Foster Overnight Oats in clear jars. This showcases the beautiful layers of oats and bananas. Top with a banana slice or a sprinkle of walnuts for a pop of color. Drizzle any extra caramel from the pan over the top. This adds a sweet touch and makes it eye-catching. A nice presentation makes the dish feel gourmet. For the full recipe, check out the [Full Recipe]. {{image_4}} You can easily make Banana Foster overnight oats dairy-free. Simply swap the milk for almond, coconut, or oat milk. These options work great and taste delicious. They keep the oats creamy without dairy. If you want added richness, try using a non-dairy yogurt on top. Want to add more flavor? You can stir in some nutmeg for warmth. A splash of rum extract brings that classic banana foster taste. If you like a nutty flavor, mix in a spoon of almond butter or peanut butter. This adds creaminess and a nice twist. Toppings can change your oats in fun ways. You can add fresh fruit like strawberries or blueberries. They add color and sweetness. Chopped pecans or almonds give a nice crunch. Drizzling more maple syrup on top can enhance the sweetness. For a fun touch, try adding a dollop of whipped cream. For the full recipe, check the [Full Recipe] section. Enjoy exploring these tasty variations! To keep your Banana Foster Overnight Oats fresh, store them in airtight containers. Use glass jars with lids or plastic containers that seal well. Make sure the oats are cool before sealing. This step prevents moisture from building up inside. When meal prepping, make a few jars at once. This saves time during busy mornings. You can layer the ingredients in jars, but keep the banana topping separate until you are ready to eat. This way, the bananas stay fresh and do not turn brown. Banana Foster Overnight Oats last about four to five days in the fridge. Check for any bad smells or changes in texture. If the oats look dry or the bananas are brown and mushy, it's best to toss them. Always trust your senses when it comes to food safety. Yes, you can use quick oats. Quick oats cook faster and absorb liquid quickly. This will make the oats softer and creamier. If you like a thicker texture, stick to rolled oats. They hold their shape better and give a nice chew. You can keep Banana Foster Overnight Oats in the fridge for up to five days. Just make sure to seal the containers well. This way, they stay fresh and tasty. As the days pass, the flavors will blend more. Yes, you can reheat the oats. Just take them out of the fridge and warm them for about 30 seconds in the microwave. Stir well after heating. This gives you a warm and comforting breakfast, just like when you first made them. For the full recipe, check the earlier section. Banana Foster Overnight Oats offer a tasty blend of simple ingredients. We explored how to prepare a creamy oat mixture, sauté sweet bananas, and assemble your dish beautifully. I shared tips for a creamier texture, smart sautéing techniques, and storage methods. You can customize the recipe to fit your taste with different toppings and dairy-free options. Enjoy making this healthy breakfast that’s easy to store and serve. Now, you have all the tools to create a delightful and nutritious meal!](https://recipetorch.com/wp-content/uploads/2025/07/133b3a29-7d8c-405d-b753-14d4bcaeea9a.webp)
Banana Foster Overnight Oats Delightfully Easy Recipe
Looking for a quick and tasty breakfast? Try my Banana Foster Overnight Oats! This easy recipe brings the classic dessert
Looking for a quick and tasty breakfast? Try my Banana Foster Overnight Oats! This easy recipe brings the classic dessert
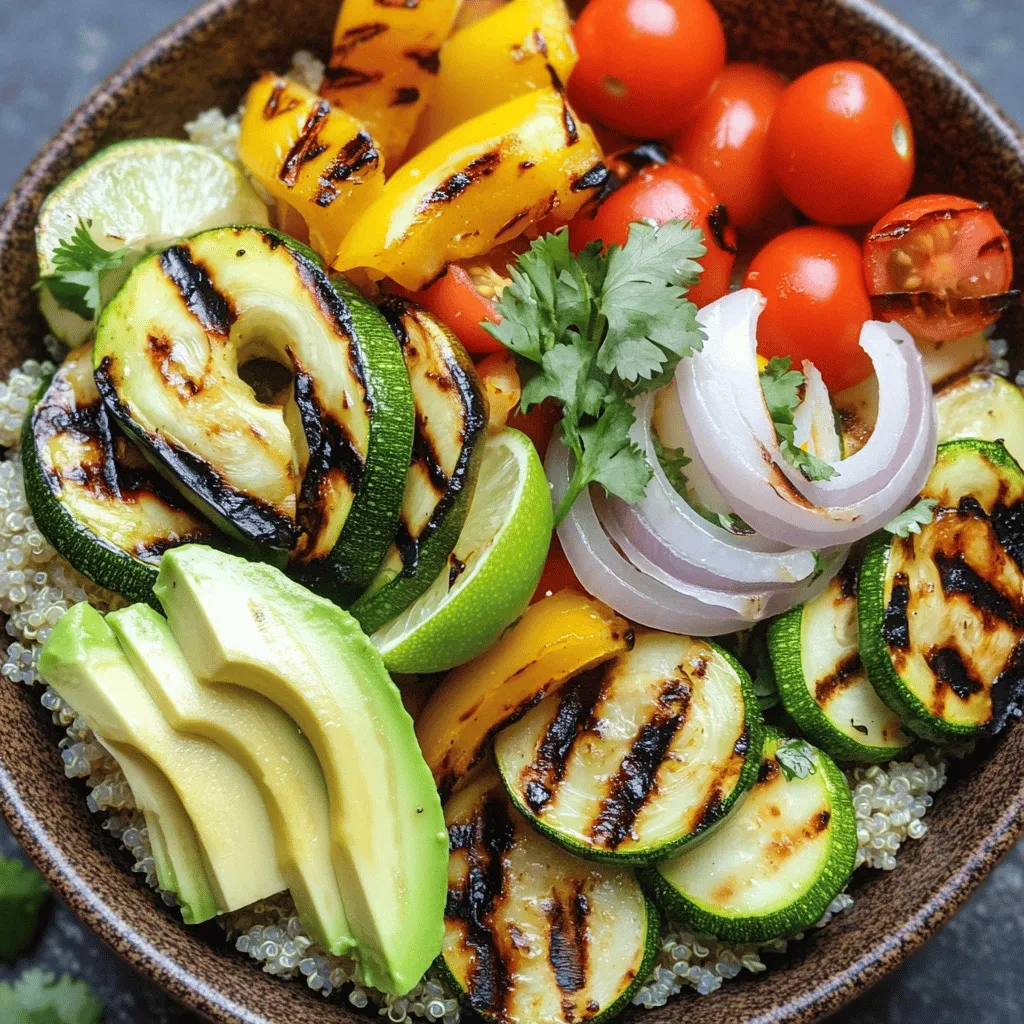
Looking for a dish that’s both tasty and healthy? Grilled Veggie Quinoa Bowls are the answer! Packed with colorful vegetables

Craving a refreshing treat this summer? Look no further than my Fresh Mango Peach Salsa! Bursting with juicy flavors from

Craving a sweet treat that’s easy to make? You’re in the right place! With just a few simple ingredients, you

Looking for a quick and tasty treat? This Peanut Butter Banana Smoothie is both healthy and delicious. Packed with nutrients
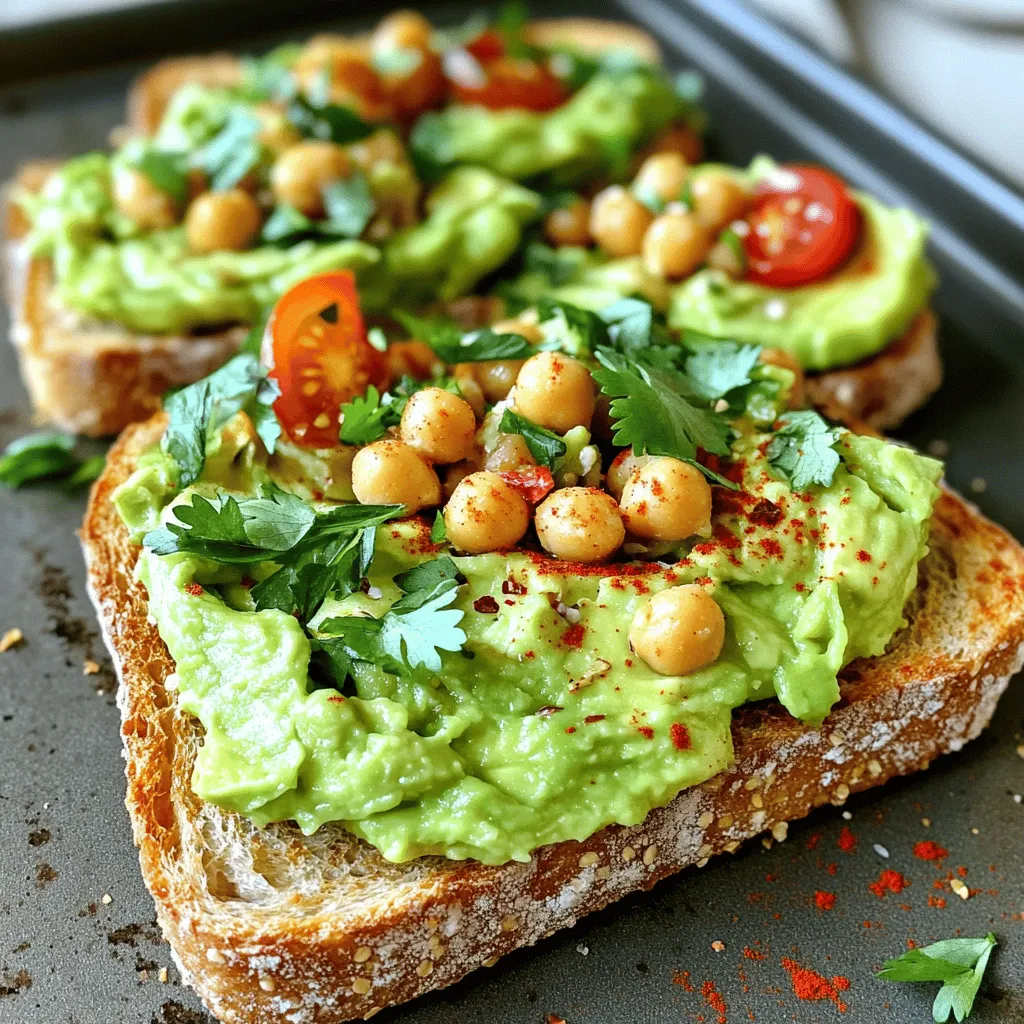
If you’re hunting for a quick, healthy meal that packs a punch, look no further. Smashed avocado chickpea toast is
![- 4 skinless salmon fillets (approximately 6 ounces each) - 3 tablespoons extra virgin olive oil - 4 large cloves of garlic, finely minced - Juice and zest of 2 medium lemons (reserve a few slices for garnish) - 1 teaspoon dried oregano - 1 teaspoon smoked paprika - Sea salt and freshly cracked black pepper, to taste - Fresh parsley, finely chopped, for garnish Gather these ingredients before you start. The salmon fillets are the star of this dish. Look for fresh, bright pink fillets. This ensures a tasty meal. The olive oil adds a rich flavor and helps the garlic stick. Minced garlic brings a strong, savory taste. Fresh lemon adds a zesty kick. It brightens the dish and balances the flavors. Zesting the lemon gives extra aroma and taste. Dried oregano adds a warm, earthy note. Smoked paprika gives a hint of smokiness, enhancing the salmon. Sea salt and black pepper season the dish perfectly. Don't skip the parsley; it adds a fresh look and taste. This recipe is simple yet full of flavor. The combination of ingredients makes every bite delightful. For the full recipe, you can refer back to the earlier section. Enjoy cooking! Set your oven to 400°F (200°C). This heat is perfect for baking salmon. It cooks the fish evenly and keeps it moist. In a small bowl, mix these ingredients together: - 3 tablespoons extra virgin olive oil - 4 large cloves of garlic, finely minced - Juice and zest of 2 medium lemons - 1 teaspoon dried oregano - 1 teaspoon smoked paprika - Sea salt and freshly cracked black pepper, to taste Whisk until the mix looks smooth. This marinade adds a zesty flavor. Place the salmon fillets on a lined baking sheet, skin-side down. Brush the marinade on each fillet. Coat them well for the best taste. Let the salmon sit for 15 to 20 minutes. This time lets the flavors soak into the fish. Now, put the baking sheet in your preheated oven. Bake for 12 to 15 minutes. The salmon is ready when it flakes easily with a fork and turns opaque pink. After baking, let the salmon rest for a couple of minutes. This helps keep it juicy. Just before you serve, sprinkle fresh parsley on top. It adds nice color and flavor. For a lovely plate, serve the salmon on a bed of steamed asparagus or fluffy quinoa. Add lemon wedges for extra zest. Now you have a tasty dish that is sure to impress! For the full recipe, check out the details above. When you buy salmon, look for bright, shiny skin. The flesh should feel firm and moist. Avoid fish with dull skin or brown spots. Fresh salmon has a clean, ocean-like smell. If you can, buy wild-caught salmon; it often tastes better. Check if it has clear eyes. This shows it is fresh and not old. To enhance your dish, try adding fresh herbs like dill or basil. You can also use spices like cumin or coriander for a twist. A pinch of red pepper flakes can add heat. Experiment with different citrus, such as lime or orange, for new flavors. Each addition can change the taste and make your salmon unique. Thickness matters when baking salmon. For fillets around 1 inch thick, bake for 12 to 15 minutes. If your fillet is thicker, add a few extra minutes. For very thin fillets, check at 8 to 10 minutes. Always use a fork to see if it flakes easily. This tells you if it is done. Adjust your time based on the thickness for perfect results. {{image_4}} You can add fresh herbs to your salmon for a flavor twist. Try using dill, basil, or thyme. These herbs add brightness and aroma. Simply chop the herbs and mix them into your marinade. You can also sprinkle them on top before baking. This variation makes your salmon taste fresher and more vibrant. Incorporating olives or feta cheese gives your dish a Mediterranean flair. Chop some olives and mix them into the marinade or sprinkle them on top before baking. Feta cheese can add a nice salty flavor. Just crumble it over the salmon in the last few minutes of baking. This brings a rich taste and unique texture. If you like heat, add red pepper flakes or Sriracha to your marinade. Start with a small amount and adjust to your taste. This addition can really change the flavor profile. It adds a kick that pairs well with the zesty lemon and garlic. You can also serve the salmon with a spicy dipping sauce for extra heat. For the full recipe, please refer to the section above. Enjoy experimenting with these variations! To keep your baked salmon fresh, store it in an airtight container. This will help seal in the moisture and flavor. Make sure to refrigerate the leftovers within two hours of cooking. Salmon can last in the fridge for up to three days. If you see any signs of spoilage, like a sour smell or discoloration, it’s best to toss it out. When you’re ready to enjoy your leftovers, reheating is key. Use the oven for the best results. Set it to 275°F (135°C) and place the salmon on a baking sheet. Cover it with foil to keep it from drying out. Heat it for about 15 minutes. You want it warm but not overcooked. This way, the salmon remains moist and tasty. If you want to keep salmon longer, freezing is a great option. Wrap each fillet tightly in plastic wrap, then place it in a freezer bag. This helps prevent freezer burn. Salmon can stay good in the freezer for up to three months. When you’re ready to eat it, defrost it in the fridge overnight. This keeps the texture from getting mushy. For the full recipe on how to make this delicious dish, check out the [Full Recipe]. Baking salmon at 400°F takes about 12 to 15 minutes. If your fillets are thicker, they may need a bit more time. Check the salmon at 12 minutes. It should flake easily with a fork and look opaque. This method keeps the fish moist. A good tip is to keep an eye on it after the 10-minute mark. Overcooking can dry out your salmon. Yes, you can use frozen salmon. Just make sure to thaw it first. You can do this in the fridge overnight. If you're in a hurry, place the sealed salmon under cold water for about an hour. Once thawed, follow the same steps as fresh salmon. Just adjust the baking time to about 15 to 18 minutes. This helps ensure even cooking. You can serve this salmon with many sides. Here are some great options: - Steamed asparagus - Roasted vegetables - Quinoa or rice - A fresh green salad - Mashed potatoes These sides add more color and flavor to your meal. They also help balance the fish’s rich taste. Baked Lemon Garlic Salmon is very healthy. Salmon is rich in omega-3 fatty acids. These fats are good for your heart. Garlic adds flavor and has health benefits too. Lemons provide vitamin C, which boosts your immune system. The olive oil in the recipe is a healthy fat. Overall, this dish is a great choice for a balanced meal. You can find the full recipe to enjoy this healthy delight. This blog post covered baking lemon garlic salmon in a simple way. We talked about choosing fresh salmon, making a tasty marinade, and baking it perfectly. You learned how to add your own twist with different spices and herbs. Baking salmon is easy and fun. It is healthy and full of flavor. Enjoy experimenting with these ideas and make this dish your own. Happy cooking!](https://recipetorch.com/wp-content/uploads/2025/06/45b214d6-e609-4d4e-a36a-892f92a8bcf7.webp)
If you’re looking for a simple and tasty meal, Baked Lemon Garlic Salmon is a winner. This dish bursts with

Looking for a quick and tasty meal? My Easy Egg Salad Lettuce Wraps will become your new favorite! This simple
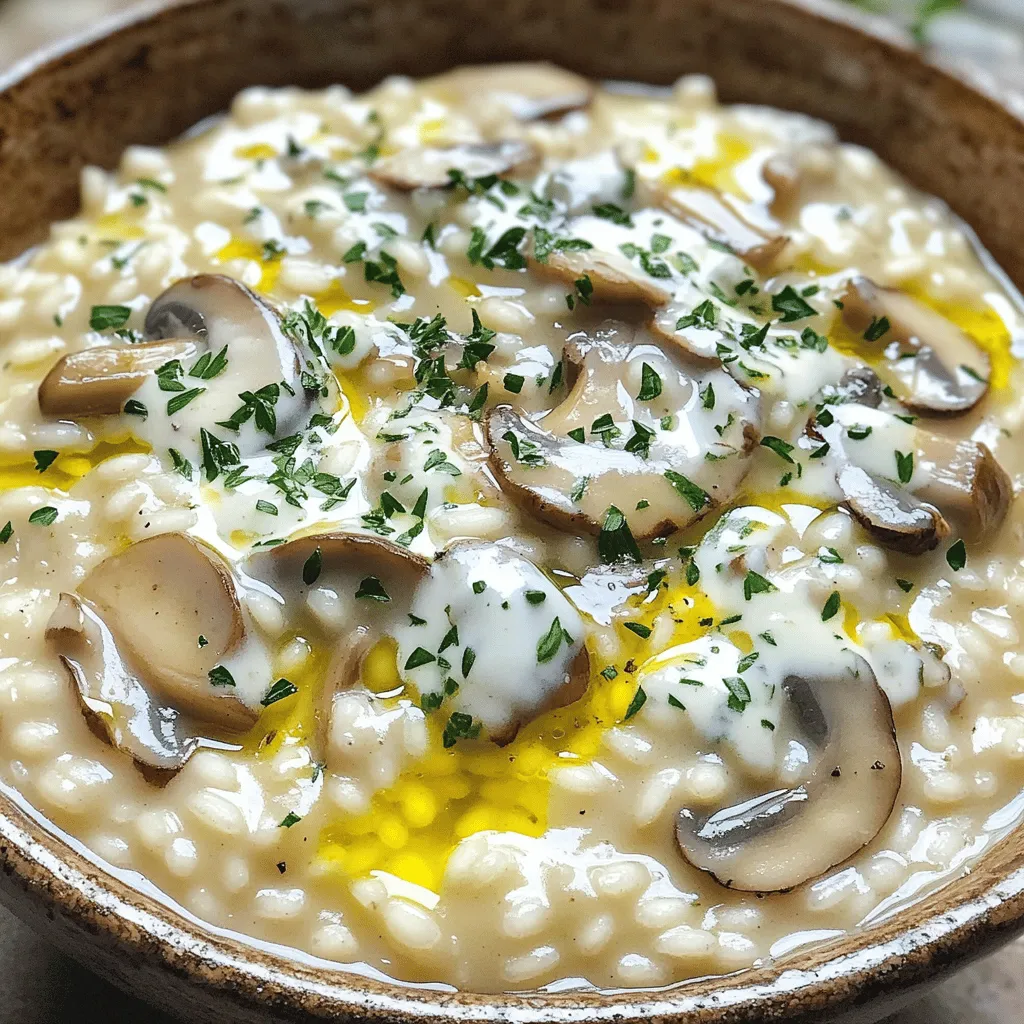
Welcome to the world of creamy mushroom risotto! If you crave a rich and flavorful dish, you’re in the right

If you’re looking for a hearty, tasty meal that’s easy to make, you’re in the right place. Buffalo Chicken Stuffed
