Skip to content
DisclaimerTerms Of UseGDPR PolicyCookie Policy

recipetorch

  • Home
  • Drinks
  • Appetizers
  • Dinner
  • Dessert
  • About
  • Contact
  • Privacy Policy
DisclaimerTerms Of UseGDPR PolicyCookie Policy

Nicole

- 1 cup green or brown lentils - 2 tablespoons extra virgin olive oil - 1 medium onion, finely diced - 2 cloves garlic, minced - 2 medium carrots, diced - 2 stalks celery, diced - 1 red bell pepper, diced - 1 medium zucchini, diced - 1 can (14 oz) diced tomatoes, with their juices - 6 cups vegetable broth, low-sodium preferred - 1 teaspoon ground cumin - 1 teaspoon dried thyme - 1 teaspoon smoked paprika - Sea salt and freshly cracked black pepper to taste - Fresh parsley or cilantro When I make this soup, I love using fresh ingredients. Green or brown lentils work best here. They keep their shape and add great texture. The extra virgin olive oil gives a nice flavor and helps cook the veggies. For vegetables, I use a mix, like onion, garlic, carrots, celery, bell pepper, and zucchini. Each adds its own taste and color. The diced tomatoes are key for a rich base. Don’t forget the vegetable broth! It brings everything together. Spices like cumin, thyme, and smoked paprika add depth. Salt and pepper round it out, so every bite is tasty. If you want to make it pop, add fresh parsley or cilantro on top. This gives a bright finish and looks beautiful in the bowl. For the full recipe, check [Full Recipe]. Healthy lentil veggie soup is easy to make and packed with nutrients. You learned about essential ingredients, preparation, and cooking steps. We discussed tips to enhance flavor and variations for dietary needs. Remember, this soup is versatile and can fit many tastes. Store leftovers properly to enjoy later. Adjust spices and veggies to keep it fresh. I hope you feel inspired to create this healthy dish for yourself and loved ones. Enjoy the warmth and health in every bowl.

Healthy Lentil Veggie Soup Packed with Flavorful Goodness

Are you ready to savor a bowl of Healthy Lentil Veggie Soup that bursts with flavor? This easy and nutritious

- 1/2 cup chia seeds - 2 cups unsweetened almond milk - 1/4 cup maple syrup (or honey) - 1 teaspoon pure vanilla extract - 1 cup fresh blueberries, plus extra for garnish - 1/4 cup sliced almonds, toasted - A pinch of salt When measuring chia seeds, use a standard dry measuring cup. Make sure to pack the seeds lightly, not firmly. For almond milk, a liquid measuring cup works best. For sweeteners, you can adjust the amount based on your taste. If you want it sweeter, add more maple syrup or honey. When adding blueberries, use fresh ones for the best flavor. Frozen blueberries can work too, but they may make the pudding runny. For sliced almonds, toasting them in a dry pan brings out their nutty flavor. This step is key for adding depth to your pudding. You can swap chia seeds with flax seeds if needed. They will give a similar texture but a different flavor. If you want to avoid nuts, try coconut milk instead of almond milk. For sweetness, agave syrup or stevia can be good alternatives. If you don’t have fresh blueberries, consider using strawberries or raspberries. They can add a nice twist to the flavor. You can also replace the sliced almonds with walnuts or pecans for a different crunch. For the full recipe, check out the detailed instructions above! Start by gathering your ingredients. In a large bowl, mix the chia seeds, almond milk, maple syrup, vanilla extract, and salt. Whisk everything together until the chia seeds blend well into the liquid. Make sure there are no clumps. This step is key for a smooth texture. After mixing, cover the bowl tightly with plastic wrap or a lid. This will keep your pudding safe from other smells in the fridge. Place it in the refrigerator for at least four hours or overnight. This time is important. It allows the chia seeds to soak up the almond milk and form a gel-like pudding. Once the pudding has set, take it out of the fridge. Give it a gentle stir to mix it up. If it feels too thick, add a little more almond milk until it reaches your desired texture. To serve, scoop the pudding into bowls or jars. Top with fresh blueberries and sprinkle on toasted sliced almonds for crunch. For a sweet touch, drizzle a bit of maple syrup on top. This adds flavor and makes it look pretty! Check the Full Recipe for more details. To get the best texture, use fresh chia seeds. Old seeds may not swell properly. When you mix the chia seeds with almond milk, whisk well. This helps break up clumps. After refrigerating, check the pudding. If it’s too thick, add a bit more almond milk. Stir gently to mix. Aim for a creamy, gel-like texture that feels smooth in your mouth. To boost the flavor, consider adding a pinch of cinnamon. This spice pairs well with blueberries. You can also try a splash of almond extract for a richer almond taste. For more sweetness, drizzle extra maple syrup on top. Fresh lemon zest adds a nice zing. Feel free to experiment and find what you love! Store any leftovers in an airtight container in the fridge. This keeps it fresh for up to five days. If the pudding thickens too much, just stir in some almond milk. Always remember to give it a quick taste before serving. You want it to be as delicious as the first day! Check out the Full Recipe for more tips on making this dish. {{image_4}} You can change the fruit in this recipe to suit your taste. Besides blueberries, try strawberries, raspberries, or even mango. Each fruit adds a different flavor and color. For a tropical twist, add pineapple or banana. Just chop the fruit into small pieces before adding it to your chia pudding. This way, you can enjoy the varied textures and tastes with each bite. Maple syrup is a great choice for this pudding, but other sweeteners work too. Honey adds a nice floral note. Agave syrup is another option for a plant-based sweetener. If you prefer no added sugars, try using mashed dates or ripe bananas. Adjust the amount based on how sweet you want your pudding. Remember, sweeter fruits can also cut down on the need for extra sweeteners. You can boost the nutrition of your chia pudding with easy add-ins. Consider mixing in some nut butter for added protein and creaminess. A scoop of protein powder can make it even more filling. You can also add flax seeds or hemp seeds for extra fiber. For a fun twist, stir in some cocoa powder for a chocolate flavor. These add-ins not only enhance nutrition but also create new flavor profiles. Explore the full recipe to see how to make this delicious treat! To keep your Blueberry Almond Chia Pudding fresh, store it in an airtight container. Glass jars work well since they seal tightly. Before sealing, ensure the pudding has cooled to room temperature. This step prevents condensation, which can make the pudding watery. Always add a layer of fresh blueberries on top before sealing for extra flavor. When stored properly, your chia pudding lasts up to five days in the fridge. However, for the best taste and texture, enjoy it within three days. Over time, the chia seeds may absorb more liquid, making the pudding thicker. If this happens, just stir in a bit of almond milk to loosen it back up. Chia pudding is best enjoyed cold, but you can warm it if you prefer. Place the desired portion in a bowl, then microwave it for about 15 to 30 seconds. Stir well to ensure even heating. Avoid overheating, as this can change the texture. If you want, add a splash of almond milk after reheating to bring back the creamy consistency. For the complete recipe, check out the Full Recipe section. Chia pudding is a simple dish made with chia seeds. These tiny seeds absorb liquid and form a gel-like texture. You mix chia seeds with milk and sweeteners, then let it sit. The result is a creamy and nutritious pudding. It can be flavored with fruits, nuts, or spices. This dish is popular for breakfast or as a healthy snack. Yes, you can use different types of milk for chia pudding. Almond milk is a great choice, but you can also use coconut, oat, or soy milk. Each type of milk gives a unique flavor and texture. If you want it creamier, try using full-fat coconut milk. Just make sure to adjust the liquid amount based on what you use. Yes, Blueberry Almond Chia Pudding is very healthy. Chia seeds are high in fiber, protein, and omega-3 fatty acids. Blueberries add antioxidants, which help fight free radicals in the body. Almonds give healthy fats and additional protein. This pudding is low in sugar if you use less maple syrup. It makes for a balanced meal or snack. For the full recipe, you can check the recipe section above. In this post, we explored chia pudding's key ingredients, step-by-step instructions, and useful tips. We also looked into flavor variations and storage practices. Chia pudding is simple to make and offers many options. You can easily customize it to fit your taste or diet. Enjoy experimenting with different fruits and sweeteners. This delicious treat supports your health and delightfully satisfies your cravings. Keep these tips in mind as you create your own chia pudding masterpiece.

Blueberry Almond Chia Pudding Creamy and Nutritious

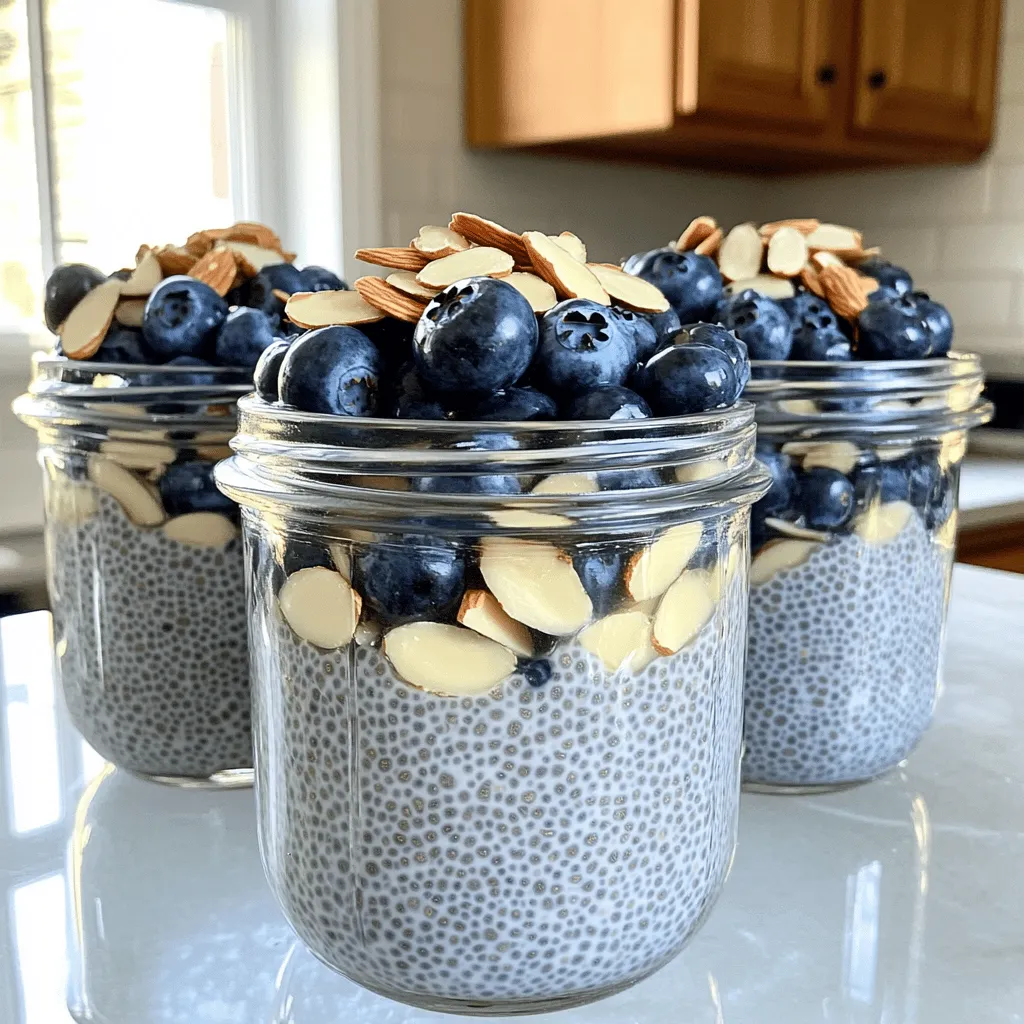
Looking for a delicious and healthy breakfast or snack? Blueberry Almond Chia Pudding checks all the boxes! It’s creamy, nutritious,

- 4 medium sweet potatoes - 1 can black beans, drained and rinsed - 1 cup corn (fresh, frozen, or canned) - 1 red bell pepper, diced - 1 small red onion, finely chopped - 2 cloves garlic, minced - 1 teaspoon ground cumin - 1 teaspoon smoked paprika - Salt and pepper, to taste - 1 avocado, diced (for topping) - Fresh cilantro, chopped (for garnish) - Lime wedges (for serving) These ingredients make a great base for vegan stuffed sweet potatoes. Sweet potatoes are not just tasty, but also packed with vitamins. They add a natural sweetness that pairs well with savory fillings. Black beans provide protein and fiber, making this dish hearty. Corn adds a nice crunch and sweetness too. You might wonder why I chose these specific spices. Ground cumin gives a warm flavor, while smoked paprika adds depth. These spices work well together and bring life to the dish. - Calories per serving: About 300 calories - Macronutrients breakdown: - Carbs: 60g - Fats: 9g - Proteins: 10g This dish offers a balanced mix of nutrients. The sweet potatoes contribute healthy carbs. The black beans add protein and fiber, making it filling. If you want to switch things up, you can use chickpeas instead of black beans. They add a different texture but still pack a punch. For spices, try chili powder or oregano for a new twist. Experimenting with these options can make your dish unique. Each choice keeps the dish healthy while adding different flavors. For the full recipe, don’t forget to check out the cooking steps! - Preheat your oven to 400°F (200°C). - Wash the sweet potatoes under cold water. Poke holes in each one with a fork. This helps steam escape while baking. - Place the sweet potatoes on a baking sheet. Bake them for 45 to 60 minutes. They are ready when a fork goes in easily. - Heat a large skillet over medium heat. Add a splash of water and toss in the red onion. Sauté it for 3 to 4 minutes until it turns soft. - Next, add the minced garlic and diced bell pepper. Sprinkle in the ground cumin and smoked paprika. Season with salt and pepper. Cook this mix for about 5 minutes. The bell pepper should be tender. - Now stir in the black beans and corn. Cook for another 5 minutes. Make sure everything is warm and mixed well. - After baking, take the sweet potatoes out of the oven. Let them cool for a few minutes. - When cool, slice each potato lengthwise. Gently press the ends to open them up. This creates a pocket for the filling. - Spoon the black bean and corn mix into each sweet potato. Fill them all the way to the top. - Finally, add diced avocado on top and sprinkle with fresh cilantro. Serve with lime wedges for a zesty touch. For a detailed guide, check the Full Recipe. To ensure your sweet potatoes come out just right, test for doneness. Use a fork to poke each potato. If the fork slides in easily, they are done. If not, give them more time. Avoid common baking mistakes by choosing potatoes of similar size. This helps them bake evenly. Remember to poke holes in each potato before baking. This step allows steam to escape, preventing messes in your oven. When it comes to side dishes, pair your stuffed sweet potatoes with a fresh salad. A crunchy slaw or grilled veggies also work well. This adds color and texture to your meal. For plating, use a wide, shallow bowl. Place the stuffed sweet potato in the center. Add a sprinkle of fresh cilantro on top. Arrange lime wedges around the potato for a pop of color. Yes, you can make these vegan stuffed sweet potatoes in advance! Prepare the sweet potatoes and filling separately. Store them in the fridge for up to three days. For reheating, warm the sweet potatoes in the oven at 350°F (175°C) for about 15 minutes. If using a microwave, heat on high for 2-3 minutes. This keeps them soft and delicious, just like fresh. {{image_4}} You can change the filling to match your mood or the season. For a Mexican twist, add salsa, avocado, or jalapeños. These bright flavors elevate the dish. You can also try a Mediterranean style. Use sun-dried tomatoes, olives, and fresh herbs like basil or oregano. This mix brings warmth and character to every bite. If you want a low-carb dish, swap sweet potatoes for cauliflower. Cauliflower has a soft texture and absorbs flavors well. For fillings, focus on high-protein options like tofu or tempeh mixed with veggies. You can use spices to enhance the taste and keep it exciting. In fall, add cranberries or pecans for a sweet crunch. These ingredients pair well with the natural sweetness of the sweet potatoes. In summer, use fresh herbs like parsley or cilantro for a bright, refreshing touch. You can also include grilled zucchini or bell peppers to keep it light and flavorful. Check out the Full Recipe for cooking steps and more ideas! After enjoying your vegan stuffed sweet potatoes, store any leftovers in the fridge. Use an airtight container to keep them fresh. This helps avoid any strong odors from spreading. If you do not have a container, wrap the sweet potatoes in plastic wrap. Make sure to seal it tightly. This will keep them safe from drying out. You can freeze stuffed sweet potatoes for later. Allow them to cool completely before wrapping them. Use freezer-safe bags or containers for best results. Squeeze out as much air as possible. When you want to eat them, thaw them overnight in the fridge. Reheat in the oven at 350°F (175°C) for about 20 minutes. This will warm them up nicely. In the refrigerator, your stuffed sweet potatoes can last for about 3-5 days. Look for signs of spoilage, like a sour smell or a slimy texture. If you see any mold, it's time to toss them. Trust your senses; if something seems off, don't eat it. Enjoy your delicious meal safely! To make Vegan Stuffed Sweet Potatoes, start by baking the sweet potatoes. Preheat your oven to 400°F (200°C) and poke holes in the potatoes. Bake for 45-60 minutes until soft. While they bake, sauté red onion and garlic in a skillet. Add diced bell pepper, ground cumin, and smoked paprika. Mix in black beans and corn until heated. After the sweet potatoes cool, cut them open and fill with the bean mixture. Top with avocado and cilantro. For the full recipe, check the section above. Yes, you can make these ahead of time. Bake and prepare the filling a day before. Store the sweet potatoes and filling separately in the fridge. When ready to eat, just reheat them in the oven or microwave. This saves time and makes meal prep easy. Great toppings for stuffed sweet potatoes include: - Diced avocado - Fresh cilantro - Lime wedges - Sliced jalapeños - Vegan sour cream - Crushed nuts or seeds Feel free to mix and match toppings to suit your taste! Yes, Vegan Stuffed Sweet Potatoes are healthy! Sweet potatoes are high in fiber and vitamins. Black beans provide protein and iron. Corn adds vitamins and minerals. This dish is low in fat and rich in nutrients, making it a great meal choice. Absolutely! You can customize the filling with various vegetables. Some ideas include: - Zucchini - Spinach - Mushrooms - Carrots - Kale Feel free to experiment with what you have on hand or your favorite flavors! Vegan stuffed sweet potatoes are tasty, healthy, and fun to make. We covered ingredients, from sweet potatoes to toppings, along with preparation steps. You learned tips for baking and meal prepping. We explored variations and smart storage methods. These sweet potatoes are more than just a meal; they’re a chance to be creative. Experiment with flavors and ingredients. Enjoy this easy, nutritious dish that can fit any diet or occasion.

Vegan Stuffed Sweet Potatoes Flavorful and Healthy Dish

Looking for a tasty and healthy meal? Vegan Stuffed Sweet Potatoes might be just what you need! These sweet potatoes

- 2 cups vegetable broth - 1 can (14 oz) crushed tomatoes - 1 cup heavy cream - 1 package (9 oz) cheese tortellini - 1 medium onion, diced - 3 cloves garlic, minced - 2 teaspoons Italian seasoning - 1 tablespoon olive oil - Salt and pepper to taste - Fresh basil leaves, for garnish - Grated Parmesan cheese, for serving (optional) For this creamy tomato tortellini soup, I focus on fresh, simple ingredients. The vegetable broth serves as a rich base. It adds depth and warmth. The crushed tomatoes bring a lovely sweetness and vibrant color. They create a comforting flavor that pairs well with pasta. Next, we have heavy cream, which makes the soup luxuriously creamy. It balances the acidity from the tomatoes. The cheese tortellini adds a delightful bite. You get cheesy goodness in every spoonful. I love using onion and garlic for their aromatic qualities. They enhance the soup's overall flavor. Italian seasoning brings a touch of classic Italian flair. It blends perfectly with the other ingredients. Using olive oil to sauté the onions and garlic adds richness. I season the soup with salt and pepper to enhance the natural flavors. Finally, for the finishing touch, fresh basil leaves and grated Parmesan cheese make each bowl feel special. These garnishes give a fresh taste and a beautiful look. This combination of ingredients creates a warm, inviting bowl of soup. It’s perfect for chilly days or when you need comfort food. {{ingredient_image_2}} - Sauté onion and garlic: Start by warming olive oil in a large pot over medium heat. Once it is hot, add the diced onion. Sauté for about five minutes until it smells good and looks translucent. Then, mix in the minced garlic and sauté for another minute. Keep stirring to avoid burning. - Combine broth and tomatoes: Next, pour in the crushed tomatoes and vegetable broth. Sprinkle in the Italian seasoning. Stir the mix until it is well combined. Bring this mixture to a gentle simmer. - Introduce tortellini: Once the soup simmers, add the cheese tortellini. Cook it according to the package instructions. This usually takes about five to seven minutes. You want the tortellini to be tender and cooked through. - Simmer the soup: Allow the soup to simmer gently. This helps the flavors blend well. Keep an eye on it so it doesn’t boil rapidly. - Stir in heavy cream: After the tortellini is cooked, lower the heat. Stir in the heavy cream slowly. Let the soup heat through for about three to four minutes. Stir occasionally to mix the cream evenly. - Adjust seasoning: Finally, taste your soup. Add salt and pepper to your liking. Adjust the seasoning until it tastes just right. To make your soup taste great, focus on sautéing. Start by heating olive oil in your pot. Add diced onion and cook until soft. This brings out a sweet flavor in the onion. Next, add minced garlic for a minute. Stir it well to avoid burning. Garlic gives your soup a warm aroma. For creaminess, add heavy cream last. Lower your heat before stirring it in. This helps keep the cream from curdling. Let it warm up for a few minutes. Stir gently to mix it in well. This creates a rich and smooth texture that you will love. Garnishes elevate the look of your soup. Fresh basil leaves add color and a hint of freshness. Simply place a few on top before serving. For a touch of elegance, sprinkle grated Parmesan cheese. It adds a nice salty flavor that balances the soup. To enhance presentation, drizzle a bit of olive oil on top. This gives a glossy finish. Serve your soup in generous bowls for a warm, inviting feel. These small touches make your dish more appealing and delicious. Pro Tips Use Fresh Ingredients: Whenever possible, opt for fresh garlic and basil to enhance the flavor of your soup significantly. Fresh ingredients can elevate the dish from good to great! Adjust Creaminess: For a lighter version, substitute half of the heavy cream with low-fat milk or use a dairy-free alternative. This will still provide a creamy texture but with fewer calories. Store Tortellini Separately: If you're planning to have leftovers, store the tortellini separately from the soup. This prevents them from becoming mushy when reheating. Experiment with Spices: Feel free to add a pinch of red pepper flakes for a spicy kick or a dash of smoked paprika for a smoky flavor that complements the tomato base beautifully. {{image_4}} You can change the broth in the soup. Vegetable broth gives a nice flavor. Chicken broth adds a bit more depth. If you prefer a lighter taste, try using water. For a dairy-free option, use coconut cream instead of heavy cream. It adds a nice sweetness. Almond milk or cashew cream also works well. These substitutes keep the soup creamy without dairy. Adding vegetables can boost the soup's nutrition. You could include spinach, kale, or bell peppers. Just chop them small and add them when you mix in the tortellini. Try different seasonings to change the taste. A pinch of red pepper flakes adds heat. You might use fresh herbs like thyme or oregano for a fresh kick. These small changes can make your soup unique each time! To keep your creamy tomato tortellini soup fresh, follow these simple steps: - Refrigeration guidelines: Store the soup in an airtight container. It will last in the fridge for about 3 to 4 days. Make sure it cools down before sealing. This helps keep the soup from getting soggy. - Freezing tips for soup: If you want to freeze the soup, use a freezer-safe container. Leave some space at the top, as the soup expands when frozen. It can stay good for up to 3 months. When you’re ready to eat it, just thaw it in the fridge overnight. When it’s time to enjoy your soup again, reheating properly is key: - Best practices for maintaining texture: Heat the soup gently over low heat. This keeps the cream from curdling and helps the tortellini stay tender. Stir often to make sure it heats evenly. - Suggested reheating methods: You can reheat it on the stovetop or in the microwave. If using the microwave, heat it in short bursts. Stir in between to prevent hot spots and ensure it heats through. Following these tips helps you enjoy your comforting bowl of creamy tomato tortellini soup, even days later! Yes, you can use frozen tortellini. Just add it straight to the soup without thawing. It will cook in the broth and get soft. Follow the package instructions to know how long to cook it. This soup stays good in the fridge for about three to four days. Store it in an airtight container. Make sure to let it cool before placing it in the fridge. No, this recipe is not gluten-free because the tortellini contains wheat. You can find gluten-free tortellini in stores. Just swap it in for a gluten-free option. Yes, you can make this soup in advance. It tastes great after a day in the fridge. Just reheat gently on the stove before serving. Add a little cream if needed for freshness. This blog post shared a simple soup recipe featuring tortellini. We covered the key ingredients, step-by-step cooking methods, and tips to enhance flavor. I also offered helpful storage tips and answered common questions about the recipe. In closing, this soup is easy to make and full of taste. Enjoy customizing it to fit your needs, whether you add extra veggies or try a different broth. Your kitchen will smell amazing, and you’ll have a warm meal ready to share.

Creamy Tomato Tortellini Soup Flavorful Comfort Bowl

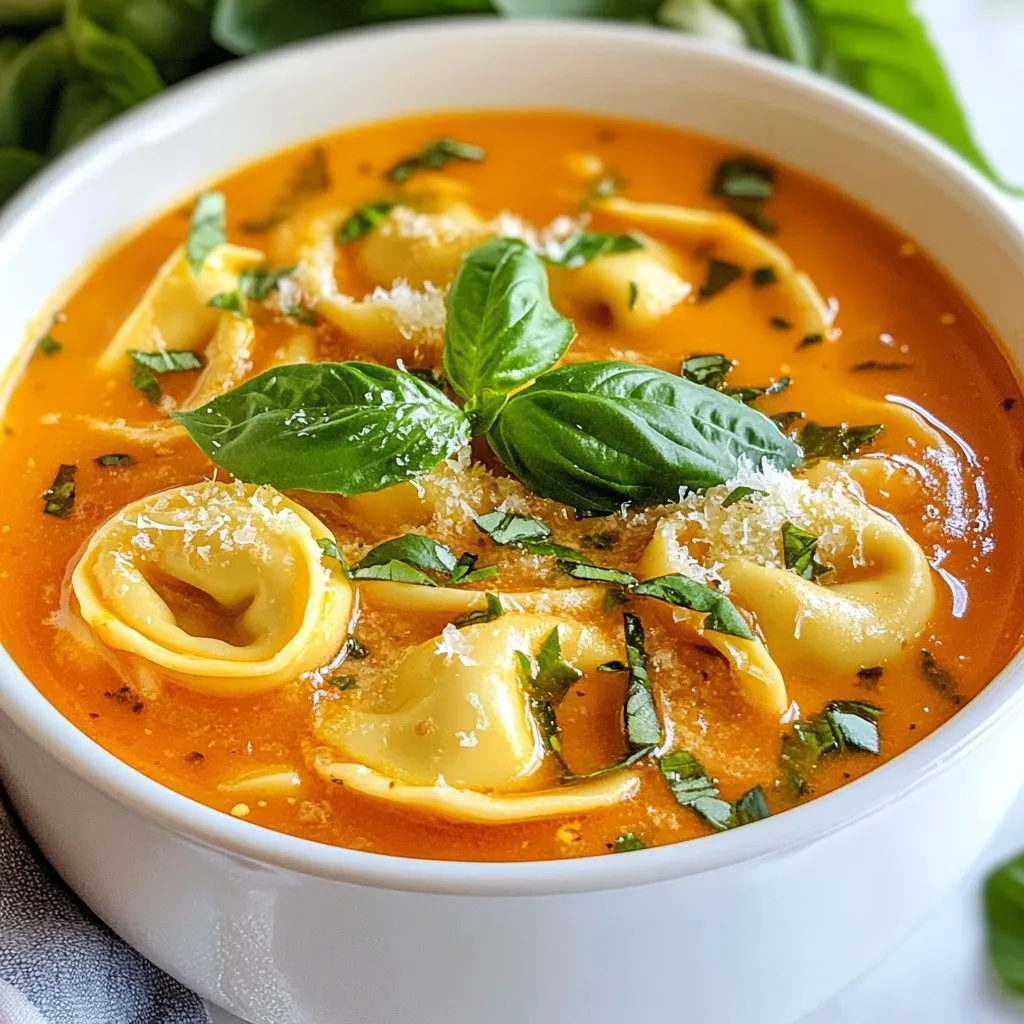
Welcome to your new favorite cozy dish: Creamy Tomato Tortellini Soup! This soup is a warm hug in a bowl.

- Hard-boiled eggs - Ripe avocado - Greek yogurt or mayonnaise - Dijon mustard - Fresh lemon juice - Fresh chives - Salt and black pepper - Optional smoked paprika - Optional fresh lettuce leaves To make a great avocado egg salad, you need simple ingredients. First, hard-boiled eggs provide protein and creaminess. Next, a ripe avocado adds healthy fats and a smooth texture. You can use Greek yogurt or mayonnaise for extra creaminess. Dijon mustard gives a nice kick, while fresh lemon juice brightens the flavors. Chives add a mild onion taste and a pop of color. Don’t forget salt and black pepper to enhance all the flavors. If you want a smoky touch, sprinkle some smoked paprika. Fresh lettuce leaves are optional but perfect for crunch. This avocado egg salad is not only tasty but also easy to prepare. You can enjoy it on its own, on bread, or nestled in lettuce. Check out the Full Recipe for detailed steps to make this dish come alive! Start by chopping the hard-boiled eggs into small pieces. Use a sharp knife for clean cuts. Transfer the chopped eggs to a medium mixing bowl. This will make it easy to mix later. Next, grab a ripe avocado. Cut it open and scoop the flesh into a bowl. Use a fork to mash it until smooth and creamy. Then, add Greek yogurt or mayonnaise, Dijon mustard, fresh lemon juice, and seasonings. Mix these well until you have a creamy, flavorful base. Now, gently fold in the chopped chives and eggs. Use a spatula or a large spoon for this. Be careful not to break the egg pieces too much. Taste the mixture and adjust the flavors. You can add more salt, pepper, or lemon juice as you like. For the full recipe, refer to the earlier section. Enjoy your delicious avocado egg salad! To avoid a mushy salad, don't over-mash the avocado. Leave some small chunks for texture. Mix gently after adding the eggs. This keeps the pieces intact and adds to the overall feel. Use a spatula for folding in the ingredients. A gentle touch helps maintain the right consistency. You can try different seasonings to boost the taste. For a zesty twist, add a pinch of cayenne pepper. To brighten the salad, consider fresh herbs like dill or parsley. Balancing flavors is key. If the salad feels too rich, add a bit more lemon juice. This will help to lighten it up nicely. For a pretty presentation, serve the salad in a colorful bowl. Top it with a sprinkle of smoked paprika for flair. You can also use fresh lettuce leaves as a base. This adds a nice crunch. Whole-grain bread is perfect for a sandwich option. Each bite becomes a delicious treat! Check out the Full Recipe for more ideas. {{image_4}} You can get creative with this avocado egg salad. Here are some fun ideas: - Diced tomatoes: They add juiciness and color. - Bell peppers: Chopped bell peppers bring crunch and sweetness. - Shredded chicken: This adds protein and makes it heartier. - Canned tuna: A quick way to add more flavor and protein. If you have special diets, this salad is flexible. Here’s how to adapt it: - Gluten-free: All ingredients are naturally gluten-free. - Vegan alternatives: Use silken tofu instead of yogurt or mayo. Want to travel the world with flavors? Try these twists: - Mediterranean-inspired: Add feta cheese and olives for a savory kick. - Spicy versions: Mix in diced jalapeños or a splash of sriracha for heat. These variations make the avocado egg salad fun and unique! Don't forget to check the Full Recipe for the base ingredients! To keep your avocado egg salad fresh, store it in an airtight container. This helps prevent air from making it brown. If you have leftovers, cover the salad tightly. Use a glass or plastic container with a good seal. Avoid using a bowl without a lid, as it can dry out. Your avocado egg salad lasts about 3 days in the fridge. Always check for signs of spoilage. If it smells sour or changes color, it’s time to toss it. Look for any separation in the mix. That’s a sign it’s no longer good. You should not reheat avocado egg salad. The avocado will become mushy and unappetizing. Instead, if the salad feels dry, add a little lemon juice. This will refresh the flavors and give it a nice zing. Enjoy it cold, either on its own or with fresh lettuce. For the full recipe, check out the detailed steps above. If you want a creamy base but lack Greek yogurt, you have options. Sour cream is a great choice. It adds a rich texture and tangy flavor. Silken tofu is another option. It blends well and keeps the dish healthy. Both substitutes work well in this salad. Yes, you can prepare this salad ahead of time. To keep it fresh, store it in an airtight container. Use lemon juice to prevent browning. I recommend eating it within two days for the best taste. If you want to meal prep, pack it with fresh lettuce or bread for quick lunches. Yes, this recipe is low in carbs. Each serving has about 4 grams of carbs. The main ingredients are eggs and avocado, both of which are low-carb. This makes it a smart choice for anyone watching their carb intake. It also provides healthy fats, making it a nutritious meal option. In this article, we explored how to create a tasty avocado egg salad. We discussed the ingredients needed, such as hard-boiled eggs and ripe avocados. You learned step-by-step how to prepare and mix everything, plus tips to perfect the texture and flavors. Variations and storage tips help ensure your salad stays fresh. This dish is easy to make and lets you be creative with flavors. Enjoy experimenting with different ingredients for your best salad yet!

Avocado Egg Salad Tasty and Healthy Meal Option

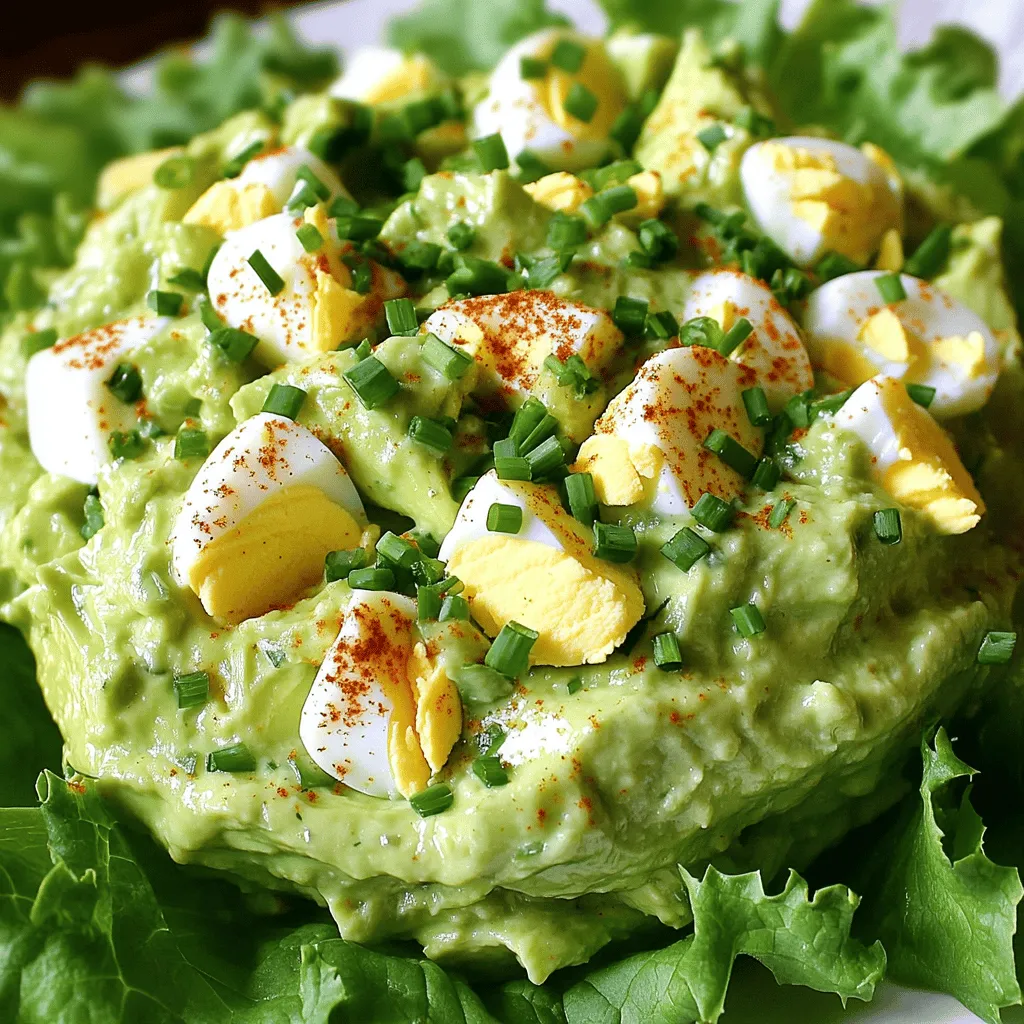
Looking for a tasty and healthy meal option? This Avocado Egg Salad is packed with flavor and nutrition! With creamy

Spinach mushroom quesadillas are easy to make and taste amazing. They mix fresh veggies with gooey cheese. You can make them in about 25 minutes. To make the best spinach mushroom quesadillas, gather these ingredients: - 2 cups fresh spinach, chopped - 1 cup mushrooms, sliced (button or cremini) - 1 cup shredded Monterey Jack cheese - 1 cup shredded mozzarella cheese - 4 large tortillas (flour or corn) - 1 tablespoon olive oil - 1 small onion, finely chopped - 2 cloves garlic, minced - Salt and pepper to taste For a little extra kick, you can add these optional ingredients: - ½ teaspoon red pepper flakes - Fresh cilantro, chopped, for garnish These ingredients will not only enhance flavor but also add a fresh touch. Enjoy customizing your quesadillas! For the full recipe, check out the instructions later on. First, heat one tablespoon of olive oil in a large skillet over medium heat. Add one small onion, chopped finely, and two cloves of minced garlic. Cook these for about 3-4 minutes until the onion looks clear and smells good. This step builds flavor. Next, add one cup of sliced mushrooms to the skillet. I prefer button or cremini mushrooms. Cook them for about 5 minutes. They will soften and let out moisture, making the filling juicy. Now, add two cups of chopped fresh spinach. Stir it in and cook for 2-3 minutes. You want the spinach to wilt down nicely. Season with salt and pepper to taste. If you like a bit of heat, add ½ teaspoon of red pepper flakes. Once done, take the skillet off the heat and set the filling aside. Grab four large tortillas, either flour or corn, for this recipe. On one half of a tortilla, sprinkle a generous amount of Monterey Jack cheese. Add the same amount of mozzarella cheese on top. Then, spoon some of the spinach and mushroom filling over the cheese. Top it with a little more cheese to keep everything inside. Carefully fold the tortilla in half, making a half-moon shape. This will hold all the tasty filling. Repeat this process for the rest of your tortillas and filling. Now, use a separate skillet or a griddle set over medium heat. Place one folded quesadilla in the skillet. Cook it for 2-3 minutes on each side. You're looking for a golden brown color. The cheese should melt and become gooey inside. Once all quesadillas are cooked, take them out and slice each one into wedges. Serve them warm for the best taste. For a lovely touch, arrange the wedges on a rustic wooden board. Garnish with fresh cilantro and serve with salsa or guacamole on the side. Enjoy your delicious meal! Cook your quesadillas over medium heat. This helps the cheese melt well. If the heat is too high, the outside will burn before the inside cooks. Aim for 2-3 minutes per side. Check for a golden brown color. To achieve extra crunch, add a bit of oil. Brush or spray the skillet before cooking. You can also use butter for a richer flavor. Avoid overcrowding the pan. Cook one or two at a time for best results. Monterey Jack adds a creamy touch, while mozzarella stretches beautifully. You can mix both for a great blend. For a sharper taste, use cheddar or gouda. If you like a kick, try pepper jack cheese. These choices will enhance your quesadilla experience. For the full recipe, check the earlier section. {{image_4}} You can easily make spinach mushroom quesadillas vegetarian by adding more veggies. Try bell peppers, zucchini, or corn. These add color and flavor. You can also swap the cheese for a vegan option. Look for plant-based cheese at stores. It melts well and tastes great. If you need a gluten-free option, use gluten-free tortillas. Many brands make tasty ones that hold up well when cooked. Just check the label to ensure they are safe for your diet. You can enjoy the same flavors without worrying about gluten. To spice things up, add jalapeños or a dash of hot sauce to the filling. For a smokier taste, try smoked paprika or chipotle powder. You can even mix in fresh herbs like basil or parsley for a fresh twist. These small changes can take your quesadilla to the next level and make it even more exciting. For the full recipe, check out the details provided earlier. To store leftover quesadillas, let them cool first. Place them in an airtight container. You can also wrap them tightly in foil or plastic wrap. Keep them in the fridge for up to three days. If you want to enjoy them later, proper storage is key. When you are ready to eat your quesadillas, you can reheat them easily. Use a skillet over medium heat for the best results. Heat each quesadilla for about three to four minutes on each side. This helps them get crispy again. You can also use a microwave. Just place a quesadilla on a plate and cover it. Heat for about one minute. Check if it's warm enough. If not, heat in 20-second bursts until hot. If you want to keep quesadillas longer, freezing is a great option. First, let them cool completely. Then, wrap each quesadilla in plastic wrap. Place the wrapped quesadillas in a freezer-safe bag. Squeeze out as much air as you can. They can stay fresh for up to three months. When you want to eat them, thaw in the fridge overnight. You can then reheat them as mentioned before. This method helps keep the taste and texture intact. For a complete guide on making these delicious quesadillas, check the Full Recipe. Yes, you can! Quesadillas are very flexible. You can add bell peppers, zucchini, or corn. These veggies add color and flavor. Just chop them up and sauté them like the mushrooms. Mix and match to find your favorite combo! You can serve many tasty sides. Salsa is a classic choice. Guacamole also pairs well. Add a simple salad for freshness. Sour cream or Greek yogurt can add creaminess. Each of these options enhances the quesadilla experience. Check for a golden brown color on each side. The cheese inside should be melted. You can also press down gently. If it feels soft and gooey, it’s ready! Serve warm for the best taste. For the full recipe, check out the details above! We covered how to make tasty spinach and mushroom quesadillas from start to finish. You learned about the key ingredients, cooking steps, and ways to add extra flavor. Plus, we discussed storage tips and answered common questions. Make these quesadillas your own by trying different veggies or spices. Enjoying your creation will make the effort worth it. Now, go ahead and start cooking! Your new favorite dish awaits.

Spinach Mushroom Quesadillas Delightful and Easy Meal

Looking for a quick, tasty meal that’s packed with nutrients? Spinach mushroom quesadillas are your answer! In just a few

- 1 can (15 oz) chickpeas, thoroughly drained and rinsed - 2 tablespoons extra virgin olive oil - 1 teaspoon smoked paprika - Additional vegetables (tomatoes, cucumber, avocado, spinach) - 1/4 cup tahini (preferably raw) - 2 tablespoons fresh lemon juice - 1 tablespoon pure maple syrup - Water for desired dressing consistency - Sesame seeds for garnish - Fresh herbs or other toppings The main ingredients in this Crispy Chickpea Buddha Bowl shine with flavor and nutrition. First, the chickpeas form the base of our dish. They provide protein and fiber, making this meal filling and healthy. I love using canned chickpeas because they save time. Just rinse and drain them well before cooking. Next, I drizzle the chickpeas with extra virgin olive oil. This oil adds richness and helps the spices stick. Smoked paprika gives a warm, smoky flavor. It transforms simple chickpeas into a crunchy treat. I also add garlic powder and ground cumin for extra flavor. For the colorful veggies, I suggest using tomatoes, cucumber, avocado, and spinach. These add freshness and crunch. You can mix and match your favorites too. Now, let’s talk about the dressing. A creamy tahini sauce ties all the flavors together. Tahini is made from ground sesame seeds and has a nutty taste. The lemon juice brightens the dressing, while maple syrup adds a touch of sweetness. You can adjust the water to get the perfect creamy texture. Finally, sprinkle sesame seeds on top for an added crunch. You can also use fresh herbs or other toppings to make it your own. This Crispy Chickpea Buddha Bowl offers a delightful mix of flavors and textures. For the full recipe, check out the details above! - Preheat your oven to 425°F (220°C). - In a bowl, mix the chickpeas with olive oil and spices. Use smoked paprika, garlic powder, ground cumin, sea salt, and black pepper. Toss well until every chickpea is coated. - Spread the chickpeas on a baking sheet. Make sure they are in a single layer. - Bake for 25-30 minutes. Shake the pan halfway through for even cooking. You want them golden and crispy. - In a small bowl, whisk together tahini, fresh lemon juice, maple syrup, and water. - Add water slowly until the dressing gets creamy. - Grab two serving bowls. Start with 1 cup of cooked quinoa in each bowl. - Layer fresh spinach or mixed greens on top. Add halved cherry tomatoes, diced cucumber, and avocado slices. - Once the chickpeas are crispy, add them to the bowls. - Drizzle with your tahini dressing. Finish with sesame seeds for extra crunch. Enjoy this colorful, tasty dish that’s full of flavor! For a detailed recipe, check the Full Recipe. To make great crispy chickpeas, start by drying them well. Remove moisture with a towel after rinsing. This step helps them crisp up in the oven. Next, spread them out on a baking sheet. Bake them at 425°F (220°C) for 25 to 30 minutes. Remember to shake the pan halfway through. This helps them cook evenly and get crunchy. You can change up the dressing for new flavors. Adding garlic or fresh herbs will boost the taste. Want a thinner dressing? Just add more water until it’s the right consistency. For a thicker dressing, use less water. Experimenting will help you find your favorite mix. Prep your ingredients ahead of time for quick assembly. You can cook quinoa and chop veggies in advance. Store them in the fridge in separate containers. This makes meal prep easy and fast. If you have leftovers, store them in airtight containers. They will stay fresh for a few days. {{image_4}} You can add grilled chicken or tofu to your Buddha bowl. Both options boost protein and flavor. Grilled chicken brings a savory taste, while tofu adds a nice texture. If you want to switch the chickpeas, try black beans or kidney beans. These beans have great taste and pair well with the other ingredients. To complement your bowl, consider adding a side of roasted sweet potatoes or a fresh garden salad. These sides enhance the meal and add texture. You can also customize your bowl with seasonal produce. In spring, add asparagus; in fall, try roasted squash. Use what is fresh to keep it exciting! If you need gluten-free options, use quinoa and a gluten-free dressing. You can make the tahini dressing with lemon juice and maple syrup for a tasty twist. If you want vegan options, this recipe is already plant-based. Just ensure any added toppings, like yogurt or cheese, are also vegan. To keep your Crispy Chickpea Buddha Bowl fresh, store it in an airtight container. Place the bowl in the fridge within two hours of serving. This dish lasts about three days in the fridge. However, the chickpeas may lose their crispiness over time. When you reheat, use the oven for the best results. Preheat your oven to 350°F (175°C). Spread the chickpeas on a baking sheet and heat for about 10 minutes. You can also use a microwave but note that the chickpeas may not stay crispy. For a tasty touch, add fresh spinach and avocado just before serving. You can freeze the chickpeas and quinoa separately. Place them in freezer-safe bags or containers. They last up to three months in the freezer. When you’re ready to eat, thaw the chickpeas and quinoa in the fridge overnight. Reheat them as mentioned above, then assemble your bowl fresh. This way, you enjoy that great taste and texture! For the full recipe, check the earlier section. If you don’t have tahini, use almond butter or plain yogurt. Both options work well in this recipe. Almond butter adds a nutty flavor, while yogurt gives a creamy texture. Experiment and find what suits your taste! Yes! This recipe is vegan as it stands. For those who prefer non-vegan options, you could add grilled chicken or feta cheese. These can enhance flavor while keeping the meal hearty. To add heat, try red pepper flakes or cayenne pepper. You can also mix in hot sauce with the tahini dressing. Adjust the amount based on your spice tolerance. A little goes a long way! To keep chickpeas crispy, store them in an open container. Avoid sealing them tightly. When reheating, place them back in the oven for a few minutes. This helps regain their crunch. Enjoy the texture! This blog post showed you how to make a crispy chickpea Buddha bowl. You learned about key ingredients, dressing options, and tips for success. The recipe offers flexibility for proteins and dietary needs. Enjoy the health benefits and great taste! Try different veggies and toppings for your perfect bowl. Meal prep tips will help you save time too. With these steps, you can easily create a delicious, nutritious meal any day.

Crispy Chickpea Buddha Bowl Flavorful and Nutritious Dish

Looking for a dish that’s both tasty and healthy? Look no further! My Crispy Chickpea Buddha Bowl is packed with

- 1 lb large shrimp, peeled and deveined - 4 cloves garlic, finely minced - Juice and zest of 2 fresh lemons - 1/4 cup extra-virgin olive oil - 1 teaspoon smoked paprika - 1/2 teaspoon red pepper flakes (optional) - Sea salt and black pepper, to taste - Fresh parsley, finely chopped Gather all these fresh ingredients before you start cooking. Fresh shrimp gives this dish its best flavor. The garlic adds a nice punch, and lemon brings brightness. Olive oil helps everything blend well. The spices add warmth and a bit of heat if you choose to use the red pepper flakes. Finally, fresh parsley makes a lovely garnish. For the full recipe, check out the detailed instructions. Enjoy! Start by making the marinade. In a large bowl, whisk together the minced garlic, olive oil, lemon juice, and lemon zest. This mix brings a burst of flavor. Next, add smoked paprika, red pepper flakes, and a pinch of sea salt and black pepper. Whisk it all together until it's smooth and fragrant. This marinade will give your shrimp a bright, zesty taste. Now, it's time to add the shrimp. Place the peeled and deveined shrimp in the bowl with the marinade. Toss gently until each shrimp is well coated. For even coating, use your hands or a spatula to mix. Make sure every shrimp gets that lovely marinade. Let the shrimp sit for about 10 minutes to soak up the flavors. Prepare your baking sheet by lining it with parchment paper. This helps with cleanup later. Spread the marinated shrimp in a single layer on the sheet. Avoid crowding them; this ensures they roast evenly. Preheat your oven to 400°F (200°C). Roast the shrimp for about 8-10 minutes. Watch closely; they are done when they turn pink and opaque. Overcooking can make them tough. Once cooked, remove the shrimp from the oven. Enjoy them hot with a sprinkle of fresh parsley on top. For the complete recipe, check out the [Full Recipe]. To choose fresh shrimp, look for a few key signs. First, check for a clean, mild smell. Fresh shrimp should smell like the ocean, not fishy. Next, look for shiny, translucent shells. Avoid shrimp with black spots or a dull appearance. The best varieties for roasting include large or jumbo shrimp. They hold up well during cooking and are more flavorful. Perfectly cooked shrimp should be pink and opaque. They should curl slightly but not be tight. Overcooked shrimp turn rubbery and dry. When roasting at 400°F, cook shrimp for 8 to 10 minutes. Start checking at 8 minutes to avoid overcooking. Serve your roasted shrimp on a colorful platter. Add lemon wedges for a bright touch. A sprinkle of fresh parsley not only adds color but also enhances the taste. You can also pair the shrimp with a light salad or crusty bread for a complete meal. Mixing fresh herbs into the dish can elevate the flavors even more. {{image_4}} You can easily change the taste of your lemon garlic roasted shrimp. Adding fresh herbs like thyme or cilantro brightens up the dish. Thyme gives a warm, earthy flavor, while cilantro adds a fresh, zesty kick. Use about one tablespoon of either herb, chopped finely, and mix it into the marinade. If you want a unique twist, try different spices. Replace smoked paprika with cumin for a warm, nutty taste. Or, add curry powder for an exotic flair. Just a teaspoon of either spice can transform the dish. Lemon garlic roasted shrimp pairs well with many side dishes. Consider serving it with a light salad made of mixed greens and a simple vinaigrette. The freshness of the salad complements the shrimp beautifully. You can also toss the shrimp into pasta. A light lemon-butter sauce with herbs can enhance the meal. Add some cherry tomatoes and spinach for color and extra flavor. You can roast or grill shrimp. Roasting in the oven gives a nice, even cook. The high heat creates a lovely caramelization on the shrimp. Grilling adds a smoky flavor and can be a fun outdoor option. Just skewer the shrimp and grill for about 2-3 minutes on each side. If you prefer stovetop cooking, heat a pan over medium-high heat. Cook the shrimp for 2-3 minutes until they turn pink. This method is quick and easy. For the full recipe, check out the link above. To keep your lemon garlic roasted shrimp fresh, refrigerate them right away. Place the shrimp in an airtight container. This helps to lock in moisture and flavor. Make sure to eat them within three days for the best taste. You can freeze cooked shrimp too. First, let them cool completely. Then, place them in a freezer-safe bag. Remove as much air as possible before sealing. This prevents freezer burn. To thaw, just place the shrimp in the fridge overnight. For quick thawing, you can run them under cold water. This keeps the shrimp tender and juicy. When it's time to eat your leftovers, reheat them gently. The best way is to use a skillet on low heat. This keeps the shrimp from getting rubbery. You can also use the oven, but cover them with foil. This helps retain moisture. Avoid microwaving shrimp, as it often makes them tough. Enjoy your delicious lemon garlic shrimp again! For the full recipe, check back to the main article. Roasting shrimp at 400°F takes about 8 to 10 minutes. You want to watch for that perfect pink color. When they turn opaque, they are done. Overcooking can make them tough, so keep an eye on them. Yes, deveining shrimp is important. The dark line you see is the shrimp's digestive tract. While it’s safe to eat, many prefer it removed for taste and presentation. To devein, just make a shallow cut along the back and pull it out. You can use frozen shrimp! Just thaw them first for the best results. To thaw, place them in the fridge overnight or run them under cold water for a few minutes. Make sure they are fully thawed and patted dry before marinating. This helps the marinade stick better. This post covers everything you need for perfect roasted shrimp. We discussed fresh ingredients like shrimp and garlic, along with spices that add flair. I shared tips on marinating, cooking, and serving. Plus, we explored ways to vary flavors and store leftovers. To wrap it up, follow these steps for a tasty dish. Enjoy experimenting with flavors and impress your guests. Cooking shrimp is simple and rewarding!

Lemon Garlic Roasted Shrimp Quick and Easy Recipe

Are you ready for a quick, easy, and delicious meal? This Lemon Garlic Roasted Shrimp recipe brings bright flavors and

To make chicken tikka masala, you need a few key items: - 500g boneless chicken breasts, cut into bite-sized pieces - 1 cup plain yogurt, preferably full-fat for richness - 2 tablespoons tikka masala spice mix - 2 tablespoons vegetable oil, for sautéing - 1 medium onion, finely chopped - 4 cloves garlic, minced - 1-inch piece of ginger, grated - 1 can (400g) crushed tomatoes - 1 cup coconut milk - 1 teaspoon garam masala - Salt and pepper to taste - Fresh cilantro, chopped, for garnish - Cooked basmati rice or soft naan, for serving These ingredients bring flavor and warmth to the dish. The yogurt helps tenderize the chicken, and the spices create a rich taste. You can add a few optional ingredients to boost the flavor: - Lemon juice, for brightness - Green chilies, for heat - Peas, for color and sweetness - Cashew cream, for extra richness These additions can give your chicken tikka masala a unique twist. Feel free to mix and match based on your taste. Sometimes you might not have everything on hand. Here are some good swaps: - Greek yogurt instead of plain yogurt - Chicken thighs instead of chicken breasts - Vegetable broth for coconut milk if you want less creaminess - Canned diced tomatoes instead of crushed tomatoes These substitutions work well and keep the dish tasty. Don’t be afraid to get creative with what you have! For the full recipe, check out the [Full Recipe]. To make chicken tikka masala, start with the chicken. In a large bowl, mix the chicken pieces with plain yogurt and tikka masala spice mix. Make sure the chicken is coated well. Cover the bowl with plastic wrap. Place it in the fridge for at least 30 minutes. For better flavor, let it sit overnight. This step makes the chicken tender and full of flavor. Next, heat vegetable oil in a large skillet over medium heat. Add the finely chopped onion. Sauté the onion until it turns soft and translucent, about 5 to 7 minutes. Stir it occasionally to avoid burning. Once the onion is ready, add minced garlic and grated ginger. Cook for one more minute until you smell their rich aroma. This mix adds depth to the dish. Now it’s time to cook the chicken. Add the marinated chicken to the skillet. Spread it out so it cooks evenly. Brown the chicken on all sides, which takes about 5 to 8 minutes. This locks in the flavors. Then, pour in the crushed tomatoes. Stir well to combine everything. Let the mixture simmer gently for about 10 minutes. This allows the flavors to meld together. After that, reduce the heat to low. Stir in the coconut milk and garam masala. Keep simmering for 10 to 15 minutes. This thickens the sauce and makes it creamy. Taste the sauce and add salt and pepper as needed. Finally, serve your chicken tikka masala hot. Garnish it with fresh cilantro. Enjoy it with fluffy basmati rice or warm naan for a complete meal. Marinating chicken is a key step for great flavor. Use plain yogurt to tenderize the meat. Combine it with tikka masala spice mix for a rich taste. Make sure each piece is well-coated. I suggest marinating for at least 30 minutes. For the best flavor, let it marinate overnight. This allows the spices to soak in deeply. To get a creamy sauce, use coconut milk. Add it after the chicken is cooked. This gives the dish a nice thickness. Simmer the sauce on low heat to keep it smooth. Stir occasionally to prevent sticking. If the sauce is too thick, you can add a bit of water. This helps achieve the perfect texture. To maximize flavor, focus on the cooking order. Sauté the onions until soft before adding garlic and ginger. This builds a flavorful base. When you add the crushed tomatoes, let them cook down. This enhances their sweetness. Adjust the seasoning at the end. Taste and add more salt or pepper if needed. Fresh cilantro on top adds brightness and flavor. {{image_4}} You can make a tasty vegetarian tikka masala using paneer or chickpeas. Paneer is a great cheese that soaks up flavor well. Cut it into cubes like chicken. For chickpeas, use canned ones for ease. Just rinse them before adding to the pan. Both options give a rich taste that everyone will love. To make this dish spicier, add more tikka masala spice mix or fresh chilies. You can also use cayenne pepper for a kick. If you prefer mild flavors, reduce the spice mix. Adding more coconut milk can cool down the heat too. Adjust the spice level to match your taste buds. You can swap some ingredients to make this dish lighter. Use Greek yogurt instead of regular yogurt for more protein and less fat. Try skinless chicken breasts for a leaner option. You can also replace coconut milk with low-fat milk or vegetable broth. These swaps keep the flavor but cut down on calories. For the full recipe, check out the detailed instructions and enjoy your cooking adventure! To store leftover chicken tikka masala, let it cool first. Use an airtight container. Place it in the fridge for up to four days. This keeps the flavors fresh and the chicken safe to eat. When reheating, use the stovetop or microwave. If using the stovetop, add a splash of water or coconut milk. This helps keep the sauce creamy. Heat on low until warm, stirring often. If using the microwave, cover the dish to trap steam. Heat in short bursts, stirring in between. This ensures even heating and delicious taste. For longer storage, freeze your chicken tikka masala. Use a freezer-safe container or bag. Make sure to remove as much air as possible. It can last up to three months in the freezer. When ready to eat, thaw it overnight in the fridge. Reheat on the stove or microwave, following the same reheating tips for the best flavor. Tikka Masala and Butter Chicken are similar but not the same. Tikka Masala uses yogurt and spices for marinating chicken. It has a creamy tomato sauce. Butter Chicken, or Murgh Makhani, is richer. It has butter and cream, making it smoother. Both dishes are delicious and popular, but they have distinct flavors. Yes, you can use frozen chicken for this recipe. Just be sure to thaw it first. Thaw the chicken in the fridge overnight or in cold water. This helps to keep the chicken safe and fresh. Once thawed, follow the marinating steps as usual. Chicken Tikka Masala goes well with many dishes. Here are some great options: - Basmati rice - Naan bread - Raita (yogurt sauce) - A fresh salad These sides balance the rich flavors of the tikka masala and add variety. To make Chicken Tikka Masala gluten-free, use gluten-free naan or rice as a side. Ensure the tikka masala spice mix is gluten-free. Most spices are safe, but always check labels. This way, everyone can enjoy this tasty dish without worry. Yes, you can prepare Chicken Tikka Masala ahead of time. Cook it and let it cool. Store it in an airtight container in the fridge for up to three days. When you are ready to eat, just reheat it. This makes dinner easy on busy nights. You can find the full recipe for Easy Chicken Tikka Masala [here](#). This detailed guide will help you create a tasty meal at home! We've explored easy chicken tikka masala's essential ingredients and cooking steps. You learned how to marinate chicken, sauté spices, and achieve a perfect sauce. We also discussed flavor tips, variations for dietary needs, and storage methods. In cooking, simple choices make a big impact. Use fresh ingredients and take your time for great results. Enjoy this dish and make it your own!

Easy Chicken Tikka Masala Simple and Flavorful Recipe

You can make a delicious chicken tikka masala at home without much fuss! This simple recipe is packed with flavor

- 4 medium sweet potatoes, peeled and cut into 1-inch cubes - 3 tablespoons extra virgin olive oil - 1 teaspoon smoked paprika - 1 teaspoon garlic powder - Sea salt and freshly ground black pepper, to taste - 1/4 cup tahini - 2 tablespoons freshly squeezed lemon juice - 2 tablespoons pure maple syrup - 1-2 tablespoons water (for adjusting tahini consistency) - Fresh parsley, finely chopped (for garnish) - Toasted sesame seeds (for garnish) - A pinch of cayenne pepper for heat - Chopped green onions for added freshness - Crumbled feta cheese for a creamy touch If you need alternatives, try using almond butter instead of tahini. You can swap sweet potatoes for butternut squash if desired. Olive oil can be replaced with avocado oil for a different flavor. Start by preheating your oven to 425°F (220°C). This high heat helps create a nice caramelized flavor. Line a large baking sheet with parchment paper. This step keeps the sweet potatoes from sticking and makes cleanup a breeze. Next, take 4 medium sweet potatoes. Peel them and cut them into 1-inch cubes. Place the cubes in a large mixing bowl. Add 3 tablespoons of extra virgin olive oil. Then, sprinkle in 1 teaspoon of smoked paprika, 1 teaspoon of garlic powder, sea salt, and freshly ground black pepper. Toss everything together until the sweet potatoes are well coated. Spread the sweet potatoes in a single layer on the baking sheet. Make sure they aren't crowded; this helps them roast evenly. Roast them in the oven for 25 to 30 minutes. About halfway through, give them a stir for even cooking. When they are tender and golden brown, they are ready. While the sweet potatoes roast, you can prepare the tahini drizzle. In a small mixing bowl, combine 1/4 cup tahini, 2 tablespoons of freshly squeezed lemon juice, and 2 tablespoons of pure maple syrup. Whisk these ingredients together until smooth. If the mixture is too thick, add 1 to 2 tablespoons of water. Keep adding water until the tahini reaches a creamy consistency. Once the sweet potatoes are done, take them out of the oven and let them cool for about 5 minutes. Drizzle the tahini sauce over the warm sweet potatoes. Finish with freshly chopped parsley and toasted sesame seeds for color and flavor. Enjoy this delicious dish! For the full recipe, check out the details provided. To get sweet potatoes that are soft inside and crispy outside, follow these tips. Cut your sweet potatoes into even 1-inch cubes. This size helps them cook evenly. Toss them well with olive oil and spices. Make sure they are in a single layer on the baking sheet. Overcrowding can lead to steaming. Roast at 425°F (220°C) for 25-30 minutes. Stir halfway through for even browning. Look for a golden color and a tender texture. Tahini can be thick and hard to drizzle. To make it smooth, start with a small bowl. Mix tahini, lemon juice, and maple syrup first. Then, add water one tablespoon at a time. Whisk until creamy. If it’s still thick, keep adding water. This way, your tahini drizzle will coat the sweet potatoes perfectly. Presentation is key! Serve your roasted sweet potatoes on a large platter. Drizzle the tahini sauce over them right before serving. Sprinkle with fresh parsley and toasted sesame seeds. These bright colors make the dish pop. Pair this dish with a light salad or grilled protein for a complete meal. You can also enjoy it as a snack. For the full recipe, be sure to check out the details above. {{image_4}} You can easily add more veggies or proteins to your sweet potatoes. Try mixing in chickpeas for extra fiber and protein. They roast well and add a nice crunch. Carrots or bell peppers also work great. Just cut them into similar sizes for even cooking. If you want to add leafy greens, toss in some spinach or kale after roasting. They wilt quickly and add color. You can also mix in nuts like walnuts or almonds for a crunchy texture. Get creative and make this dish your own! Changing up the spices can give your dish a new twist. Instead of smoked paprika, try cumin for a warm flavor. Or add a bit of chili powder for some heat. You can also use fresh herbs like rosemary or thyme to boost the taste. If you want a different sauce, try peanut sauce instead of tahini. It brings a sweet and nutty flavor that pairs well with sweet potatoes. You can also drizzle balsamic glaze for a tangy kick. Experimenting with flavors can make each meal unique! This recipe is vegan-friendly, thanks to tahini. If you want a non-vegan option, you can add yogurt or sour cream on top. These will add creaminess and a different flavor profile. For those not keen on tahini, you can swap it with almond butter. It gives a nutty taste and works well with the sweetness of the potatoes. Explore these options to find what suits your taste! To keep your roasted sweet potatoes fresh, let them cool first. Place them in an airtight container. Store them in the fridge for up to three days. This keeps them tasty and safe to eat later. When you are ready to eat your leftovers, preheat your oven to 350°F (175°C). Spread the sweet potatoes on a baking sheet. Reheat them for about 10-15 minutes. This method helps keep their texture and flavor. You can also use a microwave. Heat them in short bursts of 30 seconds until warm. Drizzle the tahini sauce on top after reheating. If you want to freeze your sweet potatoes, cool them first. Spread them out on a baking sheet in a single layer. Freeze for a few hours until solid. Then, transfer them to a freezer bag. Remove as much air as possible. They can stay in the freezer for up to three months. For the tahini drizzle, store it in a separate container. You can freeze it too, but make sure to whisk it again after thawing. You can serve roasted sweet potatoes with many dishes. Here are some great options: - Grilled chicken or fish - Quinoa salad with veggies - Steamed greens like broccoli or spinach - A fresh garden salad - Hummus and pita for a fun snack These dishes will add balance to your meal and make it more filling. You can mix and match based on what you like! Yes, you can make the tahini drizzle ahead of time. Store it in an airtight container in the fridge. It will stay fresh for about a week. Just remember to stir it well before using. If it thickens, you can add a little water to get it smooth again. To spice things up, try these ideas: - Add a pinch of cayenne pepper to the sweet potatoes before roasting. - Mix in some crushed red pepper flakes in the tahini drizzle. - Top the finished dish with sliced jalapeños for a fresh kick. These tips will give your dish the heat you want without overpowering the sweet flavor of the potatoes. Enjoy experimenting with your spice level! In this blog post, we explored how to make roasted sweet potatoes with tahini drizzle. We covered the main and optional ingredients, key preparation steps, and useful tips for perfect results. I shared variations to keep your meals exciting and storage tips to reduce waste. Remember, cooking is all about creativity. Don’t hesitate to experiment with flavors and textures. Enjoy your delicious dish and the joy of cooking!

Roasted Sweet Potatoes with Tahini Drizzle Delight

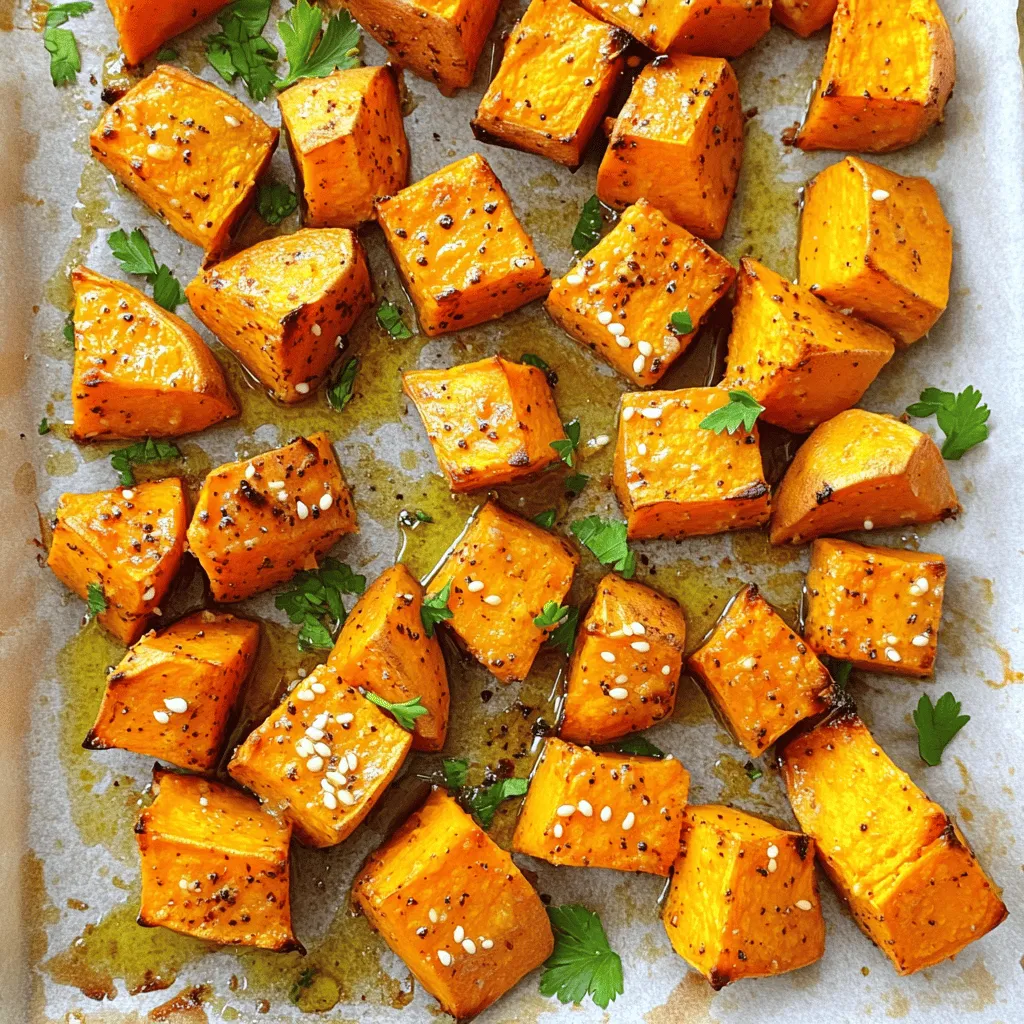
Looking for a tasty and healthy side dish? Roasted sweet potatoes with tahini drizzle are here to save the day!

Older posts
Newer posts
← Previous Page1 … Page41 Page42 Page43 … Page120 Next →

dsad

© 2026 recipetorch • Built with GeneratePress

Our Policies

  • Copyright Policy
  • Cookie Policy
  • GDPR Policy
  • Privacy Policy
  • Disclaimer
  • Terms Of Use

More Information

  • Home
  • About
  • Contact
  • Appetizers
  • Dessert
  • Dinner
  • Drinks
©2026, recipetorch About Back To Top