
Easy Chickpea Salad Wraps Delightful and Healthy Meal
Looking for a quick, tasty meal? You’ll love these Easy Chickpea Salad Wraps! Packed with fresh veggies and creamy tahini,
Looking for a quick, tasty meal? You’ll love these Easy Chickpea Salad Wraps! Packed with fresh veggies and creamy tahini,
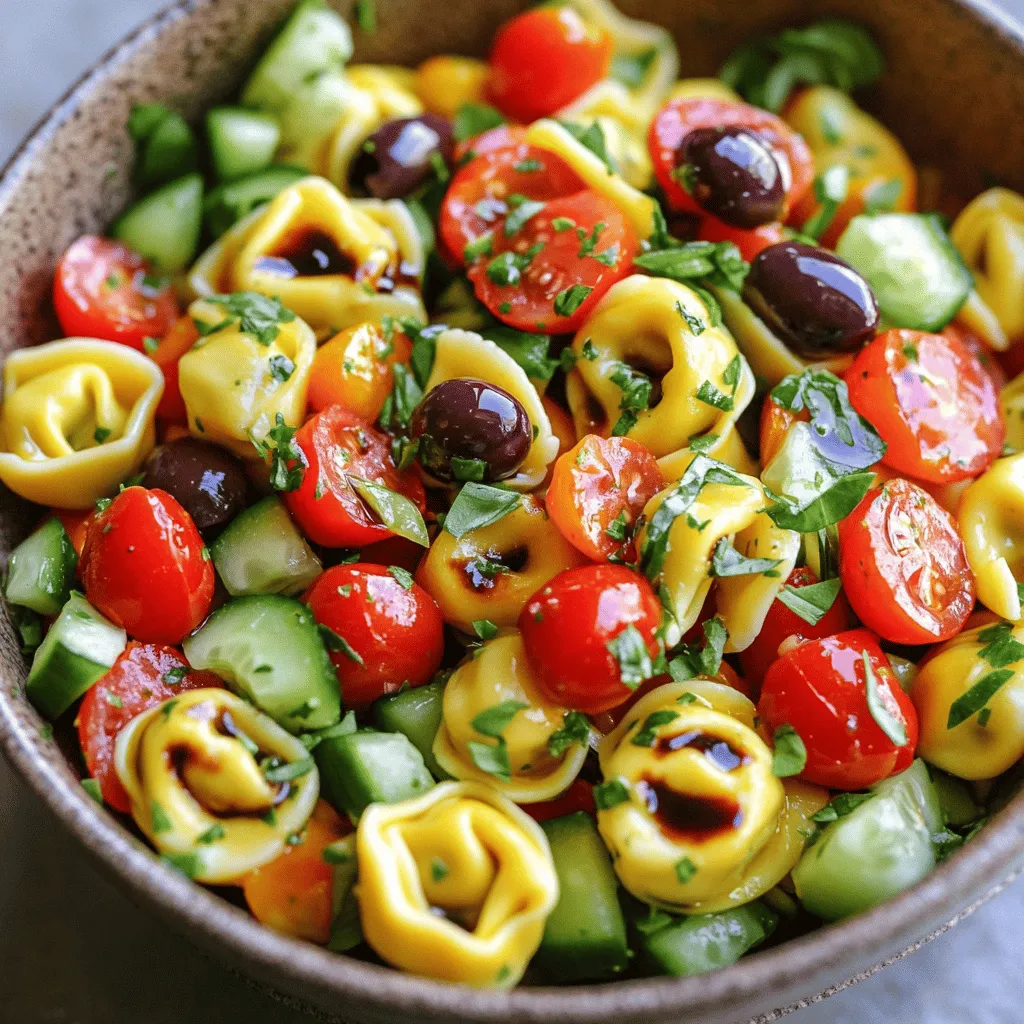
Looking for a fresh and zesty dish to brighten your meals? Dive into my Zesty Tortellini Salad! With cheese tortellini,
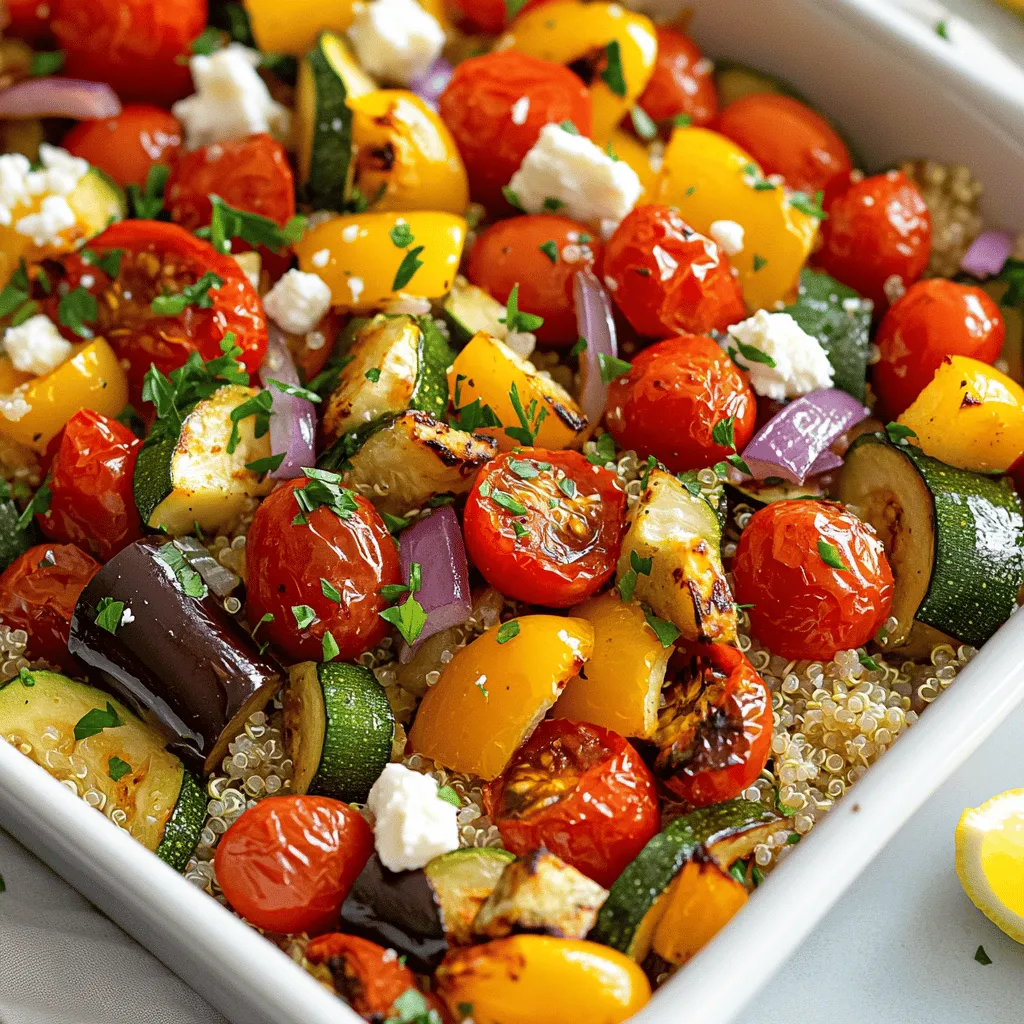
Are you ready to enjoy a delicious meal that’s easy to make? The Roasted Mediterranean Veggie Bowl is packed with

If you’re craving a warm hug in a bowl, this Creamy Broccoli Cheddar Soup is for you! I’ll guide you
![To make a tasty no-bake strawberry cheesecake, you need a few key items: - 1 ½ cups graham cracker crumbs - ½ cup unsalted butter, melted - 2 cups cream cheese, softened to room temperature - 1 cup powdered sugar - 1 cup heavy whipping cream These ingredients create a smooth and rich cheesecake base with a crunchy crust. For the fresh twist, gather: - 2 cups strawberries, hulled and sliced - ¼ cup granulated sugar (for macerating the strawberries) - Fresh mint leaves for garnish (optional) The strawberries add a burst of flavor. The mint leaves can brighten up your dish. To put this dessert together, you will need: - 9-inch springform pan - Mixing bowls - Electric mixer - Spatula This simple set of tools helps you create a beautiful cheesecake without any fuss. If you want to see the full recipe, check out the No-Bake Strawberry Cheesecake recipe. 1. In a medium bowl, combine graham cracker crumbs and melted butter. Mix well until the crumbs feel like wet sand. 2. Firmly press this mixture into the bottom of a 9-inch springform pan. Make sure it is even all around. 3. Place the pan in the refrigerator to chill while you make the filling. This helps it firm up nicely. 1. In a large bowl, use an electric mixer to beat the softened cream cheese until smooth. 2. Gradually add the powdered sugar and vanilla extract. Mix until it is well combined and creamy. 3. In another bowl, whip the heavy cream until soft peaks form. This is key for a fluffy filling. 4. Gently fold the whipped cream into the cream cheese mixture. Be careful not to deflate it. 1. Spread the cheesecake filling over the chilled crust in the springform pan. Use a spatula to smooth the top. 2. In a small bowl, toss the sliced strawberries with granulated sugar. Let them sit for about 10 minutes to become juicy. 3. Layer the macerated strawberries on top of the cheesecake filling. Let some juice drizzle down the sides. 4. Cover the pan tightly with plastic wrap and refrigerate for at least 4 hours, or overnight for the best results. 5. When ready, carefully release the sides of the springform pan. Slice the cheesecake and serve chilled. Enjoy! For the complete details of the ingredients and method, check the Full Recipe. To make a great no-bake cheesecake, start with room temperature cream cheese. Cold cream cheese can create lumps. Softened cream cheese blends smoothly with other ingredients. Next, fold the whipped cream gently into the cream cheese mixture. This keeps the filling light and airy. If you mix too hard, the air will escape, and the cheesecake will be dense. Presentation makes your cheesecake more appealing. Drizzle strawberry juice over each slice before serving. This adds color and flavor. You can also garnish with fresh mint leaves and whole strawberries. This creates a beautiful dish that looks as good as it tastes. Sometimes, your cheesecake might turn out too soft. If this happens, you can add more whipped cream or cream cheese. This will help it firm up. You may also need to chill it longer. If you want to adjust the sweetness, taste the filling before you chill it. Add more powdered sugar if it needs it. A small change can make a big difference! For the full recipe, refer to the No-Bake Strawberry Cheesecake section. {{image_4}} You can switch up the strawberries with blueberries or raspberries. Both fruits add a burst of color and flavor. They work well with the creamy cheesecake. You can also use other seasonal fruits. Try peaches in summer or apples in fall for a fun twist. For a citrus kick, add lemon zest or a splash of lemon extract. This adds brightness to your cheesecake. You can also mix in chocolate or caramel swirls. Drizzle them on top or fold them into the filling for added richness. If you need a gluten-free crust, use almond flour or gluten-free graham crackers. This keeps the dessert tasty for everyone. For a vegan version, swap cream cheese with a plant-based alternative. Use coconut cream for the whipped topping. These changes make the cheesecake friendly for more diets. For the full recipe, check the [Full Recipe]. To keep your no-bake strawberry cheesecake fresh, store it in the fridge. Use plastic wrap or a container with a tight lid. This helps avoid drying out and keeps flavors intact. It lasts up to five days in the fridge. After that, the taste and texture may change. Yes, you can freeze no-bake cheesecake! Just make sure it is well wrapped. Use plastic wrap first, then foil. This prevents freezer burn. The cheesecake can stay good for up to three months in the freezer. To thaw, move it to the fridge overnight. For quick thawing, leave it out for about an hour. After refrigeration or freezing, the cheesecake may look a bit sad. To refresh it, slice the cheesecake and add fresh strawberry juice on top. This adds color and flavor. You can also garnish with mint leaves or whole strawberries for a nice touch. Make it look as good as it tastes! To make a no-bake cheesecake set faster, you can try a few tricks: - Use a shallow pan to increase surface area. - Chill the cheesecake in the freezer for 1 hour. - Prepare the filling while the crust chills. - Ensure your cream cheese is very soft for easier mixing. These tips help reduce chilling time and make your dessert ready sooner. You can also try using gelatin to help the cheesecake firm up quickly. Just dissolve it in a bit of water and mix it into the filling. Yes, you can use other cheeses in your no-bake cheesecake. Cream cheese gives the best texture, but you can try: - Mascarpone for a richer flavor. - Neufchâtel for a lighter version. - Ricotta for a grainier texture. Each cheese brings a unique taste, allowing you to create your perfect cheesecake. You can get creative with your toppings! Here are some fun ideas: - Blueberries for a burst of flavor. - Raspberries for a tart contrast. - Sliced bananas add sweetness. - A drizzle of chocolate sauce for richness. - Caramel sauce for a sweet touch. Feel free to mix and match different fruits and sauces to make your cheesecake exciting! You now have all the steps to make a no-bake strawberry cheesecake. From the ingredients to the tips for perfecting your dessert, you are ready to impress. Remember to experiment with different toppings and flavors to make it your own. Don't forget to store leftovers properly for later enjoyment. This easy recipe will delight friends and family alike. Enjoy creating your tasty treat!](https://recipetorch.com/wp-content/uploads/2025/07/10dded2e-3920-41aa-b4fe-9e391c77af59.webp)
Craving a sweet treat that’s easy to make and oh-so-delicious? Look no further! My no-bake strawberry cheesecake will satisfy your

If you crave a dish that’s both sweet and spicy, you’ve found it! My Spicy Pineapple Chicken Kabobs bring a
![- 1 pound broccoli florets - 4 cloves garlic, finely minced - 3 tablespoons extra virgin olive oil - 1/2 cup freshly grated Parmesan cheese - 1 teaspoon freshly squeezed lemon juice - 1 teaspoon red pepper flakes (optional) - Salt and freshly cracked black pepper, to taste - Zest of 1 lemon (for garnishing) When I create Roasted Garlic Parmesan Broccoli, I focus on fresh, simple ingredients. The broccoli brings color and crunch. Garlic adds a rich, savory flavor. Olive oil helps everything roast nicely. Parmesan cheese gives a nutty, creamy touch. Lemon juice adds brightness, while red pepper flakes can bring some heat. Salt and pepper balance all the flavors perfectly. If you want a different taste, there are great options. You can swap Parmesan cheese for Pecorino Romano for a sharper flavor. Nutritional yeast makes a good dairy-free alternative. For olive oil, try avocado oil for a buttery flavor. If you want milder garlic, use garlic powder instead of fresh garlic. Each change will give you a unique twist on this dish! For the full recipe, check out the [Full Recipe]. 1. Preheat your oven to 425°F (220°C). The high heat helps to create a nice, crispy texture. 2. Take one pound of broccoli florets. Place them in a large bowl. Add four finely minced garlic cloves. This mix starts the flavor explosion. 1. Drizzle three tablespoons of extra virgin olive oil over the broccoli and garlic. This helps everything roast evenly. 2. Sprinkle salt, freshly cracked black pepper, and one teaspoon of red pepper flakes if you like a bit of heat. Toss it all well so every piece is coated. 3. Arrange the mixture on a baking sheet. Make sure the florets are in a single layer. This way, they all roast evenly without steaming. 1. Roast the broccoli for about 15 minutes. Turn the florets halfway through for even cooking. 2. After 15 minutes, take them out and sprinkle half a cup of freshly grated Parmesan cheese over the top. 3. Return the baking sheet to the oven for five more minutes. The cheese should melt and turn slightly golden. 4. Finally, squeeze one teaspoon of freshly squeezed lemon juice over the broccoli. This adds a nice zing. 5. Garnish with the zest of one lemon before serving. It gives a bright look and taste. For the full recipe, check out the earlier section. Enjoy creating this flavorful side dish! To roast broccoli perfectly, start by setting your oven to 425°F (220°C). This high heat helps the broccoli get crispy. A hot oven also cooks the garlic well, adding great flavor. Arranging the broccoli in a single layer on your baking sheet is key. This way, each floret cooks evenly. If you pile them up, they will steam instead of roast. Adding more flavor is easy! You can try mixing in herbs like thyme or oregano. A little lemon zest before serving brightens the taste too. For a crispier texture, roast the broccoli longer. Keep an eye on it to avoid burning. You can also broil it for a minute at the end. This gives a nice crunch to the cheese and florets. Roasted Garlic Parmesan Broccoli pairs well with many main dishes. It goes great with grilled chicken or salmon. You can also serve it alongside pasta for a veggie boost. For a fancy touch, plate the broccoli on a rustic wooden board. Add extra lemon zest and cracked pepper on top. This makes the dish look and taste even better! Try this recipe for Roasted Garlic Parmesan Broccoli [Full Recipe] and enjoy! {{image_4}} You can switch out Parmesan for many other cheeses. Pecorino Romano adds a sharp flavor. Cheddar gives a creamy texture. If you want a milder taste, use gouda or mozzarella. For a dairy-free option, try nutritional yeast. It brings a cheesy flavor without the milk. Vegan cheese brands also offer great alternatives. Just choose one that melts well. Roasted garlic Parmesan broccoli is tasty on its own, but you can add more veggies. Carrots, bell peppers, or cauliflower work well. They add color and crunch. For protein, consider adding chickpeas or cooked chicken. This makes it a filling meal. You can even toss in cooked quinoa for more texture and nutrients. These add-ins make your dish more exciting and nutritious. Adjust the spice level to suit your taste. If you love heat, add more red pepper flakes. For a milder dish, skip them or use less. You can also play with citrus flavors. Try adding lime juice for a twist. Lemon zest brightens the dish and pairs well with garlic. These small changes can transform the dish into something new. For the full recipe, check out Roasted Garlic Parmesan Broccoli. After you enjoy your Roasted Garlic Parmesan Broccoli, you may have some leftovers. To keep them fresh, place them in an airtight container. Make sure they cool down before sealing the container. Store it in the fridge where it will stay good for about 3-4 days. If you want to keep it longer, freezing is an option. When it's time to enjoy your leftovers, you can reheat them in a few ways. The oven works best. Preheat it to 350°F (175°C). Spread the broccoli on a baking sheet and warm it for about 10 minutes. This method helps keep the crispiness. You can also use a skillet over medium heat. Just add a little olive oil and stir until heated. Yes, you can freeze Roasted Garlic Parmesan Broccoli! To freeze, let it cool completely. Then, place it in a freezer-safe bag or container. Remove as much air as possible. It’s best to use it within 2-3 months. When you're ready to eat, thaw it in the fridge overnight. Reheat in the oven or skillet for the best results. For the full recipe, check out the detailed steps to create this tasty dish! Can I make this dish in advance? Yes, you can prep the broccoli and garlic ahead. Toss them in oil and seasonings. Store in the fridge for up to a day. Roasting just before serving keeps it fresh and tasty. How do I make Roasted Garlic Parmesan Broccoli less salty? To reduce saltiness, use less salt when seasoning. You can also add more broccoli to balance the flavors. Another tip is to add a splash of lemon juice to brighten the dish without added salt. What to do if I don’t have fresh garlic? If you lack fresh garlic, try garlic powder instead. Use about 1/4 teaspoon for each clove. Mix it in with the oil before coating the broccoli. Caloric content of Roasted Garlic Parmesan Broccoli One serving (about 1 cup) contains roughly 150 calories. This can vary based on the amount of oil and cheese used. Health benefits of broccoli and garlic Broccoli is rich in vitamins C and K. It also has fiber, which aids digestion. Garlic boosts your immune system and adds flavor without extra calories. How long do you roast broccoli for? Roast the broccoli for about 15 to 20 minutes. Check for that tender, crispy texture. Turn the florets halfway through for even cooking. What should I serve with Roasted Garlic Parmesan Broccoli? This dish pairs well with grilled chicken or fish. You can also serve it alongside pasta or a grain-based salad. It adds color and flavor to any meal. For the full recipe, check out the main article! In this blog post, we explored making the perfect Roasted Garlic Parmesan Broccoli. We covered the main ingredients, from fresh broccoli to garlic and cheese. You learned some key tips for roasting and enhancing flavors. We also discussed ingredient substitutions and variations to suit your taste. Whether serving as a side dish or a main option, this broccoli recipe shines. Enjoy trying different flavors and share your unique twists with others. Cooking is fun, and this dish proves that veggies can be delicious!](https://recipetorch.com/wp-content/uploads/2025/07/4b934bc4-b788-42d3-8da0-649013f0931b.webp)
Looking for a delicious side dish that’s both easy and packed with flavor? Look no further! My Roasted Garlic Parmesan

Are you craving a tasty and easy appetizer? Look no further than Cheesy Spinach Stuffed Mushrooms! These delectable bites are

Looking for a quick and healthy meal? Try my Lemon Dill Tuna Salad! Packed with protein and vibrant flavors, it’s
![- 1 block firm tofu, drained and pressed - 2 tablespoons cornstarch - 2 tablespoons soy sauce - 1 tablespoon sesame oil - 1 tablespoon rice vinegar - 2 cups cooked jasmine rice - 1 cup broccoli florets - 1 red bell pepper, sliced into thin strips - 1 medium carrot, julienned - 2 green onions, finely chopped - Sesame seeds for garnish - Salt and black pepper to taste Crispy tofu rice bowls are not just tasty; they are healthy too. Each bowl offers a good mix of protein, carbs, and veggies. Tofu gives around 10 grams of protein per serving. Jasmine rice adds energy with its carbs. Broccoli and bell peppers are full of vitamins and fiber, making this dish hearty and balanced. When selecting ingredients, I recommend using high-quality brands. For tofu, look for brands like Nasoya or House Foods. They provide firm tofu that holds its shape well. For soy sauce, Kikkoman is a trusted choice, giving you great flavor. Choose organic cornstarch from a brand like Bob's Red Mill for better quality. Fresh vegetables are key, so buy organic if possible. For the best experience, check out the Full Recipe for a step-by-step guide! Start by preheating your oven to 400°F (200°C). Line a baking sheet with parchment paper to keep the tofu from sticking. Cut the pressed tofu into small cubes, about 1 inch each. In a bowl, add the tofu cubes and pour in the soy sauce. Mix gently to coat all the pieces. Next, sprinkle cornstarch over the marinated tofu. Toss again, ensuring every cube is lightly coated. This step is key for that crispy texture you want. While the tofu bakes, take a large skillet and heat sesame oil over medium heat. Add the broccoli florets, red bell pepper strips, and julienned carrot to the skillet. Stir-fry these veggies for about 5 to 7 minutes. Look for them to be tender yet still bright in color. Season with salt and black pepper to enhance the flavors. This mix adds vibrant colors and nutrients to your bowl. Now it's time to bring your rice bowls together. Scoop the cooked jasmine rice into serving bowls. Top each bowl with the stir-fried vegetables and the crispy tofu. For a beautiful finish, sprinkle chopped green onions and sesame seeds on top. You can also drizzle a bit more soy sauce or a splash of rice vinegar for added flavor. This final touch gives your bowls an extra pop. Enjoy your meal with the full recipe for a delightful experience! To get crispy tofu, start with firm tofu. Drain and press it well to remove extra water. This step is key. Cut the tofu into small cubes, about 1-inch each. Toss the cubes with soy sauce for flavor. Then, sprinkle cornstarch evenly over the tofu. This helps it get that golden crunch. Spread the cubes on a lined baking sheet. Make sure they are not touching. Bake them at 400°F (200°C) for 25-30 minutes. Flip them halfway through for even crispiness. For jasmine rice, use a rice cooker or a pot on the stove. Rinse the rice first to remove excess starch. This will keep it from getting too sticky. For every cup of rice, use 1.5 cups of water. Bring the water to a boil, then cover and reduce the heat. Cook for about 15 minutes. Let the rice sit covered for 5 minutes after cooking. This will make it fluffy and perfect for your bowls. You can boost flavors with simple add-ons. Fresh herbs like cilantro or basil can add brightness. A squeeze of lime juice gives a nice zing. For a spicy kick, add chili flakes or sriracha. You can also mix in nuts for crunch or avocado for creaminess. Try different sauces like teriyaki or hoisin for variety. These small changes can turn your dish into a new experience. For the full recipe, check out the [Full Recipe]. {{image_4}} You can swap tofu for other proteins. Tempeh works well as a great choice. It has a nutty taste and cooks nicely. Seitan is another option; it has a chewy texture, similar to meat. For a lighter option, try chickpeas. They add protein and are easy to cook. You can roast them with spices for extra flavor. Sauces can change your crispy tofu rice bowls in fun ways. Try teriyaki sauce for a sweet touch. It pairs well with the crispy tofu. Peanut sauce adds creaminess and a rich flavor. For a spicy kick, use sriracha mixed with soy sauce. You can even make a lime-based dressing for a fresh taste. Experimenting with sauces can make each bowl unique. Using seasonal veggies keeps your dish fresh and tasty. In spring, add asparagus or snap peas for crunch. Summer brings zucchini and corn for a sweet flavor. Fall is perfect for using butternut squash or Brussels sprouts. In winter, try root vegetables like sweet potatoes or beets. These seasonal choices not only enhance taste but also boost nutrition. To store your crispy tofu rice bowls, let them cool down first. Place the rice and vegetables in a container with a lid. You can keep the crispy tofu in a separate container. This helps keep it crispy longer. Store everything in the fridge for up to three days. Always label your containers with the date to track freshness. When you're ready to eat, reheat the rice and veggies in a microwave. Heat them for about one to two minutes until warm. For the tofu, I recommend baking it in the oven at 375°F (190°C) for about 10 minutes. This method helps restore its crispy texture. You can also use an air fryer for about five minutes to heat it up nicely. You can freeze the rice and veggies if you want to save them for later. Place them in freezer-safe bags or containers. Make sure to remove as much air as possible to prevent freezer burn. The tofu, however, does not freeze well. It may become mushy when thawed. For best results, enjoy the tofu fresh. Use your frozen rice and veggies within three months for the best taste. Yes, you can use soft or silken tofu. Just note that they are less firm. They may not crisp up like firm tofu. If you choose soft tofu, try to handle it gently. You can also press it to remove excess moisture. This helps it hold its shape better in the dish. To make this dish gluten-free, swap regular soy sauce for gluten-free soy sauce or tamari. You can also use coconut aminos for a sweeter taste. Check the cornstarch and rice vinegar too, as they are usually gluten-free. Always read labels to be sure. You have many tasty options for toppings. Try avocado slices for creaminess. Add sliced radishes for a crunchy bite. Pickled ginger can add a nice tang. You can also sprinkle some crushed peanuts for extra texture. For heat, add sliced jalapeños or a drizzle of chili oil. You can find the full recipe to get started on making these delicious crispy tofu rice bowls. Crispy tofu rice bowls are easy to make and fun to eat. We covered the key ingredients, how to cook them, and tasty variations. With tips on storage and reheating, these bowls can fit any meal plan. I hope you feel inspired to enhance your dishes with new ideas. Enjoy experimenting with flavors and textures!](https://recipetorch.com/wp-content/uploads/2025/07/b2bf3000-db04-4635-b426-0e83170012fe.webp)
Are you ready to enjoy a meal that’s both tasty and good for you? Crispy Tofu Rice Bowls bring together
