
Chocolate Covered Pretzel Bites Sweet and Salty Treat
Craving a fun snack that’s both sweet and salty? Look no further! Chocolate-covered pretzel bites are your answer. They combine
Craving a fun snack that’s both sweet and salty? Look no further! Chocolate-covered pretzel bites are your answer. They combine

Looking for an easy and tasty side dish? Balsamic glazed roasted vegetables are your answer! This dish combines fresh veggies
![- 1 pound boneless, skinless chicken breasts, diced - 2 tablespoons Cajun seasoning - 2 tablespoons olive oil - 1 medium onion, finely chopped - 3 cloves garlic, minced - 1 bell pepper, diced These main ingredients create a strong base for your dish. The chicken brings protein, while the Cajun seasoning adds a kick. Olive oil helps cook everything evenly. The onion, garlic, and bell pepper give great flavor and texture. - 1 cup chicken broth - 1 can diced tomatoes (14 oz) - 1 cup heavy cream Liquid elements are key for a creamy sauce. Chicken broth adds depth, while diced tomatoes bring sweetness. Heavy cream makes it rich and smooth. Together, they create a delicious sauce that coats the pasta. - Fresh parsley, chopped - Grated Parmesan cheese Garnishes enhance the dish's look and taste. Fresh parsley adds color and freshness. Grated Parmesan cheese gives a salty, nutty flavor that pairs well with the creamy sauce. These optional garnishes elevate your meal. For the full recipe, check out the detailed steps to make this one-pan Cajun chicken pasta. - Seasoning the Chicken Start by placing diced chicken in a bowl. Sprinkle the Cajun seasoning over the chicken. Mix well to coat every piece. This step gives the chicken a bold flavor. Let it sit for a few minutes to absorb the seasoning. - Sautéing Chicken until Cooked Heat olive oil in a large skillet over medium-high heat. When the oil is hot, add the seasoned chicken. Cook it for about 5-7 minutes. You want the chicken to turn golden brown and fully cooked. Once done, take the chicken out and set it aside on a plate. - Sautéing Onion and Bell Pepper In the same skillet, add the chopped onion and bell pepper. Sauté these veggies for 3-4 minutes. You want the onions to become clear and the peppers to soften. This adds sweetness and depth to your dish. - Adding Garlic for Flavor Next, stir in the minced garlic. Cook for another minute. This will make your kitchen smell amazing! Garlic adds a great layer of flavor to the dish. - Adding Chicken Broth and Tomatoes Carefully pour the chicken broth into the skillet. Add the diced tomatoes with their juices. Use a wooden spoon to scrape any tasty bits from the skillet's bottom. This helps build a rich sauce. - Cooking the Pasta Bring the mixture to a boil. Then, add the penne pasta. Stir it well, ensuring it’s submerged. Reduce the heat to medium-low. Let it simmer uncovered for about 10-12 minutes. Stir occasionally to keep the pasta from sticking. The pasta should be firm yet tender when done. - Incorporating Heavy Cream Once the pasta is cooked, return the sautéed chicken to the skillet. Pour in the heavy cream and stir well. This adds richness and creaminess to the dish. Let it heat for 2-3 minutes. - Final Seasoning Adjustments Taste your dish and adjust the seasoning. Add salt and freshly ground black pepper as needed. This final touch enhances all the flavors. For the complete recipe, check out the [Full Recipe]. Adjusting Spice Levels You can change the heat in this dish. If you like it mild, use less Cajun seasoning. For more heat, add extra seasoning or even some hot sauce. Taste as you go to find the right balance for you. Enhancing Creaminess For a richer dish, add more heavy cream. You can also try cream cheese or sour cream for a twist. These options make the sauce even creamier and more delicious. Preventing Pasta from Sticking To keep your pasta from sticking, stir it often. Make sure the pasta is well covered with the sauce. If it still sticks, you can add a splash of chicken broth or water to loosen it. Achieving Perfect Texture Cook the pasta until it's just al dente. This means it should be firm to the bite. Overcooking can make it mushy. After cooking, let it sit for a minute. This will help it absorb the sauce better. Serving Suggestions Serve the pasta in shallow bowls. This makes it look nice and allows for easy eating. Pair it with garlic bread for a tasty side. Adding Extra Garnishes Top your dish with chopped parsley and grated Parmesan cheese. This adds color and flavor. A drizzle of olive oil also gives it a nice shine. For the complete cooking process, check out the Full Recipe. {{image_4}} You can switch up the protein in this dish easily. - Shrimp or Sausage Substitutes: For a seafood twist, use shrimp. Cook it until pink. A smoked sausage also adds great flavor. Slice it and sauté it with the veggies. - Vegetarian Option with Tofu: If you want a meatless meal, try tofu. Press it to remove water, then cube it. Sauté it until golden for a nice texture. Not all pasta is the same. You can choose what fits your taste. - Different Types of Pasta: While penne is great, you can use other shapes too. Bowties or fusilli work well and add fun to the dish. - Gluten-Free Options: You can go gluten-free with rice pasta. It cooks similarly and tastes good with the sauce. You can tailor the flavor to your liking. - Mild vs. Spicy Cajun Seasoning: If you prefer less heat, use mild Cajun seasoning. You can always start low and add more if needed. - Adding Vegetables for Variety: Add more veggies like zucchini or spinach. They boost nutrition and add color. Just chop them small and add them early in the cooking process. For more details, check the Full Recipe. To keep your One-Pan Cajun Chicken Pasta fresh, store leftovers in the fridge. Use airtight containers to prevent drying out. It’s best to eat the pasta within 3-4 days for optimal taste. Let it cool before sealing to avoid steam buildup. Choose containers that fit your portion size. Glass or BPA-free plastic works well. Ensure the lid seals tightly. Label the container with the date. This helps you track how long it has been stored. To reheat, use the stovetop for the best texture. Add a splash of chicken broth or water to prevent drying. Heat over medium-low heat, stirring gently. Reheat for about 5-7 minutes until hot. If using a microwave, heat in 1-minute intervals. Stir between each interval to ensure even heating. To freeze One-Pan Cajun Chicken Pasta, let it cool fully first. Portion it into freezer-safe bags or containers. Remove as much air as possible before sealing. Thaw overnight in the fridge for best results. To reheat, follow the same stovetop method. Add liquid if needed to restore creaminess. Enjoy it just like the first time! Prep time is about 10 minutes. Cooking takes around 20 minutes. So, the total time is about 30 minutes. This meal is quick and easy, perfect for busy days. Yes, you can make this dish ahead of time. Store it in the fridge for up to three days. Just reheat it on the stove until warm. If you make it in advance, the flavors will blend even more. This dish pairs well with several sides. Here are some ideas: - Garlic bread - Caesar salad - Steamed vegetables - Coleslaw These sides add a nice touch and balance the meal. You can easily adjust this recipe to suit your taste. Here are some swaps: - Use whole wheat pasta for a healthier option. - Add more veggies like spinach or zucchini. - Adjust the Cajun seasoning for more or less spice. Feel free to get creative! Absolutely! You can use other meats. Here are some options: - Shrimp for a seafood twist - Sausage for a heartier flavor - Tofu for a vegetarian choice Each will bring its own flavor to the dish. Enjoy experimenting! For the full recipe, check out the One-Pan Cajun Chicken Pasta. This article covered the key ingredients for one-pan Cajun chicken pasta, including chicken, seasoning, and creamy elements. We explored preparation steps, cooking methods, and ways to perfect the dish's flavor. You can also customize it with protein alternatives and different pasta types. To wrap up, this meal is both tasty and flexible. It’s easy to make, and leftovers store well. Try the tips and variations to make it your own. This dish is sure to impress anyone you serve it to. Enjoy your cooking adventure!](https://recipetorch.com/wp-content/uploads/2025/07/15ba4705-a412-4758-97f0-83b9b9bcc8fc.webp)
Are you ready to impress your taste buds with a mouthwatering dish? One-Pan Cajun Chicken Pasta is both flavorful and

Looking for a quick and tasty dinner option? I’ve got just the thing for you: Easy Lemon Garlic Tilapia! This
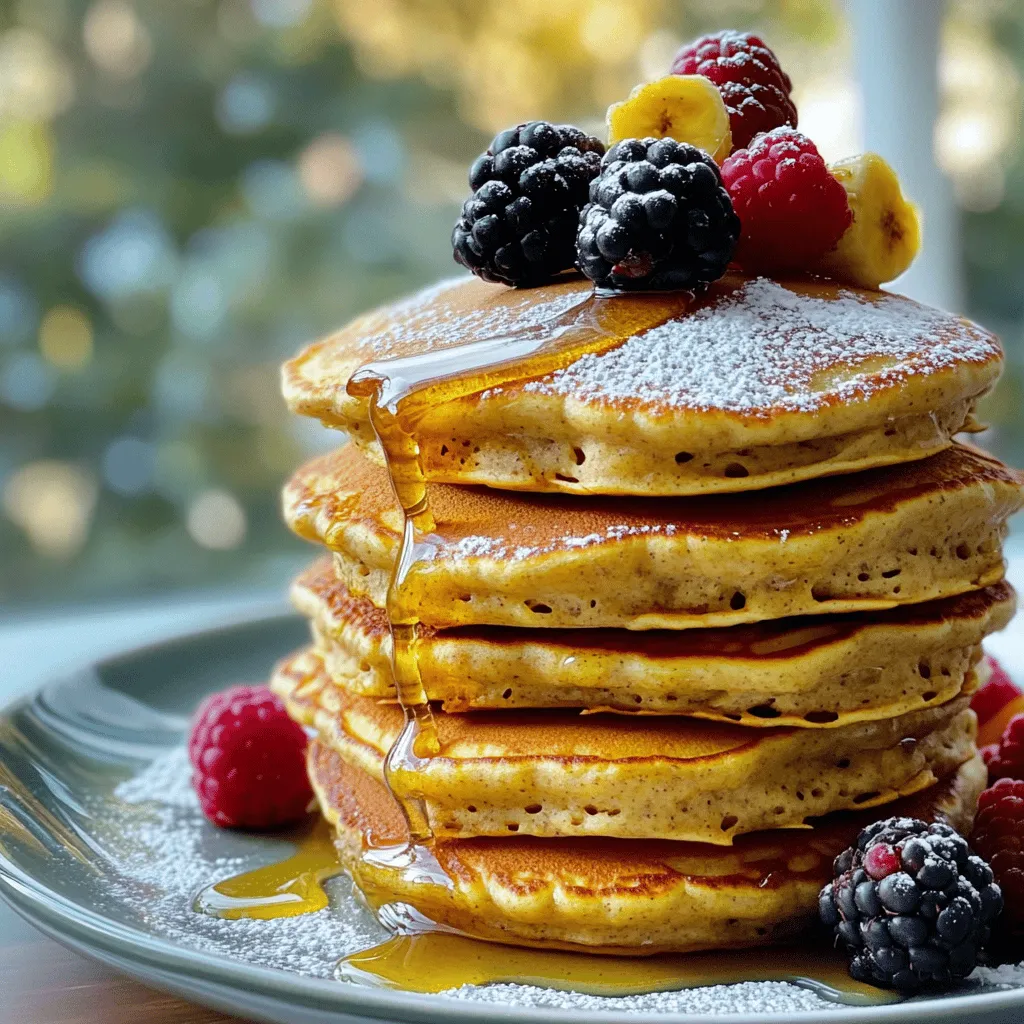
Looking for a quick and healthy breakfast? I’ve got just the recipe for you! These Healthy Banana Oat Pancakes are

Start your day with a nutritious twist on a classic favorite: Zucchini Oat Pancakes! Packed with wholesome ingredients, these pancakes
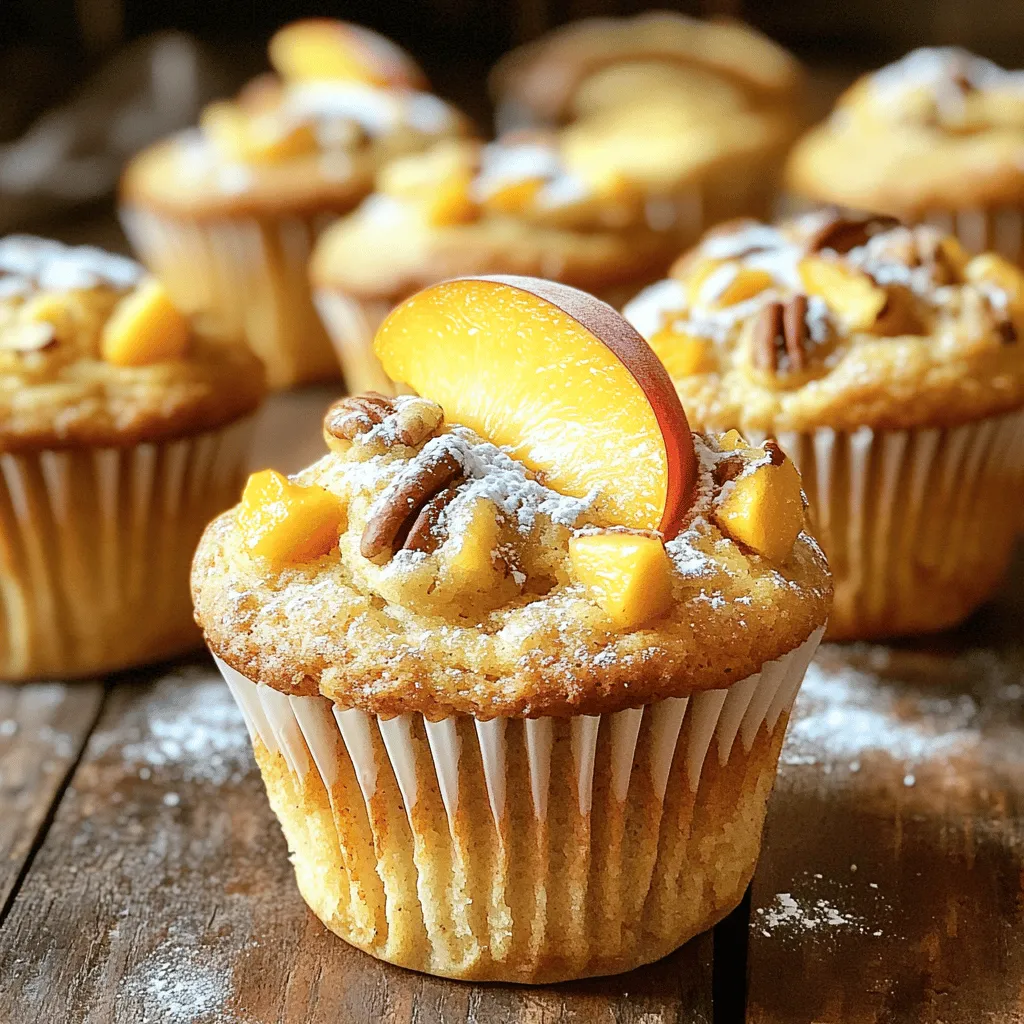
Are you ready to bake something truly delicious? Peach and pecan muffins are the perfect treat! Juicy peaches and crunchy
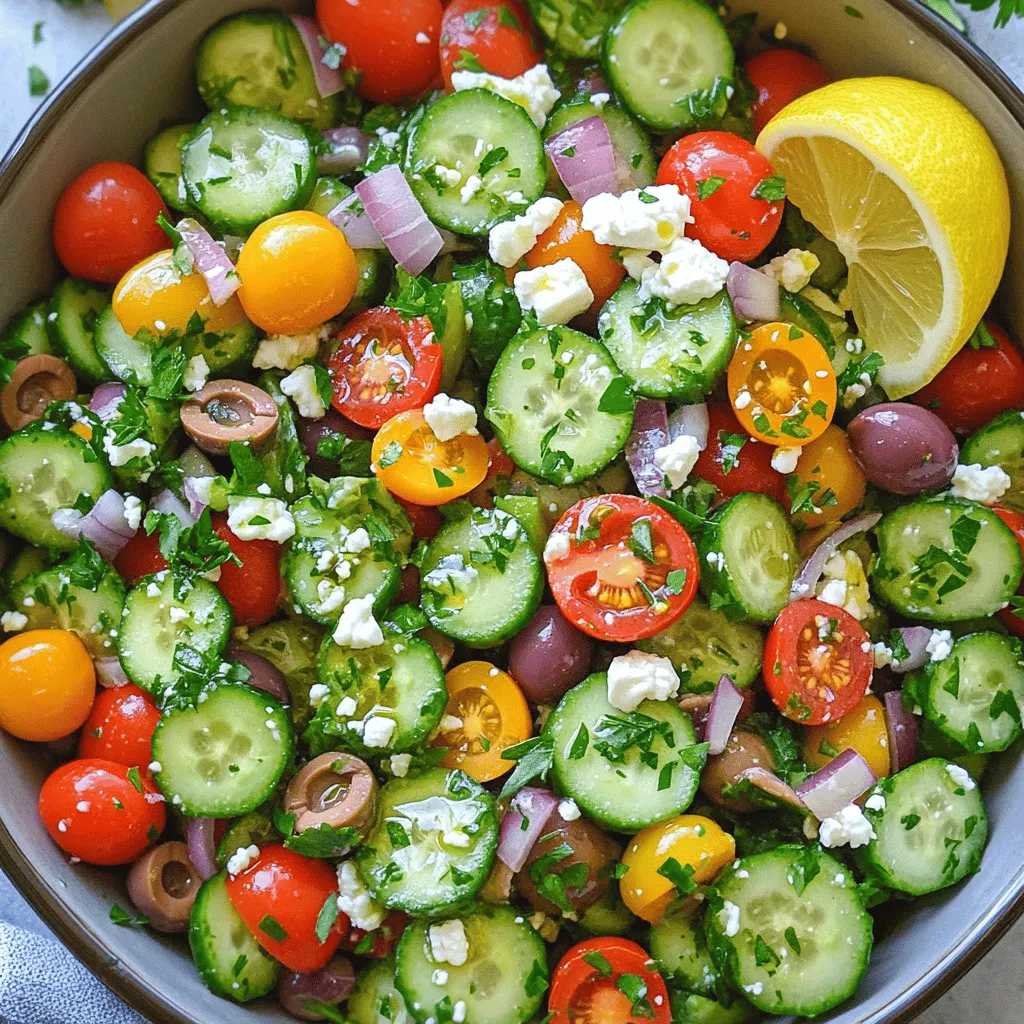
Are you looking for a fresh and vibrant side dish? My Mediterranean cucumber salad is just the ticket! With crunchy

Looking for a delicious treat that’s both quick to make and packed with veggies? Zucchini carrot muffins are your answer!
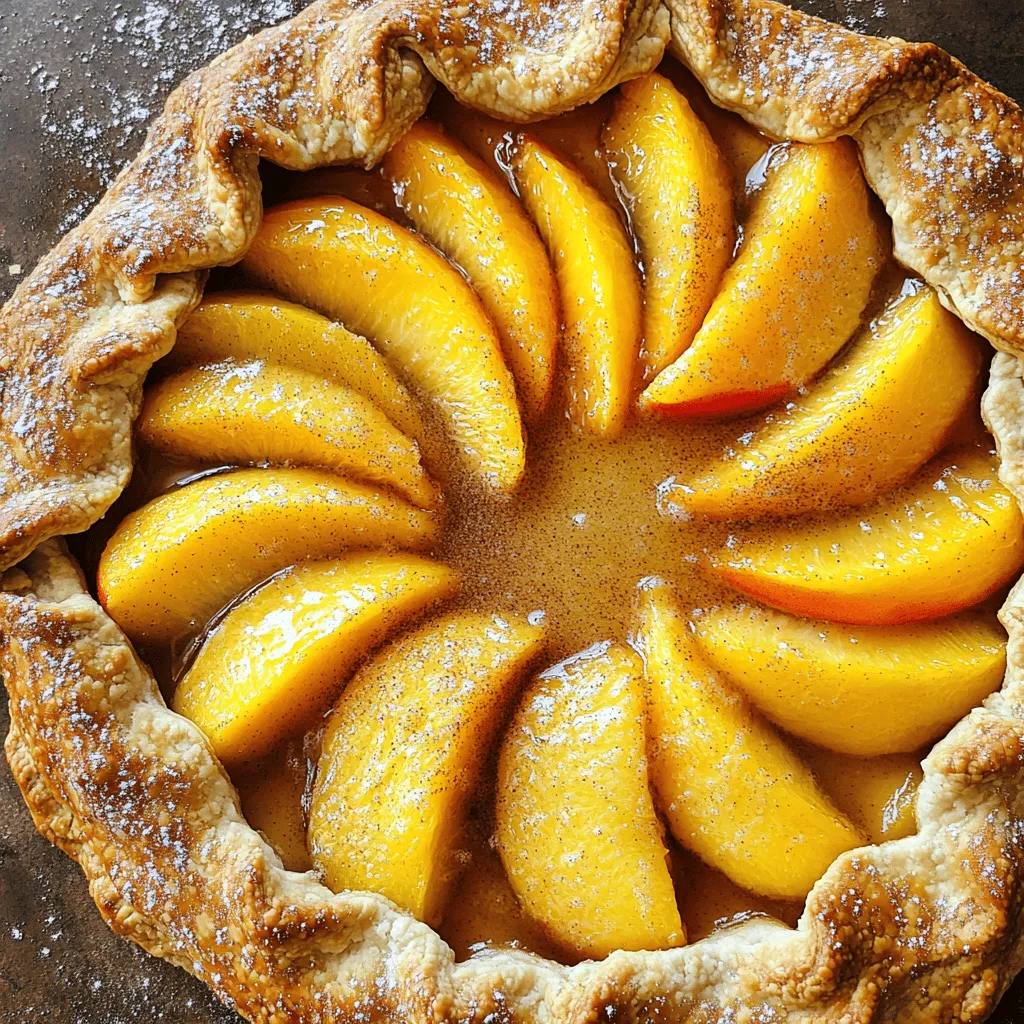
Welcome to my kitchen! Today, I’m excited to share a delightful and easy recipe for a simple peach galette. This
