Skip to content
DisclaimerTerms Of UseGDPR PolicyCookie Policy

recipetorch

  • Home
  • Drinks
  • Appetizers
  • Dinner
  • Dessert
  • About
  • Contact
  • Privacy Policy
DisclaimerTerms Of UseGDPR PolicyCookie Policy

Nicole

- 2 medium sweet potatoes, peeled and sliced into fries - 2 tablespoons olive oil - 1 teaspoon garlic powder - 1 teaspoon smoked paprika - ½ teaspoon ground cumin - ½ teaspoon fine sea salt - ¼ teaspoon freshly ground black pepper - Fresh parsley, finely chopped (for garnish) - Calories per serving: About 150 calories - Macronutrient breakdown: - Carbohydrates: 30g - Protein: 2g - Fat: 4g - Alternatives for olive oil: You can use avocado oil or coconut oil for a different flavor. - Using different spices: Try chili powder for heat or rosemary for an herb twist. Preheating your air fryer is key. It helps cook the fries evenly. Set the air fryer to 400°F (200°C) for five minutes. This ensures the fries will become crispy and golden. To get perfect fries, slice the sweet potatoes thin. Aim for about 1/4 inch thick. This size helps them cook well. Soaking the fries in water for 30 minutes can make them crispier. After soaking, dry them well with a towel. Arrange the fries in a single layer in the air fryer. Avoid overcrowding the basket. If needed, cook in batches. Cook the fries for 15 to 20 minutes. Shake the basket halfway through. This helps them cook evenly. Once done, let them cool for a minute before serving. Enjoy your crispy air fryer sweet potato fries! To get the best crispiness, cook your sweet potato fries for 15-20 minutes. This time is perfect for a golden-brown color. Remember, spacing matters! Place the fries in a single layer in the air fryer. If you stack them, they won’t cook evenly. Cook in batches if needed to keep that crisp texture. Want to boost the flavor? Add spices like cayenne pepper or chili powder for a kick. If you love heat, chop up some fresh jalapeños or add crushed red pepper flakes. These will give your fries a tasty twist! One big mistake is overcrowding the basket. This can lead to soggy fries. Always leave space for hot air to flow. Also, check your temperature. Cooking at 400°F (200°C) is key. If it’s too low, your fries will not crisp up well. Keep these tips in mind for the best results! {{image_4}} You can change up the taste of your sweet potato fries easily. Try a sweet and spicy mix. Just add some cayenne pepper or chili powder to your spice blend. The sweetness of the potatoes pairs well with the heat. You can also try a herb-infused option. Rosemary and thyme add a fresh taste. Simply toss in some dried herbs during the mixing step. If you follow a vegan diet, this recipe is a great fit. All the ingredients are plant-based. You can also make these fries gluten-free. The spices used do not contain gluten. For a low-carb option, swap sweet potatoes for zucchini or turnips. They will still give you a crispy texture. Dipping sauces can make your fries even better. Try garlic aioli or spicy ketchup for a burst of flavor. You can also pair them with ranch or a tangy yogurt dip. These fries go well with many main dishes. Serve them alongside grilled chicken, fish tacos, or a veggie burger. They add a tasty crunch to any meal. For the full recipe, check out the steps above. To keep your sweet potato fries fresh, let them cool first. Spread them out on a plate or a baking sheet. Avoid stacking to prevent sogginess. Once cool, transfer them to an airtight container. Store them in the fridge. They will stay good for about 3-5 days. If you want to keep them longer, consider freezing. To enjoy crispy leftover fries, I recommend using the air fryer. Preheat it to 375°F. Place the fries in the basket in a single layer. Heat for about 5-7 minutes. This method crisps them up nicely. You can also use an oven. Preheat it to 400°F, spread the fries on a baking sheet, and bake for 10 minutes. This keeps them crunchy. Freezing fries is simple. First, let them cool completely. Spread them out on a baking sheet in a single layer. Freeze until solid, about 1-2 hours. Then, transfer the fries to a freezer bag. Remove as much air as possible before sealing. They can stay in the freezer for up to 3 months. To use, thaw them in the fridge overnight and follow the reheating instructions. Enjoy your crispy air fryer sweet potato fries any time! For the full recipe, check out the [Full Recipe]. Air fryer sweet potato fries can last about 3 to 5 days in the fridge. Store them in an airtight container. Make sure they cool down before you seal the container. This helps keep them fresh and prevents sogginess. Yes, you can use frozen sweet potatoes. However, cooking times will change. Cook them for about 20 to 25 minutes at 400°F (200°C). Shake the basket halfway through to ensure even cooking. You might need to add a few extra minutes if they are not crispy enough. Air fryer sweet potato fries are a healthy snack. Sweet potatoes are full of vitamins A and C. They also have fiber, which helps digestion. Using less oil makes them lower in fat than fried fries. Enjoy them guilt-free! You learned how to make air fryer sweet potato fries, from ingredients to cooking steps. We covered ingredient alternatives and storage tips. Remember to preheat your air fryer for better crispiness. Don't overcrowd the basket for the best results. Enjoy trying different spices and flavors. These fries can be a healthy snack or side. Now, go make your own delicious fries and impress your friends and family!

Air Fryer Sweet Potato Fries Crisp and Flavorful Snack

Are you ready to enjoy a crispy, flavorful snack? Air fryer sweet potato fries are easy to make and perfect

To make these tasty muffins, gather the following main ingredients: - 1 cup canned pumpkin puree - 1/2 cup vegetable oil - 1/2 cup packed brown sugar - 1/4 cup granulated sugar - 2 large eggs - 1 teaspoon vanilla extract - 1 1/2 cups all-purpose flour - 1 teaspoon baking powder - 1 teaspoon baking soda - 1 teaspoon ground cinnamon - 1/2 teaspoon ground nutmeg - 1/4 teaspoon ground ginger - 1/4 teaspoon salt - 1/2 cup chopped walnuts or pecans (optional) These ingredients create a rich and moist muffin base. The pumpkin and spices work together to give a warm flavor. For the sweet streusel topping, you will need: - 1/3 cup all-purpose flour - 1/3 cup packed brown sugar - 1 teaspoon ground cinnamon - 2 tablespoons unsalted butter, melted - 1/4 cup rolled oats This topping adds a crunchy layer over the soft muffin. The oats and butter blend into a crumbly texture. You can customize your muffins with these optional mix-ins: - Chocolate chips - Dried cranberries - Chopped apples These add-ins can bring new flavors and textures to your muffins. Feel free to mix and match based on your taste. For the full recipe, check the earlier section. First, preheat your oven to 350°F (175°C). While the oven heats, prepare your muffin tin. You can line the tin with paper liners or lightly grease it with cooking spray. This step helps the muffins come out easily. In a large mixing bowl, combine 1 cup of canned pumpkin puree, 1/2 cup of vegetable oil, and 1/2 cup of packed brown sugar. Add 1/4 cup of granulated sugar, 2 large eggs, and 1 teaspoon of vanilla extract. Whisk these ingredients together until the mixture is smooth and creamy. In another bowl, sift together 1 1/2 cups of all-purpose flour, 1 teaspoon of baking powder, and 1 teaspoon of baking soda. Then, add 1 teaspoon of ground cinnamon, 1/2 teaspoon of ground nutmeg, 1/4 teaspoon of ground ginger, and 1/4 teaspoon of salt. Sifting helps mix the dry ingredients evenly. Now, slowly add the dry mixture to the wet mixture. Stir gently until the two mixtures just come together. It is okay to have small lumps. If you want a crunch, fold in 1/2 cup of chopped walnuts or pecans at this stage. In a small bowl, mix together 1/3 cup of all-purpose flour, 1/3 cup of packed brown sugar, and 1 teaspoon of ground cinnamon. Drizzle in 2 tablespoons of melted unsalted butter and stir in 1/4 cup of rolled oats. Mix until you get a crumbly texture. Using a scooping tool or spoon, fill each muffin cup about two-thirds full with the batter. Then, sprinkle the streusel topping generously over each muffin. Place the muffin tin in the oven and bake for 18-22 minutes. Check for doneness by inserting a toothpick into the center; it should come out clean. Once baked, let the muffins cool in the tin for about 5 minutes. After that, transfer them to a wire rack to cool completely. This step keeps them fluffy and tasty. If you want to explore more, check out the Full Recipe for details on presentation! When mixing your batter, start with the wet ingredients. Use a big bowl for this. You want to whisk the pumpkin, oil, sugars, eggs, and vanilla until smooth. Then, sift the dry ingredients in a separate bowl. This helps the baking powder and spices mix well. When you add dry to wet, stir gently. Over-mixing can make muffins tough. A few lumps are okay. To keep your muffins soft and moist, watch the baking time closely. Start checking them at 18 minutes. Insert a toothpick in the center of a muffin. If it comes out clean, they are done. If not, bake for a few more minutes. Remember, they will continue to cook a bit after you take them out. Feel free to adjust the spices to suit your taste. If you love cinnamon, add more! You can also try other spices like allspice or cardamom for a twist. Just remember to keep a balance. Too much spice can overwhelm the pumpkin flavor. Start with small amounts and taste the batter if you can. Make your muffins shine when serving. Arrange them on a nice plate or a wooden board. A light dusting of powdered sugar adds a sweet touch. You can also place some cinnamon sticks or fall leaves nearby for color. This makes them look even more inviting. For the full recipe, follow the steps in detail to enjoy these delightful treats. {{image_4}} You can make these muffins gluten-free. Use a gluten-free flour blend instead of all-purpose flour. Brands like Bob's Red Mill or King Arthur Flour work well. You might need to add a bit of xanthan gum to help bind the ingredients. This small change keeps the muffins moist and tasty. Feel free to get creative with nuts and fruits. Instead of walnuts or pecans, try almonds or hazelnuts. You can also add dried fruits like cranberries or raisins. These add a nice sweetness and texture. Mixing in some chocolate chips is another fun option. You can really make this recipe your own! If you want to make vegan muffins, swap the eggs for flax eggs. Mix one tablespoon of ground flaxseed with three tablespoons of water. Let it sit until it thickens. Use a plant-based oil, too. Coconut oil or canola oil works great. These adjustments keep the muffins soft and flavorful without any animal products. Check out the Full Recipe for all the details. To keep your muffins fresh, let them cool completely. Place them in an airtight container. Store them at room temperature for up to three days. If you want to keep them longer, the fridge works too. Just remember, the fridge may make them a bit dry. If you have extra muffins, freezing is a great option. Wrap each muffin in plastic wrap. Then, place them in a freezer bag. Remove as much air as possible to prevent freezer burn. You can freeze them for up to three months. This way, you can enjoy them later! To thaw frozen muffins, simply take them out of the freezer. Leave them on the counter for a few hours. If you need them fast, you can use the microwave. Heat them for about 15-20 seconds. For a crispy top, pop them in the oven at 350°F for a few minutes. Enjoy your muffins warm! Yes, you can use fresh pumpkin. Start by roasting a small pumpkin. Cut it in half, scoop out the seeds, and roast it until soft. After it cools, mash it well. You need about one cup of fresh puree for this recipe. Fresh pumpkin gives a vibrant flavor. However, canned pumpkin is easy and saves time. To cut the sweetness, reduce the brown sugar. Try using 1/4 cup instead of 1/2 cup. You can also skip the granulated sugar. Adding spices can enhance flavor without more sugar. Try adding more cinnamon or nutmeg for a deeper taste. To make fluffy muffins, avoid over-mixing the batter. Mix wet and dry ingredients until just combined. Small lumps are fine. Also, make sure your baking powder and baking soda are fresh. They help the muffins rise. Lastly, don’t skip letting your muffins cool on a rack. This keeps them fluffy. Yes! You can make mini muffins. Just fill the mini muffin cups about halfway. Bake them for about 12-15 minutes. Check for doneness by inserting a toothpick. When it comes out clean, they are ready. Mini muffins are great for snacks or parties. These muffins last about 2-3 days at room temperature. Keep them in an airtight container to keep them fresh. If you want to store them longer, consider freezing. They can last up to 3 months in the freezer. Just thaw before enjoying! For the full recipe, check the earlier section. In this blog post, we explored the delicious world of pumpkin streusel muffins. We covered key ingredients, step-by-step instructions, and helpful tips. I shared ways to customize the recipe and store leftovers. Remember, these muffins can fit many diets, like gluten-free or vegan. Make them your own with different mix-ins or spices. Enjoy baking and sharing these tasty treats! They will delight your friends and family. Now, get ready to savor the warmth and comfort these muffins bring.

Pumpkin Streusel Muffins Savory and Simple Delight

If you’re craving a warm treat that captures the essence of fall, look no further! Pumpkin Streusel Muffins are easy

- 200g block of feta cheese - 4 large eggs - 1 cup cherry tomatoes, halved - 2 tablespoons extra virgin olive oil - 1 teaspoon dried oregano - 1/2 teaspoon red pepper flakes - Salt and pepper, to taste - Fresh basil, for garnish - Crusty artisan bread, for serving The star of this dish is the feta cheese. Choose a block that is creamy and flavorful. It melts beautifully, giving your dish a rich taste. The eggs add protein and a lovely texture. Use large eggs for the best results. Cherry tomatoes bring a touch of sweetness. Halve them to help them cook evenly. The extra virgin olive oil enhances flavors. It also helps with roasting. Dried oregano adds a warm, earthy taste. Red pepper flakes give a hint of spice. You can adjust these to suit your taste. Salt and pepper are essential for balancing flavors. Use fresh basil as a garnish for color and a fresh taste. Lastly, crusty artisan bread is perfect for dipping into the creamy goodness. For the full recipe, refer to the earlier section. - Preheat your oven to 400°F (200°C). - Take a medium baking dish and place the block of feta cheese in the center. - Arrange the halved cherry tomatoes around the cheese. Make sure they fit snugly. - Drizzle extra virgin olive oil over the feta and tomatoes. - Sprinkle dried oregano, red pepper flakes, salt, and pepper evenly across the dish. - Place your dish in the oven and bake for about 25 minutes. You want the feta to turn golden and the tomatoes to blister. - After 25 minutes, take the dish out of the oven. - Use a spoon to make small wells in the tomato mixture. - Crack an egg into each well, being careful not to break the yolk. - Put the dish back in the oven and bake for another 10 to 12 minutes. Aim for set egg whites and runny yolks. - Once done, take it out and let it cool for a moment. Garnish with fresh basil leaves. - Serve it hot with crusty artisan bread for dipping. For the full recipe, check the earlier section. To get the best yolks, adjust the baking time. If you want runny yolks, check them at 10 minutes. For firmer yolks, bake a bit longer. The key is to watch closely during the last few minutes. Choosing the right feta cheese is important. A creamy, high-quality feta gives the best flavor. Look for a block of feta, not crumbled. It melts better and adds creaminess to the dish. Pair this dish with crusty artisan bread. It’s perfect for dipping into the creamy feta and eggs. You can also try sourdough or ciabatta for a nice twist. For sides, fresh fruit or a light salad works well. A simple arugula salad adds a nice peppery bite. Roasted veggies can also bring more flavor and color to your meal. One mistake is overcrowding the baking dish. Make sure there is space around the feta and eggs. This helps everything cook evenly. Another mistake is skipping the seasoning. Don’t forget the salt and pepper! They enhance the flavors of the feta and tomatoes. A little seasoning makes a big difference. Try these tips and tricks for the best Viral Baked Feta Eggs! For the full recipe, check out the details above. {{image_4}} You can spice up your baked feta eggs in a few easy ways. First, try using different peppers. For a mild taste, choose sweet bell peppers. For more heat, use jalapeños or serranos. You can also change the amount of red pepper flakes. If you like it hot, add more. If you prefer it mild, use less. This lets you tailor the dish to your taste. Want to make your dish even better? Add extra ingredients! You can include vegetables like spinach or bell peppers. They not only add color but also boost nutrition. Another option is to use flavored feta cheese. Herbs, sun-dried tomatoes, or olives can add a new twist. Mixing these in gives a unique taste to your baked feta eggs. This dish is not just for breakfast! You can transform it for lunch or dinner. Serve it with a fresh salad for a light meal. It also works great for brunch gatherings. Pair it with mimosas or coffee. This makes it a hit at any time of day. Check the full recipe for ideas on meals and sides! To store leftovers of baked feta eggs, let them cool down first. Place them in a container. Use an airtight container to keep them fresh. You can store these in the fridge for up to three days. If you want to freeze them, it’s best to freeze the feta and tomatoes without the eggs. This helps keep the eggs from becoming rubbery. When reheating, use the oven for the best results. Preheat the oven to 350°F (175°C). Place your dish in the oven for about 10-15 minutes. This warms the dish evenly. If you want a quick method, you can use the microwave. However, this might affect the texture. To keep the eggs soft, cover the dish with a damp paper towel while heating. This helps preserve moisture and flavor. If you can't have feta, don't worry! You can try these options: - Goat cheese - Ricotta cheese - Cream cheese - Tofu (for a vegan choice) These swaps offer different flavors and textures, so feel free to experiment! Yes, this dish is naturally vegetarian! Just ensure your ingredients are meat-free. You can also add: - Spinach for extra greens - Bell peppers for some crunch - Mushrooms for a savory touch These swaps keep the dish flavorful and satisfying! To prep this dish ahead of time, try these tips: - Prepare the feta and tomatoes the night before. Store them in the fridge. - Crack the eggs in the wells just before baking. - This way, you can bake it fresh in the morning! These steps save time and keep your meal tasty! This blog post outlined a tasty baked feta egg dish. We looked at the key ingredients, detailed steps, and helpful tips. You can adjust spice levels or add extras for variety. Knowing the storage tips helps keep leftovers fresh. Don't be afraid to experiment with flavors and serving ideas. This dish works for any meal. Try it for breakfast or dinner, and enjoy all the tasty options. I hope you have fun making this dish and share it with your loved ones!

Viral Baked Feta Eggs Easy and Flavorful Dish

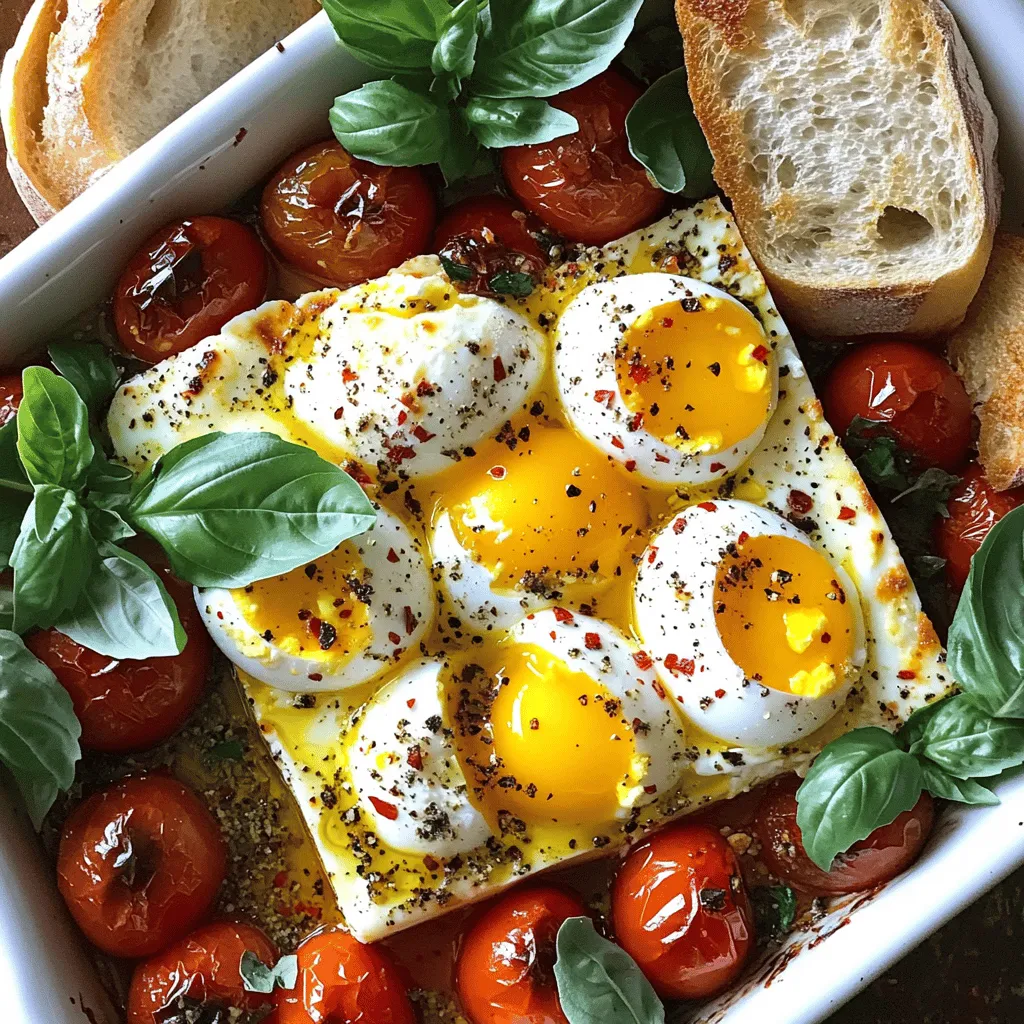
Are you ready to try a dish that’s taking the internet by storm? Viral Baked Feta Eggs are not only

- 4 bone-in chicken thighs, skin on - 2 tablespoons Dijon mustard - 2 tablespoons honey - 1 tablespoon extra virgin olive oil - 1 teaspoon garlic powder - 1 teaspoon smoked paprika - Sea salt and freshly ground black pepper to taste - 1 pound baby potatoes, cut in half - 2 cups fresh broccoli florets - Fresh parsley, chopped, for garnish - Lemon wedges for serving - Additional spices for flavor enhancement - Other vegetables like carrots or bell peppers For my Sheet Pan Honey Mustard Chicken, I love using fresh ingredients. The chicken thighs give you that juicy bite, while the Dijon mustard and honey create a sweet and tangy glaze. You can change up the flavors with different spices. Garlic powder and smoked paprika add depth. The baby potatoes add a hearty touch. They soak up the chicken juices, making them extra tasty. Fresh broccoli florets bring color and crunch to the dish. If you want to add a twist, try lemon wedges for serving. They brighten the flavors. Other veggies like carrots or bell peppers can also work well. Feel free to mix and match based on what you have at home. For the full recipe, just follow the link provided. - Preheat the oven to 400°F (200°C). - In a bowl, mix 2 tablespoons of Dijon mustard, 2 tablespoons of honey, 1 tablespoon of olive oil, 1 teaspoon of garlic powder, 1 teaspoon of smoked paprika, and some salt and pepper. Whisk until smooth. - Place 4 chicken thighs in a large bowl. Pour half of the honey mustard sauce over them. Make sure the chicken is coated well. Save the rest of the sauce for later. - Line a sheet pan with parchment paper. Spread 1 pound of halved baby potatoes on one side of the pan. Drizzle with olive oil, add salt, and toss to coat. - Lay the chicken thighs on the other side of the sheet pan, skin side up, leaving space between each piece. - Bake for 20 minutes. This helps the chicken start cooking and the flavors blend. - After 20 minutes, take out the pan. Add 2 cups of fresh broccoli florets to the empty space. Drizzle the reserved honey mustard sauce over the broccoli. - Put the pan back in the oven and bake for another 15-20 minutes. The chicken should be golden brown and reach an internal temperature of 165°F (75°C). The veggies should be tender. - Let the dish rest for a few minutes after taking it out of the oven. - For a great look, serve directly from the sheet pan. You can also transfer everything to a big serving platter. Arrange the chicken, potatoes, and broccoli nicely, and sprinkle with fresh parsley for a pop of color. For the complete recipe, check [Full Recipe]. To keep chicken thighs juicy, marinate them in the honey mustard sauce. The sauce adds flavor and moisture. Avoid overcooking by checking the chicken's internal temperature. Aim for 165°F (75°C). For crispier skin, increase the baking time by 5 minutes. You can also broil the chicken for the last few minutes. This gives a lovely golden color and crunch. Pair your honey mustard chicken with roasted vegetables or a fresh salad. Creamy mashed potatoes also work well. For wine, try a light white like Sauvignon Blanc. It balances the dish's sweetness and richness. A light red like Pinot Noir can also complement it nicely. Use a heavy-duty sheet pan for even cooking. It helps to prevent warping in the oven. A non-stick pan can be great too for easy cleanup. For mixing the sauce, a medium-sized mixing bowl and a whisk work best. They help combine the ingredients smoothly. {{image_4}} You can easily change this dish to fit your needs. For a lighter option, use boneless chicken. The cooking time will be shorter, around 20-25 minutes. Just make sure the chicken reaches 165°F. If you prefer a vegan dish, swap chicken for tofu or tempeh. Press the tofu first to remove moisture. Cut it into cubes and marinate it in the honey mustard sauce. Bake it for about 25-30 minutes for tasty results. Get creative with herbs and spices. Try adding rosemary or thyme for added depth. You can also use chili powder for a spicy kick. Just mix and match to suit your taste. Don’t forget to switch up your veggies, too! Use seasonal produce like zucchini in the summer or carrots in the fall. This keeps your meal fresh and adds different tastes. Prepare your ingredients ahead of time. Chop the veggies and marinate the chicken the night before. Store everything in the fridge for quick meals on busy days. You can also freeze leftovers for later. Just let the dish cool, then place it in airtight containers. It will stay fresh for about three months. Reheat it in the oven for best results. For the full recipe, check out the main article. To store your leftovers, place them in an airtight container. Make sure to cool them first. This helps keep the chicken and veggies fresh. Store them in the fridge within two hours of cooking. Try to eat the leftovers within three to four days for the best taste. Keep the honey mustard sauce separate if you can. This helps keep everything flavorful and fresh. If you want to freeze the leftovers, use a freezer-safe container. Make sure to label it with the date. You can freeze the chicken and veggies together or separately. They stay good for up to three months. When you are ready to eat, thaw them overnight in the fridge. Reheat the chicken in the oven at 350°F (175°C) for about 20 minutes. This helps keep it juicy and tasty. Typically, your leftovers last about three to four days in the fridge. If they smell off or look strange, it’s best to throw them away. Signs of spoilage include a slimy texture or a bad smell. Always trust your senses. It’s better to be safe than sorry when it comes to food! Check the chicken's internal temperature. Use a meat thermometer. Insert it into the thickest part of the thigh. It should read 165°F (75°C) to be safe. This ensures the chicken is fully cooked and safe to eat. You can also check for clear juices. If juices run clear, the chicken is likely done. Yes, you can prep the chicken and sauce ahead. Marinate the chicken in the honey mustard mix. Cover it and store it in the fridge for up to 24 hours. This boosts flavor and saves time. You can also chop the veggies ahead. Just keep them in airtight containers until cooking. If you don’t have Dijon mustard, try yellow mustard. It adds a tangy flavor too. You can also use whole grain mustard for a crunchier texture. Another option is honey alone, but this will change the taste. Each substitute keeps the dish tasty without losing its essence. Absolutely! This dish is great for meal prep. Cook a big batch and store leftovers. You can freeze portions in airtight containers. They last for up to three months. When ready to eat, thaw in the fridge overnight. Reheat in the oven or microwave for a quick meal. For crispy skin, dry the chicken well before cooking. Pat it with paper towels to remove moisture. Season it well with salt. This helps draw out more moisture during cooking. Bake at a high temperature, around 425°F (220°C), for extra crunch. Placing the chicken skin side up also helps. This recipe covers everything you need for a tasty meal. We looked at key ingredients, steps for cooking, and some smart tips. I shared ideas for variations and how to store leftovers, too. You can make this honey mustard chicken your own and enjoy it any day. Remember, cooking is fun! Try these ideas and make your meals special. Happy cooking!

Sheet Pan Honey Mustard Chicken Easy Dinner Delight

Ready for a quick and tasty dinner? This Sheet Pan Honey Mustard Chicken is here to save your evening! With

To make these no bake peanut butter chocolate bars, you need: - 1 cup natural peanut butter (creamy or crunchy) - 1/2 cup honey or maple syrup (for sweetness) - 2 cups rolled oats (old-fashioned or quick oats) - 1/2 cup chocolate chips (dark or semi-sweet for richness) - 1/4 cup chia seeds (optional for added nutrition and texture) - 1/2 teaspoon vanilla extract (for flavor enhancement) - Pinch of salt (to balance sweetness) If you want to swap ingredients, here are some ideas: - For peanut butter: Try almond butter or sunflower seed butter. - For honey: Use agave nectar or brown rice syrup. - For oats: Rolled oats can be replaced with crushed graham crackers. - For chocolate chips: Use dried fruit or nuts for a twist. - For chia seeds: Flaxseeds work well, too. These swaps keep the bars tasty while catering to your needs. These bars are not only delicious but also nutritious. Here's what you'll find in each bar: - Calories: About 200 - Protein: 6g - Fat: 10g - Carbohydrates: 24g - Fiber: 3g - Sugar: 8g These bars offer healthy fats and energy, making them a great snack. Enjoy experimenting with the Full Recipe to find your favorite mix! Start by gathering your ingredients. In a large bowl, add 1 cup of peanut butter and 1/2 cup of honey or maple syrup. Mix them well with a spatula or wooden spoon. You want it to be smooth and creamy. This is the base for our no bake peanut butter chocolate bars. Next, stir in 1/2 teaspoon of vanilla extract and a pinch of salt. This will enhance the flavor and balance the sweetness. Now, it's time for the dry ingredients. Gradually add 2 cups of rolled oats to the peanut butter mix. If you want extra nutrition, add 1/4 cup of chia seeds. Gently fold in 1/2 cup of chocolate chips. Make sure every oat is coated in the peanut butter mixture. This ensures a rich taste in each bite. To prepare for chilling, line an 8-inch square baking dish with parchment paper. Leave some paper hanging over the sides. This will help you lift the bars out later. Pour the mixture into the dish and spread it evenly. Press it down firmly so it holds together. Place the dish in the refrigerator for 1 to 2 hours. This helps the bars set properly. Once firm, lift the mixture out using the parchment paper. Cut into bars of your desired size. Enjoy your no bake peanut butter chocolate bars! For the full recipe, check the recipe section above. When making no bake peanut butter chocolate bars, a few mistakes can happen. First, make sure to measure your ingredients well. Too much peanut butter can make the bars too sticky. Too little oats can lead to a crumbly texture. Also, don't skip chilling the bars. They need time to firm up. If you cut them too soon, they will fall apart. Lastly, ensure you pack the mixture tightly in the dish. If not packed well, they won't hold their shape. You can easily boost the flavor of your bars. Adding a pinch of sea salt brings out the sweetness of the chocolate. You can also try different nut butters. Almond butter or cashew butter can give a new twist. If you want a spiced flavor, mix in a dash of cinnamon. For a fun twist, add mini marshmallows or dried fruit. These extras can add sweetness and chewiness. Experiment with flavors to find your favorite mix. Texture is key for these bars. You want them chewy yet firm. To achieve this, use old-fashioned rolled oats. They add a nice bite. If you prefer a smoother texture, use quick oats. For added crunch, include chia seeds. They not only add nutrition but also a nice texture. When mixing, be gentle with the chocolate chips. Stir them in last so they stay whole. This keeps your bars looking great, too. For the best results, allow them to chill for at least one hour. Then, slice them neatly for a perfect treat. You can find the full recipe to guide you through the process. {{image_4}} You can change the taste of these bars easily. Try adding spices like cinnamon or nutmeg for warmth. A dash of sea salt enhances the sweet and salty combo. You can also use extracts like almond or coconut for a fun twist. Each addition gives a unique flair to the classic recipe. Toppings can make your bars even better. Consider adding chopped nuts, like almonds or walnuts, for crunch. Dried fruits, like raisins or cranberries, can add a sweet chew. For a fun finish, drizzle melted chocolate on top. You can also sprinkle some sea salt for a gourmet touch. Mix-ins make each bite exciting and keep things fresh. Want a lighter version? Swap honey for a low-calorie sweetener, like stevia. You can also use almond butter or sunflower seed butter for a nut-free option. If you want a vegan recipe, replace honey with maple syrup. For a protein boost, add a scoop of protein powder to the mix. These changes make the bars fit many diets while still tasting great. For the full recipe, refer back to the instructions provided. To keep your no bake peanut butter chocolate bars fresh, store them in an airtight container. This helps prevent air from making them dry. Place parchment paper between layers to avoid sticking. Keep them in the fridge to maintain their firmness and flavor. Always take out only what you plan to eat to keep the rest fresh. You can freeze no bake peanut butter chocolate bars for longer storage. Cut the bars into pieces before freezing. Wrap each piece in plastic wrap, then place them in a freezer-safe bag. This way, they won’t stick together. When you want to eat them, take out a piece and let it thaw in the fridge overnight. These bars can last about one week in the fridge. If stored in the freezer, they can last for up to three months. Always check for any signs of spoilage before eating. If the bars start to smell off or change color, it’s best to toss them. Enjoy these delightful treats, knowing they are easy to store and keep! Yes, you can use crunchy peanut butter. It adds a fun texture to the bars. The bits of peanuts give each bite a nice crunch. If you love that nutty bite, go for it! Just remember, if you choose crunchy, the mix might be a bit thicker. These bars can last up to two weeks in the fridge. Keep them in an airtight container to stay fresh. If you want them to last longer, consider freezing them. They can stay good for up to three months in the freezer. Just thaw them in the fridge before you enjoy! Yes, you can substitute honey with maple syrup. Both options work well in this recipe. Maple syrup will give a different flavor, but it will still be sweet. You can also use agave syrup if you prefer. Just make sure to keep the same amount for the best results. For a lower sugar option, consider using mashed bananas or unsweetened applesauce. This article covered everything you need to know about no bake peanut butter chocolate bars. We went over the ingredients, tips, and variations to create the best bars. You now have tools to avoid mistakes and enhance flavor. Remember to store them right and try different options. Making these bars can be fun and simple. Enjoy your tasty treats and share them with friends!

No Bake Peanut Butter Chocolate Bars Delightful Treat

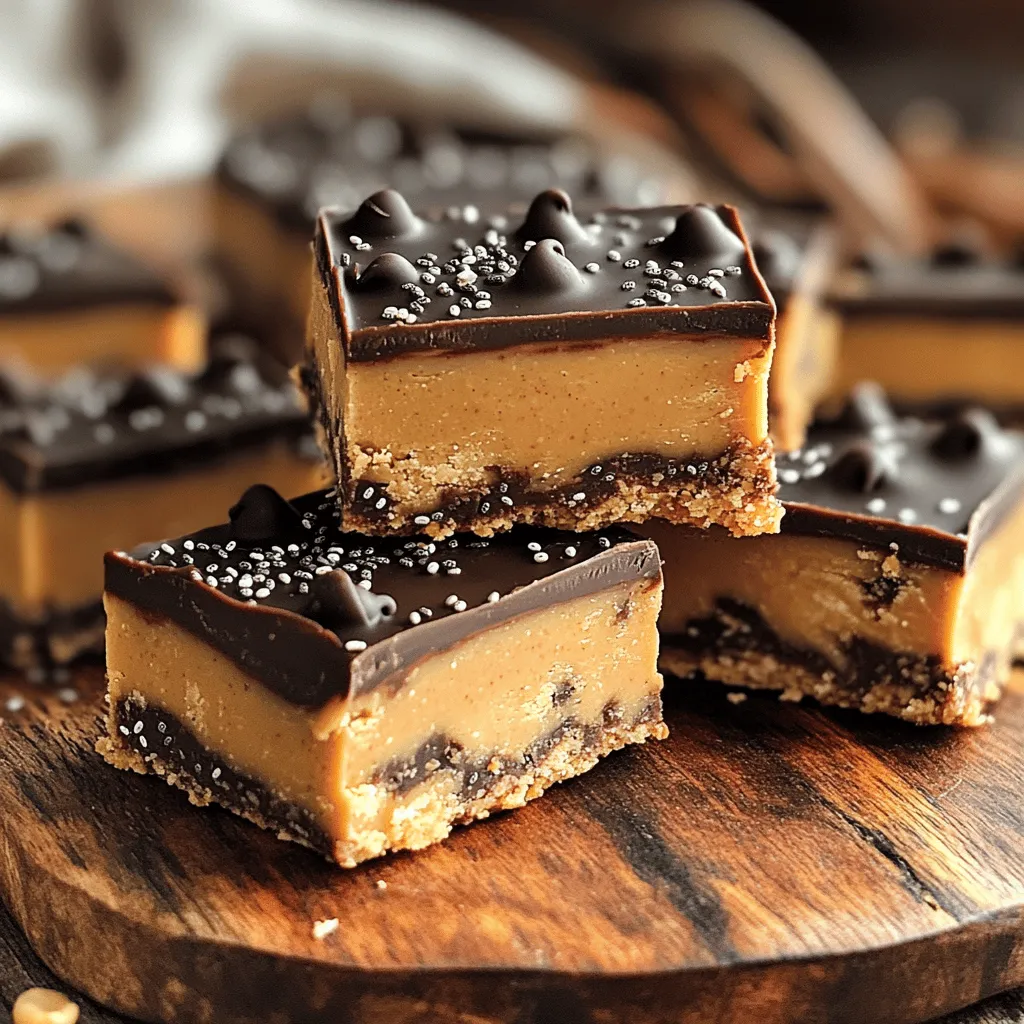
Are you ready to satisfy your sweet tooth without turning on the oven? My No Bake Peanut Butter Chocolate Bars

- 1 large head of cauliflower, chopped into bite-sized florets - 2 cloves garlic, finely minced - 1 teaspoon fresh ginger, grated - 1 cup all-purpose flour - 1 teaspoon garlic powder - 1 teaspoon smoked paprika - ½ teaspoon cayenne pepper (adjust for spice preference) - 1 cup water (or vegetable broth) - ½ cup honey - 3 tablespoons soy sauce (or tamari) - 2 tablespoons apple cider vinegar - 1 tablespoon sesame seeds - Chopped green onions When I cook these spicy honey garlic cauliflower bites, I focus on fresh, simple ingredients. The star of the dish is the cauliflower. Make sure you choose a large head with firm florets. The garlic and ginger add a punch of flavor that makes each bite exciting. For the dry ingredients, I like a mix of flour, garlic powder, smoked paprika, and cayenne pepper. This blend creates a crispy coating. You can adjust the cayenne pepper based on your spice level. The liquid ingredients bring all the flavors together. Honey gives sweetness, while soy sauce adds umami. Apple cider vinegar adds tanginess that balances the dish. Finally, garnishing with sesame seeds and green onions makes your bites look beautiful. These ingredients not only taste great but also make your dish appealing. You can find the Full Recipe for more details. - Preheat the oven to 425°F (220°C). - Line a baking sheet with parchment paper. - In a large bowl, mix the flour, garlic powder, smoked paprika, and cayenne pepper. - Gradually add water or broth while stirring. - Keep stirring until a smooth, thick batter forms. - Take each cauliflower floret and coat it in the batter. - Place them in a single layer on the baking sheet. - Bake for 25-30 minutes, flipping halfway for even crisping. - In a saucepan, combine honey, soy sauce, vinegar, garlic, and ginger. - Simmer the mixture for about 5 minutes to thicken. - Toss the baked cauliflower in the sauce to coat well. - Return the coated florets to the oven for an extra 5-7 minutes to caramelize. To get your cauliflower bites nice and crispy, follow these tips: - Make sure the batter is thick enough. This helps the coating stick well. - Flip the cauliflower bites halfway through baking. This ensures even crisping on both sides. Want to amp up the flavor? Here’s how: - Add more cayenne pepper if you like extra heat. This gives the bites a nice kick. - Try different types of vinegar, like rice vinegar or balsamic, for a unique taste. Serving your bites well makes them more appealing: - Use a bright platter to show off the cauliflower. It makes the dish pop! - Offer toothpicks for easy serving, especially at parties. It makes snacking a breeze. {{image_4}} You can make this dish vegan. Just swap the honey for agave syrup. This change keeps the sweet taste while making it plant-based. Agave syrup is a great choice. It adds the same sweetness without any animal products. Feel free to get creative with spices. You can try adding curry powder or chili flakes. Both spices give a unique twist to the bites. If you want a richer taste, add sesame oil. This oil brings a warm aroma and depth to the dish. These cauliflower bites shine when served with sauces. Consider pairing them with ranch or sriracha. Both sauces add a nice kick and complement the sweet and spicy flavors. This makes them perfect for parties or as a snack! Store any leftovers in an airtight container in the fridge. You can keep them fresh for up to three days. This helps maintain their flavor and texture, so they remain tasty. To enjoy your spicy honey garlic cauliflower bites again, reheat them in the oven. This method keeps them crispy. Avoid the microwave, as it can make them soggy and less enjoyable. If you want to prepare ahead, freeze uncooked batter-coated cauliflower. You can store it for up to two months. Just make sure to place them in a freezer-safe bag or container. When you're ready to cook, simply bake them directly without thawing for a quick meal. Yes, but it may alter the texture slightly. Frozen cauliflower can be softer. If you prefer a crunchier bite, fresh is best. Increase the amount of cayenne pepper or add hot sauce to the batter or sauce. Adjust to your taste. You can always start with a little and add more. Use gluten-free flour and tamari instead of soy sauce. This way, you keep the great flavor without gluten. These bites pair well with rice, quinoa, or as an appetizer at parties. They are great for sharing. You can also serve them with your favorite dipping sauce. For detailed instructions, refer to the Full Recipe: Spicy Honey Garlic Cauliflower Bites. It has everything you need to make this tasty dish. You now know how to make Spicy Honey Garlic Cauliflower Bites. We covered fresh and dry ingredients, plus step-by-step baking and sauce-making tips. I shared ways to achieve perfect crispiness and offered tasty variations. Remember, you can tailor flavors to your taste or keep it simple. Enjoy leftovers with ease or freeze extras for later. This recipe is sure to impress at any gathering. Try it out and elevate your snack game!

Spicy Honey Garlic Cauliflower Bites Flavorful Delight

Are you ready to spice up your snack game? These Spicy Honey Garlic Cauliflower Bites are bursting with flavor and

To make a delicious creamy Cajun chicken gnocchi, gather the following ingredients: - 1 pound gnocchi (fresh or store-bought) - 2 boneless, skinless chicken breasts, diced into bite-sized pieces - 1 tablespoon Cajun seasoning - 2 tablespoons olive oil - 1 small onion, finely chopped - 3 cloves garlic, minced - 1 cup heavy cream - 1 cup chicken broth - 1 cup bell peppers (a mix of colors like red, yellow, and green), diced - 1 cup cherry tomatoes, halved - ½ cup grated Parmesan cheese - Salt and pepper, to taste - Fresh parsley, chopped (for garnish) Each ingredient plays a key role in creating this comforting dish. The gnocchi brings a delightful chewiness, while the chicken adds protein and heartiness. Cajun seasoning gives it that zesty kick, making every bite exciting. The olive oil helps sauté the chicken and veggies, adding richness. The onion and garlic bring aromatic depth, while bell peppers and cherry tomatoes add sweetness and color. Heavy cream and chicken broth create a luxurious sauce that binds it all together. Parmesan cheese enhances the creaminess and adds a savory touch. Don't forget the salt and pepper to taste, as they elevate all the flavors. Lastly, fresh parsley adds brightness and a pop of color when you serve the dish hot. For the full recipe details, check out the complete instructions on how to prepare this delightful meal. Start by boiling water in a large pot. Add a generous amount of salt to the water. Once it boils, drop in the gnocchi. Cook them according to the package instructions. Watch for the gnocchi to float to the surface; this shows they are done. It usually takes about 2-4 minutes. Drain the gnocchi and set them aside. Heat olive oil in a large skillet over medium-high heat. While the oil heats, season the diced chicken with Cajun seasoning, salt, and pepper. When the oil is hot, add the chicken to the skillet. Sear the chicken for 6-7 minutes. Stir it occasionally to brown all sides. Browning adds a deep flavor to your dish. In the same skillet, add the finely chopped onion. Sauté the onion for 2-3 minutes until it turns soft and translucent. Then, add the minced garlic and cook for another minute. Make sure to stir continuously to avoid burning. Next, add the diced bell peppers. Cook them for about 5 minutes until they soften. Pour in the chicken broth and bring it to a gentle simmer. Lower the heat to medium-low and stir in the heavy cream. Allow the mixture to cook for 3-5 minutes, stirring occasionally. You want it to thicken slightly. This creamy base is key to a rich flavor. Now it's time to bring everything together. Add the cooked chicken back into the skillet, along with the halved cherry tomatoes. Gently stir to mix all the ingredients. Then, incorporate the cooked gnocchi and grated Parmesan cheese. Mix well until the gnocchi are fully coated in the creamy sauce. Taste your dish and adjust the seasoning with salt and pepper as needed. Heat everything through for about 2 minutes. Be careful not to lose the creaminess of the sauce. Once heated, serve your creamy Cajun chicken gnocchi hot. Garnish with chopped fresh parsley for a vibrant touch. This dish is not just hearty; it is also a feast for the eyes! You can find the complete recipe in the Full Recipe section. - Spices and Herbs: You can spice things up by adding smoked paprika or thyme. A pinch of cayenne pepper also adds heat. Fresh herbs like basil or cilantro can add a fresh twist. - Cheese: Try using a mix of cheeses. For a tangy flavor, mix in some goat cheese or feta. A sprinkle of sharp cheddar can also enhance the dish. - Sautéing: Heat your skillet before adding oil. This helps the chicken brown well. Stir often to keep it from sticking. - Simmering: When adding the cream, keep the heat low. This prevents the cream from breaking. Stir gently to maintain a smooth sauce. - Gnocchi Tips: Watch the gnocchi closely while cooking. They cook fast, usually in 2-4 minutes. Remove them as soon as they float. This keeps them soft and tender. - Plating Ideas: Serve your dish in shallow bowls. Drizzle with olive oil and sprinkle extra cheese on top. This makes it look fancy. - Pairing Options: Serve with a side salad for freshness. A glass of white wine pairs nicely, too. It cuts through the creaminess. You could also enjoy a slice of crusty bread to soak up the sauce. Check out the Full Recipe for more details! {{image_4}} If you want a meat-free dish, you can easily swap the chicken for mushrooms or tofu. Mushrooms add a nice umami flavor, while tofu offers a good protein source. Both options keep the creamy base intact. Simply sauté them the same way you would the chicken. This option is delicious and satisfying for everyone. For those who love heat, increase the Cajun seasoning or add some hot sauce. You can also add toppings like jalapeños for that extra kick. This version will surely make your taste buds dance. Just remember to adjust the heat to your liking, so it’s not too overpowering. If you want a lighter meal, try using cauliflower gnocchi or zucchini noodles instead. These alternatives can cut down on carbs while still keeping the dish hearty. Just adjust the cooking times accordingly. Cauliflower gnocchi may take a bit longer to cook, while zucchini noodles will need less time. Enjoy a comforting meal that fits your dietary needs! For the full recipe, check out the Creamy Cajun Chicken Gnocchi section above. To store leftovers, let the creamy Cajun chicken gnocchi cool completely. Transfer it to an airtight container. This helps keep the dish fresh. I recommend using glass containers. They do not stain and keep food safe. Store it in the fridge for up to three days. You can freeze this dish, but it may change the texture. To freeze, let it cool first. Then, put it in freezer-safe containers. Make sure to leave space at the top for expansion. When you want to eat it, thaw it overnight in the fridge. Avoid refreezing after thawing. This will keep it tasty. When reheating, use a skillet or microwave. For the skillet, add a splash of chicken broth. This helps maintain creaminess. Heat on medium until warm, stirring often. If using a microwave, heat in short bursts. Aim for 165°F to ensure it's hot throughout. Enjoy your creamy Cajun chicken gnocchi from the Full Recipe with these storage tips! Yes, you can use store-bought gnocchi. It saves time and effort. Fresh gnocchi often has a softer texture and richer taste. Store-bought is quick and easy but may not taste as good. To adjust spiciness, you can add more Cajun seasoning. Start with a little, then taste. If it's too spicy, add more cream or broth to cool it down. You can also use mild seasoning blends. Coconut cream works well as a dairy-free option. You can also use whole milk, but the sauce will be thinner. For a lighter option, try half-and-half or a mix of milk and cream. This dish lasts about 3-4 days in the fridge. Store it in an airtight container. Always check for off smells or changes in color before eating. You can prep most parts ahead of time. Cook the chicken and veggies, then store them in the fridge. Cook the gnocchi fresh for the best texture. Combine everything just before serving for great flavor. This blog covered a rich, creamy gnocchi dish with tender chicken and vibrant veggies. You learned how to cook gnocchi, prepare the chicken, and make the sauce. The tips offered show how to enhance flavor and customize the dish, plus how to store leftovers correctly. I encourage you to experiment with variations. You can adapt the recipe to match your taste. Enjoy cooking this hearty meal!

Creamy Cajun Chicken Gnocchi Flavorful Comfort Meal

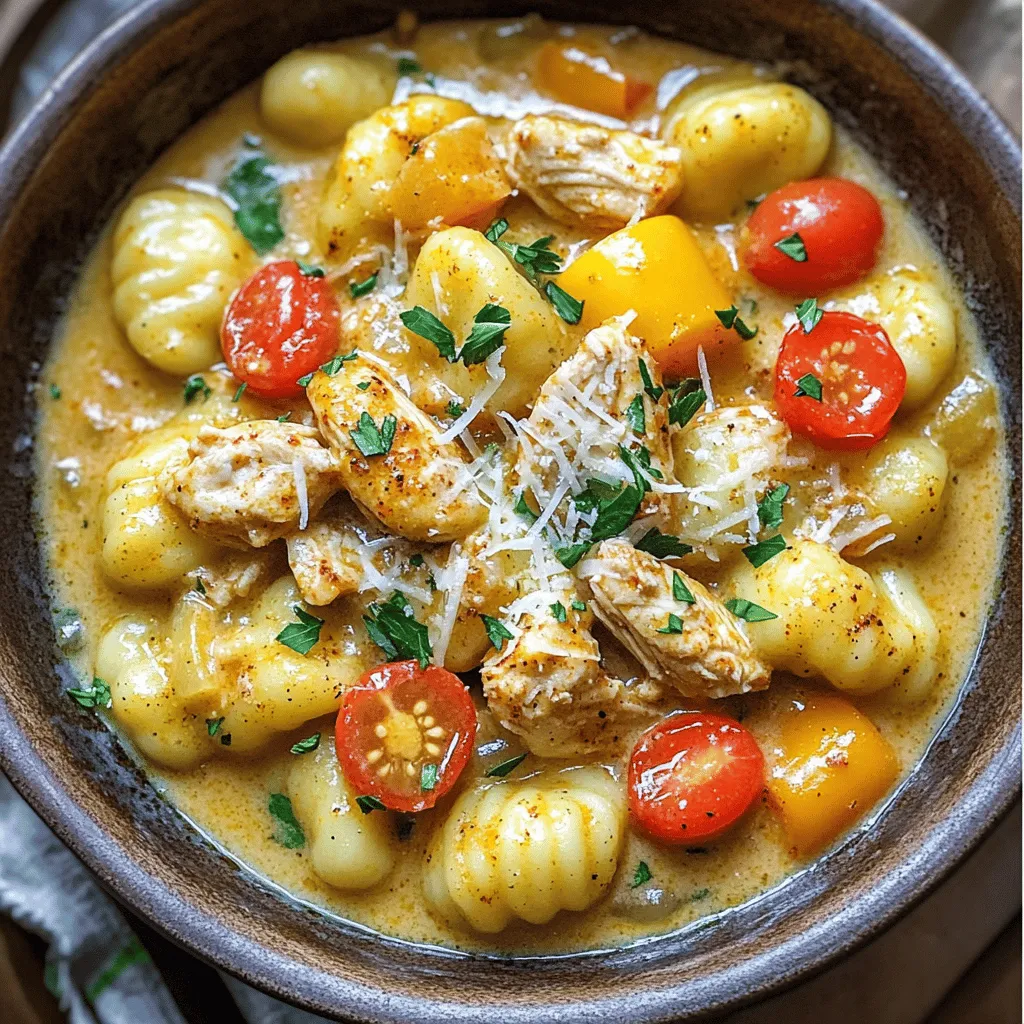
Are you ready to spice up your dinner routine? Creamy Cajun Chicken Gnocchi is a dish that brings comfort and

- 4 salmon fillets (approximately 6 oz each) - 1/4 cup honey - 3 tablespoons low-sodium soy sauce - 3 cloves garlic, finely minced - 1 tablespoon fresh ginger, grated - 1 tablespoon olive oil - Salt and freshly ground black pepper to taste - 1 tablespoon sesame seeds (for garnish) - 2 green onions, finely chopped (for garnish) Salmon is a powerhouse of nutrition. It is rich in omega-3 fatty acids. These fats are good for your heart and brain. They help reduce inflammation and improve your mood. Eating salmon can boost your overall health. Honey adds a natural sweetness to your dish. It also has antioxidants that can help your body fight free radicals. Garlic is another star in this recipe. It has many health benefits, too. Garlic can help lower blood pressure and improve cholesterol levels. Both honey and garlic work well together for flavor and health. Using this honey garlic glazed salmon recipe, you enjoy a meal that is tasty and good for you. You can feel great about serving it to your family. For the full recipe, you can check out the complete details above. - In a small bowl, whisk together: - 1/4 cup honey - 3 tablespoons low-sodium soy sauce - 3 minced cloves of garlic - 1 tablespoon grated fresh ginger This mix creates a sweet and savory glaze. Set aside 1 tablespoon of this glaze for later. - Season both sides of the salmon fillets with salt and freshly ground black pepper. This adds a nice touch of flavor. - Heat 1 tablespoon of olive oil in a large skillet over medium heat. Wait until the oil shimmers to show it’s ready. - Carefully place the salmon fillets in the skillet, skin-side down. Let them sear for 5-6 minutes. You want the skin to be crispy and golden brown. - After 5-6 minutes, gently flip the salmon using a spatula. Brush the top with the glaze you prepared. This adds a lovely flavor. - Cook for another 4-5 minutes. Keep basting the salmon with the extra glaze. The salmon should turn opaque and easily flake with a fork when done. - Once cooked, remove the salmon from the skillet. Let it rest on a plate for about one minute. This helps keep the juices inside. - Drizzle the reserved glaze over the salmon before serving. This enhances the taste and shine. - Garnish with sesame seeds and chopped green onions. This adds a pop of color and crunch. This honey garlic glazed salmon is not only tasty but also easy to make. You can find the Full Recipe for more details. To achieve crispy skin on your salmon, start with a hot skillet. Heat the olive oil until it shimmers. Then, place the salmon skin-side down and do not touch it for at least 5-6 minutes. This allows the skin to crisp up nicely. For perfect doneness, cook the salmon for about 4-5 minutes after flipping it. The fish should be opaque and flake easily with a fork. Aim for a total cooking time of 10-11 minutes. When it comes to sides, pair your honey garlic glazed salmon with jasmine rice or quinoa. The grains soak up the glaze well. You can also add sautéed vegetables like bell peppers and broccoli for a colorful plate. For an appealing presentation, garnish your dish with sesame seeds and chopped green onions. Drizzle a bit of extra glaze over the salmon before serving. This adds shine and makes the dish look even more delicious. For the full recipe, check out the earlier section. {{image_4}} You can easily change the taste of honey garlic glazed salmon. Adding citrus like lemon or lime brings a bright zing. A squeeze of fresh juice over the cooked salmon adds a nice twist. You can also add zest for an extra pop of flavor. If you like heat, incorporate spicy elements. Red pepper flakes add warmth without overpowering the dish. Sprinkle a pinch on the glaze, or mix it in while cooking. This small change can make your meal exciting and bold. You might want to use alternatives for low-sodium soy sauce. Coconut aminos is a great choice for a similar taste. It is also gluten-free, making it perfect for those with dietary restrictions. For a vegan option, swap salmon with a firm tofu or tempeh. Marinate the tofu in the same glaze for a tasty dish. You can also use vegetable broth to replace the soy sauce for a lighter flavor. These variations help you adapt the recipe to your taste and dietary needs while keeping it delicious. For the full experience, check out the Full Recipe. To keep your honey garlic glazed salmon fresh, store it in the fridge. Place the salmon in an airtight container. It stays good for up to three days. When reheating, do it gently. The best method is to use the oven. Preheat the oven to 350°F (175°C). Place the salmon on a baking sheet and cover it with foil. Heat for about 10-15 minutes. This keeps the fish moist and tasty. If you want to save some for later, freezing is a great option. First, let the salmon cool to room temperature. Wrap each fillet tightly in plastic wrap, then place them in a freezer bag. Remove as much air as you can before sealing. The salmon can last up to three months in the freezer. To thaw, take the salmon out of the freezer and move it to the fridge. Let it thaw overnight for best results. If you're in a hurry, you can use the microwave. Set it to defrost, checking every minute to avoid cooking the fish. Always ensure it is fully thawed before reheating. If you want to know the full recipe, check out the section above. How long does it take to cook salmon? It takes about 10 to 15 minutes to cook salmon. The cooking time may vary based on the thickness of the fillets. A good rule is to cook salmon for 4-6 minutes per side. Always check for doneness by using a fork. The fish should flake easily. Can I use frozen salmon fillets for this recipe? Yes, you can use frozen salmon fillets. Just make sure to thaw them in the fridge overnight. You can also run cold water over the fillets for a quicker thaw. Cook them as you would fresh salmon, but add a couple of extra minutes for cooking time. What can I substitute for honey? If you need a substitute for honey, you can use maple syrup or agave nectar. Both options will add sweetness. If you want a sugar-free option, try using a sugar-free honey substitute. Is this recipe suitable for meal prep? Yes, this recipe is great for meal prep. You can cook the salmon and store it in the fridge for up to four days. Just reheat gently in the oven or microwave before serving. What sides go well with honey garlic glazed salmon? Honey garlic glazed salmon pairs well with steamed rice or quinoa. You can add some sautéed vegetables for color and crunch. Roasted asparagus or broccoli is also a great choice. Can I grill instead of pan-sear the salmon? Yes, you can absolutely grill the salmon. Just preheat your grill and oil the grates. Cook the salmon on medium heat for about 4-5 minutes per side. This will give you a lovely smoky flavor. This blog post covered the delicious recipe for honey garlic glazed salmon. We explored ingredients and their health benefits, like omega-3s and honey. The step-by-step guide made cooking easy, while tips ensured perfect results. Variations allow you to customize flavors, and storage info helps with leftovers. Cooking salmon can be simple and rewarding. Enjoy your meal and share this recipe with others. Happy cooking!

Honey Garlic Glazed Salmon Flavorful and Easy Recipe

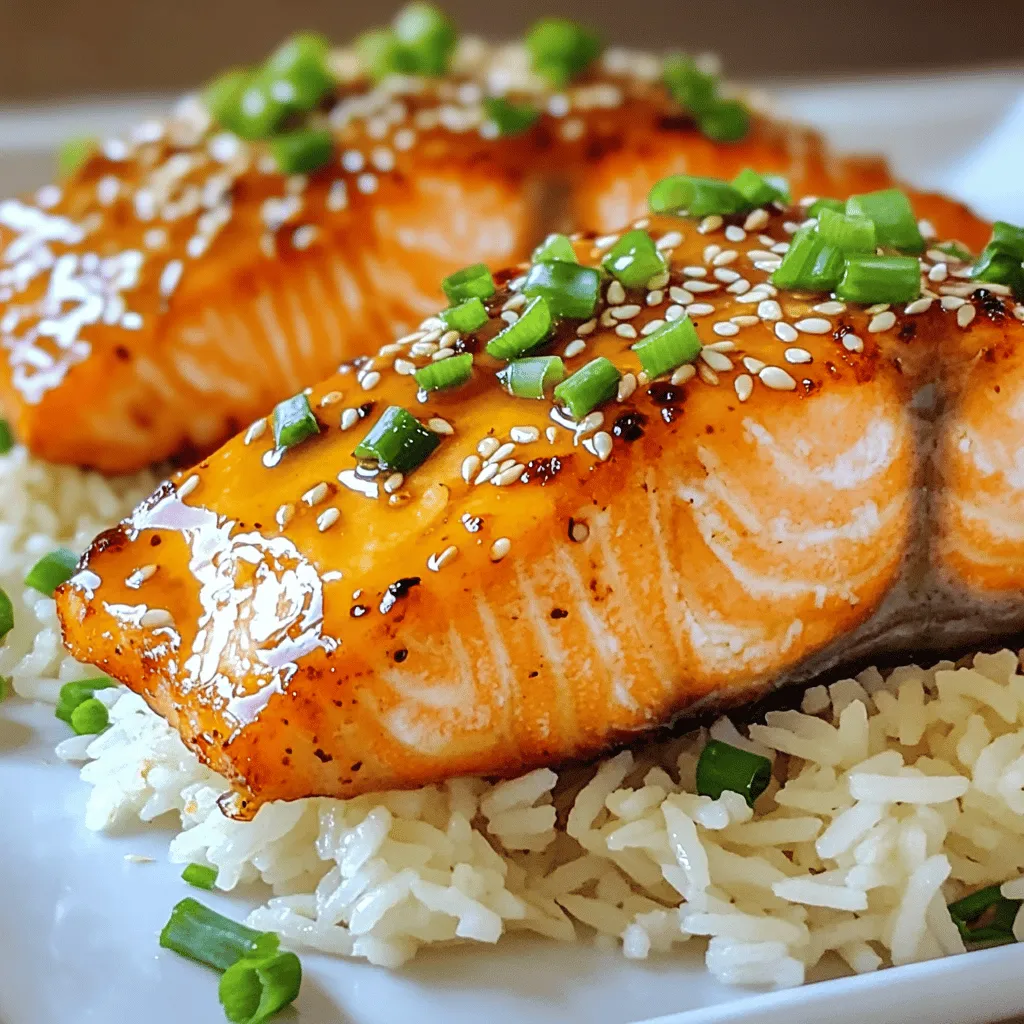
Are you ready to elevate your dinner game? This Honey Garlic Glazed Salmon recipe is quick, easy, and bursting with

To make the S'mores Stuffed Brownie Cups, gather these tasty ingredients: - 1 box of brownie mix (plus ingredients required for preparation: eggs, oil, water) - 1 cup of graham cracker crumbs - 1 cup of mini marshmallows - 1 cup of chocolate chips (choose semi-sweet or milk chocolate) - 1/4 cup of unsweetened cocoa powder - 2 tablespoons of granulated sugar - 1/4 teaspoon of salt - Cooking spray or softened butter for greasing These ingredients blend to create a rich and gooey dessert. The brownie mix forms a delicious base. The graham crackers give that classic s'mores crunch. Mini marshmallows melt perfectly for a sweet touch. The chocolate chips add a rich flavor. Cocoa powder enhances the brownie taste. Sugar balances sweetness, while salt enhances all the flavors. Greasing the pan helps keep the cups intact. You can find the full recipe above to guide your cooking journey. - Preheat your oven to 350°F (175°C). - Lightly grease your muffin pan with cooking spray or softened butter. - In a bowl, mix the brownie mix with eggs, oil, and water. Stir until smooth. - In another bowl, combine graham cracker crumbs, cocoa powder, sugar, and salt. - Spoon about one tablespoon of brownie batter into each muffin cup. - Add the graham cracker mixture on top, filling each cup halfway. - Sprinkle chocolate chips and mini marshmallows over the graham cracker layers. - Pour more brownie batter into each cup until they are three-quarters full. - Place the muffin pan in the oven and bake for 18-20 minutes. - Check for doneness with a toothpick; it should come out mostly clean. - Let the cups cool in the pan for 10 minutes before removing them. - Use a butter knife to loosen the edges if needed. These steps will guide you to create perfect S'mores Stuffed Brownie Cups. You can find the Full Recipe for complete details and measurements. To get the best brownie cups, focus on texture. You want them soft and chewy. Mix the brownie batter well, so it’s smooth. Lumps can lead to uneven baking. Don't overmix, though, or they may get tough. When greasing the muffin pan, use a light hand. I prefer cooking spray for easy coverage. If you use butter, make sure to coat every nook. This helps the brownie cups pop out with ease. If your brownie cups overflow, don’t panic. This can happen if you overfill them. Aim for three-quarters full to let them rise without spilling. If they underbake, check your oven temperature. Ovens can vary. If they seem too gooey, add a couple of extra minutes. Always test with a toothpick. It should come out with a few moist crumbs, not wet batter. {{image_4}} You can change the flavor of your brownie cups easily. Try using flavored brownie mixes like peanut butter or caramel. These options add a fun twist to the classic taste. You can also use different types of chocolate chips. Milk chocolate gives a sweet touch, while dark chocolate adds a rich flavor. Switching up the toppings can make your dessert special. Instead of mini marshmallows, use larger marshmallows or flavored ones like strawberry or caramel. You can also add nuts like walnuts or pecans for a crunchy bite. Fresh fruit, like sliced strawberries or bananas, can bring a fresh taste to your s'mores cups. Explore these options to create your perfect treat! After enjoying your s'mores stuffed brownie cups, store leftovers to keep them fresh. Let them cool completely at room temperature. Then, place them in an airtight container. This method helps prevent them from drying out. You can also wrap each cup in plastic wrap for added protection. For longer storage, consider placing them in the fridge. To enjoy your brownie cups again, reheating is key. Preheat your oven to 350°F (175°C). Place the brownie cups on a baking sheet. Heat for about 5 to 7 minutes. This method keeps the brownie soft and the marshmallows gooey. You can also use the microwave. Heat each cup for about 15-20 seconds. However, this might make them a bit less crisp. Always check to avoid overheating. Can I make these brownie cups ahead of time? Yes, you can make these brownie cups ahead of time. Prepare them and store them in an airtight container. They will stay fresh for up to three days. You can also freeze them for longer storage. Just thaw before serving. How do I prevent the brownie cups from sticking? To prevent sticking, use cooking spray or softened butter to grease the muffin pan. Make sure to coat each cup evenly. This step is key to easy removal. What can I use instead of graham crackers? If you don’t have graham crackers, try using crushed vanilla wafers or digestive biscuits. Both options will add a nice flavor and texture to your brownie cups. Can I adjust the sweetness level? Absolutely! You can reduce the sugar in the brownie mix or use dark chocolate chips. This will lower the sweetness and add depth to the flavor. How to serve the S'mores Stuffed Brownie Cups? Serve these brownie cups warm for the best taste. Drizzle with melted chocolate and sprinkle extra graham cracker crumbs on top. You can also add a scoop of vanilla ice cream on the side. It makes for a wonderful treat! For the full recipe, check out the recipe section above. You learned how to make S'mores Stuffed Brownie Cups. We covered ingredients, simple steps, and storage tips. These brownie cups mix rich flavors with fun textures. If you follow my tips, you'll create a tasty treat every time. Don’t forget to try new toppings or flavors for variety. Enjoy sharing these delicious cups with friends and family! Happy baking!

S’mores Stuffed Brownie Cups Delightful Dessert Treat

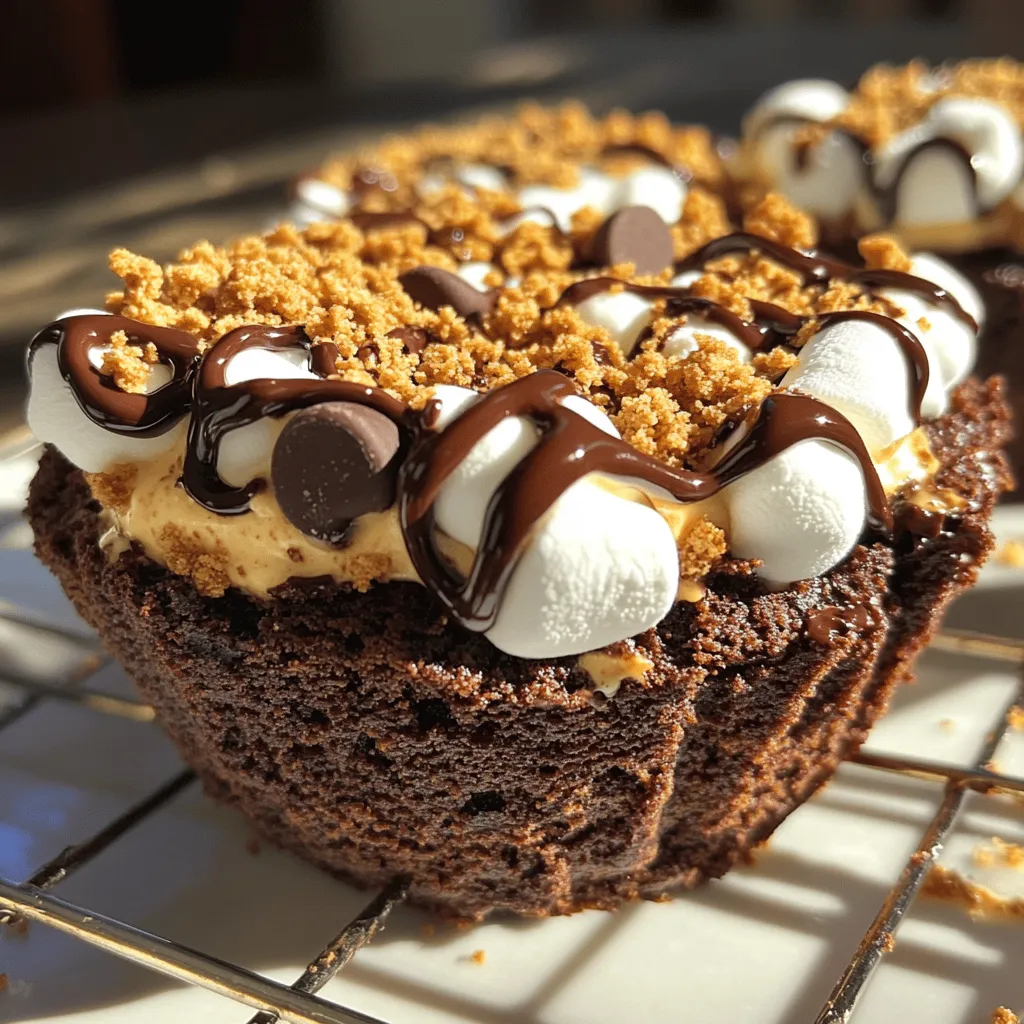
Get ready for a dessert that’s fun to make and even better to eat! These S’mores Stuffed Brownie Cups are

- 2 large sweet potatoes - 2 tablespoons olive oil - 1 teaspoon garlic powder - 1 teaspoon smoky paprika - 1/2 teaspoon cayenne pepper (optional) - Salt and freshly cracked black pepper to taste - Fresh parsley, for garnish (optional) Sweet potato fries are tasty and healthy. They are low in calories and high in nutrients. A typical serving has about 150 calories. You also get 7 grams of fat, 26 grams of carbohydrates, and 2 grams of protein. They are a great snack that won’t weigh you down. To make the best sweet potato fries, you need a few tools: - An air fryer (medium size works best) - A cutting board and a sharp knife - A mixing bowl for combining ingredients - Measuring spoons for precise amounts These tools help you create crispy, flavorful fries easily. Each step is simple, and with the right setup, you'll enjoy a great snack in no time. For the full recipe, check out the detailed steps above. Start by washing the sweet potatoes well. This removes dirt and germs. Next, peel the sweet potatoes with a vegetable peeler. Then, cut them into uniform 1/4 inch fries. Uniform sizes help them cook evenly. In a large mixing bowl, add the sweet potato fries. Pour in 2 tablespoons of olive oil. Toss the fries gently to coat them in oil. Next, add 1 teaspoon of garlic powder and 1 teaspoon of smoky paprika. If you like heat, include 1/2 teaspoon of cayenne pepper. Add salt and freshly cracked black pepper to taste. Toss again until all fries are evenly covered with the seasonings. Now, preheat your air fryer to 400°F (200°C). This step takes about 3-5 minutes. Once preheated, place the fries in the basket in a single layer. Avoid overcrowding, or they won’t get crispy. Cook the fries for 15-20 minutes. Shake the basket halfway through. This helps them brown evenly. They’re ready when they’re golden brown and crisp. After cooking, transfer the fries to a serving platter. Enjoy them hot for the best crunch. For extra color, sprinkle with fresh parsley. For the full recipe, check out the details provided earlier. To get that perfect crispiness, cut your sweet potatoes evenly. Aim for a thickness of about 1/4 inch. This helps them cook evenly. Next, avoid overcrowding in the air fryer. If you put too many fries in at once, they may steam instead of crisping up. Cook in batches if needed. Sweet potatoes are great on their own, but you can add more flavor. Try spices like cinnamon or cumin for a twist. For dips, I love pairing them with garlic aioli or spicy ketchup. These flavors complement sweet potatoes well and make the snack even better. A common mistake is overcooking or undercooking the fries. Keep an eye on them while they cook. You want them golden brown, not burnt. Also, don’t skip preheating the air fryer. This step sets the right temperature for crispy fries. Preheat for 3-5 minutes before adding your sweet potatoes. For the full recipe, check out the detailed steps above. {{image_4}} You can change the flavor of your sweet potato fries easily. For sweet fries, try adding cinnamon and brown sugar. This mix gives a warm and cozy taste. For a savory twist, use rosemary or cumin. These herbs add depth and aroma, making each fry exciting. If you don’t have an air fryer, you can still enjoy sweet potato fries. An oven works well too. Preheat your oven to 425°F (220°C). Spread the fries on a baking sheet in a single layer. Bake for 25-30 minutes, flipping halfway for even cooking. This method brings out their natural sweetness. To make your fries even healthier, use less oil. You can also try seasoning sprays to coat the fries lightly. Mixing in other veggies, like zucchini or carrots, gives you a colorful and tasty fry blend. These alternatives not only add nutrients but also enhance the flavor. To keep your sweet potato fries fresh, store them in an airtight container. Refrigerate them within two hours of cooking. This helps maintain their taste and texture. They will last for about 3 days in the fridge. After that, they may lose their crispiness. The best way to reheat fries is in your air fryer. Preheat the air fryer to 350°F (175°C). Place the fries in a single layer. Heat them for about 5 to 7 minutes. This method keeps them crispy. To avoid soggy fries, do not cover them while reheating. You can freeze sweet potato fries for later use. First, let them cool completely. Then, spread them in a single layer on a baking sheet. Freeze them for 1 to 2 hours. Once frozen, transfer them to a freezer bag. They can last up to 3 months in the freezer. When you want to cook them, do not thaw. Just cook them straight from the freezer in the air fryer at 400°F (200°C) for about 15-20 minutes. For best results, shake the basket halfway through. Yes, you can use frozen sweet potatoes. They work well, but the texture may be less crispy. When using frozen fries, cook them directly from the freezer. This helps keep them crispy. Adjust the cooking time to about 20-25 minutes. Check them often for doneness. To add heat, mix in more cayenne pepper. You can also try chili powder or crushed red pepper flakes. Toss the fries with these spices before cooking. For a smoky flavor, add smoked paprika. Start with a little, then taste and adjust. Sweet potato fries pair well with many dips. Here are a few ideas: - Ketchup - Spicy mayo - Garlic aioli - Honey mustard - Chipotle ranch Mix and match to find your favorite! Sweet potato fries have more vitamins than regular fries. They are high in fiber and beta-carotene. However, they still contain calories and fat. Using less oil can make them even healthier. Air-frying is a great way to cut down on fat. You can prep sweet potato fries in advance. Cut and season them, then store in the fridge for up to 24 hours. However, for the best texture, cook them fresh. If you must store cooked fries, keep them in an airtight container. Reheat in the air fryer for crispiness. For the full recipe, check out the [Full Recipe]. You learned how to make sweet potato fries step by step. We covered ingredients, tools, and cooking techniques. Remember to cut evenly for crispiness and avoid overcrowding. Experiment with spices to enhance flavor. Store any leftovers properly and reheat for the best texture. These fries can be a tasty and healthy alternative to regular ones. Whether you choose to dip or enjoy them plain, you’ll love serving these fries anytime. Try these tips and enjoy your delicious sweet potato fries!

Air Fryer Sweet Potato Fries Crispy and Flavorful Snack

Are you ready to make crispy and flavorful air fryer sweet potato fries? These delicious snacks are not only quick

Older posts
Newer posts
← Previous Page1 … Page30 Page31 Page32 … Page120 Next →

dsad

© 2026 recipetorch • Built with GeneratePress

Our Policies

  • Copyright Policy
  • Cookie Policy
  • GDPR Policy
  • Privacy Policy
  • Disclaimer
  • Terms Of Use

More Information

  • Home
  • About
  • Contact
  • Appetizers
  • Dessert
  • Dinner
  • Drinks
©2026, recipetorch About Back To Top