
Lemon Ricotta Pancakes Fluffy and Easy to Make
Get ready to elevate your breakfast routine with my Lemon Ricotta Pancakes that are fluffy and easy to make! These
Get ready to elevate your breakfast routine with my Lemon Ricotta Pancakes that are fluffy and easy to make! These
![- 1 lb boneless chicken breast, cut into 1-inch cubes - 1 cup fresh pineapple, cut into 1-inch chunks - 1 bell pepper, either red or yellow, cut into 1-inch squares - 1 medium red onion, cut into wedges - 1/4 cup soy sauce - 1/4 cup teriyaki sauce - 2 tablespoons honey - 1 tablespoon sesame oil - 2 cloves garlic, minced - 1 teaspoon fresh ginger, finely grated - Salt and pepper, to taste - Skewers (if wooden, soaked in water for at least 30 minutes) - Alternative vegetables: zucchini, cherry tomatoes - Spices for added flavor: crushed red pepper, black pepper Using fresh and vibrant ingredients is key to great taste. The chicken provides a nice protein base. Pineapple adds a sweet and tangy flavor. Bell peppers bring color and crunch. Red onion gives a bit of bite. The marinade is where the magic happens. Soy sauce and teriyaki sauce blend for umami. Honey adds sweetness and helps caramelize on the grill. Sesame oil gives a nutty depth. Garlic and ginger add a fresh and zesty kick. Feel free to mix in other veggies. Zucchini and cherry tomatoes are tasty options. They cook quickly and add more flavor. For spice lovers, crushed red pepper or black pepper provides a nice heat. For the full recipe, check the details above to get started on your skewers. To start, you need to make the marinade. In a bowl, mix these ingredients: - 1/4 cup soy sauce - 1/4 cup teriyaki sauce - 2 tablespoons honey - 1 tablespoon sesame oil - 2 cloves garlic, minced - 1 teaspoon fresh ginger, finely grated - Salt and pepper, to taste Add 1 pound of boneless chicken breast, cut into 1-inch cubes. Make sure every piece is covered. Cover the bowl with plastic wrap. Put it in the fridge. Let the chicken marinate for at least 30 minutes. For the best flavor, let it sit for up to 2 hours. While the chicken marinates, get your skewers ready. If they are wooden, soak them in water for at least 30 minutes. This helps prevent burning. Next, preheat your grill or grill pan to medium-high heat. After marinating, take the chicken out of the fridge. Carefully thread the marinated chicken, fresh pineapple chunks, bell pepper squares, and red onion wedges onto the skewers. Alternate the ingredients for a colorful look. Now, place the skewers on the hot grill. Grill them for about 10-12 minutes. Turn them every few minutes to cook evenly and get nice grill marks. Use a meat thermometer to check that the chicken reaches 165°F (75°C). This means it is fully cooked. For an extra flavor boost, brush the skewers with any leftover marinade in the last 2-3 minutes of grilling. Once done, take them off the grill and let them rest for a few minutes. This helps keep the juices inside. Serve the skewers warm and enjoy! For the full recipe, refer to the earlier sections. For the best flavor, marinate your chicken for at least 30 minutes. However, if you have more time, let it soak for up to 2 hours. This helps the chicken absorb all those tasty flavors! If you're looking for a gluten-free option, you can swap soy sauce with coconut aminos or tamari. Both keep the savory taste without gluten. Keep your grill at a steady medium-high heat. This helps cook the chicken evenly and gives nice grill marks. To achieve those perfect grill marks, place the skewers at a diagonal on the grill. After a few minutes, rotate them a quarter turn. This simple move creates an eye-catching pattern and enhances flavor. When serving, place your skewers on a big platter. Garnish with fresh cilantro or sprinkle sesame seeds on top. It adds color and makes the dish pop! Pair these skewers with jasmine rice or a fresh salad for a balanced meal. A small bowl of teriyaki sauce for dipping can elevate your dish even more. For the full recipe, check out the detailed steps above. {{image_4}} You can easily switch out the chicken for shrimp or tofu. Shrimp cooks quickly and adds a nice twist. Tofu works well for a plant-based option. For flavor, try different marinades. A spicy chili sauce or a sweet mango glaze can change the taste completely. Using seasonal vegetables can make your skewers even better. Think about adding zucchini, cherry tomatoes, or bell peppers. They add color and taste. Fresh herbs like cilantro or basil also make great garnishes. They give a lovely pop of flavor and look nice on the plate. If you want vegetarian or vegan options, swap chicken for hearty vegetables or tempeh. This keeps the dish filling. For those watching their sodium, use low-sodium soy sauce and teriyaki sauce. You can still enjoy great taste without the extra salt. For the full recipe, please check out [Full Recipe]. To keep your Pineapple Teriyaki Chicken Skewers fresh, use proper refrigeration. First, let the skewers cool to room temperature. Then, place them in an airtight container. This helps keep moisture in and flavors intact. You can also wrap them tightly in plastic wrap. Store the skewers in the fridge for up to three days. Reheating is simple and should keep your skewers juicy. The best way is to use an oven. Preheat your oven to 350°F (175°C). Place the skewers on a baking sheet. Cover them with aluminum foil to trap moisture. Heat for about 10-15 minutes. You can also use a microwave, but they can dry out. Heat in short bursts and cover with a damp paper towel. If you want to save skewers for later, you can freeze them. First, let the cooked skewers cool down. Then, wrap them tightly in plastic wrap and foil. This prevents freezer burn. You can store them for up to three months. When you’re ready to eat, thaw them overnight in the fridge. Reheat them using the methods above for the best taste. You can tell when chicken skewers are done by checking their color and texture. The chicken should be opaque and firm to the touch. The juices should run clear, not pink. The best way to be sure is to use a meat thermometer. It should read 165°F (75°C) for safe eating. This ensures that harmful bacteria are gone. Yes, you can make Pineapple Teriyaki Chicken Skewers ahead of time. Marinating the chicken is key. You can marinate it for up to 2 hours. If you want to prepare earlier, marinate the chicken and store it in the fridge. You can also cut the veggies and pineapple ahead. Just keep them in the fridge too. This way, you save time when you're ready to grill! You can serve these skewers with many tasty sides. Rice or quinoa works great as a base. You can also pair them with grilled veggies or a fresh salad. For drinks, try serving iced tea or a light lemonade. These choices balance the sweet and savory flavors of the skewers. Enjoy your meal with friends and family! This blog post covered how to make Pineapple Teriyaki Chicken Skewers. We explored main ingredients and marinades, step-by-step grilling, and serving tips. I shared variations to suit your taste and dietary needs. Finally, I offered storage and reheating advice for leftovers. Try these skewers for a fun meal. Experiment with different flavors and ingredients. Enjoy the bright taste and simple process! You’ll impress your family and friends with this dish.](https://recipetorch.com/wp-content/uploads/2025/07/effcb933-1d17-4c12-ba69-a47eeb06f456.webp)
Ready to elevate your next cookout? These Pineapple Teriyaki Chicken Skewers are packed with flavor and simple to make! In
![This Instant Pot Chicken Tortilla Soup is packed with flavor and easy to make. You need simple ingredients that come together quickly. In just about 45 minutes, you can enjoy a warm bowl of this tasty soup. It's perfect for busy weeknights or a cozy gathering with friends. - 1 lb boneless, skinless chicken breasts - 1 medium onion, diced - 2 garlic cloves, finely minced - 1 red bell pepper, chopped - 1 can (14 oz) diced tomatoes with green chilies - 4 cups chicken broth - 1 can (15 oz) black beans, thoroughly drained and rinsed - 1 cup frozen sweet corn - 1 tablespoon ground cumin - 1 tablespoon chili powder - 1 teaspoon smoked paprika - Salt and freshly ground black pepper, to taste - 1 fresh lime, juiced - Fresh cilantro, coarsely chopped (for garnish) - Crispy tortilla strips (for topping) You can swap chicken for turkey or use beans for a vegetarian twist. If you don’t have black beans, pinto beans work well too. You can also use fresh corn in place of frozen. For a spicy kick, add jalapeños or hot sauce. If you lack smoked paprika, regular paprika will do. Adjust these ingredients based on what you have at home. This way, you can make the soup your own. This recipe gives you room to explore while keeping the essence of the dish alive. Try it out and see what new flavors you can create! For the complete recipe, check out [Full Recipe]. To start, prepare your chicken. Season 1 pound of boneless, skinless chicken breasts. Use salt, pepper, and half of the cumin and chili powder. Make sure the chicken is well-coated. Next, chop your veggies. Dice 1 medium onion, mince 2 garlic cloves, and chop 1 red bell pepper. These will add great flavor. Now, set your Instant Pot to sauté. Add a splash of olive oil. Once it heats, add the onion, garlic, and bell pepper. Sauté for about 3 to 4 minutes. You want them tender and fragrant. After that, place the seasoned chicken breasts into the pot. Pour in 1 can of diced tomatoes with green chilies. Add 4 cups of chicken broth, 1 can of drained black beans, and 1 cup of frozen corn. Sprinkle in the remaining cumin, chili powder, and 1 teaspoon of smoked paprika. Stir gently to mix everything. Secure the lid on your Instant Pot. Make sure the pressure valve is sealed. Cook on high pressure for 15 minutes. This will let all the flavors meld beautifully. When the cooking time ends, let the pot sit for 5 minutes for a natural pressure release. After that, switch to a quick release for any remaining steam. Carefully open the lid. Now, remove the chicken. Shred it into bite-sized pieces with two forks. Return the shredded chicken to the pot and stir well. Add the juice of 1 fresh lime to the soup. This brightens the flavor. Taste your soup and adjust the seasoning with more salt or pepper if you need to. Ladle the warm soup into bowls. Top with crispy tortilla strips and chopped cilantro for extra color and flavor. Enjoy your soup! For the full recipe, check the section above. To make your Instant Pot chicken tortilla soup just right, follow these tips: - Use Fresh Ingredients: Fresh veggies add more flavor. Use ripe tomatoes and a firm onion. - Don't Skip the Sauté: Sautéing the onion and garlic first enhances the soup's taste. - Season Well: Give the chicken a good rub with salt and spices before cooking. - Cook Time Matters: Stick to 15 minutes under pressure. Overcooking can make the chicken tough. - Release Pressure Carefully: Always allow for a natural release first. This keeps the soup from splattering. When serving your soup, make it special with these ideas: - Garnish Creatively: Top each bowl with crispy tortilla strips and fresh cilantro. - Add Lime: A squeeze of fresh lime brightens the flavor. - Pair with Sides: Serve with warm tortillas or avocado slices for a complete meal. - Vibrant Bowls: Use colorful bowls to make your dish pop. To make your soup even tastier, try these simple tweaks: - Spice It Up: Add more chili powder or fresh jalapeños for heat. - Herbs and Spices: Experiment with fresh herbs like oregano or thyme for depth. - Creamy Touch: Stir in a dollop of sour cream or Greek yogurt before serving. - Cheesy Goodness: Top with shredded cheese like cheddar or queso fresco for richness. Feel free to explore and adjust these tips to fit your taste. Each change can lead to a new favorite flavor! For the full recipe, check the [Full Recipe]. {{image_4}} You can make this soup vegetarian by swapping chicken for veggies or beans. Use 1 can of chickpeas or lentils instead. This adds protein while keeping it hearty. You can also use vegetable broth instead of chicken broth. Add more vegetables like zucchini, carrots, or spinach. This keeps the soup fresh and colorful. Feel free to add extra ingredients for more flavor. Try adding avocado for creaminess or jalapeños for heat. A handful of fresh spinach or kale can boost the nutrients. You can also use fresh herbs like oregano or thyme. These herbs add depth and aroma to the soup. If you don’t have an Instant Pot, no worries! You can make this soup on the stove. Start by sautéing the veggies in a pot. Then add the broth, chicken, and other ingredients. Let it simmer for about 30-40 minutes until the chicken is cooked through. Shred the chicken and enjoy. Slow cookers work well too! Cook on low for 6-8 hours or high for 3-4 hours. The flavors will deepen as it cooks. For the full recipe, check out the [Full Recipe]. After enjoying your Instant Pot Chicken Tortilla Soup, let it cool. Transfer any leftovers to an airtight container. Make sure to cover it tightly. You can store it in the fridge. It will stay fresh for about 3 to 4 days. If you want to keep it longer, consider freezing it. To freeze your soup, follow these steps. First, let it cool completely. Then, pour it into a freezer-safe container. Leave some space at the top. This allows for expansion when it freezes. Seal the container tightly to prevent freezer burn. The soup can last up to 3 months in the freezer. When you're ready to eat, just thaw it in the fridge overnight. Reheating your soup is simple. You can use the stove or microwave. If using the stove, pour the soup into a pot. Heat it over medium heat until warm, stirring occasionally. For the microwave, place the soup in a bowl. Cover it loosely and heat it in short bursts. Stir in between to avoid hot spots. Make sure to check the temperature before serving. Enjoy it warm with your favorite toppings! For the complete recipe, check the Full Recipe. Yes, you can use frozen chicken in this recipe. Just keep in mind that frozen chicken will take longer to cook. You can add about 5 to 10 extra minutes to the pressure cooking time. This way, the chicken will cook evenly and remain juicy. To cook safely, make sure the chicken reaches an internal temperature of 165°F. If you want more heat in your soup, there are a few easy ways to spice it up. You can add more chili powder or cumin. For an extra kick, toss in some diced jalapeños or a splash of hot sauce. You can also use spicy diced tomatoes instead of regular ones. Experiment with your favorite spices to find your perfect heat level. Toppings can really enhance your tortilla soup. Here are some great options: - Crumbled queso fresco or shredded cheese - Sliced avocado for creaminess - Fresh lime wedges for a zesty boost - Chopped green onions for a fresh crunch - Sour cream or Greek yogurt for richness - Extra crispy tortilla strips for texture Feel free to mix and match these toppings to create your own unique dish. For the Full Recipe, refer to the earlier section. Enjoy your soup! This guide covers everything you need for Chicken Tortilla Soup. We examined the ingredients, offered steps to cook it in an Instant Pot, and shared tips for great flavors. I also discussed variations for different diets and gave storage info to keep leftovers fresh. Now, you can make this soup your own. Enjoy the cooking process! Transform your meal with your unique spin and share it with others. Happy cooking!](https://recipetorch.com/wp-content/uploads/2025/07/cc2fc9ce-efef-4274-ade5-f64b694a850e.webp)
Craving a warm, hearty meal that’s quick and easy to make? Let me introduce you to my Instant Pot Chicken

Are you ready to treat yourself to a creamy, smooth Mocha Caramel Frappuccino? This delightful drink combines rich coffee, sweet

Craving a cozy drink that warms you from the inside out? Meet your new favorite winter treat: Peppermint Bark Hot
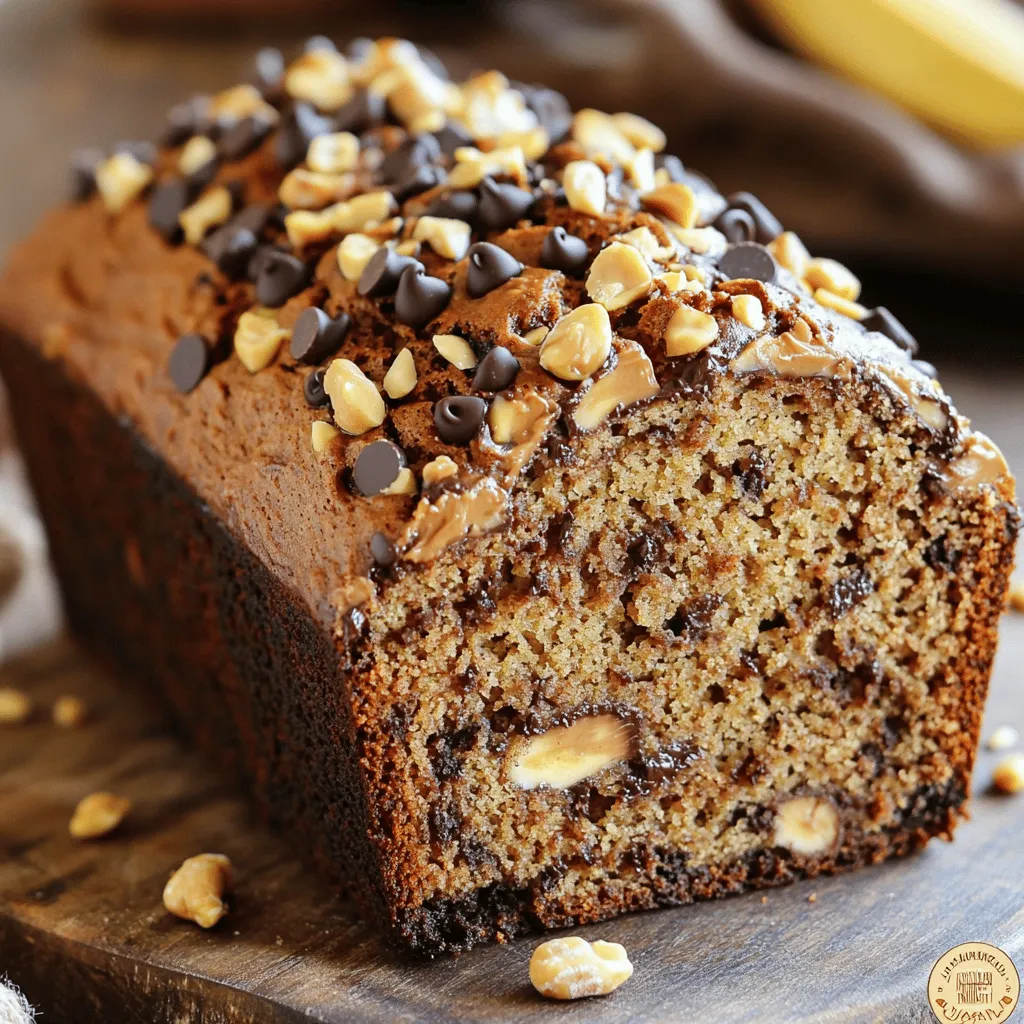
Looking for a tasty twist on classic banana bread? You’ve come to the right place! This Chocolate Peanut Butter Banana

Are you ready to spice up your snack game? These Spicy Honey Garlic Cauliflower Bites are a perfect blend of
![To make Creamy Cajun Chicken Gnocchi, you will need: - 1 pound gnocchi (store-bought or homemade) - 2 boneless, skinless chicken breasts, diced into bite-sized pieces - 1 tablespoon Cajun seasoning (adjust to taste) - 1 tablespoon olive oil - 1 cup heavy cream - 1 cup low-sodium chicken broth - 1 cup cherry tomatoes, halved - 1 cup fresh spinach leaves, washed - 1/2 cup grated Parmesan cheese - 2 cloves garlic, minced - Salt and pepper, to taste - Fresh parsley, finely chopped (for garnish) This list covers all the essentials for your dish. Each ingredient plays a key role in creating that rich, creamy flavor with a touch of spice. If you have dietary needs, here are some swaps: - Dairy-free options: Use coconut cream or cashew cream instead of heavy cream. - Gluten-free pasta: Choose gluten-free gnocchi to keep the recipe gluten-free. - Chicken replacements: You can use shrimp or tofu for a different protein source. These substitutions help anyone enjoy this dish while respecting their dietary choices. Using fresh ingredients often gives the best flavor in this recipe. Fresh spinach and tomatoes add brightness to the creamy sauce. However, frozen ingredients can work too. Frozen spinach can save time. Just thaw and drain it before adding. For the gnocchi, fresh is great, but store-bought works well too. Just follow the cooking times on the package. Whether you go fresh or frozen, the key is to enjoy the cooking process and the tasty results! For the full recipe, check out the link provided. To make Creamy Cajun Chicken Gnocchi, follow these simple steps for a tasty meal. 1. Cook the Gnocchi: Bring a big pot of salted water to a boil. Add the gnocchi and cook for 2-3 minutes. They are ready when they float. Drain them and set aside. 2. Sauté the Chicken: Heat the olive oil in a large skillet over medium heat. Add the diced chicken and sprinkle with Cajun seasoning. Cook for 5-7 minutes until golden brown. Remove the chicken and put it on a plate. 3. Sauté the Aromatics: In the same skillet, lower the heat. Add minced garlic and halved cherry tomatoes. Sauté for about 2 minutes until the tomatoes soften. 4. Create the Sauce: Pour in the heavy cream and chicken broth. Stir well and let it simmer for 3-4 minutes. This will thicken the sauce. 5. Combine Ingredients: Add the cooked gnocchi, spinach, and chicken back to the skillet. Gently fold everything together until the spinach wilts. 6. Add Cheese and Season: Gradually stir in the grated Parmesan cheese. Mix until melted and smooth. Adjust with salt and pepper to taste. Cook for another 2 minutes. 7. Serve: Remove from heat. Garnish with fresh parsley before serving. - Gnocchi: 2-3 minutes to cook. - Chicken: 5-7 minutes to sauté. - Sauce: 3-4 minutes to simmer. - Always wash your hands before and after handling raw chicken. - Use separate cutting boards for raw chicken and other foods. - Cook chicken to an internal temperature of 165°F to ensure safety. - Clean all surfaces and utensils after contacting raw chicken. For the full recipe and more details, check out the [Full Recipe]. To make a creamy sauce, start with heavy cream. This gives the sauce a rich texture. Pour in the chicken broth slowly and stir well. This helps blend the flavors. Simmer the sauce gently to avoid burning. If you want it thicker, cook it longer. Adding Parmesan cheese at the end makes it even creamier. Cajun seasoning brings heat and flavor. Adjust the amount based on your taste. If you prefer milder flavors, use less seasoning. You can also add a pinch of smoked paprika for depth. Taste as you cook. This way, you can find the right balance of spices. Remember, it's easier to add than remove. One mistake is overcooking the gnocchi. They should float when ready. Also, avoid cooking the chicken on high heat. This can make it tough and dry. Stir the sauce gently; don't let it boil too hard. Lastly, don’t skip the fresh spinach; it adds color and nutrition. Enjoying the cooking process is key to a great dish. For a full recipe, check out the [Full Recipe]. {{image_4}} You can make this dish your own by swapping in different ingredients. For the veggies, try adding bell peppers, zucchini, or mushrooms. These add color and flavor. If you want more protein, consider shrimp or sausage. Both pair well with Cajun seasoning and add a nice twist. To make this dish vegan, use plant-based gnocchi and swap heavy cream for coconut milk. For a low-carb option, replace gnocchi with cauliflower rice or zucchini noodles. Both options keep the meal tasty and satisfying while meeting your dietary needs. You can serve Creamy Cajun Chicken Gnocchi in many ways. Pair it with a fresh green salad to balance the richness. A slice of crusty bread also works well to soak up the creamy sauce. For a more filling meal, add roasted vegetables on the side. Each option enhances the dish and makes it more enjoyable. To keep your Creamy Cajun Chicken Gnocchi fresh, let it cool completely. Transfer it to an airtight container. This helps prevent spoilage and keeps the flavors intact. Store it in the fridge for up to three days. Make sure to seal the container well to avoid any odors from other foods. When you’re ready to enjoy leftovers, gently reheat them. Use a skillet over low heat. Add a splash of chicken broth or cream to restore the sauce's creaminess. Stir often to avoid sticking. If using a microwave, heat in short bursts, stirring in between. This keeps everything smooth and delicious. In the fridge, your leftovers last about three days. If you want to store them longer, freezing is a good option. Place the dish in a freezer-safe container. It can last up to three months in the freezer. Just remember to label it with the date. When you’re ready to eat, thaw it overnight in the fridge before reheating. You can use whole milk or half-and-half as a lighter option. For a dairy-free choice, use coconut milk or cashew cream. Both options may change the flavor a bit but will keep the dish creamy. Yes, you can prepare the chicken and sauce ahead of time. Just cook the gnocchi fresh when ready to serve. This keeps the gnocchi tender and prevents them from getting mushy. Absolutely! Store-bought gnocchi saves time and is easy to use. It cooks quickly and tastes great in this dish. Just make sure to follow the package instructions. The spice level depends on the brand of Cajun seasoning you use. If you like it mild, start with less. You can always add more as you go. This way, everyone can enjoy the dish at their own heat level. Salads with fresh greens or roasted vegetables pair nicely. Garlic bread also complements the creamy sauce. You could serve a simple fruit salad for a refreshing finish. For the full recipe, check out the section above! This blog post covers everything you need for Creamy Cajun Chicken Gnocchi. We looked at ingredients, cooking steps, and storage tips. With easy swaps for diets and flavor tips, you can make this dish your own. Remember the safety tips for raw chicken and avoid common mistakes. You can impress your family or friends with this creamy delight. Enjoy cooking and let your creativity shine!](https://recipetorch.com/wp-content/uploads/2025/07/3ffffac5-2a96-48b2-9f1b-6dbdc63e5061.webp)
Are you ready to spice up your dinner routine? This Creamy Cajun Chicken Gnocchi recipe is not just tasty; it’s
![To make honey garlic glazed salmon, you need the following items: - Salmon fillets: Use 4 fillets, each about 6 oz. This size ensures even cooking. - Honey: You’ll need 1/4 cup for the sweet glaze. It adds depth and flavor. - Garlic: Use 3 cloves, finely minced. Garlic gives the dish a rich taste. - Soy sauce: Add 2 tablespoons for saltiness and umami. It balances the sweetness. - Dijon mustard: Include 1 tablespoon. Mustard adds tang and enhances flavor. - Fresh ginger: Use 1 tablespoon, finely grated. Ginger gives a warm spice note. - Olive oil: You’ll need 1 tablespoon to keep the salmon moist. - Salt and freshly ground pepper: Season to taste for a perfect finish. - Sesame seeds: 1 tablespoon for garnish adds crunch and visual appeal. - Green onions: 2, finely sliced, for garnish. They add freshness and color. This list gives you all you need for a delightful honey garlic glazed salmon. Check the [Full Recipe] for more details. Start by making the honey garlic glaze. In a small saucepan, combine these ingredients: - 1/4 cup honey - 3 cloves garlic, finely minced - 2 tablespoons soy sauce - 1 tablespoon Dijon mustard - 1 tablespoon fresh ginger, finely grated Set the pan over medium-low heat. Stir the mixture well. Bring it to a gentle simmer. Cook for about 5 minutes, stirring often. The glaze should thicken slightly. Once ready, remove it from the heat and let it cool a bit. Preheat your oven to 400°F (200°C). This ensures it’s hot and ready. While the oven warms up, line a baking sheet with parchment paper. Place the salmon fillets, skin-side down, on the paper. Drizzle 1 tablespoon of olive oil over the salmon. Then, season the fillets with salt and freshly ground pepper to taste. Now it’s time to bake the salmon. Brush the top of each fillet with the honey garlic glaze. Reserve a small portion of the glaze for later. Place the baking sheet in the oven. Bake for 12 to 15 minutes. The salmon is done when it flakes easily with a fork. For a rich caramelization, switch the oven to broil for the last 2 minutes. Keep an eye on it to avoid burning. After baking, carefully take the salmon out. Brush the reserved honey garlic glaze on top of the fillets. This adds extra flavor and shine. For a lovely finish, sprinkle sesame seeds and sliced green onions on top. They add color and crunch. For the full recipe, check out the complete instructions provided earlier. To test if your salmon is done, use a fork. Gently press the thickest part of the fillet. If it flakes easily, it’s ready. Aim for an internal temperature of 145°F (63°C). To avoid overcooking, keep an eye on the time. Salmon cooks fast, usually in 12-15 minutes. If you use the broiler, watch it closely. Broiling adds flavor but can burn the glaze. You can change the flavor of the glaze easily. Try adding chili flakes for heat. Fresh herbs like thyme or cilantro can add freshness. If you want more sweetness, add a bit of brown sugar. For a tangy kick, squeeze in some fresh lime juice. Adjust the sweetness to fit your taste. For a complete meal, serve the salmon over steamed jasmine rice. This adds a lovely base. You can also pair it with roasted veggies for color and nutrition. For plating, use a white plate to highlight the salmon's golden glaze. Drizzle extra honey garlic sauce on the side for flair. Top with sesame seeds and green onions for a pop of color. For the full recipe, check the section above. {{image_4}} You can swap salmon for other fish. Try using trout or cod. Both have great flavors and cook well with the honey garlic glaze. Just adjust the cooking time since they may cook faster than salmon. For a vegetarian option, use tofu or tempeh. Firm tofu works best. Press it to remove excess water. Marinate it in the same glaze for great flavor. Bake or grill until golden brown. Tempeh also absorbs the glaze well and adds a nutty taste. To change the flavor, try adding citrus. A splash of lemon or lime juice brightens the dish. You can also add zest for more punch. For spice lovers, consider adding red pepper flakes. This gives your dish a nice kick. Create a spicy honey garlic version by mixing in sriracha or chili paste. Start with a small amount, then adjust to taste. This twist makes the dish exciting and full of flavor. Pair your salmon with lovely side dishes. Steamed rice, quinoa, or roasted vegetables complement the glaze. For a fresh touch, serve with a crisp salad. A mix of greens with a light vinaigrette works well. You can make homemade sauces or dips, too. A yogurt-based sauce with herbs adds a nice creaminess. Try a simple avocado dip for a rich, smooth contrast. These options enhance your meal and keep it fun. To store leftover salmon, place it in an airtight container. This keeps the fish fresh and safe. You should consume it within three days for the best taste. If you want to keep it longer, consider freezing it. To freeze cooked salmon properly, wrap each piece in plastic wrap. Then, place the wrapped salmon in a freezer bag. This helps prevent freezer burn. It can stay frozen for up to three months. When you’re ready to eat it, defrost the salmon in the fridge overnight. This method helps maintain its texture and flavor. For reheating leftovers, the oven is the best choice. Preheat it to 275°F (135°C). Place the salmon on a baking sheet and cover it with foil. This keeps the fish moist. Heat it for about 15 minutes or until warm. You can also use a microwave, but be careful not to overcook it. Reheating in short bursts helps keep it juicy. The best methods to cook salmon include grilling and baking. - Grilling: This method gives salmon a nice char and smoky flavor. It cooks the fish quickly, sealing in juices. You can grill over medium-high heat for about 6-8 minutes per side, depending on thickness. - Baking: Baking is easy and helps keep the salmon moist. It cooks evenly in the oven. Preheat your oven to 400°F, then bake for 12-15 minutes. Baking is often less messy and requires less attention than grilling. Yes, you can use other sweeteners. Some good options include: - Maple syrup: This gives a rich flavor but is thinner than honey. - Agave nectar: This is a great vegan option. It’s sweeter than honey. - Brown sugar: Use a bit less, as it is not as liquid. Each sweetener can change the taste slightly, but they will still make a tasty glaze. You can tell salmon is fully cooked by looking for these signs: - Color: Salmon should be opaque and flaky. - Texture: Use a fork to check if it flakes apart easily. - Internal temperature: Use a thermometer. It should reach 145°F. Checking the salmon ensures you cook it just right. Honey garlic glazed salmon is a healthy dish. Here are some benefits: - Omega-3 fatty acids: Salmon is high in these healthy fats, good for your heart. - Protein: Salmon provides a good amount of protein, which helps build muscle. - Vitamins and minerals: Salmon has vitamins like B12 and D, plus selenium. To make the recipe healthier, consider these tips: - Use less honey or a substitute. - Serve with steamed veggies or a salad for added nutrients. These changes can boost health benefits while keeping it delicious. In this blog post, we explored how to make delicious Honey Garlic Glazed Salmon. We covered the key ingredients, from salmon fillets to glaze components. You learned step-by-step instructions, tips for perfect texture, and variations for different diets. Storing, reheating, and serving ideas were also discussed. Enjoy your cooking and experimenting with flavors. Remember, great meals start with simple, fresh ingredients. You can make healthy and tasty food that everyone will love.](https://recipetorch.com/wp-content/uploads/2025/07/2415ecc0-0ba6-43cc-a359-249c6d854709.webp)
Looking for a quick yet delicious dinner idea? Honey Garlic Glazed Salmon is the perfect option! This dish combines tender

If you love a sweet treat that combines chocolate, graham crackers, and gooey marshmallows, get ready to dive into S’mores
