Skip to content
DisclaimerTerms Of UseGDPR PolicyCookie Policy

recipetorch

  • Home
  • Drinks
  • Appetizers
  • Dinner
  • Dessert
  • About
  • Contact
  • Privacy Policy
DisclaimerTerms Of UseGDPR PolicyCookie Policy

Nicole

To make this roasted tomato basil soup, you will need some fresh and simple ingredients. Here’s what you need: - 4 cups ripe tomatoes, halved (preferably Roma or vine-ripened) - 1 medium onion, chopped - 4 cloves garlic, unpeeled - 3 tablespoons olive oil - Salt and freshly cracked pepper to taste - 1 teaspoon sugar (optional, to balance acidity) - 1 cup vegetable broth (low sodium) - 1 cup fresh basil leaves, tightly packed - ½ cup heavy cream or coconut cream (for a vegan option) - Additional fresh basil for garnish These ingredients come together to create a rich and comforting soup. The ripe tomatoes bring sweetness, while the onion and garlic add depth. Olive oil enhances the flavors, and fresh basil gives it a bright finish. If you want a creamier soup, feel free to add the heavy cream or use coconut cream for a vegan twist. The sugar helps balance the acidity of the tomatoes, making the soup taste even better. This soup is not just tasty; it is also a great way to enjoy fresh ingredients. You can find the full recipe in the article. Enjoy making this simple and flavorful dish! 1. Preheat the oven: Set your oven to 400°F (200°C). This heat helps the tomatoes roast well. 2. Prepare the baking sheet: Grab a large baking sheet. Place the halved tomatoes, chopped onion, and unpeeled garlic cloves on it. Make sure they are in a single layer. 3. Season the vegetables: Drizzle olive oil over the tomatoes, onion, and garlic. Add salt and freshly cracked pepper to taste. You might want to sprinkle a teaspoon of sugar on top. This helps balance the tomato's acidity. 4. Roast in the oven: Slide the baking sheet into the oven. Roast for about 30-35 minutes. Look for the tomatoes to be tender and slightly charred. This gives the soup a deeper flavor. 1. Cool down: After roasting, take the baking sheet out of the oven. Let it cool for a few minutes. Carefully peel the roasted garlic cloves. They will taste sweet and mellow. 2. Blend the mixture: In a blender, mix the roasted tomatoes, onion, garlic, vegetable broth, and fresh basil leaves. Blend until smooth. This is where the magic happens! 3. Simmer the soup: Pour the blended mixture into a pot. Heat it gently over medium heat. Stir now and then to keep it warm. 4. Finish with cream: Add the heavy cream or coconut cream into the pot. Stir it in well. Let the soup simmer for another 5 minutes. Taste and adjust with more salt and pepper if needed. 5. Prepare for serving: Once the flavors blend nicely, take the pot off the heat. Let the soup rest for a few minutes. This wait enhances the flavors before you serve it. - Presentation Tips: Serve the soup in warm bowls. Drizzle a swirl of cream on top. Garnish with fresh basil leaves to make it look fancy and colorful. Now you have a delicious Roasted Tomato Basil Soup ready to enjoy! For the Full Recipe, check the main section. Seasoning is key to a great soup. Start with salt and pepper. Taste as you go. If the soup tastes too sharp, add a little sugar. This helps balance the acidity from the tomatoes. Fresh herbs like basil can really boost the flavor. Add them at the end of cooking for a fresh taste. Use a handful of basil leaves. Tear them gently to release their oils. For serving, consider a drizzle of cream on top. This adds richness and a lovely look. Serve with crusty bread for a complete meal. You can also add a sprinkle of cheese for extra flavor. For making this soup, you need a good blender. A high-speed blender works best for smooth soup. If you don't have one, a regular blender will do just fine. Just blend in small batches to avoid spills. You also need a heavy pot for simmering. A Dutch oven is perfect for this. It heats evenly and holds the heat well. A wooden spoon is great for stirring, too. These tools will help you make the best roasted tomato basil soup. For the full recipe, check out the details above. {{image_4}} For a creamy soup, I often use heavy cream. But if you want a vegan option, coconut cream works well. It gives the soup a rich taste without dairy. You can also try nut-based creams for different flavors. Adding spices can elevate your soup. Consider red pepper flakes for heat or smoked paprika for a depth of flavor. You can also mix in some fresh herbs like thyme or oregano. These will give your soup a new twist. If you want to boost protein, add some cooked lentils or chickpeas. They blend nicely and add a nice texture. Grilled chicken or shrimp can also make it heartier. Pair your roasted tomato basil soup with crusty bread. A slice of sourdough or a baguette complements the soup perfectly. A fresh salad on the side adds a nice crunch. Try a simple green salad with lemon vinaigrette. For gatherings, presentation matters. Serve the soup in warm bowls. Add a swirl of cream on top for a fancy touch. Garnish with fresh basil leaves for color. You can even use a drizzle of olive oil for an extra layer of flavor. For the full recipe, check out Roasted Tomato Basil Bliss. It gives you all the steps to create this comforting dish. To keep your roasted tomato basil soup fresh, store it in the fridge. Use a glass or plastic container with a tight lid. This helps prevent spills and keeps out air. Your soup will last for about three to five days in the fridge. If you want to keep it longer, freeze it. Pour the soup into freezer-safe bags or containers. Leave some space at the top for expansion. Frozen soup can last for up to three months. When you want to enjoy your soup again, reheat it gently. Pour the soup into a pot and warm it on low heat. Stir it often to avoid sticking. This way, you keep the flavors intact. If the soup seems too thick, add a splash of broth or water. Stir well to mix. For a quick option, microwave it in a bowl. Cover it loosely to let steam escape. Heat in short bursts, stirring in between. This helps maintain the soup’s creamy texture. How can I make Roasted Tomato Basil Soup vegan? You can easily make this soup vegan. Just use coconut cream instead of heavy cream. Make sure your vegetable broth is also vegan. This way, you keep all the rich flavor. Can I use canned tomatoes for this recipe? Yes, you can use canned tomatoes. Choose high-quality canned tomatoes for the best taste. They can save time and still give a nice flavor. Just skip the roasting step since they are already cooked. What can I serve with Roasted Tomato Basil Soup? This soup pairs well with crusty bread or a fresh salad. Grilled cheese sandwiches are also a classic choice. You can add a sprinkle of cheese on top for extra flavor. How long does Roasted Tomato Basil Soup last in the fridge? Store the soup in the fridge for up to five days. Use an airtight container to keep it fresh. Reheat on the stove or in the microwave before serving. What’s the difference between celery and onion in the soup? Onion adds sweetness and depth to the soup. Celery has a fresh, crisp flavor. You can use either, but onion is more common in this recipe. Both can enhance the taste if used together. Can I make this soup ahead of time? Yes, you can make this soup ahead of time. It tastes even better the next day. Just store it in the fridge and reheat when you’re ready to serve. This blog post covered how to make Roasted Tomato Basil Soup. We discussed key ingredients like tomatoes, onion, and garlic. I shared step-by-step instructions for prepping, roasting, and blending your soup. You also learned tips to enhance flavor and variations to try. Lastly, I provided important storage and reheating advice. Making this soup is fun and rewarding. You can adjust it to your taste and share it with others. Enjoy your delicious creation!

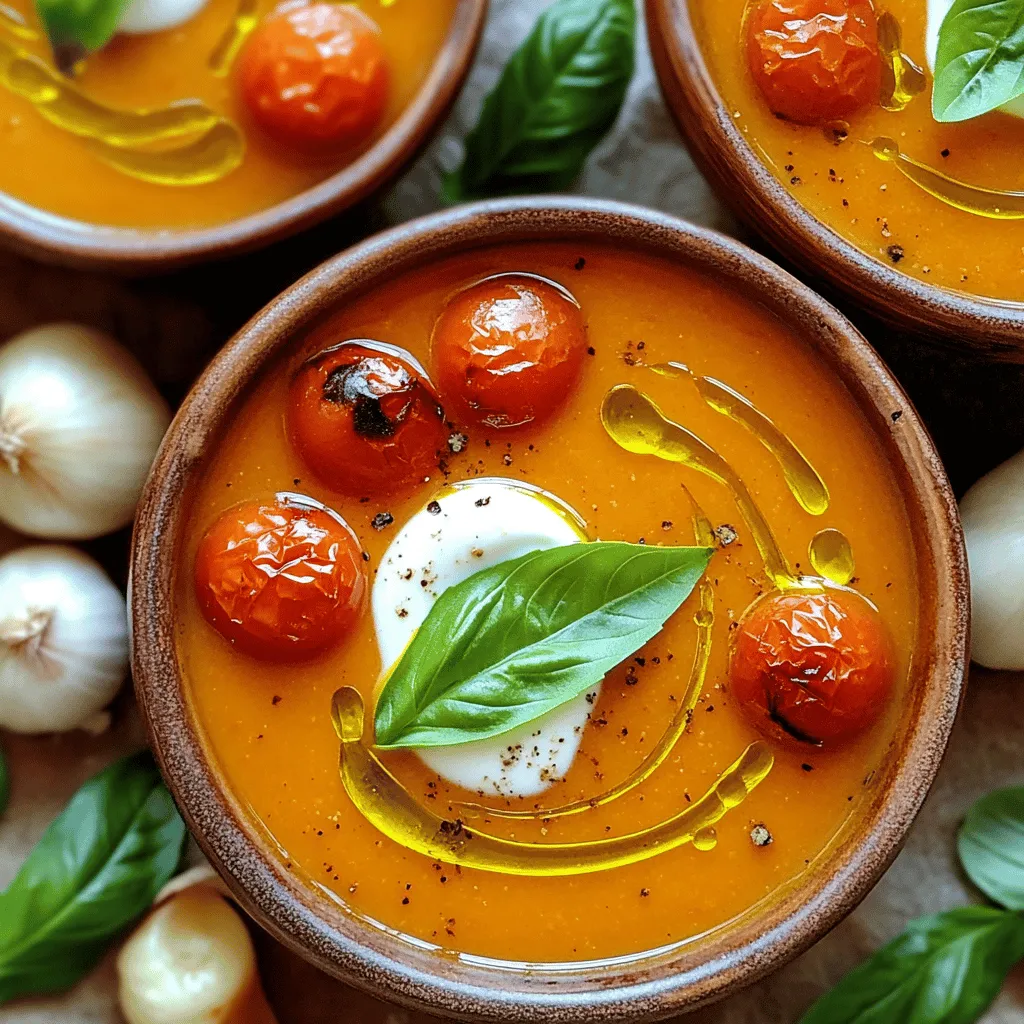
Roasted Tomato Basil Soup Simple and Flavorful Dish

Looking for a warm, tasty treat that’s easy to make? My Roasted Tomato Basil Soup is just what you need.

- 4 cups fresh broccoli florets - 1 cup finely shredded carrots - 1/2 cup onion, diced - 3 cloves garlic, minced - 4 cups vegetable broth - 1 cup heavy cream - 2 cups shredded sharp cheddar cheese - 1/4 cup all-purpose flour - 1/2 teaspoon freshly grated nutmeg - Salt and black pepper to taste - 2 tablespoons extra virgin olive oil For this Panera copycat broccoli cheddar soup, you need fresh ingredients. Start with the vegetables. The broccoli adds color and nutrition. The carrots bring sweetness, and the onion and garlic add depth. Next, you need liquids. Vegetable broth forms the base of the soup, and heavy cream gives it a rich texture. Now, let’s talk about seasonings. Sharp cheddar cheese is key to that gooey, cheesy goodness. Flour thickens the soup, while nutmeg adds a warm flavor. Don’t forget salt and black pepper to enhance all the tastes. Using quality ingredients makes a big difference. You can find all these at your local store. For the full recipe, check the complete list and instructions. Enjoy cooking! 1. Start by heating the olive oil in a large pot over medium heat. 2. Once hot, add the diced onion and minced garlic. 3. Sauté the mixture for about 3-4 minutes until the onions look clear and smell good. 4. Next, stir in the shredded carrots and fresh broccoli florets. 5. Cook this mix for another 5 minutes. You want the veggies to soften a bit but stay bright. 1. Evenly sprinkle the flour over the vegetable mix. 2. Stir well to coat everything in flour. 3. Cook for another 2 minutes to get rid of the raw flour taste. 4. Gradually pour in the vegetable broth while whisking. This helps avoid lumps. 5. Turn up the heat to bring this to a gentle boil. 6. Once it starts boiling, lower the heat and let it simmer for 15-20 minutes. The broccoli should be tender enough to pierce with a fork. 1. Carefully blend the soup using an immersion blender until smooth. If you don't have one, you can use a regular blender in batches. 2. After blending, stir in the heavy cream. 3. Then add the shredded sharp cheddar cheese. Mix well until the cheese melts and the soup is creamy. 4. Finally, season with freshly grated nutmeg, salt, and black pepper to your taste. 5. Let it simmer for another 5 minutes to blend the flavors nicely. Enjoy this warm and cheesy goodness right away! Check out the Full Recipe for more details. To make your soup taste great, start with the right seasonings. I like to add salt and black pepper as I cook. Taste the soup as you go. You can always add more later. For a little kick, try adding a pinch of cayenne pepper. It gives a nice warmth without being too spicy. Cheese is key in this soup. Use sharp cheddar for the best flavor. When adding cheese, do it slowly. Stir it in over low heat. This helps it melt well. If the cheese clumps, it won’t mix smoothly. For a creamy soup, blending is important. If you want it super smooth, use an immersion blender. It’s easy and safe. If you use a regular blender, let the soup cool a bit first. Always blend in small batches to avoid spills. Want to add more vegetables? You can! Try adding peas or cauliflower. Just chop them small and cook them with the broccoli. They will blend in nicely and add color. This soup pairs well with bread. A crusty baguette or soft roll makes it perfect. You can also serve it with a simple salad. A fresh green salad balances the soup's richness. For garnishing, sprinkle more cheese on top. A few fresh herbs, like parsley or chives, add color too. A drizzle of olive oil makes it look fancy. If you want more details about the whole process, check the Full Recipe. {{image_4}} To make this soup gluten-free, swap the all-purpose flour for cornstarch. You can mix equal parts cornstarch with water to create a slurry. Stir this in when the soup simmers. This will help thicken it without gluten. For a dairy-free version, replace the heavy cream with coconut milk or almond milk. Use dairy-free cheese for the cheddar. These swaps keep the creaminess while avoiding dairy. Adding spices can elevate your soup. A pinch of cayenne adds heat. Try thyme for an earthy taste. Fresh herbs like parsley or chives can brighten the flavor. You can also incorporate other vegetables. Spinach or kale works well. They add nutrients and color. Peas or diced potatoes can create a heartier soup. The classic way to serve this soup is in bowls. Ladle it out hot for a comforting meal. For a fun twist, try serving it in bread bowls. Hollow out a round loaf of bread. Fill it with soup and enjoy the soft bread as you eat. It’s a tasty and creative way to enjoy this dish! To store leftover soup, let it cool down first. Then, place it in airtight containers. Glass containers work well, but any sealed plastic container is fine. Always label the container with the date. This helps you keep track of freshness. For freezing, use freezer-safe containers. Leave some space at the top for expansion. You can also use freezer bags. When ready to eat, thaw it in the fridge overnight. Reheat it on the stove over low heat. Stir often to avoid burning. In the fridge, this soup lasts about three to four days. If it looks or smells off, don’t eat it. Signs of spoilage include mold or changes in color. Always trust your senses; if you doubt it, toss it. To thicken broccoli cheddar soup, you can use flour or cornstarch. Both work well. If you choose flour, sprinkle it over the veggies and cook for a couple of minutes. This helps to remove the raw taste. For cornstarch, mix it with a little cold water first. Then add it to the soup while stirring. This method helps avoid lumps. - Use 1/4 cup of all-purpose flour for a creamy texture. - For cornstarch, use 2 tablespoons mixed with water. Yes, you can use frozen broccoli in this recipe. Frozen broccoli is a good option when fresh is not available. Just make sure to thaw it first. This will help it cook evenly. You might need to reduce the cooking time since frozen broccoli softens faster. - Thaw broccoli by placing it in warm water. - Use the same amount as fresh broccoli. When reheating leftover soup, use a pot on the stove for best results. Heat it over low to medium heat. Stir the soup often to prevent it from sticking. You can also reheat it in the microwave. Just place it in a microwave-safe bowl and cover it. Heat in short bursts, stirring in between. - Add a splash of broth or cream to keep it creamy. - Make sure it's heated all the way through before serving. This soup combines fresh veggies, creamy broth, and sharp cheese for amazing flavor. Follow simple steps to prepare, blend, and season it just right. Use tips to perfect taste and adjust textures. With easy swaps for dietary needs and storage options, this recipe is flexible. You can enjoy it fresh or save it for later. Bring warmth and joy to your meals with this delicious broccoli cheddar soup!

Panera Copycat Broccoli Cheddar Soup Simple Recipe

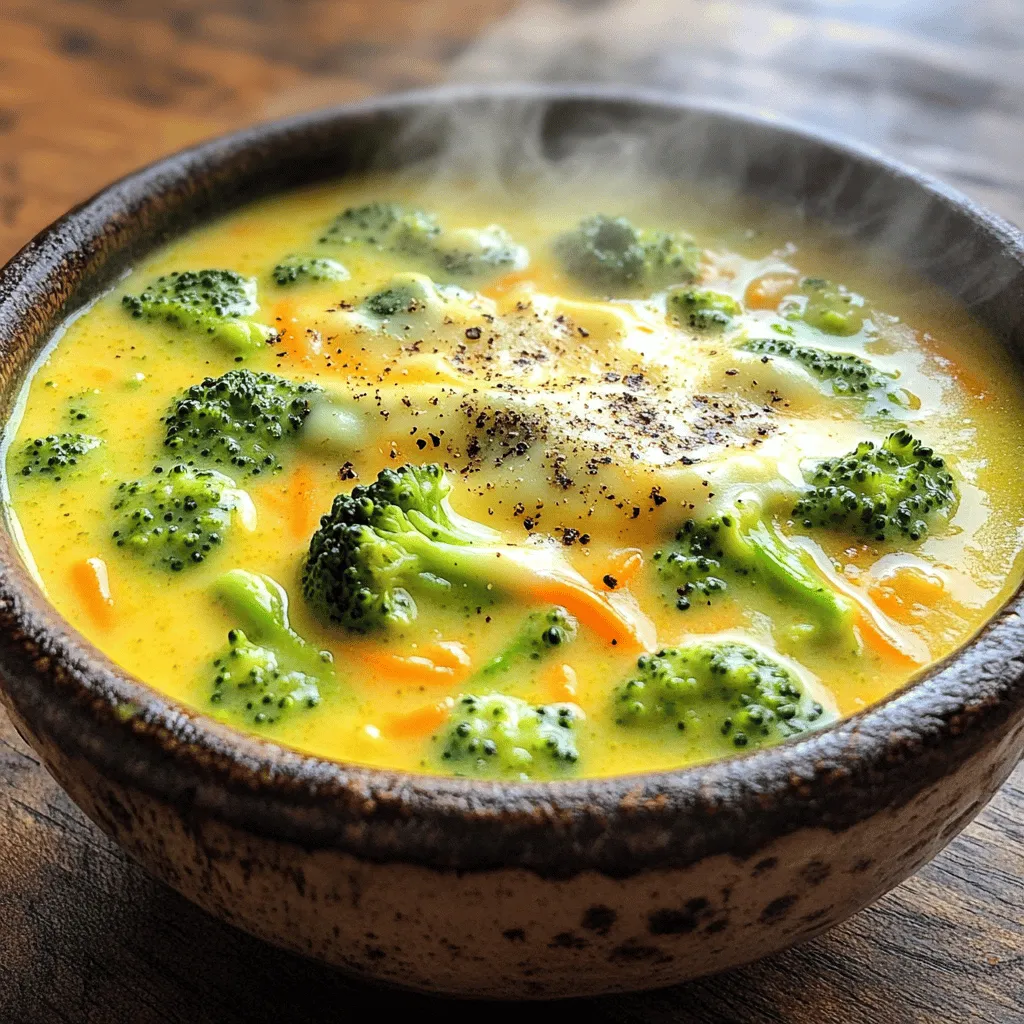
Are you craving that rich, creamy Panera Broccoli Cheddar Soup? Good news! You can make a simple, tasty version at

- 4 cups fresh broccoli florets - 1 medium onion, finely diced - 2 cloves garlic, minced - 3 cups vegetable broth - 1 cup heavy cream - 2 cups sharp cheddar cheese, freshly grated - 1 teaspoon Dijon mustard - 1/2 teaspoon smoked paprika - Salt and freshly cracked pepper to taste - 1 tablespoon olive oil - 2 tablespoons all-purpose flour (optional) When I make broccoli cheddar soup, I focus on quality. The fresh broccoli florets should look bright and crisp. Use a medium onion for a nice base flavor. The garlic adds a subtle kick that complements the cheese. The broth is key. I prefer a low-sodium vegetable broth. It lets the other flavors shine without being too salty. Heavy cream brings richness to the soup. For seasonings, I love using sharp cheddar cheese. It melts beautifully and gives that classic taste. Dijon mustard adds a nice tang. Smoked paprika gives a hint of warmth. Don’t forget to season with salt and pepper to balance all the flavors. If you want a thicker soup, you can use all-purpose flour. This step is optional, but it helps create that creamy texture. All these ingredients come together to make a comforting bowl of soup, perfect for any day. You can find the full recipe to guide you through the cooking process. 1. Sauté Aromatics: Onion and garlic Start by heating the olive oil in a large pot over medium heat. Add the finely diced onion. Cook it for about 5 minutes, stirring often, until it becomes soft and clear. Then, add the minced garlic. Cook it for another minute, stirring until it smells fantastic. 2. Adding Broccoli and Broth: Bring to a boil Next, mix in the fresh broccoli florets with the sautéed onion and garlic. Pour in the vegetable broth. Turn up the heat until the soup begins to boil. Once boiling, reduce the heat. Let it simmer for 10-15 minutes until the broccoli is bright green and tender. 1. Optional: Adding flour for thickness If you like a thicker soup, sprinkle the flour over the mixture. Stir it in well. Let it cook for a minute to remove the raw flour taste. 2. Pureeing the soup: Using an immersion blender Use an immersion blender right in the pot. Blend the soup until it reaches your favorite consistency. You can make it smooth or leave a few chunks for texture. If you don’t have an immersion blender, carefully transfer the soup to a regular blender in small batches. 1. Incorporating cream, spices, and cheese Put the pot back on low heat. Stir in the heavy cream, Dijon mustard, and smoked paprika. Mix until everything is well combined and warm. 2. Simmering for flavors Gradually add the grated cheddar cheese, stirring until it melts completely. Taste the soup, then season it with salt and freshly cracked pepper. Let it simmer on low for 5 more minutes. These steps guide you through making a delightful bowl of broccoli cheddar soup. For the full recipe, check out the earlier section. Enjoy the creamy goodness! To get the perfect texture in your broccoli cheddar soup, aim for a creamy blend. Use an immersion blender for easy mixing. You can blend it smooth or keep some pieces for a rustic feel. This choice adds to the overall experience. Cook the broccoli until it's just tender. This usually takes about 10 to 15 minutes. When it turns bright green, it's ready. Overcooked broccoli can turn mushy, which you want to avoid. Want more flavor? Try adding spices like a pinch of cayenne or nutmeg. Fresh thyme or parsley can also brighten the taste. These herbs work well with the cheese and broccoli mix. For cheese, sharp cheddar is the classic choice, but you can mix it up. Try Gruyère for a nutty flavor or pepper jack for some heat. Each cheese brings a unique twist to the soup. Make your soup look as good as it tastes. Serve it hot in warmed bowls. Top each bowl with extra cheese and a few broccoli florets for color. A drizzle of olive oil adds a nice touch too. Pair this soup with warm, crusty bread or a light salad. These sides balance the rich soup and complete your meal. Enjoying this soup is a feast for both the eyes and the palate! {{image_4}} Making it gluten-free To make this soup gluten-free, swap the all-purpose flour for a gluten-free blend. You can also use cornstarch mixed with water as a thickener. This keeps the creamy texture without the gluten. Vegan alternative options If you prefer a vegan version, use plant-based cheese and cream. Coconut milk can replace heavy cream for richness. Nutritional yeast adds a cheesy flavor without dairy. Best substitutes for cheese and cream For cheese, try using cashew cheese or vegan cheese. These options melt well and keep the flavor rich. Instead of cream, you can use silken tofu blended until smooth for a creamy texture. Using frozen versus fresh broccoli Fresh broccoli adds a bright taste and texture, but frozen works too. Frozen broccoli is often picked at peak ripeness. Just ensure you thaw it first and drain any excess water. Southwest flavors: Adding jalapeños For a spicy twist, add diced jalapeños when cooking the onions. This gives the soup a nice kick and pairs well with the cheese. Classic French variations: Adding leeks Adding leeks brings a mild, sweet flavor. Sauté them with the onions for a lovely depth. This is a classic touch that enhances the overall taste of the soup. To keep your broccoli cheddar soup fresh, store it in an airtight container. Make sure it cools to room temperature before sealing it tight. This helps avoid moisture buildup inside the container. Label the container with the date. This way, you’ll know when you made it. You can freeze broccoli cheddar soup for quick meals later. First, let the soup cool completely. Then, pour it into freezer-safe bags or containers. Leave a little space at the top, as liquids expand when frozen. To reheat, thaw the soup in the fridge overnight. Warm it on the stove over low heat. Stir well to mix any separated ingredients. In the fridge, you can keep the soup for about 3-4 days. If you freeze it, it can last up to 3 months. Always check for any off smells or changes in color before eating leftovers. For the full recipe, check the section above. How to make broccoli cheddar soup without cream? You can use milk or a plant-based milk. This gives a creamy texture. Add more cheese for richness. You can also use blended cauliflower for a thick base. Can I use frozen broccoli instead of fresh? Yes, frozen broccoli works well. It saves time and is easy to find. Just add it to the pot when you would add fresh. Cook until tender, and your soup will still taste great. What is the best cheese for broccoli cheddar soup? Sharp cheddar cheese is the best choice. It adds a strong, rich flavor. You can mix it with Gruyère cheese for extra creaminess and depth. Can I prepare this soup in advance? Absolutely! Make the soup, cool it, and store it in the fridge. It lasts about three days. Reheat gently on the stove for the best taste. Is broccoli cheddar soup healthy? Broccoli cheddar soup can be healthy. It has broccoli, which is full of vitamins. However, cream and cheese add calories. Balance it with a salad or whole grain bread. How to reduce calories in the recipe? Use low-fat milk instead of cream. Choose a reduced-fat cheese or less cheese overall. You can also add more veggies to bulk it up without adding many calories. Discover the full recipe for Cheesy Broccoli Bliss Soup to make this dish at home! This soup is a warm hug in a bowl. It combines fresh broccoli, rich cheese, and cream. You will love its comforting taste. Here’s how to make it. Ingredients: - 4 cups fresh broccoli florets - 1 medium onion, finely diced - 2 cloves garlic, minced - 3 cups vegetable broth (homemade or low-sodium) - 1 cup heavy cream - 2 cups sharp cheddar cheese, freshly grated - 1 teaspoon Dijon mustard - 1/2 teaspoon smoked paprika - Salt and freshly cracked pepper to taste - 1 tablespoon olive oil - 2 tablespoons all-purpose flour (optional, for added thickness) Instructions: 1. Sauté Aromatics: In a large pot, heat the olive oil over medium heat. Once hot, add the diced onion. Sauté until it turns translucent, about 5 minutes. 2. Add Garlic: Stir in the minced garlic. Cook for one more minute, stirring often until fragrant. 3. Add Broccoli and Broth: Mix in the broccoli florets and pour in the vegetable broth. Bring this to a boil. Once boiling, lower the heat to a gentle simmer and cook for 10-15 minutes. The broccoli should be tender and bright green. 4. Thicken (Optional): If you want a thicker soup, sprinkle flour over the mix. Stir well to combine. Cook for one minute to cook the flour. 5. Puree the Soup: Use an immersion blender in the pot to blend the soup. You can make it smooth or leave some pieces. If you don't have an immersion blender, carefully transfer the soup in batches to a traditional blender. 6. Incorporate Cream and Spices: Return the pot to low heat. Stir in the heavy cream, Dijon mustard, and smoked paprika until everything is well mixed and heated. 7. Melt the Cheese: Gradually add the grated cheddar cheese, stirring until it melts completely. Taste and add salt and cracked pepper as needed. 8. Simmer for Flavors: Let the soup simmer on low for another 5 minutes. Stir now and then to keep it warm. Prep Time: 10 mins | Total Time: 30 mins | Servings: 4 Presentation Tips: Serve the soup hot in warmed bowls. Top with extra grated cheddar and a few broccoli florets for color. Drizzle a little olive oil on top for extra richness. Enjoy it with warm crusty bread for a perfect meal! For the complete recipe, refer to the earlier section. This blog post covered how to make a delicious broccoli cheddar soup. We explored key ingredients, the cooking steps, and tips for the perfect texture and flavor. You can even adapt the recipe for different diets and tastes. Remember, this soup is versatile and can be enjoyed fresh or frozen. Try making this soup your own with unique twists. Happy cooking!

Broccoli Cheddar Soup Comforting and Creamy Delight

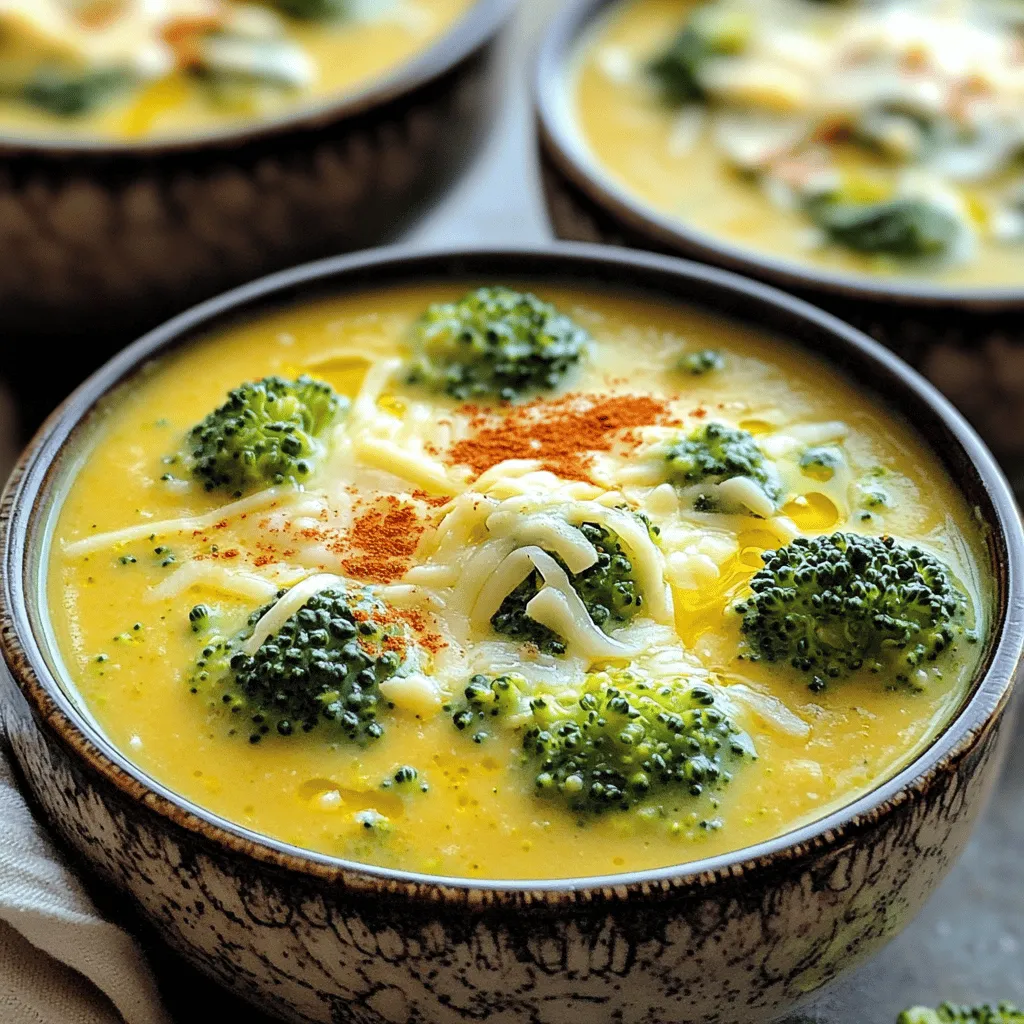
Are you craving a warm, satisfying bowl of soup? Look no further than my Broccoli Cheddar Soup, a comforting and

- 8 ounces elbow macaroni - 1 cup sharp cheddar cheese, shredded - 1 cup mozzarella cheese, shredded - 1 cup gouda cheese, shredded - 1 cup cream cheese, softened and cubed - 3 cups whole milk - 4 tablespoons unsalted butter - 1/4 cup all-purpose flour - 1 teaspoon garlic powder - 1 teaspoon onion powder - 1/2 teaspoon smoked paprika - Salt and freshly ground black pepper, to taste - 1 cup panko breadcrumbs (for topping) - Fresh parsley, finely chopped (for garnish) These ingredients create a rich and creamy dish. You start with elbow macaroni, which holds the cheese sauce well. The sharp cheddar gives a nice bite, while mozzarella adds stretch. Gouda brings a smoky flavor, and cream cheese makes it creamy. Whole milk forms the base of the sauce, and butter and flour help make it thick. Seasonings like garlic powder and onion powder enhance the taste. The panko breadcrumbs on top add a crunchy layer. Finally, fresh parsley gives a pop of color. Together, these ingredients make the ultimate comfort food. For the full recipe, check out the instructions that follow. Enjoy crafting this delicious dish! - Preheat oven to 350°F (175°C). - Boil elbow macaroni according to package instructions. Begin by preheating your oven. A hot oven helps the cheese bake well. Next, grab a large pot. Fill it with salted water and bring it to a boil. Once boiling, add the elbow macaroni. Cook until it is just right, usually about 7-8 minutes. After cooking, drain the pasta and set it aside. - Melt butter and prepare roux. - Whisk in flour, then gradually add milk. - Incorporate seasonings and melt cream cheese. In a big saucepan, melt the butter over medium heat. This butter will give your sauce a rich flavor. Now, add the flour and stir. This mix is called a roux. Cook it for 1-2 minutes while you whisk it. It should not brown. Next, slowly pour in the milk while whisking. Keep stirring until the mix thickens, about 5-7 minutes. You want a smooth sauce that coats the back of a spoon. Season this mixture with garlic powder, onion powder, smoked paprika, salt, and black pepper. Stir well to mix all the flavors. Finally, take the pan off the heat and add the cream cheese. Stir this until it melts into a smooth sauce. - Add shredded cheeses into the sauce. - Mix cooked macaroni with the cheese sauce. - Transfer to a greased baking dish. Now, it is time for the cheese magic! Gradually add the shredded sharp cheddar, mozzarella, and gouda into the sauce. Stir until all the cheese melts and combines into a creamy sauce. In a large bowl, combine the cooked macaroni with your wonderful cheese sauce. Make sure every piece of macaroni is coated. Then, transfer the mixture into a greased baking dish, spreading it out evenly. - Prepare breadcrumb topping. - Bake for 25-30 minutes until golden brown. - Garnish with parsley before serving. Next, let’s prepare the topping! In a small bowl, mix the panko breadcrumbs with a tablespoon of melted butter. This will give your dish a nice crunch. Sprinkle the breadcrumbs over the mac and cheese evenly. Now place the baking dish in the oven. Bake for 25-30 minutes until the top is golden brown and bubbly. Once done, take it out and let it cool a bit. Before you serve, sprinkle some fresh parsley on top for a lovely touch. Enjoy your creamy, cheesy delight! For the full recipe, check out the details above. To get a smooth cheese sauce, start with a roux. A roux is a mix of butter and flour. It helps thicken the sauce. Cook the roux for one to two minutes. This step keeps it from tasting raw. When you add milk, whisk it in slowly. This keeps lumps from forming. Keep whisking until the sauce coats a spoon. This takes about five to seven minutes. Seasoning is key in your sauce. I like to use garlic powder, onion powder, and smoked paprika. Adjust these to your taste. Want a kick? Try adding a pinch of cayenne! Layer flavors as you mix in the cheeses. Start with cream cheese, then add sharp cheddar, mozzarella, and gouda. Each cheese adds its own taste and texture. For a lovely presentation, serve in ramekins. This makes each portion special. You can also add extra cheese on top before baking. Pair your mac and cheese with a fresh green salad or some roasted veggies. A crisp white wine or sparkling water works great as a drink. Feel free to check out the Full Recipe for more details on making this dish! {{image_4}} You can change the flavor of your mac and cheese by using different cheeses. If you want a sharper taste, use aged cheddar. For a creamier texture, try adding fontina or havarti. Mixing in blue cheese gives a bold twist. You can also use smoked cheese for a deeper flavor. Adding flavored cheeses adds a fun twist. Think about pepper jack for heat or goat cheese for tang. These choices let you create your own unique dish. You can make your mac and cheese even better by adding vegetables. Spinach or kale adds color and nutrients. Broccoli or cauliflower adds texture. You can add roasted red peppers for sweetness. For a heartier meal, think about proteins. Cooked bacon, ham, or chicken can make it filling. If you want a vegetarian option, try black beans or chickpeas. These add protein and keep it healthy. Each add-in makes the dish special. If you want a healthier version of this dish, try whole grain macaroni. It has more fiber and nutrients than regular pasta. You can also use lower-fat cheese options. Look for reduced-fat cheddar or mozzarella. These choices cut calories without losing flavor. You can even mix in some Greek yogurt for creaminess and protein. These swaps help you enjoy comfort food while keeping it lighter. To keep your Four Cheese Baked Mac and Cheese fresh, cool it down first. Place it in an airtight container. Make sure the lid is secure. Store it in the fridge. It will last for about 3 to 5 days. If you want to freeze it, portion it into smaller containers. This makes it easy to reheat later. Allow it to cool completely before you freeze it. Wrap each container tightly with plastic wrap. You can also use a freezer bag. It will keep well for up to 2 months. To defrost, move the container to the fridge overnight. For a quick method, you can use the microwave on low. There are many fun ways to serve leftover mac and cheese. You can add some cooked veggies like broccoli or spinach. This adds color and fiber. Another option is to mix in some cooked meat, like chicken or bacon. When reheating, you can choose between microwave and oven. The microwave is faster. Use a lower power setting and cover it to keep moisture in. The oven gives a crispier texture. Preheat it to 350°F (175°C) and heat for about 15-20 minutes. This will bring back that golden, bubbly top. Enjoy your leftovers! Yes, you can prepare this dish in advance. To do this, cook the macaroni and make the cheese sauce as usual. Once combined, place it in a baking dish. Cover it tightly with plastic wrap or foil. You can store it in the fridge for up to 24 hours. When you're ready to bake, just remove the cover and heat it in the oven. It may take a bit longer to cook, about 30-35 minutes. If it seems dry, add a splash of milk before baking. Yes, this dish is vegetarian. However, some ingredients may not be, depending on their source. Always check the cheese labels. Some brands add animal rennet. It’s best to choose cheeses labeled as vegetarian. Also, ensure your pasta does not contain eggs if you want it fully vegetarian. To make Four Cheese Baked Mac and Cheese gluten-free, substitute all-purpose flour with gluten-free flour. You can use rice flour or almond flour. For the pasta, select gluten-free elbow macaroni. Many brands offer gluten-free options that work well in this recipe. Just be mindful of cooking times, as gluten-free pasta may need less time. Reheating baked mac and cheese requires a gentle touch. Preheat your oven to 350°F (175°C). Place the mac and cheese in an oven-safe dish. Add a splash of milk to keep it creamy. Cover with foil to retain moisture. Heat for around 20-25 minutes, checking frequently. Stir halfway through to ensure even warming. You can also use a microwave, but it may dry out faster. Add a little milk and heat in short bursts, stirring often. Four Cheese Baked Mac and Cheese is a delicious dish. We've covered key ingredients, including different cheeses and seasonings. You now know how to make the cheese sauce and combine everything. Baking tips help to achieve that perfect golden topping. Variations allow for personal flair, and we shared storage info to keep leftovers fresh. In summary, this dish is easy and fun to make. Whether you want classic flavors or a healthier twist, you’re ready to impress. Enjoy your cooking!

Four Cheese Baked Mac and Cheese Comfort Food Delight

If you’re searching for the ultimate comfort food, you’ve found it! My Four Cheese Baked Mac and Cheese is rich,

- 2 cups elbow macaroni - 1 pound cooked chicken, shredded - 3 cups chicken broth - 1 cup buffalo sauce - 1 cup sharp cheddar cheese, shredded - 1 cup mozzarella cheese, shredded - Chopped green onions for garnish - Olive oil - Milk - Garlic powder - Onion powder - Salt and pepper To make One Pot Buffalo Chicken Mac and Cheese, you need some tasty ingredients. The main part is the elbow macaroni, which gives a nice bite. You also need cooked chicken, which adds protein and flavor. Chicken broth keeps everything moist and adds depth. The buffalo sauce gives it that spicy kick. Cheese is key in this dish. Sharp cheddar and mozzarella melt beautifully. They create a creamy texture that hugs the pasta. You can add some optional ingredients too. Chopped green onions make a lovely garnish on top. Olive oil helps to sauté the chicken, while milk gives the sauce a smoother finish. Garlic powder and onion powder boost the flavor. Salt and pepper round it all out. For the complete recipe, check the Full Recipe. You'll love how easy it is to put together! - Heat 1 tablespoon of olive oil in a large pot over medium heat. - Add 1 pound of shredded chicken. Sauté it for 2-3 minutes. This warms the chicken and blends its flavor with the oil. - Pour in 1 cup of buffalo sauce, along with 1 teaspoon of garlic powder and 1 teaspoon of onion powder. Stir well to coat the chicken evenly. - Next, add 3 cups of chicken broth and bring the mixture to a boil. Stir it often to prevent sticking. - Once boiling, stir in 2 cups of elbow macaroni. Reduce heat to medium-low and cover the pot. Let it simmer for 8-10 minutes. Stir occasionally until the pasta is al dente. - After the pasta cooks, add 1 cup of milk to the pot. - Gradually stir in 1 cup of sharp cheddar cheese and 1 cup of mozzarella cheese. Keep stirring until both cheeses melt and create a creamy sauce. - Taste the mixture and season it with salt and pepper as needed. Adjust to balance the spice from the buffalo sauce. - Remove the pot from heat and let it sit for a few minutes. This thickens the dish before serving. - Serve your buffalo chicken mac and cheese hot. You can garnish it with chopped green onions if you'd like a bit of crunch. For a complete guide on ingredients and cooking, check the Full Recipe. To ensure your pasta is al dente, cook it for the right time. Check the package for the cooking time. For elbow macaroni, it's usually around 8-10 minutes. Stir often, so it cooks evenly. Taste a piece a minute before the time is up. If it’s firm but tender, you’re set! Avoiding clumps in your cheese sauce is key for a smooth dish. Gradually add the cheese while stirring. This helps it melt evenly. If it seems too thick, add a splash of milk. Keep stirring until it’s creamy. Adjusting the spice level with buffalo sauce is easy. If you like it hot, use more sauce. For a milder taste, add less. You can also mix in other flavors, like ranch dressing, for a twist. Adding different cheeses can create a richer flavor. Try mixing in gouda or pepper jack with the cheddar and mozzarella. Each cheese brings its unique taste and creaminess, making your dish even better. Check out the Full Recipe for more ideas on flavor combinations! {{image_4}} You can mix it up with add-ins. Adding vegetables boosts flavor and nutrition. I love using bell peppers for crunch and color. They give a sweet taste that pairs well with the buffalo sauce. Broccoli is another great option. It adds texture and is packed with vitamins. Just chop it small and toss it in the pot with the pasta. If you want to switch up the protein, consider using rotisserie chicken. It saves time and adds a nice, smoky flavor. You can also use turkey if you prefer. It works just as well and is a leaner choice. Simply shred it and add it with the chicken. For those with dietary needs, there are great options. You can find gluten-free pasta in many stores. It cooks just like regular pasta and tastes great in this dish. Look for brands made from brown rice or chickpeas for extra flavor. If you need a dairy-free option, try using dairy-free cheese. Many brands offer delicious cheese substitutes that melt well. You can also use almond milk or oat milk instead of regular milk. Just make sure to check the labels for any added sugars or flavors. These swaps keep the dish tasty while meeting your needs. To store your buffalo chicken mac and cheese, let it cool first. Place leftovers in an airtight container. This helps keep the dish fresh. Your mac and cheese will last in the fridge for about 3 to 4 days. Label the container with the date. This way, you can track how long it has been stored. When you're ready to enjoy your leftovers, reheat them for the best taste. You can use a microwave or a stovetop. If using a microwave, place the mac and cheese in a bowl. Add a splash of milk to keep it creamy. Heat it in short bursts, stirring in between. If you prefer the stovetop, use a pan. Add a little milk and warm over low heat. Stir until it is hot and smooth again. Enjoy that delightful flavor just like the first time! For the full recipe, check out the detailed steps above. Can I make One Pot Buffalo Chicken Mac and Cheese in advance? Yes, you can make this dish ahead of time. Just follow the recipe and let it cool. Store it in an airtight container. You can keep it in the fridge for about three days. When ready to eat, reheat it on the stove or in the microwave. Add a splash of milk if it seems dry. What can I substitute for chicken? If you want a different protein, try shredded turkey or even tofu. You can also use cooked sausage or beef. Each option brings a unique flavor. Adjust the cooking time based on what you choose. How can I make it spicier or milder? To make it spicier, add more buffalo sauce or some cayenne pepper. For a milder dish, use less buffalo sauce and add more cheese. You can also mix in some cream cheese for extra richness without heat. Calories and portion size This dish has around 600 calories per serving. One serving is about one cup. Keep this in mind if you are watching your calorie intake. Key nutrients present in the dish This meal provides protein from the chicken and calcium from the cheese. It also offers carbohydrates from the macaroni. You’ll find vitamins in the buffalo sauce and any veggies you add. This makes it a balanced meal! For the Full Recipe, refer to the earlier sections of this article. This blog post covers a tasty recipe for One Pot Buffalo Chicken Mac and Cheese. We shared main and optional ingredients, plus step-by-step instructions to guide your cooking. You learned helpful tips and variations to customize this dish. In closing, this meal is fun and easy to make. Don't be afraid to experiment with flavors and ingredients. Your kitchen can be full of delicious possibilities. Enjoy making this dish for yourself and your loved ones!

One Pot Buffalo Chicken Mac and Cheese Delight

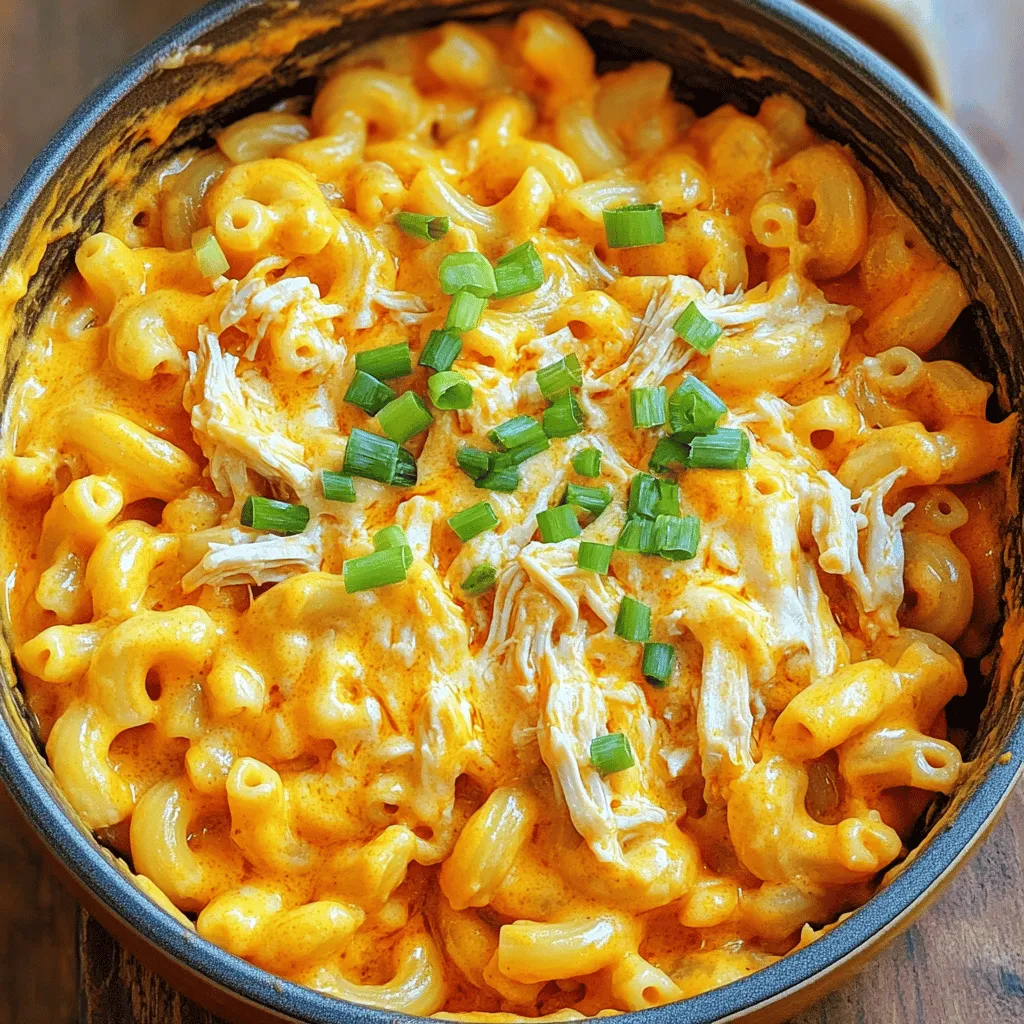
Craving comfort food that packs a flavor punch? You’re in for a treat! My One Pot Buffalo Chicken Mac and

- 4 boneless, skinless chicken breasts - 1 cup fresh mozzarella cheese, thinly sliced - 2 large ripe tomatoes, sliced thick - 1 cup fresh basil leaves, washed and patted dry - 1/2 cup balsamic vinegar - 2 tablespoons honey - 2 tablespoons olive oil, plus more for greasing - 3 cloves garlic, minced - Salt and freshly ground black pepper to taste Each of these ingredients plays an important role in the dish. The chicken provides a juicy base. Fresh mozzarella adds a creamy texture. Ripe tomatoes bring sweetness, while basil adds a fresh kick. The balsamic glaze elevates the flavors, making the dish truly special. When choosing your ingredients, look for quality. Select plump tomatoes and fresh basil for the best taste. Use high-quality balsamic vinegar for a rich glaze. These choices make a big difference in flavor. Next, gather your ingredients and get ready to create a delicious meal. {{ingredient_image_2}} - Preheat the oven to 400°F (200°C). - Grease a baking dish with olive oil. Start by getting your oven hot. A warm oven helps cook the chicken evenly. While it warms up, you can grease your baking dish. Olive oil works well here. It prevents sticking and adds flavor. - Combine balsamic vinegar and honey in a saucepan. - Simmer and reduce for 5-7 minutes. Next, let’s make the balsamic glaze. In a small saucepan, mix balsamic vinegar and honey. Stir this mixture as it heats. You want it to simmer for about 5 to 7 minutes. This will thicken the sauce and create a sweet, tangy glaze. Once it’s done, set it aside to cool. - Sear chicken in olive oil. - Layer tomatoes and mozzarella on chicken. - Drizzle with balsamic glaze. Now, heat 2 tablespoons of olive oil in a large skillet. Season the chicken breasts with salt and pepper. Sear each chicken breast for about 4-5 minutes on both sides. This step gives your chicken a golden-brown crust. After searing, carefully place the chicken in your prepared baking dish. Layer thick slices of tomatoes on top of each piece. Then, add generous slices of fresh mozzarella cheese. Finally, drizzle the balsamic glaze over everything. This adds a burst of flavor to your dish. The final step is to bake it. Place the dish in the oven and let it bake for 20-25 minutes. The chicken is done when it reaches an internal temperature of 165°F (75°C). Enjoy your delicious creation! To get the perfect sear on your chicken, use a hot skillet. Heat the olive oil over medium-high heat. Make sure the chicken breasts are dry before seasoning them with salt and pepper. Place them in the skillet without crowding. This helps them brown well. Cook for 4-5 minutes on each side until they turn golden brown. After searing, transfer the chicken to the baking dish. The best internal temperature for chicken is 165°F (75°C). Use a meat thermometer to check the thickest part of the chicken. This ensures it cooks through while staying juicy. For a beautiful plate, use a colorful platter. Lay each chicken breast on the dish. Top with fresh basil leaves and a drizzle of balsamic glaze. This adds flavor and looks stunning. For side dishes, roasted seasonal vegetables pair well. A fresh mixed salad is also great. These sides balance the rich flavors of the chicken. Pro Tips Perfectly Searing Chicken: Make sure your skillet is hot enough before adding the chicken; this helps achieve a nice golden-brown crust and seals in the juices. Using Fresh Ingredients: Opt for the ripest tomatoes and fresh mozzarella to elevate the flavors of your dish; fresh ingredients make a significant difference! Adjusting the Glaze: If you prefer a sweeter glaze, feel free to add extra honey; adjust according to your taste preference for a personalized touch. Resting the Chicken: Let the chicken rest for at least 5 minutes after baking; this allows the juices to redistribute, resulting in a juicier bite. {{image_4}} You can switch up the cheese in this dish. Instead of fresh mozzarella, try goat cheese or burrata. Both add a creamy texture and unique flavor. If you want a stronger taste, use feta cheese. Each cheese gives the dish a different twist. For herbs, basil is classic, but you can explore other options. Try fresh oregano or thyme for added depth. These herbs pair well with tomatoes and balsamic glaze. You can even mix different herbs for a fun flavor blend. Grilling the chicken is a great option. It adds a smoky flavor that contrasts well with the sweet glaze. Preheat your grill to medium heat. Grill each chicken breast for about 6-7 minutes per side. Finish by adding the tomatoes and cheese, then cover until melted. You can also adapt this recipe for a slow cooker. Sear the chicken first for flavor, then place it in the slow cooker. Layer the tomatoes and cheese on top. Pour the balsamic glaze over everything. Cook on low for 4-5 hours or high for 2-3 hours. This method keeps the chicken juicy and tender. To store leftovers, let the Balsamic Glazed Caprese Chicken cool first. Place it in an airtight container. This keeps the chicken fresh and tasty. You can store it in the fridge for up to three days. If you want to enjoy it longer, consider freezing. To freeze, use a freezer-safe container or heavy-duty freezer bags. Make sure to remove as much air as possible. This helps avoid freezer burn. You can freeze the chicken for up to three months. When you are ready to eat, thaw it in the fridge overnight. Reheat in the oven or microwave until hot. This way, you keep the flavor of the dish intact. How do I know when the chicken is done? You can check if the chicken is done by using a meat thermometer. It should read 165°F (75°C) in the thickest part. If you don't have a thermometer, cut into the chicken. The meat should be white with no pink inside. Can I use a different type of vinegar? Yes, you can use other vinegars. Red wine vinegar or apple cider vinegar can work. Each will give a different taste, but they can still be tasty. How to adjust for serving larger or smaller groups To feed more people, simply double the recipe. Use eight chicken breasts and adjust the other ingredients accordingly. If you need fewer servings, cut the recipe in half. Gluten-free alternatives This dish is naturally gluten-free. Just make sure any additional sides or sauces are also gluten-free. This blog post covered all you need for Balsamic Glazed Caprese Chicken. You learned about the main and extra ingredients, the step-by-step cooking guide, and important tips for success. I shared fun variations and smart storage options to extend freshness. Embrace this delicious recipe and make it your own. You can impress friends and family with ease. Enjoy crafting a meal that's not only tasty but also memorable. Your new skills in the kitchen will shine with every bite. Happy cooking!

Balsamic Glazed Caprese Chicken Easy and Flavorful Dish

Looking for a simple yet delicious meal? Balsamic Glazed Caprese Chicken is your answer! This dish combines juicy chicken, creamy

- 2 cups unsweetened almond milk - 1 teaspoon ground turmeric - 1/2 teaspoon ground cinnamon - 1/4 teaspoon ground ginger - 1/4 teaspoon freshly ground black pepper - 1 tablespoon honey or maple syrup - 1 teaspoon pure vanilla extract - A pinch of fine sea salt You can use other plant-based milks like oat or coconut milk. Each milk has its own flavor. If you want to switch the sweetener, maple syrup works great. Honey adds a floral note, while maple syrup gives a deeper taste. Turmeric is known for its bright color and health perks. It can help reduce inflammation and boost your immune system. Cinnamon adds warmth and may help control blood sugar levels. Ginger is not just tasty; it can settle your stomach and aid in digestion. Together, these spices create a soothing drink that is both delicious and good for you. {{ingredient_image_2}} Making a Golden Turmeric Latte is simple and quick. You will heat almond milk, add spices, and froth the mixture. This drink comes together in just ten minutes. 1. Heating the almond milk and spices In a small saucepan, pour 2 cups of unsweetened almond milk. Add 1 teaspoon of ground turmeric, 1/2 teaspoon of ground cinnamon, 1/4 teaspoon of ground ginger, and 1/4 teaspoon of freshly ground black pepper. Don’t forget a pinch of fine sea salt. Place the saucepan on medium heat. Whisk the mixture constantly. This helps blend the spices and prevents clumping. Heat until steaming, about five minutes. Avoid boiling. 2. Incorporating sweeteners and vanilla extract Remove the saucepan from heat. Now, stir in 1 tablespoon of honey or maple syrup, adjusting to taste. Add 1 teaspoon of pure vanilla extract. Mix well until everything is combined. 3. Frothing for texture For a creamy, frothy finish, use a milk frother. If you don’t have one, whisk the latte vigorously until bubbles form. This makes the drink light and airy. Choose your favorite mugs for serving. A clear glass mug shows off the golden color beautifully. After pouring, dust a light sprinkle of cinnamon on top. This adds a lovely touch and enhances the flavor. Enjoy your warm, nourishing drink! To avoid clumping in your turmeric latte, whisk the mixture well. Start by adding the almond milk and spices to your saucepan. Stir them together as you heat. This keeps the turmeric and spices evenly mixed. Remember to whisk continuously while it warms up. If you prefer a sweeter drink, adjust the honey or maple syrup to your taste. Start with one tablespoon and add more if needed. You can make your latte even better by adding spices. Try a pinch of nutmeg or cardamom for a new twist. You can also infuse flavors like vanilla bean or cocoa. These additions give your latte a unique touch. Feel free to play around with the spices until you find your favorite mix. If your latte curdles, don't worry. This can happen if the milk gets too hot. To fix it, whisk the mixture again. If the flavor is too strong, add more almond milk to balance it. For a weak flavor, add a tiny bit more turmeric or spices. Just be careful not to overdo it! Pro Tips Choose Your Milk: Experiment with different plant-based milks like oat or coconut for varied flavors and creaminess. Spice it Up: Adjust the spices according to your taste; adding a pinch of nutmeg can give a lovely warm twist. Sweetness Level: Modify the sweetness by trying different types of sweeteners like agave or stevia to suit your diet. Foam Factor: For a café-style experience, use a handheld frother to achieve a perfect foam on top of your latte. {{image_4}} You can easily make this drink vegan. Simply use any plant-based milk you like. Here are some great options: - Almond milk - Cashew milk - Oat milk - Coconut milk Each type gives a unique taste. Almond milk is light and nutty. Oat milk is creamy and smooth. Coconut milk adds a tropical twist. Choose what you enjoy most! Want to enjoy this drink cold? You can turn your warm latte into an iced version. Just follow these steps: 1. Prepare your latte as usual. 2. Let it cool down to room temperature. 3. Add ice cubes to a glass. 4. Pour the cooled latte over the ice. You can also blend it for a frosty texture! This is refreshing on a hot day. To boost health benefits, try adding functional ingredients. Here are a few ideas: - Collagen powder for skin and joint support - Adaptogens like ashwagandha for stress relief - Chia seeds for extra fiber Mix these in while heating the milk. They blend well and add great benefits to your drink. Enjoy experimenting with these variations! To store your Golden Turmeric Latte, let it cool first. Pour the latte into an airtight container. Keep it in the fridge. It stays fresh for up to three days. If you notice separation, just give it a good shake. When reheating, use low heat. Pour the leftover latte into a small saucepan. Stir it gently to avoid curdling. Heat until it’s warm, but don’t let it boil. This keeps the texture smooth and creamy. You can make this latte in bulk for busy days. Simply double or triple the recipe. Store it in the fridge for easy access. When you want a warm drink, just reheat a cup. This way, you enjoy a delicious drink anytime! A Golden Turmeric Latte is a warm drink made with turmeric, milk, and spices. It has roots in Indian culture, where turmeric is a key part of Ayurvedic medicine. This latte is not just tasty; it’s also comforting and healthy. People enjoy it for its bright yellow color and soothing flavors. The drink has become popular worldwide for its rich taste and wellness benefits. Yes, you can use fresh turmeric. Fresh turmeric has a vibrant flavor and extra nutrients. However, it can be tricky to work with. You need to peel and grate it first. This process can be a bit messy and time-consuming. Ground turmeric is easier to use and still very healthy. If you want to use fresh turmeric, add about one tablespoon of grated turmeric for every teaspoon of ground turmeric. Turmeric is safe for most people when used in food. But some may have stomach issues or allergies. If you take blood thinners, talk to a doctor before using turmeric. Pregnant women should also consult a healthcare provider. It's best to enjoy turmeric in moderation and be aware of how your body reacts. You now know how to make a delicious Golden Turmeric Latte. We covered the key ingredients, health benefits, and step-by-step cooking tips. I shared tips to perfect your latte and offered storage advice. There are also fun variations, like an iced version or adding extras for nourishment. Experimenting with flavors can make it even better. Enjoy making this drink as a warm treat or refreshing iced beverage. Embrace the healthy benefits, and savor every sip!

Golden Turmeric Latte Creamy and Nourishing Drink

Are you ready to make a cozy, creamy drink that soothes and nourishes? The Golden Turmeric Latte is your answer!

- 1 lb beef sirloin, thinly sliced against the grain - 2 cups fresh Thai basil leaves - 1 red bell pepper, sliced into thin strips - 1 cup green beans, trimmed and cut into 2-inch pieces The beef sirloin is key here. It cooks fast and stays tender. Slicing against the grain helps keep it juicy. Fresh Thai basil adds a unique flavor that sets this dish apart. The bell pepper and green beans bring both color and crunch. - 2 tablespoons soy sauce - 1 tablespoon fish sauce - 1 tablespoon oyster sauce - 1 teaspoon sugar These sauces are the heart of the stir fry. They create a savory balance. The soy sauce gives depth, while fish sauce adds umami. The oyster sauce adds a hint of sweetness. A touch of sugar rounds off the flavors perfectly. - 1 tablespoon vegetable oil - 1 teaspoon chili flakes Using vegetable oil allows for high heat without burning. This is crucial for a good stir fry. Chili flakes bring heat, which you can adjust to your taste. If you love spice, you can add more! {{ingredient_image_2}} To make the sauce, take a small bowl. Whisk together the soy sauce, fish sauce, oyster sauce, and sugar. Mix until you see no lumps. After that, set the sauce aside. Let it rest to help the flavors blend well. Heat vegetable oil in a large wok over medium-high heat. When the oil looks shiny, add the thinly sliced beef. Spread it in a single layer. Cook for 2-3 minutes until the beef is brown and just cooked. Take out the beef and set it aside on a plate. Without cleaning the pan, add minced garlic. Stir fry for about 30 seconds to bring out the smell. Then, add the sliced red bell pepper and green beans. Stir fry for 2-3 minutes. You want the veggies to soften but stay crisp. Put the cooked beef back in the wok. Pour in the sauce you made earlier. Add the chili flakes on top. Toss everything together well for about 2 minutes. Make sure all ingredients are coated and heated through. Take the wok off the heat. Gently stir in fresh basil leaves. Mix just until they wilt and smell great, which takes about 30 seconds. Serve the Thai Basil Beef Stir Fry hot over fluffy jasmine rice. Garnish each plate with extra basil leaves and a sprinkle of chili flakes. A lime wedge on the side adds a nice touch and fresh flavor. For this dish, I recommend using beef sirloin. It has great flavor and is tender. When you slice the beef, always cut against the grain. This makes the meat easier to chew and more enjoyable. If you don't know where the grain is, look for the lines in the meat. Fresh basil is key for this recipe. Try to get Thai basil if you can. It has a unique taste that really shines in your stir fry. When buying vegetables, look for crisp red bell peppers and green beans. Fresh veggies add a nice crunch and color to your dish. You can adjust the spice level to suit your taste. If you like heat, add more chili flakes. If you're not a fan of spice, use less. You can also add other ingredients for extra flavor. Try adding sliced mushrooms or baby corn for a fun twist. A splash of lime juice can brighten the dish too! Pro Tips Choose the Right Cut: For the best flavor and tenderness, use beef sirloin or flank steak. These cuts are ideal for quick stir-frying. Prep Ahead: Have all ingredients chopped and ready before starting to cook. Stir-frying is a quick process, and having everything prepared will make it easier. Don’t Overcrowd the Pan: Cook in batches if necessary to ensure the beef sears properly and doesn’t steam. This will give you a better texture. Customize Your Heat: Adjust the amount of chili flakes according to your preference. You can also add fresh chilies for an extra kick! {{image_4}} You can easily swap the beef for chicken or tofu. Chicken works well, but tofu gives a nice texture. If using chicken, slice it thinly like the beef. Tofu needs a few extra minutes to fry until crispy. Adjust cooking time for each protein: - Chicken: Cook for about 4-5 minutes until it's no longer pink. - Tofu: Cook for 5-7 minutes until it's golden brown. To create a meatless stir fry, skip the beef and double the veggies. You can use mushrooms, zucchini, or eggplant. These vegetables add great flavor and texture. Recommended substitutes for meat: - Mushrooms: Use shiitake or button mushrooms for depth. - Tempeh: This is a great protein-rich option. You can play with the sauce to create new flavors. A simple change can make a big difference. Try adding hoisin sauce for a sweeter touch. Here are a few ideas for sauce variations: - Teriyaki sauce: Adds a sweet and savory mix. - Szechuan sauce: Gives a spicy kick. Using sauces from other cuisines can also enhance the dish. Think about adding a splash of soy sauce with a hint of sesame oil for depth. Store your Thai basil beef stir fry in airtight containers. Glass or plastic containers work well. Make sure to cool the dish to room temperature before sealing. This helps keep the flavors fresh. Place the containers in the fridge. The leftovers will stay good for up to three days. When it’s time to eat your leftovers, reheat them gently. The best methods are using a skillet or microwave. For a skillet, place the stir fry over medium heat. Stir often to prevent sticking. For the microwave, use a microwave-safe dish. Heat in short bursts of 30 seconds, stirring in between. Aim for an internal temperature of 165°F to ensure safety. If you want to save some for later, freezing is a great choice. Divide the stir fry into portions before freezing. Use freezer-safe bags or containers. Remove as much air as possible to avoid freezer burn. Thaw the dish in the fridge overnight before reheating. This method helps keep the texture and flavor intact. Enjoy your tasty meal even after a few weeks! You can use regular basil as a substitute. Sweet basil has a milder taste. You can also try mint or cilantro for a fresh twist. These alternatives will change the flavor but still work well. Expect a more herbal and less spicy taste. Yes, you can make it spicy! Start by adding more chili flakes. If you want more heat, try fresh chilies or hot sauce. Add them to the oil when cooking the beef. This way, the heat blends into the dish. Adjust the spice to fit your taste. This dish takes about 25 minutes to cook. You will spend 10 minutes prepping the ingredients. Cooking time is around 15 minutes. Stir-frying is quick, so keep an eye on the beef and veggies. Enjoy this fast and tasty meal any night! We explored the essential ingredients for Thai basil beef stir fry, including beef, fresh basil, and sauces. I guided you through step-by-step cooking methods. We discussed tips for selecting quality beef and ensuring freshness. I also highlighted variations for different dietary needs and provided storage info for leftovers. Try this dish; it’s full of flavor and easy to make. You can always adjust it to suit your taste. Enjoy your cooking journey!

Thai Basil Beef Stir Fry Flavorful Dinner Delight

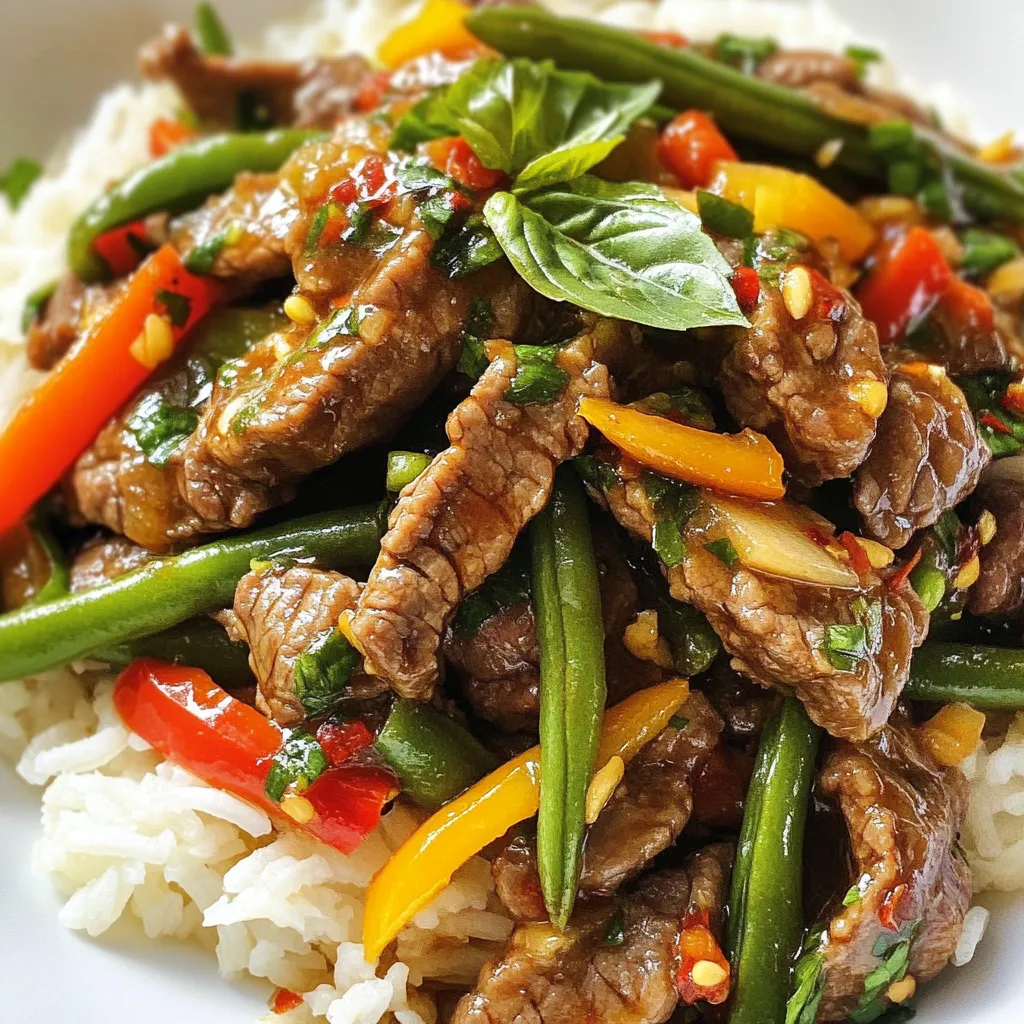
Craving a quick and flavorful dinner? Thai Basil Beef Stir Fry is your answer! This dish brings the amazing taste

- 8 oz rotini pasta - 2 cups corn kernels (fresh, frozen, or grilled) - 1 red bell pepper, diced - 1/2 small red onion, finely chopped - 1 ripe avocado, diced - 1/2 cup fresh cilantro, chopped - 1/2 cup cotija cheese, crumbled - 1/4 cup mayonnaise - 2 tablespoons sour cream - 1 tablespoon fresh lime juice - 1 teaspoon chili powder - Salt and pepper to taste - Optional: sliced jalapeños Gathering fresh ingredients makes a big difference in flavor. Use high-quality rotini pasta for the best texture. Corn adds sweetness and crunch. You can use fresh corn, frozen corn, or even grilled corn for a smoky edge. Red bell pepper brings a pop of color and sweetness. A small red onion adds sharpness without being too strong. The avocado gives creaminess and richness. Fresh cilantro adds a bright note to the dish. Cotija cheese is a must for that classic Mexican street corn taste. Mayonnaise and sour cream create a creamy dressing that ties everything together. Lime juice brightens the flavors. Chili powder adds a kick, and you can adjust it to your taste. Feel free to add sliced jalapeños if you want extra heat. This salad is versatile, and you can mix and match based on your pantry. - Alternatives for rotini pasta: Use penne or fusilli if you prefer. - Dairy-free options for mayonnaise and sour cream: Look for plant-based mayo and yogurt. - Fresh vs. canned corn considerations: Fresh corn tastes best, but canned corn works well in a pinch. You can get creative with your ingredients while keeping the core of the dish intact. Each choice impacts the final taste, so enjoy mixing it up! For the complete recipe, check out the Full Recipe section. First, bring a large pot of water to a boil. Add salt to the water for flavor. Next, add 8 oz of rotini pasta. Cook it for about 8-10 minutes. You want it al dente, which means it should be firm but not hard. After cooking, drain the pasta. Rinse it under cold water to cool it down. This stops the cooking process and helps keep the pasta from sticking together. In a big mixing bowl, combine the cooled rotini pasta with your veggies. Add 2 cups of corn, 1 diced red bell pepper, 1/2 a small red onion, and 1 diced avocado. Don’t forget 1/2 cup of chopped cilantro. Stir gently to mix everything well. Be careful not to mash the avocado; you want nice pieces to stay intact. In a smaller bowl, whisk together the dressing. Mix 1/4 cup of mayonnaise with 2 tablespoons of sour cream. Add 1 tablespoon of fresh lime juice and 1 teaspoon of chili powder. Season with a pinch of salt and pepper. Whisk until the dressing is smooth and creamy. Taste it; you can add more lime juice or chili powder if you want more flavor. Pour the dressing over the salad mixture. Using a spatula, fold the ingredients together gently. You want everything to be coated in dressing but avoid mashing. Now, sprinkle 1/2 cup of crumbled cotija cheese on top. If you like some heat, add sliced jalapeños now. Cover the salad with plastic wrap or a lid. Place it in the refrigerator for at least 30 minutes. This chill time is important. It helps the flavors blend and taste better. Enjoy your flavorful and fresh Mexican street corn pasta salad! For the complete recipe, check out the Full Recipe. To make your Mexican street corn pasta salad shine, adjust the spice levels. Start with one teaspoon of chili powder. If you like heat, add sliced jalapeños. Taste as you go to find your perfect balance. Seasoning is key to a great dish. Use salt and pepper wisely. Too much salt can overpower the other flavors. Always taste before serving. This way, you ensure every bite is full of flavor. A beautiful salad makes a big impact. Start by serving the salad in a bright, large bowl. Top it with extra crumbled cotija cheese for a nice look. Add fresh cilantro leaves for color and freshness. Lime wedges not only add zest but also enhance the visual appeal. Arrange them around the bowl. This invites everyone to dig in. Meal prep keeps your cooking easy. Prepare ingredients ahead of time. Cook the pasta and let it cool. Dice the vegetables and store them in separate containers. This way, you save time on busy days. When ready to eat, just mix everything together. For storage, use airtight containers to keep the salad fresh. It lasts well in the fridge. Enjoy your meals without the last-minute rush, and check out the Full Recipe for details! {{image_4}} You can switch up the pasta shape to make it fun. Try using penne, fusilli, or even farfalle. Each shape holds the dressing and flavors well. You can also add proteins to make it heartier. Grilled chicken adds a nice touch. Shrimp can bring a sweet flavor. Adding herbs makes the salad pop. Fresh parsley or green onions can brighten the taste. You can also mix in different cheeses for variety. Feta cheese gives a salty kick, while pepper jack adds spice. If you want a gluten-free meal, use gluten-free pasta. Many options are available now, and they taste great! For a vegan version, swap the mayonnaise and sour cream for plant-based alternatives. Cashew cream or avocado can add creaminess without dairy. The Full Recipe provides more details on these swaps. To keep your Mexican street corn pasta salad fresh, store it in the fridge quickly. Use an airtight container to seal in the flavors. This salad stays good for about three to five days. Check for any signs of spoilage, like off smells or changes in texture before eating. Can you freeze Mexican street corn pasta salad? I do not recommend freezing it. The pasta and veggies can become mushy when thawed. If you have leftovers, eat them fresh for the best taste. If you still want to freeze it, follow these tips: - Store in a freezer-safe container. - Separate the dressing from the salad. - Freeze only the pasta and corn mix. - Thaw it in the fridge overnight before serving. When reheating, warm it gently in a pan. Add fresh dressing and toppings to bring back that flavor. Enjoy your delicious meal! For the full recipe, check out the detailed instructions above. Yes, you can make this salad ahead of time. I suggest preparing it a day in advance. This gives the flavors time to mix well. Store it in the fridge in a sealed container. It stays fresh for up to three days. Just give it a good stir before serving. This salad pairs well with grilled chicken or fish. You can also serve it with tacos or burritos. Add a side of fresh salsa or guacamole for extra flavor. For a complete meal, try serving it with a light green salad. To reduce the creaminess, cut back on the mayonnaise and sour cream. You can also use Greek yogurt instead. Another option is to add more corn and veggies. This will balance out the creaminess and add texture. Absolutely! You can add chopped tomatoes, cucumbers, or radishes. Bell peppers in different colors can also brighten the dish. Try adding zucchini or shredded carrots for extra crunch. These additions will give your salad more flavor and nutrition. This blog post covered a tasty Mexican street corn pasta salad. We explored simple ingredients and easy steps to make it delicious. You learned how to mix flavors, adjust spice, and add your twist. I also shared tips for meal prep and storage. Enjoy this salad as a fun side or main dish. Try new ingredients and have fun with it!

Mexican Street Corn Pasta Salad Flavorful and Fresh Dish

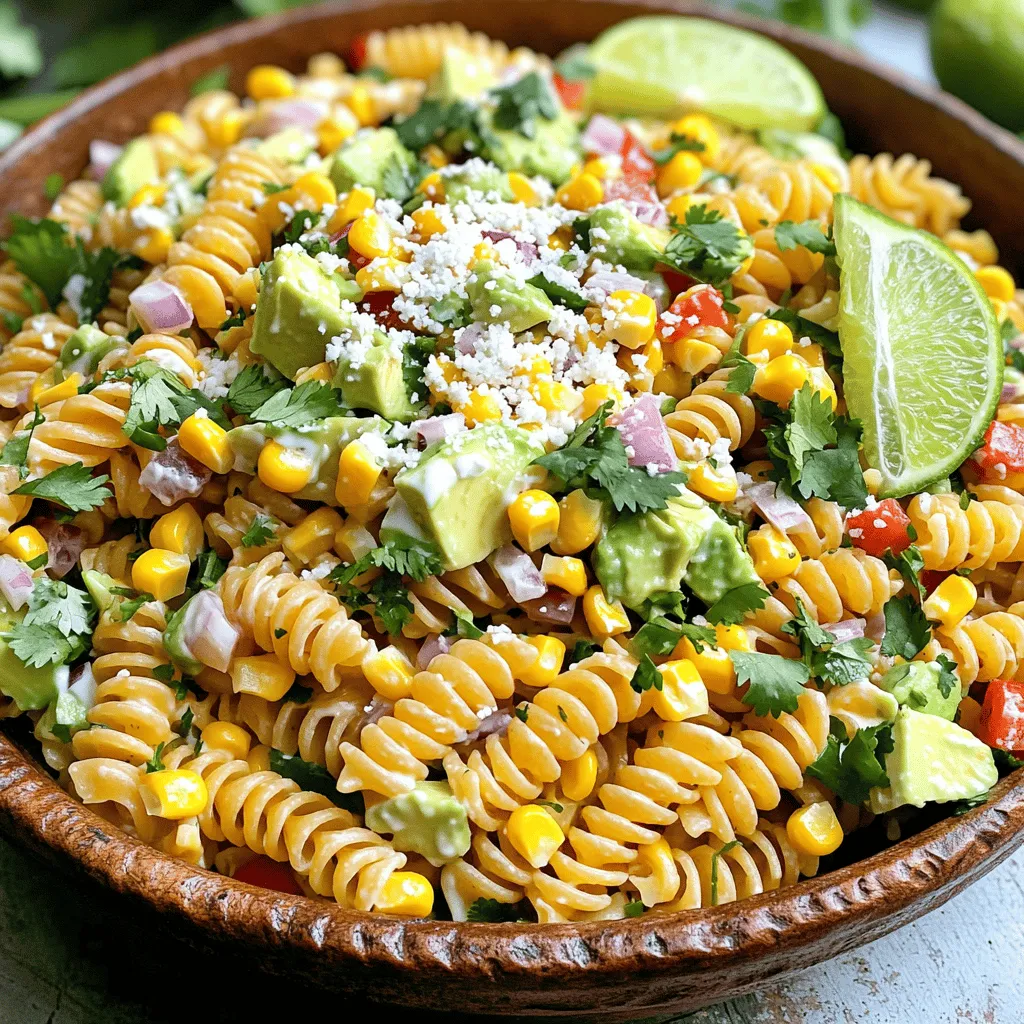
Looking for a refreshing dish that bursts with vibrant flavors? My Mexican Street Corn Pasta Salad is the answer! Packed

- 12 oz rotini pasta - 1 cup dill pickles, diced - 1/2 cup red onion, finely chopped - 1/2 cup cherry tomatoes, halved - 1 cup celery, diced - 1 cup mayonnaise - 1/4 cup Greek yogurt - 2 tablespoons pickle juice - 2 tablespoons fresh dill, chopped - 1 teaspoon garlic powder - Salt and freshly ground black pepper to taste Pasta selection and cooking tips I love using rotini pasta for this salad. The twists hold the creamy dressing well. Cook it until it's al dente, about 8 to 10 minutes. Drain and rinse with cold water to stop the cooking. Importance of dill pickles in flavor profile Dill pickles are the star of this dish. Their crunch and tang add a unique twist. The vinegar and spices from the pickles brighten up the whole salad. Role of creamy dressing ingredients The creamy dressing blends mayonnaise and Greek yogurt. This mix gives a rich, smooth texture. The pickle juice and fresh dill enhance the flavors. Garlic powder adds a nice depth. Together, they create a tangy and flavorful coating for the pasta and veggies. For the full recipe, check out [Full Recipe]. To cook rotini pasta, first, fill a large pot with water. Add a generous amount of salt to the water. Bring it to a rolling boil over high heat. Once boiling, add the rotini pasta. Cook it for about 8 to 10 minutes. You want the pasta to be al dente. This means it should be firm but not hard. When the pasta is done, drain it in a colander. Rinse it under cold running water. This stops the cooking and cools the pasta down. In a big mixing bowl, add the cooled rotini pasta. Next, mix in the diced dill pickles, finely chopped red onion, halved cherry tomatoes, and diced celery. Stir gently to combine all the ingredients. To chop vegetables uniformly, use a sharp knife. Cut them into similar sizes. This makes the salad look nice and makes it easier to eat. In another bowl, add the mayonnaise and Greek yogurt. Then, pour in the pickle juice. Add the chopped fresh dill and garlic powder. Use a whisk to blend the ingredients until smooth. This helps create a creamy texture. After mixing, taste the dressing. If needed, add salt and freshly ground black pepper to adjust the flavor. Now, pour the creamy dressing over the pasta and vegetable mix. Use a spatula or large spoon to fold everything together gently. Make sure the pasta and vegetables are coated evenly. This step is key to ensure every bite is full of flavor. Chilling the salad is important for the best flavor. It helps all the ingredients meld together. Cover the bowl with plastic wrap or transfer the salad to an airtight container. Let it chill in the fridge for at least 30 minutes. This waiting time allows the flavors to develop fully. Enjoy this creamy dill pickle pasta salad as a delightful side dish at your next gathering. If you want the complete details, check the Full Recipe. To make your creamy dill pickle pasta salad pop, focus on balancing flavors. You want a good mix of tangy, creamy, and fresh. Start with the seasonings. A little salt enhances taste, while black pepper adds warmth. Don't forget the star of the show: dill pickles. Their tanginess is the key. For extra flavor, consider adding more herbs. Fresh dill is a must, but you can mix in parsley or chives for a new twist. Experimenting with these herbs can bring unique notes to your dish. A beautiful presentation makes any dish more appealing. Serve your pasta salad in a large, colorful bowl. This will attract attention at any gathering. To elevate its look, garnish with extra sprigs of fresh dill. Whole cherry tomatoes can add a burst of color on top. This simple addition makes your dish pop. You can also use a clear glass bowl to show off the colorful ingredients. Layering the pasta salad can create visual interest. Each layer showcases the vibrant colors of the vegetables. Texture is just as important as flavor. To add crunch, consider mixing in some toasted nuts or seeds. Chopped walnuts or sunflower seeds work well here. They bring a delightful crunch that contrasts with the creamy dressing. To avoid mushy pasta, cook the rotini just until al dente. Rinse it under cold water right after cooking. This stops the cooking process and keeps the pasta firm. If you plan to store the salad, mix in the dressing right before serving. This keeps the pasta from soaking up too much moisture. For the full recipe, check out the [Full Recipe]. {{image_4}} You can swap out mayonnaise for sour cream or avocado. This change gives a rich flavor. Greek yogurt works well too. If you want to cut calories, use low-fat versions. For yogurt, try a dairy-free option like cashew yogurt. This keeps the dish creamy without dairy. You can also add different vegetables. Bell peppers, cucumbers, or carrots bring color and crunch. If you want protein, add diced chicken or chickpeas. Both will make your salad heartier. To add some heat, mix in jalapeños or a splash of hot sauce. This gives a fun kick to the creamy texture. If you prefer milder flavors, skip the spice. Experimenting with herbs can also change the taste. Fresh basil or parsley can bring a new twist. Dill is classic, but don’t be afraid to try something new. While rotini is a great choice, other pasta shapes work too. Try fusilli, penne, or farfalle for variety. Each pasta offers a unique texture. For those needing gluten-free options, use brown rice or chickpea pasta. These alternatives taste great and add extra nutrition. Choose based on your preference for a fun twist in every bite. You can find the full recipe in the earlier sections for more details. To keep your creamy dill pickle pasta salad fresh, store it in the fridge. Place the pasta salad in an airtight container. This helps prevent any odors from other foods. If you don't have one, use a bowl covered tightly with plastic wrap. Make sure it seals well to keep moisture in. Your creamy dill pickle pasta salad will last about three to five days in the fridge. Always check for signs of spoilage. Look for a change in color or an unusual smell. If it seems off, it’s best to throw it away. Trust your senses; they are your best guide. Yes, you can freeze creamy pasta salad, but it may change texture. If you choose to freeze it, use a freezer-safe container. Leave some space at the top for expansion. When ready to eat, thaw it in the fridge overnight. Stir well before serving. If the dressing separates, mix it back together. Creamy Dill Pickle Pasta Salad is a fun dish that mixes pasta with crunchy vegetables and a tangy dressing. The dish features rotini pasta, dill pickles, red onion, cherry tomatoes, and celery. The creamy dressing blends mayonnaise, Greek yogurt, dill, and pickle juice. This salad is both fresh and satisfying, perfect for picnics. Yes, you can make this salad ahead of time. I recommend preparing it a day before you plan to serve it. The flavors get better as they chill. Store the salad in an airtight container in the fridge. Just give it a quick stir before serving to mix everything well. This salad pairs well with various dishes. I suggest serving it with grilled chicken or burgers for a complete meal. You can also enjoy it alongside fresh fruit or a simple green salad. The tangy flavors complement many foods, making it a versatile side dish. Absolutely! To make this salad vegan, swap the mayonnaise and Greek yogurt for plant-based versions. You can use vegan mayo and a dairy-free yogurt. Also, ensure that the pickle juice and other ingredients are vegan-friendly. This way, everyone can enjoy this tasty dish. To serve more people, just scale up the ingredient amounts. You can double or triple the recipe easily. For example, use 24 oz of rotini pasta and double the amount of pickles and other veggies. This way, you can create a larger bowl of creamy dill pickle pasta salad for gatherings. You can find the Full Recipe above for exact measurements and instructions. This blog post shared a detailed recipe for Creamy Dill Pickle Pasta Salad. We covered the important ingredients, cooking steps, and helpful tips. You learned about the unique flavors of dill pickles and how they shine in this dish. Remember, chilling the salad allows the flavors to blend well. Feel free to experiment with different veggies or pasta types to make it your own. This dish is easy, tasty, and fun to share with friends and family. Enjoy creating your salad masterpiece!

Creamy Dill Pickle Pasta Salad Fresh and Tangy Delight

Are you ready to shake up your pasta game? Creamy Dill Pickle Pasta Salad is a fresh and tangy delight

Older posts
Newer posts
← Previous Page1 … Page26 Page27 Page28 … Page120 Next →

dsad

© 2026 recipetorch • Built with GeneratePress

Our Policies

  • Copyright Policy
  • Cookie Policy
  • GDPR Policy
  • Privacy Policy
  • Disclaimer
  • Terms Of Use

More Information

  • Home
  • About
  • Contact
  • Appetizers
  • Dessert
  • Dinner
  • Drinks
©2026, recipetorch About Back To Top