
Blackberry Lemon Yogurt Parfaits Delightful Treat
Craving a sweet and tangy treat? You’ll love these Blackberry Lemon Yogurt Parfaits! They combine creamy yogurt, fresh blackberries, and
Craving a sweet and tangy treat? You’ll love these Blackberry Lemon Yogurt Parfaits! They combine creamy yogurt, fresh blackberries, and

Are you ready to take your meals to a new level? This Sriracha Honey Glazed Chicken is a flavor boost

Are you ready to dig into a fun and tasty dish? Crunchy Ramen Noodle Salad is here to brighten up
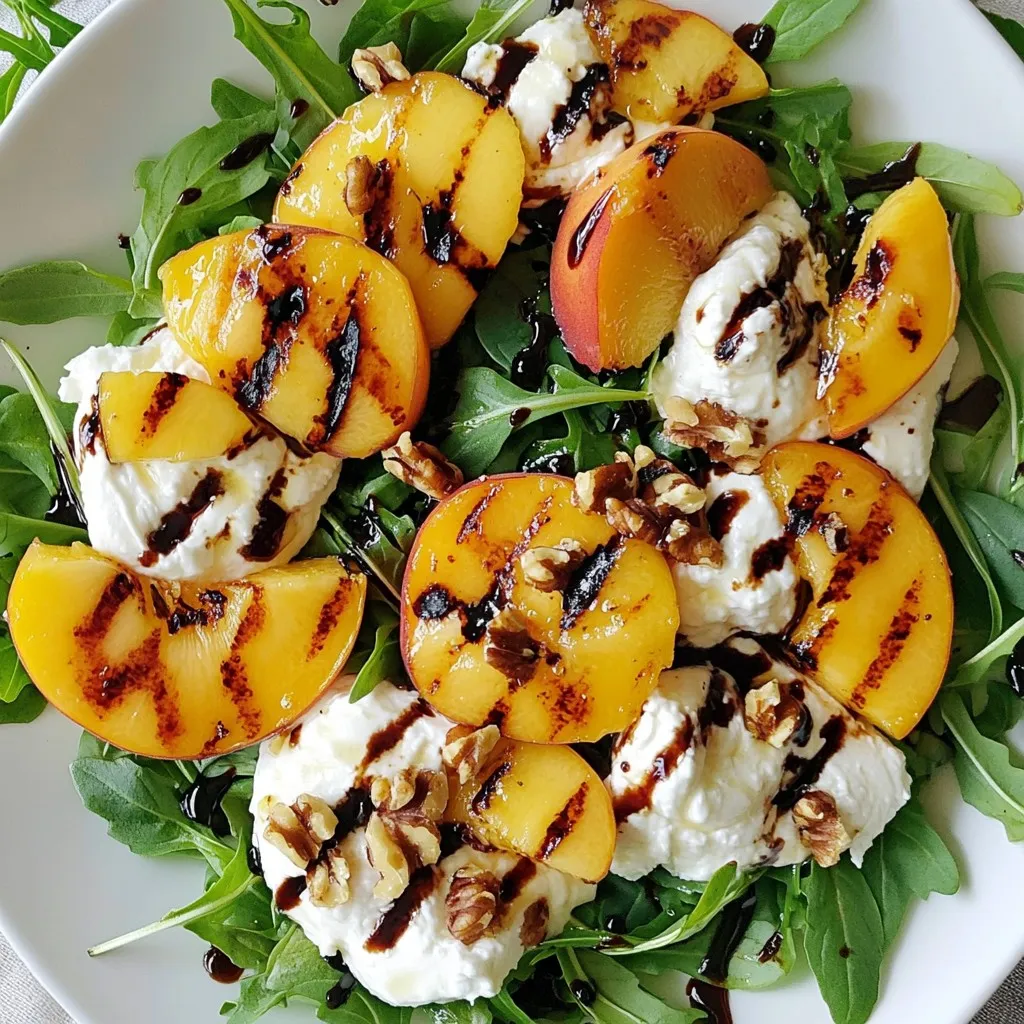
Looking to impress your taste buds? Our Grilled Peach Burrata Salad is a must-try! This fresh and flavorful dish combines
![- 1 lb sirloin steak, cut into 1-inch cubes - 4 tablespoons unsalted butter, divided - 4 cloves garlic, finely minced - 1 teaspoon fresh thyme leaves (or ½ teaspoon dried thyme) - 1 teaspoon smoked paprika - Salt and freshly ground black pepper to taste - Fresh parsley, chopped (for garnish) Gathering the right ingredients makes all the difference. Start with sirloin steak. This cut is tender and flavorful, perfect for quick cooking. Cut it into 1-inch cubes for even cooking. Next, you need unsalted butter. This rich fat helps create the delicious garlic butter sauce. You will use it in two steps, first for searing the steak, then for making the sauce. Garlic is a must. Four cloves, minced finely, add a strong flavor. Mince it well to let the oils release. Then, you have thyme. Fresh thyme brings a nice herbal note. If you use dried thyme, use less. Smoked paprika adds warmth and depth. It gives the steak a lovely color, too. Finally, season with salt and black pepper. Freshly ground black pepper gives a slight kick. Chop fresh parsley for garnish. It adds color and freshness to your dish. These ingredients come together to create a quick and tasty meal. For the full recipe, check out the detailed instructions. Start by patting the steak cubes dry with paper towels. This step helps get a nice sear. Season the steak cubes well on all sides with salt, black pepper, and smoked paprika. This mix of spices boosts the flavor of the meat. Next, melt two tablespoons of butter in a large skillet over medium-high heat. Wait for the butter to get hot and bubbly. Add the seasoned steak cubes to the skillet in a single layer. Do not overcrowd the pan; cook in batches if needed. Sear the steak bites for 2-3 minutes on each side. You want them browned and cooked to your liking. Once done, move the steak bites to a plate and cover them to keep warm. In the same skillet, lower the heat to medium. Add the remaining two tablespoons of butter. Then, toss in the minced garlic and thyme. Sauté this mix for about 1-2 minutes. You want the garlic to smell great and turn a light golden color. Be careful not to burn it; burnt garlic can taste bitter. Now, bring back the warm steak bites to the skillet. Toss them in the garlic butter sauce to coat each piece well. Cook for an additional 1-2 minutes to warm everything through. Finally, remove the skillet from heat. Just before serving, sprinkle fresh parsley over the steak bites for a bright touch. For the full experience, check out the Full Recipe. To get the best sear on your steak bites, start with dry steak cubes. Pat each piece with paper towels. This step helps create a nice crust. If your steak is wet, it will steam instead of sear. Avoid overcrowding the skillet. If you add too many steak bites at once, they won’t sear well. Cook in batches if needed. This keeps the heat high, allowing for that perfect golden color. For added flavor, try different herbs and spices. Fresh rosemary or oregano can add a nice twist. A pinch of cayenne can give it some heat. You can also swap out the steak type. Ribeye or tenderloin can add different flavors. Each cut brings its own unique taste to the dish. When serving, use a shallow bowl or a rustic wooden board. Arrange the steak bites neatly. Drizzle the garlic butter sauce over them. For an elegant touch, garnish with fresh parsley. It adds color and freshness. A simple yet stunning presentation makes your meal stand out. {{image_4}} If you want to switch things up, try using shrimp or chicken instead of steak. Shrimp cooks quickly and absorbs flavor well. Just toss them in the same garlic butter sauce. For chicken, use bite-sized pieces and adjust cooking time to ensure they’re fully cooked. Vegetarians can enjoy this dish too! Use large mushrooms, like portobello or cremini. They provide a meaty texture and soak up the delicious garlic butter sauce nicely. You can add different sauces or spices to shake things up. Try a splash of soy sauce for a savory kick. A bit of hot sauce can bring heat if you like spice. Incorporating vegetables can also enhance the dish. Bell peppers, zucchini, or asparagus work well. Just sauté them in the skillet before adding the steak. They add flavor, color, and nutrition. When serving, pair your garlic butter steak bites with rice, mashed potatoes, or a fresh salad. Each option balances the rich flavors of the dish. For drinks, a nice red wine, like a Cabernet Sauvignon, complements the steak well. If you prefer something lighter, try sparkling water with lemon. For the full recipe, don't forget to check [Full Recipe]. To store leftover steak bites, let them cool first. Place them in an airtight container. This method helps keep them fresh. You can store them in the fridge for up to three days. After that, the quality may decline. The best way to reheat steak bites is in the oven. Preheat your oven to 350°F (175°C). Place the steak bites on a baking sheet. Heat for about 10-15 minutes. This method keeps the flavor and texture intact. If you choose the microwave, use a microwave-safe dish. Cover the dish with a damp paper towel. Heat in short bursts of 30 seconds, checking often. This method can dry out the meat. Yes, you can freeze garlic butter steak bites. To do this, let them cool completely. Then, place them in a freezer-safe bag or container. Remove as much air as possible before sealing. You can freeze them for up to three months. When you're ready to eat, thaw them in the fridge overnight. Reheat them using the oven for the best results. This way, they stay delicious and juicy. It takes about 10 minutes to prep and 10 minutes to cook steak bites. In total, you will need around 20 minutes from start to finish. This quick dish is perfect for busy weeknights or when you want to impress guests without spending hours in the kitchen. Yes, you can make garlic butter steak bites ahead of time! Cook them first, then let them cool. Store the bites in an airtight container in the fridge for up to three days. When you're ready to eat, just reheat them gently in a skillet. This keeps them tasty and juicy. Many sides go well with garlic butter steak bites. Here are some popular options: - Roasted vegetables, like carrots or broccoli - Creamy mashed potatoes - Simple green salad with a light vinaigrette - Rice or quinoa for a hearty touch - Crusty bread to soak up the garlic butter sauce Feel free to mix and match these sides to create your perfect meal! For the full recipe, check out the full recipe link. In this post, we explored how to make garlic butter steak bites. We covered key ingredients, including sirloin steak and fresh herbs. I shared step-by-step cooking instructions and tips for achieving the perfect sear. You can even try variations with different proteins and flavors. Remember to store leftovers properly to enjoy later. With these tips, you can impress anyone with a tasty dish. Enjoy cooking, and don't hesitate to get creative in the kitchen!](https://recipetorch.com/wp-content/uploads/2025/07/3af3e8dc-7487-429b-8f56-6ffa85361a7e.webp)
If you’re craving a quick and tasty meal, you’ll love these Garlic Butter Steak Bites! This dish packs a big

Who doesn’t love a warm, tasty treat fresh from the oven? Pumpkin Cream Cheese Muffins are a delightful blend of

Get ready to bake the perfect Lemon Poppy Seed Muffins! In this article, I’ll share a deliciously moist recipe that

Are you ready to create a dessert that combines tangy lemon and sweet raspberry? My Lemon Raspberry Cheesecake Bars are

Looking for a tasty side dish that’s simple and quick to make? Garlic Herb Roasted Baby Potatoes are your answer!
![To make a delicious Peach Iced Tea Lemonade, you need four main ingredients: - 4 ripe peaches, peeled and sliced - 4 cups water - 4 black tea bags - 1 cup fresh lemon juice (about 4-6 lemons) - 1/2 cup honey (you can adjust to your taste) These ingredients create a sweet and refreshing drink perfect for summer. The peaches give a lovely fruity flavor, while the tea adds depth. The lemon juice brightens everything up, and honey ties it all together. You can enhance your drink with some optional garnishes: - Fresh mint leaves - Lemon slices - Additional sweeteners Adding mint leaves or lemon slices not only makes your drink look pretty, but they also add more flavor. If you like it sweeter, feel free to add more honey or any sweetener you prefer. To create this refreshing drink, you will need a few simple tools: - Blender - Medium saucepan - Large pitcher - Measuring cups Using these tools will help you blend the peaches and mix the drink easily. A blender gives you a smooth texture, while a pitcher is perfect for chilling and serving. For the complete recipe, check out the [Full Recipe]. To start, grab a medium saucepan. Pour in 4 cups of water. Place it on medium-high heat. As the water heats, keep an eye on it. You want it to reach a rolling boil. Once it starts boiling, remove the saucepan from the heat. Add 4 black tea bags into the hot water. Let the tea steep for about 5 minutes. This will give it great flavor. After steeping, take out the tea bags and set the tea aside to cool. While the tea cools, it’s time to prepare the peaches. Take 4 ripe peaches and peel them. Slice them into smaller pieces. Next, grab your blender. Add the sliced peaches to the blender. Blend them until smooth. If you like a bit of texture, just pulse the peaches a few times. This will create a nice peach puree for your drink. Now, we’re ready to mix everything together. Take a large pitcher and pour in the cooled tea. Add the peach puree you just made, then squeeze in 1 cup of fresh lemon juice. Don’t forget the honey. Start with 1/2 cup and mix well. Make sure the honey dissolves fully. This will sweeten your drink. Taste your mixture. If it needs more sweetness, add more honey. Stir again to blend. Let the mixture chill in the fridge for at least 1 hour. This allows the flavors to meld beautifully. When you serve, fill glasses with ice cubes and pour the chilled Peachy Paradise Iced Tea Lemonade over the ice. Enjoy! To balance sweetness and acidity, use ripe peaches. They bring natural sweetness. Add lemon juice for tartness. Start with half the honey. Taste your mix, then add more honey if needed. This gives you control over the final flavor. Remember, balance keeps your drink refreshing and bright. Chill your Peachy Paradise Iced Tea Lemonade for at least one hour. This allows the flavors to blend well. If you’re short on time, chill it in the freezer for about 20 minutes. Just don’t forget it! You want it cold, but not frozen solid. Garnish your drink for a lovely look. Add a slice of lemon to each glass. Fresh mint leaves also enhance the aroma and taste. Serve over ice for a cool refreshment. You can even add a fun straw for a festive touch. Enjoy it outdoors on a sunny day! {{image_4}} You can change up the flavor of your Peach Iced Tea Lemonade by using other fruits. Strawberries and raspberries work great! They add a bright color and sweet taste. Simply replace the peaches with your chosen fruit. Blend them just like you did with the peaches. This gives you a fun twist on the drink. You can customize the sweetness of your drink to fit your taste. While honey is my favorite, you can use sugar, agave syrup, or stevia. Each sweetener has a different flavor. For example, agave syrup adds a mild sweetness, while stevia is calorie-free. Start with a small amount and taste until you find your perfect balance. Want to make a fun cocktail? You can easily add spirits to your iced tea lemonade. Vodka works well for a light drink, while bourbon adds a rich flavor. Mix in about 1 to 2 ounces of your chosen spirit for each serving. This makes a refreshing adult beverage for summer parties or picnics! Try these variations to make your Peach Iced Tea Lemonade even more exciting. The full recipe gives you a great base to start with, and you can get creative from there. To store leftovers properly, pour the drink into a clean pitcher. Cover it tightly with a lid or plastic wrap. This keeps the Peach Iced Tea Lemonade fresh for up to three days. Always stir before serving, as the flavors might separate a bit. You can freeze Peach Iced Tea Lemonade for later use. Pour the drink into ice cube trays or freezer-safe containers. This method allows you to enjoy a chilled version later. To serve, simply thaw the cubes in the fridge or blend them into a slushy treat. After preparation, the drink lasts about three days in the fridge. For the best taste, consume it within this time. The flavor will be at its peak when freshly made, but storing it correctly helps maintain its deliciousness. Yes, you can make this drink ahead of time. It actually tastes better when the flavors blend. To prep in advance, prepare the tea and peach puree. Mix them with lemon juice and honey. Then, store the mixture in the fridge. Just remember to chill it for at least an hour. When ready to serve, add ice and garnish. Black tea is a classic choice for this drink. However, you can explore other options too. Green tea gives a lighter taste. Herbal teas like peach or chamomile can add unique flavors. I suggest trying different types to find your favorite. You can easily tweak the sweetness. Start with half a cup of honey. After mixing, taste the drink. If you want it sweeter, add more honey. You can also use sugar or agave syrup if you prefer. Adjusting to your taste makes this drink perfect for you. You have all the tools to make a refreshing peach iced tea lemonade. We covered key ingredients like peaches and black tea. I shared step-by-step instructions for blending and mixing. You also learned tips for perfecting flavor and serving. Remember, feel free to experiment with other fruits or sweeteners. Store leftovers properly for future enjoyment. Making this drink ahead saves time and boosts fun. With these tips, you can create a delightful drink every time. Enjoy your peach iced tea lemonade!](https://recipetorch.com/wp-content/uploads/2025/07/659c7790-881a-440a-b7e7-95f2d09f7283.webp)
Looking for the perfect drink to cool down this summer? Peach Iced Tea Lemonade is your answer! This refreshing blend
