
Homemade Soft Pretzel Bites Perfectly Simple Recipe
Are you ready to elevate your snack game? With my perfectly simple recipe for homemade soft pretzel bites, you can
Are you ready to elevate your snack game? With my perfectly simple recipe for homemade soft pretzel bites, you can

Get ready to wow your guests with my Cheesy Spinach Artichoke Dip, an irresistible party favorite! This creamy, cheesy delight
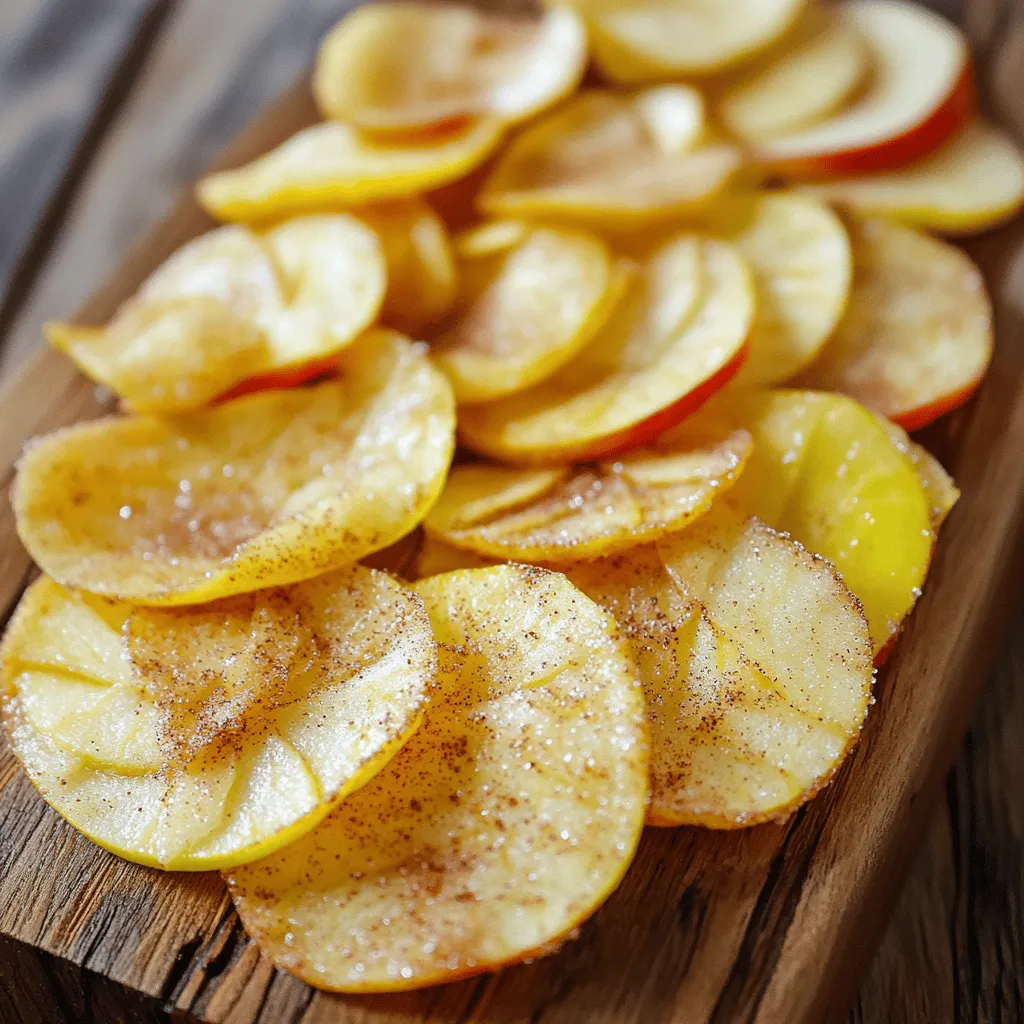
Crispy and sweet, cinnamon sugar apple chips are the perfect snack! With just five simple ingredients, you can create a

If you’re searching for an easy and tasty dish, look no further than Honey Soy Glazed Chicken Wings. This recipe
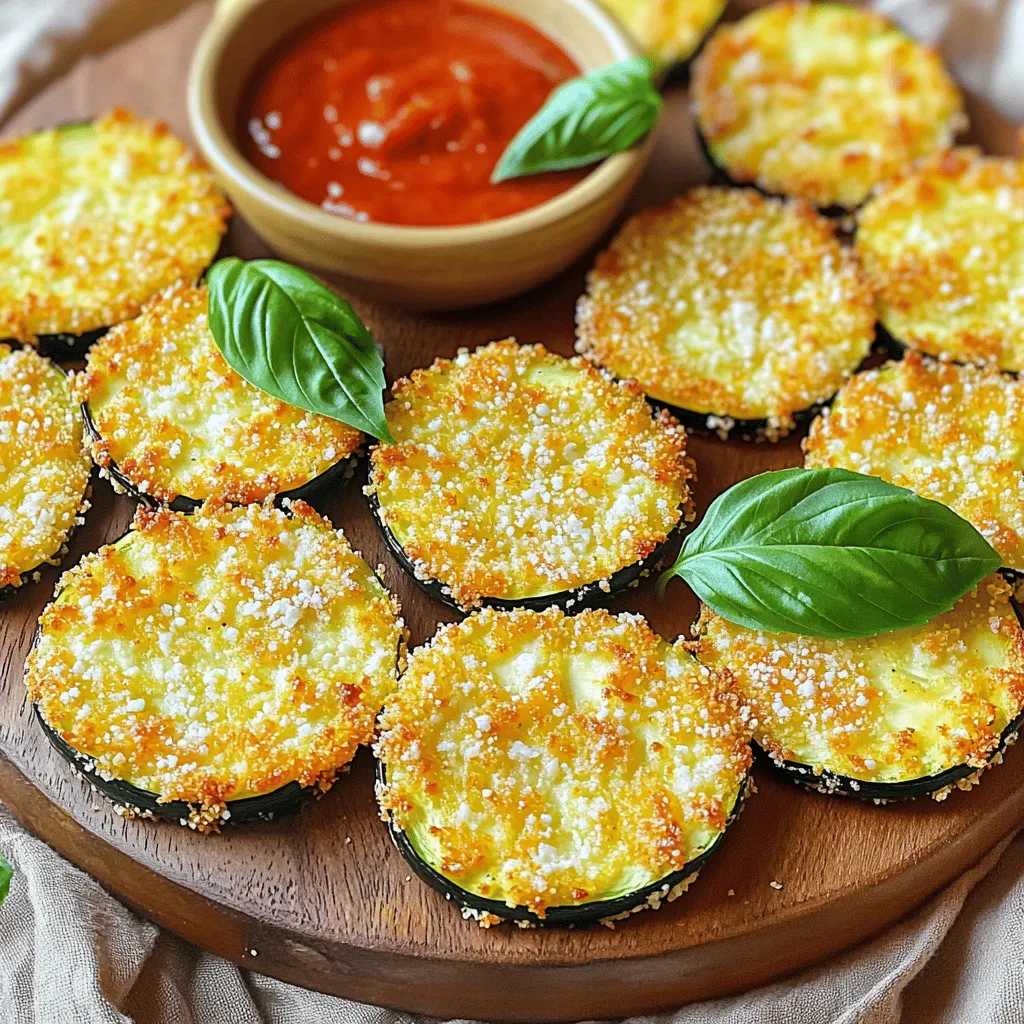
If you’re craving a snack that’s both healthy and delicious, you’re in luck! My Zucchini Parmesan Crisps are the perfect
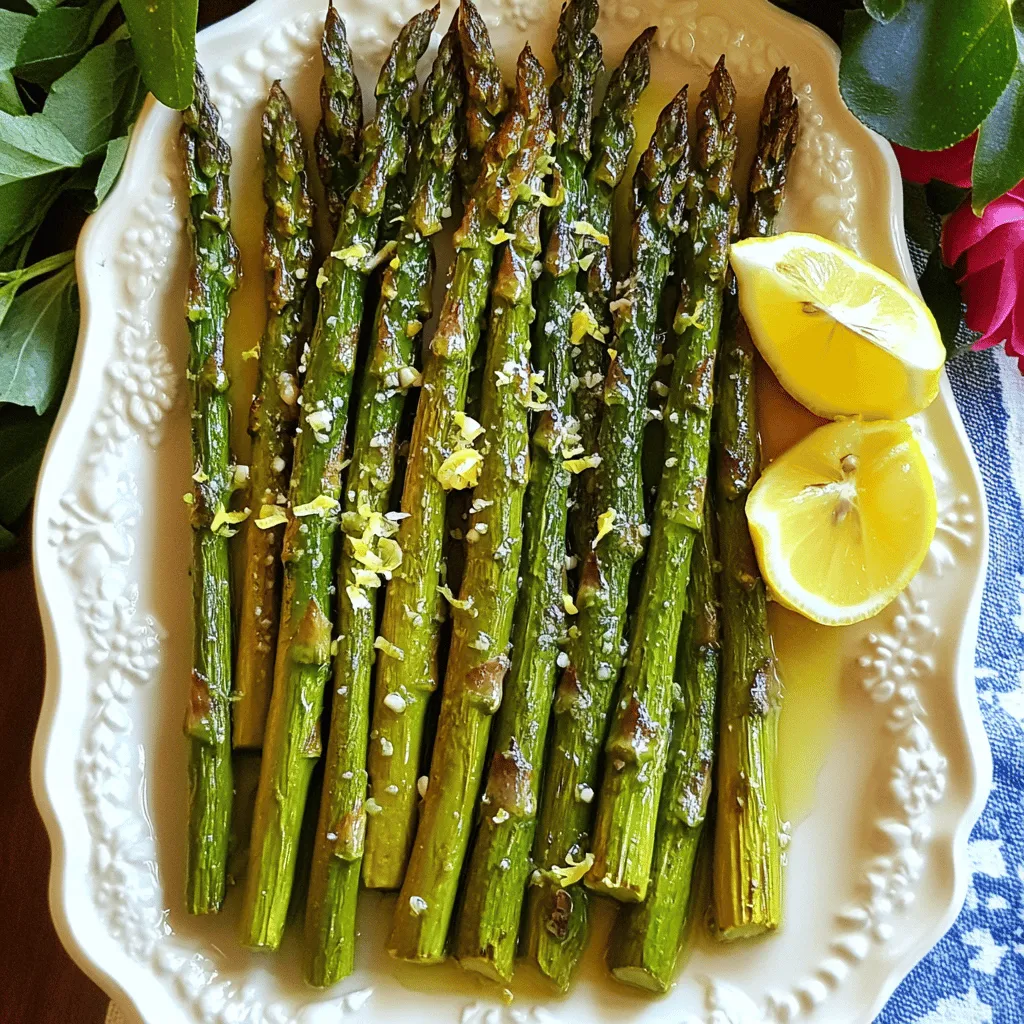
Are you ready to brighten up your dinner table? Lemon Garlic Roasted Asparagus is the perfect dish! It’s easy to
![- 1 pound boneless, skinless chicken breasts - 1/2 cup buffalo sauce - 1 tablespoon extra-virgin olive oil - Garlic powder - Onion powder - Salt - Black pepper - Shredded carrots - Diced celery - Blue cheese crumbles (optional) - Romaine or butter lettuce leaves - Tips for selecting fresh lettuce: Look for crisp leaves and avoid any browning. A good head of lettuce feels firm and has a bright color. Always wash your lettuce gently to keep it fresh and clean. 1. Preheat your skillet on medium heat. Add 1 tablespoon of extra-virgin olive oil. 2. Once the oil is shimmering, add 1 pound of diced chicken. 3. Season the chicken with 1 teaspoon of garlic powder, 1 teaspoon of onion powder, salt, and black pepper. Stir well. 4. Cook the chicken for about 6-8 minutes. Stir occasionally until it is no longer pink. 1. After the chicken is cooked, pour in 1/2 cup of buffalo sauce. 2. Stir to coat the chicken evenly. 3. Allow it to heat for 2-3 minutes. This helps the sauce thicken. 1. While the chicken cooks, rinse 8 large lettuce leaves under cool water. Pat them dry gently. 2. Take a lettuce leaf and place a spoonful of buffalo chicken in the center. 3. Top with 1/2 cup of shredded carrots and 1/2 cup of diced celery for crunch. 4. If you like, add 1/4 cup of blue cheese crumbles on top. 5. Finish each wrap with a sprinkle of freshly chopped cilantro or parsley. These instructions will lead you to a tasty meal. For more details, check the Full Recipe. Enjoy! To make buffalo chicken lettuce wraps perfect, adjust the buffalo sauce to fit your taste. If you like it hot, add more sauce. If you prefer mild, use less. You can also mix sauces for a unique flavor. Always ensure the chicken is thoroughly cooked. Check that it is no longer pink inside, and the juices run clear. This keeps your wraps safe and tasty. When serving buffalo chicken lettuce wraps, a great display makes them more inviting. Arrange the filled wraps on a large platter. You can add small bowls of extra buffalo sauce for dipping. Lime wedges on the side add a fresh touch. For gatherings, consider using a tiered stand for a fun look. Guests will love the colorful display! Using the right tools makes cooking easier. A non-stick skillet is best for cooking the chicken. It helps prevent sticking and makes cleanup simple. A spatula is handy for stirring the chicken. You’ll also want a cutting board and a sharp knife for prepping the veggies. Have some clean kitchen towels ready for drying the lettuce. This makes your cooking experience smooth and fun. You can find the full recipe for buffalo chicken lettuce wraps above. {{image_4}} You can change the protein in your buffalo chicken lettuce wraps. Try using turkey instead of chicken. It gives a nice twist and is leaner. Tofu is a great choice for a vegetarian option. It absorbs flavors well and adds protein. You can also add fun toppings. Sliced avocado adds creaminess. It makes the wraps more filling. Green onions bring a nice crunch and extra flavor. These small changes can make a big difference. You can pick between spicy and mild buffalo sauce. If you like heat, go for a spicier sauce. If you prefer less heat, choose a mild one. You can even mix sauces for a unique taste. You can also try other sauces or dressings. Ranch dressing pairs nicely with buffalo flavors. It cools down the spice and adds creaminess. You can mix buffalo sauce with honey for a sweet twist. This gives your wraps a new flavor profile. If you need gluten-free options, use gluten-free sauces. Many buffalo sauces are already gluten-free, so check the label. For low-carb choices, stick with the lettuce wraps and skip any bread. For vegetarian or vegan options, use tofu or tempeh instead of chicken. This keeps the flavor and cuts out meat. You can also use a vegan buffalo sauce for a perfect fit. These adjustments ensure everyone can enjoy this meal. For the full recipe, check out the [Full Recipe]. To keep your buffalo chicken lettuce wraps fresh, store leftovers in an airtight container. Place the chicken mixture separate from the lettuce leaves. This keeps the leaves crisp and prevents them from wilting. You can safely refrigerate leftovers for up to three days. After that, the chicken may lose its taste and texture. You can freeze the chicken mixture for later use. Place it in a freezer-safe container or bag. Make sure to remove as much air as possible to prevent freezer burn. This chicken mixture can last up to three months in the freezer. When you're ready to eat, thaw it overnight in the fridge for the best results. To maintain the chicken's texture and flavor, reheat it gently. The best method is to use the stovetop. Heat a skillet over medium heat and add a splash of water to keep it moist. Stir until warmed through. If you use a microwave, do it in short bursts of 30 seconds, stirring in between. This helps the chicken heat evenly without drying out. You can easily add heat to your buffalo chicken lettuce wraps. Here are some ideas: - Increase buffalo sauce amount for more spice. - Add sliced jalapeños or diced serrano peppers. - Mix in hot sauce like Sriracha or Tabasco. - Use spicy ranch dressing instead of regular. These options let you control the heat level. Adjust it based on your taste! Yes, you can prep the chicken mixture ahead of time. Here are some tips for meal prep: - Cook the chicken and mix with buffalo sauce. - Store it in an airtight container in the fridge. - This mixture stays good for about 3 days. - You can easily reheat it in a skillet or microwave. This saves time on busy days while keeping the meal fresh! Buffalo chicken lettuce wraps offer a healthy meal option. Here’s a quick look at their benefits: - Chicken is a lean protein source. - Lettuce provides vitamins and fiber. - You can add fresh veggies like carrots and celery. - Using low-fat blue cheese lowers calorie count. These wraps are low in carbs and high in nutrients. They fit well into many diets! Buffalo chicken lettuce wraps are simple, tasty, and fun. You learned key ingredients and steps for cooking. We covered tips for perfecting your wraps and ideas for healthy swaps. With these wraps, you can customize the flavor and keep your meals fresh. Don’t forget to store leftovers correctly for future bites. Enjoy making these wraps for any meal or gathering. Your cooking skills will impress everyone!](https://recipetorch.com/wp-content/uploads/2025/07/d2bf7fe9-cbd6-414d-965f-d85283d535b8.webp)
Looking for a quick and tasty meal? Buffalo Chicken Lettuce Wraps are the answer! They’re easy to make and packed
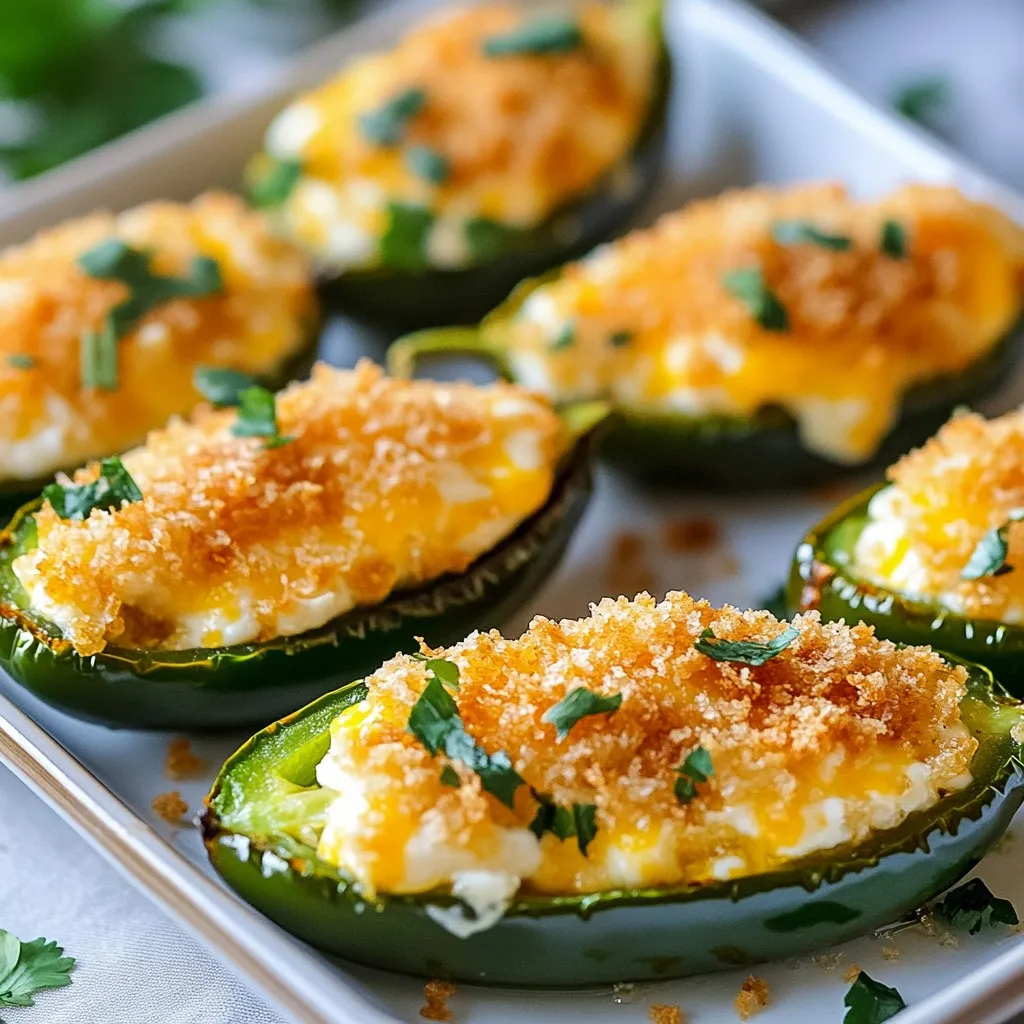
Get ready for a tasty treat! Air Fryer Jalapeño Poppers are a crispy, flavorful snack. With fresh jalapeños stuffed with
![To make delicious chocolate hazelnut crepes, gather these ingredients: - 1 cup all-purpose flour - 2 large eggs - 1 ½ cups milk - 2 tablespoons melted butter (plus more for cooking) - 2 tablespoons granulated sugar - 1 teaspoon pure vanilla extract - 1/4 teaspoon fine salt - 1/2 cup chocolate hazelnut spread - 1/4 cup toasted hazelnuts, chopped - Whipped cream (for serving) - Fresh berries, like strawberries or blueberries (for garnish) Knowing how to measure your ingredients is key. Use a dry measuring cup for flour and sugar. Crack the eggs into a bowl to avoid shells. Measure milk in a liquid measuring cup for accuracy. Melt the butter in a small bowl, then let it cool slightly before adding. - Flour: 1 cup equals about 120 grams. - Eggs: Use large eggs for best results. - Milk: 1 ½ cups is about 360 milliliters. - Butter: 2 tablespoons is about 30 grams. - Sugar: 2 tablespoons is about 25 grams. - Vanilla Extract: Always use pure for great taste. - Salt: Fine salt mixes better than coarse. - Chocolate Hazelnut Spread: Brands like Nutella work well. - Hazelnuts: Chop them finely for a better crunch. - Whipped Cream and Berries: Add as much as you like for serving. If you need to swap ingredients, here are some options: - Flour: Use whole wheat flour for a nuttier taste. - Eggs: You can use flaxseed meal mixed with water as a vegan egg. - Milk: Almond or oat milk works for a dairy-free option. - Butter: Coconut oil can replace butter for a dairy-free choice. - Sugar: Honey or maple syrup can sweeten nicely. - Chocolate Hazelnut Spread: Peanut butter or almond butter can also work. Feel free to mix and match these ingredients based on your taste and needs. For the full recipe, check out the [Full Recipe]. To start, gather your ingredients. You need all-purpose flour, eggs, milk, melted butter, sugar, vanilla extract, and salt. In a large mixing bowl, combine the flour, sugar, and salt. Whisk these dry ingredients until they mix well. In another bowl, crack the eggs and beat them. Add the milk, melted butter, and vanilla extract to this bowl. Whisk until everything blends together. Gradually pour this wet mix into the dry mix. Use a whisk to combine them until the batter is smooth. Let the batter sit for about 20 minutes. This helps the crepes become tender and tasty. Now, it’s time to cook! Preheat your non-stick skillet over medium heat. Lightly grease the pan with melted butter to prevent the crepes from sticking. Pour about 1/4 cup of batter into the skillet. Quickly tilt and swirl the pan to spread the batter into a thin layer. Cook the crepe for 2-3 minutes. You will see the edges lifting and the bottom turning golden. Carefully flip the crepe with a spatula and cook for another minute. Once done, transfer the crepe to a plate. Repeat this with the rest of the batter, adding more butter to the pan when needed. To assemble, take one cooked crepe and spread about 1 tablespoon of chocolate hazelnut spread on one half. Fold the crepe in half over the spread, then fold it again to form a triangle. Sprinkle the chopped toasted hazelnuts on top. Add a dollop of whipped cream and some fresh berries for color and flavor. Serve your crepes warm. Enjoy the rich chocolate, nutty hazelnuts, and the freshness of the berries! For the full recipe, check the previous section. To get thin crepes, you need the right batter. Make sure to whisk it well until smooth. Resting the batter for about 20 minutes helps too. This step makes the crepes tender. Use a non-stick skillet or a crepe pan for easy cooking. When you pour the batter, use about 1/4 cup each time. Quickly tilt the pan to spread the batter thinly. The goal is a nice, even layer. If you see bubbles forming, it's time to flip! One common mistake is using too much batter. This makes thick crepes, which are not what we want. Another mistake is not preheating the pan enough. If it’s too cold, the crepes stick. Also, don't rush the cooking. Let the edges lift before flipping. Lastly, avoid overcooking, as this can dry out the crepes. Aim for a light golden color on each side. To boost flavor, add a touch of vanilla extract to the batter. This small change makes a big difference. You can also try using milk alternatives like almond or oat milk. For added texture, sprinkle in some chopped toasted hazelnuts directly into the batter. This makes every bite a little crunchier. Pair the crepes with fresh berries and whipped cream to balance the sweetness. Enjoy creating your own twist on this chocolate hazelnut delight! For the complete recipe, check the Full Recipe section. {{image_4}} If you want to make nut-free crepes, simply skip the hazelnuts. You can use sunbutter or soy nut butter instead of chocolate hazelnut spread. This option gives a similar creamy texture and taste. You can also use fruit preserves or chocolate spread made without nuts. These alternatives ensure everyone can enjoy the crepes without worry. You can get creative with fillings and toppings. Try adding fresh fruits like bananas, strawberries, or raspberries. Cream cheese or mascarpone cheese can add a nice twist. You can also drizzle caramel or chocolate sauce on top. For a fun mix, add a sprinkle of cinnamon or powdered sugar before serving. These changes make your crepes unique and fun every time. To make vegan crepes, replace eggs with flaxseed meal mixed with water. Use plant-based milk, like almond or oat milk, instead of regular milk. For gluten-free crepes, swap all-purpose flour with a gluten-free flour blend. These adjustments keep the crepes delicious while catering to different diets. Remember, each change adds a new layer of flavor and texture to your dish. For the full recipe, check out the [Full Recipe]. To keep your leftover crepes fresh, stack them neatly. Place a piece of parchment paper between each crepe. This method prevents sticking and keeps them intact. Then, store them in an airtight container. Keep the container in the fridge for up to three days. If you notice any moisture, use a paper towel to absorb it before sealing. Reheating crepes is simple. You can use a skillet or microwave. For the skillet, heat it over low heat. Add a small amount of butter to the pan. Place the crepe in the skillet and warm it for about 30 seconds on each side. If using the microwave, wrap the crepe in a damp paper towel. Heat it for 15-20 seconds. Check it to ensure it’s warm, but not hot. Freezing crepes is a great way to save time. First, let the crepes cool completely. Then, stack them with parchment paper in between. Place the stack in a freezer-safe bag or container. You can freeze them for up to two months. When you’re ready to use them, thaw the crepes overnight in the fridge. Reheat as mentioned above. Enjoy your delicious crepes anytime! For the full recipe, check the section above. The best way to flip a crepe is simple. Use a thin spatula. Start by gently lifting the edges of the crepe. Once the edges lift, slide the spatula under the crepe. Quickly flip it over in one smooth motion. Practice makes perfect, so don’t worry if it takes a few tries. A non-stick pan makes this easier. Yes, you can make the batter ahead of time. Mix the ingredients, and let the batter rest. Cover it and store it in the fridge for up to two days. This can save you time on busy mornings. Just remember to stir the batter again before cooking. You can serve chocolate hazelnut crepes in many fun ways. For breakfast, top with whipped cream and fresh berries. Add a drizzle of maple syrup for extra sweetness. For dessert, you might layer them with more chocolate hazelnut spread. Serve with a scoop of ice cream for a treat. These crepes are great for any meal! Enjoy them warm and fresh from the pan. You learned about making chocolate hazelnut crepes, a tasty treat. We covered the key ingredients, how to prepare the batter, and ways to cook and assemble. I shared tips for perfect thin crepes and common mistakes to avoid. You can also explore delicious variations and proper storage methods. With these insights, you can confidently enjoy your crepes for any meal. Dive in, experiment, and have fun creating your own delicious versions.](https://recipetorch.com/wp-content/uploads/2025/07/6e2610ab-d6f2-4554-8dc0-9f6d92e3a5b9.webp)
If you love rich flavors and sweet treats, then you’re in for a treat! Chocolate hazelnut crepes are simple to
![- 4 large bell peppers - 1 cup quinoa - 2 cups vegetable broth - 1 cup cherry tomatoes - 1 small red onion - 1 can chickpeas - Kalamata olives - Dried oregano, ground cumin, garlic powder - Feta cheese, parsley, olive oil - Salt and pepper When making Mediterranean stuffed peppers, the ingredients are key. The large bell peppers serve as the tasty vessel for the filling. Choose vibrant colors like red, yellow, or green for a beautiful dish. Quinoa adds protein and a nutty flavor. It cooks well in vegetable broth, giving it depth. Next, the cherry tomatoes add a burst of sweetness. The small red onion gives crunch and a bit of bite. Chickpeas bring creaminess and protein. They also help fill the peppers nicely. For seasonings, Kalamata olives add a salty touch. Dried oregano, ground cumin, and garlic powder bring warmth and earthiness. Feta cheese provides creaminess and tang. Fresh parsley brightens the dish with color and flavor. Don't forget the olive oil, salt, and pepper to enhance every bite. For the full recipe, check the instructions above. Enjoy every step of this fun cooking adventure! First, preheat your oven to 375°F (190°C). While the oven heats, take four large bell peppers. Cut off their tops and remove all seeds. This step is crucial for a good filling. Next, brush each pepper lightly with olive oil. This helps them brown nicely during baking. In a medium saucepan, bring two cups of vegetable broth to a vigorous boil. Once it's boiling, add one cup of well-rinsed quinoa. Turn the heat down to low and cover the pot. Let it simmer for about 15 minutes. This will let the quinoa absorb all the broth. When done, fluff the quinoa gently with a fork and set it aside. In a spacious mixing bowl, combine the cooked quinoa with one cup of halved cherry tomatoes, one finely diced small red onion, and a can of thoroughly drained chickpeas. Add half a cup of roughly chopped Kalamata olives, one teaspoon of dried oregano, one teaspoon of ground cumin, and half a teaspoon of garlic powder. Don’t forget to mix in half of the crumbled feta cheese! Taste the mixture and season it with salt and freshly cracked pepper if needed. This will add great flavor. Now, it’s time to stuff those peppers! Carefully fill each bell pepper with the quinoa mixture. Press down gently to pack it in well. After that, sprinkle the remaining feta cheese on top for added flavor and texture. Cover the baking dish with aluminum foil. This keeps the moisture in. Bake the peppers in the preheated oven for 25 minutes. After this, carefully remove the foil. Bake for another 10 to 15 minutes. This allows the peppers to become tender and get a nice char. Once fully cooked, take the baking dish out of the oven. Let the stuffed peppers cool for a few minutes before serving. For a lovely finish, garnish with fresh parsley. This adds a pop of color and freshness to your dish. Enjoy your Mediterranean stuffed peppers! For the complete recipe, check out the [Full Recipe]. - Choosing the best bell peppers: Look for large, firm peppers. Bright colors like red, yellow, or orange add fun to your dish. Check for smooth skin and no blemishes. This ensures they cook well and look great. - Ensuring even cooking: To help peppers cook evenly, slice a small part off the bottom if they wobble. This keeps them upright. Also, cover with foil at first. This traps steam and helps them soften. - Adding herbs and spices: Fresh herbs like basil or mint can brighten the dish. Add them right before serving for the best flavor. Sprinkle in some chili flakes for a spicy kick. - Incorporating other vegetables: Mix in chopped zucchini or spinach for extra nutrients. You can also add grated carrots or diced mushrooms. They blend well with the filling and add great taste. - Serving tips for an appealing dish: Serve your stuffed peppers on a large platter. Drizzle with the baking juices for extra flavor. Arrange them in a circle for a stunning look. - Garnishing ideas with parsley and olive oil: Just before serving, sprinkle fresh parsley on top. A light drizzle of olive oil adds richness and shine. This makes your dish pop with color and flavor. For the complete recipe, refer to [Full Recipe]. {{image_4}} You can easily switch the protein in Mediterranean stuffed peppers. If you love meat, use ground turkey or chicken instead of chickpeas. This swap adds a hearty taste. Ground beef can also work well. Just cook it until brown before mixing it with the other filling ingredients. If you want a plant-based option, try beans or lentils. Black beans or kidney beans can add great flavor and texture. Lentils cook fast and are rich in protein. So, they are a smart choice for a filling meal. To make these peppers fully vegan, you can leave out the feta cheese. Use a mix of nuts and seeds for creaminess instead. This keeps your dish tasty and satisfying. You can also use plant-based cheese made from nuts. Look for dairy-free cheese that melts well for a great topping. If you want to keep it vegetarian, you can stick with the feta cheese. It adds a salty taste that pairs well with the other ingredients. Just choose a brand that uses vegetarian rennet. You can serve Mediterranean stuffed peppers in different styles. For a nice dinner, place them on a large platter. Drizzle the juices from baking over the top. This adds flavor and makes them look appealing. If you want a fun appetizer, serve them cold. Slice the peppers into smaller pieces for easy bites. This way, they are perfect for sharing at a party. You can enjoy them warm or cold, and they still taste great. For the full recipe, check out the Mediterranean Stuffed Peppers Delight section. To keep your Mediterranean stuffed peppers fresh, refrigerate them. Place the cooled peppers in an airtight container. They stay good for about three to four days. Always check for any signs of spoilage before eating. For longer storage, you can freeze them. Wrap each stuffed pepper in plastic wrap, then place them in a freezer-safe bag. They can last for up to three months in the freezer. When you're ready to eat, just thaw them in the fridge overnight. Reheating stuffed peppers correctly ensures you keep their flavor. The best method is baking. Preheat your oven to 350°F (175°C). Place the peppers in a baking dish and cover with foil to keep them moist. Heat them for about 20-25 minutes. If you're short on time, you can use a microwave. Place the pepper on a microwave-safe plate. Cover it with a damp paper towel. Heat in short bursts, checking every minute until warm. Microwaving is quick, but it may make the peppers a bit soggy compared to baking. You can find the full recipe for Mediterranean stuffed peppers in the previous section. Enjoy your delicious meal! How long do stuffed peppers last in the fridge? Stuffed peppers can last about 3 to 5 days in the fridge. Store them in an airtight container. This helps keep them fresh and tasty. Always check for any signs of spoilage before eating. Can I make stuffed peppers ahead of time? Yes, you can prep stuffed peppers in advance. Stuff them and store them in the fridge for up to a day. You can bake them when you’re ready to eat. This makes meal prep easy and fun! What are the health benefits of quinoa? Quinoa is a great source of protein and fiber. It helps you feel full and satisfied. It also has all nine essential amino acids, making it a complete protein. Quinoa is rich in vitamins and minerals, like magnesium and iron. This makes it a smart choice for healthy eating. Are stuffed peppers low in calories? Stuffed peppers can be low in calories, depending on the ingredients. They are filled with vegetables, quinoa, and beans, which are all healthy. A single stuffed pepper is often under 300 calories. This makes them a great option for a lighter meal. Can I use other grains instead of quinoa? Yes, you can use other grains! Brown rice or farro work well. Just make sure to cook them before stuffing the peppers. Each grain adds a different taste and texture to your dish. How do I know when the peppers are done? Peppers are done when they are tender and slightly charred. You can test them by piercing with a fork. If the fork goes in easily, they are ready to eat. Enjoy your stuffed peppers warm for the best flavor! For the complete recipe, check out the [Full Recipe]. In this blog post, we've explored how to create delicious Mediterranean stuffed peppers. You learned about the important ingredients, step-by-step cooking instructions, and useful tips. Feel confident to mix flavors and adapt recipes to suit your tastes. Whether you want to make them vegan or change the filling, the options are endless. Remember, these peppers are not just tasty; they also pack nutrition. Now, it’s time for you to try making them and enjoy every bite.](https://recipetorch.com/wp-content/uploads/2025/07/eefb20f7-abe6-4980-99dc-551ef9445e6f.webp)
Imagine a dish that bursts with flavor and is as easy to make as it is delicious. Mediterranean Stuffed Peppers
