Skip to content
DisclaimerTerms Of UseGDPR PolicyCookie Policy

recipetorch

  • Home
  • Drinks
  • Appetizers
  • Dinner
  • Dessert
  • About
  • Contact
  • Privacy Policy
DisclaimerTerms Of UseGDPR PolicyCookie Policy

Nicole

Marinating the shrimp Start by mixing chili powder, olive oil, lime juice, salt, and black pepper in a bowl. This mixture will be your marinade. Whisk it well until everything blends. Add the large shrimp and coat them fully. Cover the bowl and place it in the fridge for 15-20 minutes. This step makes the shrimp taste great. Cooking the shrimp Heat a non-stick skillet over medium-high heat. Once hot, add the marinated shrimp. Cook them for 2-3 minutes on each side. You want them to change to a nice pink color. When they are fully cooked, take them off the heat. Let them cool for about a minute before adding them to the salad. Dicing avocados, cucumber, and bell pepper While the shrimp marinates, it’s time to chop the veggies. Take the ripe avocados and cut them into small pieces. Do the same with the cucumber and red bell pepper. Place all these diced veggies into a large mixing bowl. Then, add the finely chopped jalapeño and red onion. This mix adds crunch and flavor. Adding spices and seasonings Next, sprinkle a bit of salt and black pepper over the chopped vegetables. This step helps bring out their natural flavors. You can also add more lime juice if you like it tangy. Toss everything gently to mix the spices well. Tossing the salad Now, it’s time to combine the shrimp with the veggies. Add the cooled shrimp to the bowl with the diced vegetables. Gently fold in the chopped cilantro, being careful not to mash the avocados. Toss everything together until it’s mixed well. This creates a colorful and tasty salad. Adjusting seasoning to taste Finally, taste the salad. If it needs more flavor, add extra salt or black pepper. You can also squeeze a bit more lime juice if you want more zest. Make sure every bite is full of flavor before serving. To get tender shrimp, cook them just right. Use medium-high heat and watch closely. Shrimp cook fast, so don't let them go too long. They should be pink and firm. Marinate shrimp for 15-20 minutes. This helps them soak up all the flavors. Don't marinate too long, or they can turn tough. Choosing ripe avocados is key to a great salad. Look for avocados that yield slightly when you press gently. They should feel soft but not mushy. Fresh vegetables make a big difference. For cucumbers and bell peppers, pick ones that are bright and firm. Freshness adds crunch and taste. An eye-catching presentation makes your salad pop. Serve it in hollowed-out avocado skins for a fun twist. Just before serving, drizzle more lime juice on top. This adds a zesty kick. Pair your salad with a light drink, like iced tea or sparkling water. These drinks complement the spicy shrimp and creamy avocado perfectly. Pro Tips Marinate Longer for More Flavor: If time allows, marinate the shrimp for up to an hour to deepen the flavor even further. Perfect Avocado Selection: Choose avocados that are slightly soft to the touch but not overly ripe to ensure they hold their shape in the salad. Customize the Heat: Adjust the amount of jalapeño according to your spice tolerance; for a milder version, remove the seeds and membranes. Freshness is Key: Serve the salad immediately after mixing to maintain the vibrant colors and fresh flavors of the ingredients. {{image_4}} You can change the protein in this salad. If you want a different flavor, try grilled chicken or steak. Both options add a nice, hearty touch. For a vegetarian option, use tofu or chickpeas. They soak up the flavors well and keep the salad filling. Get creative with your salad! Adding fruits like mango or pineapple gives a sweet twist. You can also adjust the heat level by choosing spicy or mild recipes. If you like it hot, add more jalapeño. If you prefer less heat, use just a little. Switching up the dressing can change the whole dish. A creamy avocado dressing adds a rich texture. For a lighter option, try vinaigrette made with lime juice and olive oil. Both dressings enhance the fresh flavors of the salad. To keep your Spicy Shrimp Avocado Salad fresh, store it in an airtight container. Make sure to seal it tightly to avoid air and moisture. It’s best to keep the shrimp and veggies separate if possible. This keeps the salad from getting soggy. Use a glass or a high-quality plastic container for the best results. In the fridge, your salad will last for about 1-2 days. After that, the avocados may brown and the shrimp can spoil. If you have leftover shrimp, you can freeze it. Place the shrimp in a freezer-safe bag and remove as much air as possible. It can stay fresh for about 3 months in the freezer. For the best taste, enjoy the salad cold or at room temperature. If you want to reheat the shrimp, do it gently. Use a skillet on low heat to warm it up. Avoid heating it in the microwave, as it can make the shrimp rubbery. Serve the salad right after mixing to enjoy the fresh flavors. Yes, you can prepare some parts in advance. It keeps well if you store it right. - Shrimp: Marinate the shrimp ahead of time. Store it in the fridge for up to 2 hours. - Veggies: Chop the avocado, cucumber, and bell pepper. Keep them in a bowl with lemon juice to prevent browning. - Mixing: Combine the shrimp with the veggies just before serving. This keeps the salad fresh and tasty. You can use several tasty options if you prefer not to use shrimp. - Chicken: Grilled chicken works well. Cook it until it's juicy and tender. - Tofu: Firm tofu is a great vegetarian option. Marinate and sauté it for flavor. - Chickpeas: Canned chickpeas add protein and texture. They are easy to use and fill you up. Yes, this salad is gluten-free. - Ingredients: All ingredients used are naturally gluten-free. Fresh veggies and shrimp are safe for a gluten-free diet. - Dressings: Always check labels on dressings, just to be sure. Some may contain gluten. Enjoy this salad worry-free, knowing it fits your dietary needs! This blog post covered how to make a tasty Spicy Shrimp Avocado Salad. We discussed key ingredients, like large shrimp and ripe avocados, and shared tips for cooking and mixing. You learned about flavor enhancers like lime juice and cilantro. We also explored alternative proteins and storage methods. Enjoy this salad as a fresh meal or a side dish. Its versatility makes it a great choice. Follow the steps, and you will create a dish that impresses everyone!

Spicy Shrimp Avocado Salad Fresh and Flavorful Meal

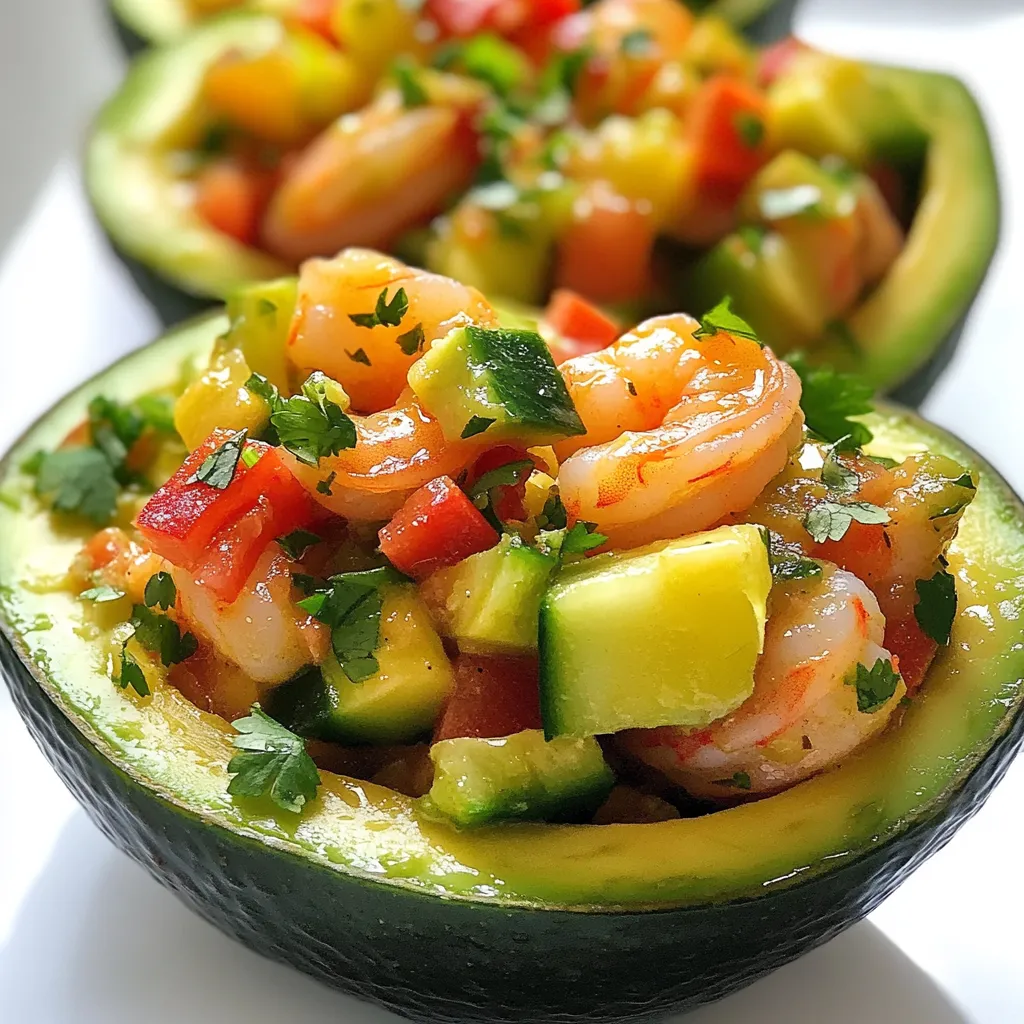
Looking for a fresh and flavorful meal? Dive into this Spicy Shrimp Avocado Salad! Packed with juicy shrimp, creamy avocados,

- 12 large pretzel rods - 1 cup semi-sweet chocolate chips - 1 tablespoon coconut oil - 1/2 cup crushed nuts (options: almonds, pecans, or walnuts) - 1/2 cup colorful sprinkles - 1/4 cup sea salt (optional, for topping) To make chocolate covered pretzel rods, you need simple and fun ingredients. First, grab 12 large pretzel rods. These will be the base for our treat. Next, gather 1 cup of semi-sweet chocolate chips. This will add rich flavor. You will also need 1 tablespoon of coconut oil. It helps the chocolate melt smoothly. For toppings, consider 1/2 cup of crushed nuts. You can use almonds, pecans, or walnuts. Each nut adds a unique crunch. Next, have 1/2 cup of colorful sprinkles ready. They will make your pretzels look festive and fun. Finally, you may want 1/4 cup of sea salt. This adds a nice touch of salty flavor that balances the sweet chocolate. With these ingredients, you can create a tasty treat that everyone will love. Start by gathering your ingredients. You need chocolate chips and coconut oil. Place one cup of semi-sweet chocolate chips in a microwave-safe bowl. Add one tablespoon of coconut oil. The oil helps the chocolate melt smoothly. Heat this mixture in the microwave in 30-second bursts. Stir it well after each interval. Keep heating until it is smooth and melted. This process usually takes about one to two minutes. Now, let’s prepare the pretzel rods. Take 12 large pretzel rods from the package. Line a baking sheet with parchment paper. This paper will keep the pretzels from sticking. It also makes cleaning up easier later. Place the pretzel rods on the sheet, ready for dipping. It’s time to dip! Grab a pretzel rod and dip it into the melted chocolate. Make sure to coat at least half of the rod. Allow any extra chocolate to drip back into the bowl. This prevents clumps. While the chocolate is still soft, add toppings. You can sprinkle crushed nuts or colorful sprinkles right away. If you like, add a pinch of sea salt for a sweet and salty mix. Place the dipped pretzel rods back on the parchment paper. Make sure they have some space between them. Repeat this for all 12 rods. Once you finish dipping, put the baking sheet in the fridge. Let the pretzels chill for about 30 minutes. This will help the chocolate set and harden. After that, they are ready to enjoy! To make a smooth chocolate coating, use semi-sweet chocolate chips. Adding coconut oil helps the chocolate melt well. It also gives a nice shine. Microwave the chocolate in short bursts. Stir often to avoid burning. Dip the pretzel rods halfway into the chocolate. Let the extra chocolate drip back into the bowl. This keeps the coating even and neat. For a fun display, stand the finished pretzel rods in a jar. You can also wrap each rod in cellophane. Tie it with a bright ribbon for a gift. This makes your treats look special. If you want, mix and match toppings for a colorful touch. Use nuts and sprinkles in different patterns. Let your creativity shine! Store your chocolate covered pretzel rods in an airtight container. Keep them at room temperature. They stay fresh for up to a week. If you live in a hot area, fridge storage works too. Just remember to let them come to room temp before serving. This keeps the chocolate smooth and tasty! {{image_4}} You can use many types of chocolate for your pretzel rods. Here are some fun choices: - White chocolate: This sweet option adds a nice touch. It looks great and tastes smooth. - Milk chocolate: Classic and creamy, milk chocolate is always a crowd-pleaser. It melts well and coats nicely. - Dark chocolate: For a richer taste, dark chocolate is perfect. It adds depth and pairs well with salty pretzels. Try mixing these chocolates for a fun twist! Toppings can make your pretzel rods pop. Here are some tasty ideas: - Crushed cookies: Oreos or graham crackers can add crunch and flavor. - Coconut flakes: Sweet and chewy, coconut adds a tropical flair. - Colorful sprinkles: These bring joy and fun to your treats. Great for kids! - Crushed nuts: Almonds, pecans, or walnuts add a delightful crunch. They also enhance the flavor. Feel free to combine toppings for even more fun! You can make themed pretzel rods for any occasion. Here are some ideas: - Holidays: For Halloween, use orange and black sprinkles. For Christmas, try red and green. - Birthdays: Customize with sprinkles in the birthday person's favorite colors. - Parties: Match colors to your party theme. Use sprinkles or toppings that fit your style. These themed pretzel rods add a special touch to any event! Chocolate covered pretzel rods make a great snack for parties. They are easy to make and fun to eat. You can serve them at birthday parties, baby showers, or any gathering. They add a sweet and salty crunch that everyone loves. You can set them out on a table or arrange them in jars for a bright display. These treats fit right in during the holidays. You can use festive colors for sprinkles to match the season. For Halloween, use orange and black sprinkles. For Christmas, go for red and green. You can even add holiday-themed toppings, like crushed candy canes for a peppermint twist. They make great snacks for family gatherings or cozy nights at home. Chocolate covered pretzel rods can be lovely gifts. You can wrap each pretzel in clear cellophane bags. Tie them with a colorful ribbon for a nice touch. If you want to make a bigger gift, place them in a decorative jar. They look great and taste even better! Plus, everyone loves a homemade gift. Chocolate covered pretzel rods stay fresh for up to one week. Store them in an airtight container at room temperature. This keeps them crunchy and tasty. Avoid exposing them to heat or humidity, as this can affect their texture. Yes, you can use various pretzels! Try regular pretzel rods, mini pretzels, or even pretzel twists. Each type adds a unique texture and taste. Choosing different pretzel shapes can also make your treats more fun and exciting! You can find pre-made chocolate covered pretzel rods at many stores. Check local grocery stores, candy shops, or specialty sweet shops. Online retailers also offer a variety of options if you prefer shopping from home. Absolutely! You can make these treats a few days in advance. Just store them properly in an airtight container. This makes them a great option for parties or events. Prepare them ahead to save time on the big day! You have learned to make delicious chocolate-covered pretzel rods. We covered the ingredients, from pretzel rods to chocolate options. You saw how to melt the chocolate and prepare the pretzels. I shared tips for perfecting your coating and ideas for serving them. Whether for a party or a gift, these treats are fun and easy to make. Try different toppings and chocolates to create your own style. With these tips, you'll impress everyone with your tasty treats. Enjoy making and sharing!

Chocolate Covered Pretzel Rods Simple and Fun Treat

Are you ready for a sweet and crunchy treat that’s easy to make? Chocolate-covered pretzel rods are the perfect snack

- 2 cups all-purpose flour - 1/3 cup granulated sugar - 1 tablespoon baking powder - 1/2 teaspoon salt - 1/2 cup unsalted butter, cold and cubed - 1/2 cup dried cranberries - Zest of 1 orange - 1/2 cup freshly squeezed orange juice - 1 large egg - 1 teaspoon vanilla extract - 1 cup powdered sugar - 2 tablespoons orange juice For these Orange Glazed Cranberry Scones, I focus on balance and taste. I use dry and wet ingredients to create a rich flavor. With the dry mix, I start by using all-purpose flour. It gives the scones a soft texture. I add granulated sugar for sweetness, baking powder for rise, and salt to enhance flavors. Next, I move to the wet ingredients. Cold, unsalted butter adds richness. I cube it to keep it chilled. Dried cranberries bring a sweet and tart burst. The zest of one fresh orange brightens every bite. I squeeze the juice of that orange for a juicy flavor and use an egg to bind everything. A touch of vanilla adds warmth. For the glaze, I mix powdered sugar with orange juice. This makes a sweet topping that complements the scones. The glaze is easy to adjust. If it’s too thick, I add more juice. If it’s too thin, I add more sugar. These ingredients come together to make a tasty treat that’s hard to resist! - Preheat your oven to 400°F (200°C). This step gets your oven ready for baking. - Line a baking sheet with parchment paper. This prevents the scones from sticking to the pan. - In a large bowl, whisk together 2 cups of all-purpose flour and 1/3 cup of granulated sugar. This helps mix the dry ingredients well. - Add 1 tablespoon of baking powder and 1/2 teaspoon of salt to the bowl. Whisk again until everything is well combined. - Cut 1/2 cup of cold, cubed unsalted butter into the flour mix. Use your fingers or a pastry cutter to mix until it looks like coarse crumbs. - Fold in 1/2 cup of dried cranberries and the zest of 1 orange. Make sure they spread out evenly. - In a separate bowl, whisk together 1/2 cup of freshly squeezed orange juice, 1 large egg, and 1 teaspoon of vanilla extract until smooth. - Gradually pour this wet mixture into the dry mix. Stir with a spatula until just combined. Do not overmix; it's okay if the dough is slightly sticky. - Transfer the dough to a floured surface. Knead it gently just a few times to help it hold shape. - Flatten the dough into a round disc about 1 inch thick. Cut this disc into 8 equal wedges. - Place the wedges on the lined baking sheet, leaving some space between each scone. - Bake in the preheated oven for about 15-18 minutes. They should turn golden brown on top. Once baked, remove them from the oven and let them cool slightly on the sheet. To get the right texture, avoid overmixing your dough. Mix just until the wet and dry ingredients combine. Overmixing makes the scones tough, not tender. Also, ensure your butter is cold. Cold butter creates flaky layers. Cut the butter into the flour until it looks like coarse crumbs. This step is key for a light scone. You can swap some ingredients to boost flavor. Try using brown sugar instead of granulated sugar. This gives a richer taste. Adding spices like cinnamon or nutmeg can also enhance the flavor. Just a pinch can make your scones even more delightful. For a beautiful display, arrange the scones on a nice platter. Make sure they have space between each one. Drizzle extra orange glaze over them for a shiny finish. You can also add garnishes like fresh cranberries or thin orange slices. These small touches make your scones look festive and inviting. {{image_4}} You can easily change the flavor of your scones. Here are a few ideas: - Adding nuts or chocolate chips: Chopped walnuts or pecans give a nice crunch. Chocolate chips add sweetness. Mix in about 1/2 cup of your choice with the cranberries. - Experimenting with different fruits: Try using dried cherries or blueberries instead of cranberries. Fresh seasonal fruits can also work. Just remember to adjust the juice if needed. If you or your friends have dietary needs, here are some swaps: - Gluten-free alternatives: Use a gluten-free flour blend instead of all-purpose flour. Most blends will work well in this recipe. - Vegan substitutions: Replace the egg with a flax egg. Mix 1 tablespoon of ground flaxseed with 2.5 tablespoons of water. For butter, use vegan butter or coconut oil. Scones can change with the seasons: - Using seasonal fruits: In spring, add fresh strawberries; in fall, consider apples or pears. Each fruit brings its own flair. - Holiday-themed variations: For Christmas, add spices like cinnamon or nutmeg. A sprinkle of festive colored sugar on top of the glaze adds holiday cheer. To keep your Orange Glazed Cranberry Scones fresh, store them in an airtight container. This prevents air from drying them out. Place a piece of wax paper between layers to avoid sticking. Keep the container at room temperature for up to two days. If you want to keep them longer, consider the following methods. For long-term storage, freezing is your best option. Allow the scones to cool completely. Then, wrap each scone tightly in plastic wrap. Place the wrapped scones in a freezer bag. This helps to lock in freshness. You can freeze them for up to three months. When you're ready to enjoy, just thaw them at room temperature or reheat them. To refresh your scones, preheat your oven to 350°F (175°C). Place the scones on a baking sheet. Bake for about 5-10 minutes. This restores their warmth and texture. If you want, you can also microwave them for 10-15 seconds. Just be careful not to overheat, as they can become tough. Enjoy your scones warm for the best taste! To make scones fluffy, use cold butter and avoid overmixing. Cut the butter into the flour until it looks like coarse crumbs. This helps create pockets of air. You also want to make sure your baking powder is fresh. This will give your scones the lift they need. Yes, you can use fresh cranberries. However, fresh cranberries are more tart than dried ones. If you use them, add a bit more sugar to balance the tartness. Fresh cranberries will also give a juicy burst in every bite. Serve these scones warm for the best taste. You can drizzle them with extra orange glaze. They pair well with a cup of tea or coffee. For a festive touch, add fresh cranberries or orange slices as garnish. Scones are best eaten fresh. They can last for about 2 days at room temperature. Store them in an airtight container to keep them soft. If you want to keep them longer, freeze them for up to 3 months. Just reheat before serving. In this blog post, we explored how to make delicious Orange Glazed Cranberry Scones. We covered the key ingredients, step-by-step instructions, tips for the best texture, and variations to try. Remember, detailed attention to your ingredients and process can create perfect scones. With practice, you can adapt these recipes to your taste. Enjoy baking these treats and sharing them with others! Cooking should always be fun and rewarding.

Orange Glazed Cranberry Scones Perfectly Tasty Treat

If you’re searching for a delightful treat that perfectly balances sweet and tart, look no further! Orange glazed cranberry scones

To make delicious cranberry pistachio fudge, gather these key ingredients: - 2 cups white chocolate chips - 1 can (14 oz) sweetened condensed milk - 1 cup dried cranberries, finely chopped - 1 cup unsalted pistachios, coarsely chopped - 1 teaspoon pure vanilla extract - 1/2 teaspoon flaky sea salt These ingredients work together to create a rich and creamy treat. The white chocolate brings sweetness, while the cranberries and pistachios add great texture and flavor. You can enhance the look and taste with these optional toppings: - Additional pistachios - Extra dried cranberries Sprinkling these on top makes the fudge even more festive. It adds a nice crunch and bright color. If you need alternatives, consider these options: - White chocolate chips: Use carob chips or vanilla-flavored chocolate. - Sweetened condensed milk: Try coconut milk or a homemade version with milk and sugar. - Dried cranberries: Use raisins or chopped dried cherries for a new twist. - Unsalted pistachios: Almonds or walnuts can also work well. These swaps can help you customize the fudge to suit your taste. {{ingredient_image_2}} First, grab an 8x8 inch baking pan. Line it with parchment paper. Make sure you leave some paper hanging over the edges. This helps you lift the fudge out later. It makes the whole process easier. Your fudge will slide out smoothly when it’s set. Next, take a medium saucepan. Add the white chocolate chips and sweetened condensed milk. Heat this mixture on low. Stir it gently and keep an eye on it. You want the chocolate to melt completely. Keep stirring until it turns nice and smooth. This step is crucial, as a good melt makes the fudge creamy. Once your chocolate mixture is smooth, take it off the heat. Now, add the pure vanilla extract. This will boost the flavor. Sprinkle in the flaky sea salt for a taste twist. Then, fold in the finely chopped dried cranberries and coarsely chopped pistachios. Mix them well into the creamy fudge. This adds great texture and flavor. Finally, pour the mixture into your prepared pan. Use a spatula to smooth the top. If you like, sprinkle more pistachios and cranberries on top. Press them down gently into the fudge for a pretty finish. To get a smooth and creamy fudge, melt the white chocolate slowly. Heat it gently with the sweetened condensed milk. Stir constantly to avoid burning. Once melted, the mix should look glossy and silky. If it feels too thick, add a tiny bit more milk. Store your fudge in an airtight container. Keep it in the fridge to stay fresh. It should last up to two weeks this way. You can also freeze the fudge. Wrap it well in plastic wrap, then place it in a freezer bag. It will last about three months in the freezer. For serving, cut the fudge into small squares. Place them on a pretty serving platter. You can drizzle some melted chocolate on top for a fancy touch. For extra flair, sprinkle edible gold dust around the edges. This will make your fudge shine and impress your guests! Pro Tips Chop Ingredients Finely: Ensure the dried cranberries and pistachios are chopped to the desired size for even distribution throughout the fudge, enhancing both texture and flavor. Use High-Quality Chocolate: Selecting premium white chocolate chips can significantly impact the taste and smoothness of your fudge, making it more indulgent. Mind the Temperature: Melting the chocolate over low heat prevents scorching and allows for a perfectly creamy consistency, so stir gently and be patient. Let It Set Properly: For the best texture, be sure to chill the fudge for the full 2-3 hours until firm; this step is crucial for easy slicing and a delightful bite. {{image_4}} You can easily change the flavors in this fudge. For a nutty twist, swap pistachios for almonds or walnuts. Both add a rich taste. You can also use different dried fruits. Try dried cherries or apricots for a fun flavor change. Each option brings its unique touch to the fudge. If you want a vegan version, use dairy-free chocolate chips instead of white chocolate. Swap the sweetened condensed milk for coconut milk. This keeps the fudge creamy and delicious. You can also check for vegan-friendly brands of the other ingredients. Always read labels to ensure they meet your needs. This fudge is perfect for the holidays. To make it festive, add orange zest for a bright flavor. You can also sprinkle crushed candy canes on top for a winter touch. Another idea is to use seasonal spices like cinnamon or nutmeg in the mix. These small changes can make your fudge a holiday delight. To keep your cranberry pistachio fudge fresh, store it in an airtight container. Line the container with parchment paper to avoid sticking. If you stack the fudge, separate layers with more parchment paper. This will help keep the fudge intact and tasty. When stored properly, your fudge can last up to two weeks at room temperature. For longer storage, you can freeze it. Wrap the fudge tightly in plastic wrap and then in aluminum foil. It will stay fresh in the freezer for up to three months. To thaw, place it in the fridge overnight before serving. Look for a few signs to tell if your fudge is no longer good. If you see mold or an off smell, it’s best to throw it away. The texture might also change, becoming dry or crumbly. If you notice these signs, do not eat the fudge. Always trust your senses when it comes to food safety. Yes, you can use semi-sweet chocolate. This will give your fudge a richer taste. The sweetness will be less than with white chocolate. Adjust the sugar in the recipe if you want it sweeter. The fudge needs to chill for at least 2-3 hours. If you want it firmer, leave it longer. Check if it feels solid before slicing. The longer it chills, the better it holds its shape. Yes, but the fudge will change in texture and taste. You can use heavy cream with sugar as a substitute. This will keep the fudge creamy but may need more stirring. In this blog, we explored everything about making fudge. We covered key ingredients, optional toppings, and substitutes you can use. You learned step-by-step instructions and tips to achieve the perfect fudge texture. We also looked at fun variations, storage tips, and FAQ answers. Making fudge is fun and rewarding. With this guide, you can create delicious fudge that impresses everyone. Enjoy the process and be creative as you make sweet treats!

Cranberry Pistachio Fudge Irresistible Holiday Treat

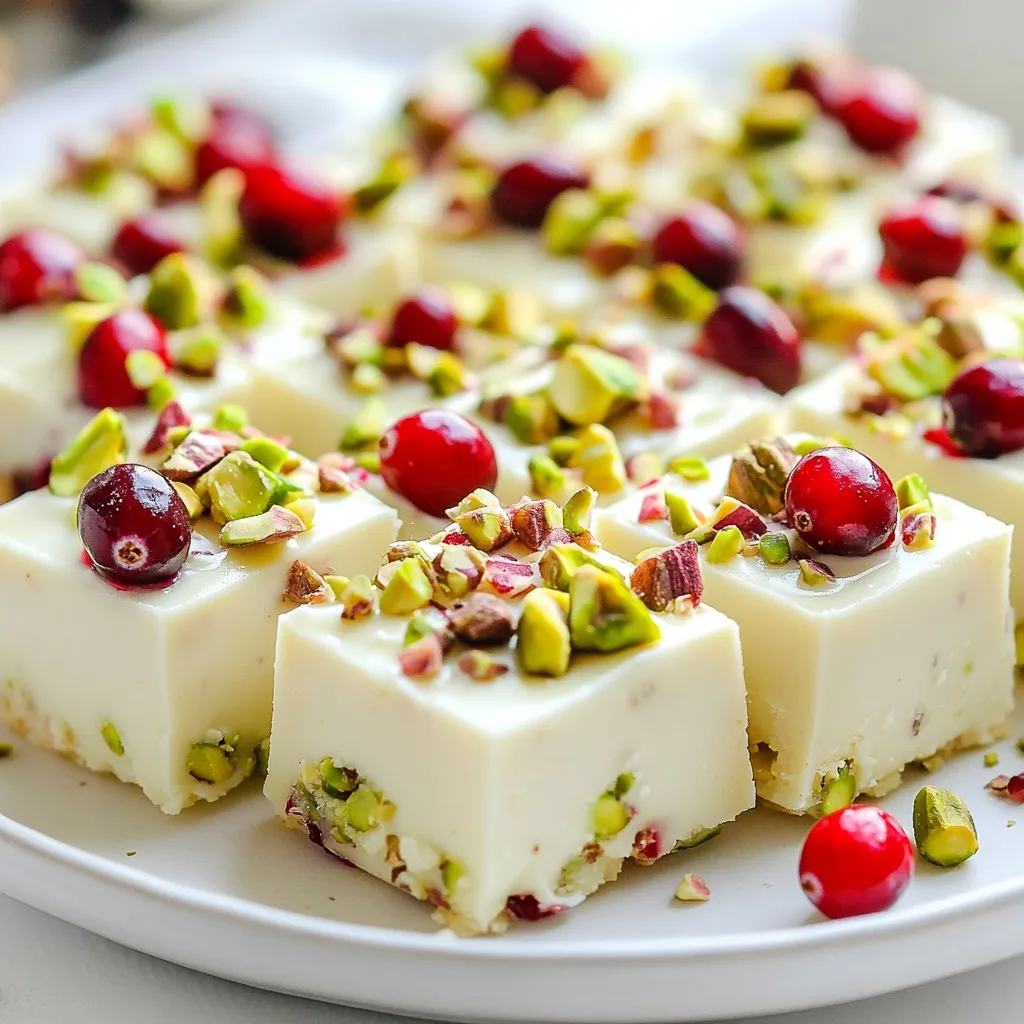
Looking to make your holiday gatherings extra special? This Cranberry Pistachio Fudge is a must-try! With its rich chocolate, tart

To make Pumpkin Spice Energy Balls, you need these simple ingredients: - 1 cup rolled oats - 1/2 cup almond butter (or peanut butter) - 1/2 cup canned pumpkin puree - 1/3 cup honey or maple syrup - 1/4 cup ground flaxseed - 1 teaspoon pumpkin spice blend (or mix of cinnamon, nutmeg, and ginger) - 1/4 teaspoon salt - 1/4 cup chocolate chips (optional) - 1/4 cup chopped nuts (like walnuts or pecans, optional) These ingredients work together to create a tasty and healthy treat. The oats provide fiber, while the pumpkin adds nutrition and flavor. You can customize your energy balls by adding different ingredients: - Seeds: Try adding chia seeds or sunflower seeds for extra crunch. - Dried fruits: Chopped dates or cranberries can add sweetness. - Protein powder: A scoop can boost the protein content. - Nut butter variations: Use cashew or sunflower seed butter based on your preference. Feel free to mix and match based on what you have at home. Each Pumpkin Spice Energy Ball has a healthy mix of nutrients. They are rich in fiber, protein, and healthy fats. Here’s a quick look at what you get: - Calories: About 100 per ball - Protein: Around 3 grams - Fat: About 5 grams (mostly healthy fats) - Carbohydrates: Roughly 12 grams - Fiber: Around 2 grams These energy balls make a great snack, giving you energy without the sugar crash. Enjoy them as a quick breakfast or a post-workout boost! To start, grab a large mixing bowl. Add 1 cup of rolled oats, 1/2 cup of almond butter, and 1/2 cup of canned pumpkin puree. Use a sturdy spatula or spoon to mix these ingredients. Stir until you have a smooth mixture. This step is key for a good texture. Now, it’s time to add some flavor. Pour in 1/3 cup of honey or maple syrup. Next, add 1/4 cup of ground flaxseed, 1 teaspoon of pumpkin spice blend, and 1/4 teaspoon of salt. Mix well so every bit of the dry ingredients gets moistened. You don't want any dry spots in your mixture. With clean hands, scoop up a little of the mixture. Roll it into a small ball, about 1 inch in size. Keep going until you shape all the mixture into balls. Place them on a baking tray lined with parchment paper. Make sure to leave some space between each ball. Refrigerate them for about 30 minutes. This helps them firm up nicely. Enjoy your tasty and healthy snack! To make the best pumpkin spice energy balls, start with a large mixing bowl. Combine the rolled oats, almond butter, and pumpkin puree first. Use a sturdy spatula or spoon to mix well. Make sure the mixture is smooth and even. If you find it too thick, add a splash of water. This helps combine the ingredients better. Add the sweeteners and spices next. Pour in the honey or maple syrup. Add the ground flaxseed, pumpkin spice blend, and salt. Mix until there are no dry bits left. If you want more flavor, fold in the chocolate chips and chopped nuts. Stir gently to keep them evenly distributed. When it's time to shape the balls, keep your hands clean and dry. Scoop a small amount of the mixture. Aim for about one inch in diameter. Roll the mixture in your hands gently. This helps form a nice round shape. If the mixture is sticky, dampen your hands with a little water. Place each ball on a baking tray lined with parchment paper. Leave space between each ball. This ensures they don’t stick together when they chill. For a beautiful presentation, arrange the energy balls in a vibrant bowl. You can sprinkle a hint of extra pumpkin spice on top. Adding some chopped nuts gives a nice touch, too. These energy balls make a great snack for on-the-go. You can also serve them at gatherings. They are easy to grab and enjoy. {{image_4}} You can easily make these energy balls vegan. Just swap honey for maple syrup. Almond butter works well, but you can use any nut or seed butter. Make sure your chocolate chips are dairy-free, too. If you need a gluten-free option, rolled oats are a safe choice. Ensure they are certified gluten-free. You can also use gluten-free flour if you want to change the texture. Feel free to play with spices! Add a pinch of ginger or a dash of allspice. Want more crunch? Toss in sunflower seeds or pumpkin seeds. Coconut flakes can also add a nice touch. Don't be afraid to experiment! To keep your pumpkin spice energy balls fresh, store them in an airtight container. Place them in the fridge after they chill. They will stay good for about one week. If you want to enjoy them longer, freezing is a great option. To freeze your energy balls, arrange them on a baking sheet first. Make sure they do not touch each other. Freeze them for about two hours until firm. After that, transfer them to a freezer-safe bag or container. They can last up to three months in the freezer. Just thaw them in the fridge before you enjoy them! Check for a few signs to know if your energy balls are still good. If they smell off or look dry, it’s best to toss them. Also, if you see mold or any strange colors, do not eat them. Fresh energy balls should have a pleasant pumpkin spice aroma and a moist texture. Pumpkin Spice Energy Balls are packed with good stuff. They have oats, which give you energy and fiber. Fiber helps with digestion and keeps you full. Pumpkin adds vitamins like A and C. These vitamins help your immune system. The almond butter gives you healthy fats and protein. This combo makes these bites a great snack. Yes, you can! Almond butter is tasty, but you can use peanut butter or cashew butter. Each nut butter gives a different flavor. Choose what you like best. Just make sure the nut butter is smooth for easy mixing. When stored in an airtight container, they last up to a week in the fridge. Make sure to keep them sealed to stay fresh. If you want them longer, try freezing them. They can last for months in the freezer. Yes! Use maple syrup instead of honey. Also, make sure to use a nut butter that is vegan. This way, you can enjoy these tasty treats without any animal products. If you don’t have pumpkin spice, you can mix ground cinnamon, nutmeg, and ginger instead. Use a teaspoon of each spice for a similar flavor. This will keep your energy balls delicious and festive. Absolutely! You can add dried fruit like cranberries or raisins. You can also mix in seeds like chia or sunflower seeds. These add flavor, texture, and extra nutrients to your energy balls. To avoid sticky hands, wet your palms with water or lightly oil them. This will help the mixture roll easily into balls. It also makes clean-up easier after making your snacks. Yes, they are perfect for kids! They are tasty and packed with nutrients. Kids can enjoy these as a snack or a quick breakfast. Plus, they are fun to make together as a family. You learned how to make tasty Pumpkin Spice Energy Balls with easy steps. We covered key ingredients, from sweeteners to spices, and how to customize them. I shared tips for mixing and rolling the balls just right. You also got ideas for vegan and gluten-free options. Plus, you know how to store them for freshness. These energy balls are not just tasty; they fuel your day. Enjoy making and sharing them!

Pumpkin Spice Energy Balls Nourishing and Tasty Treat

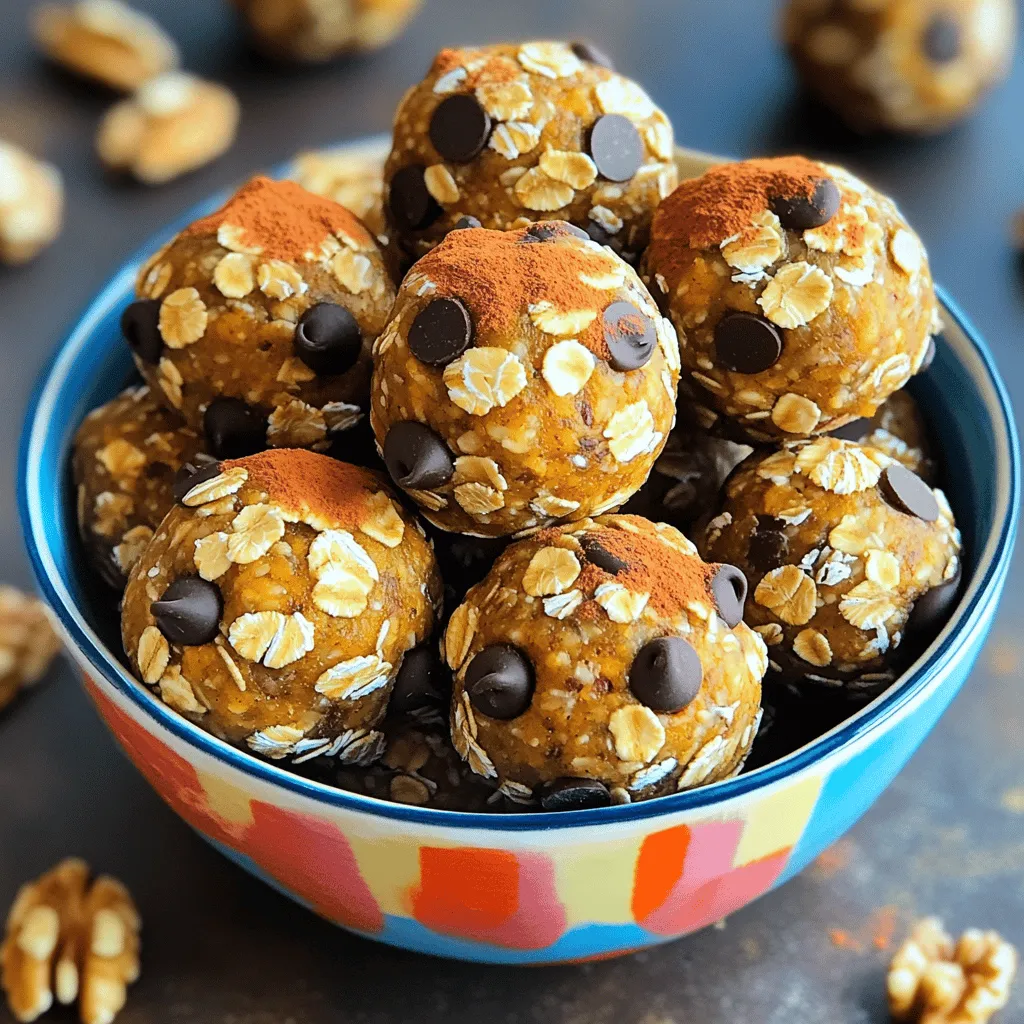
Are you ready to enjoy a tasty, nourishing snack? Pumpkin Spice Energy Balls are the perfect way to satisfy your

- 2 tablespoons extra-virgin olive oil - 1 medium onion, finely diced - 3 cloves garlic, minced - 1 carrot, peeled and diced - 4 cups vegetable broth - 1 (14-ounce) can of diced tomatoes, with their juices - 1 teaspoon dried basil - 1 teaspoon dried oregano - Salt and freshly ground black pepper to taste - 9 ounces fresh or frozen cheese tortellini - 4 cups fresh spinach, rinsed and chopped - 1 tablespoon freshly squeezed lemon juice - Grated Parmesan cheese for serving (optional) To make this soup, you will need a large pot. A wooden spoon will help you stir the ingredients. If you want to serve it nicely, keep some bowls handy. A ladle makes it easy to serve the soup. When selecting your ingredients, look for firm onions without soft spots. Choose garlic that feels solid and has no green sprouts. Pick carrots that are bright and smooth. For spinach, select leaves that are fresh and vibrant green. If you use tortellini, check the package for freshness. Fresh ingredients make your soup taste great! Start by heating 2 tablespoons of extra-virgin olive oil in a large pot over medium heat. Wait until it shimmers. Then, add 1 medium onion, finely diced. Sauté for 3-4 minutes, until the onion turns soft and clear. Next, add 3 cloves of minced garlic and 1 diced carrot. Stir the mix for another 2-3 minutes. You want the smell of garlic and onion to fill your kitchen. Now, pour in 4 cups of vegetable broth and 1 can of diced tomatoes with their juices. Mix everything well. Sprinkle in 1 teaspoon each of dried basil and oregano. Season with salt and black pepper to taste. Raise the heat until the soup boils. When it starts bubbling, gently toss in 9 ounces of fresh or frozen cheese tortellini. Lower the heat and let it simmer for 5-7 minutes. Check the package instructions for the exact time. After the tortellini cooks, stir in 4 cups of fresh spinach. Let it wilt for 1-2 minutes. Remove the pot from the heat. Drizzle in 1 tablespoon of fresh lemon juice to brighten the soup's taste. Give it a taste and adjust the seasoning if needed. Finally, ladle the soup into bowls. If you like, add grated Parmesan cheese on top for a creamy finish. Enjoy your warm soup with crusty bread on the side! To make your soup shine, start with fresh ingredients. Use sweet onions and ripe tomatoes. Fresh herbs like basil and oregano will boost the taste. A squeeze of lemon juice brightens the soup. You can also add a dash of red pepper flakes for a bit of heat. Finally, finish with grated Parmesan for a rich touch. One mistake is overcooking the tortellini. Keep an eye on the time; they should be tender, not mushy. Another error is not seasoning enough. Taste your soup and add salt and pepper as needed. Lastly, don’t skip the lemon juice. It really brings all the flavors together. This soup is perfect for meal prep. Cook a big batch and store it in the fridge. It lasts for about three days. For freezing, let it cool before placing it in airtight containers. When reheating, add a splash of broth to keep it creamy. This way, your soup stays delicious and ready to enjoy! {{image_4}} You can add protein to the soup for extra flavor and nutrition. Cooked chicken works well. Use grilled or rotisserie chicken for ease. Chop the chicken and stir it in with the tortellini. Sausage also adds a nice kick. Choose Italian sausage for a spicy twist. Remove the casing and brown it in the pot before adding other ingredients. This will give your soup a rich taste. If you want a vegetarian or vegan option, skip the cheese tortellini. Use plant-based tortellini instead. There are many brands that offer great vegan choices. For added protein, consider using chickpeas or lentils. They blend well with the soup and boost nutrition. You can also use nutritional yeast instead of Parmesan for a cheesy flavor without dairy. Feel free to get creative with your veggies. Carrots and spinach are great, but you can try others too. Zucchini or bell peppers add color and texture. You can even add kale for a twist. Just chop it up and stir it in with the spinach. It will wilt nicely and add a hearty touch. Remember, the more veggies, the more nutrition! After you finish your meal, let the soup cool down. Once cool, transfer it to an airtight container. Place it in the fridge. It will stay fresh for up to three days. If you want, you can also store the soup in individual portions. This makes it easy to grab for lunch or dinner later. If you want to save the soup for later, freezing is a great option. Use freezer-safe containers or bags. Make sure to leave some space at the top since liquids expand when frozen. Label the containers with the date. You can freeze the soup for up to three months. When you’re ready to eat, just thaw it in the fridge overnight. To reheat, pour the soup into a pot over medium heat. Stir it often to help it heat evenly. You can also use the microwave. Just place the soup in a microwave-safe bowl and cover it. Heat in short intervals, stirring in between. Add a splash of water or broth if it seems thick. Enjoy your warm and comforting bowl of soup! Yes, you can make this soup in advance. It tastes even better the next day. To store it, let it cool first. Then, put it in an airtight container and keep it in the fridge for up to three days. When you're ready to eat, just heat it on the stove until warm. If you don't have tortellini, you can use other pasta. Small shapes like shells or elbows work well. You can also use gnocchi or even rice. Just adjust the cooking time to ensure they are tender. To make this soup gluten-free, choose gluten-free tortellini or pasta. Many stores offer good options now. Also, check the broth label to ensure it’s gluten-free. With these swaps, you can enjoy the soup without worry. This soup is hearty and packed with nutrients. Each serving has about 300 calories. It provides protein from the tortellini and fiber from the spinach and tomatoes. You also get vitamins A and C, plus a good dose of iron. If you add cheese, it boosts the calcium too. This blog post covered key ingredients, step-by-step cooking, and valuable tips. You learned how to prepare a tasty tortellini soup with the right tools and fresh ingredients. I shared ways to enhance flavors and avoid common mistakes. In the end, exploring variations and storage tips helps you get the most from your meal. Whether you want a quick bite or a healthy dish, this soup fits the bill. Enjoy your cooking adventure!

One-Pot Spinach Tomato Tortellini Soup for Dinner

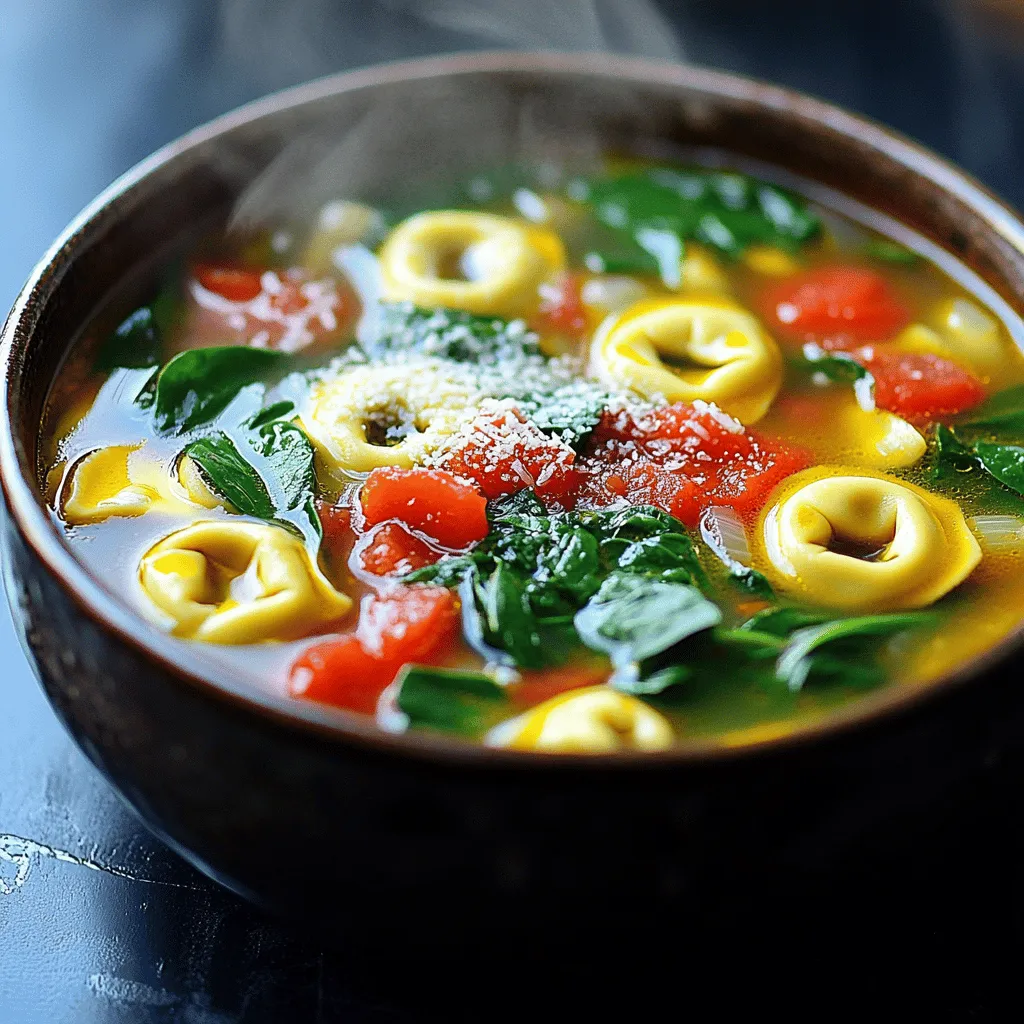
Looking for a quick and tasty dinner idea? My One-Pot Spinach Tomato Tortellini Soup is here to save the day!

- 2 cups heavy cream - 1 cup sweetened condensed milk - 1 teaspoon vanilla extract - 1 ½ cups chocolate sandwich cookies, crushed - ½ cup mini chocolate chips (optional) - Electric mixer - Large mixing bowl - Spatula - Freezer-safe container The first step in creating your no-churn cookies and cream ice cream is gathering the right ingredients. You need heavy cream, sweetened condensed milk, vanilla extract, chocolate sandwich cookies, and mini chocolate chips if you like. Next, make sure you have the right tools. An electric mixer helps whip the cream well. A large mixing bowl holds your ice cream mixture. A spatula makes folding easy. Finally, a freezer-safe container is necessary for freezing the ice cream. Gathering these items will set you up for ice cream success. You’ll enjoy making this treat with simple steps. - Step 1: Whip the heavy cream Start by pouring 2 cups of heavy cream into a large bowl. Use an electric mixer on medium speed. Beat the cream for about 3-4 minutes. Watch closely as soft peaks form. This is key for a light texture. - Step 2: Combine condensed milk and vanilla In another bowl, mix 1 cup of sweetened condensed milk with 1 teaspoon of vanilla extract. Stir gently until everything blends well. A smooth mixture is what you want. - Step 3: Fold whipped cream into the condensed milk mixture Now, take the whipped cream and carefully fold it into the condensed milk mixture. Use a spatula and be gentle. You want to keep the air in the whipped cream for a fluffy ice cream. - Step 4: Incorporate cookie pieces and optional chocolate chips Once combined, add in 1 ½ cups of crushed chocolate sandwich cookies. If you like, toss in ½ cup of mini chocolate chips too. Mix gently until the cookie pieces are evenly spread throughout. - Step 5: Transfer to a container and prepare for freezing Pour this tasty mixture into a freezer-safe container. Spread it out evenly so it freezes well. This step is crucial for the best texture. - Step 6: Freeze until firm Cover the container tightly. Place it in the freezer for at least 6 hours. You want the ice cream to be firm and ready for scooping. To make great no-churn ice cream, soft peaks in whipped cream are key. This means you should stop mixing when the cream forms peaks that gently bend over. If you mix too long, the cream can turn grainy. When you fold the whipped cream into the condensed milk, be gentle. Use a spatula and lift the cream from the bottom to the top. This keeps the air in the cream and makes your ice cream light and fluffy. For a fun presentation, serve your ice cream in chilled bowls. This keeps it cold longer. You can add extra crushed chocolate cookies on top for a nice look and crunch. Try drizzling chocolate syrup or caramel over the ice cream. You can also sprinkle some mini chocolate chips for extra sweetness. These toppings make the treat even more special. If your ice cream is too hard, let it sit out for a few minutes before scooping. This softens it just enough for easy serving. If you notice a grainy texture in your ice cream, it may have been whipped too long. To fix this, try mixing it again with a spatula until smooth. Add a bit of heavy cream and gently fold it in to help restore the silky texture. {{image_4}} You can change the cookies to make this ice cream fun. Using different sandwich cookies adds new flavors. Try using vanilla or mint cookies instead of chocolate. This simple swap gives your ice cream a fresh twist. You can also mix two types of cookies for a unique taste. Adding flavorings can take your ice cream to the next level. A splash of almond or mint extract can brighten the taste. You might also infuse the mix with coffee for a rich depth. Peanut butter is another tasty option. Just mix in a few spoonfuls for a creamy, nutty flavor. Get creative with mix-ins to boost texture and flavor. You can add fruits like strawberries or bananas for a fruity kick. Chopped nuts can provide a lovely crunch. Swirls of fudge or caramel add sweetness and richness. Don't hesitate to experiment and find your perfect blend! For the best results, use a freezer-safe container. Look for ones that seal tightly. This keeps air out and helps your ice cream stay fresh. A shallow container works best. It helps the ice cream freeze evenly. To prevent freezer burn, cover the ice cream with plastic wrap before sealing the lid. This added layer stops ice crystals from forming. Homemade ice cream can last about two weeks in the freezer. After that, it may start to lose flavor and texture. Signs that your ice cream has gone bad include a strange smell or odd texture. If you see ice crystals on top, it’s time to toss it out. Always trust your senses! You can refreeze ice cream, but it’s not ideal. Each time you refreeze, the texture gets worse. The ice cream may become grainy or icy. To maintain the best texture, only scoop what you need. If you must refreeze, do so quickly. Store it in a tightly sealed container to help keep it creamy. Yes, you can whip the cream by hand. Use a large bowl and a whisk. It takes more time, but it's doable. Whisk until you see soft peaks. This can take about 8 to 10 minutes. No, this recipe contains dairy. However, you can make it dairy-free. Use coconut cream instead of heavy cream. You can also use a dairy-free condensed milk. Make sure to check labels for allergens. The ice cream is ready when it is firm to the touch. You should be able to scoop it easily. If it feels hard like a rock, let it sit at room temperature for a few minutes. This helps soften it just a bit for perfect scooping. Making homemade ice cream is fun and easy. You just need simple ingredients and a few tools. We covered everything from whipping cream to freezing tips. With these steps, you can create a tasty treat that suits your taste. Don’t forget to try different mix-ins for variety. Enjoy your treat and share it with friends and family. This ice cream brings joy to every occasion, so get started today!

No-Churn Cookies And Cream Ice Cream Delight

Are you ready to make a rich and creamy ice cream that requires no churn? This No-Churn Cookies And Cream

- 1 large head of cauliflower - 4 cloves fresh garlic - 3 tablespoons extra virgin olive oil - Zest and juice of 1 fresh lemon - 1 teaspoon smoky paprika - 1 teaspoon dried oregano - Sea salt and freshly ground black pepper - Fresh parsley - Lemon slices To make Lemon Garlic Roasted Cauliflower, you need fresh and simple ingredients. Start with a large head of cauliflower. Cut it into bite-sized florets. This helps it roast evenly. Fresh garlic adds a strong flavor. Use four cloves, finely minced. Next, you want good olive oil. I suggest using three tablespoons of extra virgin olive oil. This oil has a rich taste and helps the seasoning stick to the cauliflower. Seasoning is key to this dish. Use the zest and juice of one fresh lemon. The lemon gives a bright, zesty taste. Add one teaspoon of smoky paprika for depth. It brings a nice warmth. You also need one teaspoon of dried oregano. This herb adds a lovely aroma. For garnishes, use sea salt and freshly ground black pepper to taste. They enhance all the flavors. Fresh parsley adds color and freshness. Finally, lemon slices brighten your dish. They look pretty and add a nice touch when serving. Gather these ingredients, and you are ready to create a bold flavor dish! - Preheat the oven to 425°F (220°C). - Line a baking sheet with parchment paper. The first step is very important. Preheating the oven helps the cauliflower roast evenly. Lining the baking sheet makes cleaning easy later. - Combine cauliflower florets with garlic. - Add olive oil, lemon zest, and lemon juice. In a big bowl, mix the cauliflower florets and minced garlic. Then, pour in the olive oil and add the lemon zest and juice. This mix gives the cauliflower a fresh taste. You can also add smoky paprika, dried oregano, sea salt, and black pepper for extra flavor. - Toss to coat and spread in a single layer. - Roast for 25-30 minutes, stirring halfway. Now it’s time to coat the florets. Use a wooden spoon or your hands to mix everything well. Spread the coated cauliflower in a single layer on the baking sheet. This helps each piece cook properly. Roast the cauliflower for 25 to 30 minutes. Stir halfway through for an even roast. Look for a golden brown color and a tender texture. After roasting, let it cool slightly. Transfer it to a serving dish and garnish with parsley and lemon slices. Enjoy the bold flavors of this dish! To avoid soggy cauliflower, ensure you cut the florets evenly. This helps them cook at the same rate. Spread the florets in a single layer on the baking sheet. If they overlap, they will steam instead of roast. Adjust the cooking time based on your desired tenderness. For a firmer bite, roast for 25 minutes. If you like it softer, aim for 30 minutes. Stir the florets halfway through cooking. This ensures even browning and tenderness. Lemon Garlic Roasted Cauliflower pairs well with grilled chicken or fish. It also complements quinoa or a fresh green salad. For gatherings, serve it as a colorful side dish. You can also create a veggie platter with dips like hummus or tzatziki. To elevate your dish, consider serving it in a vibrant bowl. Add lemon slices and fresh parsley on top for a pop of color. Your guests will love the bright look and bold flavor. For a personal touch, try adding spices like cumin or chili flakes. These spices can give your dish a unique twist. You can also include add-ins like pine nuts or feta cheese for extra flavor. Balancing acidity is key. The lemon juice adds brightness, but you can mix in a drizzle of honey for sweetness. This will round out the flavors and create a well-balanced dish. {{image_4}} You can easily make this dish vegan. Just stick to the original recipe. All the ingredients are plant-based. For gluten-free diets, this recipe is already safe. Cauliflower, garlic, and olive oil contain no gluten. If you want to mix it up, try other veggies! Broccoli and Brussels sprouts roast well, too. You can also use sweet potatoes for a sweeter taste. For seasoning swaps, add cumin for warmth or chili flakes for heat. These changes can create a new flavor profile. For a Mediterranean twist, add olives or feta cheese. This gives a briny flavor that pairs well. You can also try an Asian-inspired version. Use sesame oil instead of olive oil and add fresh ginger. This will add a nice zing to the dish. Both options will keep the dish exciting and fresh! To store leftovers, place the cauliflower in an airtight container. This keeps it fresh. You can enjoy it for about 3 to 5 days. Always let the dish cool before sealing it. This helps avoid moisture build-up. When you're ready to eat, simply reheat it. To freeze roasted cauliflower, first let it cool completely. Then, spread it on a baking sheet. Freeze for 1 to 2 hours until firm. Once frozen, transfer it to a freezer-safe bag. Squeeze out as much air as possible. This will help prevent freezer burn. For reheating, place the frozen cauliflower on a baking tray. Bake at 400°F (200°C) for about 20 minutes. Stir halfway through to heat evenly. You can also microwave it for a quicker option, but the oven keeps it crispy. Leftover roasted cauliflower is very versatile. You can add it to salads for extra flavor. It also works well in soups or stews. Try blending it into a creamy sauce or dip. Another idea is to mix it into pasta dishes. It adds a nice texture and taste. You can even toss it in a stir-fry for a quick meal. No need to waste any of that deliciousness! You can pair Lemon Garlic Roasted Cauliflower with many dishes. Here are some tasty options: - Grilled chicken or fish for protein. - Quinoa or couscous for a grain side. - A fresh green salad for crunch. - Hummus or tzatziki for a creamy dip. - Whole grain bread for a hearty meal. These pairings make a complete and balanced meal. Yes, you can make this dish ahead of time. Here are some tips: - Roast the cauliflower and let it cool. - Store it in an airtight container in the fridge for up to three days. - Reheat in the oven at 350°F (175°C) until warm. - You can also serve it cold as a salad topping. Meal prepping helps you save time on busy days. Look for these signs of perfectly roasted cauliflower: - The florets should be golden brown. - They should feel tender when pierced with a fork. - The edges should be crispy but not burnt. These signs mean your cauliflower is ready to enjoy! In this blog post, I shared how to make Lemon Garlic Roasted Cauliflower. I covered main ingredients, seasonings, and helpful tips for roasting perfection. I also discussed serving ideas, variations, and storage methods. Remember, this dish is easy to make and can be adapted to fit your tastes. Try it out, and enjoy the fresh flavors. You will find it a flexible side that pairs well with many meals. Explore the options to make it your own and savor every bite!

Lemon Garlic Roasted Cauliflower Bold Flavor Dish

Are you ready to elevate your veggie game? Lemon Garlic Roasted Cauliflower is a bold flavor dish that will wow

To make Cookie Butter Banana Bread, you'll need these simple ingredients: - 3 ripe bananas, mashed until smooth - 1 cup creamy cookie butter - 1/2 cup granulated sugar - 1/4 cup packed brown sugar - 2 large eggs, at room temperature - 1/2 cup unsalted butter, melted and slightly cooled - 1 teaspoon pure vanilla extract - 1 teaspoon baking soda - 1/2 teaspoon salt - 1 ½ cups all-purpose flour - 1/2 teaspoon ground cinnamon (optional, for warmth) - 1/2 cup chocolate chips (optional, for added sweetness) You can customize your banana bread. Here are some fun ideas: - Nuts: Chopped walnuts or pecans add a nice crunch. - Dried fruit: Raisins or cranberries can add sweetness. - Spices: A dash of nutmeg or cardamom can enhance flavor. The right bananas make all the difference. Here are my tips: - Look for brown spots: Choose bananas with brown spots on the peel. This means they are sweet and soft inside. - Avoid green bananas: Green bananas are not ripe and will not mash well. - Use overripe bananas: If your bananas are very brown, that’s perfect! They will make your bread taste even better. Using ripe bananas ensures your Cookie Butter Banana Bread is moist and delicious. Enjoy baking! Start by preheating your oven to 350°F (175°C). Grease a 9x5-inch loaf pan with butter or non-stick spray. Set it aside for later use. This step is key to ensure your banana bread comes out easily after baking. Next, take your ripe bananas. You want them to be very soft. Mash them in a bowl until they are smooth. This helps create a nice texture in your bread. Now, add 1 cup of creamy cookie butter to the bananas. Stir in 1/2 cup of granulated sugar and 1/4 cup of packed brown sugar. Mix this well until it is smooth. Now, it’s time for the eggs. Crack 2 large eggs into your banana mixture. Whisk them in until they blend well. Your mixture should look creamy and inviting. Next, drizzle in 1/2 cup of melted butter and 1 teaspoon of pure vanilla extract. Stir gently to combine all the liquids. In a separate bowl, whisk together 1 teaspoon of baking soda, 1/2 teaspoon of salt, and 1 ½ cups of all-purpose flour. If you want warmth, add 1/2 teaspoon of ground cinnamon. Mixing these dry items helps to spread them evenly in the batter. Gradually add the dry mix to the wet ingredients. Stir gently until you see no dry flour. Avoid overmixing, as this can make your bread tough. If you love sweets, fold in 1/2 cup of chocolate chips now for a tasty surprise in every slice. Pour the batter into your greased loaf pan. Use a spatula to smooth the top for an even bake. Place the pan in your preheated oven and bake for 60-70 minutes. To check if it’s done, insert a toothpick into the center. If it comes out clean, your banana bread is ready. Once baked, let the bread cool in the pan for about 10 minutes. After that, gently transfer it to a wire rack. Let it cool completely before slicing. Enjoy the warm, sweet aroma filling your kitchen! For the best banana bread, use ripe bananas. They should be brown and soft. This ripeness gives the bread a rich flavor. Mash the bananas well until smooth. This prevents lumps. Mix the wet and dry ingredients just until combined. Overmixing makes the bread tough. You want a light, fluffy texture. One common mistake is using cold eggs. Always use room temperature eggs. They mix better and help the batter rise. Another mistake is not measuring flour correctly. Too much flour can lead to a dry loaf. Use the spoon and level method for accurate measurement. Also, do not skip the baking soda. It is key for rising. Slice the banana bread and serve warm. A light dusting of powdered sugar adds charm. For a special treat, drizzle cookie butter on each slice. You can also add a scoop of ice cream for dessert. This makes a sweet combo. Enjoy your banana bread with coffee or tea for a cozy snack! {{image_4}} You can easily make this recipe nut-free. Simply skip any nuts and use creamy cookie butter. This keeps your banana bread smooth and delicious without nuts. If you want crunch, add some seeds like sunflower or pumpkin seeds. They add a nice texture without nuts. To make the banana bread gluten-free, swap the all-purpose flour for a gluten-free flour blend. Most blends work well in baking. Just make sure it has a good mix of starches and protein. You may need to add a bit of xanthan gum if your blend does not have it. This will help the bread hold together. You can play with flavors in banana bread. Try adding spices like nutmeg or cardamom for warmth. You can also mix in dried fruits like raisins or cranberries. For a twist, use different cookie butters, like speculoos or chocolate cookie butter. Each will give a unique taste to your bread, making it fun to try new things! To keep your cookie butter banana bread fresh, store it properly. Wrap the bread in plastic wrap. This helps retain moisture. Place the wrapped bread in an airtight container. This way, it stays soft and tasty. You can keep it at room temperature for up to three days. If you want it to last longer, the fridge is a good option. Just remember, the fridge can make it a bit dry. Freezing is a great way to save banana bread for later. First, let the bread cool completely. Then, wrap it tightly in plastic wrap. You can also use aluminum foil for extra protection. After wrapping, place it in a freezer-safe bag or container. Label it with the date. Frozen banana bread can last for up to three months. When you're ready to eat it, just thaw it in the fridge overnight. To enjoy warm banana bread again, here’s how to reheat it. If you want to use the oven, preheat it to 350°F (175°C). Slice the bread and place it on a baking sheet. Heat for about 10-15 minutes. You can also use a microwave. Just heat each slice for 10-15 seconds. Keep an eye on it, so it doesn’t get too hot. Enjoy your banana bread warm with a spread of cookie butter! Yes, you can use crunchy cookie butter. It adds a fun texture to your banana bread. The bits of cookie will create a nice contrast against the soft bread. Just keep in mind that the flavor might be slightly different. If you love that crunch, go for it! To check if your banana bread is done, insert a toothpick into the center. If it comes out clean or with a few moist crumbs, it’s ready. If it has wet batter on it, bake for a few more minutes. Remember, the bread will continue to cook a bit after you take it out. Cookie butter banana bread stays fresh for about 3-5 days at room temperature. Keep it wrapped in plastic wrap or in an airtight container. If you want it to last longer, you can freeze it for up to three months. Just make sure to slice it first for easy thawing later! In this blog post, we dove into crafting delicious banana bread. We covered the key ingredients, step-by-step instructions, and tips for perfect texture. We explored variations to suit different diets and shared proper storage methods. Remember, ripe bananas make for the best flavor, and avoiding common mistakes leads to great results. Enjoy your banana bread warm or cooled, and don’t be afraid to try new flavors. Each bite should be a treat that makes you smile. Happy baking!

Cookie Butter Banana Bread Irresistible and Simple

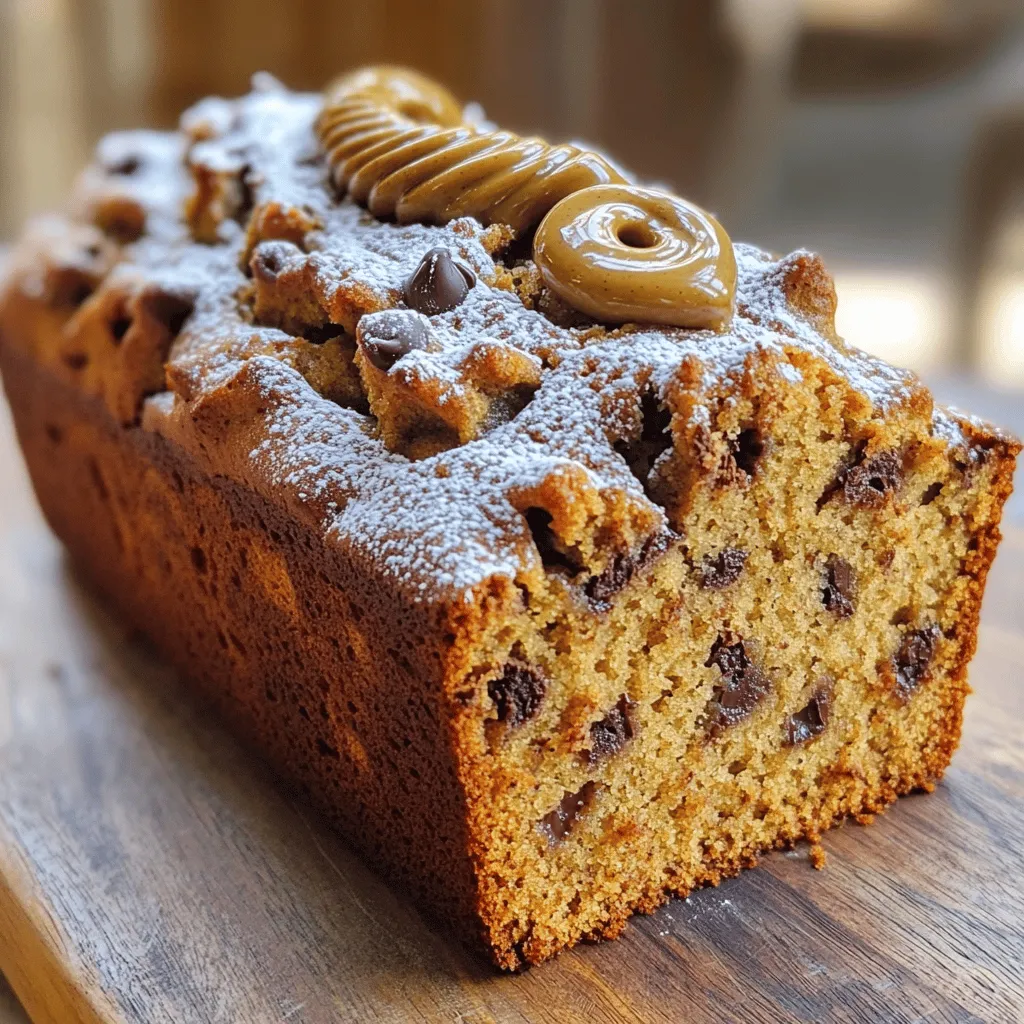
Welcome to your new favorite treat: Cookie Butter Banana Bread! This recipe combines the rich, sweet taste of cookie butter

- 1 bunch of fresh asparagus, trimmed - 3 tablespoons extra virgin olive oil - 3 cloves garlic, finely minced - Zest of 1 fresh lemon - Juice of 1 fresh lemon - 1 teaspoon sea salt - 1/2 teaspoon freshly ground black pepper - 1/2 teaspoon red pepper flakes (optional, for a spicy kick) - Grated Parmesan cheese (for serving, optional) - Lemon slices (for garnish) Each of these ingredients plays a role. The asparagus gives texture and taste. Olive oil adds richness. Garlic brings a strong flavor. Lemon zest and juice brighten the dish. Sea salt and black pepper enhance all the flavors. Red pepper flakes can add heat if you like spice. - Balsamic vinegar for a tangy twist - Fresh herbs like parsley or thyme for extra freshness - Toasted nuts like almonds or pine nuts for crunch Feel free to mix in what you love. Adding balsamic vinegar can give a sweet and tangy note. Fresh herbs add a burst of color and flavor. Nuts provide a nice crunch that contrasts the tender asparagus. - Look for bright green color and firm stalks. - Avoid asparagus with soft or wrinkled ends. - Choose thinner stalks for a more tender bite. Fresh asparagus is key to great taste. When choosing asparagus, feel the stalks. They should be firm and not bend easily. The tips should be tightly closed and not mushy. This ensures you get the best flavor and texture in your dish. Start by preheating your oven to 425°F (220°C). This heat helps the asparagus get crispy. Rinse the asparagus under cold water to clean it. Trim about 1-2 inches off the tough ends. Lay the asparagus out on a baking sheet lined with parchment paper. Make sure they are in a single layer for even cooking. In a small bowl, mix 3 tablespoons of extra virgin olive oil, 3 minced garlic cloves, and the zest and juice of 1 lemon. Add 1 teaspoon of sea salt, 1/2 teaspoon of black pepper, and red pepper flakes if you want some heat. Whisk the mixture until it blends well. This marinade adds great flavor to the asparagus. Drizzle the lemon garlic marinade over the asparagus. Toss it gently with your hands to coat every spear. Return the asparagus to the baking sheet in a single layer. Place it in the oven and roast for 15-20 minutes. Watch them closely. They should be tender but still firm, with crispy tips. Once they are ready, take them out and let them cool for a minute. If you like, sprinkle grated Parmesan cheese on top while warm. Serve the asparagus on a platter and add lemon slices for garnish. To get the best texture, cook the asparagus for 15-20 minutes. If you want it more tender, extend the time. If you like it crispier, reduce the time. Keep checking to find your perfect balance. Thin asparagus cooks faster than thick ones. Always watch them closely in the last few minutes. You can boost the flavor with other herbs. Try thyme, oregano, or basil for a new twist. A splash of balsamic vinegar adds depth too. For a kick, add more red pepper flakes. Mixing in some lemon zest right before serving brightens the dish. This makes it taste fresh and lively. To roast evenly, spread the asparagus in a single layer on the baking sheet. Avoid crowding the spears; they need space to cook well. Toss them in the lemon garlic mix until fully coated. This helps each spear absorb the flavors. Turn them halfway through cooking for an even roast. {{image_4}} You can make this dish even more exciting by adding herbs or spices. Fresh herbs like thyme or rosemary work well. You can also try dill for a fresh twist. If you want extra heat, add more red pepper flakes. A pinch of smoked paprika gives a nice flavor too. Feel free to mix and match until you find your favorite combination. If you have dietary needs, this recipe is easy to adapt. For a vegan option, skip the Parmesan cheese or use a dairy-free cheese. If you need a gluten-free version, this dish is naturally gluten-free. You can also use avocado oil instead of olive oil for a different taste. Lemon garlic roasted asparagus pairs well with many dishes. It complements grilled chicken or fish perfectly. You can also serve it with quinoa or rice for a hearty meal. For a light lunch, add it to a salad. Top with sliced almonds for added crunch. The bright flavors of this dish make it a great side for any occasion. To keep your Lemon Garlic Roasted Asparagus fresh, store it properly. Place leftovers in an airtight container. This will help maintain flavor and texture. You can keep it in the fridge for up to three days. Just remember to let it cool before sealing. When you are ready to enjoy your leftovers, reheating is key. Preheat your oven to 350°F (175°C). Spread the asparagus on a baking sheet. Heat for around 10 minutes until warm. This method helps keep the asparagus crispy. Avoid using a microwave, as it may make the asparagus soggy. Freezing can be an option if you have extra asparagus. First, let it cool completely. Then, spread the asparagus on a baking sheet in a single layer. Freeze for about two hours. Once frozen, transfer the spears to a freezer-safe bag. You can store it for up to three months. When ready to eat, thaw in the fridge overnight before reheating. Yes, you can use frozen asparagus. Thaw it first and pat it dry. The texture may be softer, but it will still taste great. You might want to roast it a bit longer to ensure it cooks through. This dish is very versatile. It pairs well with grilled chicken, fish, or pasta. You can also serve it with rice or quinoa for a complete meal. A light salad or crusty bread also makes a great side. To make it vegan, skip the Parmesan cheese. Use nutritional yeast for a cheesy flavor. The rest of the recipe is already dairy-free. Enjoy the bright flavors without any animal products! To make Lemon Garlic Roasted Asparagus, gather your ingredients first. You need: - 1 bunch of fresh asparagus, trimmed - 3 tablespoons extra virgin olive oil - 3 cloves garlic, finely minced - Zest of 1 fresh lemon - Juice of 1 fresh lemon - 1 teaspoon sea salt - 1/2 teaspoon freshly ground black pepper - 1/2 teaspoon red pepper flakes (optional) - Grated Parmesan cheese (for serving, optional) - Lemon slices (for garnish) Start by preheating your oven to 425°F (220°C). This high heat gives the asparagus a nice crisp. Rinse the asparagus under cold water, removing any dirt. Trim off the tough ends to keep it tender. Place the asparagus on a lined baking sheet in a single layer. Next, make the zesty marinade. In a bowl, mix olive oil, minced garlic, lemon zest, lemon juice, sea salt, black pepper, and red pepper flakes if you like heat. Whisk it well. Drizzle this mix over the asparagus. Toss gently to coat each spear. Arrange the asparagus again in a single layer on the baking sheet. Roast them in the oven for about 15-20 minutes. Watch for them to become tender but still slightly firm. The tips should be crispy. Once cooked, take the baking sheet out of the oven. Let it cool for a minute. If you want, sprinkle grated Parmesan cheese over the asparagus. Serve it on a plate with fresh lemon slices for a bright touch. This dish is not just tasty; it’s also healthy! A serving (about 1 cup) of Lemon Garlic Roasted Asparagus has roughly: - Calories: 80 - Fat: 6g - Carbohydrates: 8g - Protein: 2g - Fiber: 4g Asparagus is a great source of vitamins A, C, E, and K. It also provides folate and fiber, making it a nutritious addition to your meals. This recipe serves four people. You can enjoy it as a side dish or a light main course. - Prep Time: 10 minutes - Cook Time: 20 minutes - Total Time: 30 minutes This dish is quick and easy to make, perfect for busy weeknights or special occasions. In this article, we explored how to make Lemon Garlic Roasted Asparagus. You learned about key ingredients, optional mixes, and tips for fresh asparagus. I shared step-by-step instructions, including preheating, marinating, and roasting tips. You also discovered how to adjust cooking times, enhance flavors, and explore variations. Finally, I covered storage methods and answered your common questions. Now, enjoy making this tasty dish your own!

Lemon Garlic Roasted Asparagus Simple and Tasty Recipe

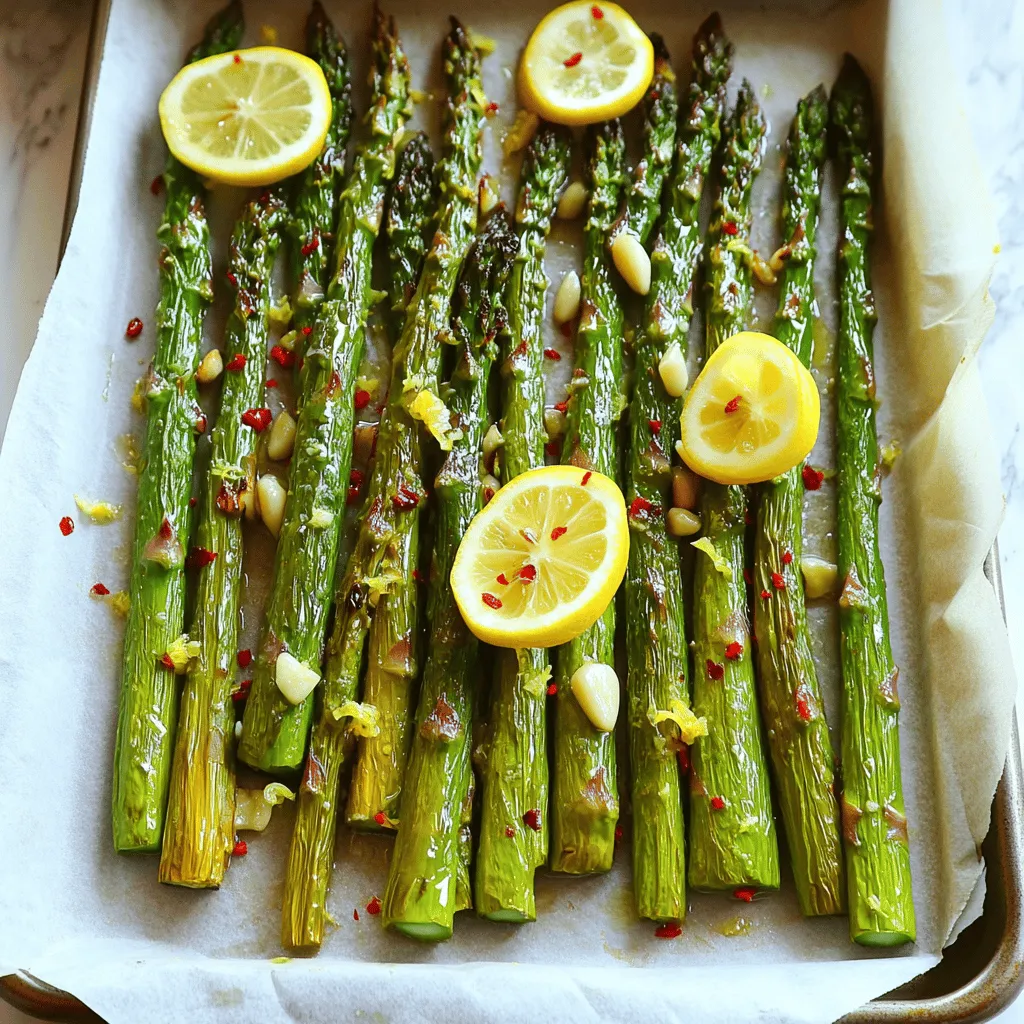
Do you want a simple, tasty side dish that impresses? Look no further than Lemon Garlic Roasted Asparagus! This easy

Older posts
Newer posts
← Previous Page1 … Page21 Page22 Page23 … Page120 Next →

dsad

© 2026 recipetorch • Built with GeneratePress

Our Policies

  • Copyright Policy
  • Cookie Policy
  • GDPR Policy
  • Privacy Policy
  • Disclaimer
  • Terms Of Use

More Information

  • Home
  • About
  • Contact
  • Appetizers
  • Dessert
  • Dinner
  • Drinks
©2026, recipetorch About Back To Top