Skip to content
DisclaimerTerms Of UseGDPR PolicyCookie Policy

recipetorch

  • Home
  • Drinks
  • Appetizers
  • Dinner
  • Dessert
  • About
  • Contact
  • Privacy Policy
DisclaimerTerms Of UseGDPR PolicyCookie Policy

Nicole

- 1 cup green or brown lentils, thoroughly rinsed - 1 can (15 oz) butter beans, drained and rinsed - 2 cups fresh spinach, roughly chopped - 1 medium onion, finely diced - 2 cloves garlic, minced - 2 medium carrots, peeled and diced - 1 celery stalk, diced - 1 teaspoon ground cumin - 1 teaspoon smoked paprika - Sea salt and freshly ground black pepper to taste - 1 tablespoon extra virgin olive oil - 1 tablespoon fresh lemon juice This soup is simple and healthy. It uses lentils and butter beans as the base. Lentils pack a protein punch and are rich in fiber. Butter beans add creaminess and flavor. Fresh spinach gives the soup a bright green color and vitamins. Use fresh vegetables for the best taste. Onion and garlic add depth. Carrots and celery give sweetness and crunch. For seasonings, ground cumin and smoked paprika bring warmth and warmth. A little sea salt and black pepper enhance flavors. Olive oil adds richness. Fresh lemon juice gives a nice tang and freshness. Gather these ingredients to create a nourishing bowl of soup. Each bite is packed with flavor and nutrition. You will love how easy this recipe is! {{ingredient_image_2}} 1. Start by heating one tablespoon of extra virgin olive oil in a large pot over medium heat. 2. Add one finely diced medium onion and two minced garlic cloves. Sprinkle in a pinch of sea salt. Sauté for about five minutes. The onion should turn soft and clear. 3. Next, add two diced carrots and one diced celery stalk. Stir these veggies for another five minutes. This helps them soften and build flavor. 1. Now, sprinkle one teaspoon of ground cumin and one teaspoon of smoked paprika into the pot. Stir for one minute. This lets the spices release their wonderful aromas. 2. Pour in one cup of thoroughly rinsed green or brown lentils and four cups of vegetable broth. Turn the heat up to bring it to a boil. 3. Once boiling, reduce the heat to low, cover the pot, and let it simmer for about 25 minutes. The lentils should be tender but not mushy. 1. Gently fold in one can of drained and rinsed butter beans and two cups of roughly chopped fresh spinach. Stir carefully to mix. 2. Cover the pot and simmer for another five minutes. The spinach will wilt, and the beans will heat through. 3. Remove the pot from heat. Add one tablespoon of fresh lemon juice. Taste the soup and adjust the sea salt and black pepper as needed. 4. Serve the soup hot in bowls, garnished with chopped fresh parsley. Enjoy with a slice of crusty bread for a perfect meal. - Adjusting seasoning: Always taste your soup before serving. If it lacks flavor, add more sea salt or black pepper. A splash of lemon juice brightens the taste. - Using fresh herbs: Fresh herbs like parsley or cilantro can boost the flavor. Add them right before serving for the best taste. - Tips for sautéing vegetables: Start with a hot pot to sear the onions. This brings out their sweetness. Stir often to avoid burning, and add a pinch of salt to help them soften. - Best practices for lentil cooking: Rinse lentils well to remove dust. Simmer them gently; this keeps them intact and prevents mushiness. Check for doneness after 25 minutes. - Accompaniments like bread: A slice of crusty bread pairs well with the soup. It’s perfect for dipping and adds texture. - Presentation ideas: Ladle the soup into bowls and sprinkle with extra parsley or smoked paprika. This makes the dish look fresh and inviting. Pro Tips Enhance Flavor: Consider sautéing the garlic and onion until golden brown for a deeper flavor profile. Texture Variation: For a creamier soup, blend a portion of the soup and then mix it back in with the rest. Herb Infusion: Add fresh herbs such as thyme or dill during the last few minutes of cooking for an aromatic touch. Storage Tips: This soup stores well; keep it in an airtight container in the fridge for up to 4 days or freeze for longer storage. {{image_4}} You can easily switch up the legumes in this soup. Try chickpeas or black beans for a new taste. They add different textures and flavors. If you want different greens, consider kale or Swiss chard. Both will give a new twist while still being healthy. This soup is great for everyone. If you want a vegetarian version, you’re in luck; it’s already vegetarian. For a vegan option, just ensure your broth is plant-based. If you are gluten-free, this soup is safe to eat, as all the ingredients are gluten-free. To spice things up, add a pinch of cayenne or red pepper flakes. This will give your soup a nice kick. You can also mix in other veggies like zucchini or bell peppers. Just remember to chop them small so they cook well with the rest. To store leftovers, let the soup cool first. Then, pour it into an airtight container. It keeps best in the fridge for 3 to 4 days. For best taste, eat within this time. For keeping fresh, always cover the container tightly. Use glass or BPA-free plastic containers. Label with the date so you know when you made it. This helps you keep track. You can freeze this soup easily. First, let it cool completely. Then, use freezer-safe containers or bags. Leave some space for expansion. This soup can stay fresh for up to 3 months in the freezer. When you want to eat it, move it to the fridge overnight to thaw. You can also thaw it in the microwave. Reheat in a pot on medium heat. Stir often until it's hot all the way through. In the fridge, the soup lasts 3 to 4 days. In the freezer, it can last 3 months. Watch for signs of spoilage. If it smells sour or looks discolored, toss it out. If you see mold, do not eat it. Always trust your senses! Yes, you can make this soup ahead of time. Meal prep saves you time on busy days. You can store it in the fridge for up to four days. The flavors will deepen as it sits. Just reheat it on the stove or in the microwave. This is a great way to enjoy healthy meals without fuss. If you want a thicker soup, use a few easy tips. You can blend part of the soup. Just take out a cup, blend it, and stir it back in. Another option is to add more lentils. Cook them longer until they break down. You’ll enjoy a heartier texture! This soup pairs well with many sides. Consider crusty bread for dipping. A fresh salad balances the meal nicely. You can also serve it with a dollop of yogurt or sour cream. These additions enhance the flavors and make it more filling. Enjoy experimenting with your favorite sides! We covered a simple lentil soup recipe, outlining its key ingredients, cooking steps, and storage tips. You can adjust flavors and swap ingredients based on your taste. Remember to explore variations to keep things fresh and exciting. This soup is easy to make and perfect for anyone, whether you're a beginner or an expert cook. With the right techniques, you'll create a tasty meal that feels warm and satisfying. Trust me; this soup will become a favorite in your kitchen. Enjoy cooking and sharing this hearty dish!

Spinach Lentil Butter Bean Soup Simple and Healthy Recipe

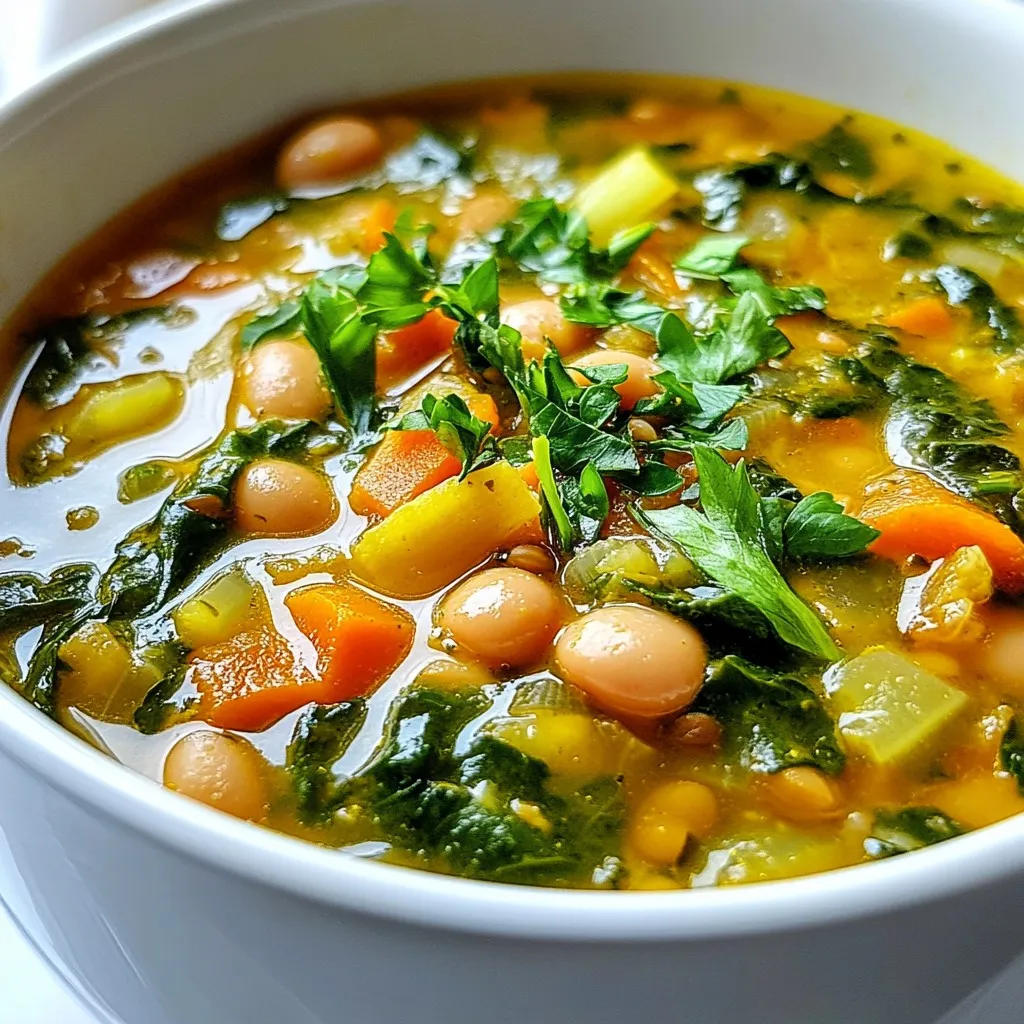
Looking for a warm, filling dish that’s packed with nutrients? This Spinach Lentil Butter Bean Soup is your answer! With

- 4 ears of fresh corn, husked - 4 tablespoons olive oil - 1 teaspoon chili powder - 1/2 teaspoon smoked paprika - 1/4 teaspoon cayenne pepper (adjust based on your spice preference) - Zest of 1 lime - Juice of 2 limes - Salt and pepper, to taste - 1/4 cup crumbled queso fresco or cotija cheese - Fresh cilantro leaves, for garnish - Grill - Basting brush - Mixing bowl - Whisk - Tongs {{ingredient_image_2}} First, heat your grill to medium-high. This step is key to getting nice grill marks. A hot grill helps the corn cook evenly and develop flavor. Make sure it is ready before you start. In a bowl, mix olive oil, chili powder, smoked paprika, and cayenne pepper. Add lime zest and lime juice to this blend. Don’t forget to sprinkle in salt and pepper too. Whisk all the ingredients until smooth. This marinade will give your corn a zesty kick. Take your husked corn and brush it well with the marinade. Coat each ear on all sides. Set aside some marinade for later. Place the corn on the hot grill. Grill each ear for 10 to 15 minutes. Turn them often to ensure they cook well and get those lovely grill marks. The corn is done when it feels tender. In the last few minutes, use your reserved marinade to baste the corn. This adds flavor and keeps it moist. Once cooked, carefully remove the corn from the grill. Let it cool on a plate. If you like, sprinkle some crumbled queso fresco or cotija cheese while it’s warm. Lastly, add fresh cilantro leaves for color and flavor. Enjoy your savory treat! For perfect grilled corn, preheat your grill to medium-high heat. This heat helps to get those lovely grill marks. Place the corn directly on the grill. Turn the ears every few minutes. This way, they cook evenly. Grill for 10 to 15 minutes until tender. Use tongs to handle the corn safely. Adjusting spice levels is key to your taste. Start with one teaspoon of chili powder. If you like heat, add more cayenne pepper slowly. Taste the marinade before brushing it on the corn. You can always add spice, but it’s hard to take it away. To enhance flavors, use fresh lime juice and zest. They add brightness to the corn. Don’t skip the queso fresco or cotija cheese. It adds a creamy taste that balances the spice. Fresh cilantro brings a nice herbal note. For a fun twist, add a sprinkle of smoked paprika on top before serving. This adds a savory touch that is hard to resist. Pro Tips Choose Fresh Corn: Always select the freshest corn available for the best flavor and texture. Look for bright green husks and plump kernels. Customize the Spice Level: Adjust the amount of cayenne pepper in the marinade to suit your heat preference, making it milder or spicier as desired. Grill Marks Matter: For those beautiful grill marks, make sure to turn the corn every few minutes for an even char and to avoid burning. Serve Immediately: Grilled corn is best enjoyed fresh off the grill. Serve it right away for optimal flavor and tenderness. {{image_4}} You can change the flavor of your corn by trying different spices. For a smoky taste, add more smoked paprika. If you prefer a tangy kick, mix in some lime juice and zest from another citrus, like lemon. You can also use garlic powder or onion powder for depth. For a sweet note, sprinkle some brown sugar into the marinade. Feel free to mix and match spices based on what you enjoy. While queso fresco and cotija cheese work well, you can use other cheeses too. Feta cheese adds a salty bite, while Parmesan gives a nutty flavor. For a creamy touch, try using goat cheese. You can also skip the cheese for a lighter version. Just make sure to garnish with fresh herbs for flavor. Grilled corn pairs well with many dishes. Serve it alongside grilled meats, tacos, or burgers. It makes a great side for summer barbecues. You can also turn it into a salad by cutting the kernels off the cob and mixing them with avocado and tomatoes. For a fun twist, try serving it with a spicy dipping sauce or a drizzle of ranch dressing. Enjoy it with drinks like lemonade or iced tea for a refreshing meal. After grilling, let the corn cool down. Place any leftover corn in a container. Cover it tightly with a lid or plastic wrap. Store it in the fridge. It will stay fresh for up to three days. When you're ready to eat the leftover corn, you can reheat it easily. Microwave the corn for one to two minutes. You can also grill it again for a few minutes. This will warm it up and give it that nice grilled flavor. If you have more corn than you can eat, freezing is a great idea. Wrap each ear of corn in plastic wrap. Then, place them in a freezer bag. Make sure to remove as much air as you can. You can freeze the corn for up to three months. When you want to use it, thaw it in the fridge overnight before reheating. Yes, you can use frozen corn. However, fresh corn gives the best taste and texture. If you use frozen corn, thaw it first. Then, follow the same steps to coat and grill it. The grilling time may be shorter. Keep an eye on it to avoid overcooking. To make this corn vegan, skip the cheese. Use plant-based cheese or leave it out entirely. The marinade is already vegan-friendly. Just focus on the chili and lime flavors. You can also add nutritional yeast for a cheesy flavor without dairy. Grilled corn pairs well with many sides. Here are some ideas: - Grilled veggies like peppers and zucchini - A fresh salad with avocado and tomatoes - Spicy black bean dip with tortilla chips - Rice or quinoa with lime and cilantro - Barbecued meat or veggie burgers for a complete meal These sides enhance the flavors and make for a fun meal! Grilled corn is simple and fun to make. We covered all the steps, from choosing ingredients to grilling techniques. You learned about marinades and cooking tips for the best flavor. Don't forget the variations to suit your taste and the best ways to store leftovers. Grilled corn adds joy to any meal. I hope you feel ready to enjoy this tasty treat!

Chili Lime Grilled Corn on the Cob Savory Treat

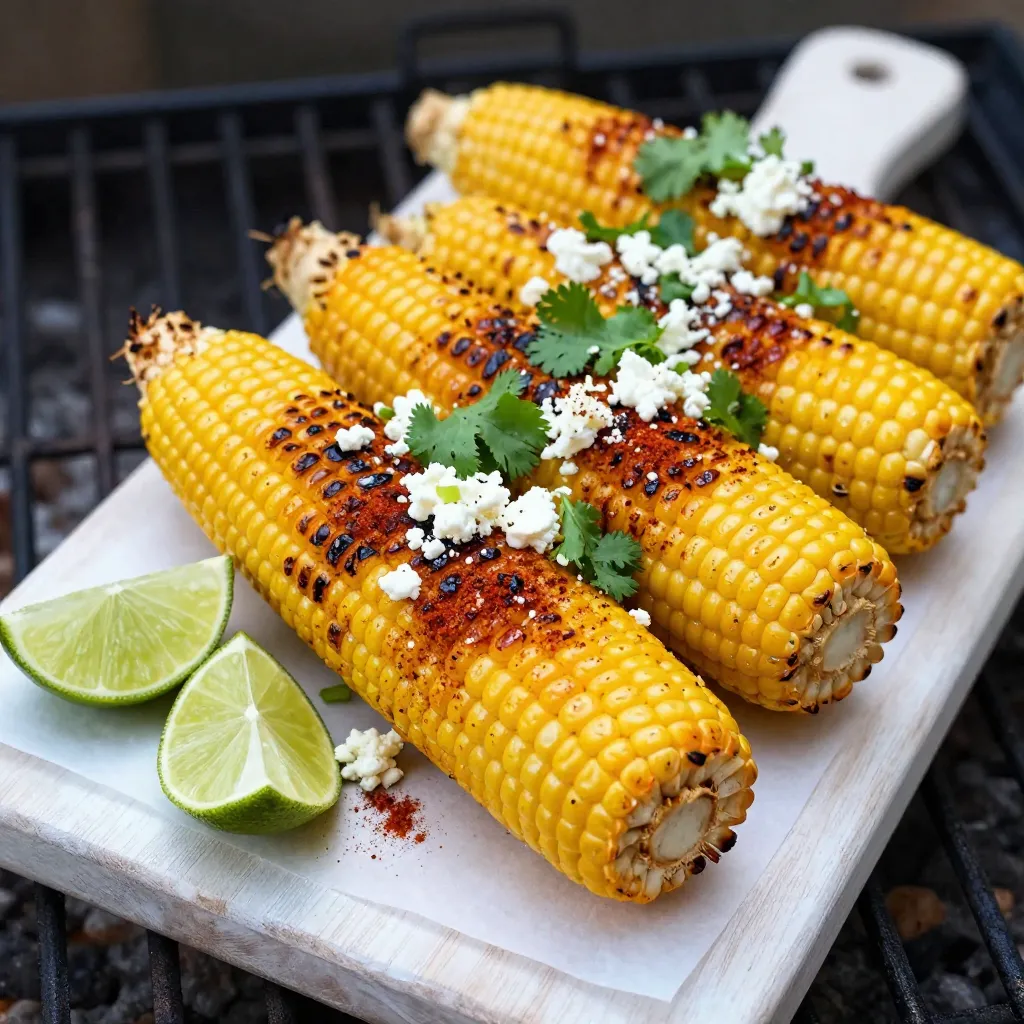
Ready to elevate your summer cookouts? My Chili Lime Grilled Corn on the Cob is a savory treat you won’t

- 1 lb ground chicken - 1/2 cup breadcrumbs - 1/4 cup grated Parmesan cheese - 1/4 cup finely chopped fresh parsley - 1 large egg - 2 cloves garlic, minced - 1 teaspoon fresh ginger, grated - Salt and black pepper to taste - 1 cup pineapple chunks (either fresh or canned) - 1 bell pepper (red or yellow), diced into small pieces - 1/2 cup granulated sugar - 1/2 cup ketchup - 1/4 cup apple cider vinegar - 1 tablespoon soy sauce (or coconut aminos for a lighter alternative) - 1 tablespoon cornstarch (mixed with 2 tablespoons cold water for thickening the sauce) You can swap ground chicken for ground turkey. Use gluten-free breadcrumbs if needed. For a dairy-free option, skip the Parmesan cheese or use a vegan alternative. Instead of fresh parsley, try fresh cilantro for a different flavor. If you want a spicy kick, add red pepper flakes to the sauce. For a fruity twist, consider adding chopped mango with the pineapple. Each serving contains about 350 calories. You will find around 22 grams of protein, which helps build muscles. The meal also has 27 grams of carbs and 15 grams of fat. It offers a good source of vitamins and minerals from the bell pepper and pineapple. This dish can fit into many diets, making it a great family meal choice. {{ingredient_image_2}} To start, preheat your oven to 400°F (200°C). Then, grab a large mixing bowl. In it, combine 1 pound of ground chicken with 1/2 cup of breadcrumbs, 1/4 cup of grated Parmesan cheese, and 1/4 cup of finely chopped fresh parsley. Next, add in 1 large egg, 2 minced garlic cloves, and 1 teaspoon of grated fresh ginger. Don’t forget to season with salt and black pepper. Mix everything well until fully combined. Now, use your hands to shape the mixture into small meatballs. Aim for each one to be about 1 inch in diameter. Once shaped, place them on a lined baking sheet, leaving some space between each meatball. Bake these in your preheated oven for around 20 minutes. You want them to be cooked through and golden brown on the outside. While the meatballs bake, let’s prepare the sweet and sour sauce. In a medium saucepan, combine 1 cup of pineapple chunks, 1 diced bell pepper, 1/2 cup of granulated sugar, 1/2 cup of ketchup, 1/4 cup of apple cider vinegar, and 1 tablespoon of soy sauce. Set the pan over medium heat and let it simmer gently. Stir occasionally for about 5 minutes. After that, mix 1 tablespoon of cornstarch with 2 tablespoons of cold water. Stir this mixture into the sauce to thicken it. Cook for another 2-3 minutes, until the sauce reaches your desired thickness. Once the meatballs are done, add them to the saucepan. Toss them gently in the sauce until they are fully coated. Serve the sweet and sour chicken meatballs warm over rice or noodles, and enjoy! To get the best texture for your meatballs, start with ground chicken. The meat should be fresh, not frozen. Mix it gently with breadcrumbs, Parmesan, and parsley. Avoid overmixing, as that can make them tough. Use your hands to form small meatballs, about one inch wide. Make sure they are even in size for even baking. For a smooth sauce, mix pineapple, bell pepper, sugar, ketchup, and vinegar in a saucepan. Heat it over medium until it simmers. Stir it often to prevent sticking. When the sauce simmers, add the cornstarch mixture slowly. This will help thicken your sauce. Cook for a few more minutes until it looks glossy and thick. Serve your sweet and sour meatballs warm. Add them to a platter or individual bowls. A bed of rice or noodles makes a great base. Drizzle extra sauce over the meatballs for more flavor. Garnish with fresh parsley for a pop of color. This dish not only tastes great but also looks beautiful on the table! Pro Tips Use Fresh Ingredients: Fresh chicken and vegetables enhance the flavor and texture of the meatballs. Opt for fresh pineapple for a burst of natural sweetness. Don't Overmix: When combining the meatball ingredients, mix just until combined. Overmixing can lead to tough meatballs. Adjust the Sauce: Feel free to tweak the sweetness or acidity of the sauce by adjusting the sugar or vinegar to match your taste preference. Pair with Rice: Serving the meatballs over rice or noodles not only makes for a complete meal but also helps soak up the delicious sauce. {{image_4}} You can change the ground chicken to fit your taste. Try ground turkey for a lighter meal. Ground beef adds a rich flavor, while ground pork offers a nice twist. If you want a plant-based option, use lentils or chickpeas. Just mash them up and mix with the same ingredients. To make this dish gluten-free, swap breadcrumbs for gluten-free oats or crushed nuts. You can also use ground flaxseed as a binder. For a low-carb version, use cauliflower rice instead of regular rice. This keeps the meal light and healthy while still being filling. You can change the flavor to match your cravings. Add chili flakes for a spicy kick. If you love sweet dishes, mix in mango or peaches for a fruity twist. For an Asian flair, use sesame oil instead of soy sauce. Each option brings a new taste that keeps your family excited at dinner. To store leftover sweet and sour chicken meatballs, place them in an airtight container. Make sure they cool down before you seal the container. This helps keep them fresh. You can keep them in the fridge for up to three days. Freezing is a great option for longer storage. First, let the meatballs and sauce cool completely. Then, place them in freezer-safe bags or containers. Remove as much air as possible. You can freeze them for up to three months. When you're ready to eat, thaw them in the fridge overnight. To reheat meatballs, you have a few options. The best way is in the oven. Preheat your oven to 350°F (175°C). Place the meatballs in a baking dish with a little sauce on top. Cover with foil and heat for about 15-20 minutes. You can also use the microwave. Heat them in short bursts, stirring in between, until hot. Enjoy them warm over rice or noodles! Yes, you can make these meatballs ahead of time. Prepare them and bake as usual. Let them cool, then place them in a container. Store in the fridge for up to three days. When you’re ready to eat, just heat them up with the sauce. This makes for an easy family meal on busy nights. The best way to serve sweet and sour chicken meatballs is warm. Place them on a platter or in individual bowls. They taste great over rice or noodles. You can also add extra sauce on top for more flavor. Garnish with parsley for a pop of color. This makes the dish look appealing and adds a fresh touch. Absolutely! You can use any sauce you like. If you prefer a spicy kick, try a sweet chili sauce. For a tangy twist, use BBQ sauce. You can also mix in some honey or teriyaki sauce for different flavors. Experiment with what you enjoy most. This recipe is flexible to fit your taste buds. This blog post covered how to make delicious Sweet and Sour Chicken Meatballs. We shared ingredients, step-by-step instructions, and helpful tips. You learned how to customize flavors and make healthy swaps. Storing and reheating leftovers is simple too. In the end, enjoy these meatballs however you like. They’re easy to make and fun to share. Cooking should feel good and bring smiles to your table. Happy cooking!

Sweet & Sour Chicken Meatballs Easy Family Meal

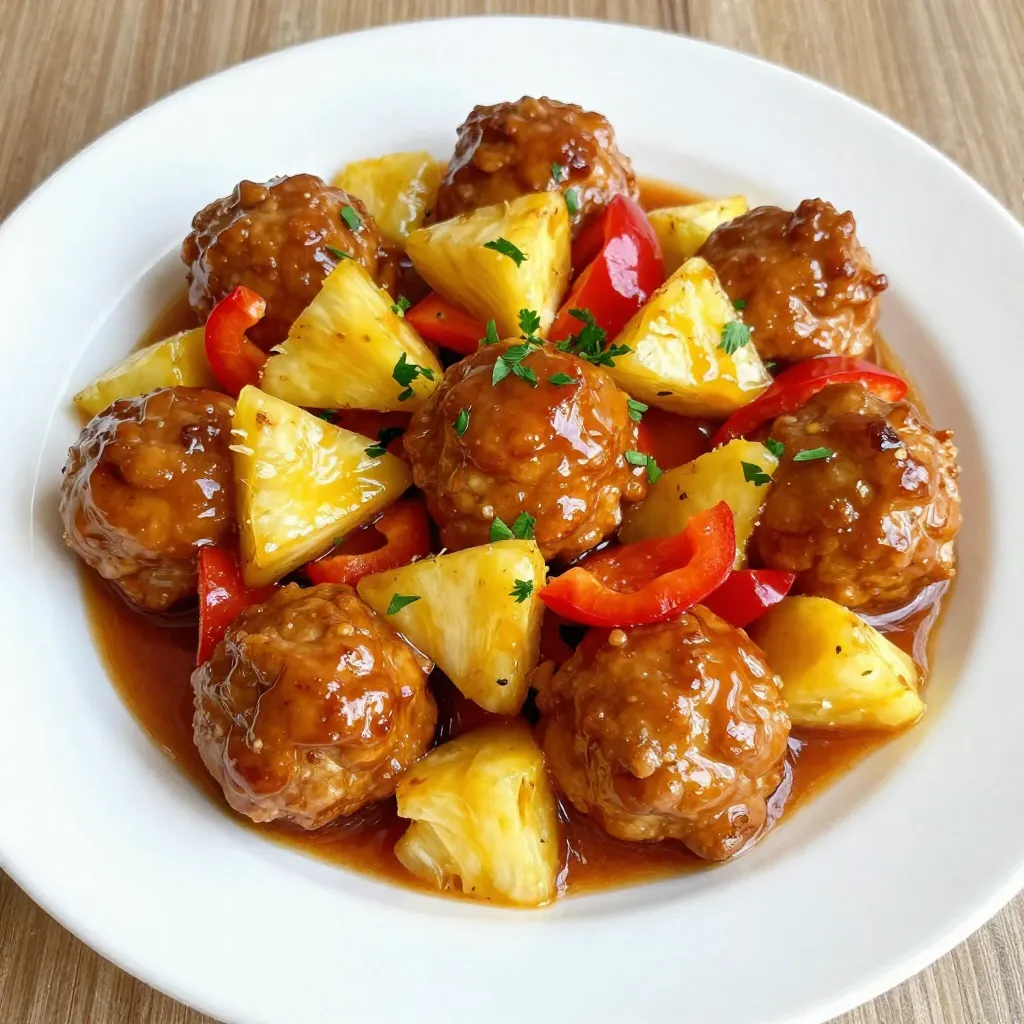
Looking for a fun and tasty family meal? Sweet & Sour Chicken Meatballs are the answer! With juicy meatballs drenched

For the best teriyaki chicken pineapple kabobs, gather these key ingredients: - 1 lb boneless chicken breast, cut into 1-inch chunks - 1 cup fresh pineapple, cut into 1-inch chunks - 1 bell pepper (either red or yellow), cut into 1-inch pieces - 1 small red onion, cut into wedges - 1/4 cup soy sauce - 2 tablespoons honey - 2 tablespoons rice vinegar - 1 tablespoon sesame oil - 2 garlic cloves, minced - 1 teaspoon fresh ginger, grated - Salt and pepper, to taste - Skewers (if using wooden skewers, soak in water for 30 minutes prior to use) These ingredients create a mix of sweet and savory flavors. The fresh pineapple adds a juicy burst that pairs well with the chicken. You can boost the flavor of your kabobs with these optional ingredients: - Cherry tomatoes for a juicy pop - Zucchini slices for extra veggies - Green onions for a mild onion flavor - Fresh cilantro for a fresh taste - Lime wedges for a zesty finish Adding these will make your kabobs even more colorful and fun. Feel free to mix and match! To make cooking easy, gather these tools: - Mixing bowl for the marinade - Whisk for mixing - Grill or grill pan for cooking - Skewers for assembling kabobs - Tongs for flipping kabobs - Meat thermometer to check doneness Having the right tools makes cooking smoother and more enjoyable. You'll love how easy it is to whip up these tasty kabobs. To start, you need to make a tasty marinade. In a mixing bowl, combine: - 1/4 cup soy sauce - 2 tablespoons honey - 2 tablespoons rice vinegar - 1 tablespoon sesame oil - 2 minced garlic cloves - 1 teaspoon grated fresh ginger Whisk these ingredients together until smooth. Next, add the chicken pieces and coat them well. Cover the bowl with plastic wrap or a lid. Place it in the fridge for 30 minutes or up to 2 hours. This wait helps the chicken absorb all the flavors. Once marinated, it’s time to build your kabobs. Grab your skewers. If you use wooden ones, soak them in water for 30 minutes. This step keeps them from burning. Begin threading the marinated chicken, pineapple chunks, bell pepper pieces, and red onion wedges onto the skewers. Alternate the colors and textures to make them look fun and bright. Now, preheat your grill to medium heat. This step helps cook the kabobs evenly. Remove the skewers from the marinade, letting extra marinade drip off. Season with salt and pepper to taste. Place the kabobs on the grill and cook for 10-12 minutes. Turn them occasionally to ensure they cook evenly. The chicken should reach an internal temperature of 165°F (75°C) and have a nice char. For extra flavor, brush the kabobs with leftover marinade during the last few minutes. Once done, let them rest for a few minutes. This step keeps the juices inside, making every bite delicious! To grill chicken well, start with even chunks. Cut your chicken breast into 1-inch pieces. This helps it cook evenly. Preheat your grill to medium heat. A hot grill seals in juices and gives nice grill marks. Use a meat thermometer to check the chicken. It should reach 165°F (75°C) to be safe. Flip the kabobs every few minutes. This ensures all sides get that perfect char. For great pineapple, use fresh fruit. Cut it into 1-inch pieces to match the chicken. You want the outside to caramelize while keeping the inside juicy. Place pineapple on the grill for about 5-7 minutes. Turn it halfway through. Watch for grill marks; this means it's close to done. Grilled pineapple tastes sweet and smoky, making it a perfect match for savory chicken. You can spice up your kabobs easily. Try adding different herbs and spices to the marinade. For a kick, add chili flakes or smoked paprika. You can also mix in fresh herbs like cilantro or basil. If you want a sweeter taste, add more honey. Experiment with flavor combinations that you enjoy. This is your chance to make the kabobs uniquely yours! {{image_4}} You can switch out chicken for other proteins. Try shrimp for a quick cook. Beef works great too. Cut it into bite-sized pieces. Pork tenderloin is another tasty option. Just remember to adjust cooking times. Each protein brings unique flavors to the kabobs. If you want a vegetarian kabob, skip the chicken. Use firm tofu instead. Cut it into cubes and marinate just like the chicken. You can also add more veggies. Try mushrooms, zucchini, or cherry tomatoes. These will add great color and flavor to your dish. While I love the teriyaki marinade, you can play with flavors. A sweet chili sauce adds a nice kick. For a tangy twist, try a lemon-garlic marinade. Just mix lemon juice, olive oil, and minced garlic. You can also use yogurt with spices for a creamy touch. To keep your leftover kabobs fresh, place them in an airtight container. You can also wrap them tightly in plastic wrap. Store the kabobs in the fridge for up to three days. Make sure they cool down before sealing. This helps keep the flavors intact. When you're ready to enjoy the kabobs again, use the oven or a grill. Preheat your oven to 350°F (175°C). Place the kabobs on a baking sheet and cover them with foil. Heat for about 10-15 minutes, or until warm. If using a grill, reheat them for about 5 minutes, turning often. This keeps them juicy and tasty. You can freeze the kabobs if you have extras. Wrap each one in plastic wrap, then place them in a freezer bag. Remove as much air as possible. They will stay fresh for about two months. When ready to eat, thaw them in the fridge overnight. Reheat as mentioned above for the best flavor. Yes, you can use chicken thighs. They stay moist and tender when cooked. Thighs also add rich flavor. Just cut them into 1-inch chunks like the breasts. This keeps the cooking time similar. You can marinate the chicken for 30 minutes to 2 hours. Longer marinating makes the chicken tastier. Just don’t exceed 2 hours, as it can get too salty. I find 1 hour gives a great flavor boost. Great side dishes include: - Steamed rice: A nice base to soak up the sauce. - Grilled veggies: They complement the kabobs' flavors well. - Asian slaw: Adds crunch and freshness to the meal. - Cucumber salad: A cool, refreshing side. These options balance the sweet and savory notes of the kabobs. To sum up, we explored the essential ingredients for teriyaki chicken pineapple kabobs. I shared steps for marinating the chicken, assembling the kabobs, and grilling them perfectly. Tips on grilling chicken and cooking pineapple made this dish a winner. We also discussed tasty variations and how to store leftovers properly. Remember, kabobs are versatile. Feel free to mix proteins or tweak flavors. Enjoy your cooking adventures, and savor every bite!

Teriyaki Chicken Pineapple Kabobs Flavorful and Fun

Are you ready to take your summer grilling to the next level? Teriyaki Chicken Pineapple Kabobs are not just a

- 250g tagliatelle pasta - 200g mixed mushrooms (cremini, shiitake, oyster), sliced - 300ml heavy cream - Fresh thyme or 1 teaspoon dried thyme - 50g grated Parmesan cheese - Salt and pepper to taste - 1 tablespoon olive oil - Fresh parsley, chopped (for garnish, optional) In this creamy mushroom thyme tagliatelle, I use tagliatelle pasta because it holds sauce well. The mixed mushrooms add depth and richness. I recommend using cremini, shiitake, and oyster mushrooms. They bring unique flavors to the dish. Heavy cream is key to achieving that luscious texture. It makes the sauce rich and smooth. For seasoning, I love fresh thyme, but dried thyme works too. Parmesan cheese adds a salty, nutty flavor that elevates the dish. Finally, salt and pepper balance out all the tastes. I often include olive oil to sauté the onions and mushrooms, adding a hint of richness. Fresh parsley makes a lovely garnish and adds a pop of color. You can skip it if you prefer. Just remember to have fun with the ingredients! Start by filling a large pot with water. Add a generous pinch of salt to it. Bring the water to a boil over high heat. Once it’s boiling, add 250g of tagliatelle pasta. Cook it according to the package instructions. You want the pasta to be al dente, which usually takes about 8-10 minutes. After cooking, drain the pasta but save 1 cup of the starchy pasta water for later. In a large skillet, heat 1 tablespoon of olive oil over medium heat. When the oil is hot, add 1 finely chopped medium onion. Sauté the onion for about 3-4 minutes until it turns translucent and soft. Next, add 3 minced garlic cloves and 200g of sliced mixed mushrooms. You can use cremini, shiitake, or oyster mushrooms. Sauté this mixture for about 7-10 minutes. Stir occasionally until the mushrooms turn golden brown and their moisture evaporates. With the mushrooms cooked, pour in 300ml of heavy cream. Also, sprinkle in 1 tablespoon of chopped fresh thyme. Stir everything well to mix the ingredients. Allow the mixture to simmer for about 5 minutes. This lets the sauce thicken slightly and develop its flavor. Now, it's time to combine. Gently fold the cooked tagliatelle into the creamy sauce. If the sauce seems too thick, use a splash of the reserved pasta water to adjust the texture. Toss the pasta thoroughly to ensure it’s evenly coated in the rich, creamy sauce. Next, stir in 50g of grated Parmesan cheese until it melts and blends well. Taste the sauce and adjust the seasoning with salt and pepper based on your preference. Let the dish cook for another 2 minutes over low heat. This ensures everything is warm, and the flavors meld beautifully. If you like, you can garnish with fresh parsley before serving. - Best practices for cooking tagliatelle: Use a large pot for boiling water. Add a good pinch of salt to the water. This helps flavor the pasta. Stir the tagliatelle often to prevent sticking. Cook until al dente, about 8-10 minutes. This gives you a nice bite. Remember to save some pasta water before draining it. - Tips for sautéing mushrooms perfectly: Choose a mix of mushrooms for better flavor. Clean them with a damp cloth instead of rinsing. Heat olive oil in a large skillet over medium heat. Add onions first, cooking until soft and clear. Then, add garlic and mushrooms. Stir often and let them cook until golden brown. This helps them lose moisture and adds depth. - Substitutions for ingredients: You can use any pasta you like, not just tagliatelle. If you can’t find fresh thyme, use dried thyme. It works well too. For a lighter sauce, swap heavy cream with half-and-half or a plant-based cream. - Additional herbs or spices to consider: Consider adding a pinch of nutmeg for warmth. Fresh basil or parsley can add a fresh twist. You might also try a bit of red pepper flakes for heat. - Presentation tips for a gourmet look: Serve the tagliatelle in shallow bowls. Sprinkle extra Parmesan on top and drizzle with olive oil. A fresh sprig of thyme or some parsley can add a pop of color. This makes the dish look fancy and inviting. - Suggested pairings with side dishes or wines: A simple green salad pairs well with the rich pasta. Try a crisp white wine like Pinot Grigio or Sauvignon Blanc. These wines balance the creaminess nicely. A light, fruity red like Pinot Noir can also work if you prefer red. {{image_4}} You can easily make this dish vegetarian. Just add more vegetables like spinach, bell peppers, or zucchini. These veggies give extra color and flavor. You can also swap the heavy cream for plant-based cream. This keeps the dish creamy while making it dairy-free. If you want to add protein, chicken or shrimp works great. For chicken, cut it into bite-sized pieces. Cook it for about 5-7 minutes in the skillet before adding the onions. For shrimp, add them after the garlic and cook until pink, around 3-4 minutes. This makes the meal more filling and hearty. To make this dish gluten-free, look for gluten-free pasta. Brands often use rice or corn flour. Cook it just like regular pasta. You can also use alternative flours to make your own pasta. Almond flour or chickpea flour are good options. This way, everyone can enjoy creamy mushroom thyme tagliatelle! To store leftovers, let the dish cool first. Place it in an airtight container. This keeps it fresh and tasty. You can keep it in the fridge for up to three days. After that, the flavor may fade. Always check for any signs of spoilage before eating. You can freeze creamy mushroom thyme tagliatelle for later use. To do this, let it cool completely. Then, transfer it to a freezer-safe container. Label it with the date to keep track. It will stay good for about one month. When ready to eat, thaw it overnight in the fridge. Reheat it gently in a skillet over low heat. Add a splash of cream or pasta water to bring it back to life. Stir until it’s hot and creamy again. If you have leftover creamy mushroom sauce, you can use it in many ways. Try it on baked potatoes for a tasty topping. You can also mix it with cooked rice or quinoa. This adds a rich flavor to your grains. Another fun idea is to use it in a casserole. Just layer it with veggies or proteins, then bake. You can also serve it as a dip with bread or crackers. Get creative and enjoy every bite! This dish takes about 30 minutes to make. You need 10 minutes to prep and 20 minutes to cook. It is quick and easy, perfect for a weeknight meal. Yes, you can use many types of mushrooms. I recommend cremini, shiitake, or oyster mushrooms. Each type adds its own unique flavor. Cremini has a rich taste, shiitake adds earthiness, and oyster mushrooms bring a delicate sweetness. Yes, this recipe works well for meal prep. You can cook the tagliatelle and sauce ahead of time. Store them separately in the fridge. When you are ready to eat, just heat them together on the stove. You can pair this dish with a fresh green salad or garlic bread. A light white wine like Pinot Grigio matches well. You might also enjoy it with a side of steamed veggies for added color and nutrition. To make it dairy-free, use coconut cream or cashew cream instead of heavy cream. Nutritional yeast can replace Parmesan cheese for a cheesy flavor. Adjust the salt for taste, as these alternatives may change the flavor slightly. This creamy mushroom thyme tagliatelle is easy to make and delightful to eat. You learned about key ingredients like tagliatelle, heavy cream, and mixed mushrooms. I shared tips for perfect cooking, enhancing flavors, and serving suggestions. Consider variations, like vegetarian options or gluten-free pasta, to suit your taste. Finally, proper storage techniques help keep leftovers fresh. Enjoy making this dish, and feel free to experiment! Your kitchen adventures can lead to new favorites.

Creamy Mushroom Thyme Tagliatelle Rich and Easy Recipe

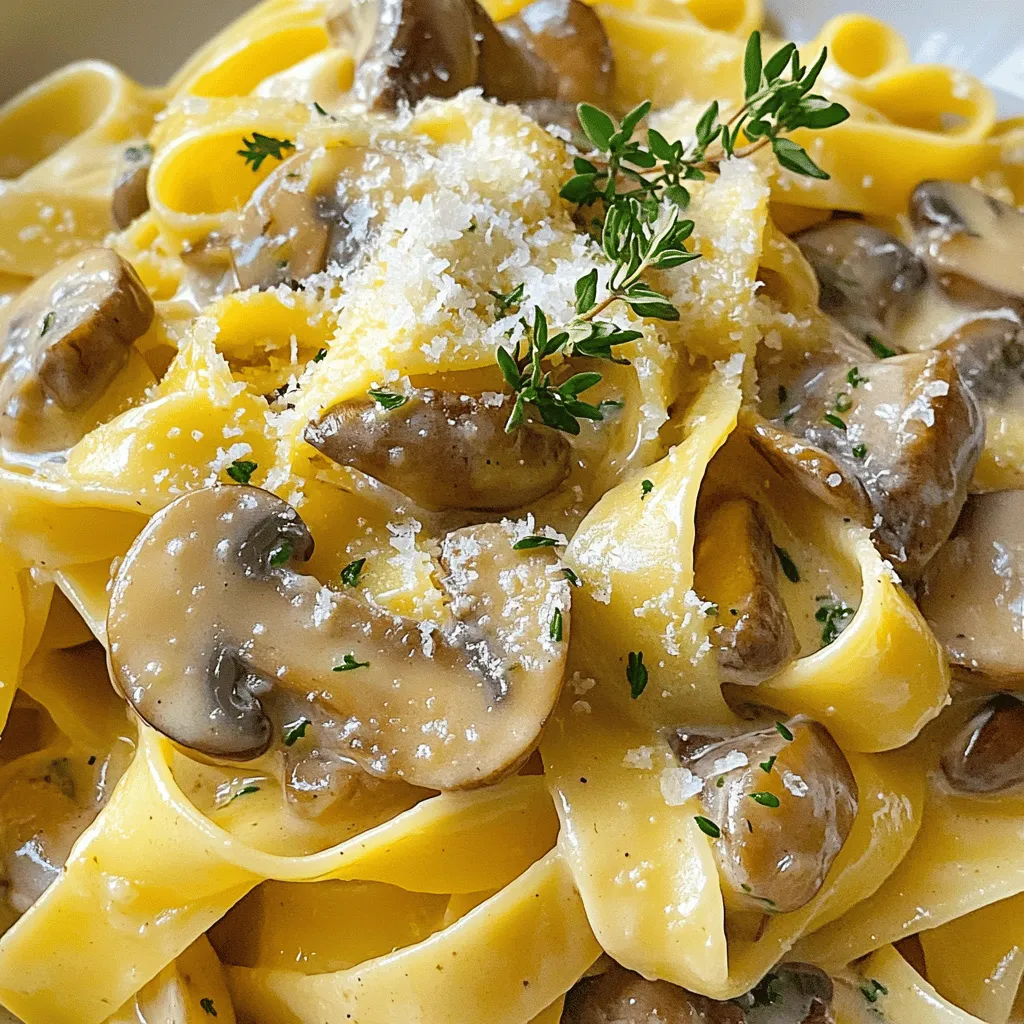
Are you ready to whip up a comforting dish that’s rich in flavor and easy to make? My Creamy Mushroom

To make Parmesan crusted chicken tenders, gather these ingredients: - 1 pound of chicken tenders - 1 cup of freshly grated Parmesan cheese - 1 cup of panko breadcrumbs - 2 large eggs - 1 tablespoon of Dijon mustard - 1 teaspoon of garlic powder - 1 teaspoon of onion powder - 1 teaspoon of Italian seasoning - Salt and freshly cracked black pepper, to taste - 1/4 cup of fresh parsley, finely chopped - Olive oil spray or melted butter for drizzling You can swap ingredients based on what you have: - Use shredded mozzarella instead of Parmesan for a milder flavor. - Replace panko breadcrumbs with regular breadcrumbs if needed. - If you don’t have Dijon mustard, try yellow mustard for a different twist. - Fresh herbs like basil or thyme can replace parsley for a unique taste. - Use egg substitutes like flaxseed meal mixed with water if you're vegan. When picking your ingredients, keep these tips in mind: - Choose fresh, high-quality chicken tenders for the best flavor and texture. - Opt for block Parmesan cheese and grate it yourself for maximum freshness. - Look for panko that is light and crispy; it gives the best crunch. - Check herbs for bright color and fresh smell; they enhance your dish. - Use extra virgin olive oil for drizzling; it adds rich flavor and healthy fats. 1. Start by preheating your oven to 425°F (220°C). This helps the chicken cook evenly. 2. Line a baking sheet with parchment paper. This makes cleanup quick and easy. 3. In a shallow bowl, whisk together two large eggs. Add Dijon mustard, garlic powder, onion powder, salt, and pepper. Mix until smooth. 4. In another shallow bowl, combine grated Parmesan cheese, panko breadcrumbs, Italian seasoning, salt, and pepper. Stir well to mix these ingredients. 5. Take a chicken tender and dip it into the egg mixture. Let excess egg drip off. 6. Next, coat the tender with the Parmesan-breadcrumb mix. Press down lightly to help it stick. 7. Place the coated chicken tenders on the lined baking sheet in a single layer. 8. For an extra crispy finish, spray the tops with olive oil or drizzle melted butter. 9. Place the baking sheet in the oven. Bake for about 15-20 minutes. Look for a golden brown color. 10. Use a meat thermometer to check if the chicken is at 165°F (74°C). 11. Once done, remove from the oven. Let the tenders rest for a few minutes to keep them juicy. 12. Just before serving, sprinkle fresh parsley on top for a pop of color and flavor. Using a meat thermometer is key. Insert it into the thickest part of the chicken. Once it hits 165°F (74°C), the chicken is safe to eat. This ensures the chicken is cooked through and juicy. Imagine the golden, crispy tenders coming out of the oven. They should look crunchy and inviting. The melted cheese and crispy breadcrumbs create a lovely texture. If available, check out video guides for visual steps. They can help you follow along easily. To get the best crunch, use panko breadcrumbs. They are lighter than regular ones. Make sure to bake at a high temperature. Set your oven to 425°F (220°C). Lightly spray the tops with olive oil or drizzle melted butter before baking. This step adds flavor and helps them brown nicely. One common mistake is not drying the chicken enough. Pat your chicken tenders with paper towels. This helps the coating stick better. Another mistake is overcrowding the baking sheet. Keep the tenders in a single layer. This allows hot air to circulate around them, ensuring they bake evenly. These chicken tenders pair wonderfully with a fresh salad. Try a simple green salad with lemon vinaigrette. You can also serve them with dipping sauces like honey mustard or ranch. If you want a side, roasted vegetables or mashed potatoes work well. The flavors of these sides balance the rich, cheesy taste of the tenders. {{image_4}} You can change the coating for more fun. Try using crushed cornflakes instead of panko. This gives a sweet crunch. Mix in some spices like smoked paprika or cayenne for heat. You can also use different cheeses. Try cheddar or mozzarella for a tasty twist. These chicken tenders shine when served with tasty sides. Pair them with crispy fries or a fresh salad. For dips, ranch dressing or honey mustard works well. You can even try spicy sriracha mayo for a kick. Serve with veggies, like carrot sticks or cucumber slices, for a balanced meal. You can cook chicken tenders in various ways. Baking is easy and healthy, but frying adds extra crunch. If you want to grill, marinate the chicken first for flavor. Grill on medium heat for about 4-5 minutes per side. This gives you a smoky taste while keeping the chicken juicy. To keep your Parmesan crusted chicken tenders fresh, place them in an airtight container. Make sure they are at room temperature before sealing. Store them in the fridge for up to three days. This will help maintain their flavor and texture. For the best taste, reheat your chicken tenders in the oven. Preheat your oven to 375°F (190°C). Place the tenders on a baking sheet and cover them loosely with foil. Heat them for about 10-15 minutes. Check that they are heated through but not dry. If you want them extra crispy, remove the foil in the last few minutes. You can freeze your chicken tenders for up to three months. First, let them cool completely. Place them in a single layer on a baking sheet. Freeze them until solid, then transfer to a freezer bag. Remove as much air as possible to prevent freezer burn. When you're ready to eat, thaw them in the fridge overnight before reheating. You can serve Parmesan crusted chicken tenders with many tasty sides. Here are some great ideas: - French fries: A classic pairing, crispy and golden. - Mashed potatoes: Creamy and buttery, they complement the crunch. - Green salad: Fresh veggies add a nice crunch and balance. - Steamed broccoli: A healthy side that goes well with chicken. - Dipping sauces: Try ranch, honey mustard, or marinara for extra flavor. Yes, you can use chicken breasts instead of tenders. Just cut them into strips. This way, they will cook evenly. Make sure the strips are not too thick. This helps them cook faster and stay juicy. To check if the chicken is fully cooked, use a meat thermometer. Insert it into the thickest part of the tender. The internal temperature should reach 165°F (74°C). If you don't have a thermometer, cut a tender in half. The meat should be white, not pink. This shows it is ready to eat. In this post, we explored everything you need for perfect Parmesan Crusted Chicken Tenders. We covered key ingredients and substitutions, cooking steps, and tips for the best results. Remember to pick quality ingredients for better taste and avoid common mistakes. Consider different flavors and prepared sides to enhance your meal. Store any leftovers properly for future enjoyment. Follow these guidelines, and you will impress family and friends with your cooking skills. Enjoy your delicious creation!

Parmesan Crusted Chicken Tenders Crispy and Delicious

Craving something crispy and tasty? I’ve got just the dish for you: Parmesan Crusted Chicken Tenders! These golden, crunchy treats

- 1 cup rolled oats - 1/2 cup almond butter - 1/4 cup honey or maple syrup - 1/2 cup shredded coconut - 1/4 cup dark chocolate chips - 1/4 cup whole almonds - 1 teaspoon vanilla extract - 1/4 teaspoon sea salt To make Almond Joy Energy Bites, gather these ingredients first. Rolled oats form the base. Almond butter adds creaminess. Honey or maple syrup gives a sweet touch. Shredded coconut adds texture and flavor. Dark chocolate chips bring a touch of sweetness. Whole almonds add crunch. Vanilla extract enhances the taste. Sea salt balances all the flavors. You can adjust the sweetness by choosing honey or maple syrup. For a twist, use unsweetened coconut. If you want a dairy-free option, pick dairy-free chocolate chips. Each ingredient plays a role in making these bites taste amazing. Using quality ingredients matters. Choose fresh nuts and organic coconut for the best taste. This recipe is simple, and you’ll have a tasty snack ready in no time. - Mixing the Base Ingredients Start by grabbing a large mixing bowl. In it, combine 1 cup of rolled oats, 1/2 cup of almond butter, and 1/4 cup of honey or maple syrup. Use a spatula or spoon to mix these ingredients well. You want them to blend until smooth and creamy. - Adding in Coconut and Chocolate Next, add 1/2 cup of unsweetened shredded coconut, 1/4 cup of dark chocolate chips, 1/4 cup of roughly chopped whole almonds, 1 teaspoon of vanilla extract, and 1/4 teaspoon of sea salt into the bowl. Stir gently, making sure everything is evenly mixed. This is where you get that classic Almond Joy flavor! - Forming the Energy Bites Now it’s time to shape your bites! Scoop out the mixture using your hands. Roll it into small balls, about 1 inch wide. If the mix is too sticky, chill it in the fridge for 10-15 minutes. This makes it easier to handle. - Setting on a Baking Sheet Line a baking sheet with parchment paper. Place the rolled energy bites on the sheet, leaving space between them. This prevents them from sticking together. - Refrigeration Time Chill the bites in the fridge for at least 30 minutes. This helps them set and firm up. After they are nice and firm, you can store them in an airtight container. Enjoy them within a week, or freeze for longer shelf life! - Airtight Container Storage: Once your Almond Joy Energy Bites are set, store them in an airtight container. This keeps them fresh and tasty. You can place them in the fridge for up to a week. - Freezing for Longer Shelf Life: If you want to save some for later, freezing works great. Just place the bites in a single layer on a baking sheet. Freeze them for a few hours, then transfer them to a bag or container. They can stay good for up to three months in the freezer. - Refrigerating the Mixture: If the mixture feels sticky while rolling, pop it in the fridge for about 10-15 minutes. This makes it easier to handle and shape into bites. - Using Wet Hands for Easier Rolling: To prevent sticking, wet your hands with a bit of water before rolling the bites. This simple trick helps the mixture glide right off your hands. {{image_4}} Nut-Free Option If you need a nut-free snack, you can swap almond butter for sun butter. This nut-free option keeps the flavor and texture you love. The other ingredients stay the same. You still get that yummy taste without the nuts. Vegan Version To make a vegan version, use maple syrup instead of honey. This small change makes it plant-based. Also, choose dairy-free chocolate chips to keep it vegan-friendly. With these swaps, you keep the same great taste while meeting your dietary needs. Adding Protein Powder Want a protein boost? Mix in your favorite protein powder. One scoop works well with the other ingredients. This simple step gives your energy bites extra nutrition and helps keep you full longer. Incorporating Different Nuts or Seeds You can switch up the nuts for variety. Try cashews, walnuts, or pecans for a unique twist. If you prefer seeds, sunflower seeds or pumpkin seeds are great choices. Mixing different nuts or seeds adds new flavors and textures to your energy bites. - Calories per Bite: Each Almond Joy Energy Bite has about 100 calories. This makes them a perfect snack when you need a quick boost. - Protein, Fats, and Carbohydrates Overview: Each bite gives you around 3 grams of protein, 5 grams of healthy fats, and 12 grams of carbs. The oats and almonds provide good carbs while almond butter adds healthy fats. - Energy Boosting Qualities: The combination of oats, almond butter, and honey provides lasting energy. This mix helps you stay active throughout the day. Perfect for a pre-workout snack! - Nutritional Value of Almonds and Coconut: Almonds are rich in vitamin E and magnesium. They help with muscle recovery. Coconut adds fiber and aids digestion. Together, they make these energy bites not just tasty but also good for your health. Almond Joy Energy Bites last up to one week in the fridge. Store them in an airtight container. This keeps them fresh and tasty. If you want them to last longer, freeze them. They can stay good for three months in the freezer. Yes, you can use peanut butter instead of almond butter. Both have a similar texture. This swap may change the flavor a bit, but it will still taste great. Just pick the one you like best! Yes, these energy bites are gluten-free. Rolled oats are naturally gluten-free. Just make sure to use certified gluten-free oats if you have a strict gluten allergy. This way, you can enjoy these bites worry-free. To make the bites less sweet, reduce the honey or maple syrup. You can also use less chocolate. Try adding more oats or coconut to balance the flavor. This way, you keep the yummy taste without all the sugar. You now know how to make tasty Almond Joy Energy Bites. We covered the ingredients, steps, and tips to make it easy. I shared fun options for variations and important nutritional facts. These bites are great for energy and taste. Feel free to customize your recipe to suit your needs. Enjoy making these energy bites and sharing them with friends or family!

Almond Joy Energy Bites Simple and Tasty Snack

Are you craving a sweet yet healthy snack? Let me introduce you to Almond Joy Energy Bites! Packed with oats,

For this recipe, you can use fresh or canned peaches. If you choose fresh peaches, peel and slice about 4 cups. If using canned peaches, make sure to drain them well. Fresh peaches give a bright flavor, while canned peaches save time. Both options work well. You need 1 cup of granulated sugar to sweeten the peaches. Add 1 teaspoon of ground cinnamon for a hint of warmth and spice. This mix brings out the natural flavors of the peaches and adds a cozy touch. The sugar and cinnamon create a lovely balance in the dish. A box of yellow cake mix serves as the base of this dump cake. This mix makes it quick and easy to prepare. Just sprinkle it evenly over the peach mixture without mixing. It creates a nice layer that bakes into a soft, sweet crust. The cake mix gives the dessert its structure and sweetness. First, set your oven to 350°F (175°C). Preheating the oven is key. It helps bake the cake evenly. Your dump cake will turn out just right when the oven is hot. In a big bowl, mix 4 cups of fresh or canned peaches with 1 cup of sugar, 1 teaspoon of cinnamon, and 1 teaspoon of vanilla extract. Toss these together gently. Make sure the peaches are coated well. This mix gives your cake a sweet and spicy flavor. Pour the peach mix into a greased 9x13 inch baking dish. Spread it out evenly. Next, take a box of yellow cake mix and sprinkle it over the peaches. Do not stir! This keeps layers separate and makes the cake light. Now, drizzle 1 cup of melted unsalted butter over the cake mix. This adds moisture and flavor. If you want, add 1/2 cup of chopped nuts on top for some crunch. Finally, bake your cake for 40-45 minutes. It should look golden brown and bubbly when done. Let it cool for 10 minutes before serving. Enjoy your tasty peach cobbler dump cake! To get the best texture in your peach cobbler dump cake, avoid mixing the layers. After adding the peaches, just sprinkle the cake mix on top. This keeps the cake light and fluffy. Drizzle the melted butter evenly over the cake mix. It helps create a crispy top. Bake it until golden brown and bubbly. Your kitchen will smell amazing! Serve your dump cake warm in bowls. Top it with a scoop of vanilla ice cream or whipped cream. This cool treat contrasts nicely with the warm cake. You can also add a pinch of cinnamon or some chopped nuts on top. This adds a fun twist and makes it look pretty. For extra flavor, try adding fresh herbs like mint. You can also mix in some almond extract with the vanilla. This gives the cake a unique taste. If you want to switch things up, think about adding some berries or other fruits. They can make the dump cake even more delicious! {{image_4}} You can swap peaches with other fruits. Try using fresh or canned cherries, blueberries, or apples. Each fruit gives a new taste. If you pick apples, use a bit more sugar. For berries, you may want to skip the sugar. This way, you keep the cake sweet and balanced. For gluten-free options, use gluten-free cake mix. Many brands offer easy swaps. You can also use almond flour or coconut flour. If you want it dairy-free, choose a dairy-free butter or oil. These swaps keep the cake tasty and safe for all eaters. If you need a nut-free cake, simply skip the nuts. The cake will still taste great. You can add a bit of extra cinnamon for flavor. If you want more crunch, consider using crushed cookies or cereal on top. This keeps the texture fun without nuts. To keep your peach cobbler dump cake fresh, store it in the fridge. Use an airtight container to prevent it from drying out. If you leave it uncovered, it will become hard. It’s best to eat it within 3 to 5 days for the best taste. You can also freeze leftovers if you want to save some for later. First, let it cool completely. Then, wrap it tightly in plastic wrap. Place it in a freezer-safe bag or container. It can last for up to 3 months in the freezer. When you're ready to enjoy it, just take it out and thaw it in the fridge overnight. To reheat your peach cobbler dump cake, you have a few options. For the best results, use the oven. Preheat it to 350°F (175°C). Place the cake in an oven-safe dish and cover it with foil. Heat for about 15 to 20 minutes. If you're short on time, you can use the microwave. Heat it in short bursts of 30 seconds until warm. Enjoy it with a scoop of ice cream or whipped cream for a treat! A dump cake is a simple dessert. You layer fruit at the bottom of a dish. Then, you sprinkle cake mix on top. Finally, you pour melted butter over everything. The cake bakes up soft and sweet. It is easy and fun to make, perfect for all skill levels. You can use any fruit you like with this method. Yes, you can prepare the peach mixture ahead of time. Just place it in the fridge until you are ready to bake. You should not add the cake mix or butter until baking. This keeps the cake fresh and fluffy. Your dump cake is done when the top is golden brown. It should also be bubbly around the edges. This usually takes about 40 to 45 minutes in the oven. You can check it by inserting a toothpick in the center. If it comes out clean, your cake is ready. Let it cool for about 10 minutes before serving. This blog post covered how to make a delicious dump cake with peaches. We discussed using fresh or canned peaches, sugar, cinnamon, and yellow cake mix. I shared step-by-step instructions for preparation and tips for perfect texture and serving. Variations like fruit swaps and dietary changes were also included. Lastly, I provided essential storage tips and answered common questions. Making a dump cake is simple and fun. You can enjoy it today or save it for later. Happy baking!

Peach Cobbler Dump Cake Simple and Delicious Dessert

Are you ready to whip up a dessert that’s both simple and delicious? This Peach Cobbler Dump Cake combines juicy

- 4 boneless, skinless chicken thighs - 2 tablespoons olive oil - 3 cloves garlic, minced Chicken thighs are juicy and flavorful. They stay moist while cooking. Olive oil adds richness and helps with browning. Garlic brings a strong aroma that enhances the dish. - 1 large lemon (zested and juiced) - 1 teaspoon dried oregano - 1 teaspoon smoked paprika Lemon zest and juice give a bright, tangy taste. Dried oregano adds a hint of earthiness. Smoked paprika offers a warm, smoky flavor that rounds out the dish. - 1 cup cherry tomatoes, halved - 1 cup kalamata olives, pitted and halved - 1 cup baby spinach Cherry tomatoes provide sweetness and juiciness. Kalamata olives add a briny touch that complements the chicken. Baby spinach wilts down nicely, adding color and nutrients. 1. Preheat your skillet over medium-high heat. This step takes about two minutes. 2. While the skillet heats, season the chicken thighs. Use salt, pepper, dried oregano, and smoked paprika for great taste. Be sure to coat both sides well. 1. When the oil shimmers, place the seasoned chicken thighs in the skillet. Sear them for 5-7 minutes on each side. Look for a golden brown color. 2. Check the internal temperature with a meat thermometer. It should reach 165°F (75°C). Once done, remove the chicken and set it aside. 1. In the same skillet, add minced garlic. Sauté for about 30 seconds. Stir often to avoid burning the garlic. 2. Next, add halved cherry tomatoes and pitted kalamata olives. Stir and cook for 2-3 minutes. You want the tomatoes to soften and release their juices. 1. Pour in the lemon juice and add the lemon zest. Stir to coat the vegetables in that bright flavor. 2. Return the seared chicken thighs to the skillet. Add baby spinach and cook for another 2-3 minutes. Stir gently until the spinach wilts and brightens. 3. Taste the dish. Adjust seasoning with more salt and pepper if needed. 4. Finally, remove the skillet from heat. Sprinkle chopped parsley on top for a fresh finish before serving. - Achieving perfect chicken sear: Start with a hot skillet. Heat the olive oil until it shimmers. This helps the chicken brown nicely. Season both sides of the thighs well. Place them in the skillet without overcrowding. This gives each piece space to sear properly. - Preventing garlic from burning: When you add garlic, stir it constantly. Cook it for about 30 seconds. If it turns brown, it will taste bitter. Remove it from the heat if it gets too dark too fast. - Recommended spices to add: You can play with spices to boost flavor. Try adding a pinch of red pepper flakes for heat or some thyme for a fresh twist. These spices complement the lemon well. - Balancing acidity with seasoning: The lemon juice adds brightness. To balance this, taste your dish before serving. Adjust with salt and pepper as needed. Remember, a little salt can enhance the lemon’s zing. - Rustic serving ideas: Serve this dish straight from the skillet. It creates a warm, inviting look. You can also plate the chicken and veggies for a more formal feel. - Garnishes to elevate appearance: Sprinkle fresh parsley on top before serving. You can also add lemon wedges for a pop of color. This will make the dish look fresh and vibrant. {{image_4}} You can easily swap ingredients for different flavors. Try using shrimp instead of chicken. Shrimp cooks fast and soaks up the lemon taste well. Tofu is a great choice for a plant-based option. It absorbs flavors and adds a nice texture. Switching up the vegetables can also make this dish fun. Bell peppers add sweetness and color. Zucchini is another tasty option that cooks quickly. Both options keep the meal fresh and exciting. To give your dish a Greek twist, add feta cheese. It melts slightly and adds creaminess. The saltiness pairs well with the lemon and olives. For a spicy kick, infuse the skillet with harissa. This North African spice paste brings heat and depth. Just a small amount can transform the whole dish. If you need a gluten-free option, this recipe is already safe. Just check your chicken and olive brands for gluten. For a vegan adaptation, replace chicken with chickpeas or cauliflower. Both options provide protein and texture. Use vegetable broth instead of chicken broth for added flavor. This change keeps the dish hearty and satisfying. To keep your Mediterranean Lemon Chicken Skillet fresh, follow these tips: - Refrigeration: Place leftovers in an airtight container. They stay good for up to 3 days in the fridge. - Freezing: For longer storage, freeze in a safe container. It lasts up to 3 months. Remember to label it with the date. When you're ready to enjoy your leftovers, here’s how to reheat them: - Recommended methods: Use a skillet over medium heat for even warming. You can also use the microwave, but cover it to avoid drying out the chicken. - Avoiding overcooking: Heat just until warm. Check the chicken’s temperature; it should be at least 165°F (75°C). This keeps it juicy and tender. What can I substitute for chicken thighs? You can use chicken breasts or drumsticks. Both work well in this dish. Chicken breasts are leaner, while drumsticks give more flavor. Just adjust the cooking time as needed. Can I use fresh herbs instead of dried? Yes, fresh herbs add great taste! Use three times more fresh herbs than dried. For oregano, use about three teaspoons of fresh. The flavor will be brighter and more vibrant. How long to cook chicken in a skillet? Cook chicken thighs for about 5-7 minutes on each side. They should be golden brown and reach an internal temperature of 165°F (75°C). This ensures juicy and safe-to-eat chicken. Can I make this dish ahead of time? Absolutely! You can cook it in advance. Store it in the fridge for up to three days. Reheat it gently on the stove to keep the flavors fresh. Is it possible to make it in a slow cooker? Yes, you can use a slow cooker! Sear the chicken first for flavor. Then, add it to the slow cooker with the veggies and cook on low for 4-6 hours. How to adjust the recipe for more servings? To serve more, simply double or triple the ingredients. Use a larger skillet or cook in batches. Make sure to adjust cooking times if using more chicken. This dish is simple yet full of flavor. We began with key ingredients like chicken thighs, garlic, and olive oil. We added lemon, oregano, and smoked paprika for taste. Then we incorporated colorful veggies like cherry tomatoes and spinach. Cooking tips helped us achieve perfection while minimizing mistakes. We explored fun variations to suit different diets. Lastly, we covered storage methods to keep leftovers fresh. Experiment with the recipe and make it your own. You will enjoy every bite!

Mediterranean Lemon Chicken Skillet Flavorful Delight

Are you ready to bring some sunshine to your dinner table? The Mediterranean Lemon Chicken Skillet packs bold flavors and

- 4 boneless, skinless chicken breasts - 2 cups mushrooms, sliced (cremini or button mushrooms recommended) - 4 cloves garlic, minced - 1 tablespoon fresh thyme leaves (or 1 teaspoon dried thyme) - 1 tablespoon fresh rosemary, finely chopped (or 1 teaspoon dried rosemary) - 1/4 cup chicken broth - 1/4 cup heavy cream - 2 tablespoons olive oil - Salt and pepper - Fresh parsley, chopped (for garnish) The main ingredients in this recipe create a rich flavor. The chicken breasts provide protein and a nice base. Mushrooms give an earthy taste that pairs well with garlic. Fresh herbs like thyme and rosemary add depth and aroma. You'll need chicken broth to make the sauce creamy and flavorful. Heavy cream brings a smooth texture to the dish. Olive oil helps cook the chicken and adds richness. For seasoning, salt and pepper are key. They enhance all the flavors in the dish. Don't forget fresh parsley! It adds a pop of color and freshness when you serve. Gather all these ingredients to create a delightful meal that is simple yet impressive. {{ingredient_image_2}} - Seasoning the chicken Start by seasoning both sides of the chicken breasts with salt and pepper. This step is key to enhancing the chicken's natural flavor. Use a good amount of salt and pepper for the best taste. - Searing the chicken in the skillet Heat 2 tablespoons of olive oil in a large skillet over medium-high heat. When the oil is shimmering, add the seasoned chicken breasts. Sear each side for about 5-6 minutes until they turn a lovely golden brown. Make sure they cook all the way through. Once done, take the chicken out and place it on a plate. - Sautéing mushrooms and garlic In the same skillet, add 2 cups of sliced mushrooms. Cook them for about 4-5 minutes. Stir occasionally until they soften and turn golden. Next, add 4 cloves of minced garlic, 1 tablespoon of fresh thyme, and 1 tablespoon of rosemary. Sauté for 1-2 minutes. The garlic should smell great and soften nicely. - Adding chicken broth and cream Pour in 1/4 cup of chicken broth. Use a wooden spoon to scrape any brown bits from the skillet. This adds deep flavor to your sauce. Then, stir in 1/4 cup of heavy cream. Let this mixture come to a gentle simmer and thicken for about 3 minutes. - Returning chicken to the skillet Place the seared chicken breasts back in the skillet. Spoon the mushroom sauce over them. Let everything simmer together for about 2-3 minutes. This step helps the chicken absorb all the delicious flavors. - Adjusting sauce seasoning Taste the sauce and adjust it if needed. Add more salt and pepper to make it just right. This ensures every bite is flavorful and satisfying. - Ensuring perfect chicken doneness: To check if the chicken is done, use a meat thermometer. The internal temperature should reach 165°F (75°C). If you don’t have a thermometer, cut into the chicken. The juices should run clear, and the meat should no longer be pink. Always let the chicken rest for a few minutes after cooking. This keeps it juicy. - Enhancing flavor with herbs and spices: Fresh herbs like thyme and rosemary make a big difference. If you use dried herbs, remember they are stronger. Use about a third of the amount. Garlic adds a nice punch to the dish. Sauté it just until it smells fragrant. Be careful not to burn it; that can make it bitter. - Serving suggestions with rice or vegetables: For a beautiful plate, slice the chicken. Lay the slices over fluffy rice or steamed veggies. The creamy mushroom sauce can drizzle over the top. This adds color and makes the dish pop. - Garnishing for a restaurant-style look: Fresh parsley adds a burst of color and freshness. Sprinkle it on top just before serving. You can also add a lemon wedge on the side for a touch of brightness. This simple garnish gives a fancy finish to your meal. Pro Tips Rest the Chicken: Allow the chicken breasts to rest for a few minutes after cooking. This helps the juices redistribute, ensuring moist and flavorful meat. Use Fresh Herbs: For the best flavor, opt for fresh herbs like thyme and rosemary. They provide a vibrant taste that dried herbs may lack. Adjust Sauce Consistency: If the sauce is too thick, add a splash more chicken broth or cream to reach your desired consistency. Pair with Sides: This dish pairs wonderfully with rice, mashed potatoes, or steamed vegetables to soak up the delicious sauce. {{image_4}} Dairy-free options You can make this dish without dairy. Use coconut cream instead of heavy cream. This gives a rich texture with a hint of sweetness. You can also use vegetable broth in place of chicken broth for a full dairy-free meal. Low-carb alternatives To make this a low-carb dish, eliminate the heavy cream. You can use cauliflower puree instead. It gives a creamy texture without the carbs. Pair the chicken with zucchini noodles or steamed broccoli for a light and healthy meal. Additional herbs and spices Feel free to get creative with herbs! You can add oregano, basil, or even some red pepper flakes for heat. Fresh herbs like tarragon or dill also work well. These will elevate the flavor and add a unique twist to the dish. Incorporating vegetables You can add more veggies for a heartier meal. Spinach, bell peppers, or asparagus are great choices. Just sauté them with the mushrooms. This adds color and nutrients, making your dish even more appealing and healthy. To keep your Garlic Herb Mushroom Chicken fresh, follow these steps: - Cool Completely: Let the dish cool down to room temperature. - Use Airtight Containers: Place leftovers in airtight containers. - Refrigerate: Store in the fridge for up to 3 days. - Label: Write the date on the container to track freshness. When you want to enjoy your leftovers, here’s how to reheat safely: - Microwave Method: Place the chicken in a microwave-safe dish. Cover it with a lid or microwave-safe wrap. Heat on medium for 2-3 minutes. Check if it’s warm throughout. - Stovetop Method: Add the chicken with sauce back into a skillet. Heat on low for about 5 minutes, turning gently. This keeps the sauce creamy. - Oven Method: Preheat the oven to 350°F (175°C). Place the chicken in a baking dish and cover with foil. Heat for 15-20 minutes. This method helps keep the chicken moist. By following these tips, you ensure your meal stays tasty and safe to eat again! Can I use different types of mushrooms? Yes, you can use different mushrooms. Cremini and button mushrooms work well. You could also try shiitake or portobello mushrooms for a richer flavor. Each type of mushroom brings its own taste. Mix a few kinds for more depth in your dish. How can I make this recipe spicy? To make this dish spicy, add red pepper flakes. Start with a pinch and taste. You can also add jalapeños or hot sauce. For a smoky flavor, try smoked paprika. This adds heat without overpowering the dish. Caloric content and serving size Each serving of Garlic Herb Mushroom Chicken has about 330 calories. This is based on a meal size of one chicken breast with sauce. Adjusting the cream or oil can change the calorie count. Health benefits of the ingredients - Chicken: A great source of lean protein. - Mushrooms: Packed with vitamins and antioxidants. - Garlic: Known for its immune-boosting properties. - Fresh herbs: Add flavor and nutrients with fewer calories. What sides complement this dish? Pair Garlic Herb Mushroom Chicken with fluffy rice or mashed potatoes. Steamed vegetables like broccoli or green beans make great sides too. A simple salad with vinaigrette can add freshness to your meal. Wine or beverage pairings to enhance the meal For wine, a light white like Sauvignon Blanc works well. It balances the creamy sauce. If you prefer something non-alcoholic, try sparkling water with a slice of lemon. This adds a refreshing touch to your meal. This blog post shared a simple recipe for Garlic Herb Mushroom Chicken. We covered your key ingredients, step-by-step cooking instructions, and helpful tips. You learned how to store leftovers safely and explore variations for dietary needs. Cooking can be fun and rewarding. With this dish, you can impress your family or friends easily. Enjoy your flavorful meal!

Garlic Herb Mushroom Chicken Savory and Easy Recipe

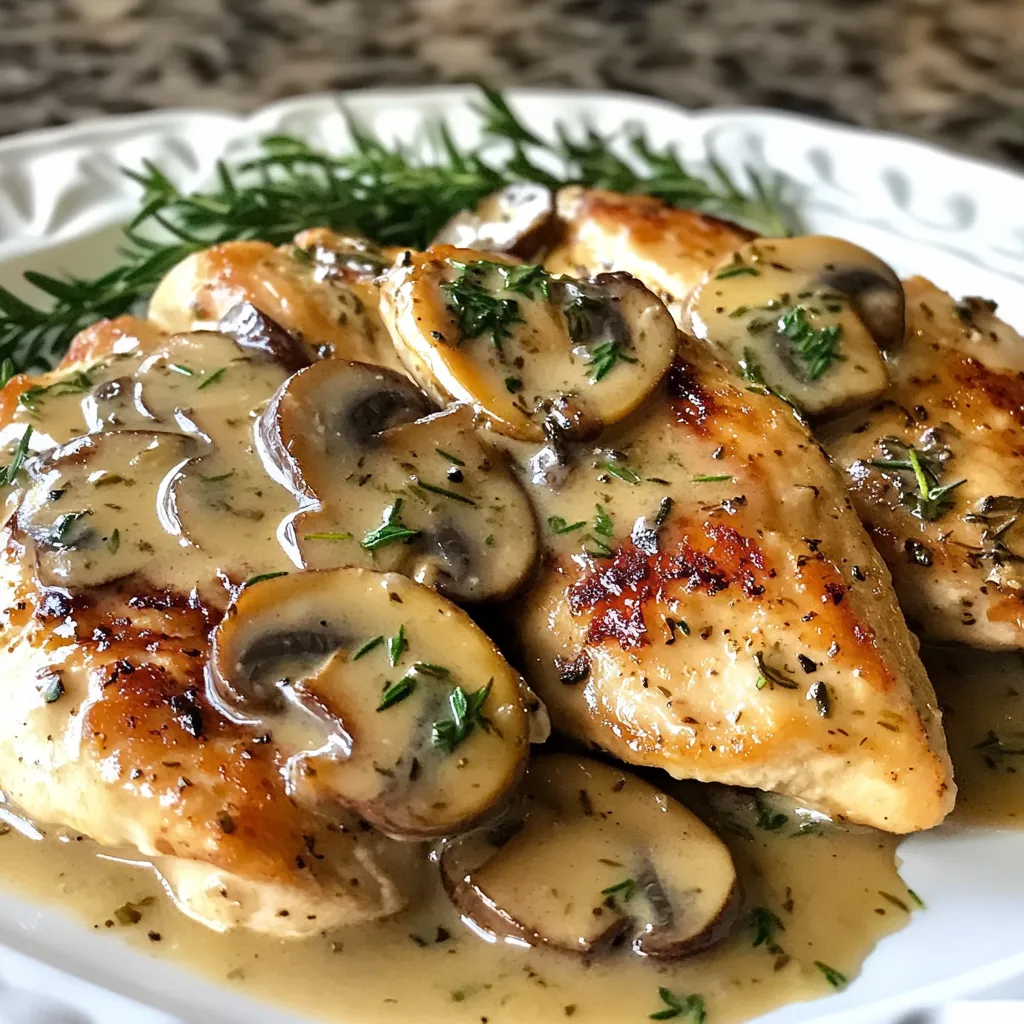
Looking for a meal that’s both savory and easy to make? You’ll love my Garlic Herb Mushroom Chicken! This dish

Older posts
Newer posts
← Previous Page1 … Page20 Page21 Page22 … Page120 Next →

dsad

© 2026 recipetorch • Built with GeneratePress

Our Policies

  • Copyright Policy
  • Cookie Policy
  • GDPR Policy
  • Privacy Policy
  • Disclaimer
  • Terms Of Use

More Information

  • Home
  • About
  • Contact
  • Appetizers
  • Dessert
  • Dinner
  • Drinks
©2026, recipetorch About Back To Top