Skip to content
DisclaimerTerms Of UseGDPR PolicyCookie Policy

recipetorch

  • Home
  • Drinks
  • Appetizers
  • Dinner
  • Dessert
  • About
  • Contact
  • Privacy Policy
DisclaimerTerms Of UseGDPR PolicyCookie Policy

Nicole

- 4 cups milk (dairy or non-dairy) - 1 cup canned pumpkin puree - 1/2 cup pure maple syrup - 1/4 cup unsweetened cocoa powder - 1 teaspoon vanilla extract - 1 teaspoon pumpkin pie spice - Pinch of salt - Whipped cream for serving - Ground cinnamon or nutmeg for garnish When I make Maple Pumpkin Hot Cocoa, I love using simple, fresh ingredients. First, I choose my milk. You can use dairy milk or go for non-dairy options like almond, oat, or coconut milk. Each brings a unique taste to the drink. Next, I add one cup of canned pumpkin puree. This gives the cocoa a rich flavor and creamy texture. The pumpkin also adds nutrients, making it a cozy treat that's good for you. For sweetness, I pour in half a cup of pure maple syrup. This syrup adds a natural sweetness that pairs perfectly with pumpkin and cocoa. I always use pure maple syrup for the best taste. I then add a quarter cup of unsweetened cocoa powder. It’s important to choose high-quality cocoa for the best flavor. To deepen the taste, I include one teaspoon of vanilla extract. This adds a warm and sweet note. Then, I mix in one teaspoon of pumpkin pie spice. This blend includes cinnamon, nutmeg, ginger, and allspice, giving the drink its seasonal vibe. Finally, I add a pinch of salt. This tiny amount helps to enhance all the flavors. When it’s time to serve, I top each mug with whipped cream. I also sprinkle ground cinnamon or nutmeg on top for a lovely finish. This drink is a true cozy delight, perfect for chilly days! - Start by pouring 4 cups of milk into your slow cooker. You can use dairy milk or a non-dairy option like almond or oat milk. - Next, add 1 cup of canned pumpkin puree. This gives your cocoa that rich fall flavor. - Pour in 1/2 cup of pure maple syrup for natural sweetness. - Add 1/4 cup of unsweetened cocoa powder. Choose a high-quality cocoa for the best taste. - Mix in 1 teaspoon of vanilla extract to deepen the flavor. - Sprinkle in 1 teaspoon of pumpkin pie spice for a warm, cozy touch. - Finally, add a pinch of salt to enhance the flavors. - Use a whisk to blend all the ingredients until smooth and uniform. Make sure there are no lumps. - Cover your slow cooker with the lid. Set it to low heat. - Allow the mixture to simmer for 2 hours. Stir it every 30 minutes. This helps keep everything mixed and prevents sticking. - After 2 hours, taste your hot cocoa. If you want it sweeter, stir in more maple syrup to your liking. - When it’s ready, ladle the hot cocoa into your favorite mugs. - Top each mug with a generous swirl of whipped cream. - For a fun finish, dust each serving with a little ground cinnamon or nutmeg. Enjoy! Stirring is key to a great hot cocoa. It keeps the mixture smooth and prevents sticking. I recommend stirring every 30 minutes during cooking. This ensures that all flavors blend well. Use a whisk for mixing. It helps create a velvety texture. Whisking also breaks up any clumps in the cocoa powder. Feel free to get creative with spices! You can add more pumpkin pie spice or even a dash of cayenne for heat. Vanilla extract adds depth, but you can also try almond or hazelnut extracts. Flavored syrups like caramel or chocolate can give your cocoa a unique twist. Just stir them in slowly after cooking. Garnishing makes your hot cocoa special. Top each serving with a generous swirl of whipped cream. Add a sprinkle of ground cinnamon or nutmeg for extra flavor. Serve on a wooden platter with cinnamon sticks or mini pumpkins beside the mugs. For snacks, soft cookies or spiced bread pair well with the drink. Enjoy your cozy delight! {{image_4}} For a dairy-free treat, use non-dairy milk. Almond, oat, or coconut milk works great. Each type brings its own flavor. For a rich taste, coconut milk shines. Almond milk is lighter and adds a nutty hint. When using non-dairy milk, adjust the sweetness. Non-dairy milks can be less sweet, so taste as you go. If you love chocolate, you can boost the cocoa. Increase the unsweetened cocoa powder to 1/2 cup. This gives a richer chocolate taste. You can also add chocolate chips. Stir in a cup of semi-sweet or dark chocolate chips. They melt and make the drink extra creamy. You can add other fall flavors too. Try adding a pinch of nutmeg or ginger for a warm spice kick. You might also want to mix in some caramel syrup for sweetness. Adjust the sweetness based on your taste. If you prefer it sweeter, add more maple syrup. Each of these changes brings a new twist to the drink. To keep your maple pumpkin hot cocoa fresh, follow these steps: - Refrigeration: Place any leftover hot cocoa in the fridge. It stays good for about 3 to 4 days. - Storage Containers: Use an airtight container or a jar with a tight lid. This helps keep flavors in and prevents spills. You can reheat your cocoa easily. Here’s how: - Microwave: Pour your cocoa into a microwave-safe mug. Heat it for 1 to 2 minutes. Stir halfway through to ensure even heating. - Slow Cooker: If you want to use the slow cooker, pour the cocoa back in. Heat on low for about 30 minutes. Stir it every 10 minutes to keep it smooth. Tips: When reheating, taste your cocoa. You may want to add a bit more maple syrup to boost the flavor. Always stir well to keep the texture nice and creamy. Yes, you can easily make this recipe vegan. Just swap the milk for a non-dairy option. Almond, oat, or coconut milk work great. For the whipped cream, look for a vegan brand or make your own from coconut cream. Use maple syrup as your sweetener. It adds a nice flavor and keeps it natural. You can store leftover hot cocoa in the fridge for up to four days. Use an airtight container to keep it fresh. Before serving, reheat it on the stove or in the microwave. Stir well after reheating to mix the flavors. Yes, you can use fresh pumpkin. It offers a wonderful taste and texture. Start by roasting a small pumpkin until it’s soft. Then, scoop out the flesh and mash it. This fresh pumpkin adds depth to your hot cocoa and makes it special. This hot cocoa recipe blends milk, pumpkin, and spices for a cozy drink. You learned how to prepare it step-by-step, with tips for the best taste. Remember, stirring and customizing can elevate your cocoa. Don’t forget to try variations for different flavors, like a dairy-free version or a richer chocolate option. Enjoy your drink warm and share it with friends. You now have all the tools to create a delicious hot cocoa experience!

Maple Pumpkin Hot Cocoa Slow Cooker Cozy Delight

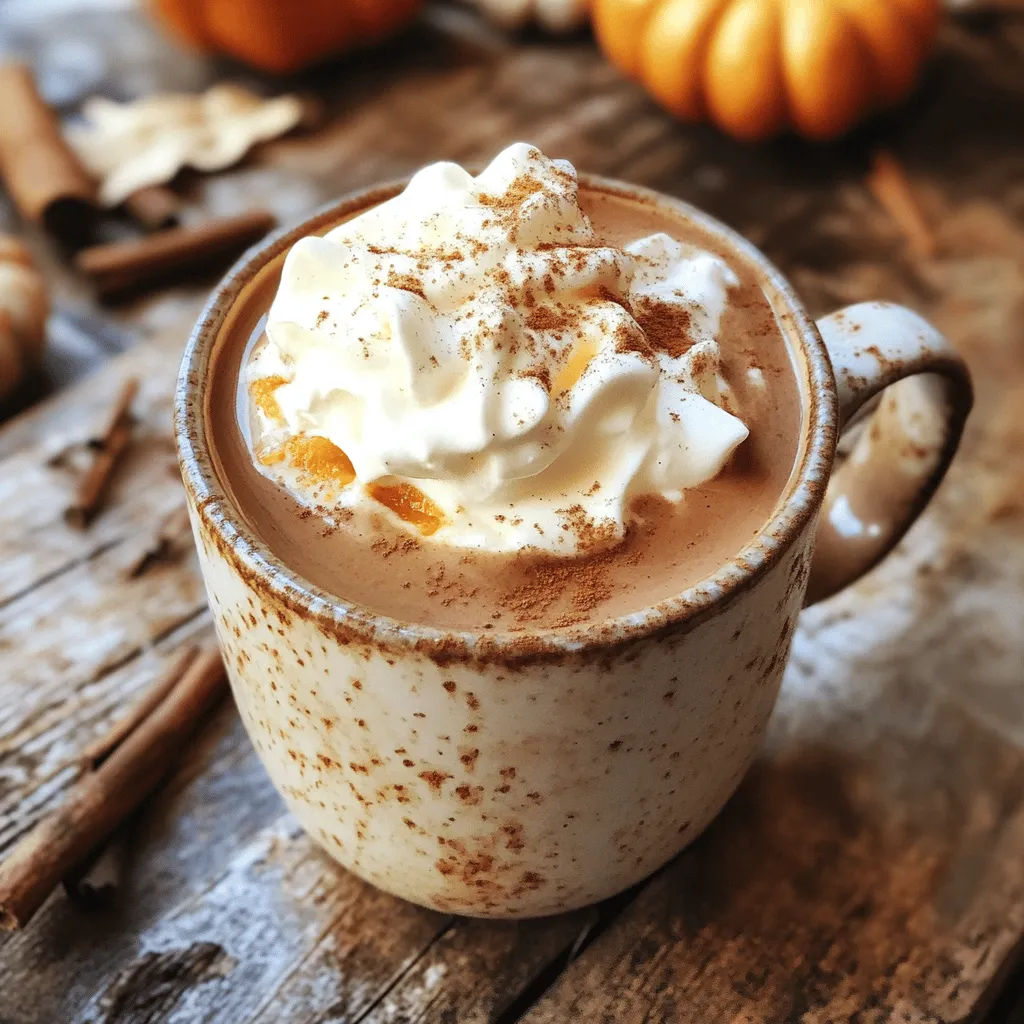
If you love the cozy vibe of autumn, you’ll adore my Maple Pumpkin Hot Cocoa. This rich and creamy drink

- 1 cup almond flour - 1 cup rolled oats - 1/2 cup unsweetened shredded coconut - 1/2 cup dark chocolate chips or cacao nibs - 1/2 cup creamy almond butter - 1/4 cup honey or pure maple syrup - 1 teaspoon pure vanilla extract - 1/2 teaspoon sea salt - 1/4 cup chopped almonds These main ingredients bring the joy of Almond Joy to your energy balls. The almond flour gives a nutty base. Rolled oats add fiber and texture. Shredded coconut brings sweetness and chewiness. Dark chocolate or cacao nibs provide rich flavor. Almond butter acts as a creamy binder. Honey or maple syrup adds natural sweetness. Vanilla extract enhances all the flavors. Sea salt balances the sweetness. Lastly, chopped almonds add crunch. You can add a few extras to boost flavor: - A pinch of cinnamon for warmth - A tablespoon of chia seeds for more nutrients These optional ingredients are not needed but can elevate the taste. Cinnamon adds a cozy touch. Chia seeds provide fiber and omega-3s. Each energy ball has about: - Calories: 120 - Protein: 3g - Carbs: 10g - Fat: 8g - Fiber: 2g These bites are not just tasty; they also give energy. They are great for a quick snack or a post-workout treat. With wholesome ingredients, they help you stay fueled and satisfied. Enjoy these bites as part of a balanced diet. {{ingredient_image_2}} First, gather all your ingredients. You need almond flour, rolled oats, shredded coconut, dark chocolate chips, almond butter, honey, vanilla extract, sea salt, and chopped almonds. In a large bowl, mix the almond flour, oats, shredded coconut, and sea salt. Use a whisk to combine them well. This step ensures there are no clumps in your dry mix. Next, add the creamy almond butter, honey (or maple syrup), and vanilla extract to the bowl. Stir with a spatula until a sticky dough forms. If it feels too dry, add a splash of water or more almond butter. You want it to hold together. Then, fold in the dark chocolate chips and chopped almonds. Make sure they are spread evenly through the mixture. This adds a nice crunch and rich flavor. Now it’s time to shape your energy balls. With clean hands, take a portion of the mixture and roll it into a ball about one inch wide. Press firmly so they stay together. Place the rolled balls on a baking sheet lined with parchment paper. Leave some space between each ball. This keeps them from sticking together. After shaping, put the baking sheet in the fridge for at least 30 minutes. This helps the energy bites firm up and makes them easier to eat. Once they are chilled, transfer the energy balls to an airtight container. Store them in the fridge to keep them fresh. They last about one week. These steps give you tasty Almond Joy Energy Balls that are easy to make and perfect for snacking! To get the right texture for your Almond Joy energy balls, start with the right mix. Combine the almond flour and oats well. If your mixture feels too dry, add a splash of water or more almond butter. The dough should be sticky but still hold its shape. If it's crumbly, keep mixing. You can make these energy balls your own. Add different nuts like walnuts or pecans for a new crunch. Switch up the chocolate chips with butterscotch or white chocolate. If you like spice, try adding a pinch of cinnamon for warmth. You can also mix in dried fruits for added sweetness and texture. Serve your energy balls in a fun bowl. You can sprinkle some extra shredded coconut on top for a nice touch. Use colorful liners for each ball if you want to make them pop. These tasty bites are great for snacks or after workouts. Enjoy them with friends or pack them for lunch! Pro Tips Use Fresh Ingredients: Ensure that your almond flour and shredded coconut are fresh for the best flavor and texture. Experiment with Sweeteners: Feel free to substitute honey with agave syrup or use stevia for a lower-calorie option. Customize Your Mix-ins: Add dried fruits like cranberries or apricots for extra sweetness or a variety of nuts for different textures. Store Properly: Keep your energy bites in an airtight container in the fridge to maintain freshness and flavor for longer. {{image_4}} If you want a nut-free option, swap the almond flour for oat flour. You can also use sunflower seed butter in place of almond butter. This keeps the taste rich and fun while avoiding nuts. You can add pumpkin seeds for crunch if you like. You can mix things up with flavors! Try adding dried fruit like cherries or cranberries. These add a nice chew and sweetness. You can also use white chocolate chips instead of dark ones for a creamy twist. Another great idea is to add a pinch of cinnamon for warmth. To make these energy balls vegan, use maple syrup instead of honey. For the almond butter, choose a nut-free butter if needed. You can also use vegan chocolate chips or cacao nibs. This way, you keep the classic taste while making it plant-based. To keep your Almond Joy energy balls fresh, store them in an airtight container. This will help hold in moisture and flavor. You can leave them in the fridge for up to one week. If you want to keep them longer, try freezing them. Just make sure they are tightly sealed to avoid freezer burn. Freezing is a great way to save your energy balls for later. To freeze, first, place the rolled balls on a baking sheet. Make sure they are not touching. Freeze them for about an hour until firm. Once frozen, transfer them to a freezer-safe bag or container. They can last for up to three months in the freezer. When you want to eat one, just take it out and let it thaw for a few minutes. To ensure your energy balls stay tasty, check for any signs of spoilage. Look for changes in color or smell. If they feel hard or dry, they may not taste as good. For best quality, eat them within one week if stored in the fridge. When frozen, they can last longer, but you’ll want to enjoy them within three months for the best taste. Yes, you can use any nut butter you like! Peanut butter, cashew butter, or sunflower seed butter all work well. Just remember that each nut butter has its own taste. This will change the flavor of your energy balls. Feel free to experiment and find what you enjoy most. To make these energy balls vegan, swap the honey for maple syrup or agave nectar. Both options provide sweetness without using animal products. Ensure that your chocolate chips or cacao nibs are dairy-free as well. This way, you keep the yummy taste while staying vegan. If you need a substitute for honey or maple syrup, try using agave nectar or brown rice syrup. Both options add sweetness and stickiness to the mixture. You can also use date syrup for a rich flavor. Just adjust the amount to taste. Almond Joy energy balls are simple to make and tasty to eat. You learned the key ingredients, step-by-step instructions, and helpful tips. I shared variations to fit your needs and ideas for storage. You can customize these snacks to match your tastes. Remember, they are great for sharing or enjoying on your own. Now get in the kitchen and have fun making your own Almond Joy energy balls!

Almond Joy Energy Balls Simple and Tasty Recipe

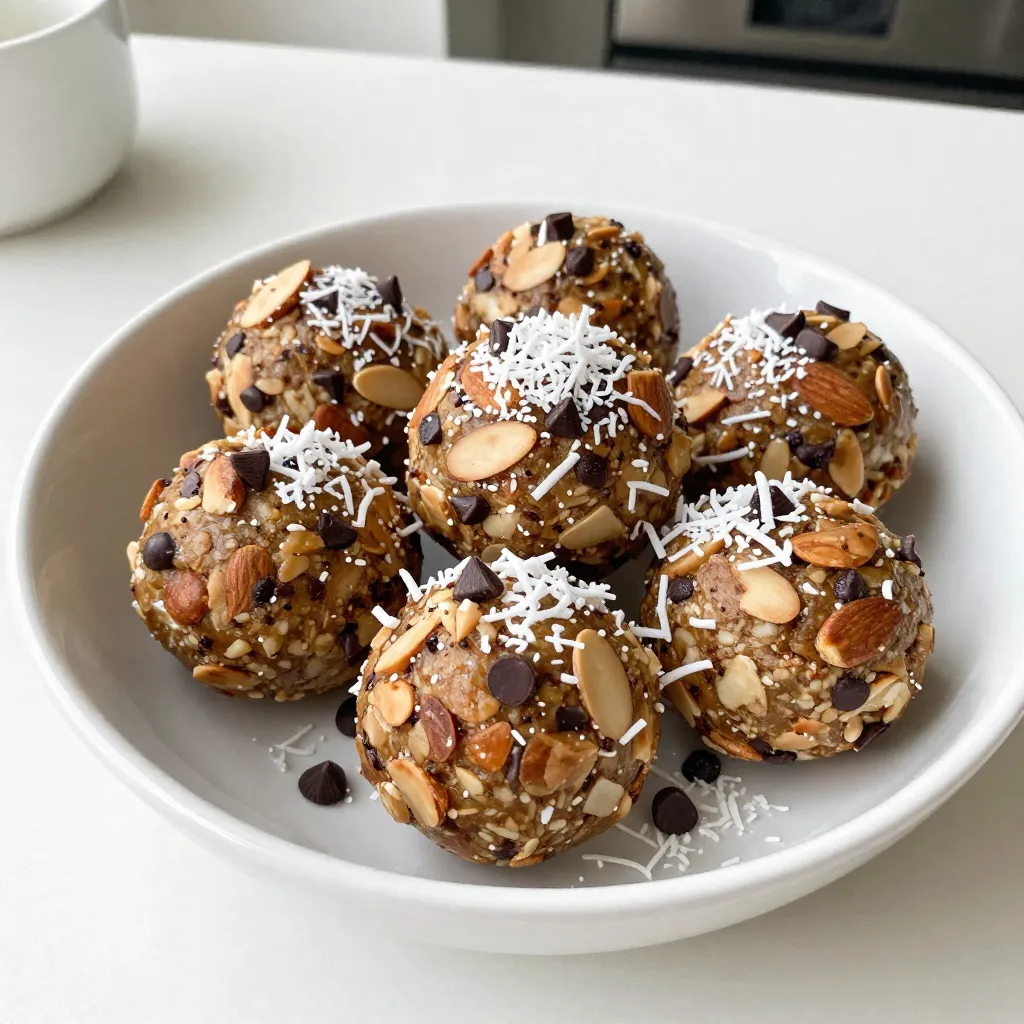
If you’re looking for a quick, healthy snack that satisfies your sweet tooth, you’ve found it! Almond Joy Energy Balls

To make Chocolate Caramel Pretzel Bark, you need these key items: - 2 cups pretzel sticks - 1 cup semisweet chocolate chips - 1 cup caramel candies, unwrapped - 2 tablespoons heavy cream - Sea salt, for sprinkling You can add some extra flair with these optional ingredients: - 1/4 cup chopped nuts (e.g., pecans or almonds) If you need to avoid certain allergens, here are some easy swaps: - Use gluten-free pretzels for a gluten-free version. - Replace semisweet chocolate chips with dairy-free chocolate chips for a vegan option. - Substitute heavy cream with coconut cream for a dairy-free alternative. These ingredients make the bark rich and crunchy. You can customize it to fit your taste or dietary needs easily. {{ingredient_image_2}} First, preheat your oven to 350°F (175°C). This step is key for the perfect bark. While it warms up, grab a baking sheet. Line it with parchment paper. Make sure the paper hangs over the edges. This makes it easy to lift the bark later. Next, arrange 2 cups of pretzel sticks in a single layer on your sheet. Bake them for just 5 minutes. This quick bake crisps them up and boosts their flavor. It adds a nice crunch to the final treat. While the pretzels bake, let’s make the caramel. In a microwave-safe bowl, put 1 cup of unwrapped caramel candies. Add 2 tablespoons of heavy cream. Heat this in the microwave in 30-second bursts. Stir it well after each time. Stop when it’s smooth and melted. Be careful not to burn it. Now, we’ll melt the chocolate. Use another bowl for 1 cup of semisweet chocolate chips. Again, microwave in 30-second intervals. Stir each time until it’s melted and smooth. After baking, take out the pretzels. Pour the melted caramel over them right away. Use a spatula to spread it evenly. Next, drizzle the melted chocolate on top. You can also spread it out if you want. If you like nuts, now is the time to add them. Sprinkle chopped nuts over the warm chocolate. Press them down gently to stick. Finally, add a pinch of sea salt on top. This will balance the sweetness perfectly. Let the bark cool at room temperature until it’s firm. If you’re in a rush, chill it in the fridge for about 30 minutes. Once set, lift the bark using the parchment paper. Break it into pieces of your choice. Enjoy your delicious creation! To get the right caramel texture, be patient. Melt the caramel and cream slowly in the microwave. Stir every 30 seconds. If it’s too thick, add a splash of cream. If it’s too runny, heat it a bit longer. The goal is a smooth, pourable mix. This makes it easy to spread over the pretzels. If your caramel hardens too fast, it may not have enough cream. Always use heavy cream for the best results. If your chocolate seizes, it may have gotten too hot. Heat chocolate gently. If you see clumps, add a tiny bit of oil to smooth it. Serve your pretzel bark on a bright plate. Use a clear jar for a fun gift. Wrap individual pieces in pretty cellophane. This makes them feel special. A sprinkle of sea salt adds a nice touch. The contrast in color looks great too. Pro Tips Use Fresh Caramels: Ensure your caramel candies are fresh for the best melting consistency and flavor. Older caramels may not melt smoothly, affecting the texture of your bark. Experiment with Chocolate: Try using different types of chocolate, such as dark or white chocolate, for a unique flavor combination that complements the caramel and pretzels. Chill for Quick Setting: If you're short on time, place the baking sheet in the refrigerator for about 30 minutes to speed up the setting process without compromising texture. Perfectly Even Pieces: To get evenly sized pieces, use a sharp knife or a pizza cutter to slice the bark once it’s set but still slightly soft. This will prevent cracking and crumbling. {{image_4}} You can boost the flavor of your bark by adding nuts. Nuts add crunch and richness. Try pecans or almonds for a great taste. Simply chop them up and sprinkle over the warm chocolate layer. Press them down gently so they stick. This little step makes your bark even better. Sea salt gives a nice contrast to the sweet chocolate and caramel. The salt enhances the flavors and makes each bite special. You can also switch it up with flavored salts. Try smoked salt for a unique twist. Each flavor brings out different notes in your bark, making it fun to explore. The type of chocolate you use can change the whole taste of your bark. Semisweet chocolate is great, but you can use dark chocolate for a richer flavor. Milk chocolate adds a sweeter touch. If you prefer white chocolate, that works too! Each choice gives a different vibe, so experiment with what you like best. To keep your chocolate caramel pretzel bark fresh, store it in an airtight container. This prevents moisture and air from ruining the texture. Place parchment paper between layers to avoid sticking. Keep the container in a cool, dry place, away from sunlight. If you live in a warm area, consider refrigerating it to maintain quality. Chocolate caramel pretzel bark can last about two weeks at room temperature. If stored in the fridge, it can stay fresh for up to a month. Always check for signs of spoilage, like a change in smell or texture. If you see any, it’s best to toss it out. You can freeze chocolate caramel pretzel bark for longer storage. Wrap it tightly in plastic wrap, then place it in a freezer-safe bag. This method helps to lock in freshness. It can last for about three months in the freezer. To enjoy, thaw it overnight in the fridge. Avoid defrosting at room temperature to prevent melting. To cut Chocolate Caramel Bark, first let it cool completely. Once set, lift it from the baking sheet by the parchment paper. Place it on a cutting board. Use a sharp knife to slice it into pieces. For best results, cut the bark when it's cold. This way, it won't crumble. Yes, you can use different pretzels! Pretzel sticks work well, but you can also try pretzel rods or twists. Each will give a unique taste and texture. Experiment to find your favorite. Just make sure they are similar in size for even coverage. To modify for dietary needs, there are many options. For gluten-free, use gluten-free pretzels. If you need dairy-free, select dairy-free chocolate and caramel. You can also use nut-free chocolate if allergies are a concern. Always check labels to ensure safety. Absolutely! You can add many toppings to your bark. Consider nuts like pecans or almonds for crunch. Dried fruits like cranberries or cherries can add a sweet twist. Sprinkles or crushed candies can give it a fun look. The options are endless! This guide walks you through making delicious chocolate caramel pretzel bark. You learned the essential ingredients, step-by-step instructions, and useful tips for success. Remember to explore flavor variations and customize to your taste. Store your bark properly for the best freshness. Whether you share it or keep it for yourself, this treat will satisfy any sweet tooth. Enjoy experimenting with this fun recipe!

Chocolate Caramel Pretzel Bark Irresistible Treat

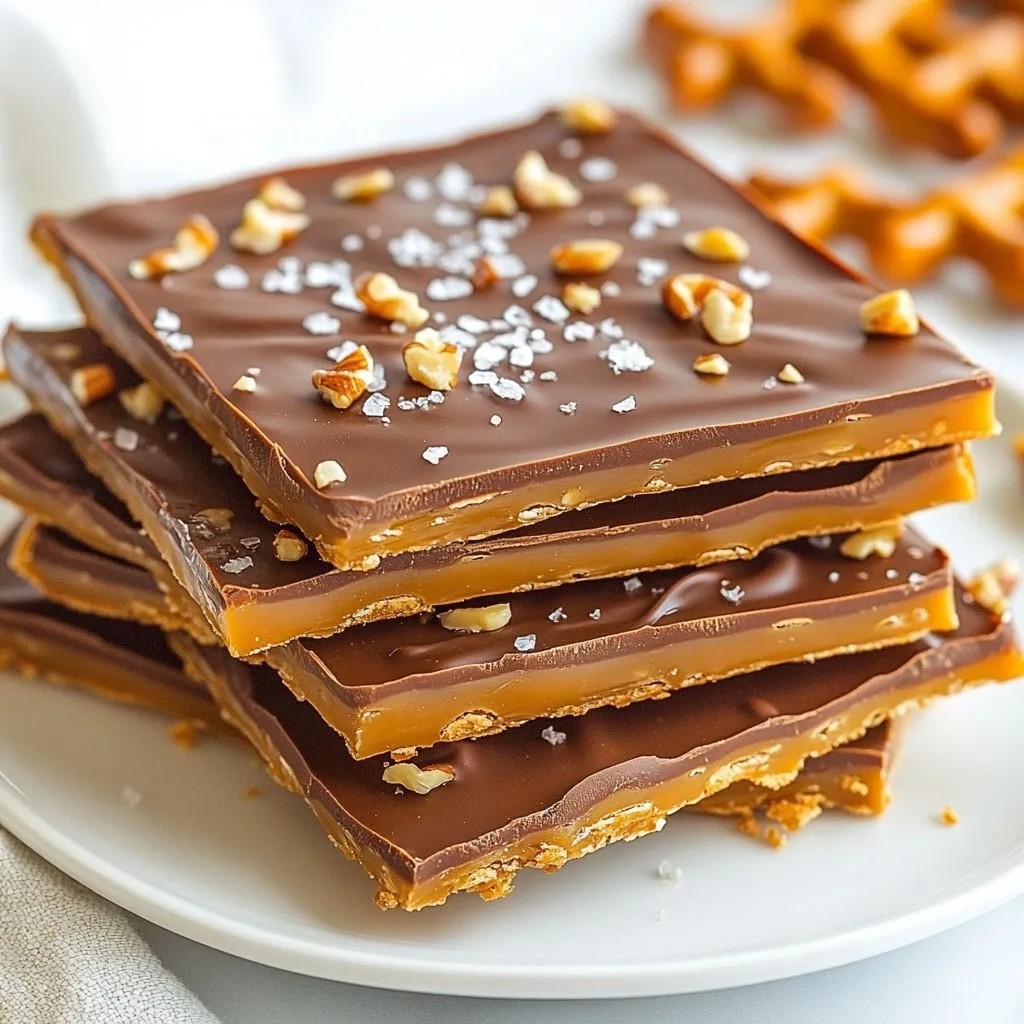
Get ready to treat yourself! Chocolate Caramel Pretzel Bark is a mix of sweet and salty that will delight your

- 1 cup rolled oats - 1 cup coconut milk (from a can or carton) - 1 ripe mango, diced (reserve a little for garnish) - 1/4 cup unsweetened shredded coconut - 2 tablespoons chia seeds - 1 tablespoon maple syrup (or honey) - 1/2 teaspoon pure vanilla extract - A pinch of salt - Fresh mint leaves for garnish (optional) You can use any rolled oats for this dish. Gluten-free oats work too. If you want a different flavor, try almond milk or oat milk instead of coconut milk. For sweetness, honey or agave syrup can replace maple syrup. If you cannot find chia seeds, you can skip them, but they add great texture. This recipe serves two and packs a nutritious punch. Each serving contains about: - Calories: 350 - Protein: 8 grams - Fat: 12 grams - Carbohydrates: 50 grams - Fiber: 10 grams - Sugars: 8 grams Mango and coconut provide vitamins and healthy fats. Chia seeds add omega-3s and fiber. Enjoy this healthy breakfast without the guilt! {{ingredient_image_2}} Start by taking a medium mixing bowl. Add 1 cup of rolled oats to the bowl. Pour in 1 cup of coconut milk. It can be from a can or a carton. Next, add 2 tablespoons of chia seeds. Then, mix in 1 tablespoon of maple syrup and 1/2 teaspoon of pure vanilla extract. Finally, add a pinch of salt. Use a whisk or spoon to stir everything well. You want all the ingredients to blend smoothly. Now, it’s time to add some fun flavors. Carefully fold in 1 ripe mango, diced into small pieces. Also, add 1/4 cup of unsweetened shredded coconut. Be gentle when mixing. You want to keep the mango pieces whole. If you like, set aside a bit of mango and coconut for topping later. This will make your dish look nice when you serve it. Once the mixture is ready, cover the bowl tightly with plastic wrap. You can also divide the oats into jars with lids. Place them in the refrigerator for at least 4 hours. If you can, leave them overnight for the best results. This allows the oats and chia seeds to soak up the coconut milk. In the morning, stir the oats to break up any clumps. If it’s too thick, add a splash of coconut milk. To serve, scoop the oats into bowls or jars. Top with the reserved mango, extra shredded coconut, and fresh mint leaves if you want. Enjoy your refreshing breakfast! To get creamy and smooth overnight oats, follow these simple steps. Use rolled oats, as they absorb liquid well. Mix them with coconut milk and chia seeds. The chia seeds help thicken the mixture overnight. Stir the mix well to avoid clumps. If the oats seem too thick in the morning, add a splash of coconut milk. This keeps the texture just right. You can make these mango coconut oats your own. Try adding other fruits like strawberries or bananas. You can also switch the maple syrup for honey or agave. For a nutty taste, add a spoonful of almond butter. If you want a spicier kick, sprinkle in some cinnamon. The choices are endless, so feel free to experiment. These oats are great for breakfast or a snack. Serve them in bowls for a family breakfast. Put them in jars for a grab-and-go option. They also work well as a healthy dessert. Just top them with extra mango and mint for a fancy touch. You can enjoy them any time of day! Pro Tips Use Fresh Mango: For the best flavor, use a ripe, fresh mango. If it's not in season, frozen mango can be a good alternative. Adjust Sweetness: Feel free to adjust the sweetness according to your taste. Add more maple syrup or honey if you prefer a sweeter breakfast. Make It Ahead: This recipe is perfect for meal prep. You can make multiple servings at once and store them in the fridge for a quick breakfast during the week. Add Variety: Feel free to mix in other fruits or nuts to change up the flavor. Berries, bananas, or almonds can be delightful additions! {{image_4}} You can switch up the fruit in your overnight oats. Try bananas for a creamy taste. Or use berries for a burst of flavor. Pineapple adds a tropical twist. Peaches and apples work well too. Each fruit changes the taste and texture. Mix and match to find your favorite! While coconut milk is rich and creamy, you have choices. Almond milk is light and nutty. Oat milk gives a smooth flavor. Soy milk adds protein and creaminess. You can even use regular cow's milk if you prefer. Each milk brings its own unique taste to the dish. Boost your oats with some extra ingredients. Nuts add crunch and healthy fats. Seeds like flax or pumpkin give more nutrition. A spoonful of yogurt makes it creamy and tangy. You can also add protein powder for a health kick. Each add-in offers different benefits and flavors to enjoy! To keep your mango coconut overnight oats fresh, store them in the fridge. Use a tightly sealed container or a jar with a lid. This helps prevent any odors from other foods. If you made extra, it’s best to separate portions. This way, you can grab a serving when you're ready. You can keep your overnight oats in the fridge for up to five days. The oats will stay tasty and safe to eat. Just check for any signs of spoilage, like an off smell or mold. If it looks or smells strange, throw it away. If you have extra oats, you can freeze them! Use a freezer-safe container or jar. Leave some space at the top, as the oats will expand when frozen. They can last up to three months in the freezer. When you are ready to eat, thaw in the fridge overnight. You can also microwave them for a quick warm-up. Add a splash of coconut milk for creaminess after thawing. You can keep overnight oats in the fridge for up to five days. This makes them a great meal prep choice. Just store them in airtight containers to keep them fresh. It’s best to add toppings, like fruit or nuts, just before eating. Yes, you can use quick oats. They will make the oats softer and creamier. However, rolled oats give a chewier texture. If you prefer a thicker consistency, stick with rolled oats. Yes, this recipe is vegan-friendly. Use maple syrup instead of honey for sweetness. Coconut milk adds a rich, creamy taste, perfect for a vegan diet. If you don’t have chia seeds, you can use flaxseeds. Ground flaxseeds work well too. They help thicken the oats and add healthy fats. You can also skip them, but the texture will change slightly. You learned how to make delicious overnight oats with mango and coconut. We covered important ingredients, step-by-step instructions, and helpful tips. You can now customize your oats, try new flavors, and know how to store them. Remember, it’s all about using fresh ingredients and keeping it simple. Enjoy your tasty, nutritious creation for breakfast or a snack!

Mango Coconut Overnight Oats Simple and Quick Recipe

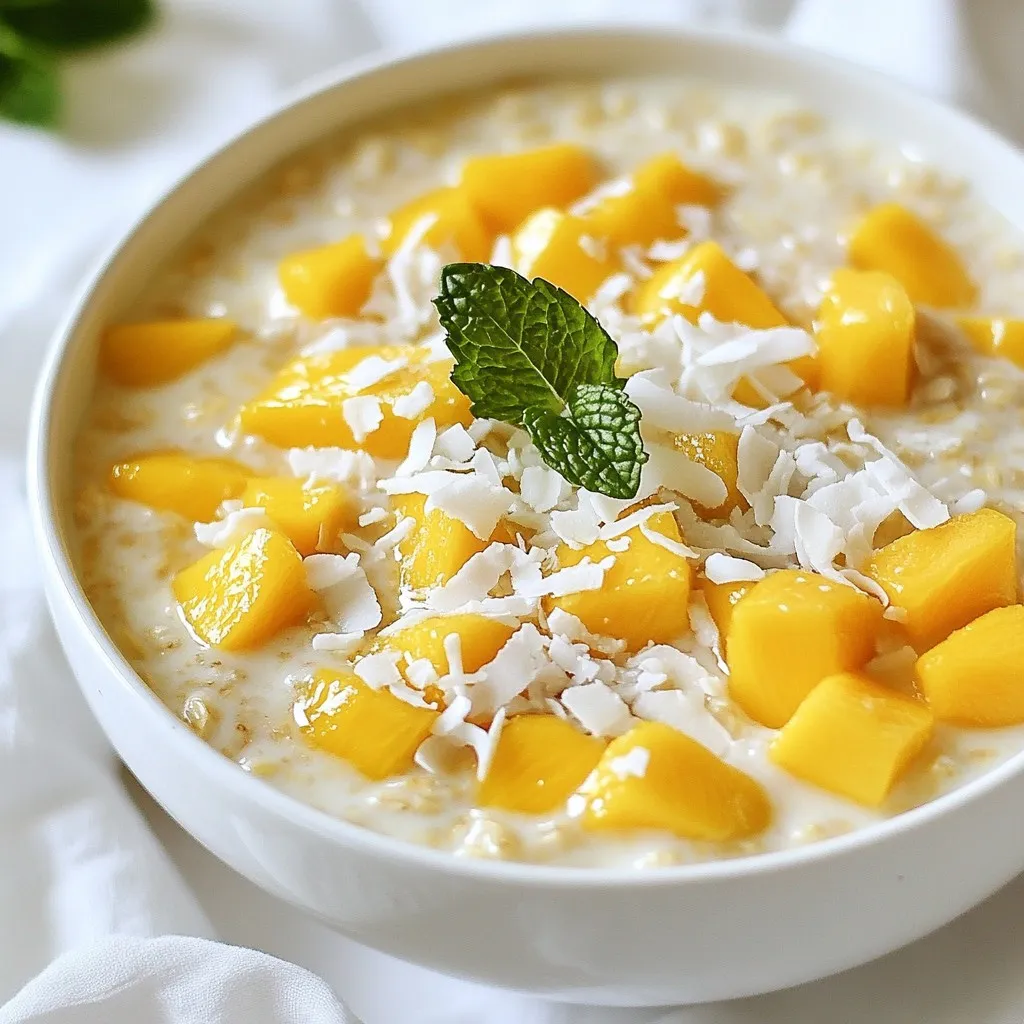
Start your day with a burst of tropical flavor! In this simple recipe for Mango Coconut Overnight Oats, you’ll discover

- 2 cups warm water (110°F / 43°C) - 1 packet (2 ¼ teaspoons) active dry yeast - 2 tablespoons granulated sugar - 5 cups all-purpose flour - 1 tablespoon salt - 1 cup sharp cheddar cheese, shredded - 2-3 jalapeños, finely chopped (with seeds removed for milder heat) - ½ cup baking soda - 1 large egg (beaten for egg wash) - Coarse sea salt for sprinkling Gathering the right ingredients is key to making the best Jalapeño Cheddar Stuffed Pretzels. The warm water activates the yeast, making the dough rise. Yeast is a living thing; it needs sugar to feed on. The granulated sugar helps this process. Using high-quality all-purpose flour gives the pretzels their chewy texture. Salt adds flavor and balances the taste. For the filling, I love using sharp cheddar cheese. Its bold flavor pairs well with the spice of jalapeños. Removing the seeds from jalapeños makes them less hot, so you can control the spice level. When cooking, baking soda is essential. It helps achieve that classic pretzel crust. An egg wash gives the pretzels a nice, golden color when baked. Lastly, sprinkling coarse sea salt on top adds a nice crunch. All these ingredients work together to create a tasty snack you’ll enjoy! {{ingredient_image_2}} - Combine warm water, yeast, and sugar. - Wait for the mixture to become frothy. This shows the yeast is alive and ready. - Mix flour and salt in a large bowl. - Pour in the yeast mixture and stir. - Form the dough and knead until smooth, about 5-7 minutes. If sticky, add more flour. - Cover the dough with a damp cloth. - Let it rise in a warm place for about 1 hour. It should double in size. - Punch the dough down to release air. - Divide it into 10 equal pieces and roll each into a long rope. - Flatten each rope, add cheese and jalapeños, then seal and twist into a pretzel shape. - Boil about 10 cups of water and add baking soda. - Carefully drop each pretzel into the water for about 30 seconds. - Use a slotted spoon to remove them and let water drain. - Preheat your oven to 450°F (230°C) and line baking sheets with parchment paper. - Brush the tops of the pretzels with beaten egg wash. - Sprinkle with coarse sea salt and bake for 12-15 minutes until golden brown. - Adjusting for stickiness: If your dough is sticky, add a bit more flour. Start with one tablespoon at a time. This will help you get a nice, smooth texture. - Kneading techniques for elasticity: Knead the dough for about 5-7 minutes. Use the heel of your hand to push the dough away, then fold it back. This helps develop gluten, giving the dough its stretch. - Choosing the right cheese: Use sharp cheddar for a bold flavor. It melts well and pairs perfectly with jalapeños, making each bite exciting. - Use of spices or herbs for added flavor: Consider adding garlic powder or onion powder to the dough. Dried herbs like oregano can also add depth to the taste. - Best dips to accompany: Serve these pretzels with spicy mustard or a creamy cheese dip. Both options enhance the flavor and make for a fun snack. - Ideal presentation ideas: Place the pretzels on a rustic wooden board. Add a small bowl of dip in the center. It makes for a beautiful and inviting display. Pro Tips Yeast Activation: Make sure the water is warm but not too hot; if it's above 120°F (49°C), it may kill the yeast and prevent the dough from rising. Jalapeño Selection: For a milder flavor, remove the seeds and membranes of the jalapeños before chopping. For extra heat, keep them intact! Twisting Technique: When shaping the pretzels, ensure the ends are twisted tightly to prevent them from unraveling during boiling and baking. Perfect Baking: Keep an eye on the pretzels while baking. Ovens can vary, so check for that golden-brown color to ensure they’re perfectly done. {{image_4}} You can switch up the cheese in your pretzels. Try using mozzarella for a stretchier bite. A creamy goat cheese can add a tangy twist. Mixing different cheeses boosts the taste. A blend of sharp cheddar and pepper jack adds a kick. You can control the heat by using different jalapeños. For milder bites, use fewer seeds. If you love spice, try serrano peppers instead. Adding smoked paprika or cayenne can also turn up the heat. Experimenting with spices keeps things fun. Want a healthier twist? Use whole wheat flour for a nutty flavor. If you need gluten-free options, almond flour works well. You can also infuse your dough with herbs like rosemary or thyme. This adds a fragrant touch that elevates your pretzels. To keep your pretzels fresh, store them in an airtight container. This helps keep them soft. You can keep them at room temperature for one to two days. If you want to keep them longer, try refrigeration. However, this may change their texture. For long-term storage, freezing is the best option. Wrap each pretzel in plastic wrap. Then, place them in a freezer bag. They can last up to three months. When you're ready to eat them, thaw them in the fridge overnight. To reheat, preheat your oven to 350°F (175°C). Place the pretzels on a baking sheet and heat for about 10-12 minutes. This keeps them crispy and warm. When it’s time to serve, warming is key. Use the oven for the best taste. If you want a quick option, microwave them for 20-30 seconds. However, the oven gives a better texture. Serve your pretzels with spicy mustard or cheese dip for a tasty treat! It takes about 1 hour and 40 minutes to make these pretzels. You’ll spend about 20 minutes on prep. Then, let the dough rise for 1 hour. After that, baking takes around 12 to 15 minutes. Just enjoy the process! Yes, you can make the dough ahead. Prepare it and let it rise. After rising, cover it tightly with plastic wrap. Store it in the fridge for up to 24 hours. When ready, let it come to room temperature before shaping. These pretzels pair well with many dips. I recommend tangy spicy mustard or creamy cheese dip. You can also try salsa or guacamole. Fresh veggies on the side add a nice crunch! Absolutely! You can use gluten-free flour blends. Look for ones that work well for baking. Make sure to check the package for measurements. This way, you can enjoy the same delicious taste without gluten! You now know how to make Jalapeño Cheddar Stuffed Pretzels from start to finish. We covered the key ingredients, step-by-step instructions, and expert tips for perfecting your dough. You learned about variations and storage info for your pretzels too. Final thoughts: Pretzels are not just a snack; they can be a fun meal. Get creative with fillings and spices. Enjoy your tasty treats fresh, or store them for later. Happy baking!

Jalapeño Cheddar Stuffed Pretzels Tasty Quick Snack

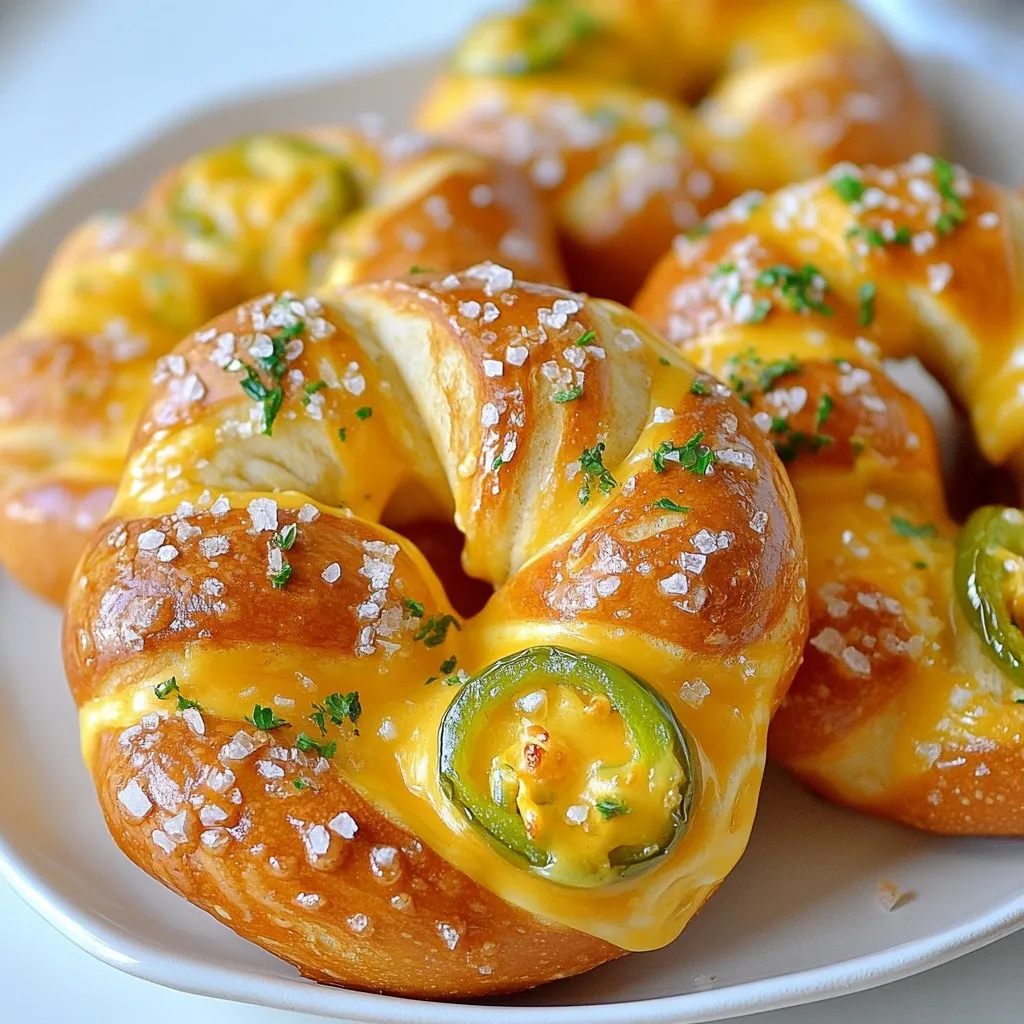
Craving a quick, flavorful snack? You’re in the right place! These Jalapeño Cheddar Stuffed Pretzels are not just tasty—they’re easy

- 1 pound boneless, skinless chicken breast - 6 cups low-sodium chicken broth - 1 tablespoon extra virgin olive oil - 1 medium onion, finely diced - 3 cloves garlic, minced - 2 medium carrots, thinly sliced - 2 celery stalks, thinly sliced I love these main ingredients. The boneless chicken breast gives the soup a lean protein. The low-sodium broth keeps the flavor rich without too much salt. Extra virgin olive oil adds a nice touch of healthy fat. Fresh veggies like onion, garlic, carrots, and celery provide taste and texture. - 1 teaspoon ground turmeric - 1 teaspoon fresh ginger, finely grated - 1 teaspoon dried thyme - Salt and freshly cracked pepper to taste Seasonings are key to making this soup special. Ground turmeric gives it a bright color and helps fight inflammation. Fresh ginger adds warmth and flavor. Dried thyme gives the soup a subtle earthiness. Don't forget to taste and adjust the salt and pepper! - 1 cup kale, chopped (or substitute with spinach) - 1 cup mushrooms, sliced - Fresh cilantro or parsley, chopped for garnish Optional ingredients let you customize your soup. I often add kale or spinach for extra nutrients. Mushrooms bring a savory depth to the dish. Fresh herbs at the end brighten the flavors and make it look pretty. {{ingredient_image_2}} To start, I heat one tablespoon of extra virgin olive oil in a large pot. I set the heat to medium. Once the oil shimmers, I add one medium onion, finely diced. I sauté the onion for about 3-4 minutes until it turns translucent. This step adds great flavor to the soup. Next, I stir in three cloves of minced garlic and one teaspoon of finely grated ginger. I cook them for about one minute. The aroma fills the kitchen and makes my mouth water. Now it’s time to add some color and nutrition. I incorporate two medium carrots, thinly sliced, and two celery stalks, also thinly sliced. I let them cook for an additional 5 minutes. This softens the veggies nicely. Then, I sprinkle in one teaspoon of ground turmeric and one teaspoon of dried thyme. I stir well to coat all the vegetables in the spices. I pour in six cups of low-sodium chicken broth, bringing the soup to a gentle boil. This is where the magic happens! I carefully add one pound of boneless, skinless chicken breasts. I reduce the heat to low and let it simmer for 20-25 minutes. The chicken will become tender during this time. Once cooked, I remove the chicken and place it on a cutting board. Using two forks, I shred the chicken into bite-sized pieces and return it to the pot. To finish, I add one cup of sliced mushrooms and one cup of chopped kale. If I’m feeling adventurous, I might use spinach instead. I continue to cook for another 5-7 minutes until the greens wilt and the mushrooms soften. Finally, I taste the soup and adjust the seasoning with salt and freshly cracked pepper. I serve the soup hot, garnished with freshly chopped cilantro or parsley. This adds a lovely burst of color and flavor. - Best practices for sautéing vegetables: Start with medium heat. Use extra virgin olive oil for a rich flavor. Add onions first and cook until they turn soft. This takes about 3-4 minutes. Add garlic and ginger next. Stir for just one minute to bring out their scents. - Ensuring tender chicken: Use boneless, skinless chicken breast for ease. When you add the chicken, keep heat low. Let it simmer for 20-25 minutes. This slow cook makes the chicken tender. - Adjusting spice levels: If you like it spicy, add more ginger or turmeric. You can also sprinkle in a pinch of red pepper flakes. Taste as you go to find your perfect mix. - Recommended sides for serving: Serve this soup with whole-grain bread for dipping. A fresh salad pairs well too. For a fun twist, try it with crusty baguette slices. - Anti-inflammatory properties of ingredients: Turmeric is a star in this soup. It has curcumin, known for its anti-inflammatory effects. Ginger also helps reduce inflammation. - Nutritional advantages of specific vegetables: Carrots and kale are full of vitamins. Carrots have beta-carotene, great for vision. Kale is rich in antioxidants, which help fight disease. Mushrooms add fiber and boost immune health. Pro Tips Use Fresh Ingredients: Fresh vegetables and herbs will enhance the flavor and nutritional value of your soup, making it more vibrant and healthy. Chicken Broth Matters: Opt for low-sodium chicken broth to control the salt level in your soup while still achieving a rich flavor. Customize Your Greens: Feel free to swap kale with other greens like spinach or Swiss chard, depending on your preference or what you have on hand. Let It Rest: Allow the soup to sit for a few minutes after cooking; this lets the flavors meld together, resulting in a more delicious dish. {{image_4}} To make this soup fit different diets, you can swap the chicken. Tofu or beans work well for a vegetarian option. Both add protein and texture. For gluten-free adjustments, check your broth. Most low-sodium broth is gluten-free, but confirm it on the label. You can also use rice noodles instead of regular pasta if you like. You can change the flavor of the soup easily. For an Asian twist, add miso and lemongrass. Miso gives it a rich taste, while lemongrass adds a fresh zing. If you prefer Mediterranean flavors, try adding oregano and lemon. Oregano gives warmth, and lemon brightens the dish, making it more lively. Using fresh, local produce can make your soup even better. Visit farmers' markets to find seasonal veggies. They taste great and have more nutrients. In winter, add root vegetables like parsnips or turnips. In spring, fresh peas or asparagus work well. In summer, try zucchini or bell peppers. In fall, you can add pumpkin for a cozy touch. Each season brings new flavors to explore! To store leftovers, first let the soup cool. Then, pour it into airtight containers. This keeps the soup fresh and tasty. You can store it in the fridge for up to three days. After this time, the flavor and texture may change. For freezing, use freezer-safe containers. Leave some space at the top, as soup expands when frozen. It’s best to freeze the soup in individual portions. This way, you can thaw just what you need. To thaw, place the soup in the fridge overnight or use the microwave. When ready to eat, reheat it on the stove over low heat. To reheat, pour the soup into a pot over medium heat. Stir often to avoid sticking. Heat until it reaches your desired temperature. You can boost the flavor after storage. Add a little fresh garlic or herbs right before serving. This gives your soup a fresh taste that pops. Enjoy your warm, nourishing meal! What makes this chicken soup anti-inflammatory? This chicken soup is anti-inflammatory due to its key ingredients. Turmeric and ginger are natural anti-inflammatories. They help reduce inflammation in the body. The fresh vegetables provide vitamins and minerals that also fight inflammation. By using low-sodium broth, you lower the risk of water retention. This makes the soup healthier and more balanced. Can I substitute chicken with another protein? Yes, you can use other proteins like tofu or beans. Tofu is a great plant-based option. It absorbs flavors well and adds protein. Beans, such as chickpeas or lentils, also work well. They add texture and extra fiber. Choose a protein that suits your diet and taste. How to reduce sodium levels in the recipe? To lower sodium, use homemade broth instead of store-bought. You can also use unsalted broth. When adding salt, start small and taste as you go. Avoid adding extra salt until the end. Fresh herbs can add flavor without high sodium. Options for spice adjustments for sensitive palates If you find spices too strong, reduce their amounts. Use half the amount of turmeric and ginger. You can also add more vegetables to fill the soup. This will keep the flavors mild. If you like, add a bit of lemon juice for brightness without heat. How long does it take to cook the chicken fully? Cook the chicken for 20-25 minutes on low heat. Make sure the chicken reaches an internal temperature of 165°F. This ensures the chicken is safe to eat. Use a meat thermometer for accuracy. What can I do if the soup is too salty? If the soup tastes too salty, add more water or low-sodium broth. You can also add extra vegetables to balance the salt. Potatoes are a great option; they absorb some salt. Simmer for a few minutes after adding more ingredients. Taste again to check the flavor. This blog explored a simple chicken soup recipe filled with healthy ingredients. We discussed the main ingredients, steps for cooking, flavor tips, and ways to store it. Remember, you can modify this soup to fit your taste and diet. Whether you're looking for comfort or nutrition, this recipe has you covered. Enjoy making your own version, and let it warm you from the inside out!

Anti-Inflammatory Chicken Soup Nourishing and Simple

Are you searching for a warm, comforting dish that fights inflammation? Look no further! My Anti-Inflammatory Chicken Soup is not

To make blueberry lemon cheesecake bars, you'll need these key ingredients: - 1 and 1/2 cups graham cracker crumbs - 1/4 cup granulated sugar - 1/2 cup unsalted butter, melted - 16 oz cream cheese, softened at room temperature - 1 cup granulated sugar - 2 large eggs, at room temperature - 1 teaspoon pure vanilla extract - Zest of 1 lemon - 1/4 cup freshly squeezed lemon juice - 1 cup fresh blueberries (plus extra for topping) When measuring ingredients, be precise. Use dry measuring cups for dry items like graham cracker crumbs and sugar. For liquids, use a liquid measuring cup. Here are a few tips: - Graham cracker crumbs: Crush them finely for a better crust. You can use a food processor or place them in a zip-top bag and crush with a rolling pin. - Cream cheese: Let it soften at room temperature for about an hour. This helps it mix smoothly. - Lemon juice: Always use fresh juice for the best taste. It brightens the flavor so well. Using good ingredients makes a big difference. High-quality cream cheese gives a rich and creamy texture. Fresh blueberries add natural sweetness and vibrant color. Here’s why quality matters: - Flavor: Fresh ingredients enhance the taste. You’ll notice the difference. - Texture: Quality products mix better. This leads to a smoother filling. - Presentation: Fresh fruit looks beautiful and makes your dessert appealing. By focusing on these details, you create blueberry lemon cheesecake bars that shine in taste and look. {{ingredient_image_2}} First, set your oven to 350°F (175°C). This heat helps cook the bars evenly. Grab an 8x8 inch baking pan. Line it with parchment paper, leaving some paper hanging over the sides. This makes it easy to lift the bars out later. In a medium bowl, mix 1 and 1/2 cups of graham cracker crumbs with 1/4 cup of granulated sugar. Pour in 1/2 cup of melted unsalted butter. Stir this mixture until it looks like wet sand. Press the crust firmly into the bottom of your prepared pan. Bake it for 10 minutes. Let it cool a bit while you make the filling. In a large bowl, beat 16 oz of softened cream cheese. Use an electric mixer on medium speed for about 2 minutes until it's smooth. Gradually add 1 cup of granulated sugar while mixing. Then, add 2 large eggs one at a time, mixing well after each. Next, fold in 1 teaspoon of pure vanilla extract, the zest of 1 lemon, and 1/4 cup of freshly squeezed lemon juice. Mix until everything is combined. Lastly, gently fold in 1 cup of fresh blueberries, being careful not to break them. Now, pour the cheesecake filling over your cooled crust. Smooth the top with a spatula. Bake in the oven for 30 to 35 minutes. The edges should be set, but the center can still jiggle a bit. After baking, let the bars cool at room temperature. Then, put them in the fridge for at least 4 hours, or better yet, overnight. This helps them set perfectly. When ready to serve, lift the cheesecake bars out of the pan using the parchment paper. Cut them into squares. For a nice touch, garnish with extra fresh blueberries and a sprinkle of lemon zest. This adds color and makes them look even more appetizing! When making blueberry lemon cheesecake bars, it’s easy to make mistakes. Here are a few to watch for: - Overmixing the filling: This can make the texture too dense. Mix just until combined. - Not using room temperature ingredients: Cold cream cheese can lead to lumps. Always let it warm up. - Skipping the chilling time: These bars need time to set. Don't rush the cooling process. For the best texture, focus on these steps: - Beat the cream cheese well: Make it smooth and fluffy for a creamy filling. - Fold in the blueberries gently: This keeps them whole and adds nice bursts of flavor. - Check the baking time: The center should jiggle slightly. This means it will set perfectly as it cools. You can boost the flavors in your cheesecake bars. Here’s how: - Use fresh lemon juice and zest: This adds brightness to the bars. - Add a pinch of salt: It balances the sweetness and enhances the berry flavor. - Top with extra blueberries: This fresh garnish adds color and taste. Experimenting with these tips will make your cheesecake bars even more delightful! Pro Tips Room Temperature Cream Cheese: Make sure your cream cheese is at room temperature before mixing. This will ensure a smooth and creamy texture without lumps. Fresh Blueberries: Use fresh blueberries for the best flavor and texture. If using frozen, make sure to thaw and drain them well to avoid excess moisture in the filling. Chill Overnight: For the best results, refrigerate the cheesecake bars overnight. This allows the flavors to meld and the texture to firm up perfectly. Cleaning Cuts: To make clean cuts, use a sharp knife and wipe it with a damp cloth between each cut. This keeps the edges of the bars looking neat and professional. {{image_4}} You can easily swap some ingredients if you have dietary needs. For a gluten-free option, use gluten-free graham crackers. They work well in the crust. If you want a lower-sugar version, try using a sugar substitute. Look for ones that measure like sugar for the best results. For a dairy-free choice, you can use cashew cream instead of cream cheese. It gives a nice texture and flavor. While blueberries are delicious, you can try other fruits too. Raspberries add a nice tartness. Strawberries bring a sweet touch. Blackberries can also work well. Just make sure any fruit you use is fresh and ripe. This way, you’ll get the best flavor in your bars. You can mix and match fruits for even more fun flavors. Adding more flavor is a great way to make these bars special. Try adding a pinch of cinnamon for warmth. A splash of almond extract can add a nutty taste. If you love chocolate, fold in some mini chocolate chips. This adds a decadent touch. Lemon zest gives a bright, fresh flavor. You can even experiment with herbs like mint for a unique twist. Each addition makes these cheesecake bars a fun treat! To keep your blueberry lemon cheesecake bars fresh, store them in the fridge. Use an airtight container or cover them tightly with plastic wrap. This prevents the bars from drying out and keeps them tasting great. If you plan to eat them within three days, this method works perfectly. For longer storage, consider freezing them. If you want to save some bars for later, freezing is easy. First, cut the cheesecake into squares. Wrap each piece in plastic wrap. Then, place the wrapped pieces in a freezer-safe bag. Remember to squeeze out as much air as possible before sealing. They can last up to three months in the freezer. When you're ready to enjoy, thaw them in the fridge overnight. Blueberry lemon cheesecake bars stay fresh in the fridge for about five days. If they are frozen, thaw them before eating. You can serve them cold or at room temperature. If you prefer them warm, gently heat them in the microwave for about ten seconds. This softens the bars without cooking them. Yes, you can use frozen blueberries. They work well in this recipe. Just make sure to thaw and drain them first. This prevents excess moisture from ruining the bars. Frozen blueberries may break apart more easily. So, be gentle when folding them into the batter. Blueberry lemon cheesecake bars last about 5 to 7 days in the fridge. Store them in an airtight container. This keeps them fresh and tasty. If you want to enjoy them longer, consider freezing them. Just remember to let them thaw in the fridge before serving. Yes, you can make these bars without eggs. Use a substitute like unsweetened applesauce or silken tofu. This will help bind the filling together. Keep in mind that the texture may change slightly. The bars might be a bit denser but still delicious. To cut cheesecake bars, first, chill them well. Use a sharp knife for clean cuts. Dip the knife in hot water and wipe it dry between cuts. This helps avoid messy edges. For nice squares, cut into equal rows and columns. Enjoy those perfect bites! This blog post covered all you need to know about making blueberry lemon cheesecake bars. We explored key ingredients, step-by-step instructions, and tips to avoid mistakes. You learned how to store your bars and variations to try. Remember, quality ingredients and careful prep lead to tasty results. Baking is fun, and with these tips, you’ll impress your friends and family. Enjoy your cheesecake bars!

Blueberry Lemon Cheesecake Bars Easy Delightful Treat

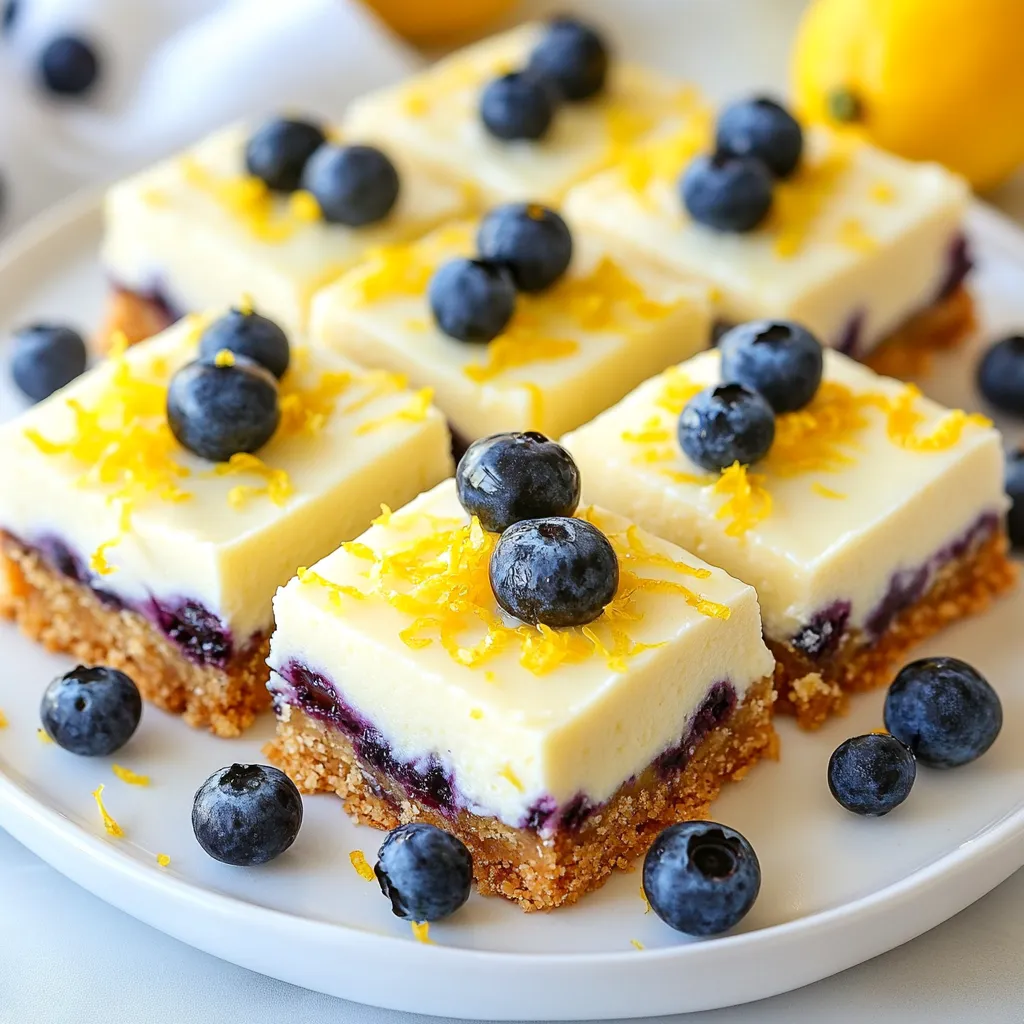
Are you ready to treat yourself to a sweet delight? Blueberry Lemon Cheesecake Bars are the perfect mix of creamy

- 4 medium sweet potatoes - 2 cups cooked chicken, shredded - 1/2 cup buffalo sauce (adjust to taste) - 1/2 cup Greek yogurt - 1 cup shredded cheddar cheese - 1/4 cup green onions, sliced - 1/2 cup celery, diced - Salt and pepper to taste - Optional: fresh parsley for garnish These ingredients come together to create a wonderful dish. Sweet potatoes add natural sweetness and nutrition. They also provide a sturdy base for your filling. The chicken, mixed with buffalo sauce, gives a spicy kick. You can adjust the sauce for your preferred heat level. Greek yogurt adds creaminess and tang. It balances the flavors well. The cheese melts beautifully and adds richness. Green onions and celery provide crunch and freshness. Don't forget to use salt and pepper to enhance the taste. This mix of ingredients makes every bite enjoyable. You can even add fresh parsley for a pop of color if you like. {{ingredient_image_2}} First, set your oven to 400°F (200°C). This high heat helps cook the sweet potatoes just right. Next, rinse the sweet potatoes under cold water to wash off dirt. Make sure to dry them with a towel. Grab a fork and prick the skins several times. This lets steam escape while baking. Now, place the pricked sweet potatoes on a lined baking sheet. Give them space to breathe. Bake them for 45 minutes to 1 hour. They are ready when they feel soft and a fork can go through easily. While the sweet potatoes bake, let’s make the filling. In a medium bowl, mix 2 cups of shredded chicken with 1/2 cup of buffalo sauce. Stir until the chicken gets fully coated in the sauce. You can adjust the sauce to make it hotter or milder. This step is key for finding your perfect heat level! When the sweet potatoes cool a bit, cut each one in half lengthwise. Use a spoon to scoop out some of the flesh but don’t scoop too much! You want the skins to stay strong. Set the scooped flesh aside for later. In another bowl, mix the reserved sweet potato flesh with 1/2 cup of Greek yogurt, 1/2 cup of diced celery, and 1/4 cup of sliced green onions. Add salt and pepper to taste. Stir well until everything is blended. Now, fold the buffalo chicken into this sweet potato mixture. Combine them gently but make sure they mix well. Spoon this filling back into the sweet potato halves, packing it in nicely. Top each half with the remaining 1 cup of shredded cheddar cheese. Return your stuffed sweet potatoes to the oven. Bake them for an extra 10-15 minutes until the cheese melts and becomes bubbly. The cheese should look golden and delicious. Finally, let them cool a bit. If you like, garnish them with more green onions or some fresh parsley for a nice touch. To bake sweet potatoes just right, you need the right time and checks. Bake them for 45 minutes to 1 hour at 400°F (200°C). Check if they are soft by poking them with a fork. If the fork goes in easily, they are ready. Here are some pro tips to boost flavor: - Prick the sweet potatoes well with a fork. This lets steam escape and helps cook evenly. - Line your baking sheet with parchment paper. It makes cleanup easy and keeps the potatoes from sticking. You can make the filling even better with some easy changes. Try adding: - A splash of ranch dressing for a creamy twist. - Diced jalapeños for extra heat. - Chopped bell peppers for crunch. To balance the heat from the buffalo sauce, mix in some Greek yogurt. It adds creaminess and cools the spice. Adjust the buffalo sauce to your taste. You can use less if you like it mild. Pro Tips Adjust the Heat: If you prefer a milder flavor, start with less buffalo sauce and gradually add more to reach your desired spiciness. Perfectly Cooked Sweet Potatoes: To check if the sweet potatoes are done, insert a fork; it should easily penetrate the flesh without resistance. Cheese Variations: Experiment with different types of cheese such as pepper jack for an extra kick or mozzarella for a milder melt. Make Ahead: You can prepare the filling in advance and store it in the refrigerator for up to 2 days, making assembly quick and easy. {{image_4}} You can change the protein in Buffalo Chicken Stuffed Sweet Potatoes easily. If you want a lighter dish, use turkey instead of chicken. Ground turkey works well with the buffalo sauce. It gives a nice flavor and keeps the dish healthy. For a plant-based option, try tofu. You can crumble firm tofu and sauté it with buffalo sauce. This gives a great taste without meat. Another delicious idea is to use black beans. They add protein and fiber, making the dish filling and tasty. Just mash or mix them into the sweet potato filling. When it comes to cheese, you have choices. Cheddar cheese is classic, but you can use mozzarella or pepper jack for a twist. Each one brings a unique flavor. If you want a creamier texture, consider cream cheese. It melts well and makes each bite smooth. For those who avoid dairy, there are many dairy-free cheese options. Look for brands that melt well, like almond or cashew cheese. These options let everyone enjoy the dish while keeping it creamy and cheesy. To store your Buffalo Chicken Stuffed Sweet Potatoes, let them cool first. Place them in an airtight container. You can store them in the fridge for up to three days. For longer storage, freeze the stuffed potatoes. Wrap each one tightly in plastic wrap, then place them in a freezer-safe bag. They can last in the freezer for up to three months. When you're ready to enjoy your leftovers, you have a few options. For the best results, reheat them in the oven. Preheat the oven to 350°F (175°C). Place the stuffed sweet potatoes on a baking sheet and cover them with foil. Bake for about 20 minutes or until heated through. You can also microwave them for a quick option. Place a stuffed sweet potato on a microwave-safe plate. Heat on medium for about 2-3 minutes, checking that it's hot all the way through. If using the microwave, the texture may not be as nice as when baked. Always let them sit for a minute before eating to avoid burns. Yes, you can prepare these stuffed sweet potatoes in advance. To do this, follow these steps: - Bake the sweet potatoes and let them cool. - Prepare the buffalo chicken filling. - Stuff the sweet potatoes and cover them tightly with plastic wrap. - Store them in the fridge for up to 2 days. When you're ready to eat, just bake them again until warm. This method saves time and keeps the dish fresh. While buffalo sauce shines in this recipe, you can try other sauces too. Here are some great alternatives: - BBQ sauce for a sweeter flavor. - Ranch dressing for a creamy touch. - Sriracha sauce for a spicy kick. Feel free to mix and match based on your taste. Each sauce brings its own unique twist to the dish. Adjusting the spice level is easy. For a spicier dish, add more buffalo sauce. If you want it milder, try these tips: - Use less buffalo sauce and add more Greek yogurt. - Mix in some cream cheese for a smooth texture. - Add a pinch of sugar to balance the heat. These changes let you enjoy your stuffed sweet potatoes just the way you like! You can make Buffalo Chicken Stuffed Sweet Potatoes easily at home. We covered all you need: ingredients, step-by-step instructions, and tips for the best flavor. Try out different proteins and cheese options for fun twists. Store leftovers for later and enjoy them reheated with the same great taste. With simple changes, you can customize this dish for your taste. It’s a fun and tasty way to enjoy sweet potatoes while adding protein and veggies. Make it your own and enjoy!

Buffalo Chicken Stuffed Sweet Potatoes Delightful Dish

Are you ready to spice up your dinner routine? Buffalo Chicken Stuffed Sweet Potatoes are a game-changer! This dish combines

To make a delicious High-Protein Mocha Smoothie Bowl, gather these ingredients: - 1 cup unsweetened almond milk - 1 frozen banana - 1 scoop chocolate protein powder - 2 tablespoons cold brew coffee - 1 tablespoon unsweetened cocoa powder - 1 tablespoon almond butter - 1 tablespoon chia seeds - 1 teaspoon honey or maple syrup (optional, for sweetness) These ingredients create a rich and creamy base. The frozen banana adds natural sweetness and creaminess. The chocolate protein powder gives a protein boost and chocolate flavor, while cold brew coffee adds a nice kick. Cocoa powder deepens the chocolate taste. Almond butter brings healthy fats, and chia seeds add fiber and texture. You can use honey or maple syrup if you want it sweeter. Choosing the right toppings makes your smoothie bowl even better. Here are some great options: - Sliced banana - Granola - Cacao nibs - Coconut flakes - Mixed berries These toppings add crunch, flavor, and color. Sliced banana enhances the banana taste. Granola gives a nice crisp texture. Cacao nibs add a rich chocolate crunch. Coconut flakes offer a tropical twist, and mixed berries provide a burst of freshness. Feel free to mix and match toppings based on your taste! To start, gather your ingredients. You will need: - 1 cup unsweetened almond milk - 1 frozen banana - 1 scoop chocolate protein powder - 2 tablespoons cold brew coffee - 1 tablespoon unsweetened cocoa powder - 1 tablespoon almond butter - 1 tablespoon chia seeds - 1 teaspoon honey or maple syrup (optional) Combine all these ingredients in your blender. Using a frozen banana is key. It makes your smoothie thick and creamy. Fresh bananas won't give you the same texture. Plus, frozen bananas add a nice chill to your bowl. Now, let's blend! Set your blender to high speed. Blend for about 1-2 minutes. You want a smooth and creamy texture. If you see bits of banana or protein powder, stop and scrape down the sides. Then, blend again until it’s perfect. If your mixture is too thick, add a splash of almond milk to help it blend. Once your smoothie is blended, it’s time to serve. Pour the mixture into a deep bowl. This gives it a nice look. Now, let’s talk toppings! I like to arrange my toppings for a colorful and fun display. You can use: - Sliced banana - A handful of granola - Cacao nibs - Coconut flakes - Mixed berries Take your time to make it pretty. A well-arranged bowl is not just tasty; it's also fun to eat. Grab a spoon and enjoy your high-protein mocha smoothie bowl right away! You can boost your smoothie bowl's health with great ingredients. Consider adding spinach or kale. These greens blend well and add vitamins. You can also use hemp seeds for extra protein. They have a nutty flavor and mix easily. If you want fiber, try adding oats. This will make your bowl more filling. If you want less sugar, try using stevia or monk fruit. These sweeteners keep the taste sweet without adding calories. You can also enhance flavors with spices. A pinch of cinnamon or nutmeg adds warmth. For a richer taste, try vanilla extract or a dash of espresso powder. These will elevate your smoothie bowl. A good blender makes a big difference. For smooth results, use a high-speed blender. Brands like Vitamix or Blendtec are great choices. They can blend tough ingredients like frozen fruit and seeds. If you have a lower-powered blender, blend in small batches. This will help avoid any chunks in your smoothie. {{image_4}} You can switch up the protein powder for more fun. Try vanilla or even peanut butter protein. Each choice will change the taste. If you want to add seasonal fruits, think about berries in summer or apples in fall. These fruits not only add flavor but also extra nutrients. If you need vegan options, use plant-based protein powder. Almond milk is already vegan, so you’re good there. For gluten-free choices, ensure your toppings are gluten-free. If you have nut allergies, skip almond butter. You can use sunflower seed butter instead. This swaps out the nuts while keeping it creamy. You can pair your mocha smoothie bowl with other bowls for a fun breakfast. Try a berry smoothie bowl or a green smoothie bowl. Mixing flavors makes breakfast exciting and colorful. Don’t be afraid to get creative with textures and tastes! To keep your smoothie bowl fresh, store the base in the fridge. Place it in an airtight container. It lasts about 1-2 days. If you add toppings, store them separately. This keeps them crunchy and fresh. Meal prep makes life easier. You can blend the smoothie base and store it. Freeze the base in portions. Use freezer-safe jars or silicone bags. They save space and prevent freezer burn. Label the containers with the date to track freshness. When you want to enjoy your leftovers, take them out of the freezer. Thaw it in the fridge overnight. If you’re in a hurry, use the microwave. Heat it in short bursts to avoid overheating. Stir well after heating. You can add fresh toppings before serving. Enjoy your tasty, high-protein mocha smoothie bowl! This smoothie bowl packs a punch! It has around 350 calories per serving. Here's a quick breakdown: - Protein: About 25 grams - Carbohydrates: Roughly 45 grams - Fat: Approximately 10 grams - Fiber: About 8 grams The protein comes mainly from the chocolate protein powder and almond butter. The banana and chia seeds add fiber and healthy carbs. Yes, you can! If you want to swap almond milk, here are some tasty options: - Soy milk: High in protein - Oat milk: Creamy and naturally sweet - Coconut milk: Adds a rich flavor - Cow's milk: Traditional choice with more protein Choose what you like best for your smoothie bowl! Absolutely! Meal prepping this smoothie bowl is easy. Here are some best practices: - Make the base ahead: Blend the ingredients and store in the fridge for up to 2 days. - Prep toppings separately: Keep toppings in small containers to stay fresh. - Assemble when ready: Pour the base into a bowl and add toppings just before eating. This way, you’ll enjoy a fresh and delicious meal any time! Your high-protein mocha smoothie bowl is easy to make and packed with nutrients. We covered key ingredients, topped it off with some delicious options, and explored many fun ways to mix it up. Remember, you can customize flavors and adjust the sweetness to fit your taste. Prepare in advance for a quick meal, and enjoy the smooth, creamy texture. This smoothie bowl is a great addition to your diet anytime you need a nutritious boost. Savor the simple joy of creating and enjoying a healthy treat!

High-Protein Mocha Smoothie Bowl Energizing Start

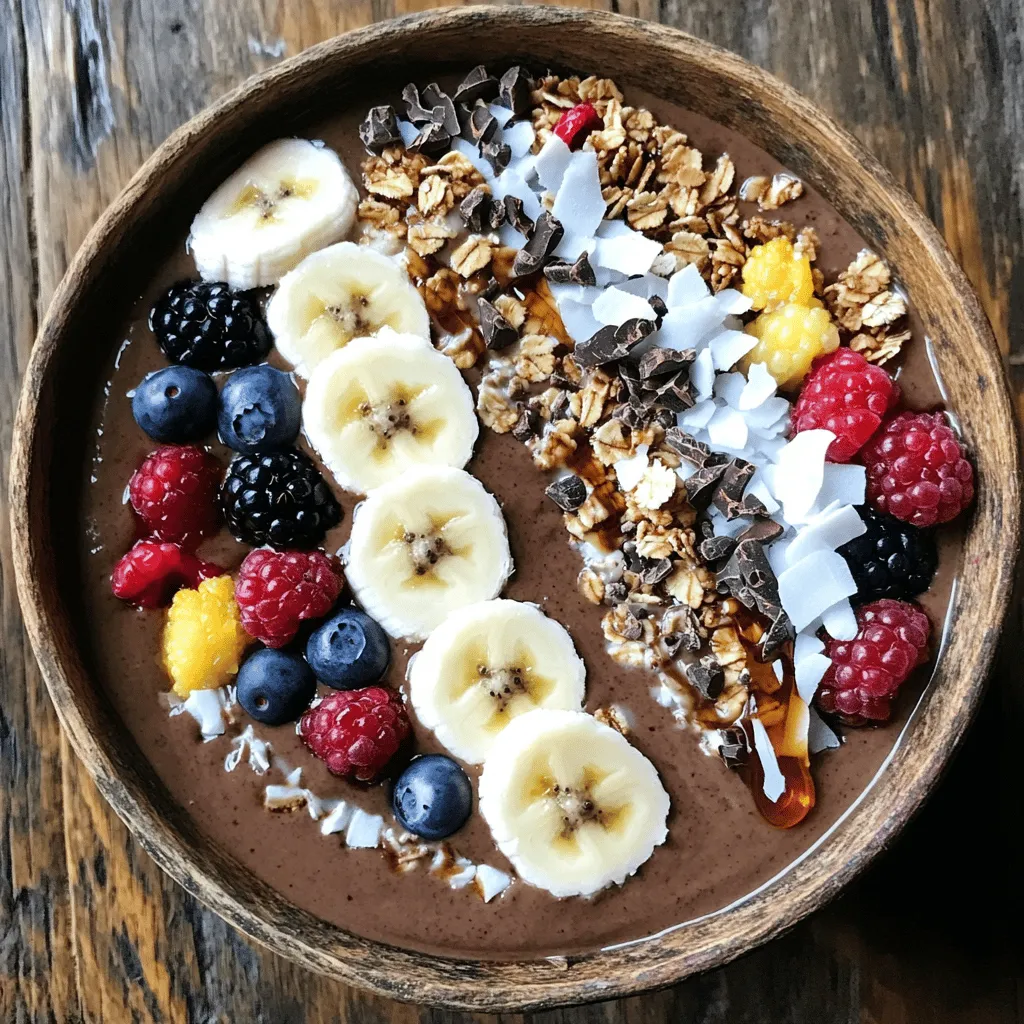
Kickstart your day with my High-Protein Mocha Smoothie Bowl! This tasty treat packs a punch, combining rich chocolate and coffee

- 200g soba noodles - 1 tablespoon sesame oil - 3 cloves garlic, finely minced - 1 teaspoon red chili flakes Soba noodles form the base of this dish. They are quick to cook and have a unique flavor. I love using sesame oil for its nutty taste. Garlic adds depth, while chili flakes give a nice kick. Adjust the chili to suit your spice level. - 1 cup assorted bell peppers, thinly sliced - 1 small zucchini, julienned - 1 medium carrot, julienned - 2 green onions, finely chopped Colorful bell peppers brighten the dish. They add crunch and sweetness. Zucchini and carrots provide texture and nutrition. Green onions finish the dish with freshness. Use a mix of red, yellow, and green peppers for a vibrant look. - 2 tablespoons soy sauce - 1 tablespoon rice vinegar - 1 tablespoon honey or maple syrup Soy sauce brings umami flavor, while rice vinegar adds a tangy touch. Honey or maple syrup balances with sweetness. Together, these sauces create a tasty coating for the noodles and veggies. Start by filling a pot with water. Add a good pinch of salt. Bring the water to a rolling boil. Carefully add the soba noodles. Cook them according to the package instructions, usually 4-5 minutes. Once cooked, drain the noodles. Rinse them under cold water to stop the cooking. This keeps them firm and fresh. In a large skillet or wok, pour in the sesame oil. Heat it over medium heat. When the oil is hot, add the minced garlic and red chili flakes. Sauté them for about 30 seconds. You want the garlic to turn golden and smell great. Add the sliced bell peppers, julienned zucchini, and julienned carrot to the skillet. Stir-fry these colorful veggies for about 3-4 minutes. Cook them until they are bright and slightly tender, but still crisp. Now, add the cooked soba noodles to the skillet with the veggies. In a small bowl, whisk together the soy sauce, rice vinegar, and honey or maple syrup. Drizzle this sauce over the noodles and vegetables. Toss everything gently until it is well mixed and coated with the sauce. Once everything is combined, remove the skillet from heat. Fold in the chopped green onions. Finish with a sprinkle of sesame seeds for a crunchy touch. For serving, use deep bowls. Top with more green onions and sesame seeds. You can also add a lime wedge on the side for extra flavor. To keep your noodles firm and fresh, rinse them after cooking. This stops the cooking process and prevents them from getting mushy. Use a large pot of boiling water and add a good pinch of salt before cooking your soba noodles for better flavor. Adjusting spice levels is easy. Start with a teaspoon of red chili flakes. Taste it, then add more if you want more heat. You can add even more taste to your stir-fry. Try adding a splash of lime juice for a fresh twist. A handful of fresh herbs like cilantro or basil also makes a great addition. Using cold or leftover vegetables works well too. Just toss them in right before serving for a quick and easy upgrade. For sides, pair your stir-fry with a light salad or steamed edamame. Both add color and texture to your meal. When plating, use deep bowls to showcase the vibrant colors of the dish. Top with green onions and sesame seeds for a beautiful finish. A lime wedge on the side adds a nice touch and extra flavor. {{image_4}} You can easily make this dish vegan. First, swap honey for maple syrup. This keeps it sweet and plant-based. Next, add tofu or tempeh for protein. Just cube the tofu and sauté it until golden. This will give you a hearty meal that fits any vegan diet. If you need a gluten-free meal, you have options. Try using rice noodles or quinoa noodles instead of soba. Both have a great texture and flavor. Make sure to use gluten-free soy sauce or tamari in the sauce. This keeps your dish safe while still tasty. Want to change up the flavors? You can spice it up with extra sauces. Try adding sriracha or a splash of lime juice for zest. You can also mix in different vegetables. Broccoli, snap peas, or mushrooms work great. This will give your stir-fry a new twist each time you make it. To keep your Minute Chili Garlic Soba Stir-Fry fresh, use proper storage containers. Glass or BPA-free plastic containers work best. Make sure they seal tightly. This helps keep moisture in and air out. Cool the stir-fry to room temperature before storing it. This step prevents condensation, which can cause sogginess. The stir-fry will stay good in the fridge for about three days. When you're ready to enjoy your leftovers, the best methods for reheating are using a skillet or microwave. If you use a skillet, add a splash of water or sesame oil. Heat on medium until warm. Stir often to avoid sticking. If using a microwave, place the stir-fry in a microwave-safe dish. Cover it with a damp paper towel to keep it moist. Heat in short bursts of 30 seconds, stirring in between. This method helps avoid sogginess. You can freeze the stir-fry for longer storage. Divide it into portions before freezing. Use airtight containers or freezer bags to prevent freezer burn. Make sure to remove as much air as possible from the bags. To thaw, place the frozen stir-fry in the fridge overnight. For a quick thaw, use the microwave on the defrost setting. After thawing, reheat as mentioned before, and enjoy your meal! This dish takes about 20 minutes to make. You need around 10 minutes to prep. Cooking the noodles and stir-frying the veggies takes another 10 minutes. It’s quick and easy! Yes! You can use other noodles if you like. Try udon, rice noodles, or even spaghetti. Just adjust the cooking time based on the noodle type you choose. You can add many proteins to this dish. Grilled chicken, shrimp, or tofu work great. Just cook them separately and toss them in with the noodles. Absolutely! This stir-fry is perfect for meal prep. Cook a big batch and store it in containers. It stays fresh for a few days in the fridge. This blog post covered how to make a tasty chili garlic soba stir-fry. We looked at the main ingredients, like soba noodles, vegetables, and sauces. Then, I shared easy steps for cooking and combining flavors. You can tweak the recipe with tips on variations and storage. In the end, this dish is simple, fresh, and fun. Enjoy making it your own!

Minute Chili Garlic Soba Stir-Fry Quick and Tasty Meal

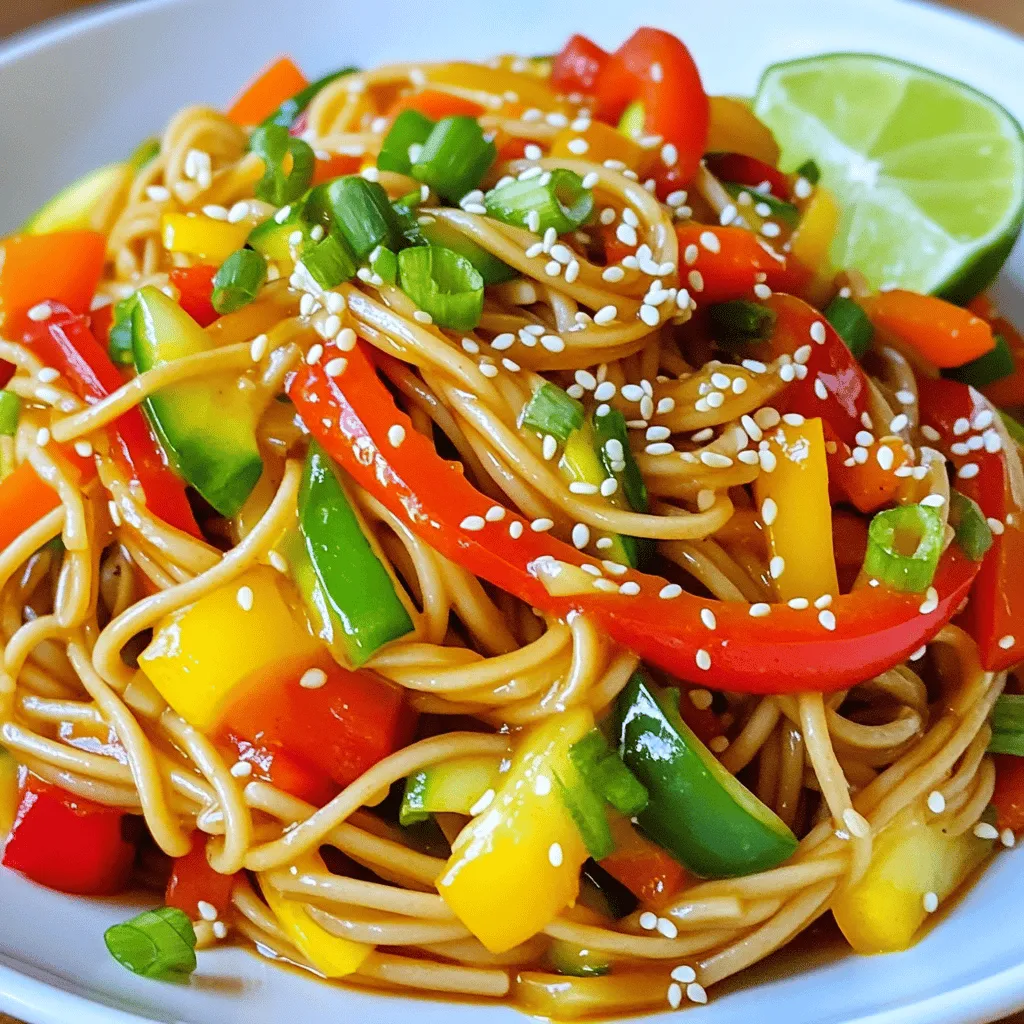
If you need a quick and tasty meal, this Minute Chili Garlic Soba Stir-Fry is your answer! With simple ingredients

Older posts
Newer posts
← Previous Page1 … Page16 Page17 Page18 … Page120 Next →

dsad

© 2026 recipetorch • Built with GeneratePress

Our Policies

  • Copyright Policy
  • Cookie Policy
  • GDPR Policy
  • Privacy Policy
  • Disclaimer
  • Terms Of Use

More Information

  • Home
  • About
  • Contact
  • Appetizers
  • Dessert
  • Dinner
  • Drinks
©2026, recipetorch About Back To Top