Skip to content
DisclaimerTerms Of UseGDPR PolicyCookie Policy

recipetorch

  • Home
  • Drinks
  • Appetizers
  • Dinner
  • Dessert
  • About
  • Contact
  • Privacy Policy
DisclaimerTerms Of UseGDPR PolicyCookie Policy

Nicole

- 1 package of Oreo cookies - 3 tablespoons unsalted butter - 8 oz cream cheese - 1 cup pumpkin puree - 1/2 cup powdered sugar - 1 teaspoon pure vanilla extract - 1 teaspoon pumpkin pie spice - Optional: Whipped cream for topping - Additional crushed Oreos - Optional caramel sauce or cinnamon sprinkle The heart of this no-bake Oreo pumpkin cheesecake lies in its ingredients. You will need a package of Oreo cookies for the crust. The creaminess comes from eight ounces of cream cheese. Pumpkin puree adds flavor and color, while powdered sugar gives sweetness. Next, you will enhance the flavor with vanilla extract and pumpkin pie spice. These two ingredients make each bite taste like fall. For a fun touch, consider topping your dessert with whipped cream. To make your cups visually appealing, use extra crushed Oreos. You can also drizzle caramel sauce or sprinkle cinnamon on top. These final touches elevate your treat from simple to stunning. Each layer of flavor and texture makes this dessert a must-try. To make the crust, start by combining the crushed Oreo cookies with melted butter in a bowl. Mix them well until the crumbs look sandy and hold together. This texture is key for a good base. Next, grab your serving cups or jars. Spoon the Oreo mixture into each cup. Use a small measuring cup or spoon to press it down firmly. This helps it stay compact and not crumble later. Now, let’s move on to the filling. In a large bowl, beat the softened cream cheese until it's smooth. Make sure there are no lumps; we want a creamy texture. Then, add in the pumpkin puree, powdered sugar, vanilla extract, and pumpkin pie spice. Mix everything together until it’s all blended and smooth. This will give your filling a rich pumpkin flavor. Next, we need to make the whipped cream. In a separate bowl, whip the heavy cream until it forms stiff peaks. This means it should look fluffy and hold its shape. Once that’s done, gently fold the whipped cream into the pumpkin mixture. Be careful not to stir too hard; we want to keep the airiness of the cream. This step adds lightness to your cheesecake. Now it’s time to assemble the cups. Carefully spoon the pumpkin cheesecake mixture onto the Oreo crust in each cup. Fill them generously, but don’t overflow! Use a spatula or the back of a spoon to level and smooth out the top. This gives it a nice finish and makes it look neat. Finally, cover the cups with plastic wrap and place them in the fridge. Chill them for at least four hours. This setting time is important; it helps the cheesecake firm up and makes it easier to enjoy. After chilling, your delightful treats will be ready to serve! - Using different types of cookies for the crust: Try using chocolate wafers or graham crackers. Each option adds a unique twist. Chocolate wafers give a richer taste, while graham crackers add a nice crunch. - Experimenting with spices for added flavor: You can mix in nutmeg or cinnamon. These spices can enhance the pumpkin flavor. A pinch of ginger adds warmth too. Don’t be afraid to play with the spice amounts to find your favorite blend. - Presentation ideas for an eye-catching dessert: Use clear cups to show off those lovely layers. You can also drizzle caramel or chocolate on top for an extra touch. A sprinkle of cinnamon or extra crushed Oreos makes it pop. - Pairing ideas for a dessert display: Serve these cups with spiced cookies or mini pumpkin muffins. This creates a fun dessert table. You might also want to offer some coffee or chai tea to complement the flavors. - Recommended mixing bowls and tools: Use a large mixing bowl for the cream cheese and a medium bowl for the whipped cream. A spatula helps fold the mixtures without losing air. - Suggestions for serving cups or jars: Small glass jars or clear plastic cups work well. Choose sizes that allow for a good layer of cheesecake and crust. This makes each bite enjoyable and pretty. {{image_4}} You can add more flavors to your cheesecake cups. Try mixing in chocolate or caramel. This gives a rich taste. Just melt some chocolate or caramel and swirl it into the pumpkin mixture. You can also use fruit purees, like apples or pears. They add a fresh twist to the pumpkin flavor. For those who need gluten-free options, swap out the Oreo cookies. Use gluten-free cookies instead. They work just as well in the crust. If you want vegan options, look for cream cheese made from plant-based ingredients. You can also use coconut cream instead of whipped cream. These simple swaps keep the taste delicious. Need to serve more people? You can easily scale up the recipe. Just double the ingredients for a larger gathering. For small events, make mini dessert cups. Use smaller jars or cups to create bite-sized treats. This way, everyone can enjoy a taste without feeling too full. To keep your No Bake Oreo Pumpkin Cheesecake Cups fresh, seal them tightly. Use plastic wrap or lids that fit well on your cups. This helps keep air out and prevents them from drying out. I recommend using small glass jars or plastic cups with covers. They are easy to store and look nice too. These cheesecake cups stay fresh in the fridge for about five days. After five days, the taste and texture may change. Watch for signs of spoilage like a sour smell or a change in texture. If the whipped cream starts to separate, it’s time to toss them out. You can freeze these cheesecake cups for up to a month. Just make sure to cover them well. Wrap each cup in plastic wrap, then place them in a freezer-safe bag. When you’re ready to eat them, thaw in the fridge overnight. Avoid thawing them at room temperature, as this can make the texture off. Yes, you can use pre-made pumpkin puree. It is smooth and easy to work with. However, avoid pumpkin pie filling. Pumpkin pie filling has added sugar and spices. This will change the taste of your cheesecake. Stick to pure pumpkin puree for the best flavor. The cheesecake needs to chill for at least 4 hours. Chilling gives it the right texture. It helps the filling set and become firm. If you can, chill it overnight. This extra time makes it even better. You can make these cheesecake cups ahead of time. They are perfect for parties or special days. Just follow the recipe and store them in the fridge. They stay fresh for up to 3 days. This makes it easy to enjoy dessert without stress. Garnishing is fun and easy! You can add extra crushed Oreos on top. This adds a nice crunch. Whipped cream is also a great choice. For a twist, try drizzling caramel sauce or sprinkling cinnamon. These toppings make the dessert look fancy and taste even better. This blog post covered how to make delicious pumpkin cheesecake cups. We looked at key ingredients like Oreos, cream cheese, and pumpkin puree. The steps showed how to create a tasty crust and filling. Don't forget to chill the cups for the best texture. Feel free to try different cookies or flavors to make it your own. With these tips, you can impress friends and family. Enjoy your creation, and happy baking!

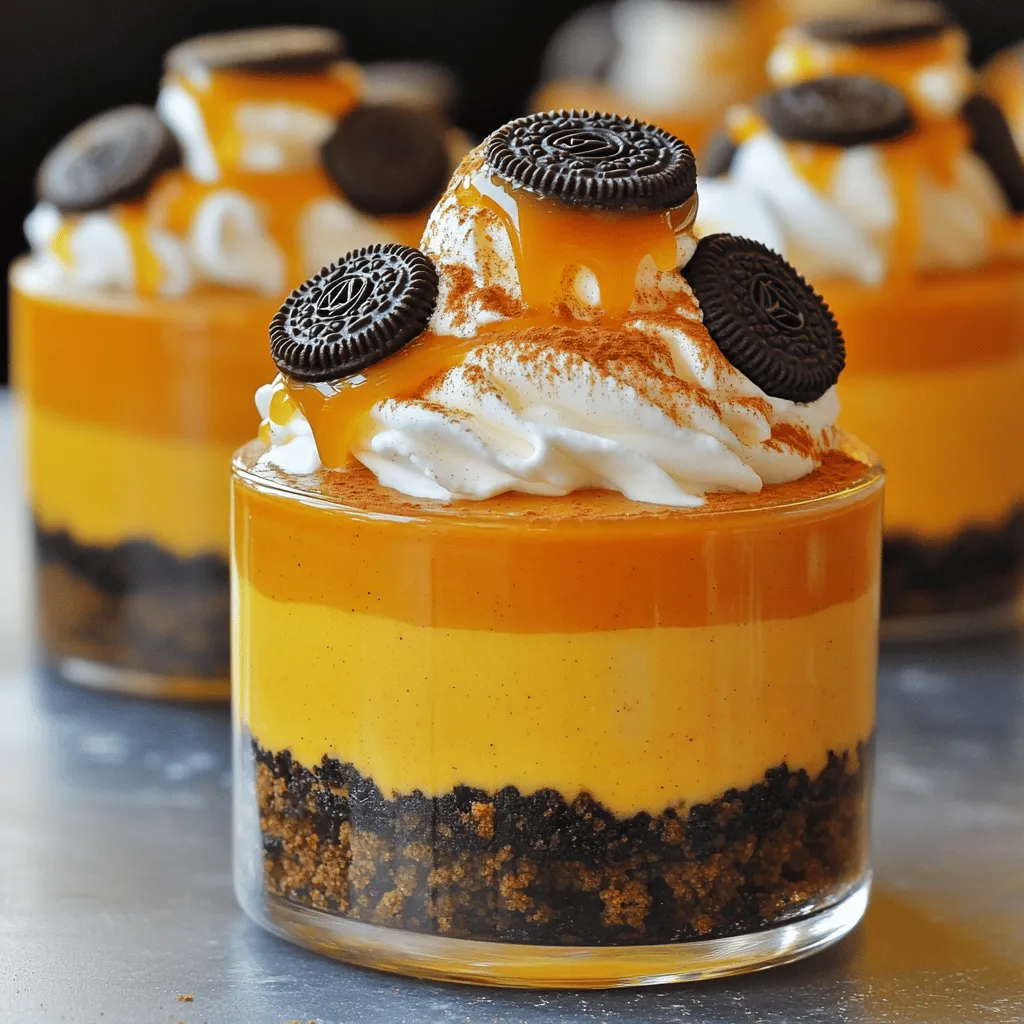
No Bake Oreo Pumpkin Cheesecake Cups Delightful Treat

Get ready for a tasty fall treat with my No Bake Oreo Pumpkin Cheesecake Cups! This easy recipe combines rich

Here are the simple ingredients you need for Sheet Pan Teriyaki Salmon & Veggies: - Fresh salmon fillets - Vegetables: broccoli, baby carrots, red bell pepper - Teriyaki sauce - Sesame oil and honey (or maple syrup) - Garlic and ginger - Seasoning: salt and black pepper - Garnish: sesame seeds and green onions Each ingredient plays a key role in making this dish tasty. The salmon gives protein and richness. Broccoli, baby carrots, and red bell pepper add color and crunch. The teriyaki sauce brings a sweet and savory flavor. Sesame oil and honey enhance this flavor, making it even better. Garlic and ginger provide a warm, aromatic touch. Don’t forget the salt and pepper! They help balance the flavors. Finally, sesame seeds and green onions add a pop of color and fun texture as a garnish. Gather these ingredients, and you are ready to create a delightful meal! First, preheat your oven to 400°F (200°C). This heat will cook the salmon and veggies just right. Next, line a large baking sheet with parchment paper. This makes cleanup easy and keeps your food from sticking. In a small bowl, mix together the teriyaki sauce, sesame oil, honey, minced garlic, and grated ginger. Whisk until smooth. This marinade adds flavor to your salmon and veggies. Place the salmon fillets on one side of the baking sheet. Season each fillet with salt and black pepper. Pour half of the marinade over the salmon, ensuring they are well coated. Set the other half aside for the veggies. In a large bowl, combine the washed broccoli florets, sliced baby carrots, and red bell pepper strips. Drizzle the reserved marinade over the vegetables. Toss gently to coat them evenly. Spread the marinated vegetables on the other side of the baking sheet. Make sure they are spaced apart to roast well. Bake everything in the preheated oven for about 15 to 20 minutes. The salmon will flake easily when done. The veggies should be tender yet still crisp. When the baking time is up, take the sheet pan out of the oven. Drizzle any leftover marinade over both the salmon and vegetables. This will enhance the flavors. Finally, garnish with sesame seeds and sliced green onions. This adds a nice crunch and color. To cook salmon just right, aim for an internal temperature of 145°F. Use a food thermometer for best results. If you don’t have one, look for the salmon to turn opaque. The flesh should flake easily when you poke it with a fork. This means it's ready to eat and packed with flavor. When choosing vegetables, pick fresh and bright options. For broccoli, look for deep green florets without yellowing. Slice the baby carrots diagonally for a nice touch. The red bell pepper should feel firm and vibrant. For roasting, spread veggies evenly on the pan. This ensures they cook well and stay crisp. If you want more flavor, consider adding extra spices. A sprinkle of chili flakes can add heat, while a dash of soy sauce can deepen the taste. Pair your dish with fluffy jasmine rice or a light quinoa salad. This creates a balanced meal and adds texture. {{image_4}} You can switch salmon for chicken or tofu. If you choose chicken, use boneless, skinless thighs or breasts. Cut them into small pieces for quick cooking. Marinate them as you would the salmon. If you prefer tofu, use firm or extra-firm tofu. Press it to remove excess water, then cube it. Marinate and bake the tofu the same way. This gives you tasty options for any diet. Feel free to mix up the veggies. Zucchini and snap peas are great choices. Slice zucchini into half-moons for even cooking. Snap peas add a nice crunch. Other options include bell peppers in different colors or asparagus. Each vegetable brings its unique taste and texture. You can also use frozen veggies if you're short on time. Just make sure they are thawed and drained. While teriyaki is delicious, there are other sauces to try. You can use soy sauce mixed with honey and garlic for a different flavor. A spicy sriracha glaze can add heat. For a tangy twist, try a lemon or lime sauce. Each sauce can change the dish's profile while keeping it simple. Experimenting can lead to fun and tasty meals. To keep your teriyaki salmon and veggies fresh, store them in airtight containers. This helps lock in flavor and moisture. Let the dish cool down to room temperature before sealing. Refrigerate it within two hours of cooking. Properly stored, it lasts up to three days in the fridge. When reheating, I recommend using an oven or microwave. For the oven, preheat it to 350°F (175°C). Place the salmon and veggies on a baking sheet and cover with foil. Heat for about 10 to 15 minutes. This method keeps the dish moist. If using a microwave, heat in short bursts. This prevents overcooking and helps maintain flavor. Yes, you can freeze this dish! To do this, let the meal cool completely. Cut the salmon and veggies into portions. Use freezer-safe bags or containers. Make sure to remove as much air as possible to avoid freezer burn. You can freeze it for up to three months. When ready to eat, thaw overnight in the fridge and reheat as mentioned above. You bake salmon at 400°F for about 15 to 20 minutes. The salmon should flake easily with a fork when done. This quick cooking time works well for tender, juicy salmon. Yes, you can use frozen salmon. Just thaw it first before cooking. Thawing ensures even cooking and better flavor. Place the frozen salmon in the fridge overnight or in cold water for quicker thawing. You can serve this dish with steamed rice or quinoa. Both options add texture and balance the meal. You might also try a fresh salad or some noodles for variety. Yes, this recipe is great for meal prep. You can store leftovers in airtight containers. It keeps well in the fridge for up to three days, making it easy to grab and go. To make homemade teriyaki sauce, mix soy sauce, honey, and garlic. Add in some ginger for a fresh taste. Heat the mixture on the stove until it thickens. This sauce is simple and full of flavor! This blog post covered a tasty teriyaki salmon dish with fresh veggies. We looked at the ingredients needed and how to prepare everything step by step. You learned about marinating salmon, baking it, and getting the veggies just right. Plus, I shared tips to enhance flavor and make meal prep easy. In the end, this dish is simple and fun to make. You can adjust it to fit your taste. Enjoy your cooking journey with delicious results!

Sheet Pan Teriyaki Salmon & Veggies Simple Recipe

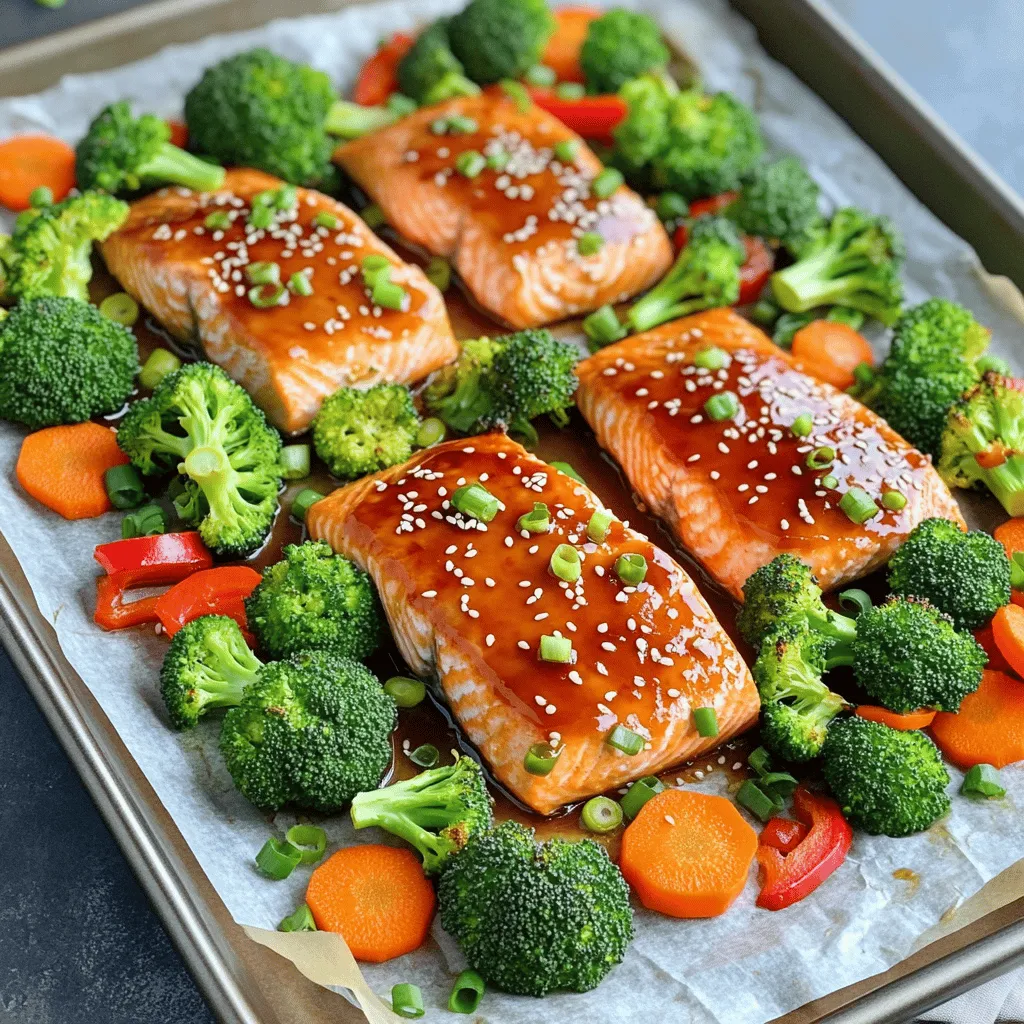
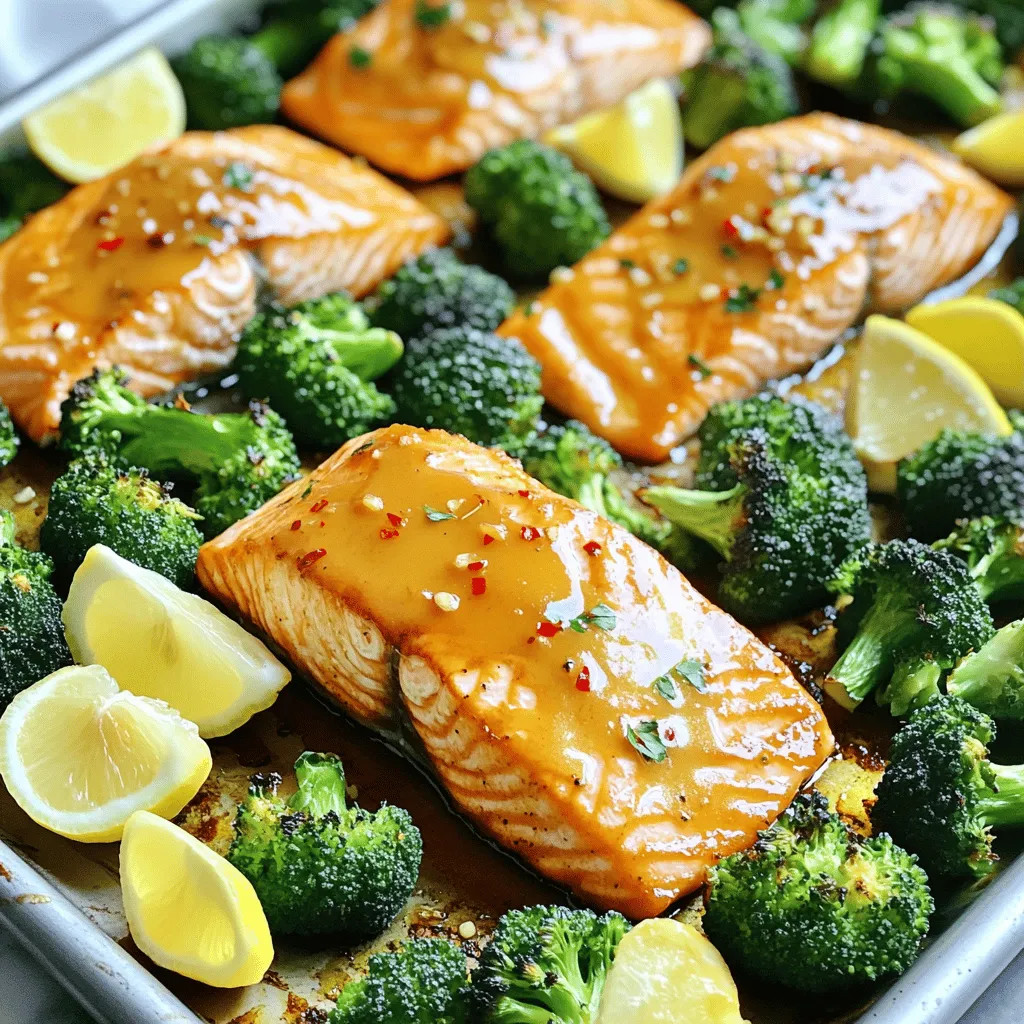
Looking for a quick and tasty dinner? This Sheet Pan Teriyaki Salmon and Veggies recipe is just what you need!

- 2 cups fresh strawberries, hulled and chopped - 2 tablespoons honey or maple syrup Strawberries are the star of this recipe. Choose ripe, sweet strawberries for the best taste. Hulling means removing the green leafy part at the top, making them ready for blending. You can add honey or maple syrup to adjust the sweetness. - 1 cup plain Greek yogurt - 1 tablespoon vanilla extract Greek yogurt brings a creamy base to these popsicles. It adds protein and a slight tang. The vanilla extract gives a lovely aroma and extra flavor. - 1 tablespoon freshly squeezed lemon juice - A pinch of salt Lemon juice adds brightness and balances the sweetness. Just a pinch of salt enhances all the flavors. It makes the popsicles taste even better. {{ingredient_image_2}} Start by placing your chopped strawberries in a blender. Add two tablespoons of honey or maple syrup. This adds sweetness based on your taste. Blend until the mixture is smooth. Set the puree aside for later. In a mixing bowl, combine one cup of plain Greek yogurt. Add one tablespoon of vanilla extract and one tablespoon of freshly squeezed lemon juice. Don't forget a pinch of salt! Whisk everything until it's creamy and well mixed. This mixture adds a rich flavor to the popsicles. Begin by pouring half of the strawberry puree into your popsicle molds. Fill them just enough to create an even layer. Next, add a generous layer of the yogurt mixture on top. Smooth it out so it looks nice. After that, pour the rest of the strawberry mixture over the yogurt layer. To create a marbled effect, take a skewer or popsicle stick. Gently swirl it through the layers. Be careful not to mix them too much! Insert the popsicle sticks upright into the molds. Now, transfer the molds to your freezer. Freeze for at least 4 to 6 hours, or until the popsicles are firm. When they are ready, run warm water over the outside of the molds for a few seconds. This helps loosen the popsicles, making removal easier. Enjoy your refreshing treat! To modify sweetness, start by tasting the strawberry puree. If it’s too tart, add more honey or maple syrup. I like to use two tablespoons for a nice balance. For a lighter touch, you can cut down to one tablespoon. Remember, you can always add more, but you cannot take it out once mixed. This makes it easy to find your sweet spot. To create that stunning marbled look, use a skewer or popsicle stick. After layering the strawberry puree and yogurt, gently swirl it through both layers. Go slow! This helps keep the colors separate while still blending them slightly. A few swirls are enough to achieve a beautiful effect. The goal is to see both colors in each popsicle. When it's time to serve, presentation matters! Place the popsicles on a bright plate. Garnish with fresh strawberry slices and a sprig of mint for a pop of color. This not only makes your dish look fancy but also adds a fresh taste. Your guests will love the effort you put into making the popsicles look as good as they taste. Pro Tips Fresh Strawberries are Key: Use ripe, fresh strawberries for the best flavor. They should be bright red and fragrant, which indicates sweetness. Adjust Sweetness to Taste: Depending on the ripeness of your strawberries, you may need to adjust the amount of honey or maple syrup. Start with less and add more if needed. Layer for Visual Appeal: When layering the strawberry puree and yogurt, take your time to create distinct layers for a beautiful marbled effect. Effortless Removal: If you have trouble removing the popsicles from the molds, running warm water over the outside for a few seconds will help loosen them without melting. {{image_4}} You can mix things up with different fruits. Instead of just strawberries, try blueberries, raspberries, or blackberries. You can also explore tropical fruits like mango or pineapple. Each choice adds a new twist. For example, mango brings a lovely sweetness. Mixing berries can give a nice tart flavor. If you want a dairy-free option, try coconut or almond yogurt. These options add a unique flavor and keep the popsicles creamy. For extra taste, pick flavored yogurt. You can use vanilla or even coconut-flavored yogurt. These choices can make your popsicles even more exciting. Adding nuts or granola can give your popsicles a nice crunch. Chopped almonds or walnuts work well. A sprinkle of granola adds texture and flavor. You can mix these in with the yogurt or sprinkle them in the molds. This adds a fun surprise to each bite. To keep your strawberry yogurt swirl popsicles fresh, follow these tips: - Use airtight containers: After freezing, place popsicles in airtight bags or containers. This prevents freezer burn. - Label and date: Always label your storage with the date. This helps track freshness. - Freezing duration: These popsicles last about 1 to 2 months in the freezer. Enjoy them within this time for the best taste. When ready to enjoy, here’s how to soften your popsicles: - Room temperature: Let the popsicles sit out for about 5 minutes. This helps them soften. - Warm water: Run warm water over the outside of the mold for about 10 seconds. This loosens them up quickly. If you have leftover popsicles, here’s what to do: - Reseal carefully: If you thaw a popsicle and don’t eat it, wrap it tightly in plastic wrap. This helps keep it fresh. - Refreezing: You can refreeze it, but know that the texture may change. The popsicle may become a bit icy. For best results, eat them fresh! Yes, you can use frozen strawberries! They are often picked and frozen at their peak ripeness. This means they can taste just as good as fresh ones. Using frozen strawberries can be easier, too. Just blend them straight from the freezer. However, be aware that the texture may be a bit softer. This might change the final look of your popsicles. If you prefer a firmer texture, add a little less sweetener. Popsicles usually take about 4 to 6 hours to freeze completely. For best results, aim for at least six hours. This ensures they are firm and easy to remove from the molds. If you are in a hurry, you can try freezing them for a shorter time. Just be careful; they may be too soft to hold their shape. Absolutely! You can use small cups or ice cube trays as molds. Just pour the mixture into your chosen containers. If you use cups, insert sticks once the mixture is a bit firm. This helps the sticks stay upright. You can also use silicone molds, which make it easier to pop the popsicles out. Be creative! You learned how to craft tasty strawberry popsicles using fresh ingredients and simple steps. Start with blending strawberries and sweeteners. Then, mix yogurt with lemon and vanilla. Layer and freeze for a delicious treat. Remember, you can adjust sweetness and try different fruits too. Store your popsicles right for lasting enjoyment. Enjoy your cool creations and impress friends and family with unique flavors!

Strawberry Yogurt Swirl Popsicles Refreshing Summer Treat

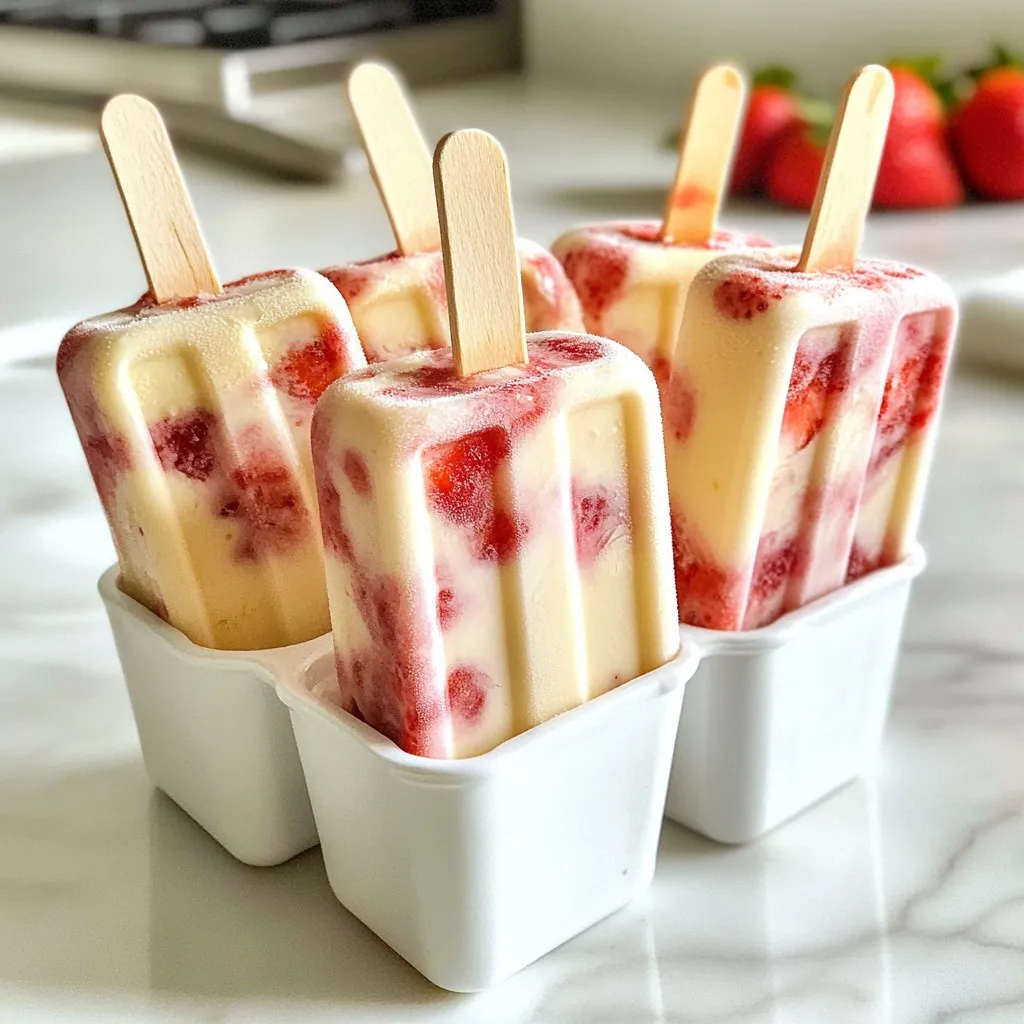
Beat the summer heat with my Strawberry Yogurt Swirl Popsicles! These tasty treats are easy to make and use fresh

- 1 large head of cauliflower, cut into bite-sized florets - 1 cup all-purpose flour - 1 cup non-dairy milk (like almond or oat milk) - 1 teaspoon garlic powder - 1 teaspoon onion powder - 1 teaspoon smoked paprika - Salt and pepper, to taste - 1 cup panko breadcrumbs - 1/2 cup honey - 4 cloves garlic, minced - 2 tablespoons soy sauce (or tamari for a gluten-free option) - 1 tablespoon apple cider vinegar - 1 teaspoon ground ginger - 1 tablespoon sesame seeds (for garnish) - Fresh cilantro leaves (for garnish) Each ingredient plays a key role in making these wings special. The cauliflower gives a great base, while the batter makes it crunchy. Honey and garlic add sweet and savory notes that make you want more. The panko breadcrumbs ensure a crispy texture that contrasts nicely with the tender cauliflower. {{ingredient_image_2}} Preheat Oven and Prepare Baking Sheet First, set your oven to 425°F (220°C). This high heat helps create crispy wings. Next, line a baking sheet with parchment paper. This makes cleaning up easy. Make the Batter In a large bowl, mix together 1 cup of flour, 1 teaspoon of garlic powder, 1 teaspoon of onion powder, 1 teaspoon of smoked paprika, and salt and pepper. Gradually whisk in 1 cup of non-dairy milk until smooth. This batter gives the wings a tasty coating. Coat Cauliflower Florets Take your cauliflower head and cut it into bite-sized florets. Dip each floret into your batter, making sure it’s fully coated. Next, roll it in panko breadcrumbs for a great crunch. Place the coated florets on your baking sheet in a single layer. Placing Florets on the Baking Sheet Carefully arrange your cauliflower florets on the prepared baking sheet. Make sure they have space between them. This helps them bake evenly. Baking Duration and Tips for Crispness Put the baking sheet in the oven. Bake the cauliflower wings for 25-30 minutes. Remember to flip them halfway through. This ensures they get golden brown and crispy on both sides. Combining Ingredients in a Saucepan While the wings bake, grab a small saucepan. Over medium heat, mix 1/2 cup of honey, 4 minced garlic cloves, 2 tablespoons of soy sauce, 1 tablespoon of apple cider vinegar, and 1 teaspoon of ground ginger. Cooking and Thickening the Sauce Stir the sauce as it heats up. Let it come to a gentle simmer. Cook it for about 5 minutes. This thickens the sauce and makes it rich and flavorful. Tossing Cauliflower Wings in Sauce Once the wings are done baking, take them out of the oven. Place them in a large mixing bowl. Pour the honey garlic sauce over the hot wings. Toss them gently until all the wings are covered in sauce. Presentation Tips and Serving Suggestions To serve, transfer the sticky wings to a platter. Sprinkle sesame seeds on top for crunch. Add fresh cilantro leaves for a pop of color and flavor. Enjoy your delicious Sticky Honey Garlic Cauliflower Wings! To get that perfect crunch, always use panko breadcrumbs. Panko is lighter and airier than regular breadcrumbs. This texture helps the wings turn out crispy and golden. Feel free to try different seasonings. You can add some chili powder or even herbs for a unique taste. To make sure the sauce sticks well, toss the wings right after baking. The heat helps the sauce cling to each floret. You can also try a thicker sauce. For a lighter option, brush the sauce on instead of tossing. This way, you keep some crunch. Pair these wings with your favorite dipping sauces. Ranch or blue cheese work great. For side dishes, try a fresh salad or roasted veggies. They add color and complement the wings nicely. Pro Tips Choose the Right Cauliflower: Opt for fresh cauliflower that is firm and free of any brown spots for the best flavor and texture. Get Extra Crunch: For an even crunchier texture, double-dip the cauliflower in the batter and panko breadcrumbs before baking. Adjust Sweetness: Feel free to adjust the amount of honey in the sauce according to your taste preferences; you can substitute with maple syrup for a vegan option. Perfect Pairings: These wings pair excellently with a side of vegan ranch dressing or a fresh salad to balance the sweetness. {{image_4}} For a gluten-free version, you can switch to gluten-free flour. There are many options like almond flour or chickpea flour. Both work well in the batter. They give a nice texture and flavor to the wings. For the sauce, use tamari instead of soy sauce. Tamari is a gluten-free soy sauce that tastes great. It keeps the sauce rich and flavorful without gluten. If you want some heat, add spices to the batter. A pinch of cayenne pepper or red pepper flakes will do the trick. These spices bring a nice kick to your cauliflower wings. You can also use chili sauce as an alternative to the honey garlic sauce. Sriracha or gochujang adds a spicy twist. Just mix it with the honey for a sweet and spicy treat. To make these wings vegan, you can substitute honey. Use maple syrup or agave nectar instead. Both options will give you that sweet flavor without honey. For a creamy vegan sauce, try using coconut milk or cashew cream. Blend them with garlic and your favorite spices for a rich taste. This adds a new layer of flavor to your wings. To keep your sticky honey garlic cauliflower wings fresh, follow these steps: - Refrigeration Tips: Place your leftover wings in an airtight container. Store them in the fridge for up to three days. Make sure they cool down before sealing. This helps keep them crispy and tasty. - Freezing Cauliflower Wings: If you want to save them longer, freeze the wings. Lay them in a single layer on a baking sheet. Freeze them for about an hour. Once frozen, transfer them to a freezer-safe bag. They can last up to three months in the freezer. For the best results when reheating, consider these methods: - Best Practices for Maintaining Crispiness: Use the oven to reheat wings. Preheat it to 375°F (190°C). Place wings on a baking sheet and heat for about 10-15 minutes. This keeps them crispy and delicious. - Microwave vs. Oven Reheating: The microwave is quick but may make them soggy. If you’re in a hurry, you can use it. Heat in short bursts, checking often. The oven is better for crispiness. Knowing how long your wings last helps avoid waste: - How Long They Last in the Fridge: In the fridge, sticky honey garlic cauliflower wings stay fresh for about three days. After that, they may lose flavor and texture. - Signs of Spoilage: Check for any off smells or changes in texture. If they look slimy or smell bad, it's best to toss them. Always trust your senses when it comes to food safety. Yes, you can use fresh cauliflower. Fresh cauliflower has a firmer texture. It also tastes better than frozen. Frozen cauliflower may be softer after cooking. This can change the way the wings feel in your mouth. Fresh florets will stay crunchy and hold their shape. I recommend using fresh if you want the best flavor and texture. To add heat to your wings, try these ideas: - Add cayenne pepper to the batter. - Mix sriracha or chili sauce into the honey garlic sauce. - Use spicy paprika instead of smoked paprika. - Toss in red pepper flakes before serving. These options give a nice kick to your wings. Adjust the spice level to fit your taste. Yes, you can make these wings ahead of time. Here’s how to do it: - Prep the cauliflower: Cut and coat the florets in batter and breadcrumbs. - Store in the fridge: Place coated florets in an airtight container for up to 24 hours. - Bake before serving: When ready, bake them fresh. This keeps them crispy. By meal prepping, you save time on busy days. Enjoy these tasty wings whenever you want! This blog post guided you through making delicious cauliflower wings. We explored main ingredients, step-by-step instructions, tips for crunch, and plenty of tasty variations. Remember, the key to great wings is in the batter and the sauce. Don't hesitate to try spicing things up or going gluten-free. Store leftovers properly to keep them fresh. Feel free to experiment with new ideas and serving suggestions. Enjoy your cooking journey and serve these wings with pride!

Sticky Honey Garlic Cauliflower Wings Irresistible Treat

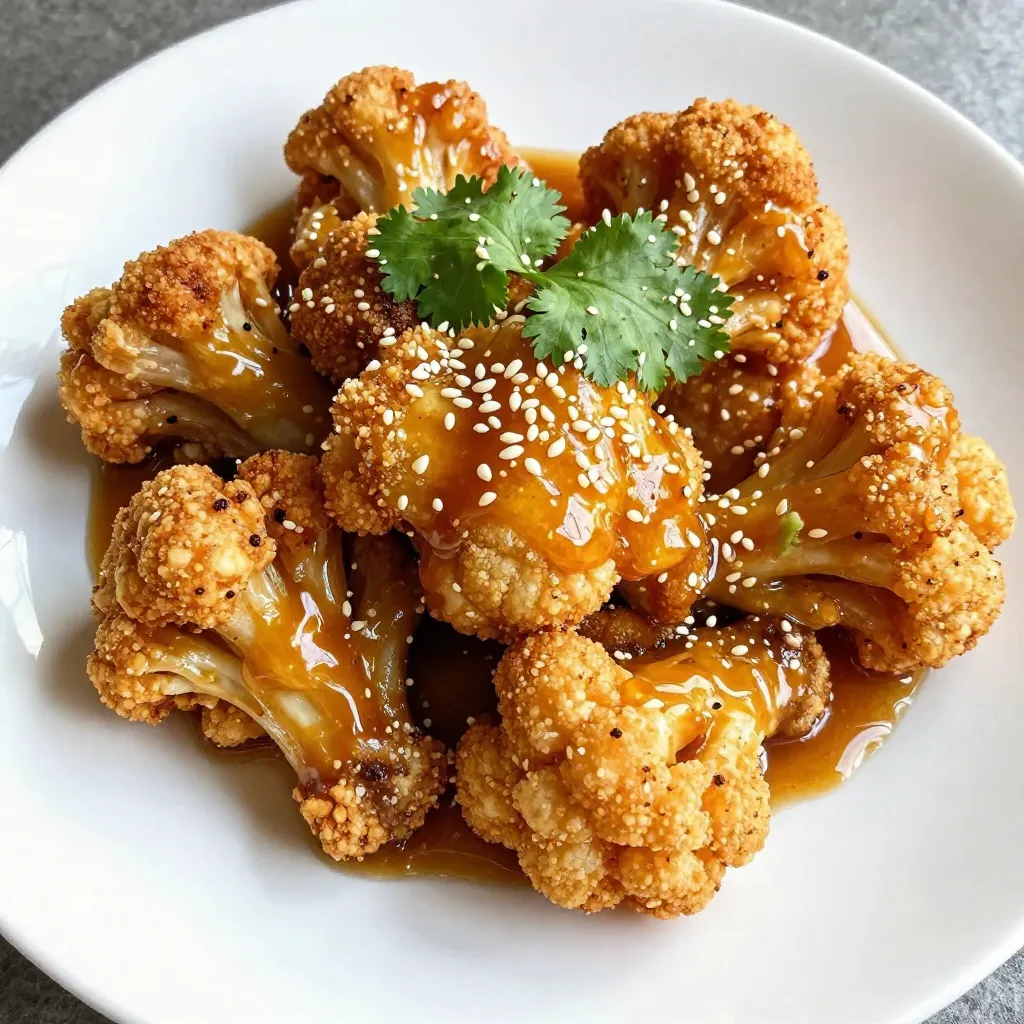
Looking for a delicious snack that’s both healthy and packed with flavor? You’ve found it! My Sticky Honey Garlic Cauliflower

- 1½ cups all-purpose flour - ½ cup unsalted butter, softened - 1¼ cups fresh blueberries - 1 teaspoon baking powder - 1 cup sugar - 3 large eggs - Zest from 1 large lemon - 1 teaspoon pure vanilla extract - 2 tablespoons fresh lemon juice For this blueberry lemon pound cake, I focus on simple, fresh ingredients. The all-purpose flour gives structure, while the butter adds richness. Fresh blueberries burst with flavor, making each bite a delight. Baking powder helps the cake rise, ensuring a light texture. Sugar not only sweetens but also contributes to the cake's lovely crust. Eggs bind everything together, making a moist cake. To enhance flavor, I use lemon zest for a bright note. Pure vanilla extract adds warmth, while fresh lemon juice balances sweetness with a tangy kick. These ingredients work together to create a delightful dessert. When you gather these ingredients, you set the stage for a delicious baking adventure. So, let’s get ready to bake something special! {{ingredient_image_2}} Preheat your oven to 350°F (175°C). This step is crucial for even baking. Next, prepare your loaf pan. Grease it well with butter or cooking spray. Line the bottom with parchment paper. This makes it easy to remove the cake after baking. In a medium bowl, whisk together the following dry ingredients: - 1½ cups all-purpose flour - 1 teaspoon baking powder - ½ teaspoon baking soda - ¼ teaspoon fine sea salt Mix these well, so they are evenly combined. Set this mixture aside for later. In a large bowl, cream together the butter and sugar. Use an electric mixer on medium speed for about 3-4 minutes. You want the mixture to look light and fluffy. Next, add the eggs one by one. Beat well after each egg. This keeps the mixture smooth and creamy. Now, it's time to mix the wet and dry ingredients. Start by adding one-third of the dry mixture to the butter mix. Then, add half of the sour cream. Repeat this process. Finish with the remaining dry ingredients. Mix gently so you do not overmix. Some lumps are okay. Next, fold in the blueberries and fresh lemon juice using a spatula. Be gentle to avoid breaking the berries. Carefully pour the batter into the prepared loaf pan. Smooth the top with a spatula. Place the pan in the oven and bake for 55-60 minutes. To check for doneness, insert a toothpick into the center. It should come out clean or with a few moist crumbs attached. Once baked, let the cake cool in the pan for 10 minutes. Then, transfer it to a wire rack to cool completely before slicing. How to avoid overmixing the batter? To avoid overmixing the batter, mix until just combined. When adding dry ingredients, stop mixing as soon as you see no dry flour. Some lumps are okay! This keeps your cake light and fluffy. Ensuring an even bake To ensure an even bake, rotate your cake halfway through baking. Oven spots can be hot or cool. By turning the pan, you help the cake bake evenly. Always check for doneness with a toothpick. Options for substituting sour cream If you don’t have sour cream, you can use plain yogurt or buttermilk. Both give moisture and tang. This keeps the cake rich and soft. Adding spices or extracts for extra flavor You can spice things up! Try adding a pinch of cinnamon or nutmeg. A dash of almond extract can also add depth. These add subtle layers of flavor to your pound cake. Using powdered sugar for decoration After your cake cools, sift powdered sugar on top. This gives a lovely snowy look. It adds sweetness without being too heavy. How to arrange blueberries and lemon slices For a charming touch, arrange fresh blueberries and lemon slices on top. Spread them out nicely for a beautiful display. This makes your cake look as good as it tastes! Pro Tips Use Room Temperature Ingredients: Ensure that your butter, eggs, and sour cream are at room temperature. This helps create a smoother batter and better texture in your pound cake. Don’t Overmix: When combining the dry and wet ingredients, mix just until incorporated. Overmixing can lead to a dense cake, so it’s okay if there are a few lumps. Fresh Blueberries: For the best flavor and texture, use fresh blueberries. If using frozen, do not thaw them before adding to the batter, as this can make the cake soggy. Check for Doneness: Start checking the cake for doneness a few minutes before the suggested baking time. Ovens can vary, and you want to avoid overbaking. {{image_4}} You can easily adapt this recipe to fit your needs. For a gluten-free option, swap all-purpose flour for almond or coconut flour. Both of these flours add a nice nutty flavor. Make sure to adjust the liquid as needed, since these flours absorb moisture differently. If you want a vegan version, replace eggs with flaxseed meal or applesauce. Use vegan butter instead of regular butter. You can also use plant-based sour cream for a creamy texture. These swaps keep the cake moist and tasty. Want to change up the flavors? Raspberries or blackberries work well in this cake. They add a tart taste that pairs nicely with lemon. You can mix different berries too for a fun twist. For something unique, try adding herbs like thyme. Just a small amount can make a big difference in flavor. Thyme brings a fresh taste that contrasts well with the sweetness of the cake. If you want to serve smaller portions, make mini loaves or cupcakes. This way, everyone can enjoy their own little cake. Bake mini loaves for about 25 to 30 minutes. Cupcakes will need about 18 to 20 minutes. For serving suggestions, this cake is great for brunch or as a light dessert. Pair it with tea or coffee for a delightful afternoon treat. You can also serve it at parties, adding a sprinkle of powdered sugar and fresh blueberries for a fancy touch. To keep your leftover pound cake fresh, wrap it well. Use plastic wrap or an airtight container. This helps to keep moisture in and air out, which is key for great taste. Make sure to store it at room temperature. It will stay good for about three days. If you want it to last longer, freezing is a good option. To freeze your cake, let it cool completely first. Wrap it in plastic wrap, ensuring it's tight. Then, place it in a freezer-safe bag or container. This method helps prevent freezer burn. You can freeze the cake for up to three months without losing flavor. When you're ready to eat it, thaw the cake in the fridge overnight. This keeps it moist and tasty. Enjoy a slice of your cake any time! Can I use frozen blueberries instead of fresh? Yes, you can use frozen blueberries. They work well, but do not thaw them first. This keeps the batter from turning blue. Frozen berries may also add moisture to the cake. How can I tell when the cake is fully baked? To check if your cake is done, insert a toothpick into the center. If it comes out clean or with a few crumbs, the cake is ready. If the toothpick has wet batter, bake it a bit longer. What to do if the cake sinks in the middle? A sinking cake may mean the oven was too hot or the batter was overmixed. To fix this, avoid opening the oven door while baking. Make sure to mix the batter just until combined. Why did my pound cake turn out dense? A dense pound cake can happen if you added too much flour or did not cream the butter enough. Make sure to measure your flour correctly and cream the mixture until light and fluffy. What beverages pair well with this cake? This cake pairs nicely with tea or coffee. A glass of lemonade also complements the lemon flavor well. If you prefer something fruity, try a berry smoothie. Can I serve it with a sauce or glaze? Yes! A light lemon glaze or vanilla sauce adds extra flavor. You can simply mix powdered sugar with lemon juice to create a quick glaze. Drizzle it over the cooled cake for a tasty touch. This blog post shared how to make a delicious Blueberry Lemon Pound Cake. We explored key ingredients and precise measurements you need. I outlined the step-by-step baking process, tips for success, and variations for dietary needs. My final thought: This cake is easy and enjoyable to make. It’s perfect for any occasion. So, gather your ingredients and start baking your flavorful masterpiece! You will love the taste and aroma. Enjoy your baking!

Blueberry Lemon Pound Cake Delightful and Simple Recipe

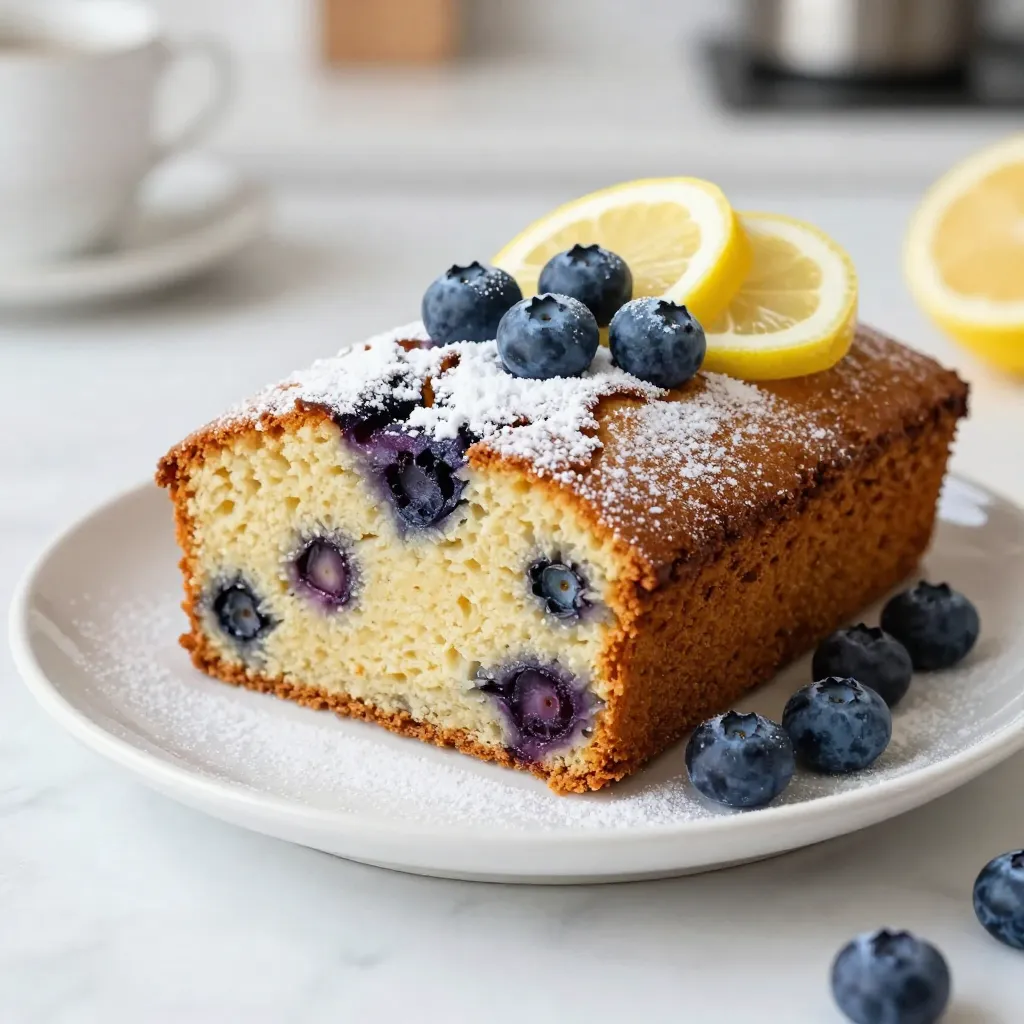
If you’re craving a sweet treat that’s both simple and bursting with flavor, you’re in the right place! This Blueberry

- 1 cup natural, creamy peanut butter - ½ cup honey or pure maple syrup - 1 cup rolled oats - ½ cup protein powder (chocolate or vanilla) - ¼ cup unsweetened cocoa powder - ½ cup semi-sweet dark chocolate chips - Chopped nuts or seeds (like almonds or pumpkin seeds) - A pinch of fine sea salt - Each serving has about 150 calories. - Protein content is around 5 grams per ball. - They also provide healthy fats and fiber. Peanut Butter Cup Protein Balls are a great snack. They are easy to make and packed with flavor. The main ingredients give you protein and energy. Natural creamy peanut butter is rich in healthy fats. Honey or maple syrup adds sweetness. Rolled oats provide a chewy texture and fiber. Protein powder boosts the protein content. Unsweetened cocoa powder gives that chocolate flavor we all love. You can add dark chocolate chips for extra sweetness. Chopped nuts or seeds add a nice crunch. A pinch of fine sea salt enhances the flavors. These protein balls are not just tasty; they are also healthy. Each bite gives you energy for your day. They are perfect before or after a workout. The best part? You can enjoy them any time! 1. Start by mixing the natural peanut butter with honey or maple syrup. Use a large bowl for this. Blend them well until the mix is smooth and creamy. This step is key for a good texture. 2. Next, add the rolled oats, protein powder, cocoa powder, vanilla extract, and salt to the bowl. Stir these ingredients together until they form a thick, sticky mix. This is where the flavor starts to build. 3. Now, fold in the dark chocolate chips. Make sure they are evenly spread throughout the mix. If you want a crunch, add chopped nuts or seeds at this time. 1. Scoop out a tablespoon of the mixture. Roll it into a ball using your hands. Aim for a size that fits easily in your mouth. 2. For even sizes, use a cookie scoop or your hands. This will help your protein balls cook evenly and look nice too. 1. Chilling is important. Place your protein balls on a lined baking sheet. Leave some space between each ball. 2. Put the baking sheet in the fridge for at least 30 minutes. This helps them firm up and makes them easier to handle. 3. Once chilled, transfer the protein balls to an airtight container. Store them in the fridge for up to a week. They will stay fresh and tasty this way. To make your peanut butter cup protein balls even tastier, try different flavors. You can use almond butter instead of peanut butter for a nutty twist. Add a sprinkle of cinnamon for warmth. For a fruity touch, mix in dried fruit like raisins or cranberries. Getting the right texture is key. If your mixture feels too dry, add a bit more honey or maple syrup. If it’s too wet, toss in extra oats or protein powder. This way, you can achieve a perfect balance of creaminess and chewiness. When it comes to presentation, make it fun! Place your protein balls in small, colorful cups. This makes them pop on the table. For an extra special touch, drizzle melted dark chocolate over the top. It adds elegance and an extra layer of flavor. Pair these protein balls with fresh fruit or yogurt for a complete snack. They also work well as a quick breakfast on the go. Just grab a few and you’re set! Watch out for a few common pitfalls while preparing your protein balls. First, measure your ingredients carefully. Too much peanut butter can make them overly sticky. Too little honey can lead to a dry mix. If your balls don’t hold their shape, they might need more chilling time. Placing them in the fridge for at least 30 minutes helps them firm up. If your mixture feels too crumbly, mix in a bit more liquid. This will help bind everything together. {{image_4}} You can switch up the nut butter for fun flavors. Almond butter or cashew butter works great. Each nut butter brings its own taste. You can also add spices to boost flavor. A dash of cinnamon adds warmth, while nutmeg gives a cozy touch. Choose your protein wisely. Plant-based protein works well if you want a vegan option. Whey protein is great for a creamy texture. Flavored protein powders can change the taste. Chocolate or vanilla flavors add a twist to your protein balls. Get creative with mix-ins! Swap the chocolate chips for dark chocolate or white chocolate. Dried fruits like cranberries or raisins add sweetness. You can also add seeds for a health boost. Pumpkin seeds or chia seeds can enhance nutrition and crunch. To keep your peanut butter cup protein balls fresh, store them in an airtight container. This helps prevent them from drying out. You can use a glass jar or a plastic container with a tight seal. For longer shelf life, freeze the protein balls. Simply place them in a freezer-safe bag or container. Make sure to separate layers with parchment paper to avoid sticking. These protein balls last about one week in the fridge. Keep an eye on them! Signs of spoilage include a change in texture or an off smell. If they feel dry or hard, it’s time to toss them. Making a double batch is easy and saves time. Just double all the ingredients and follow the same steps. You can also prep these protein balls on a busy day. Make them ahead of time and store them in your fridge or freezer. This way, you always have a healthy snack ready to go! Peanut butter cup protein balls are tasty snacks packed with nutrition. They mix peanut butter, oats, and protein powder. These ingredients give you energy and keep you full. The addition of cocoa and chocolate chips makes them a sweet treat. They are easy to make and fun to eat, perfect for busy days or workouts. Yes, you can make these protein balls vegan! Just swap honey for pure maple syrup. Use a plant-based protein powder too. This way, you still enjoy great taste without animal products. You can also skip the chocolate chips or use dairy-free ones. You can easily adjust the sweetness. If you want less sweet, cut back on honey or syrup. If you prefer it sweeter, add more. Taste the mixture before rolling them into balls. This lets you find the perfect balance for your taste buds. Absolutely! You can choose different protein powders. Whey, casein, or plant-based options work well. Each type adds its flavor and texture. Chocolate or vanilla powders blend nicely with the other flavors. Just remember to check the serving size on the package. Yes, these protein balls are great for kids! They offer healthy fats, protein, and fiber. Just ensure no one has allergies to the ingredients. Kids love the taste, and they make a great snack after school. They're a fun way to fuel their playtime! Peanut butter cup protein balls are easy to make and fun to eat. We covered key ingredients—like natural peanut butter, oats, and protein powder. I shared steps for mixing, shaping, and storing your protein balls for the best taste. You can add flavor twists with spices or different nut butters. Don’t forget tips for storage and avoiding common mistakes. These protein balls are a great snack for everyone, including kids. Try making them and enjoy a tasty, healthy treat!

Peanut Butter Cup Protein Balls Healthy Snack Boost

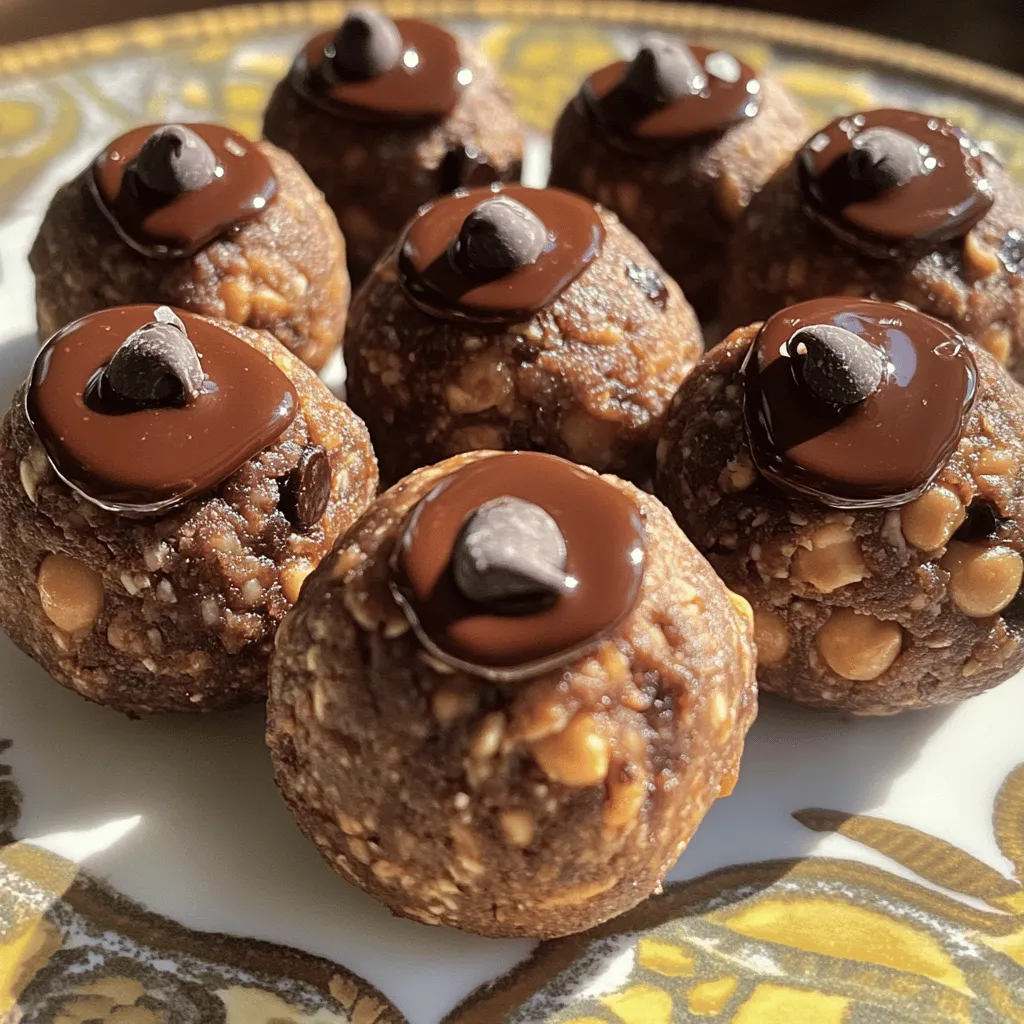
Looking for a healthy snack that satisfies your sweet tooth? Peanut Butter Cup Protein Balls are your answer! Packed with

- 4 salmon fillets (approximately 6 oz each) - 1 pound fresh broccoli florets - 1/4 cup pure maple syrup - 2 tablespoons Dijon mustard - 2 tablespoons extra virgin olive oil - 2 cloves garlic, finely minced The main ingredients make this dish shine. Salmon fillets are rich and healthy. They provide protein and omega-3 fats. Broccoli florets add color and crunch. The maple syrup brings sweetness. Dijon mustard adds a tangy kick. Olive oil keeps everything moist. Garlic gives a depth of flavor that sings. - Salt and black pepper - Optional red pepper flakes - Lemon wedges for serving Seasoning is key. Salt and pepper enhance the natural flavors. You can add red pepper flakes for heat. This is optional but adds a nice touch. Lemon wedges serve as a bright contrast. They add freshness when you squeeze them over the dish. This keeps the meal light and vibrant. First, preheat your oven to 400°F (200°C). This temperature will help the salmon and broccoli cook evenly. Next, make the maple-Dijon glaze. In a bowl, whisk together 1/4 cup of pure maple syrup, 2 tablespoons of Dijon mustard, 2 tablespoons of extra virgin olive oil, 2 cloves of minced garlic, salt, and black pepper. Mix until it’s smooth and well combined. This glaze will add great flavor to your dish. Now, grab a large, rimmed sheet pan. Arrange 4 salmon fillets skin-side down in the center. Place 1 pound of fresh broccoli florets around the salmon. It’s important to spread them evenly so they roast well. After that, drizzle the maple-Dijon mixture over the salmon and broccoli. Use a spatula or brush to coat everything well. If you like some heat, sprinkle on red pepper flakes as desired. Slide the sheet pan into your preheated oven. Bake for 15-20 minutes. The salmon should be opaque and flake easily with a fork. The broccoli should be tender but still bright green. After baking, take the pan out of the oven and let it cool for a minute. This brief cooling helps the flavors settle. Enjoy your meal! To make your salmon and broccoli taste amazing, glazing is key. Start by spreading the maple-Dijon mix evenly over both. I like to use a brush for this. This way, every piece gets a nice coat. Don't be shy with the glaze! It adds a rich flavor, and it caramelizes nicely during baking. Seasoning is also vital. Use a good pinch of salt and black pepper. If you want to jazz it up, add red pepper flakes for some heat. This small step can make a big difference in taste. If your salmon fillets are thicker, you may need to adjust the baking time. Thicker fish can take an extra 5 minutes. Always check for doneness. Salmon should be opaque and flake easily with a fork. For roasting broccoli, keep an eye on its color. It should be bright green and tender, but not mushy. This usually takes about 15 minutes. If you want it crispier, leave it in a little longer. How you present your dish matters! You can serve the salmon and broccoli straight from the sheet pan for a casual vibe. Or, plate them on individual dishes for a nicer touch. Adding lemon wedges gives a pop of color and flavor. For a complete meal, think about adding sides. Rice or quinoa pairs well with this dish. A simple salad could also add freshness and balance. Enjoy your meal! {{image_4}} If you want to change up the salmon, use trout or tilapia instead. Both fish cook well and have a nice taste. For a plant-based option, try chickpeas or tofu. They soak up flavors nicely. When it comes to vegetables, broccoli is great, but you can swap it for green beans, asparagus, or Brussels sprouts. These options add different textures and flavors to the dish. To take your dish up a notch, think about adding fresh herbs. Chopped dill or parsley can brighten the flavors. You could also try thyme or rosemary for a more earthy taste. Another fun way to boost flavor is by using different glazes. Try honey mustard, teriyaki sauce, or even a spicy sriracha mix. Each adds a unique twist to the classic maple-Dijon taste. If you want to switch up the cooking method, try grilling the salmon. This adds a smoky flavor and can make the skin crispy. Just remember to keep an eye on it so it doesn’t overcook. You can also pan-sear the salmon on the stovetop. Start by cooking the fish skin-side down in a hot pan. This gives it a nice crust. Once browned, add the broccoli to the pan for a quick steam. For a slow cooker version, place the salmon and broccoli in with the glaze. Cook on low for about 4 hours. This method keeps everything moist and flavorful. To keep your sheet-pan maple Dijon salmon and broccoli fresh, use these tips: - Refrigerating leftovers: Let the salmon and broccoli cool to room temperature. Place them in an airtight container. Store in the fridge for up to three days. This helps maintain their flavor and texture. - Freezing for later use: If you want to save more, freeze the leftovers. Wrap the salmon and broccoli tightly in plastic wrap. Then, place them in a freezer-safe bag. They can last for about two months. Remember to label the bag with the date. To enjoy your leftovers, follow these reheating tips: - Best methods for reheating: The oven works best for reheating salmon and broccoli. Preheat it to 350°F (175°C). Place the food on a baking sheet, cover it with foil, and heat for about 10-15 minutes. This warms the dish evenly. - Maintaining texture and flavor: To keep the salmon moist, add a splash of water before covering it with foil. This helps prevent it from drying out. For the broccoli, check for tenderness to ensure it stays vibrant. Enjoy your meal again just as delicious as the first time! To check if your salmon is cooked, look for a few signs. First, the fish will turn opaque and lose its raw look. Second, gently press it with a fork. If it flakes easily, it's ready. You can also use a food thermometer. The ideal internal temperature for salmon is 145°F (63°C). This ensures it is both safe and delicious. Yes, you can prep this dish in advance. For meal prep, marinate the salmon and broccoli up to 24 hours ahead. Store them in an airtight container in the fridge. When you're ready to cook, just preheat the oven and bake. This makes dinner quick and easy! This dish pairs well with various sides. Here are some tasty options: - Quinoa or rice for a hearty base - A fresh green salad for crunch - Roasted sweet potatoes for sweetness - Garlic bread for a comforting touch These sides will balance the flavors of the salmon and broccoli perfectly. Enjoy your meal! This blog post covered making a tasty sheet-pan meal with salmon and broccoli. We explored key ingredients, from salmon fillets to the maple-Dijon glaze. I shared steps for easy prep and cooking, along with tips for maximizing flavor. Variations showed ways to mix it up and make it your own. Finally, I discussed proper storage and reheating tips. With these insights, you can create a delicious meal that’s quick and healthy. Enjoy exploring these ideas, and happy cooking!

Sheet-Pan Maple Dijon Salmon & Broccoli Delight

Looking to add a tasty twist to your dinner routine? You’re in the right place! This Sheet-Pan Maple Dijon Salmon

- 1/2 cup unsalted butter (1 stick) - 1 cup granulated sugar - 2 large eggs (room temperature) - 1 teaspoon vanilla extract - 1/3 cup unsweetened cocoa powder - 1/2 cup all-purpose flour - 1/4 teaspoon salt - 1/4 teaspoon baking powder - 16 oz cream cheese, softened (preferably at room temperature) - 1/2 cup granulated sugar - 2 large eggs (room temperature) - 1 tablespoon instant coffee granules - 1 teaspoon vanilla extract - 1/4 cup sour cream - 1/4 cup chocolate chips - 1 tablespoon brewed coffee The brownie layer needs butter, sugar, eggs, and cocoa powder. You want soft butter for easy mixing. The cheesecake layer is rich and creamy. Use softened cream cheese for a smooth texture. The optional topping adds extra flavor. It’s a great way to enhance the mocha taste. Make sure to have all these ingredients ready before you start. This helps keep everything organized and fun. You will love how these layers come together to create something so special! Start by preheating your oven to 350°F (175°C). Prepare a 9x9-inch baking pan by greasing it or lining it with parchment paper. Melt 1/2 cup of unsalted butter in a saucepan over low heat. Once it is melted, remove it from the heat. Stir in 1 cup of granulated sugar until well mixed. Add 2 large eggs, whisking them in one at a time. Then, mix in 1 teaspoon of vanilla extract. Sift in 1/3 cup of unsweetened cocoa powder, 1/2 cup of all-purpose flour, 1/4 teaspoon of salt, and 1/4 teaspoon of baking powder. Stir gently until just combined. Pour the brownie batter into your prepared pan and spread it evenly. Bake for about 20 minutes and let it cool slightly. In a large bowl, beat 16 oz of softened cream cheese with an electric mixer. Mix it until it is smooth and creamy. Gradually add 1/2 cup of granulated sugar while mixing on medium speed. This step ensures the sugar dissolves fully. Add 2 large eggs one at a time, mixing well after each. Now, add 1 tablespoon of instant coffee granules, 1 teaspoon of vanilla extract, and 1/4 cup of sour cream. Blend until smooth and free from lumps. Pour the cheesecake mixture over the cooled brownie layer. Use a spatula to spread it evenly across the brownies. Return the pan to your preheated oven. Bake for 25 to 30 minutes. The cheesecake should be set but still have a slight jiggle in the center. It will firm up more while it cools. After baking, take the pan out of the oven. While the bars are still warm, sprinkle 1/4 cup of chocolate chips on top. If you want a stronger mocha flavor, drizzle 1 tablespoon of brewed coffee over the chocolate chips. Let the bars cool to room temperature in the pan. For the best texture, move the bars to the refrigerator. Chill them for at least 4 hours or overnight. This will help the flavors meld perfectly. To get the best texture, use room temperature ingredients. This helps them blend well. For the brownie layer, do not overmix the batter. Mixing too much can make them tough. For the cheesecake, make sure the cream cheese is smooth before adding sugar. This keeps the mixture creamy. Chill the bars for at least four hours. This helps them set nicely. You will need a few simple tools. A 9x9-inch baking pan is key for even baking. Use parchment paper for easy removal. A mixing bowl and electric mixer make your work easier. A spatula helps spread the cheesecake layer evenly. A sharp knife is best for cutting the bars cleanly. Serve the bars on a pretty platter. Cut them into squares for easy serving. Drizzle warm chocolate sauce on top for extra flavor. Whipped cream adds a nice touch too. For a fancy finish, sprinkle cocoa powder or chocolate shavings on top. These small details make your bars look and taste even better! {{image_4}} You can make these mocha brownie cheesecake bars even better! Consider adding nuts, like walnuts or pecans, for a crunchy bite. You can also swap out the chocolate. Use dark chocolate for a rich taste or milk chocolate for a sweeter touch. Want to up the coffee flavor? Add more instant coffee granules or espresso powder to the cheesecake layer. You can even mix in some caramel sauce for a sweet twist. Every variation brings new fun! If you need gluten-free bars, use almond flour instead of all-purpose flour. For a vegan version, replace the eggs with flaxseed meal and use a dairy-free cream cheese. You can swap the butter for coconut oil and use dairy-free chocolate. These changes still give you that creamy texture and rich flavor. Everyone can enjoy these bars! These bars are great for any event! For parties, cut them into small squares for easy serving. Add a scoop of vanilla ice cream on the side for a treat. For a cozy night in, serve them warm with a cup of coffee. If it's a special occasion, dress them up with whipped cream and chocolate shavings. They are perfect for birthdays, holidays, or just because! Enjoy the delight of these mocha brownie cheesecake bars at any time. You can store unbaked brownie batter in the fridge. Place it in an airtight container. It stays fresh for up to 3 days. Just remember to keep it covered well to avoid drying out. When ready to bake, stir it lightly before pouring it into your pan. Once baked, let the brownie cheesecake bars cool. Cut them into squares after they cool to room temperature. Store them in an airtight container. They last up to one week in the fridge. If you want to keep them fresh longer, you can also freeze them. To freeze, wrap each square in plastic wrap tightly. Then place them in a freezer-safe bag. They can stay frozen for up to three months. When you're ready to enjoy, take out the bars and thaw them in the fridge overnight. You can also warm them slightly in the microwave for a few seconds for a fresh taste. Yes, you can! Cream cheese gives a rich flavor. You can try mascarpone or ricotta for a lighter taste. Just keep the texture in mind. They may change the final taste. The cheesecake is done when it has a slight jiggle in the center. It should not look wet or runny. Also, the edges will look set. Let it cool; it will firm up more. You can use brewed coffee instead. Just reduce the amount of sour cream slightly. You can also use espresso powder for a richer coffee flavor. If you prefer no coffee, skip it entirely. Absolutely! These bars are perfect for making ahead. Bake and chill them for up to two days. Store them in the fridge. They taste even better after resting. Use a sharp knife. For the best cuts, clean the knife between slices. This way, the bars stay neat. You can also chill them longer for firmer cuts. You now have a complete guide to making delicious brownie cheesecake bars. We covered the key ingredients, step-by-step instructions, tips, and variations. You can customize flavors and adapt to dietary needs. Remember to store them properly for the best taste. Enjoy your baking, and have fun sharing these tasty treats with others!

Mocha Brownie Cheesecake Bars Delightful and Simple

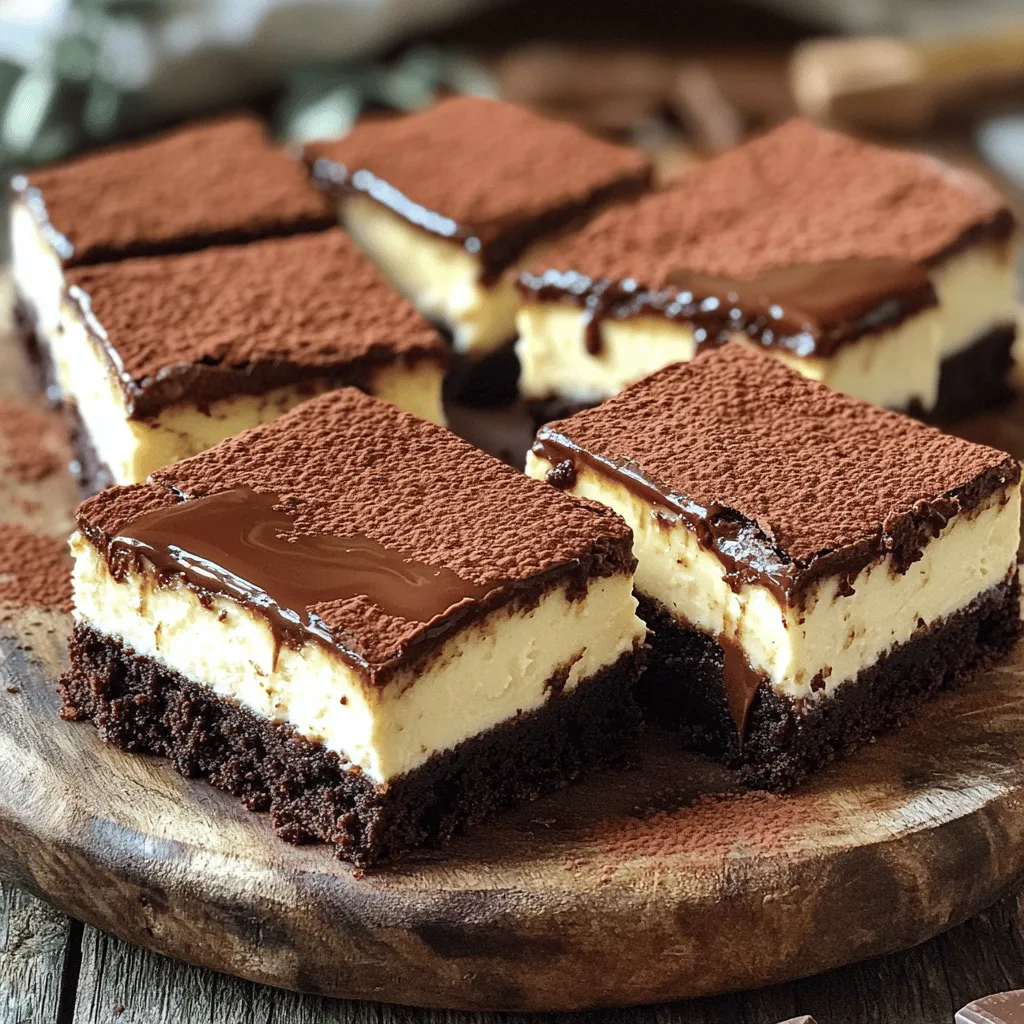
Craving a sweet treat that’s both rich and easy to make? Look no further! My Mocha Brownie Cheesecake Bars combine

- 1 lb boneless, skinless chicken thighs - 2 tablespoons honey - 3 cloves garlic, finely minced - 2 tablespoons soy sauce - 1 tablespoon extra-virgin olive oil - 1 medium zucchini, sliced into half-moons - 1 bell pepper, cut into bite-sized pieces - 1 cup fresh broccoli florets To make the Honey Garlic Chicken Veggie Sheet Pan, start with boneless, skinless chicken thighs. They stay juicy and tender during cooking. Honey gives a sweet touch, while garlic adds depth. Soy sauce brings umami, and olive oil keeps everything moist. For veggies, I love using zucchini, bell pepper, and broccoli. They not only taste great but also add color. - 1 teaspoon dried thyme - 1 teaspoon smoked paprika - Salt and black pepper to taste - Fresh parsley, finely chopped, for garnish For seasonings, I use dried thyme and smoked paprika. Thyme has a lovely, earthy flavor. Smoked paprika adds a slight smokiness. Use salt and black pepper to taste. Fresh parsley brightens up the dish. It adds a pop of color and freshness. This mix of flavors makes each bite special. 1. Preheat your oven to 400°F (200°C). This ensures even cooking. 2. Line a large baking sheet with parchment paper. This helps with easy cleanup. 3. In a bowl, mix together 2 tablespoons honey, 3 minced garlic cloves, 2 tablespoons soy sauce, 1 tablespoon olive oil, 1 teaspoon dried thyme, 1 teaspoon smoked paprika, salt, and black pepper. Whisk until smooth. 4. Add 1 pound of chicken thighs to the bowl. Coat each piece well. For the best flavor, let the chicken marinate for 15 minutes. If you have more time, marinate for up to 2 hours in the fridge. 1. While the chicken marinates, prepare your veggies. Start with slicing 1 medium zucchini into half-moons. 2. Cut 1 bell pepper into bite-sized pieces. 3. Wash and break 1 cup of broccoli into florets. 4. Arrange the zucchini, bell pepper, and broccoli on the baking sheet. 5. Drizzle a little olive oil over the veggies. Season with salt and pepper. Toss them well to coat evenly. 1. After marinating, place the chicken thighs on the baking sheet. Arrange them among the veggies. 2. Drizzle leftover marinade over both the chicken and veggies for more flavor. 3. Bake everything in the preheated oven for 25-30 minutes. 4. Check the chicken; it should reach an internal temperature of 165°F (75°C). The veggies should be tender and bright. 5. Once done, take the sheet pan out of the oven. Let it rest for about 5 minutes. 6. Before serving, sprinkle freshly chopped parsley on top for a fresh touch. For the best flavor, marinate chicken for at least 15 minutes. If you have more time, marinate overnight in the fridge. This step makes a big difference. The longer the chicken soaks, the better it tastes. To make sure chicken cooks evenly, cut thighs into similar sizes. This helps them cook at the same rate. For veggies, check their texture. They should be tender but still bright and crisp when done. For a fun presentation, serve the dish straight from the pan. It looks great and saves on cleanup. You can also plate individual servings. Add a sprinkle of sesame seeds or extra parsley for color. Pair this meal with rice or a light salad for a complete dining experience. {{image_4}} You can switch chicken thighs for many other proteins. Tofu works well for a plant-based option. Firm tofu holds its shape and absorbs flavors nicely. You can also use fish, like salmon or tilapia. They cook quickly and add a different taste. For veggies, choose what’s in season. You can use asparagus in spring or sweet potatoes in fall. Carrots and snap peas are great choices year-round. Mix and match to find your favorite combinations. If you need a gluten-free meal, use tamari instead of soy sauce. This keeps all the flavor without gluten. You can also skip the soy sauce entirely and add more honey for sweetness. For a low-carb or keto-friendly dish, swap out the honey for a low-carb sweetener like erythritol. Replace the zucchini with cauliflower for a veggie that’s lower in carbs. This keeps the meal tasty and fits your diet. To keep your Honey Garlic Chicken Veggie Sheet Pan fresh, follow these steps: - Allow the dish to cool completely after cooking. - Transfer leftovers into airtight containers. - Store in the fridge for up to 3 days. - For longer storage, freeze in a freezer-safe container for up to 3 months. Using glass containers helps retain heat and flavor. They also make it easy to see what’s inside. To enjoy this dish again, follow these reheating methods: - For best results, reheat in the oven at 350°F (175°C) for 15-20 minutes. - You can also use a microwave. Heat in 30-second intervals until warm. - Add a splash of water in the microwave to keep veggies from drying out. These methods help maintain the chicken's flavor and the veggies' crispness. Enjoy your meal just like when it was fresh! Yes, you can make this recipe ahead of time. Marinate the chicken in the fridge for up to 2 hours. You can also chop the veggies and store them in the fridge. When you're ready, just bake everything together. Yes, you can freeze this dish. Assemble the chicken and veggies, then place them in a freezer bag. Remove as much air as possible before sealing. You can freeze it for up to 3 months. Thaw it overnight in the fridge before baking. To adjust the recipe, simply halve the ingredients. Use ½ lb of chicken and reduce the veggies accordingly. Keep the marinade ratios the same for the best flavor. You can always save some for later! This dish pairs well with rice or quinoa. You could also serve it with a fresh salad or crusty bread. For a light touch, add a side of fruit. Enjoy exploring different combinations! You now have a clear guide to making a tasty Honey Garlic Chicken Veggie Sheet Pan meal. We covered choosing fresh ingredients, marinating chicken, and preparing colorful veggies. Cooking tips help ensure everything tastes great. Don’t be afraid to swap proteins and veggies to fit your taste. Proper storage keeps leftovers fresh, and reheating methods help maintain flavor. Enjoy this easy, healthy dish that can impress at any meal. Think of all the fun and tasty options you can create!

Honey Garlic Chicken Veggie Sheet Pan Delight

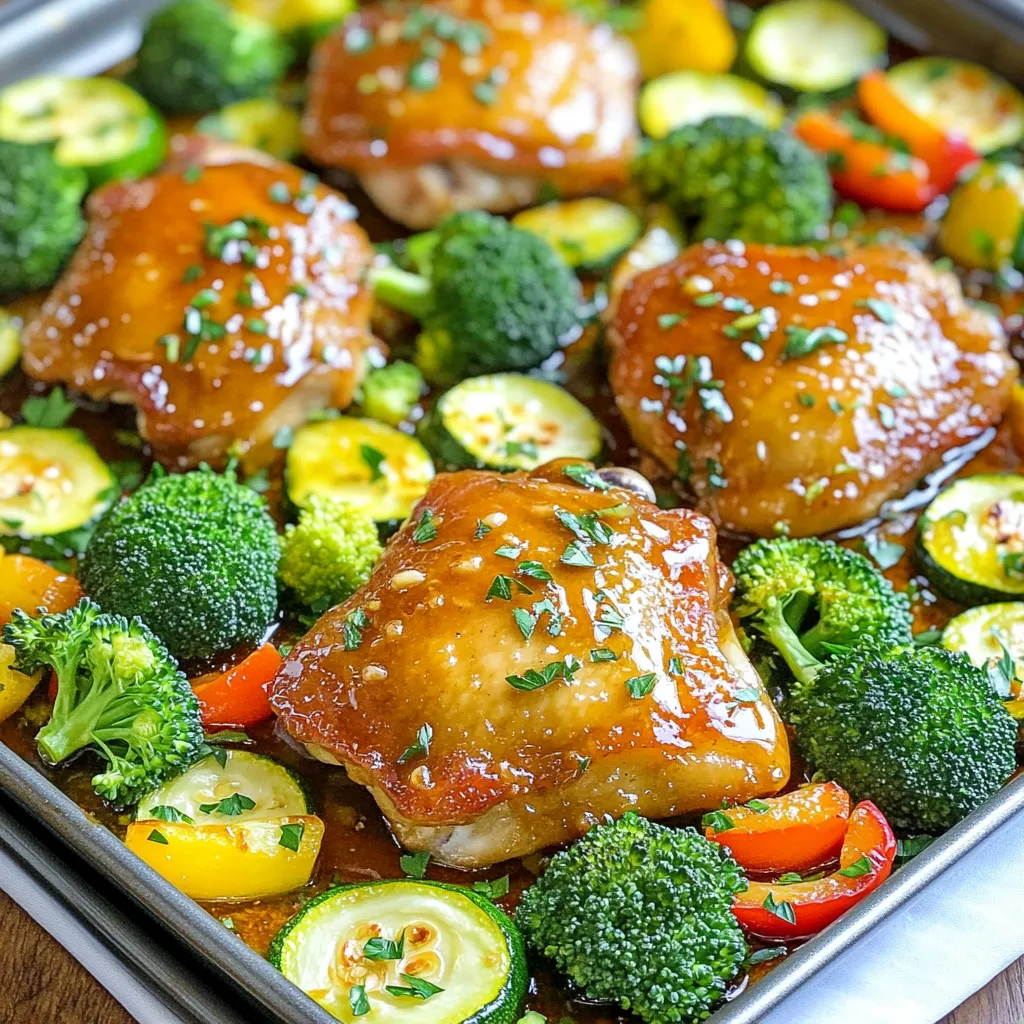
Looking for an easy, tasty meal? The Honey Garlic Chicken Veggie Sheet Pan Delight is here to save your dinner

- 4 large russet potatoes - 1/4 cup extra-virgin olive oil - 6 cloves of garlic, finely minced - 1 cup freshly grated Parmesan cheese - 2 teaspoons dried oregano - 1 teaspoon garlic powder - 1 teaspoon smoked paprika - Sea salt and freshly-ground black pepper, to taste - Fresh parsley for garnish Gather these ingredients for a tasty treat. The russet potatoes give a fluffy inside and crisp skin. Olive oil helps the spices stick and adds rich flavor. Garlic is key here, bringing a bold taste to the wedges. Freshly grated Parmesan cheese melts and crisps up nicely in the oven. Dried oregano adds an earthy note, while smoked paprika gives a hint of sweetness. Use sea salt and black pepper to elevate all the flavors. Lastly, fresh parsley adds a pop of color and freshness when you serve. This mix creates a mouthwatering snack or side dish. Enjoy every bite! {{ingredient_image_2}} 1. Preheat your oven to 425°F (220°C). This step is key for crispy potato wedges. 2. Rinse and scrub the large russet potatoes under cold water. Get rid of any dirt. 3. Cut each potato into wedges. Aim for about eight wedges per potato to cook evenly. 4. In a big bowl, whisk together the olive oil, minced garlic, oregano, garlic powder, smoked paprika, sea salt, and black pepper. Mix until everything is well combined. 1. Carefully add the potato wedges to the bowl. Toss them gently with your hands or a spatula. 2. Make sure each wedge is coated well in the oil and spice mix. This gives them great flavor. 3. Spread the seasoned wedges out on a baking sheet lined with parchment paper. Ensure they do not overlap. This helps them bake evenly. 1. Generously sprinkle the freshly grated Parmesan cheese over the potato wedges. The cheese will stick to the oil and spices. 2. Place the baking sheet in your preheated oven. Bake for 30-35 minutes until they are golden brown and crispy. 3. Flip the wedges halfway through the baking time. This step ensures they cook evenly and get that perfect crunch. 4. Once done, remove the baking sheet from the oven. Let the wedges cool for a few minutes before serving. This keeps them crispy. To get those perfect crispy potato wedges, follow a few key steps. First, make sure to soak your potato wedges in cold water for at least 30 minutes. This helps remove excess starch, which can cause sogginess. After soaking, pat them dry with a towel. A dry surface helps them crisp up nicely. Use a light coating of oil. Too much oil can lead to soggy results. I recommend using a baking sheet made of aluminum. It heats quickly and promotes even crisping. If you have a wire rack, placing the wedges on it allows air to circulate, enhancing crispiness. Want to spice things up? Try adding paprika or cumin for a different twist. A pinch of cayenne pepper can add heat if you like it spicy. For garlic lovers, consider tossing in roasted garlic or even garlic salt for an extra kick. Fresh herbs like thyme or rosemary can also elevate the flavor profile. Dipping sauces can take your potato wedges to another level. Aioli, ranch dressing, or even spicy ketchup are great choices. For a fun twist, try serving them with a side of cheese sauce. Present your wedges on a rustic wooden board for a charming look. You can also place them in a stylish bowl with your dips in small dishes on the side. This makes for a fun and interactive meal. Pro Tips Choose the Right Potatoes: Russet potatoes are ideal for wedges due to their high starch content, which results in a fluffy interior and crispy exterior. Season Generously: Don’t be shy with the seasonings! Ensure each wedge is thoroughly coated in the oil and spice mixture for maximum flavor. Use a Hot Oven: Preheating the oven to 425°F (220°C) is crucial for achieving that perfect golden brown and crispy texture. Flip for Even Cooking: Remember to flip the wedges halfway through baking to ensure that all sides cook evenly and develop a uniform crispiness. {{image_4}} You can switch russet potatoes for sweet potatoes. Sweet potatoes have more vitamins and fiber. They also add a nice sweetness to the dish. You can also try different cheeses. For example, use mozzarella or cheddar for a fun twist. These cheeses will melt nicely and give a creamy texture. Want to jazz up your wedges? You can add crispy bacon bits or spicy jalapeños. Bacon gives you that savory crunch, while jalapeños add heat. You can also swap herbs. Try using rosemary or thyme instead of oregano. These herbs bring a fragrant touch to your dish. If you want a quicker option, use an air fryer. Set your air fryer to 400°F (200°C). Cook the wedges for about 20 minutes, shaking the basket halfway through. This method makes them super crispy! For a summer treat, grill them! Preheat your grill and use a grill basket to keep the wedges from falling. Grill for about 15 minutes, flipping until they are tender and charred. This adds a lovely smoky flavor. To keep your baked garlic parmesan potato wedges fresh, store them in an airtight container. This helps lock in flavor and moisture. Place the wedges in the fridge within two hours after baking. They can last in the fridge for about 3 to 5 days. For the best crispiness, reheat your wedges in the oven. Preheat your oven to 400°F (200°C). Spread the wedges on a baking sheet and heat for about 10-15 minutes. This method brings back their crunch. If you're in a hurry, you can use the microwave. Place the wedges on a plate and heat for 30 seconds to 1 minute. However, they may lose some crispiness in the microwave. You can freeze baked potato wedges for later use. Let them cool completely, then spread them in a single layer on a baking sheet. Freeze them for about 1-2 hours until solid. Once frozen, transfer the wedges to a freezer bag. They can stay fresh for up to 3 months. To thaw, place them in the fridge overnight. Reheat in the oven to restore their crisp texture. To make your baked garlic parmesan potato wedges crispy, follow these tips: - Choose the right potatoes: Use large russet potatoes. They have a high starch content, which helps achieve that crispy texture. - Cut evenly: Cut the potatoes into uniform wedges. This helps them cook at the same rate. - Use enough oil: Coat the wedges in olive oil. This helps them crisp up in the oven. - Don't crowd the pan: Spread the wedges in a single layer on the baking sheet. This allows hot air to circulate and crisp them. - Flip halfway: Turn the wedges halfway through baking. This ensures they brown evenly. - High temperature: Bake at 425°F (220°C). The high heat helps create a golden crust. Following these tips will give you crispy, tasty wedges every time! Yes, you can prepare potato wedges in advance. Here are some options: - Pre-cut and store: Cut the potatoes into wedges. Place them in a bowl of cold water. This keeps them from browning. Store in the fridge for up to 24 hours. - Season ahead: You can also toss the wedges in the oil and spices a few hours before cooking. Just keep them covered and refrigerated. - Freezing: For longer storage, freeze the seasoned wedges. Lay them flat on a baking sheet until frozen. Then, transfer to a freezer bag. You can bake them straight from the freezer, but add a few extra minutes to the cooking time. These options make it easy to enjoy these wedges without much fuss! Several tasty dips go well with baked garlic parmesan potato wedges. Here are some favorites: - Ketchup: A classic choice! Its sweetness balances the savory flavors. - Aioli: This creamy garlic dip enhances the garlic flavor in the wedges. - Ranch dressing: Its cool, creamy texture pairs well with the warm, crispy potatoes. - Sour cream: A simple dip that adds a tangy touch. - Spicy mayo: Mix mayonnaise with sriracha for a kick of heat. Feel free to mix and match these dips to find your favorite pairing! You can make tasty garlic Parmesan potato wedges with simple steps. First, gather fresh ingredients and prep your potatoes. Bake them perfectly for a golden, crisp finish. Remember to try different spices or toppings to mix up the flavors. Whether you enjoy them fresh or save some for later, these wedges are easy to store and reheat. Keep experimenting to find your favorite combinations. Enjoy your cooking journey with these delicious potato wedges!

Baked Garlic Parmesan Potato Wedges Crispy Delight

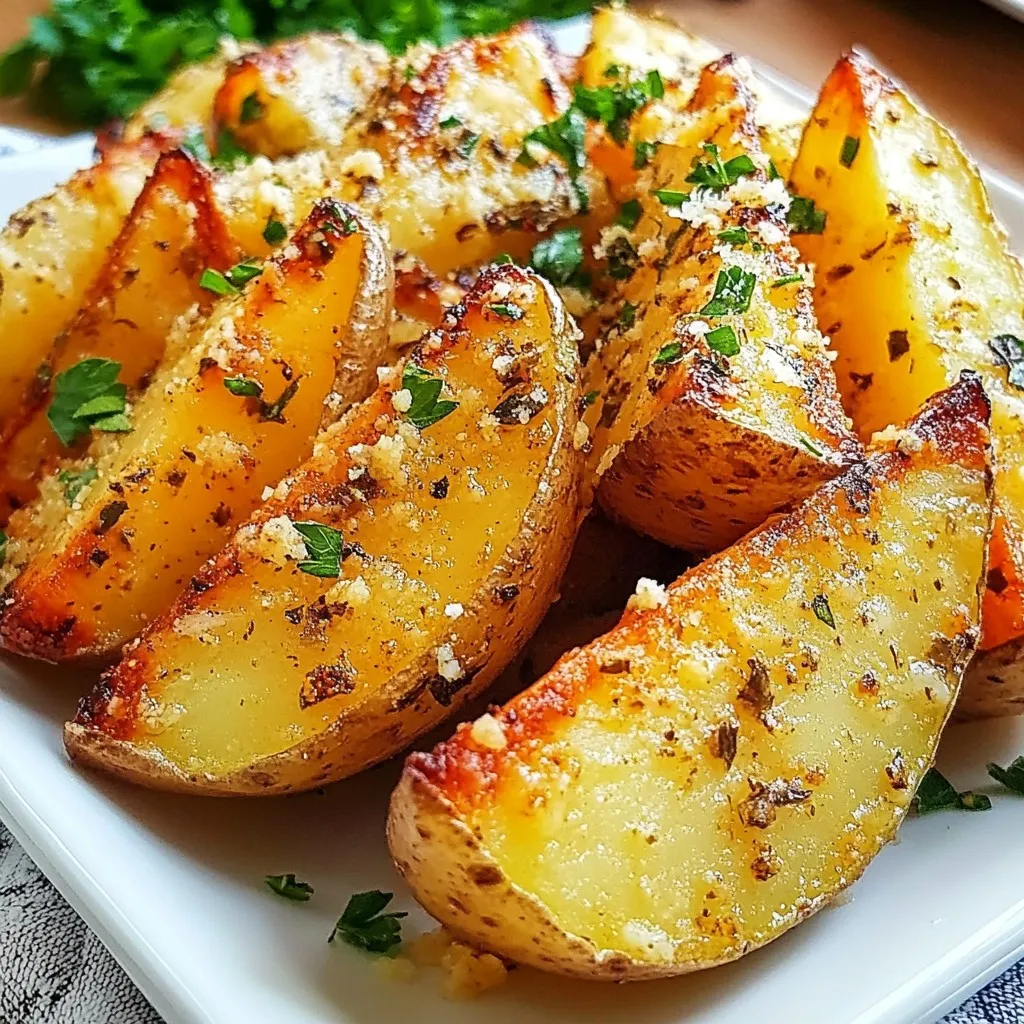
Are you ready for a crispy treat that will elevate your snack game? Baked Garlic Parmesan Potato Wedges are golden,

Older posts
Newer posts
← Previous Page1 … Page13 Page14 Page15 … Page120 Next →

dsad

© 2026 recipetorch • Built with GeneratePress

Our Policies

  • Copyright Policy
  • Cookie Policy
  • GDPR Policy
  • Privacy Policy
  • Disclaimer
  • Terms Of Use

More Information

  • Home
  • About
  • Contact
  • Appetizers
  • Dessert
  • Dinner
  • Drinks
©2026, recipetorch About Back To Top