Skip to content
DisclaimerTerms Of UseGDPR PolicyCookie Policy

recipetorch

  • Home
  • Drinks
  • Appetizers
  • Dinner
  • Dessert
  • About
  • Contact
  • Privacy Policy
DisclaimerTerms Of UseGDPR PolicyCookie Policy

Nicole

To make Greek Chicken Gyro Bowls, gather these key ingredients: - 2 boneless, skinless chicken breasts - 2 tablespoons extra virgin olive oil - 3 cloves garlic, minced - 2 teaspoons dried oregano - 1 teaspoon smoked paprika - Salt and freshly ground black pepper, to taste - 1 lemon, zested and juiced - 1 cup cooked quinoa (white or tri-color) - 1 cup cherry tomatoes, halved - 1 medium cucumber, diced - ½ red onion, thinly sliced - 1 cup plain Greek yogurt - 1 tablespoon fresh dill, finely chopped - ½ teaspoon garlic powder - Feta cheese, crumbled, for topping - Fresh parsley, chopped, for garnish These ingredients combine to create a fresh and tasty meal. The chicken gives protein, while quinoa offers fiber. Vegetables add crunch and color. You can elevate your bowls with these optional garnishes: - Olives for a briny kick - Sliced avocado for creaminess - Extra lemon wedges for brightness - More herbs like mint or cilantro These additions can enhance flavor and texture. Choose what you love most to make your bowl special. Selecting quality ingredients is key for great flavor. Here are some tips: - Chicken: Look for fresh, organic chicken for the best taste. - Olive Oil: Choose extra virgin olive oil for its rich flavor. - Herbs and Spices: Use fresh herbs for a vibrant taste. If using dried, check the expiration date. - Vegetables: Pick ripe, firm vegetables for the best crunch. - Yogurt: Select whole-milk Greek yogurt for a creamy sauce. When you use fresh, high-quality ingredients, your Gyro Bowls will shine. Enjoy the process of picking out your ingredients and let your meal reflect your tastes. First, we make a tasty marinade. In a medium bowl, mix these ingredients: - 2 tablespoons extra virgin olive oil - 3 cloves garlic, minced - 2 teaspoons dried oregano - 1 teaspoon smoked paprika - Salt and freshly ground black pepper - Zest and juice of 1 lemon Add the chicken breasts to the bowl. Make sure they are well coated. Cover the bowl and let it sit for at least 30 minutes. You can also refrigerate it for up to 2 hours. This will help the flavors soak in. Next, we cook the chicken. Preheat your grill or a large skillet over medium-high heat. When it’s hot, place the marinated chicken on it. Cook for about 6-7 minutes on each side. Make sure the chicken reaches 165°F (75°C) inside. This ensures it’s safe to eat. Once done, take it off the heat. Let the chicken rest for 5 minutes before slicing it into strips. Now, let’s make the tzatziki sauce. Grab a small bowl and mix together: - 1 cup plain Greek yogurt - 1 tablespoon fresh dill, finely chopped - ½ teaspoon garlic powder - A pinch of salt - A squeeze of fresh lemon juice Stir until it’s smooth. Taste it and adjust the seasoning if needed. Set it aside for the flavors to blend nicely. Now it’s time to build your bowls! Start with a base layer of cooked quinoa. You’ll need about 1 cup for four bowls. Then, add the sliced grilled chicken on top. Next, layer in: - 1 cup cherry tomatoes, halved - 1 medium cucumber, diced - ½ red onion, thinly sliced Make it colorful and fun! Finally, let’s finish the bowls! Drizzle the tzatziki sauce generously over each one. Then, sprinkle crumbled feta cheese on top. Add some fresh parsley for a nice touch. Serve your Greek Chicken Gyro Bowls right away. They taste best fresh! If you have leftovers, store them in airtight containers in the fridge for later. To get juicy chicken, marinate it well. Use a mix of olive oil, garlic, and spices. Let the chicken rest in the marinade for at least 30 minutes. This will help the flavors soak in. When cooking, make sure your grill or skillet is hot. Cook each side for about 6-7 minutes. Always check the chicken's internal temperature. It should be 165°F (75°C). Rest the chicken after cooking. This keeps it juicy and tender. For a tastier tzatziki sauce, use fresh ingredients. Start with plain Greek yogurt for creaminess. Add finely chopped dill for that unique flavor. A squeeze of lemon juice brightens the sauce. For some extra zing, try adding a bit of grated cucumber. This adds crunch and freshness. Mix all the ingredients well and let it sit. This waiting time helps the flavors blend together nicely. Taste it before serving, and adjust the seasoning if needed. To make your gyro bowls look great, start with a base of quinoa. Use a mix of white and tri-color quinoa for a pop of color. Layer the sliced chicken on top. Then add vibrant cherry tomatoes, cucumbers, and red onions. Drizzle the tzatziki sauce generously over the top. Finish with crumbled feta cheese and chopped parsley. You can also add lemon wedges on the side. This brightens the dish and adds a fresh touch. A well-presented bowl makes every bite more enjoyable. {{image_4}} You can easily change the protein in your gyro bowl. Try using grilled shrimp or lamb instead of chicken. Both options add great taste. For a quick meal, shredded rotisserie chicken works well too. Just warm it up and add to your bowls. If you want a veggie-friendly version, use chickpeas or lentils. They add protein and flavor. For a vegan option, replace Greek yogurt with a plant-based yogurt. Tofu marinated in the same spices as chicken is a tasty choice too. Just grill or sauté it until golden. Switching up your veggies keeps things exciting. In summer, add ripe bell peppers or zucchini. In fall, roasted sweet potatoes or butternut squash work well. Seasonal ingredients not only taste better but also support local farmers. Always look for fresh herbs like basil or mint to brighten your dish. To keep your Greek Chicken Gyro Bowls fresh, store them in airtight containers. This helps lock in flavor and moisture. Let the bowls cool to room temperature first. Then, divide them into single servings for easy access. You can store them in the fridge for up to four days. If you notice any signs of spoilage, like an off smell or texture, toss them out. When you’re ready to enjoy leftovers, reheating is key. For the best taste, use the stove or oven. Heat the chicken on medium until warmed through. If using a microwave, heat in short bursts to prevent drying out. Add a splash of water or olive oil to keep moisture. The tzatziki sauce is best served cold, so add it fresh after reheating. Meal prep makes busy days easier. Prepare your Greek Chicken Gyro Bowls ahead of time. Store each component separately. Keep the quinoa, chicken, and veggies in one container. Place the tzatziki sauce in a small jar. This way, you can mix and match for lunch or dinner. You can also freeze cooked chicken for up to three months. Just thaw and reheat when you’re ready to eat! You can use brown rice or couscous as a great substitute for quinoa. Both grains add a nice texture. If you want something lower in carbs, try cauliflower rice. It’s light and absorbs flavors well. Greek Chicken Gyro Bowls can stay fresh in the fridge for up to four days. Make sure to store them in airtight containers. This keeps the chicken and veggies from getting soggy. Yes, you can freeze Greek Chicken Gyro Bowls! Just make sure to leave out the fresh toppings like tomatoes and cucumbers. Freeze the chicken and quinoa together for up to three months. Thaw in the fridge before reheating. Gyro bowls go well with many sides. Try a Greek salad for a fresh crunch. Hummus and pita bread make a tasty combo too. Roasted vegetables add a warm touch to your meal. Greek chicken gyro bowls are full of flavors and fun. We covered key ingredients, marinating chicken, and making tzatziki sauce. I shared tips for cooking and plating your bowls for the best look. You can even try different proteins or make vegetarian options. Remember to store leftovers right to keep them fresh. With these steps, you can enjoy delicious and healthy meals at home. Try making these bowls this week and impress everyone at your table.

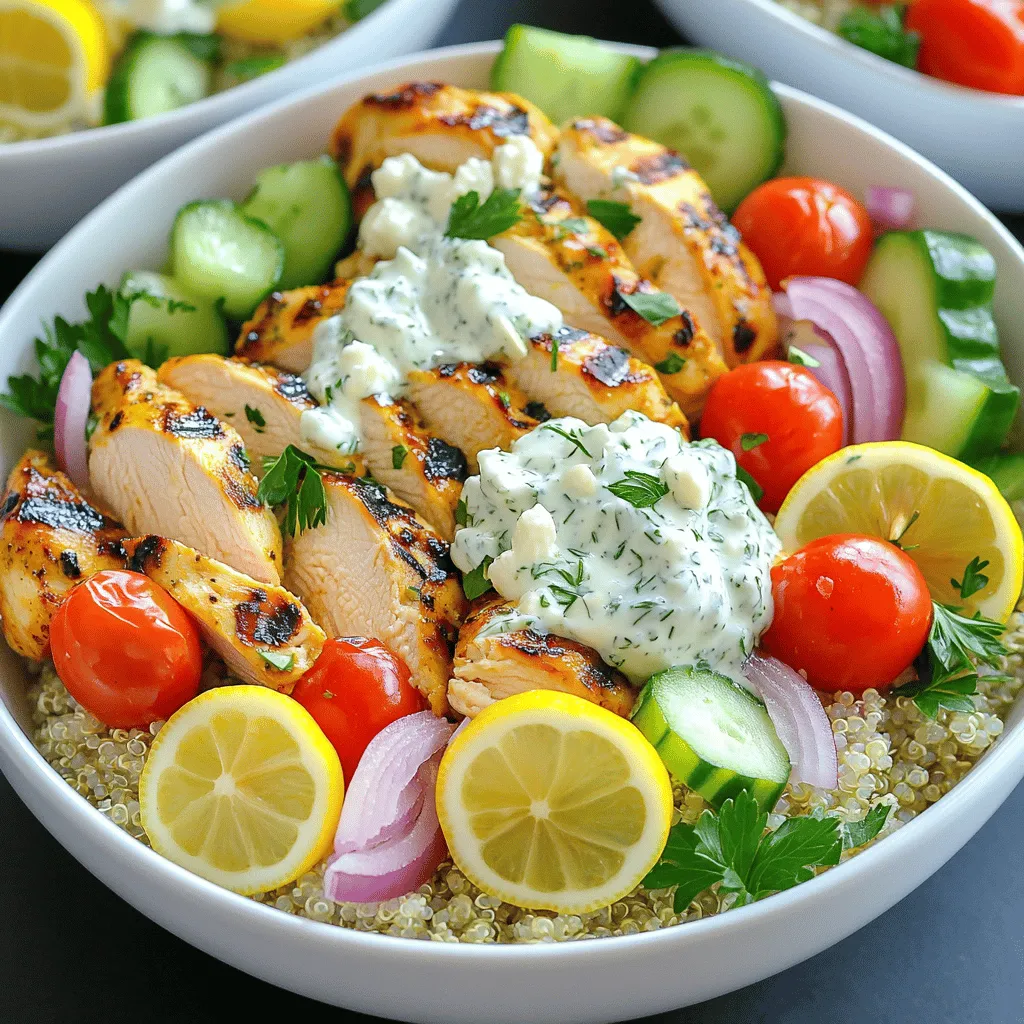
Greek Chicken Gyro Bowls Flavorful and Fresh Meal

Looking for a quick, healthy meal that bursts with flavor? These Greek Chicken Gyro Bowls are your answer. You get

To make Spicy Garlic Edamame, you need a few simple ingredients. Here’s what you will gather: - 2 cups edamame in pods (fresh or frozen) - 3 tablespoons olive oil - 4 cloves garlic, minced - 1-2 teaspoons red pepper flakes (adjust for spice preference) - 1 tablespoon soy sauce - 1 tablespoon sesame oil - 1 teaspoon freshly grated ginger - Salt, to taste - Toasted sesame seeds, for garnish - Chopped green onions, for garnish You can use fresh or frozen edamame for this recipe. Fresh edamame pods are often sweeter and have a nice crunch. They also take a bit longer to prepare. You just rinse them under cold water and dry them off. Frozen edamame is super convenient. It cooks quickly and is usually just as tasty. If you choose frozen, boil them for about 4-5 minutes. This gives you the tender texture we want without losing the flavor. The seasonings give the edamame a bold kick. Olive oil is the base for sautéing garlic. Garlic adds a rich flavor that pairs well with the heat from red pepper flakes. Soy sauce brings a salty depth. Sesame oil adds a nutty aroma. Freshly grated ginger gives a nice zing. For garnishes, toasted sesame seeds add crunch. Chopped green onions bring freshness and color. These toppings not only look great but also enhance the dish's flavor profile. To start, if you choose frozen edamame, boil a large pot of salted water. Add the edamame pods to the boiling water. Cook them for about 4-5 minutes until they feel tender yet firm. Drain the edamame in a colander and set them aside. If you use fresh edamame, just rinse the pods under cold water and pat them dry. Next, grab a large skillet or frying pan. Heat 3 tablespoons of olive oil over medium heat. Once the oil is hot, add 4 minced garlic cloves. Sauté for 1-2 minutes, stirring often. You want the garlic to be fragrant and light golden. Be careful; burnt garlic will ruin the taste. Now, add the cooked edamame pods to the skillet. Sprinkle in 1-2 teaspoons of red pepper flakes, 1 tablespoon of soy sauce, 1 tablespoon of sesame oil, and 1 teaspoon of freshly grated ginger. Use a spatula to mix everything well. Cook for another 2-3 minutes so the flavors blend nicely. Taste the mix and add salt as needed. If you want more heat, add more red pepper flakes. Once seasoned, take the skillet off the heat. Transfer the spicy garlic edamame into a large serving bowl. Make sure to scrape up all the flavorful bits from the skillet. Before serving, top with toasted sesame seeds and chopped green onions. This adds a nice crunch and extra flavor. Enjoy this bold snack! When choosing edamame, look for bright green pods. They should feel firm and plump. Avoid any that look yellow or shriveled. Fresh edamame has a crisp texture and a sweet taste. Frozen edamame is also a great option if fresh is not available. Just check the packaging for quality. To change the heat, start with one teaspoon of red pepper flakes. You can always add more if you like it spicy. If you want less heat, use fewer flakes. Taste the dish before serving. This helps ensure it suits your taste. Remember, you can always adjust after cooking. You can prepare the edamame in advance. Cook the pods and mix them with the sauce. Store them in an airtight container in the fridge. When you're ready to eat, heat them in a skillet. This keeps them fresh and tasty. Enjoy them warm for the best flavor! {{image_4}} You can make spicy garlic edamame heartier by adding protein. Try throwing in cooked shrimp or grilled chicken. The protein pairs well with the spicy garlic flavor. For a vegetarian option, add cubes of firm tofu. Simply sauté the tofu until golden before mixing it with the edamame. This recipe is already mostly vegetarian and vegan. Just ensure your soy sauce is vegan. You can use tamari as a gluten-free option. If you want a unique twist, add some cooked lentils or chickpeas. This will boost the protein and fiber content while keeping it plant-based. Want to spice things up even more? Add a splash of fresh lime juice before serving. The citrus brightens the dish. You can also toss in some toasted nuts, like cashews or almonds, for extra crunch. They add great texture and flavor to the overall dish. To keep leftover edamame fresh, let it cool first. Use an airtight container. Store it in the fridge for up to three days. This keeps the flavor and texture nice. If you find it too cold, let it sit out for a bit before eating. When ready to eat, you can reheat your edamame easily. The best way is to use a skillet. Heat it on low and add a splash of water. Stir occasionally until it warms through. You can also microwave it. Just put it in a bowl with a little water. Cover it and heat for about one minute. Freezing edamame is a great option too. After cooking, let it cool completely. Place it in a freezer bag or container. Remove as much air as possible before sealing. This way, it can last up to three months in the freezer. When you need it, just thaw it in the fridge overnight. Then, reheat it as you like! Edamame are young soybeans in pods. They are tasty and packed with nutrients. These little green gems provide protein, fiber, vitamins, and minerals. One cup of cooked edamame has about 17 grams of protein. They are low in calories, making them a great snack. Edamame also contains antioxidants, which can help fight free radicals in the body. Eating edamame can support heart health and aid digestion. If you prefer not to use the stovetop, you can cook edamame in the microwave. Place the edamame pods in a microwave-safe bowl. Add a splash of water and cover the bowl with a plate. Microwave for about 3-5 minutes. Check for doneness; they should be tender yet firm. You can also steam them in a steamer basket. Just make sure to keep an eye on the time to avoid overcooking. Yes, you can use garlic powder instead of fresh garlic. Garlic powder offers a different flavor, but it works well in this recipe. Use about 1 teaspoon of garlic powder for every clove. Adjust to your taste, as garlic powder can be less intense than fresh. However, fresh garlic gives a more robust flavor and aroma. I recommend trying both to see which you prefer! Yes, spicy garlic edamame can be gluten-free. Just make sure to choose gluten-free soy sauce. Many brands offer gluten-free options. The main ingredients, edamame, olive oil, garlic, and spices, are naturally gluten-free. This dish is a great choice for those with gluten sensitivities. Always check the labels to be sure your ingredients are safe! In this post, we explored how to make delicious spicy garlic edamame. We covered ingredients, preparation, and tips for selecting the best edamame. You can adjust spice levels and add protein for extra flavor. Storing leftovers and reheating is easy, so you can enjoy them later. If you try this dish, you’ll enjoy a tasty and healthy snack. Keep experimenting with flavors and ingredients to make it your own!

Spicy Garlic Edamame Bold and Flavorful Snack

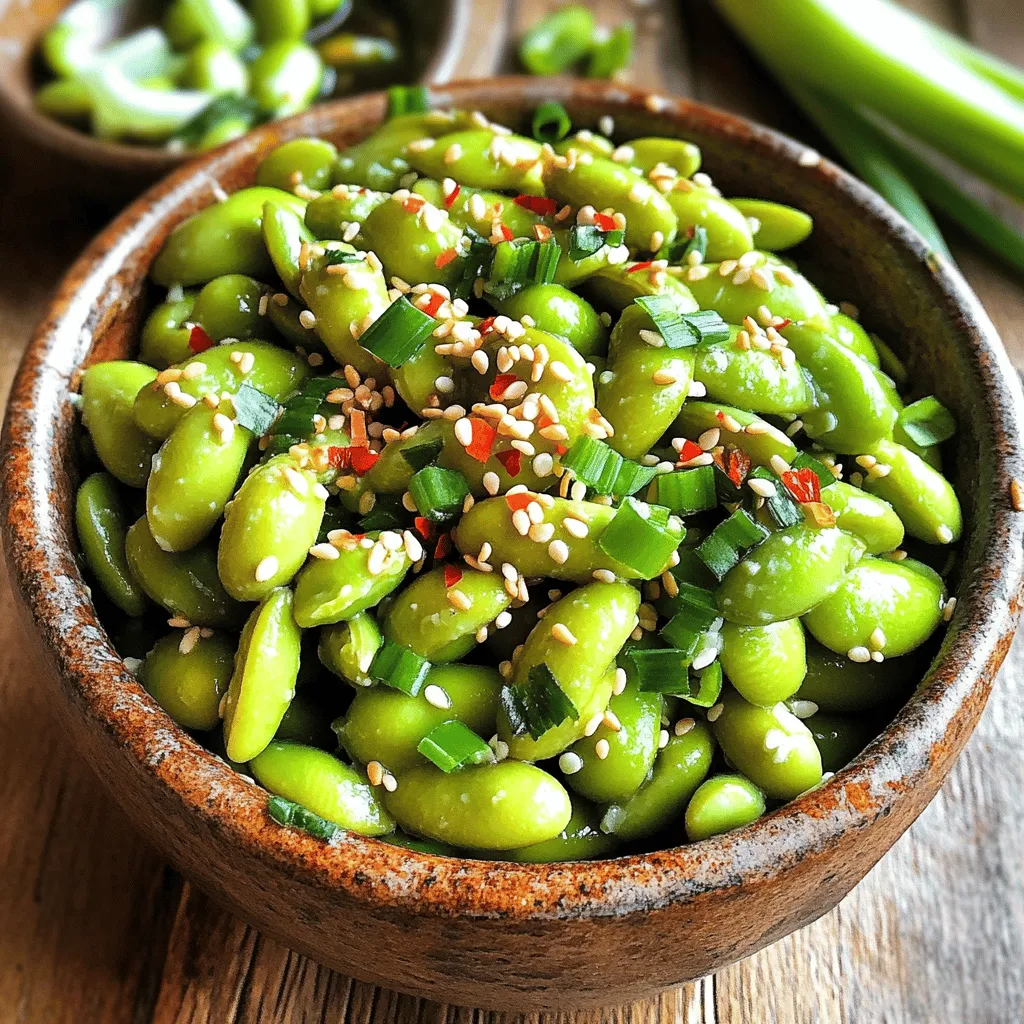
Looking for a bold, flavorful snack that packs a punch? Spicy Garlic Edamame is just what you need! This easy

- 8 oz rice noodles - 1 cup red bell pepper, thinly sliced - 1 cup carrot, julienned - 1 cup cucumber, thinly sliced - 1 cup red cabbage, shredded - 1/4 cup green onions, chopped - 1/2 cup unsalted roasted peanuts, coarsely chopped - 1/4 cup fresh cilantro, finely chopped You will love the fresh taste of the main ingredients. Rice noodles are light and easy to cook. The colorful veggies add crunch and flavor. Red bell pepper gives sweetness. Carrots add a bright, crisp bite. Cucumbers keep it cool and refreshing. Red cabbage brings a nice crunch. Green onions add a mild onion flavor. Peanuts give a great texture, and cilantro adds a fresh note. - 1/3 cup peanut butter - 3 tablespoons soy sauce or tamari - 2 tablespoons pure maple syrup - 2 tablespoons fresh lime juice - 1 tablespoon sesame oil - 1 teaspoon sriracha - 1 clove garlic, minced - Salt, to taste The spicy peanut sauce is the star of this dish. Peanut butter makes it creamy and rich. Soy sauce or tamari adds depth. Maple syrup gives a hint of sweetness. Lime juice brings brightness. Sesame oil adds a nutty flavor. Sriracha gives it that kick. Fresh garlic adds a punch. Adjust salt to fit your taste. This sauce melds perfectly with the noodles and veggies, making every bite a delight! {{ingredient_image_2}} 1. Fill a large pot with water and bring it to a boil. 2. Once boiling, add 8 oz of rice noodles. 3. Cook the noodles for about 4-6 minutes. They should be tender but slightly firm. 4. Drain the noodles and rinse them with cold water. This stops the cooking. Set aside. 1. Wash your vegetables thoroughly. 2. Thinly slice 1 cup of red bell pepper and 1 cup of cucumber. 3. Julienne 1 cup of carrot and shred 1 cup of red cabbage. 4. Chop 1/4 cup of green onions. 5. Combine all the vegetables in a large mixing bowl. 1. In a medium bowl, add 1/3 cup of peanut butter. 2. Pour in 3 tablespoons of soy sauce, 2 tablespoons of maple syrup, and 2 tablespoons of fresh lime juice. 3. Add 1 tablespoon of sesame oil, 1 teaspoon of sriracha, and 1 clove of minced garlic. 4. Whisk the ingredients until smooth. 5. Taste the sauce and adjust the seasoning with salt as needed. 1. Gently add the cooled rice noodles to the bowl with the vegetables. 2. Drizzle the spicy peanut sauce over the noodles and vegetables. 3. Use two forks or tongs to toss everything together. Make sure all the ingredients are well-coated. 1. Present the salad in individual bowls or on a large platter. 2. Garnish with 1/2 cup of coarsely chopped peanuts and 1/4 cup of fresh cilantro. 3. For extra flair, serve with lime wedges and a sprinkle of sesame seeds. Adjust the sriracha based on your spice level! To get the best noodle texture, cook the rice noodles just until they are al dente. This means they should be soft but still have a bit of bite. - Boil a large pot of water. - Add the noodles and cook for about 4-6 minutes. - Drain them and rinse under cold water right away. Rinsing stops the cooking. This way, your noodles won’t get mushy. When chopping your vegetables, focus on uniform sizes for even cooking and a nice look. - Slice the bell pepper and cucumber thinly. - Julienne the carrots for great texture. - Shred the cabbage finely. Mix all veggies well in a big bowl to get an even distribution. You can customize the spice level to fit your taste. If you like it hotter, add more sriracha. - Start with 1 teaspoon for mild heat. - Add more until it’s spicy enough for you. If you need to change ingredients for dietary needs, swap soy sauce for tamari for gluten-free. - Use almond or sun butter instead of peanut butter for nut allergies. - Maple syrup can be replaced with agave for a vegan option. Garnishing makes your dish pop. Add chopped peanuts and fresh cilantro on top for color and crunch. - For a fresh look, sprinkle sesame seeds over the salad. - Consider lime wedges on the side for an extra zing. This not only looks great but also adds bright flavors! Pro Tips Choose Your Noodles Wisely: Opt for rice noodles that are labeled as "vermicelli" for a lighter texture, or go for thicker varieties for a more substantial bite. Both options work well with the spicy peanut sauce! Prep Ahead: Chop all your vegetables in advance and store them in airtight containers in the fridge. This way, you can quickly assemble the salad when you're ready to eat! Adjust the Spice: If you're serving this dish to a crowd, consider serving the sriracha on the side. This allows guests to customize their spice level according to their preference! Fresh Herbs Matter: Don't skip the fresh cilantro! It adds a burst of flavor that complements the richness of the peanut sauce. You can also experiment with other herbs like mint for a different twist! {{image_4}} You can easily adapt this salad for special diets. For gluten-free options, swap regular soy sauce with tamari. This keeps the same rich flavor while being safe for gluten-free eaters. For a vegan version, ensure your peanut butter does not contain honey. The rest of the ingredients are already plant-based, making this salad easy to enjoy by everyone. Want to add protein? Toss in grilled chicken or sautéed tofu. Both options give the salad a nice boost. You can also add more veggies like snap peas, broccoli, or spinach. This not only adds color but also more nutrients. Feel free to mix and match based on what you like or have on hand. If you crave something different, try other dressings. A tahini sauce can work well here. You can also make a spicy sesame dressing for a new twist. For a creative spin on the peanut sauce, mix in some coconut milk for creaminess. This makes the sauce rich and smooth while balancing the heat from the sriracha. To keep your Spicy Peanut Noodle Salad fresh, store it in an airtight container. This helps prevent moisture loss and keeps flavors intact. Place the salad in the fridge right after serving. You can enjoy it for up to three days. After that, the noodles may turn mushy and the veggies could wilt. If you want to save the salad for later, you can freeze it. First, separate the noodles and the veggies. Place them in freezer-safe bags. Squeeze out air before sealing. This method helps maintain their quality. When you’re ready to eat, let them thaw in the fridge overnight. This way, they’ll be ready for mixing. To reheat the noodles, use hot water. Just dip them in boiling water for a few seconds. This warms them without cooking further. You can also use a microwave. Heat in short bursts, stirring often. This keeps the texture smooth and the flavor strong. Enjoy your salad at the right temperature! Spicy Peanut Noodle Salad stays fresh for about 3 to 4 days in the fridge. To keep it tasty, store it in an airtight container. This helps to keep the flavors and textures intact. Avoid adding the dressing until you’re ready to eat. This way, the noodles and veggies stay crisp. Yes, you can make this salad ahead of time! Prepare the noodles and chop the veggies the day before. Store them separately from the sauce. Mixing them together just before serving keeps everything fresh. You can also store leftovers for a quick meal later in the week. If you need a nut-free option, use sunflower seed butter or tahini. Both provide a similar creamy texture. You can also try almond butter if you are okay with nuts. Each alternative brings its own unique flavor, so choose what you prefer. Absolutely! Spicy Peanut Noodle Salad is great for meal prep. You can make it in bulk and portion it out for the week. Just remember to keep the sauce and salad separate until you are ready to eat. This helps to maintain freshness and crunch. You can easily create a tasty Spicy Peanut Noodle Salad with fresh ingredients. We covered cooking rice noodles, preparing veggies, and making the spicy peanut sauce. I shared tips for storage and variations to fit your needs. Remember, you can change the spice level and add proteins for different flavors. This salad is not only delicious but also simple to prepare and store. Enjoy customizing it and sharing it with friends!

Spicy Peanut Noodle Salad Fresh and Flavorful Delight

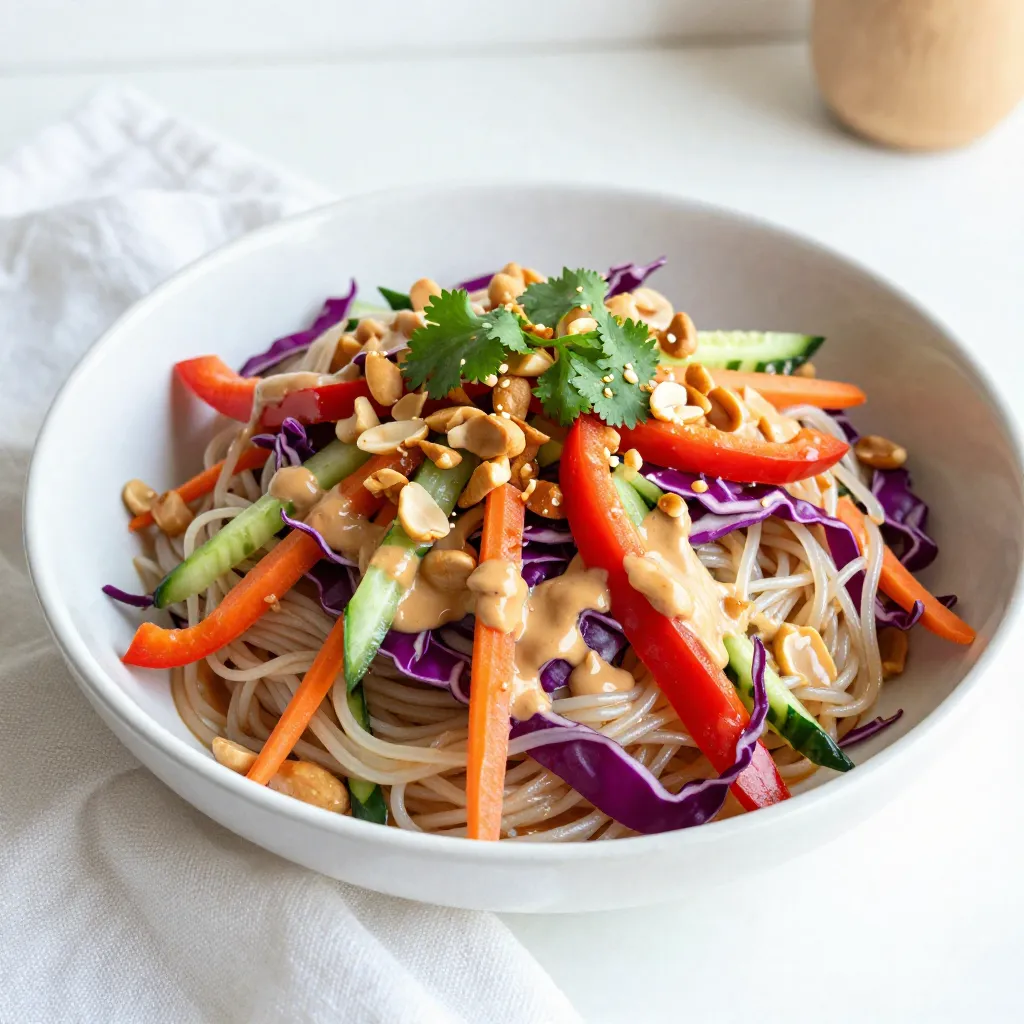
If you crave bold flavors and fresh ingredients, this Spicy Peanut Noodle Salad is for you! Packed with vibrant veggies,

To make the perfect Apple Cider Chai Latte, gather the following ingredients: - 2 cups apple cider - 1 cup milk (dairy or non-dairy) - 2 chai tea bags - 1-2 tablespoons maple syrup - 1 teaspoon vanilla extract - 1/2 teaspoon ground cinnamon - 1/4 teaspoon ground ginger - A pinch of ground cloves To elevate your latte, consider these tasty toppings: - Whipped cream - A sprinkle of ground cinnamon - Additional cinnamon stick for garnish You can easily adapt this recipe to fit your needs: - For dairy-free, use almond, oat, or soy milk. - For sugar-free, swap maple syrup with a sugar-free sweetener. - You can also use unsweetened apple cider to reduce sweetness. These options let everyone enjoy a delicious cup of Apple Cider Chai Latte! Making an Apple Cider Chai Latte is simple and fun. You will need a medium saucepan, measuring cups and spoons, and your favorite mugs. Gather all your ingredients first. This makes the process smooth and quick. You'll enjoy the warm spices and sweet apple cider. 1. Heat the Apple Cider: Start by pouring 2 cups of apple cider into your medium saucepan. Set the heat to medium. Stir it gently as it heats. Wait for about 5 minutes until it starts to simmer. 2. Steep the Chai: Once simmering, add 2 chai tea bags to the saucepan. Let them steep for 5-7 minutes. This step is key to get rich flavors into the cider. 3. Remove Tea Bags: After steeping, carefully take out the tea bags. Squeeze them lightly to get out any remaining liquid. 4. Mix in the Goodies: Now, add 1 cup of milk, 1-2 tablespoons of maple syrup, 1 teaspoon of vanilla extract, 1/2 teaspoon of ground cinnamon, 1/4 teaspoon of ground ginger, and a pinch of ground cloves into the cider. Stir well. Heat this mixture gently. It should be hot, but do not let it boil. 5. Pour and Enjoy: Once heated, pour the chai latte into your favorite mugs. 6. Finish with a Twist: If you want to make it extra special, top with whipped cream. You can also sprinkle more cinnamon on top or add a cinnamon stick. - Timing is Key: Steep the chai tea bags for the full 5-7 minutes. This ensures you get the best flavor. - Taste Before Removing: If you like a stronger chai flavor, you can steep a little longer. Just remember, longer steeping can make it a bit bitter. - Use Fresh Tea: Always use fresh chai tea bags. Old or stale tea won’t give you the right taste. With these steps, you will create a delicious drink that warms your heart and soul. Enjoy! Start with fresh apple cider. The taste of your drink depends on it. Use your favorite milk, whether dairy or plant-based. This choice adds creaminess to your drink. Adjust the maple syrup for sweetness. A little can go a long way. Don't skip the spices! They are key to a rich flavor. Ground cinnamon, ginger, and cloves bring warmth to every sip. Steep your chai bags for 5-7 minutes. This ensures the flavor blends well with the cider. Heat gently to keep the latte creamy. Avoid boiling the milk to prevent curdling. Don’t rush the simmering process. If the cider isn't hot enough, it won’t blend well. Oversteeping the chai tea can make it bitter. Stick to the time for the best taste. Be careful when squeezing the tea bags. Too much pressure releases bitterness. Also, avoid skipping the vanilla extract. It adds depth to the flavor. If you forget the whipped cream, your latte will still taste good. But it gives a lovely finish! Try adding a hint of nutmeg for a cozy touch. You can also mix in a splash of caramel syrup. This adds a sweet twist. For a spicy kick, include a dash of cayenne pepper. It may sound odd, but it works! Experiment with different milk types. Almond, oat, and coconut milk each bring their own unique taste. Serve your latte with a cinnamon stick for stirring. It looks nice and adds extra flavor. Enjoy your drink with a slice of apple pie for a perfect pair! {{image_4}} To make a vegan version, swap the milk for a non-dairy option. Almond, oat, or coconut milk works well. Use the same amounts as the original recipe. The flavor stays rich and creamy. You can still enjoy those warm spices and sweet apple cider. This vegan twist is perfect for anyone avoiding dairy. If you want a sugar-free drink, skip the maple syrup or use a sugar substitute. Stevia or erythritol can replace the sweetness. Adjust the amount to fit your taste. You can also use unsweetened apple cider. This keeps the drink flavorful without added sugars. In fall, try adding pumpkin puree for extra flavor. Just mix in about 1/4 cup when you add the milk. This creates a warm, cozy drink. You can also add a dash of nutmeg for a festive touch. These seasonal twists keep the recipe fun and exciting all year long. To store leftover Apple Cider Chai Latte, let it cool first. Pour it into an airtight container. You can use glass jars or plastic containers. Seal tightly and place it in the fridge. It will stay fresh for up to three days. If you want, you can also freeze it. Pour it into ice cube trays for easy use later. When you are ready to enjoy your latte again, take it out of the fridge. Pour the latte into a small pot. Heat it over medium-low heat. Stir often to avoid burning. You can also use a microwave. Pour it into a microwave-safe mug and heat for 1-2 minutes. Stir halfway through to make sure it heats evenly. The shelf life of your ingredients varies. Apple cider lasts about a week in the fridge after opening. Unopened cider can stay fresh for several months. Milk lasts about a week after the sell-by date, depending on type. Chai tea bags can last for a year if stored in a cool, dry place. Spices like cinnamon and ginger last around six months for the best flavor. Always check for signs of spoilage before using any ingredient. The best apple cider is fresh, unfiltered cider. It has a rich, sweet taste. Look for local brands if possible. Avoid the clear, filtered versions. They lack the depth of flavor that makes this drink special. Fresh cider pairs well with chai spices too. Yes, you can make this drink ahead of time. Prepare it and let it cool. Store it in the fridge for up to three days. When ready to enjoy, reheat it gently on the stove. Avoid boiling to keep the flavors intact. Apple cider is rich in antioxidants, which are good for your health. Chai tea has spices like ginger and cinnamon. These spices may help with digestion and have anti-inflammatory properties. Maple syrup adds natural sweetness and minerals. Milk provides calcium and protein, making this drink nutritious and tasty. In this blog post, we explored how to make a delicious Apple Cider Chai Latte. We covered all the necessary ingredients and options for toppings. You learned step-by-step instructions for preparing this tasty drink. We discussed tips to perfect your latte and common mistakes to avoid. With variations and storage tips, you can easily customize your drink to fit your needs. Remember, making this drink is fun and rewarding. Enjoy your warm cup of flavor with friends or family!

Apple Cider Chai Latte Deliciously Spiced Recipe

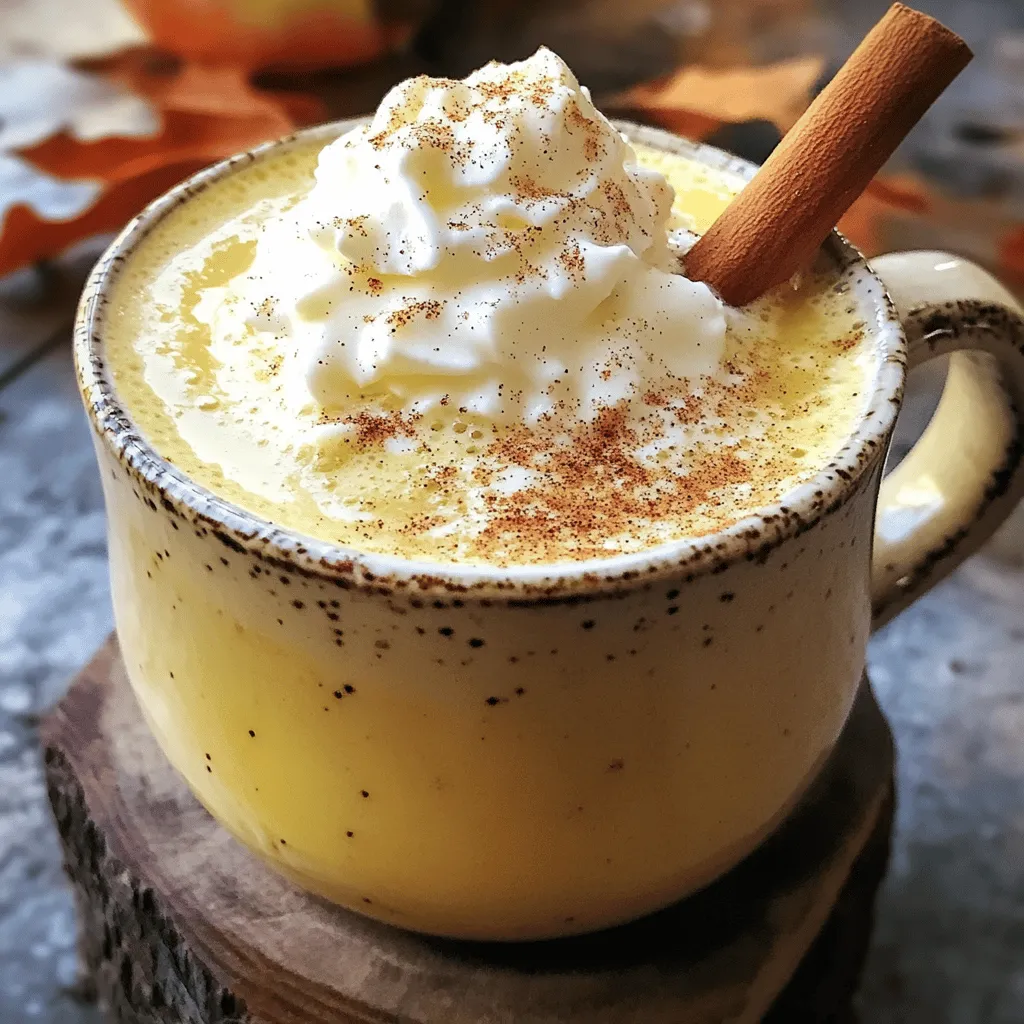
Warm up your fall days with my delicious Apple Cider Chai Latte. This cozy drink blends sweet apple cider and

- 1 large eggplant - 1 cup breadcrumbs (panko recommended) - 1/2 cup freshly grated Parmesan cheese - 2 large eggs - 1 teaspoon Italian seasoning blend - 1/2 teaspoon garlic powder - Salt and black pepper - Marinara sauce for dipping Each serving has about 180 calories, 8 grams of fat, 22 grams of carbs, and 6 grams of protein. Eggplant is a star in this recipe. Its texture works well as fries. You will love how crispy they get in the air fryer. Panko breadcrumbs make the fries extra crunchy. Parmesan cheese adds a rich flavor that makes them hard to resist. I suggest using fresh eggs for the best results. They help the coating stick well. Salt draws moisture out of the eggplant and cuts any bitterness. Italian seasoning gives the fries a nice herb taste. Garlic powder adds a bit of zest too. If you like, you can dip these fries in marinara sauce. It adds a tangy touch that pairs well with the crispy fries. Start by cutting the eggplant into thin fries, about 1/4 inch thick. Place the slices in a colander. Generously sprinkle salt on them. Let them rest for 30 minutes. This step draws out moisture and reduces bitterness. After 30 minutes, rinse the eggplant under cold water. Make sure to wash off all the salt. Pat each slice dry with paper towels. This is key for a crispy fry. Now, set your air fryer to preheat at 375°F (190°C). Preheating helps the fries cook evenly and turn crispy. This step is very important, so don’t skip it! In a shallow bowl, mix together the breadcrumbs, grated Parmesan cheese, Italian seasoning, garlic powder, and a little salt and pepper. Stir until all the ingredients are well blended. This mix gives the fries a tasty, crunchy coating. Take one eggplant slice and dip it into the beaten eggs. Make sure it’s fully covered. Let any extra egg drip off. Next, roll it in the breadcrumb mixture. Press gently to help the crumbs stick. Repeat this for all slices, ensuring each one is well coated. Place the coated eggplant fries in the air fryer basket. Arrange them in a single layer, leaving space between each fry. Avoid overcrowding the basket. This allows hot air to circulate around each piece and cook them evenly. Cook the eggplant fries in the air fryer for 15 to 18 minutes. Remember to turn them halfway through the cooking time. They should look golden brown and crispy when done. This is the moment you’ve been waiting for! To get that perfect crisp, preheat your air fryer. Set it to 375°F (190°C) before you start cooking. This step warms the air fryer and helps the fries cook evenly. Next, space your eggplant fries well in the basket. If you crowd them, they will steam instead of crisp. Give each fry room to breathe for the best results. Salting the eggplant is key. After cutting the eggplant into fries, sprinkle salt on them and let them sit for about 30 minutes. This process pulls out moisture and reduces bitterness. Once done, rinse off the salt and dry each slice well with paper towels. This prevents sogginess and keeps the fries crispy. Serve your eggplant fries warm for the best flavor and texture. They taste great right out of the air fryer. If you let them sit too long, they can lose their crispiness. For a fun touch, dip them in warm marinara sauce. This adds a tangy kick and makes them even more enjoyable! {{image_4}} You can customize your eggplant fries to match your taste. Try adding spices like smoked paprika or cayenne pepper for a kick. You can also mix in fresh herbs like basil or oregano to the breadcrumbs. These add flavor and freshness. If you prefer a different cheese, try using mozzarella or a spicy cheese blend. Experimenting with spices and herbs makes each batch unique. If you need a gluten-free option, swap the breadcrumbs for gluten-free alternatives. You can use almond flour or crushed gluten-free crackers. Both options give a nice crunch. Make sure your cheese is also gluten-free. This way, you can enjoy the dish without worry. For dipping, marinara sauce is classic, but don’t stop there. You can try ranch dressing, garlic aioli, or even a spicy sriracha mayo. These dips add fun flavors. For sides, pair the fries with a fresh salad or some roasted vegetables. This makes your meal more balanced and colorful. Enjoying different dips and sides can turn a simple snack into a feast! To keep your leftover eggplant fries fresh, use an airtight container. Place a paper towel at the bottom to absorb moisture. This helps maintain crispiness. Store the container in your fridge. Consume the fries within 3 days for the best taste and texture. To reheat and keep them crispy, use your air fryer. Preheat it to 375°F (190°C). Place the fries in the basket in a single layer. Heat for about 5-7 minutes. This method helps restore their crunch. You can also use an oven. Set it to 375°F (190°C) and bake for 8-10 minutes. To freeze your eggplant fries, let them cool completely. Arrange them in a single layer on a baking sheet. Freeze until solid, then transfer them to a freezer bag. Remove as much air as possible to prevent freezer burn. They can stay frozen for up to 3 months. To reheat, cook straight from frozen in your air fryer at 400°F (200°C) for 10-12 minutes. Check for crispiness and adjust the time if needed. Enjoy your delicious fries again! Yes, you can! Here are a few great options: - Zucchini - Sweet potatoes - Carrots - Bell peppers These veggies can also give you a fun and tasty fry. Just cut them into thin sticks like the eggplant. Remember, cooking times may change based on the veggie you choose. To add some heat, try these tips: - Add cayenne pepper to the breadcrumb mix. - Use spicy Italian seasoning instead of regular. - Serve with a spicy dipping sauce, like sriracha or a hot marinara. Start with a small amount and adjust to your taste. You can always add more! If you don't own an air fryer, no worries! You can still make these fries: - Oven Method: Preheat your oven to 425°F (220°C). Place the coated eggplant fries on a baking sheet lined with parchment paper. Bake for about 25-30 minutes, flipping halfway until they are golden brown. - Stovetop Method: Use a skillet with oil over medium heat. Fry the coated eggplant strips in batches until they are crispy and brown on both sides. Both methods will give you tasty fries, just with a different texture! In this article, we talked about making tasty eggplant fries. You learned about the key ingredients and how to prepare them step by step. I shared tips to achieve the best crisp and avoid sogginess. We also covered how to store leftovers and explore different variations. Now, you can enjoy a healthier snack that's easy to prepare. Remember, customizing with your favorite spices can make a big difference. So, gather your ingredients and start cooking!

Air Fryer Eggplant Parmesan Fries Crisp and Flavorful

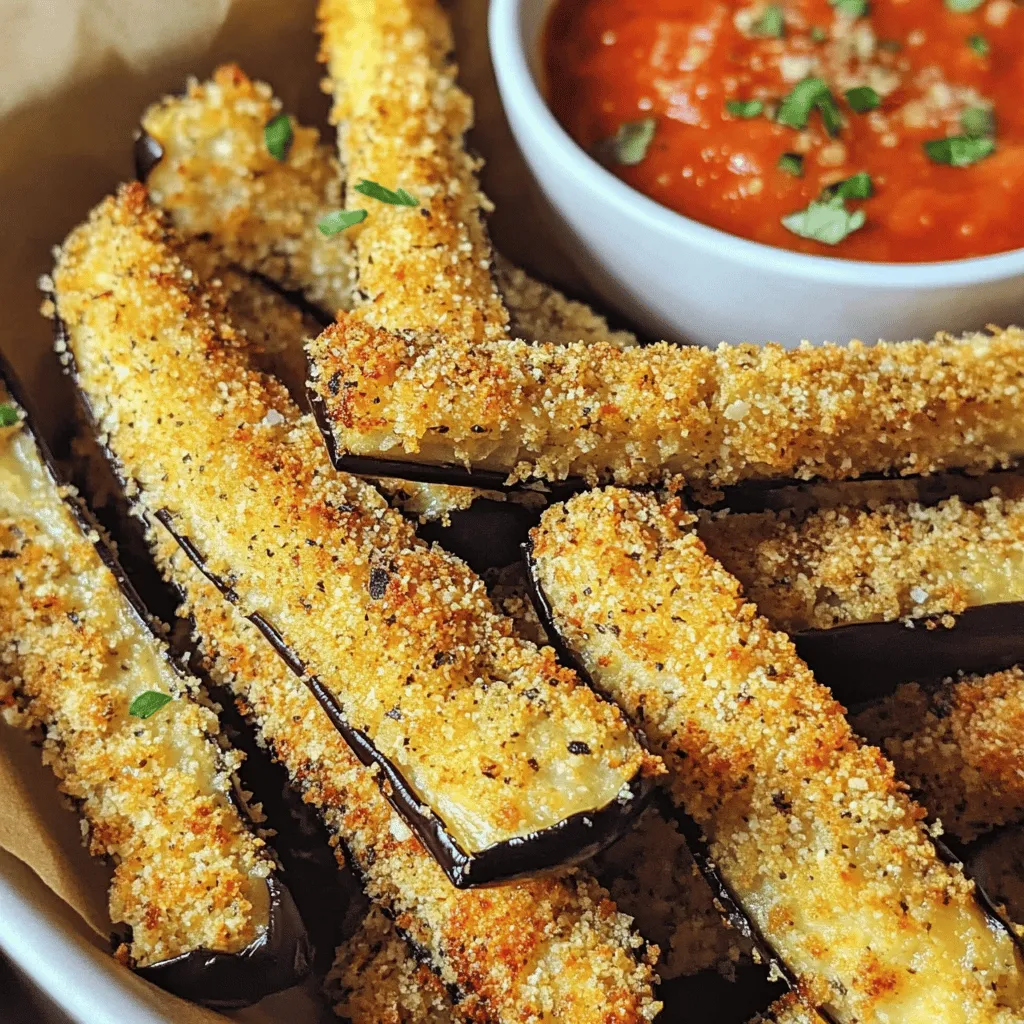
Are you ready to enjoy a healthier version of your favorite snack? My Air Fryer Eggplant Parmesan Fries are crispy,

- 1 cup rolled oats - 1 ½ cups almond milk (or preferred milk) - 1 medium apple, peeled and diced - 1 teaspoon ground cinnamon - 1 tablespoon maple syrup (or honey, to taste) - 1 tablespoon chia seeds - ¼ teaspoon ground nutmeg - 2 tablespoons Greek yogurt (optional, for added creaminess) - 2 tablespoons chopped walnuts (for a crunchy topping) - Additional apple slices (for garnish) - A pinch of salt To make Apple Pie Overnight Oats, you need simple, easy items. Rolled oats serve as the base, bringing fiber and texture. Almond milk keeps it creamy and adds flavor. The diced apple gives a fresh taste and sweetness. Cinnamon and nutmeg bring warmth, making it feel like pie. Maple syrup adds a touch of sweetness. Chia seeds help thicken the oats and add nutrients. Greek yogurt makes it rich and creamy. Walnuts give a nice crunch on top. Finally, don’t forget the apple slices for a pretty finish! If you want to switch things up, here are some ideas. Use oats that suit your diet, like gluten-free oats. For milk, try coconut milk or oat milk for a different flavor. Instead of a fresh apple, use applesauce for smoothness. You can also swap maple syrup for agave nectar or brown sugar. Instead of chia seeds, use flaxseeds for a similar effect. If you don’t have Greek yogurt, regular yogurt or a non-dairy option works too. Each serving of Apple Pie Overnight Oats gives you a healthy start to your day. Here’s a rough breakdown: - Calories: 350 - Protein: 10g - Carbs: 55g - Fat: 12g - Fiber: 8g - Sugar: 12g These oats are not just tasty; they also fuel your day with good nutrients. The oats provide energy. Apples offer vitamins. The nuts add healthy fats. This meal keeps you full until lunch. {{ingredient_image_2}} Start by gathering your ingredients. You need rolled oats, almond milk, a diced apple, chia seeds, and spices. In a medium bowl, mix the rolled oats, almond milk, and chia seeds first. Stir well to blend them. Next, add the diced apple, ground cinnamon, nutmeg, maple syrup, and a pinch of salt. Mix these gently until they combine nicely. If you want creaminess, add Greek yogurt now. This step makes a smooth base. Divide the mixture into two jars or bowls. Seal them tightly with lids. Place the jars in the fridge overnight. This soak helps the oats absorb the milk and flavors. The key to great texture is soaking time. Let your oats sit in the fridge for at least eight hours. This allows the oats to soften and swell. If you find the oats too thick in the morning, simply add a splash of almond milk. This helps to create the texture you love. Mixing in the Greek yogurt also adds creaminess, making every bite delightful. You can prep these oats ahead of time. Make them the night before for an easy breakfast. Store them in airtight jars in the fridge for up to three days. This recipe is great for meal prep. If you want to make a larger batch, just double the ingredients. Remember to add toppings like walnuts and apple slices just before serving. This keeps them fresh and crunchy. You can change this recipe to fit your taste. Here are some ideas: - Different Fruits: Swap apples for bananas, berries, or pears. - Sweeteners: Use honey, agave, or stevia instead of maple syrup. - Nut Butters: Try adding almond or peanut butter for a nutty flavor. - Spices: Add ginger or cloves for an extra kick. To make your oats taste even better, try these tips: - Toast Nuts: Lightly toast walnuts in a pan for more flavor. - Infused Milk: Heat almond milk with cinnamon before mixing. This adds warmth and depth. - Vanilla Extract: A splash of vanilla adds sweetness without sugar. - Layering: Create layers in your jar with oats and fruit for a fun look and taste. Avoid these common pitfalls for the best overnight oats: - Too Much Liquid: Start with the right amount of milk to keep oats from being runny. - Skipping Chia Seeds: These help thicken the mixture and add nutrients. - Not Mixing Well: Be sure all ingredients are combined for even flavor. - Forgetting to Stir: Stir before serving to mix flavors and improve texture. Pro Tips Use Fresh Apples: For the best flavor, use fresh, crisp apples like Honeycrisp or Granny Smith, which will maintain their texture after soaking. Customize Sweetness: Taste the mixture before refrigerating and adjust the sweetness by adding more maple syrup or honey based on your preference. Make Ahead in Batches: Prepare multiple jars at once to enjoy quick, healthy breakfasts throughout the week without daily prep. Add Variations: Try adding different spices like ginger or cloves, or mix in dried fruits and seeds for added flavor and nutrition. {{image_4}} You can change up the fruit to keep things exciting. Instead of apples, try ripe bananas. They add a nice sweetness and creaminess. Berries like blueberries or strawberries work well too. They bring a fresh taste and vibrant color. For a tropical twist, add diced mango or pineapple. Each fruit gives a unique flavor to your overnight oats. If you want a vegan option, skip the Greek yogurt. Use coconut yogurt instead for creaminess. You can also use plant-based milk like oat or soy milk. These swaps make the recipe dairy-free while keeping it delicious. Always check labels to ensure no dairy sneaks in. This way, everyone can enjoy the dish. You can adapt this recipe for any season. In fall, add pumpkin puree and spices like ginger. In winter, mix in dried fruits like cranberries or figs. Spring is great for fresh fruits like strawberries or peaches. Summer shines with refreshing fruits like cherries or apricots. These seasonal changes keep your oats fresh and fun all year. You can keep apple pie overnight oats in the fridge for up to five days. This makes them great for meal prep. Just make sure you store them in airtight containers. The flavors will meld together nicely over time, creating a tasty treat. I recommend using glass jars or plastic containers with tight lids. Glass jars work well because they are easy to clean and do not retain odors. Make sure to choose containers that are just the right size for your servings. This way, you can grab a jar and go! You can enjoy apple pie overnight oats cold or warm. If you prefer them warm, simply heat them in the microwave for about 30 seconds. Stir well to ensure even heating. Top with extra chopped walnuts and apple slices for added crunch. A drizzle of maple syrup can also make it extra special! Yes, you can skip the chia seeds. They help thicken the oats. If you leave them out, try adding a bit more rolled oats. This will still give you a nice texture. You can also add yogurt for creaminess if you want. You can use any milk you like. Options include cow's milk, soy milk, or oat milk. Each will give a different flavor, but they all work well. If you want a nut-free choice, go for coconut or rice milk. Absolutely! You can make several jars at once. Just follow the same steps and store them in the fridge. They stay fresh for up to five days. This makes breakfast easy all week long! Apple pie overnight oats are easy to make and tasty. We covered the main ingredients, including alternatives and nutrition facts. I shared step-by-step instructions to help you prepare them perfectly. Plus, I offered tips to customize flavors and avoid mistakes. You can also enjoy many variations, from seasonal fruits to vegan options. Finally, I outlined storage tips to keep your oats fresh. Enjoy making this delicious dish. It’s a simple way to start your day right!

Delicious Apple Pie Overnight Oats Easy Recipe

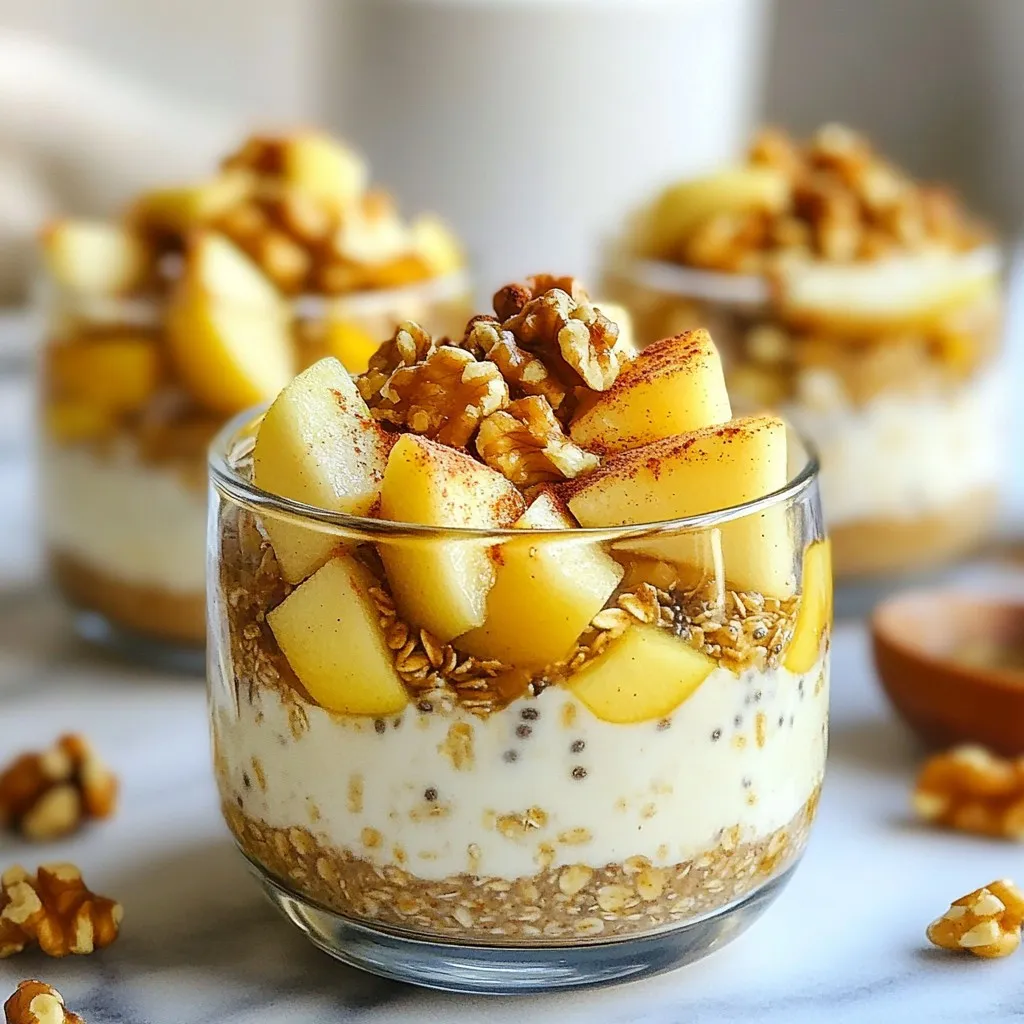
Looking for a quick, tasty breakfast that screams comfort? You’ll love these Apple Pie Overnight Oats! With simple ingredients and

- Large shrimp (1 pound, peeled and deveined) - Honey (1/4 cup) - Minced garlic (3 cloves) - Soy sauce (1 tablespoon, preferably low sodium) - Sriracha sauce (1 tablespoon, adjust spice level) - Olive oil (1 tablespoon) - Ground ginger (1 teaspoon) - Paprika (1 teaspoon) - Salt and black pepper - Sliced bell peppers (red and green) - Sliced red onion - Fresh cilantro or parsley for garnish - Lemon wedges for serving The key to this dish is fresh, high-quality shrimp. I like to use large shrimp for a satisfying bite. You’ll also want the honey to be pure and not a blend. It gives the dish a sweet touch that balances the heat from the sriracha. Minced garlic adds a strong flavor, so be sure to use fresh cloves. For the soy sauce, I recommend low sodium to keep the dish balanced. Adjust the sriracha to make it as spicy as you like. Using colorful bell peppers not only adds taste but also makes the dish look bright and appealing. The red onion gives a nice crunch and sweetness. When garnishing, fresh herbs like cilantro or parsley add a pop of color and fresh taste. Lastly, lemon wedges serve as a zesty finish. Squeeze them over the dish before eating to enhance the flavors. - Preheat the oven to 400°F (200°C) and line a sheet pan with parchment paper. - In a medium bowl, mix honey, minced garlic, soy sauce, sriracha, olive oil, ginger, paprika, salt, and black pepper. This creates a tasty marinade. - Add the shrimp to the marinade. Make sure each piece is coated well. Let it sit for 15-20 minutes. This helps the shrimp soak up all the flavors. - While the shrimp marinates, slice your vegetables. Place the bell peppers and red onion on the sheet pan. Drizzle with olive oil and sprinkle salt and black pepper. Toss to coat them evenly. - Once the shrimp finish marinating, arrange them over the veggies on the sheet pan. Don’t crowd the shrimp; this helps them cook better. - Bake everything in your oven for 10-12 minutes. The shrimp should be pink and opaque, and the veggies should be tender yet crisp. Enjoy the wonderful smells as it cooks! - Ensure shrimp are not overcrowded on the sheet pan for even cooking. This way, they cook well without steaming. - Adjust sriracha for desired heat level. If you want it spicy, add more. For less heat, use less. - Serve directly from the sheet pan or transfer to a serving platter. Both options look great! - Drizzle leftover sauce over the dish. This adds flavor and makes it look nice. - Sprinkle with sesame seeds for a crunchy finish. It adds a lovely touch! {{image_4}} You can make this dish your own with simple swaps. Try using scallops or firm fish instead of shrimp. This keeps the dish fresh and fun. For a vegan option, swap honey for maple syrup. It adds sweetness and works well with the spices. Want more heat? Experiment with different hot sauces. You can try a smoky chipotle sauce or even a classic cayenne pepper. Each option brings its own flavor. Adjust the spice to what you like best. Feel free to add more veggies for flavor and crunch. Zucchini, asparagus, or snap peas will work great. They cook quickly and add nice texture. You can mix and match to find your favorite combination. Store your leftovers in an airtight container. You can keep them in the refrigerator for up to 2 days. This keeps the shrimp and veggies fresh. Just make sure to let them cool down before sealing the container. When you're ready to eat, you can reheat them in a pan or microwave for a quick meal. If you want to save some for later, freeze portions in a freezer-safe container. This dish freezes well for up to 3 months. Be sure to label the container with the date. When you're ready to enjoy, thaw in the fridge overnight. Reheat on the stove or in the microwave, and they will taste almost as good as fresh. Look for shrimp that are opaque and pink in color. This change means they are cooked through. The shrimp should curl into a nice "C" shape. If they form an "O," they may be overcooked. Keep an eye on them while baking to get the best result. Yes, just make sure to thaw and drain excess moisture before marinating. Frozen shrimp can work well. Place them in the fridge overnight or in cold water for a faster thaw. Once thawed, pat them dry. This helps the marinade stick better and prevents a watery dish. Serve with rice, quinoa, or a fresh salad for a complete meal. These sides soak up the spicy honey garlic sauce nicely. You can also add some crusty bread to mop up the sauce. For a lighter option, a simple green salad adds freshness and crunch. This blog post covers how to make a tasty sheet pan spicy honey garlic shrimp meal. We discussed ingredients, preparation steps, and cooking tips. You can swap ingredients or adjust spice levels to suit your taste. Remember, avoiding overcrowding on the sheet pan ensures even cooking. Whether you keep leftovers a few days or freeze for later, this dish is easy to store and reheat. Enjoy this flavorful, simple meal that brings fun to your kitchen. Now grab your ingredients and start cooking!

Sheet Pan Spicy Honey Garlic Shrimp Quick and Zesty Dish

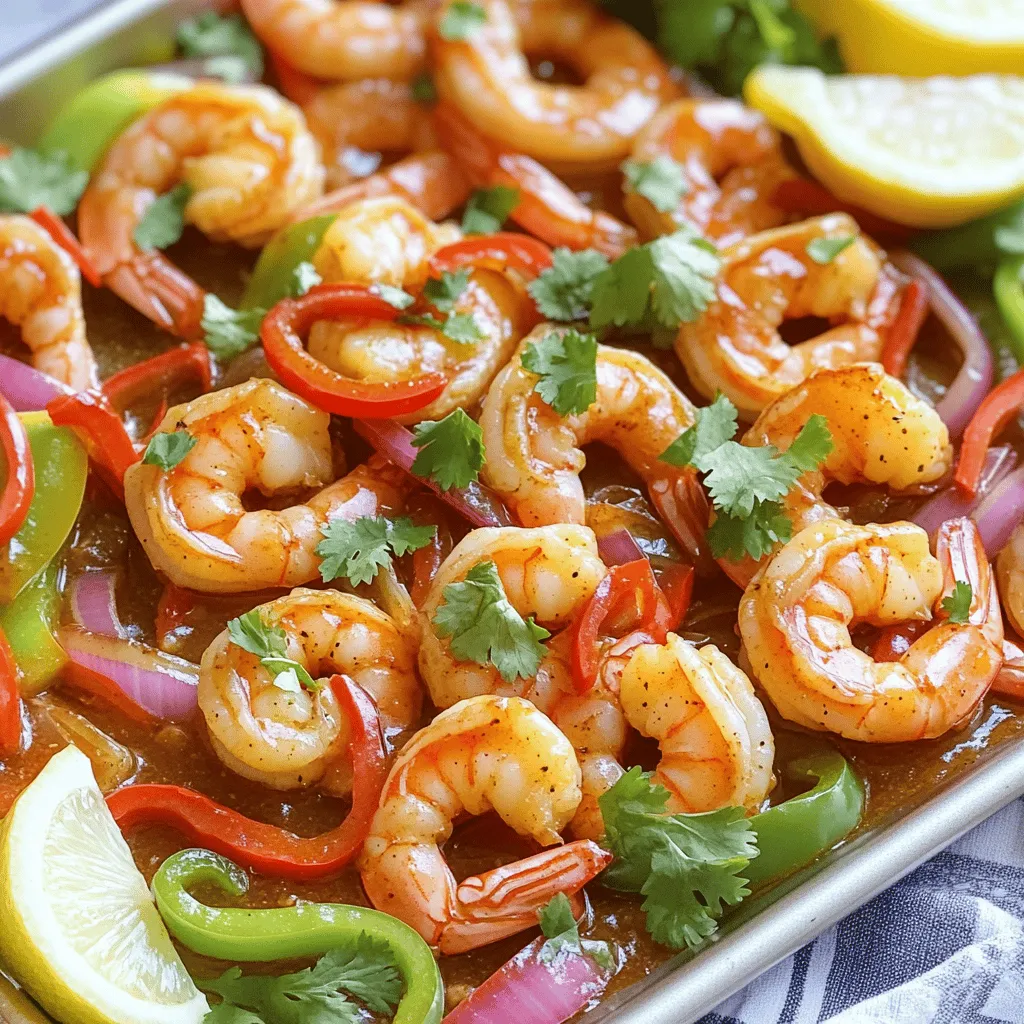
Get ready for a quick and tasty meal with my Sheet Pan Spicy Honey Garlic Shrimp! This easy recipe combines

For my pumpkin chia pudding, I use simple, wholesome ingredients. Here’s what you need: - 1 cup pumpkin puree (canned or fresh) - 1/4 cup chia seeds - 2 cups almond milk (or any milk of choice) - 1/4 cup maple syrup (adjust sweetness to your liking) - 1 teaspoon pure vanilla extract - 1 teaspoon pumpkin pie spice - A pinch of salt These ingredients blend together to create a creamy and tasty pudding that’s perfect for any time. To make your pudding even better, consider these toppings: - Whipped coconut cream - Crushed nuts - Seeds These add texture and flavor, making each bite delightful. Each ingredient in this pudding packs a punch of nutrients: - Pumpkin puree: Rich in vitamins A and C, it supports eye health and boosts immunity. - Chia seeds: Full of fiber, protein, and omega-3 fatty acids. They help keep you full longer. - Almond milk: Low in calories, it’s a great dairy-free option for hydration. - Maple syrup: A natural sweetener that provides antioxidants and minerals. - Vanilla extract: Adds flavor and may improve mood. - Pumpkin pie spice: Contains cinnamon and nutmeg, which may help regulate blood sugar. These ingredients not only taste great but also nourish your body. Enjoy your pumpkin chia pudding! To make pumpkin chia pudding, start by mixing the base. In a medium bowl, combine 1 cup pumpkin puree with 2 cups almond milk. Next, add 1/4 cup maple syrup, 1 teaspoon vanilla extract, 1 teaspoon pumpkin pie spice, and a pinch of salt. Whisk everything together until it's smooth. Once mixed, it’s time to add the chia seeds. Gradually sprinkle 1/4 cup chia seeds into the pumpkin mix. Stir constantly to keep the seeds from clumping. This step is key for a creamy pudding. Now, cover your bowl tightly with plastic wrap or divide the mixture into individual jars. Chill in the fridge for at least 4 hours or overnight. This waiting time lets the chia seeds soak up the liquid and thicken the pudding. After chilling, take it out and give it a good stir. If it feels too thick, add a splash of almond milk. This will help you reach your desired texture. For the best consistency, whisk well when mixing ingredients. This helps blend everything smoothly. If you want a thicker pudding, use more chia seeds. For a thinner pudding, use less. Chill the pudding long enough. The longer it sits, the creamier it becomes. If you're in a hurry, 4 hours is okay, but overnight is best. Always stir the pudding after chilling. This will help break up any clumps and make it smooth again. Adjust the texture with extra milk if needed. Serving your pudding can be fun! Spoon the pumpkin chia pudding into bowls or clear jars. This way, you can show off the beautiful orange color. For toppings, consider adding a dollop of whipped coconut cream. This adds a nice creaminess. You can also sprinkle on some crushed nuts or seeds for crunch. Layer the pudding with toppings in jars for a pretty look. A sprinkle of cinnamon on top adds a nice touch. Enjoy your creamy, nourishing treat! When making pumpkin chia pudding, avoid these common mistakes: - Not whisking enough: Make sure you blend the pumpkin puree and milk well. This helps prevent lumps and gives a smooth texture. - Skipping the chill time: Don't rush the chilling process. Allow the pudding to sit for at least 4 hours, or overnight if you can. This is key for the chia seeds to absorb the liquid. - Not stirring the chia seeds: When you add chia seeds, stir them in slowly. This prevents clumping and ensures they mix evenly. To make your pudding even better, try these tips: - Use fresh spices: Freshly ground spices can boost the flavor. Try grinding your own pumpkin pie spice for a rich taste. - Adjust sweetness: Taste the mixture before chilling. If it's not sweet enough, add more maple syrup to suit your taste. - Add a pinch of sea salt: This enhances the flavors and balances the sweetness. For the best results with your chia pudding, follow these practices: - Soak chia seeds: If you prefer, soak the chia seeds in the milk for 15 minutes before mixing them with the pumpkin. This ensures they expand well. - Use a whisk: Whisk the pumpkin mixture thoroughly. A whisk helps incorporate air, making the pudding lighter. - Serve in clear jars: For a beautiful presentation, layer the pudding in clear jars. This showcases the lovely pumpkin color and makes it more appealing. {{image_4}} This pumpkin chia pudding is naturally vegan and gluten-free. You can use almond milk, coconut milk, or any plant-based milk. This choice keeps the pudding light and creamy. If you need a nut-free option, try oat milk or rice milk. Both work well and keep the pudding rich in flavor. You can easily change the flavor of your pudding. For a chocolate twist, add cocoa powder to the pumpkin mix. Start with 2 tablespoons of cocoa for a rich taste. If you like spice, try adding a pinch of cayenne pepper. This will give a nice kick to your pudding. For a more festive flavor, mix in some orange zest. It adds a fresh note that pairs well with pumpkin. Seasonal ingredients can elevate your pudding. In fall, add chopped apples or pears for crunch. These fruits add natural sweetness and texture. In winter, mix in peppermint extract for a cool flavor. You can also top it with crushed gingerbread cookies for a fun treat. During spring, try fresh berries like strawberries or blueberries. They brighten the dish and add a burst of color. Each variation adds a new twist to the classic recipe. You can have fun experimenting with these ideas to find your favorite! To keep your pumpkin chia pudding fresh, store it in airtight containers. You can use bowls or jars with lids. If you plan to serve it later, portion out individual servings. This makes it easy to grab and go! When stored correctly, pumpkin chia pudding lasts about 4 to 5 days in the fridge. The flavors deepen as it sits, so it can taste even better the next day. Just give it a good stir before serving. You can freeze pumpkin chia pudding if you want to make it last longer. Just pour it into freezer-safe containers. It will stay good for about 2 months. When you're ready to eat it, transfer it to the fridge to thaw overnight. Stir well before enjoying. If it seems thick, add a bit of milk to reach your desired consistency. Yes, you can use fresh pumpkin. Simply roast or steam it until soft. Then, blend it until smooth. Fresh pumpkin gives a bright flavor. It may have more water, so adjust the almond milk slightly. To meal prep, make a big batch in advance. Store it in jars for easy grab-and-go snacks. Just follow the recipe and divide the pudding into individual servings. This makes it easy for breakfast or dessert. You can use honey, agave, or coconut sugar. Each sweetener will change the taste a bit. Start with a small amount, then adjust to your liking. Taste as you go to find your perfect level of sweetness. The pudding lasts about 5 days in the fridge. Keep it in an airtight container. If you notice any change in smell or texture, it's best to discard it. Always check before enjoying! Yes, you can try flaxseeds or hemp seeds. They will change the texture a little. Quinoa is another option, but make sure it's cooked first. Each substitute has its own unique flavor. You can easily make tasty pumpkin chia pudding using simple steps and ingredients. We explored essential ingredients, preparation tips, and how to enhance flavor. You learned about storage and common mistakes to avoid. Remember, there are many ways to customize this pudding. Try adding your favorite flavors or toppings. With these tips, you'll create a delicious and healthy treat. Enjoy experimenting with this recipe, and make it your own!

Pumpkin Chia Pudding Creamy and Nourishing Delight

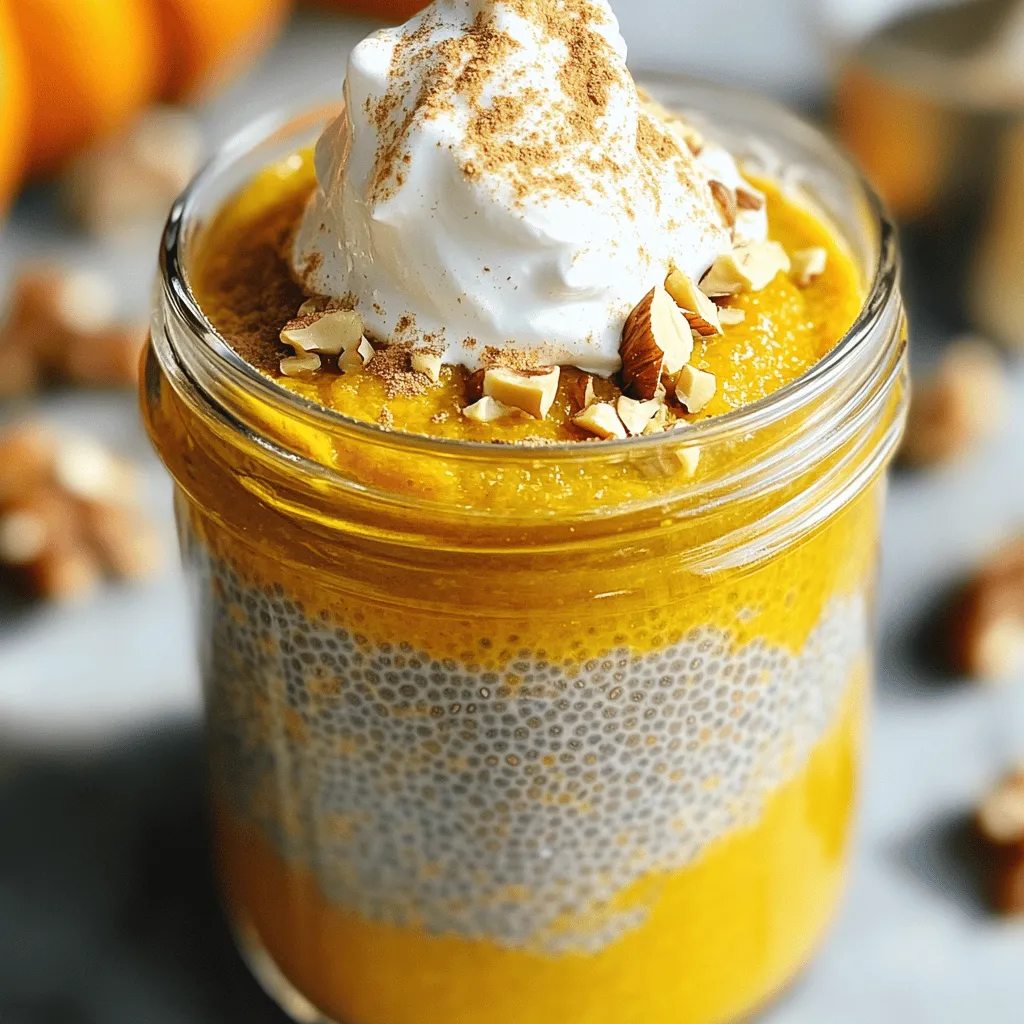
Looking for a tasty and healthy treat? You’ll love this Pumpkin Chia Pudding! It combines the rich flavor of pumpkin

To make your Slow Cooker Caramel Pumpkin Spice Latte, gather these items: - 4 cups freshly brewed coffee - 1 cup milk (dairy or non-dairy) - 1 cup pumpkin puree (canned or homemade) - 1/4 cup caramel sauce, plus extra for topping - 1/4 cup firmly packed brown sugar - 2 teaspoons pumpkin pie spice - 1 teaspoon pure vanilla extract - Whipped cream, for topping - Ground cinnamon or pumpkin pie spice, for garnish You can switch things up based on your taste: - Use almond, oat, or soy milk for a dairy-free option. - Choose maple syrup instead of brown sugar for a lighter sweetness. - Try adding a shot of espresso for a stronger coffee flavor. - Experiment with different spices like nutmeg or ginger for a unique twist. Using fresh ingredients makes a big difference. Freshly brewed coffee gives a rich flavor. Fresh pumpkin puree enhances the taste and adds nutrients. Quality caramel sauce adds creaminess and sweetness. When ingredients are fresh, your latte will taste better. This is key to making every sip smooth and delightful. Always choose the best you can find for the best results. Start by gathering your ingredients. You will need 4 cups of brewed coffee, 1 cup of milk, 1 cup of pumpkin puree, 1/4 cup of caramel sauce, and 1/4 cup of brown sugar. Don’t forget the pumpkin pie spice and vanilla extract. Pour the coffee into your slow cooker first. Then, add the pumpkin puree, brown sugar, caramel sauce, pumpkin pie spice, and vanilla extract. This mix creates a warm, cozy flavor. After adding all your ingredients, stir well. Use a whisk or a wooden spoon to blend them until smooth. Cover the slow cooker and set it to low heat. Cook for about 2 to 3 hours. This time allows all the flavors to come together. You will smell the sweet pumpkin spice aroma filling your kitchen as it cooks. In the last 15 minutes of cooking, it’s time to add the milk. Gently stir it in to warm it up. This step is key for a creamy texture. After everything is done cooking, taste your latte. You can add more caramel or brown sugar if you want it sweeter. Your delicious caramel pumpkin spice latte is now ready to serve! You may want your caramel pumpkin spice latte sweeter. Start by tasting it after cooking. If you want more sweetness, add a little brown sugar or caramel sauce. Mix well with a spoon until it blends. Remember, you can always add more, but you can't take it out! Creaminess makes your latte feel special. Use whole milk for the best results. If you prefer non-dairy, try oat milk or almond milk. Add the milk in the last 15 minutes of cooking. This way, it warms up without boiling over. Stir gently to keep it smooth. Serve your latte in fun mugs to set the mood. Add whipped cream on top for fluffiness. Drizzle extra caramel sauce over the cream for a nice touch. A light sprinkle of cinnamon or pumpkin pie spice creates a beautiful finish. You can also add a cinnamon stick for stirring! {{image_4}} You can easily make this latte dairy-free or vegan. Simply swap regular milk for your favorite plant-based milk. Almond, oat, or coconut milk work great. They add creamy texture and flavor. Make sure to choose unsweetened versions for a balanced taste. For a richer flavor, try using coconut cream instead of milk. Want to elevate your drink? There are many add-ins you can try. Consider adding a shot of espresso for extra caffeine. You can also mix in a dash of nutmeg for warmth. A few drops of almond extract can add a nutty twist. If you love chocolate, a tablespoon of cocoa powder can create a mocha version. You can change this latte for various holidays. For Halloween, add some orange food coloring for fun. During Thanksgiving, include a splash of maple syrup for a sweet note. For Christmas, try peppermint extract to create a festive treat. Each season brings a new way to enjoy this delightful drink. After enjoying your slow cooker caramel pumpkin spice latte, store any leftovers carefully. First, let the latte cool down. Then, pour it into an airtight container. Make sure to seal it well. Store it in the fridge for up to three days. This way, you can enjoy it later without losing any flavor. When you're ready to enjoy your latte again, reheating is easy. Pour the desired amount into a pot. Heat over medium-low heat on the stove. Stir gently until warm. You can also use a microwave-safe cup. Heat in 30-second intervals, stirring in between, until it's just right. Avoid overheating to keep the taste intact. If you want to store your latte for longer, freezing is a great option. Pour the cooled latte into ice cube trays. Once frozen, transfer the cubes to a freezer bag. This will help save space. You can use these cubes in smoothies or thaw them for a quick drink later. Just remember, freezing may change the texture slightly, so enjoy it fresh if you can! Yes, you can use instant coffee. Just mix it with hot water. Use about 1 cup of instant coffee for this recipe. The taste might differ a bit but will still be tasty. Instant coffee saves time and effort. It’s a great option if you want a quick fix. To thicken your latte, use less milk or add more pumpkin puree. You can also blend the latte for a frothy texture. Another option is to add a little cornstarch. Mix one teaspoon of cornstarch with a splash of cold milk. Then stir it into the slow cooker. This will give it a nice creamy feel. Many treats pair well with a pumpkin spice latte. Here are some ideas: - Pumpkin muffins - Cinnamon rolls - Gingerbread cookies - Apple pie - Spice biscotti These snacks enhance the warm flavors of your drink. Each bite complements the cozy taste of your latte. Enjoying them together makes for a perfect fall treat! This blog post showed you how to make a great pumpkin spice latte. We explored the key ingredients and the importance of freshness. Step-by-step instructions guided you through combining flavors and cooking. Tips helped you adjust sweetness and ensure creaminess. Variations opened up options for everyone, even without dairy. In the end, enjoy your homemade latte any way you like!

Slow Cooker Caramel Pumpkin Spice Latte Delight

Craving a warm drink that wraps you in cozy flavors? Let’s make a Slow Cooker Caramel Pumpkin Spice Latte! This

- 2 large russet potatoes - 2 tablespoons olive oil - 1 tablespoon ranch seasoning mix - 1 teaspoon garlic powder - 1 teaspoon onion powder - ½ teaspoon paprika - Salt to taste To make Air Fryer Ranch Potato Chips, you need a few simple ingredients. Start with two large russet potatoes, as they are great for chips. You will also need two tablespoons of olive oil for crispness. The flavor comes from one tablespoon of ranch seasoning mix, one teaspoon of garlic powder, one teaspoon of onion powder, and half a teaspoon of paprika. Finally, add salt to taste. Each ingredient plays a key role in making these chips tasty and crunchy. The olive oil helps the seasoning stick and adds a rich flavor. The ranch seasoning mix gives that classic tangy taste we love in ranch chips. Garlic and onion powder boost the flavor even more, while paprika adds a hint of smokiness. This combination makes each chip delicious and hard to resist. You can find these ingredients at any grocery store, making this recipe easy to follow. With just these items, you can create a snack that everyone will enjoy. First, scrub and wash the russet potatoes under running water to remove dirt. I like to use a vegetable brush for this. Next, cut the potatoes into thin rounds. Aim for about 1/8 inch thick. This will help them cook evenly and get crispy. Now, soak the potato slices in cold water. Let them sit for about 30 minutes. Soaking helps remove excess starch, which makes your chips crispier. After soaking, drain the slices using a colander. Then, pat them dry with a towel. Make sure to remove as much moisture as you can. In a large bowl, combine the dried potato slices with olive oil and seasonings. Use ranch seasoning mix, garlic powder, onion powder, paprika, and a sprinkle of salt. Toss everything together until each slice gets a nice coating. This step is key for maximum flavor. Next, preheat your air fryer to 350°F (175°C). Once it's ready, arrange the potato slices in the air fryer basket. Lay them out in a single layer and avoid overlapping. This ensures even cooking. If you have a lot of slices, you may need to cook them in batches. Cook the potato slices for about 10 to 15 minutes. Be sure to shake the basket halfway through for even crisping. Keep an eye on them, as you can cook them a bit longer if you want extra crispiness. Once done, transfer the chips to a wire cooling rack. This helps them cool and stay crispy. Let them cool before serving. To make your chips super crispy, soak the potato slices in cold water. This step removes excess starch. Starch can make chips soggy. After soaking for 30 minutes, drain the slices well. Then, pat them dry using towels. This helps cut down on moisture. Do not overcrowd the air fryer. If you fill it too much, the chips won’t cook evenly. Instead, cook them in batches. This way, every chip gets hot air. Adjust cooking time slightly for each batch. You may need a few extra minutes for each round. Want to amp up the taste? Add more seasonings to the mix! Try using cayenne pepper for heat or smoked paprika for a smoky flavor. You can also blend herbs like dill or parsley for fresh notes. Don’t be afraid to experiment with your favorite spices. Each twist can create a fun new flavor! {{image_4}} You can easily change the flavor of your ranch potato chips. Here are two fun ideas: - Spicy ranch potato chips: Add some heat by mixing in cayenne pepper or chili powder with your ranch seasoning. This gives a nice kick to the chips. - Cheesy ranch potato chips: Sprinkle some grated cheese, like cheddar or parmesan, over the seasoned slices before air frying. This will give a rich, cheesy taste. If you don’t have an air fryer, you can still enjoy these chips. Here’s how: - How to bake: Preheat your oven to 400°F (200°C). Spread the seasoned potato slices on a baking sheet lined with parchment paper. Bake for about 20-25 minutes. Flip them halfway through for even cooking. Keep an eye on them to avoid burning. - Tips for frying in oil: Heat about 2 inches of oil in a deep pot. Fry the potato slices in small batches. Cook for 3-4 minutes until golden brown. Drain on paper towels to remove excess oil. Adding extra ingredients can make your chips even better: - Adding parmesan cheese: Mix in grated parmesan with your seasonings. This adds a savory flavor that pairs well with ranch. - Incorporating fresh herbs: You can add chopped fresh herbs like parsley or dill for a bright touch. Mix them with the potatoes after drying for extra freshness. These variations and methods can help you make the most of your ranch potato chips. To keep your chips fresh, you need the right container. Use an airtight container to prevent air from getting in. This helps maintain their crispiness. You can also use a resealable plastic bag. Just make sure to squeeze out as much air as you can. Store the chips in a cool, dry place away from light. Avoid the fridge, as moisture can make them soggy. If your chips lose their crunch, don't worry! You can re-crisp them easily. Preheat your air fryer to 350°F (175°C). Place the chips in a single layer in the basket. Heat them for about 3 to 5 minutes. Keep an eye on them to avoid burning. This method helps restore their crispy texture. You can also use an oven if you prefer. Just spread them on a baking sheet and heat at the same temperature. Yes, you can! While russet potatoes work great, other types also shine. Try using Yukon Gold for a sweeter flavor. Red potatoes can add a nice color and creaminess. Just ensure they are firm and suitable for slicing. Homemade air fryer potato chips stay fresh for about five days. Store them in an airtight container. If you notice any soft spots, that means they are losing their crunch. You can prepare these chips in advance! Slice and season them, then store in the fridge for a day. For best taste, cook them close to serving time. If you must serve later, reheat in the air fryer for a few minutes to regain crispness. You learned how to make tasty air fryer potato chips using simple ingredients and steps. From selecting russet potatoes to air frying techniques, you have the tools you need. Remember to soak the slices for crispiness and store any leftovers properly. Feel free to explore flavor variations and even different cooking methods. Enjoy your homemade snack, and don’t hesitate to share your creations. Happy cooking!

Air Fryer Ranch Potato Chips Tasty and Crunchy Snack

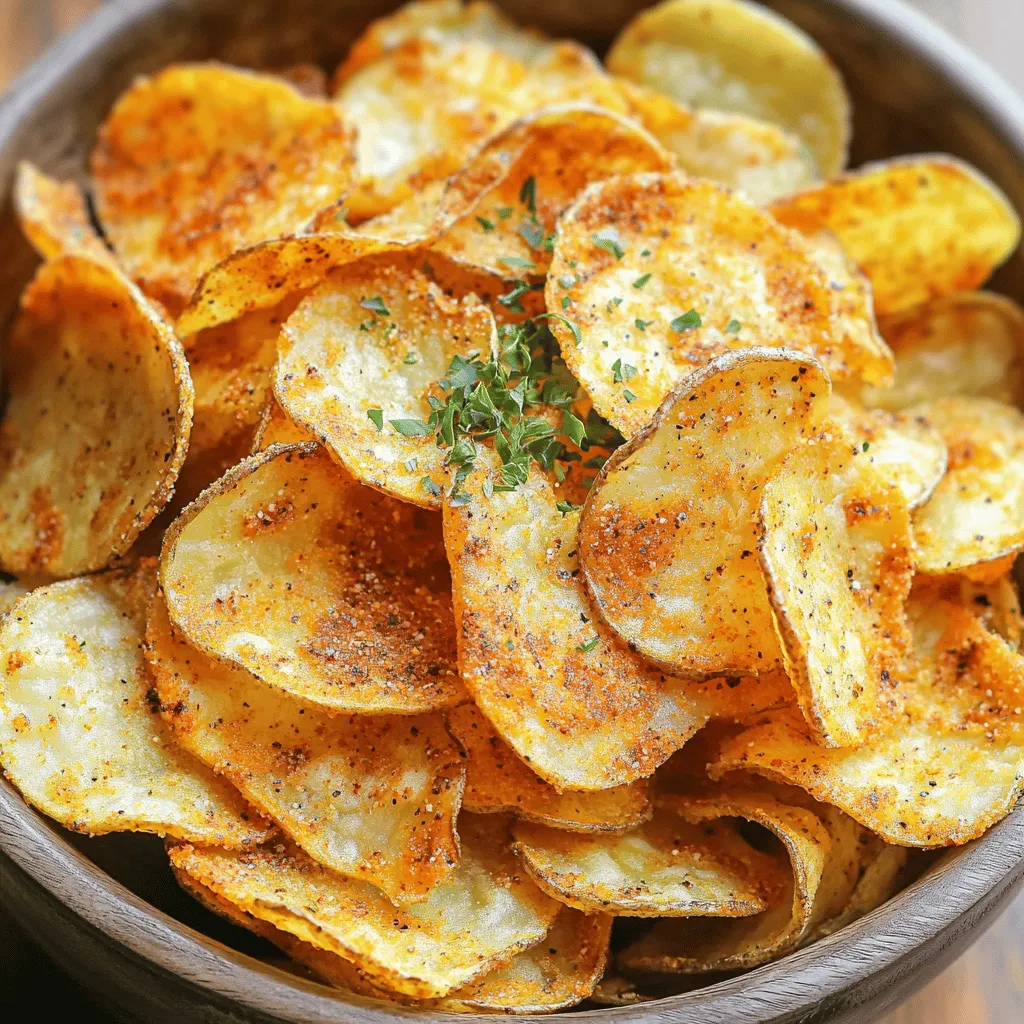
Are you ready for a snack that’s both tasty and crunchy? Let’s make Air Fryer Ranch Potato Chips! With just

Older posts
Newer posts
← Previous Page1 … Page12 Page13 Page14 … Page120 Next →

dsad

© 2026 recipetorch • Built with GeneratePress

Our Policies

  • Copyright Policy
  • Cookie Policy
  • GDPR Policy
  • Privacy Policy
  • Disclaimer
  • Terms Of Use

More Information

  • Home
  • About
  • Contact
  • Appetizers
  • Dessert
  • Dinner
  • Drinks
©2026, recipetorch About Back To Top