Skip to content
DisclaimerTerms Of UseGDPR PolicyCookie Policy

recipetorch

  • Home
  • Drinks
  • Appetizers
  • Dinner
  • Dessert
  • About
  • Contact
  • Privacy Policy
DisclaimerTerms Of UseGDPR PolicyCookie Policy

Nicole

- 2 cups cooked chickpeas (or 1 can, drained and rinsed) - 1/4 cup tahini - 3 tablespoons extra virgin olive oil I start with the base of our hummus. Chickpeas are key. They add creaminess and protein. If you use canned chickpeas, drain and rinse them well. Tahini brings a nutty flavor. It also helps create a smooth texture. Extra virgin olive oil adds richness. It enhances the taste and ties everything together. - 1/2 cup diced cucumber - 1/2 cup cherry tomatoes, halved Next, I cut up fresh produce. Diced cucumber adds crunch. It also gives a refreshing taste. Cherry tomatoes bring sweetness and color. Halving them makes them easy to grab and eat. They brighten up the board and add nutrition. - 1/4 cup Kalamata olives, pitted and halved - 1/4 cup crumbled feta cheese - Fresh parsley, chopped, for garnish Toppings bring flavor and texture to the hummus. Kalamata olives add a salty kick. Their rich taste contrasts nicely with the creamy hummus. Crumbled feta cheese offers a tangy bite. It also adds a beautiful touch. Finally, fresh parsley is a must for garnish. It adds color and freshness. {{ingredient_image_2}} To start, gather your ingredients. You will need chickpeas, tahini, olive oil, lemon juice, minced garlic, cumin, sea salt, and black pepper. In a food processor, combine these ingredients. Blend the mixture on high speed. You want it to be creamy and smooth. If the hummus is too thick, add cold water slowly. Add one tablespoon at a time, blending after each addition. Keep blending until it reaches the right texture. Taste it. Adjust the seasoning with more salt or pepper if needed. Now, transfer the hummus to a large platter. Spread it out evenly with a spatula. Use the back of a spoon to create swirls. This adds a nice look to the dish and makes it more inviting. Next, it’s time to make it colorful. Arrange the diced cucumber, halved cherry tomatoes, Kalamata olives, and crumbled feta on top of the hummus. Make sure it looks beautiful and fresh. Finally, drizzle some olive oil over the hummus. This adds flavor and shine. Garnish with fresh parsley for a burst of color. Your loaded Greek hummus board is now ready to serve! Enjoy with warm pita bread and colorful veggie sticks. To get the best texture, start by blending your ingredients well. If it feels too thick, add cold water. Just one tablespoon at a time will help you reach a creamy consistency. Blend after each addition. This small step can make a big difference. Next, think about flavor balance. Taste your hummus after blending. If it seems bland, add a pinch of sea salt or more lemon juice. These tweaks help brighten the flavors. Don’t be shy about adjusting to your taste. How you serve your loaded Greek hummus board matters. Use a large, colorful plate or a wooden board. This adds beauty to your meal. Spread the hummus evenly for a nice look. Create swirls in the hummus with the back of a spoon. This adds depth and makes it pretty. Next, arrange your toppings in a fun pattern. Place cucumbers, tomatoes, olives, and feta in clusters. This makes your board inviting and fun to share. To make your board even better, add other dips. Pair your hummus with tzatziki or baba ganoush. These flavors blend well together and offer variety. For drinks, consider serving a light white wine, like a Sauvignon Blanc. This wine complements the flavors of the hummus. You could also choose sparkling water with fresh lemon. It’s refreshing and enhances your meal. Pro Tips Use Fresh Ingredients: The flavor of your hummus will significantly improve when using fresh lemon juice, garlic, and other vegetables. Opt for the freshest produce available for the best taste. Adjust Consistency: If your hummus is too thick, add water gradually while blending to reach your desired creaminess. A touch of extra olive oil can also enhance the texture. Experiment with Toppings: Feel free to get creative with toppings—consider adding roasted red peppers, artichoke hearts, or even a sprinkle of smoked paprika for a unique twist on flavor. Serve with Variety: While pita is a classic choice, serving hummus with an array of colorful vegetable sticks not only enhances presentation but also adds crunch and nutrition to your spread. {{image_4}} You can switch up the beans in your hummus. Try black beans or white beans for a new taste. Each type brings a unique flavor. You can also change the nuts. Use sunflower seeds or walnuts instead of tahini. This change offers a different texture and flavor. Want some heat? Add jalapeños for a spicy kick. You can mix in a little chili powder for extra spice. For a fresh twist, try adding herbs. Basil or dill can brighten up your hummus. These herbs give a new layer of flavor. If you need a gluten-free option, skip the pita. Use veggie sticks like carrots, cucumbers, or bell peppers instead. They are crunchy and tasty. You can also make this dish vegan. Just skip the feta cheese or use a plant-based version. This way, everyone can enjoy your loaded Greek hummus board! To keep your hummus fresh, store it in an airtight container. This helps lock in flavor and moisture. Place a layer of olive oil on top before sealing. It creates a barrier against air. Leftover hummus stays good in the fridge for about three to five days. Always check for any off smells or changes in texture. You can make hummus a day ahead of your gathering. This allows flavors to blend and deepen. Just store it in the fridge, covered tightly. When it’s time to serve, take it out and let it sit for about 15 minutes. This brings it closer to room temperature. If you want, you can drizzle more olive oil or add fresh toppings just before serving. Yes, you can freeze hummus! Use a freezer-safe container and leave space at the top. The hummus can expand as it freezes. It stays good for about three months in the freezer. When you're ready to eat it, take it out and thaw it overnight in the fridge. To serve, stir it well and add a drizzle of olive oil for freshness. Serve your hummus board at room temperature. This brings out the flavors better. Pair it with warm pita bread and crunchy vegetable sticks. I love using carrots, bell peppers, and celery. They add color and texture to the board. Arrange the colorful veggies around the hummus for a fun look. Drizzle some olive oil on top for shine and taste. Yes, you can! If you don't have tahini, use sunflower seed butter or Greek yogurt. Both make a creamy base. You can also add a splash of extra olive oil for richness. Just adjust the flavors with garlic and lemon juice. This keeps the taste bright and fresh. Feel free to experiment until you find what you love. Making this board is quick! It only takes about 15 minutes from start to finish. You blend the hummus in just a few minutes. Then, take your time to arrange the toppings. This part is fun and lets you get creative. Enjoy the process and make it your own. In this blog post, we explored how to create a delicious hummus board using simple but fresh ingredients. We covered the main components, from chickpeas to garnishes like feta and parsley. I shared step-by-step instructions for perfecting the texture and presentation of your hummus. Plus, you learned clever tips for serving and storage. Whether you choose to stick with classic flavors or explore new variations, making hummus can be fun and rewarding. Enjoy your homemade creation and share it with friends and family!

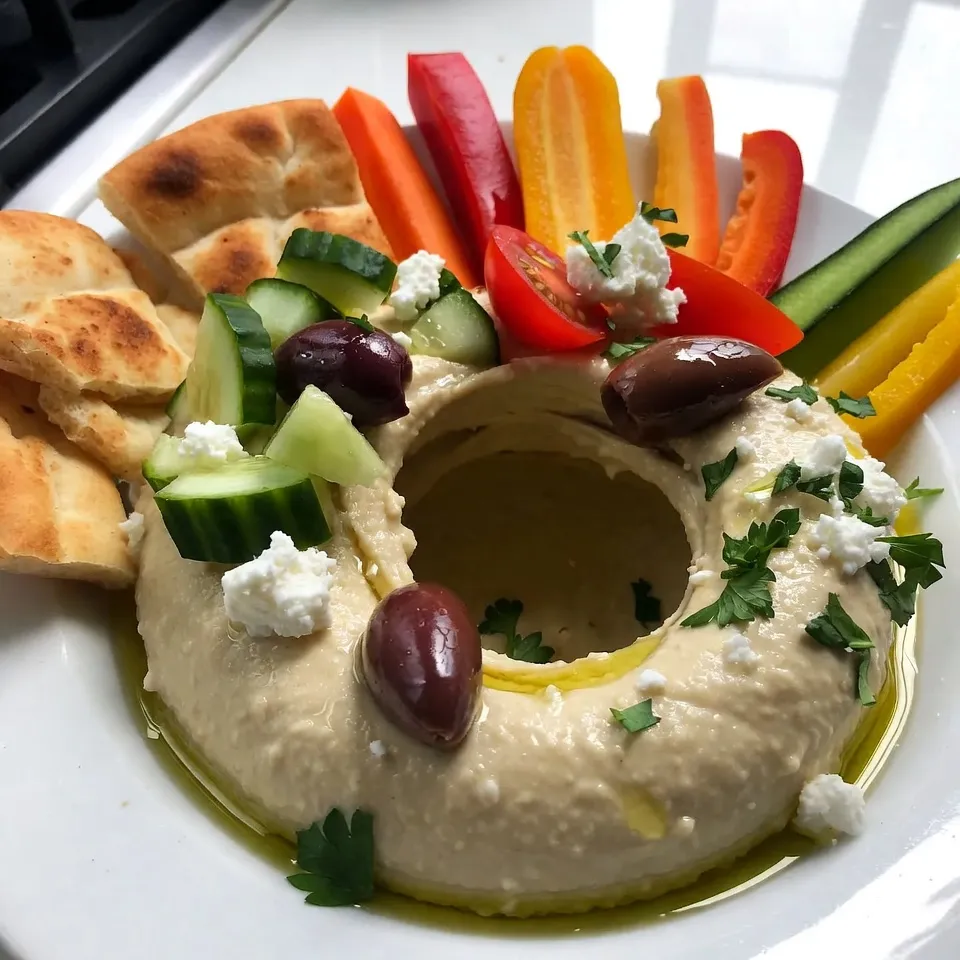
Loaded Greek Hummus Board for Flavorful Gatherings

Looking for a crowd-pleaser that brings flavor and fun to your gatherings? The Loaded Greek Hummus Board is the perfect

To make tasty chimichurri steak tacos, you need a few key ingredients. Here’s what you will need: - 1 lb flank steak - Salt and pepper to taste - 1 tablespoon olive oil for cooking - 4 small corn tortillas - 1 ripe avocado, sliced into thin wedges - 1/2 cup cherry tomatoes, halved - Fresh cilantro leaves, for garnish These ingredients come together to create a delicious meal. The flank steak gives the dish a rich flavor. The fresh veggies add color and crunch. Flank steak is a great choice for tacos. It is lean but packed with flavor. When cooked right, it is tender and juicy. I recommend grilling the steak to enhance its taste. You should season the steak well with salt and pepper. This helps bring out its natural flavor. Cook it for about 5-7 minutes on each side for the best results. Let it rest before slicing to keep it juicy. Chimichurri sauce is key for these tacos. It adds a fresh and zesty kick. Here’s what you need for the sauce: - 1 cup fresh parsley, finely chopped - 1/2 cup fresh cilantro, finely chopped - 4 garlic cloves, minced - 1/2 teaspoon red pepper flakes - 1/2 cup olive oil - 2 tablespoons red wine vinegar (or fresh lemon juice) - Salt and pepper to taste Mix the herbs, garlic, and red pepper flakes in a bowl. Slowly whisk in the olive oil and vinegar. This creates a vibrant sauce. Adjust the salt and pepper to your liking. Let the sauce sit for a bit. This helps the flavors blend perfectly. {{ingredient_image_2}} To start, grab a medium bowl. You will mix the herbs and spices. Add 1 cup of finely chopped fresh parsley and 1/2 cup of finely chopped fresh cilantro. Next, add 4 minced garlic cloves and 1/2 teaspoon of red pepper flakes. These ingredients give the sauce a great kick! Slowly whisk in 1/2 cup of olive oil. Then, add 2 tablespoons of red wine vinegar or fresh lemon juice for some tang. Taste it and add salt and pepper as you like. Set this aside to let the flavors blend. Now, let’s focus on the flank steak. First, season it well with salt and pepper on both sides. Heat a grill pan or skillet over medium-high heat. Add 1 tablespoon of olive oil to the pan. Once the oil is hot, add the flank steak. Grill it for about 5-7 minutes on each side. You want it to be medium-rare for the best taste and texture. When done, move it to a cutting board. Let it rest for 5 minutes. This helps keep the juices in. After resting, slice it thinly against the grain for tender bites. Next, let’s warm the tortillas. Take a dry skillet and heat it over medium heat. Warm each corn tortilla for about 30 seconds on each side. They should be soft and easy to fold. Now it’s time to assemble your tacos! On each tortilla, add a few slices of the steak. Drizzle the chimichurri sauce generously over the top. Then, add a few avocado slices and halved cherry tomatoes for freshness. Finally, sprinkle fresh cilantro leaves on top for a pop of color and taste. Enjoy your delicious tacos! To cook the best flank steak, start with a hot pan. Heat your grill pan or skillet until it's very hot. This helps form a nice crust. Season the steak well with salt and pepper. Place it in the pan without crowding. Don't flip it too soon; let it sear for about 5-7 minutes per side. This ensures a juicy and tender cut. Always slice against the grain. This keeps the meat tender and easy to chew. To make your chimichurri really pop, use fresh herbs. A mix of parsley and cilantro works best. Add minced garlic for a bold kick. Red pepper flakes give it a nice heat. The olive oil adds richness, while red wine vinegar brings brightness. For a twist, try fresh lemon juice instead. Let your chimichurri sit for at least 15 minutes. This helps all the flavors blend perfectly. Taste and adjust the salt and pepper as needed to suit your palate. For a great presentation, serve your tacos on a wooden board. Add lime wedges for a splash of color. Drizzle extra chimichurri sauce over the tacos for a fresh look. Include avocado slices and halved cherry tomatoes for added texture and flavor. Garnish with fresh cilantro leaves to make it pop. This not only looks good but adds freshness too. Enjoy your vibrant chimichurri steak tacos with friends and family! Pro Tips Let the Steak Rest: Allow the steak to rest for at least 5 minutes after cooking. This helps the juices redistribute, resulting in a more tender and flavorful bite. Customize Your Chimichurri: Feel free to adjust the ingredients in the chimichurri to suit your taste. Adding fresh oregano or a splash of lime juice can elevate the flavor profile. Perfect Tortilla Texture: When warming tortillas, make sure not to overheat them. Just a few seconds on each side will keep them pliable without drying them out. Garnish Generously: Don’t skimp on the garnishes! Fresh cilantro, avocado, and bright tomatoes not only add flavor but also make your tacos visually appealing. {{image_4}} You can switch out flank steak for other meats or veggies. Here are some tasty choices: - Grilled chicken breast - Pork tenderloin - Shrimp - Roasted cauliflower - Black beans Each protein brings its own flavor. Try marinating them in chimichurri sauce for a burst of taste. Chimichurri is flexible. You can change its flavor by mixing in different herbs or spices. Here are some ideas: - Use fresh oregano instead of parsley. - Add mint for a refreshing twist. - Use lemon juice instead of vinegar for brightness. - Mix in jalapeños for some heat. Feel free to experiment and find your favorite blend! Tacos are all about the toppings. Here are some great options to add: - Diced red onion - Crumbled feta cheese - Sliced radishes - Pickled jalapeños - Sour cream or Greek yogurt For sides, you can serve chips and salsa, or a simple salad. Enjoy these variations to make your meal even better! Store leftover tacos in a sealed container. Keep them in the fridge for up to three days. If you want to keep them longer, wrap each taco in foil. This will help them stay fresh for about a month in the freezer. When you are ready to eat, thaw them in the fridge overnight before reheating. Chimichurri sauce is best stored in an airtight jar. It can last in the fridge for about one week. If you have extra, you can freeze it in ice cube trays. Once frozen, pop the cubes out and store them in a bag. This way, you can use only what you need later. To reheat tacos, warm them gently in a skillet over medium heat. Heat for about 2-3 minutes on each side. This keeps the tortillas soft. If you are reheating the steak, slice it thin and quickly warm it in a pan. Avoid using a microwave, as it can make the tacos soggy. For the chimichurri sauce, simply give it a quick stir before serving. This helps revive its fresh flavor. The best steak for tacos is flank steak. It is tender and has great flavor. It cooks quickly and slices easily. You can also use skirt steak or sirloin. Each gives a tasty bite. Just remember to slice against the grain for the best texture. Yes, you can use store-bought chimichurri sauce. It saves time and still adds flavor. However, fresh chimichurri is easy to make. Making it at home lets you control the taste. You can adjust the herbs and spices to your liking. If you’re in a hurry, store-bought works just fine! To create vegan Chimichurri Steak Tacos, swap the steak for grilled mushrooms or jackfruit. Both options add great texture and flavor. You can use the same chimichurri sauce. Just make sure your tortillas are vegan. Top with avocado and fresh veggies for a filling meal. Enjoy the delicious flavors without meat! Chimichurri steak tacos are a fun dish to make and enjoy. We covered the main ingredients, like flank steak and chimichurri sauce. You learned how to prepare the sauce and cook the steak. Plus, I shared helpful tips for great flavor and presentation. Remember, you can customize these tacos with different proteins and toppings. Store leftovers properly for tasty meals later. Keep exploring and enjoy making this crowd-pleaser for family and friends!

Chimichurri Steak Tacos Flavorful and Easy Recipe

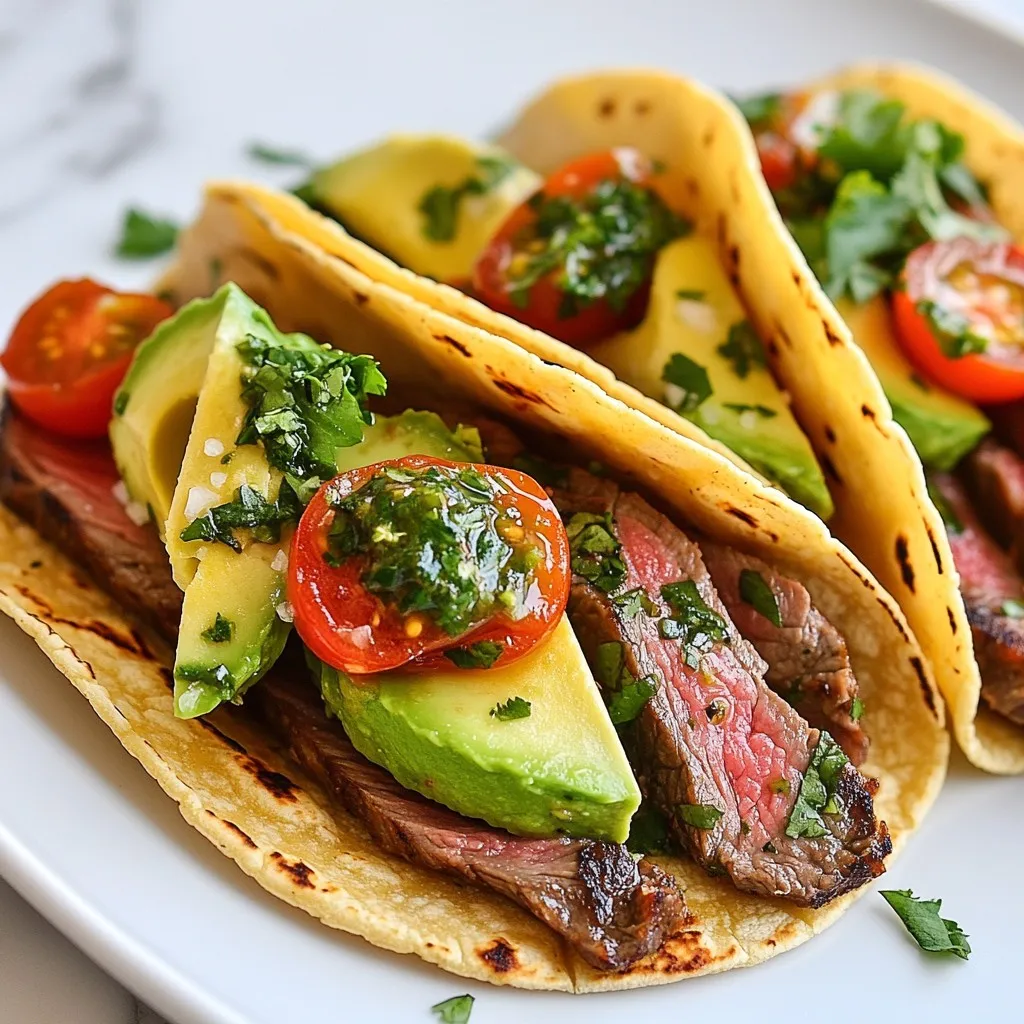
Are you ready to spice up taco night? In this post, I’ll show you how to make Chimichurri Steak Tacos

- 4 boneless, skinless chicken thighs - 1/4 cup honey - 1/4 cup low-sodium soy sauce - 4 cloves garlic, minced - 1 teaspoon fresh ginger, grated - 1 tablespoon olive oil - 1 teaspoon sesame oil - 1 cup broccoli florets - 1 red bell pepper, thinly sliced - 1 cup baby carrots, halved - 2 green onions, finely chopped - Sesame seeds You can swap chicken thighs for chicken breasts. This change keeps the dish light. If you don’t have honey, maple syrup works well. Use tamari instead of soy sauce for a gluten-free option. For the veggies, feel free to mix in snap peas or zucchini. If you want more heat, add red pepper flakes to the marinade. This recipe is flexible, so use what you have! {{ingredient_image_2}} First, preheat your oven to 400°F (200°C). This step is key for even cooking. To make cleanup easy, line a sheet pan with parchment paper. This will catch any drips and make your life simpler. Next, let’s make the honey garlic marinade. In a small bowl, mix together the following: - 1/4 cup honey - 1/4 cup low-sodium soy sauce - 4 cloves garlic, minced - 1 teaspoon fresh ginger, grated - 1 tablespoon olive oil - 1 teaspoon sesame oil Whisk these ingredients until they blend well. This sweet and savory mix adds amazing flavor. Now, grab your chicken thighs. Pat them dry with a paper towel. Season each thigh with salt and pepper on both sides. This enhances the taste. In a large bowl, add the chicken and pour half of the marinade over it. Make sure each piece is coated well. Let the chicken marinate for 15-20 minutes. While it marinates, prepare your veggies. In another bowl, mix together: - 1 cup broccoli florets - 1 red bell pepper, thinly sliced - 1 cup baby carrots, halved Drizzle the remaining marinade over the veggies and toss them to coat. It’s time to bake! Place the marinated chicken thighs on the lined sheet pan. Surround them with the coated veggies, making sure everything is in a single layer. This helps with even cooking. Bake for 25-30 minutes. You’ll know it’s done when the chicken reaches 165°F (75°C) and the veggies are tender. For a nice caramelized finish, switch to broil for the last 2-3 minutes. Watch closely to avoid burning! After baking, take the pan out and let it rest for a few minutes. Before serving, sprinkle chopped green onions and sesame seeds for a fresh touch. Enjoy your delicious meal! For juicy chicken, choose boneless, skinless thighs. They cook evenly and stay moist. Pat them dry before seasoning. This step helps the salt and pepper stick better. Allow the chicken to marinate for 15 to 20 minutes. This lets the flavors soak in. Baking at 400°F brings out the best texture. Always check the internal temperature; it should reach 165°F for safety. Feel free to swap veggies based on what's fresh and in season. In spring, add asparagus and snap peas for a crunch. In summer, try zucchini and cherry tomatoes for a sweeter taste. In fall, use Brussels sprouts and sweet potatoes for warmth. Winter favorites like cauliflower and kale also work great. This keeps your dish exciting and packed with nutrients. Broiling adds a nice touch to your chicken and veggies. After baking, switch your oven to broil for 2 to 3 minutes. Keep a close watch to avoid burning. You want that golden, caramelized look. This step enhances the dish's flavor, making it more appealing. Just remember, not every oven broils the same, so stay nearby! Pro Tips Marinate for Maximum Flavor: Allow the chicken to marinate for at least 30 minutes or even overnight in the refrigerator for a deeper flavor infusion. Veggie Variations: Feel free to swap in other vegetables like snap peas or zucchini for a different flavor profile and added nutrition. Check Chicken Temperature: Use a meat thermometer to ensure your chicken is perfectly cooked; it should reach an internal temperature of 165°F (75°C). Serve with Rice: Pair the dish with steamed rice or quinoa to soak up the delicious honey garlic sauce for a complete meal. {{image_4}} You can change the protein in this dish. Try using boneless skinless chicken breasts instead of thighs. They cook faster and are leaner. You can also use shrimp or salmon for a seafood twist. Both will soak up the honey garlic marinade well. If you prefer a plant-based option, tofu is a great choice. Press it to remove water and cut it into cubes. Marinate it just like the chicken for tasty results. Mix up the veggies for a new taste. Zucchini slices work well and cook quickly. Cauliflower florets are another option; they add a nice bite. You might like to use asparagus or snap peas. Just adjust the cooking time for these quicker-cooking veggies. They still get that sweet sauce flavor. Feel free to experiment with whatever you have at home. Spices can really enhance the dish. Adding red pepper flakes gives a nice heat. You might also try smoked paprika for a subtle smoky taste. Fresh herbs like thyme or rosemary can add a lovely aroma. If you like Asian flavors, sprinkle in some five-spice powder. Just a little will go a long way. Adjust the spices to match your taste buds for a unique twist. After enjoying your meal, let the chicken cool down. Place leftovers in an airtight container. This keeps the chicken and vegetables fresh. Store them in the fridge. They stay good for up to three days. If you want to keep them longer, consider freezing. To reheat, you can use the oven or microwave. If using the oven, preheat it to 350°F (175°C). Place the chicken and veggies on a baking sheet. Warm for about 15-20 minutes. Check that the chicken is hot all the way through. In the microwave, heat in short bursts. Start with one minute, then check and stir. For freezing, wrap the chicken and veggies tightly in foil or plastic wrap. Then, place them in a freezer-safe bag. This prevents freezer burn. They can last up to three months in the freezer. When you’re ready to eat, move the container to the fridge to thaw overnight. Once thawed, reheat as described above. Enjoy your delicious meal again! Yes, you can use bone-in chicken. Bone-in chicken adds flavor and moisture. Just remember, it may take longer to cook. Make sure the internal temperature reaches 165°F (75°C). To check if the chicken is fully cooked, use a meat thermometer. Insert it into the thickest part of the thigh. When it reads 165°F (75°C), the chicken is safe to eat. This dish pairs well with rice or quinoa. You can also serve it with a side salad or some crusty bread. These options help soak up the tasty sauce. Marinating chicken takes about 15-20 minutes. This time allows the flavors to soak into the meat. For stronger flavor, you can marinate it longer, up to 4 hours. Yes, you can prepare this dish ahead of time. Marinate the chicken and veggies a few hours before baking. You can also bake it, then store leftovers for later. This post covers everything to make honey garlic chicken. We explored the key ingredients and options for garnish. You learned how to prep, marinate, and bake your dish. I shared tips for great texture and seasonal veggie swaps. Plus, we discussed variations and how to store leftovers safely. Enjoy creating your dish! Your friends and family will love it, and so will you.

Sheet Pan Honey Garlic Chicken Flavorful Dinner Idea

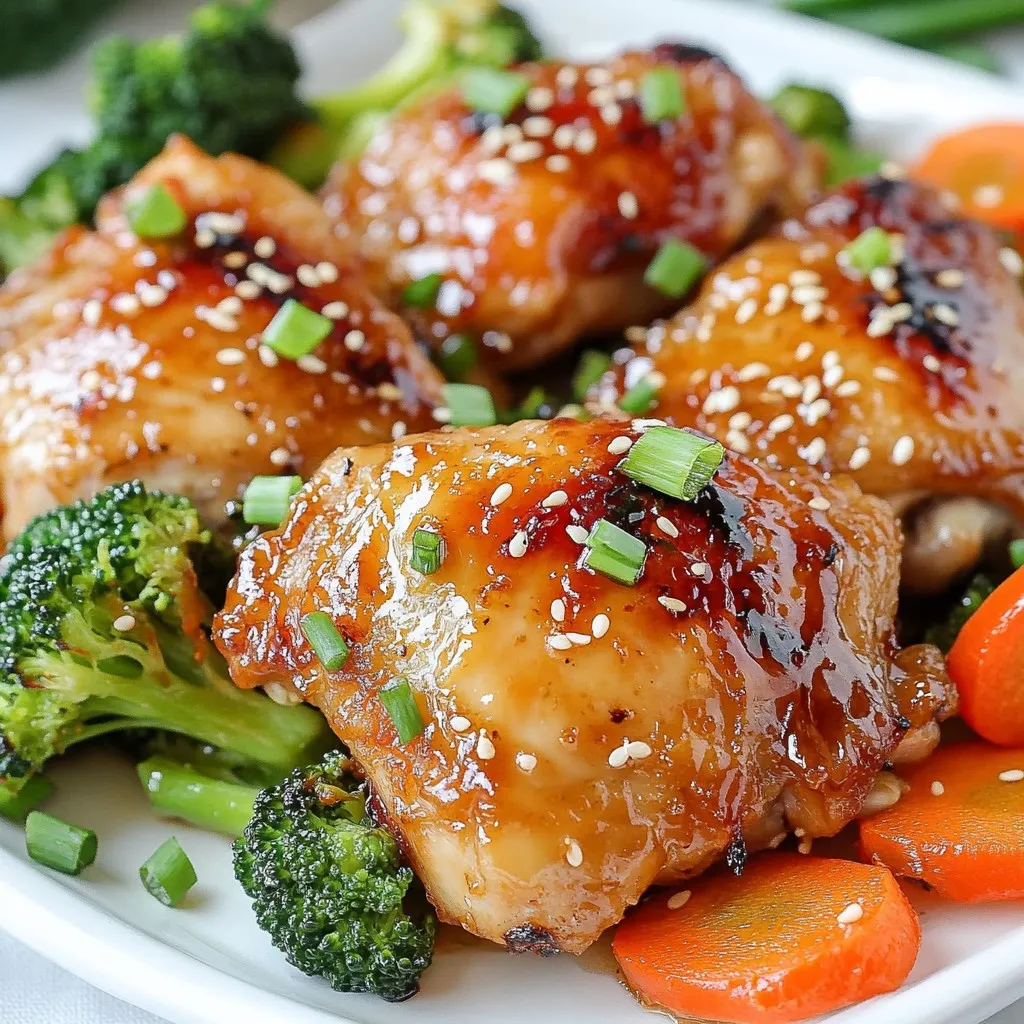
Looking for a quick and tasty dinner? Try my Sheet Pan Honey Garlic Chicken! This dish combines sweet, sticky flavors

- 4 cups mixed baby greens (arugula, spinach, kale) - 1 cup fresh cranberries (or dried cranberries) - 1/2 cup walnut halves, toasted - 1/2 cup crumbled feta cheese (optional) - 1/2 red onion, thinly sliced - 1/2 cup cucumber, diced - 1/4 cup extra virgin olive oil - 2 tablespoons apple cider vinegar - 1 tablespoon honey - Salt and freshly cracked pepper - Cranberries: Fresh cranberries add tartness. Dried ones provide sweetness. - Walnuts: Toasting the walnuts brings out their flavor. Use raw walnuts if you prefer. - Feta Cheese: This cheese gives a creamy touch. Omit it for a dairy-free salad. - Onion: Red onion has a sharp taste. You can use green onions for a milder flavor. - Cucumber: Choose a firm cucumber for crunch. You can also use bell peppers for a different taste. - Mixed Baby Greens: These greens are rich in vitamins A and C. They help boost your immune system. - Cranberries: These berries are high in antioxidants. They support heart health and may reduce urinary tract infections. - Walnuts: They contain healthy fats and protein. They are great for brain health due to their omega-3 content. - Feta Cheese: This cheese offers calcium and protein. It's also lower in calories than many cheeses. - Olive Oil: Extra virgin olive oil is rich in healthy fats. It can lower bad cholesterol levels. {{ingredient_image_2}} Making a Cranberry Walnut Green Salad is easy and quick. You can make this salad in just 10 minutes. Gather all your ingredients first. This makes assembly smooth and fun. 1. Start by adding the mixed baby greens to a large salad bowl. Use a mix of arugula, spinach, and kale for great taste. 2. If using fresh cranberries, rinse them in cold water. Add them whole to the bowl. For dried cranberries, sprinkle them on top of the greens. 3. To toast the walnut halves, heat a dry skillet over medium heat. Add the walnuts and stir them for about 5 minutes. They should smell nice and look golden. Once done, take them off the heat and add them to the salad. 4. Gently fold in the crumbled feta cheese and thinly sliced red onion. These add a nice creaminess and sharpness. 5. Next, add diced cucumber to the mix. This gives a nice crunch and bright color. 6. Now, make the dressing. In a small bowl, whisk together the olive oil, apple cider vinegar, honey, salt, and pepper. Mix until everything is combined well. 7. Drizzle the dressing over the salad. Toss gently to coat all the ingredients. Be careful not to bruise the greens. 8. Finally, taste the salad. Adjust the seasoning with more salt and pepper, if needed. - Chill your salad bowl before using it. This keeps the salad fresh and crisp. - When adding the dressing, do it in small amounts. You can always add more if needed. - For a beautiful presentation, serve on a large platter. Garnish with extra feta, walnuts, and whole cranberries for color. Enjoy making this vibrant salad! It’s fresh, colorful, and packed with flavor. Toasting walnuts brings out their flavor. Start by using a dry skillet over medium heat. Add the walnut halves and stir them often. You want them to turn golden, which takes about five minutes. Watch closely! They can burn quickly. Once they smell nutty, take them off the heat. Let them cool before adding to your salad. This step makes your salad taste amazing. You can save time by making the dressing ahead. Combine extra virgin olive oil, apple cider vinegar, honey, salt, and pepper in a jar. Shake it well until mixed. Store it in the fridge for up to three days. When you are ready to serve, just shake it again. This way, your dressing stays fresh and flavorful. Presentation matters! Serve your salad in chilled bowls or on a large platter. For a pop of color, add whole cranberries on top. Sprinkle extra crumbled feta and toasted walnuts for a beautiful look. This not only makes it tasty but also visually appealing. Your guests will love it! Pro Tips Use Fresh Ingredients: For the best flavor and nutrition, opt for fresh ingredients, especially the greens and cranberries. Fresh produce elevates the overall taste of the salad. Toast the Walnuts: Toasting the walnuts enhances their flavor and adds a delightful crunch. Keep a close eye on them to prevent burning, as they can quickly go from toasted to charred. Balance the Dressing: Adjust the sweetness and acidity of your dressing to suit your taste. If you prefer a sweeter dressing, add a bit more honey; for extra tang, increase the apple cider vinegar. Presentation Matters: Serve the salad in chilled bowls or on a large platter for an elegant touch. Garnish with extra feta and walnuts for a visually appealing presentation. {{image_4}} You can make this salad heartier by adding protein. Grilled chicken is a great choice. It adds flavor and makes the salad more filling. Just slice the chicken and toss it in with the greens. If you want a plant-based option, try chickpeas. They add protein and a nice texture. Rinse canned chickpeas and add them right in. Both options will keep you satisfied longer. To keep this salad vegetarian, skip the feta cheese. Instead, try using avocado for creaminess. If you want it vegan, just leave out any cheese. You can also add nuts or seeds for healthy fats. Sunflower seeds or pumpkin seeds work well. They give a nice crunch and are full of nutrients. Seasonal ingredients can keep your salad fresh and exciting. In spring, add peas or asparagus for a bright twist. In summer, fresh tomatoes or bell peppers can add color and flavor. In fall, think about roasted butternut squash or apples for sweetness. Winter is perfect for using hearty greens like kale. These swaps will keep your salad interesting all year round. To keep your Cranberry Walnut Green Salad fresh, store it in an airtight container. Place the salad in the fridge right after serving. If you have leftover dressing, store it separately. This keeps the greens crisp and prevents sogginess. Enjoy your salad within three days for the best taste. To maintain freshness, avoid mixing the dressing until serving. If you plan to eat later, keep the salad components separate. Store greens, fruits, and nuts together, and add the dressing just before serving. This method keeps everything crunchy and vibrant. Generally, salads like this one are best served cold. If you want to warm it up, consider only the walnuts. Toast them in a pan briefly to revive their flavor. Avoid reheating the entire salad, as it can wilt the greens and change the taste. Yes, you can use dried cranberries. They add a delicious sweetness to the salad. Fresh cranberries have a tart flavor, while dried cranberries are sweeter. Choose based on your taste. If you use dried, sprinkle them evenly over the greens for a chewy bite. The salad remains tasty either way. This salad is naturally gluten-free. All the ingredients used are free from gluten. Just check the labels on any store-bought items, like feta cheese or honey, to ensure they are also gluten-free. You can enjoy this salad without worry. This salad pairs well with many dishes. You can serve it with grilled chicken for protein. It also complements fish dishes, like salmon or tilapia. For a vegetarian option, serve it with a hearty grain bowl. The bright flavors of the salad balance rich meals nicely. In this blog post, we explored key ingredients for your salad, their benefits, and tips for preparation. I shared easy steps and serving suggestions for the best taste. We also discussed tasty variations, including protein options and seasonal swaps. Remember, proper storage keeps your salad fresh longer. Now you can enjoy a healthy meal that’s both delicious and flexible. With these insights, you feel ready to make the perfect salad any time.

Cranberry Walnut Green Salad Fresh and Flavorful Mix

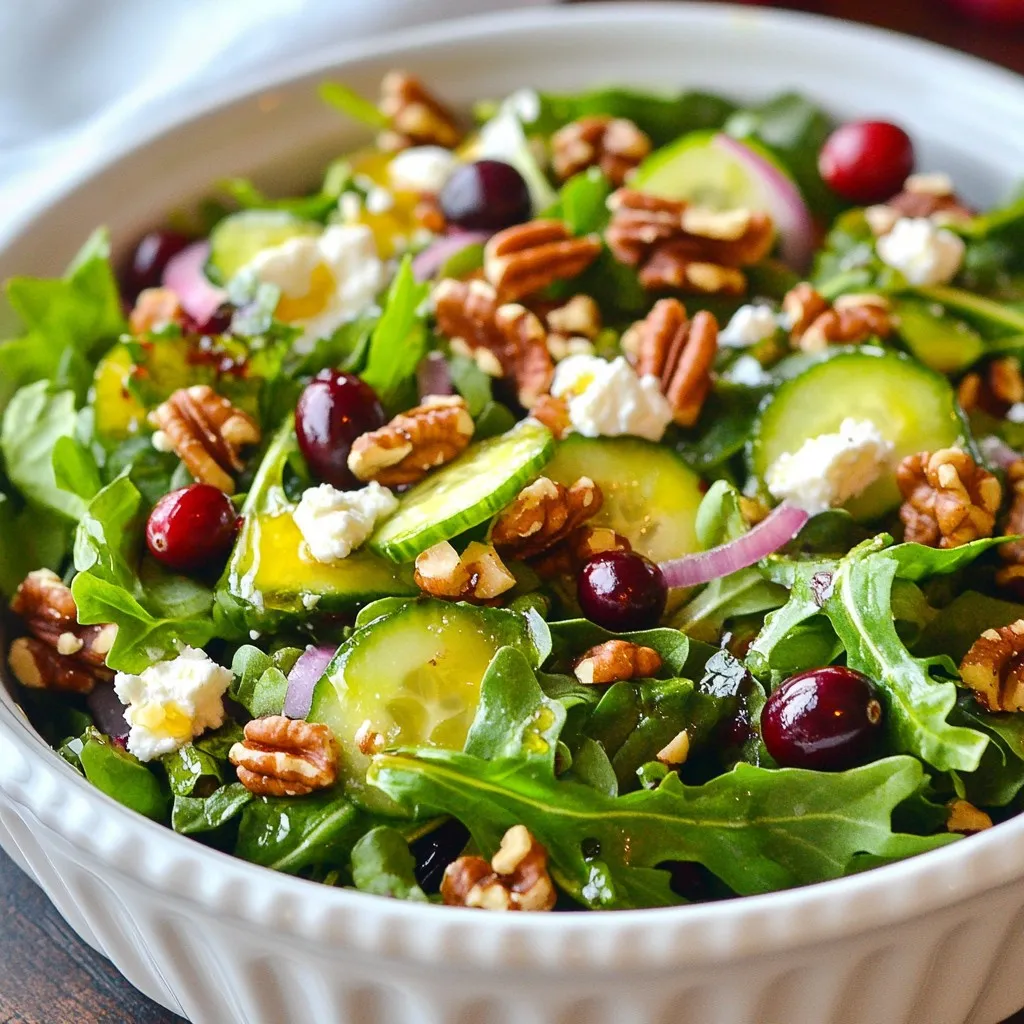
Looking for a fresh and vibrant dish to brighten up your meals? This Cranberry Walnut Green Salad is just what

- 1/2 cup unsalted butter (1 stick) - 1 cup granulated sugar - 2 large eggs - 1 teaspoon vanilla extract - 1/3 cup unsweetened cocoa powder - 1/2 cup all-purpose flour - 1/4 teaspoon salt - 1/4 teaspoon baking powder - 16 oz cream cheese, softened - 1/2 cup granulated sugar - 2 large eggs - 1 teaspoon vanilla extract - 1/2 teaspoon peppermint extract - 1 cup whipped cream (or Cool Whip) - Crushed peppermint candies for garnish - Chocolate syrup - Fresh mint leaves - Additional crushed peppermint for decoration Each ingredient plays a key role in making this dessert special. The brownie layer gives a rich base. The cheesecake layer adds creaminess and a minty fresh taste. Crushed peppermint candies offer a fun crunch. You can also add chocolate syrup for extra sweetness and visual appeal. Fresh mint leaves brighten up the dish. These ingredients make your Peppermint Brownie Cheesecake an irresistible treat that everyone will love. {{ingredient_image_2}} 1. Preheat the Oven: Start by preheating your oven to 350°F (175°C). This step is key for even baking. 2. Grease the Pan: Use non-stick spray or butter to coat a 9-inch springform pan. This prevents sticking and makes removal easy. 3. Melt the Butter: In a medium saucepan, melt 1/2 cup of unsalted butter over low heat. Stir until fully liquid. 4. Mix in Sugar: Remove the pan from heat. Add 1 cup of granulated sugar and stir until it blends well. 5. Add Eggs and Vanilla: Crack in 2 large eggs, mixing one at a time. Then, add 1 teaspoon of vanilla extract and stir. 6. Combine Dry Ingredients: Gradually add 1/3 cup unsweetened cocoa powder, 1/2 cup all-purpose flour, 1/4 teaspoon salt, and 1/4 teaspoon baking powder. Mix until just combined, careful not to overmix. 7. Bake the Brownie Layer: Pour the batter into the pan, spreading it evenly. Bake for about 20 minutes. A toothpick should come out with a few moist crumbs. Let it cool slightly. 1. Beat the Cream Cheese: In a large mixing bowl, beat 16 oz of softened cream cheese with 1/2 cup of granulated sugar. The mix should be smooth and creamy. 2. Add Eggs: Mix in 2 large eggs, one at a time. Beat well after each addition for a nice, creamy texture. 3. Add Flavors: Stir in 1 teaspoon of vanilla extract and 1/2 teaspoon of peppermint extract until well mixed. 4. Fold in Whipped Cream: Gently fold in 1 cup of whipped cream using a spatula. This keeps the cheesecake light and airy. 1. Layer the Cheesecake over Brownies: Carefully pour the cheesecake mix over the cooled brownie layer in the springform pan. Smooth out the top evenly. 2. Bake the Cheesecake: Place it in the oven and bake for about 50-60 minutes. The center should be set but still slightly jiggly. 3. Cooling Process: Once done, turn off the oven and crack the door open. Let the cheesecake cool inside for an hour. After that, move it to the fridge. Chill for at least 4 hours, or overnight for best flavor. This process gives you a rich and creamy peppermint brownie cheesecake that is sure to impress! To make the best brownie layer, mix just enough. Overmixing can make them tough. Use a spatula to combine your ingredients gently. I like to check for doneness by inserting a toothpick. If it comes out with a few moist crumbs, you’re good! Let the brownies cool for a few minutes before adding the cheesecake layer. For a creamy cheesecake, beat the cream cheese and sugar until smooth. Add eggs one at a time to keep it light. Mix slowly to avoid air bubbles, which cause cracks. After baking, let the cheesecake cool. Chill it for at least four hours. Overnight chilling gives the best taste and texture. To serve, slice the cheesecake into wedges. Each slice looks great on a decorative plate. Drizzle chocolate syrup over the top for flair. Add crushed peppermint candies for a festive touch. You can also place fresh mint leaves beside each slice for a nice pop of color! Pro Tips Use Room Temperature Ingredients: Make sure your cream cheese and eggs are at room temperature before mixing. This helps create a smoother, creamier cheesecake filling. Don't Overmix: When combining the whipped cream into the cheesecake mixture, fold gently to maintain the airy texture. Overmixing can lead to a dense cheesecake. Cooling in the Oven: Allowing the cheesecake to cool in the oven with the door cracked helps prevent cracking on the surface, ensuring a perfect presentation. Chill Overnight: For the best flavor and texture, chill the cheesecake overnight. This allows the flavors to meld beautifully and enhances the overall taste. {{image_4}} You can have fun with flavor! Try adding chocolate chips to the brownie layer for extra richness. You can also swap the vanilla extract for almond extract. This change brings a nutty twist. For seasonal flavors, think about using orange or cinnamon during the holidays. Each option gives a unique taste to your cheesecake. Want to make this cheesecake fit your diet? You can easily make it gluten-free. Just replace all-purpose flour with almond flour or a gluten-free blend. For a dairy-free version, use vegan cream cheese and coconut whipped cream. You can also cut down on sugar by using a low-sugar substitute like erythritol or stevia. These changes let everyone enjoy this dessert. Feeling like a smaller treat? You can make mini cheesecakes! Use cupcake liners in a muffin tin. Pour a smaller amount of brownie batter into each cup. Bake for about 12-15 minutes instead of 20. After cooling, add the cheesecake layer and bake for 20-25 minutes. These mini versions are perfect for parties or gifts! To keep your peppermint brownie cheesecake fresh, store it in the refrigerator. Use an airtight container to prevent it from drying out. If you want to freeze it, wrap slices tightly in plastic wrap, then foil. This helps avoid freezer burn. When you thaw it, do so slowly in the fridge. This keeps the texture smooth. When you want to enjoy leftovers, the best way is to let them sit at room temperature for about 30 minutes. This helps soften the cheesecake. You can also microwave a slice for about 10-15 seconds. Just watch it closely to avoid melting the cream cheese layer too much. Your peppermint brownie cheesecake will stay fresh in the fridge for about 5 days. Look for signs of spoilage, like an off smell or mold. If it looks or smells bad, it’s best to throw it away. Enjoy it while it’s still tasty! Yes, you can make this peppermint brownie cheesecake ahead of time. It tastes even better after a day in the fridge. To prepare, follow the steps in the recipe. Once baked and cooled, wrap it in plastic wrap. Store it in the fridge for up to three days. For a longer storage option, freeze the cheesecake. Just make sure to wrap it well. This way, you can enjoy it later without losing flavor. Brownie cheesecake combines two delicious desserts. The bottom layer is a rich, fudgy brownie. It gives a dense and chocolatey base. The top layer is a smooth cheesecake. This layer is creamy and light, thanks to the whipped cream. The peppermint extract adds a fresh twist. Together, they create different textures. You have the chewy brownie and the creamy cheesecake, which makes each bite a delight. Yes, you can switch out the peppermint extract. Almond extract gives a nice nutty flavor. Vanilla extract adds warmth and sweetness. If you want a fruity twist, try lemon extract. Each extract will change the taste a bit. Feel free to experiment to find your favorite flavor combination. This recipe combines rich brownies and creamy cheesecake for a perfect dessert. You learned the layers, tips for success, and storage ideas. Now you can create tasty treats easily. Have fun customizing flavors and impressing friends with your baking skills. Remember, the joy of cooking comes from sharing what you love. Enjoy your delightful brownie cheesecake!

Peppermint Brownie Cheesecake Irresistibly Decadent Treat

Get ready to indulge in a dessert that screams festive cheer! This Peppermint Brownie Cheesecake is a perfect blend of

- 1 lb (450g) ground chicken - 1 tablespoon vegetable oil - 3 cloves garlic, minced - 1 small onion, finely chopped - 1 red bell pepper, diced - 2 tablespoons soy sauce - 1 tablespoon fish sauce - 1 teaspoon sugar - 1 teaspoon ground black pepper - 1 teaspoon sesame oil - 1 cup fresh Thai basil leaves, roughly chopped - 1 head of butter or romaine lettuce, leaves separated You need ground chicken for a rich flavor. It cooks fast and stays juicy. Use vegetable oil to sauté your aromatics. Garlic and onion bring a strong base taste. The red bell pepper adds sweetness and color. Soy sauce and fish sauce create depth in your dish. The sugar balances the saltiness. Black pepper adds a hint of spice. Sesame oil gives a nutty aroma. Fresh Thai basil is key for authentic flavor. Lettuce leaves serve as your cups. They are crunchy and light. - Chopped peanuts - Sliced chili - Lime wedges Garnishes can elevate your meal. Chopped peanuts add crunch and richness. Sliced chili gives heat for those who like it spicy. Lime wedges provide a fresh, zesty touch. These extras make your Thai Basil Chicken Lettuce Cups even better. {{ingredient_image_2}} - Heating the skillet: Start by heating 1 tablespoon of vegetable oil in a large skillet over medium heat. Wait until it shimmers; this shows it’s ready. - Sautéing garlic and onion: Next, add 3 cloves of minced garlic and 1 finely chopped small onion. Sauté for 2-3 minutes until the garlic smells great and the onion looks clear. - Cooking ground chicken: Raise the heat to medium-high and add 1 pound of ground chicken. Cook for 5-6 minutes, breaking it apart with a spatula. It should turn brown and be fully cooked. - Incorporating red bell pepper: Now, toss in 1 diced red bell pepper. Cook for another 2-3 minutes until the pepper is tender but still bright. - Mixing in sauces and seasonings: Carefully add 2 tablespoons of soy sauce, 1 tablespoon of fish sauce, 1 teaspoon of sugar, 1 teaspoon of ground black pepper, and 1 teaspoon of sesame oil. Stir well to coat everything in the sauce. - Folding in Thai basil: Finally, fold in 1 cup of roughly chopped fresh Thai basil leaves. Cook for another minute until the basil wilts. Remove the skillet from heat. - Spoon filling into lettuce leaves: Take a lettuce leaf and scoop a generous amount of the chicken mixture into the center. - Adding garnishes: If you like, sprinkle with chopped peanuts and add sliced chili on top for a bit of heat. Enjoy your fresh, light meal! To avoid dry chicken, use fresh ground chicken. Cook it until just browned. This keeps it juicy. Use medium-high heat for even cooking. Stir often to break apart the chicken. This helps it cook evenly. For a kick, add sliced chili to the mix. Start with one chili if you prefer mild. You can also add more fresh herbs like cilantro. This brightens the dish and adds depth. Arrange filled lettuce cups on a large platter. This makes a beautiful display for guests. Serve lime wedges on the side. Guests can squeeze lime juice for added flavor. Pair these cups with a light drink like iced tea. It balances the meal perfectly. Pro Tips Use Fresh Basil: Fresh Thai basil adds an authentic flavor to the dish. Be sure to use it just before serving to maintain its vibrant taste. Adjust Spice Level: For a milder dish, remove the chili seeds or omit them entirely. For more heat, add extra sliced chilies or a dash of hot sauce. Prep Ahead: You can prepare the chicken mixture ahead of time. Just reheat it before serving to save time during meal prep. Serving Suggestions: Serve with lime wedges for guests to squeeze over their lettuce cups for a refreshing burst of flavor that complements the dish. {{image_4}} You can change the meat in this dish. Ground turkey works well. It has a mild taste. You can also use tofu for a vegetarian option. Tofu absorbs flavors nicely, making it tasty. Using mushrooms is another great choice. They add a nice texture and umami flavor. If you need gluten-free options, try tamari sauce. It has a similar taste to soy sauce but is gluten-free. You can also switch up the flavors. Adding lime juice gives a fresh twist. For a sweeter sauce, add more sugar or honey. Feel free to swap the red bell pepper. Zucchini or carrots can add crunch and color. You might also add spinach or kale for extra greens. These options boost nutrition and taste without overpowering the dish. To store leftovers, place the chicken mixture in an airtight container. Make sure the lettuce cups stay separate to keep them crisp. Leftovers can last in the fridge for up to three days. When ready to eat, just spoon the chicken back into fresh lettuce leaves. For best results, freeze the chicken mixture without the lettuce. Store it in a freezer-safe bag or container. Remove as much air as possible to prevent freezer burn. The mixture can last up to two months in the freezer. When it's time to eat, thaw the chicken in the fridge overnight. Reheat it in a skillet over medium heat until it warms through. Then, assemble your lettuce cups fresh! Yes, you can make this recipe ahead of time. Cook the chicken mixture and let it cool. Store it in an airtight container in the fridge for up to three days. When you are ready to serve, just reheat it in a pan. Prepare the lettuce cups fresh for the best taste. Butter lettuce or romaine lettuce works great for this dish. Both types have sturdy leaves that hold the filling well. Butter lettuce is softer and has a nice crunch, while romaine is crisp and refreshing. Choose what you prefer! To spice things up, add sliced chili peppers to the chicken mixture. You can also serve fresh chili on the side. Another option is to drizzle some sriracha or chili sauce over the filled lettuce cups. Adjust the spice level to match your taste. While fresh Thai basil gives the best flavor, you can use dried as a substitute. However, the taste will be different. Use half the amount of dried basil compared to fresh. Add it earlier in the cooking process to allow the flavors to develop. These lettuce cups pair well with jasmine rice or quinoa. You can also serve a side of fresh fruit like mango or pineapple. A light cucumber salad adds a nice crunch too. Consider offering lime wedges to squeeze over the cups for added zest. This blog post covered a tasty Thai basil chicken recipe in lettuce cups. We explored essential ingredients, tasty tips, and fun variations. Keeping your chicken juicy and flavorful is key. You can switch proteins and sauces to match your taste. Remember to store leftovers wisely for later enjoyment. These cups offer a fresh twist on dinner. Enjoy making this dish for family and friends, and get creative with your garnishes! Most importantly, have fun in the kitchen!

Thai Basil Chicken Lettuce Cups Flavorful and Light Meal

Dive into the world of Thai Basil Chicken Lettuce Cups, where fresh flavors meet light, healthy eating! This dish is

- 2 cups all-purpose flour - 1/3 cup granulated sugar - 1 tablespoon baking powder - 1/2 teaspoon salt - 1/2 teaspoon ground nutmeg - 1/4 teaspoon ground cinnamon - 1/2 cup unsalted butter, cold and cut into small cubes - 1/2 cup eggnog (store-bought or homemade) - 1 large egg, beaten - 1 teaspoon vanilla extract - 1/2 cup mini chocolate chips (optional) - 1/4 cup powdered sugar (for glaze) - 1 tablespoon milk (for glaze) - Nuts (e.g., pecans or walnuts) - Dried cranberries or raisins - Flavorings (e.g., almond extract) When making eggnog scones, the right ingredients make all the difference. Start with all-purpose flour for a fluffy texture. Granulated sugar adds sweetness, while baking powder helps the scones rise. Salt balances flavors, and spices like nutmeg and cinnamon give warmth. Cold butter is key. It creates flaky layers. Eggnog adds rich flavor and moisture. The beaten egg helps bind everything together. Vanilla extract enhances the taste. Want to customize? Add mini chocolate chips for a sweet surprise! You can also mix in nuts for crunch or dried fruit for chewyness. Flavorings like almond extract can give a unique twist. Using these ingredients ensures your eggnog scones are a delightful treat. Enjoy baking! {{ingredient_image_2}} 1. Preheat your oven to 400°F (200°C). 2. Line a baking sheet with parchment paper. This helps prevent sticking. 3. In a large bowl, mix 2 cups of flour, 1/3 cup sugar, 1 tablespoon baking powder, 1/2 teaspoon salt, 1/2 teaspoon nutmeg, and 1/4 teaspoon cinnamon. Whisk them well until combined. 1. Cut 1/2 cup of cold butter into small cubes. 2. Add the butter to the dry mix. Use a pastry cutter or your fingers to blend. The mix should look like coarse crumbs with some butter bits left. 3. In another bowl, whisk together 1/2 cup eggnog, 1 beaten egg, and 1 teaspoon vanilla. Mix until smooth. 4. Pour the wet mix into the dry mix. Stir gently with a spatula until just combined. If you want, fold in 1/2 cup mini chocolate chips for some extra fun. 1. Turn the dough onto a floured surface. Shape it into a disc about 1 inch thick. 2. Cut the disc into 8 wedges, like a pizza. Place them on the baking sheet with space between each. 3. Bake for 15-20 minutes. The tops should be lightly golden. Insert a toothpick in the center. If it comes out clean, they are done. 4. Let the scones cool on a wire rack for about 5 minutes. 5. To make the glaze, mix 1/4 cup powdered sugar with 1 tablespoon milk until smooth. Drizzle it over the warm scones in a fun pattern. To make the best scones, start with cold ingredients. Cold butter keeps the scones flaky. When you mix it, you want small, pea-sized pieces. This creates layers as the scones bake. If the butter is warm, the scones turn dense, which is not what we want. Mixing the dough gently is key. You need to combine the wet and dry ingredients just enough. Overmixing makes the dough tough. Use a spatula or wooden spoon, and stop as soon as you see no dry flour. If you fold in chocolate chips, do it lightly. A good glaze makes scones shine. For a nice finish, drizzle the glaze in a zigzag pattern. Use a fork or spoon for this. It adds a festive touch and looks great on a plate. Pair your scones with drinks for a cozy treat. A warm cup of tea or coffee works well. The flavors of eggnog scones blend nicely with these drinks. You can also serve them with a dollop of whipped cream for extra delight. This makes your holiday table look inviting and fun! Pro Tips Chill the Butter: Keep your butter as cold as possible before mixing. This ensures flaky scones by creating pockets of steam during baking. Don’t Overmix: Mix the dough just until combined to avoid tough scones. The less you handle it, the better the texture. Eggnog Variations: Experiment with different flavors of eggnog, such as spiced or vanilla, to create unique variations of these scones. Serving Suggestions: Serve the scones warm with a side of whipped cream or spiced butter for an extra indulgent treat. {{image_4}} You can switch up flavors for fun twists on classic eggnog scones. Try pumpkin spice eggnog scones. Just add 1 teaspoon of pumpkin spice to the dry mix. This gives a warm, cozy flavor perfect for fall. The spices blend well with the eggnog's creaminess. Another great option is gingerbread eggnog scones. Mix in 1 teaspoon of ground ginger, 1/2 teaspoon of ground cloves, and 1 teaspoon of molasses. These spices bring a festive touch. They make your kitchen smell like the holidays. If you need gluten-free options, use gluten-free flour. Look for a blend that works well in baking. This way, you can still enjoy the scones without the gluten. For vegan substitutes, swap the egg with a flax egg. Mix 1 tablespoon of ground flaxseed with 2.5 tablespoons of water. Let it sit for a few minutes until it thickens. Use almond or soy milk for the eggnog. This makes the scones plant-based and tasty, too! To keep your baked scones fresh at room temperature, place them in an airtight container. This helps prevent them from drying out. They stay good for about 2-3 days. If you want to keep them longer, refrigeration is a great option. Store the scones in the fridge for up to a week. Just make sure they are in a sealed container to avoid absorbing any odors. For freezing, wrap each scone tightly in plastic wrap. Then, place them in a freezer bag. This way, you can enjoy them for up to three months. When you're ready to eat, just thaw them on the counter or overnight in the fridge. To reheat scones and keep their texture, preheat your oven to 350°F (175°C). Place the scones on a baking sheet. Heat them for about 10 minutes. This warms them through and keeps them soft. You can also use a microwave. Just heat each scone for about 15-20 seconds. Be careful not to overheat, as this can make them tough. Enjoy your warm scones with a cup of tea or coffee! Can I substitute eggnog with something else? Yes, you can use milk or cream instead. You can add spices like nutmeg and cinnamon to mimic eggnog's flavor. This will still give you a warm, festive taste. How long do eggnog scones last? Eggnog scones stay fresh for about two days at room temperature. You can store them in an airtight container. For longer storage, keep them in the fridge for up to a week. Can these scones be made ahead of time? Yes, you can make the dough ahead. Shape it into a disc and wrap it tightly. Store it in the fridge for up to 24 hours. When ready, just slice and bake. What to do if scones turn out too dry? If your scones are dry, add a splash of milk or eggnog. Mix gently until the dough feels moist. Avoid overworking the dough, as this can make them tough. How to fix a dough that’s too sticky? If your dough is too sticky, sprinkle in a little flour. Mix it in slowly until the dough is manageable. Remember, a bit of stickiness is normal, but too much can be tricky. You now have everything you need to make delicious eggnog scones. We covered the main ingredients, preparation steps, and tips for perfecting your scones. Remember, using cold ingredients and not overmixing are key. Consider trying seasonal variations or dietary options to suit your taste. Enjoy these scones fresh or as leftovers, following the right storage tips. Baking should be fun, so get creative with toppings and pairings! Enjoy sharing this treat with family and friends.

Eggnog Scones Delightful Holiday Baking Treat

Are you ready to add a festive twist to your holiday baking? These eggnog scones are a delightful treat, perfect

- 1 pound boneless, skinless chicken breasts - 1 can (14.5 oz) fire-roasted diced tomatoes (including juices) - 1 can (15 oz) black beans, drained and rinsed thoroughly - 1 can (8 oz) sweet corn, drained The chicken breasts give this soup its heartiness. Fire-roasted tomatoes add a smoky flavor. Black beans and sweet corn bring sweetness and texture. Each ingredient plays a role in making the soup rich and filling. - 1 tablespoon chili powder - 1 teaspoon ground cumin - 1 teaspoon smoked paprika - Salt and black pepper, to taste Chili powder adds warmth and depth. Ground cumin brings an earthy tone. Smoked paprika enhances the soup with a gentle smokiness. Adjust salt and pepper for the perfect taste. These spices create a flavor base that makes the soup so inviting. - Fresh cilantro, chopped (for garnish) - Corn tortillas, sliced into strips and baked until crispy (for garnish) - Juice of 1 fresh lime Garnishing the soup with fresh cilantro brightens the flavors. Crispy tortilla strips add a fun crunch. A squeeze of lime juice at the end gives a zesty kick. Together, these garnishes make each bowl a delight to eat. {{ingredient_image_2}} Set your Instant Pot to Sauté mode. Pour in one tablespoon of olive oil. Let the oil heat for about one minute. Add one medium onion, finely diced, and one bell pepper, diced into small pieces. Toss in three minced garlic cloves. Sauté these for 3-4 minutes. You want the onions to become soft and clear. Once the veggies are soft, sprinkle in one tablespoon of chili powder, one teaspoon of ground cumin, and one teaspoon of smoked paprika. Add salt and black pepper to taste. Stir the spices in for about one minute. This step brings out the rich flavors of the spices. Now it’s time to layer the ingredients. Place one pound of boneless, skinless chicken breasts right on top of the sautéed veggies. Next, add one can of fire-roasted diced tomatoes, including juices. Pour in one can of black beans, drained and rinsed, and one can of sweet corn, drained. Finally, add four cups of low-sodium chicken broth. Make sure everything is well combined. Secure the lid on the Instant Pot. Set the valve to the “Sealing” position. Cook on high pressure for 15 minutes. When the cooking time is up, carefully switch the valve to “Venting” for a quick release. Wait for the pressure pin to drop before opening the lid. Take the chicken out of the pot. Use two forks to shred the chicken into small pieces. Return the shredded chicken back into the soup. Stir everything together well. Squeeze the juice of one fresh lime into the soup. Taste it and adjust the seasonings if needed. Serve the soup hot in bowls. Top it with crispy tortilla strips and a sprinkle of fresh cilantro for color and flavor. Ensuring Even Cooking To cook chicken evenly, cut it into smaller pieces. This helps it cook faster and more uniformly. When sautéing, stir the vegetables often. This prevents them from burning and ensures they soften nicely. Avoiding Common Mistakes One common mistake is overfilling the pot. Too many ingredients can lead to uneven cooking. Always follow the recommended ingredient amounts. Also, make sure to let the pressure release naturally for a few minutes before switching to quick release. Recommended Garnishes Garnishes can take your soup to the next level. I love using fresh cilantro and crispy tortilla strips. They add color and texture. You can also add avocado slices or a dollop of sour cream for creaminess. Adjusting Spice Levels If you like it spicy, add more chili powder or diced jalapeños. For a milder taste, reduce the chili powder. Always taste before serving to find the right balance for your family. Time-Saving Strategies You can prep ingredients the night before. Chop the veggies and store them in the fridge. You can also season the chicken and let it marinate. This way, cooking will be quick and easy. Leftover soup tastes even better the next day, as the flavors meld together. Pro Tips Use Fresh Ingredients: Fresh vegetables and spices can elevate the flavors of your soup, making it taste more vibrant and delicious. Adjust Spice Level: If you prefer a spicier soup, consider adding diced jalapeños or red pepper flakes to the sautéed vegetables for an extra kick. Make it Ahead: This soup stores well! Prepare a larger batch and refrigerate for up to 4 days or freeze for later consumption. Garnish for Flavor: Adding toppings like avocado, sour cream, or shredded cheese can enhance the soup's richness and provide a delightful contrast to the zesty flavors. {{image_4}} Alternative Proteins If you want to change the protein, you can use turkey or pork. Both options work great. You can also try shredded rotisserie chicken for a quick meal. Just add it at the end to warm it through. Vegetarian/Vegan Options For a vegetarian version, swap the chicken for beans or lentils. Use vegetable broth instead of chicken broth. You can add more veggies like zucchini or sweet potatoes to make it hearty. Different Spice Combinations You can mix up the spices to suit your taste. Try adding cayenne for heat or oregano for depth. A touch of lime zest can brighten the flavor too. This keeps the soup lively and fresh. Adding More Vegetables Feel free to add more vegetables. Carrots, spinach, or even kale work well. Just chop them small and add them with the other ingredients. This boosts nutrition and flavor. Taco-Inspired Serving Ideas Think outside the bowl! Serve the soup in taco shells or tortillas. Top with cheese, avocado, or salsa for extra flavor. This makes it fun and interactive for everyone. Soup & Salad Combinations Pair the soup with a fresh salad. A simple green salad works well. You can add a lime vinaigrette for a zesty touch. This combination makes a balanced meal that's filling and tasty. How do you store leftovers? First, let the soup cool down. Pour it into an airtight container. Make sure to leave some space at the top. This helps prevent spills. You can store it in the fridge for up to four days. What are the best practices for freshness? Always use clean utensils when serving. This keeps bacteria away. If you want to keep the flavors fresh, do not add garnishes until serving. This way, the toppings stay crisp. How do you freeze the soup? Let the soup cool completely. Then, pour it into freezer-safe bags or containers. Try to remove as much air as possible. This helps prevent freezer burn. Label each bag or container with the date. You can freeze it for up to three months. What are the thawing and reheating tips? To thaw, place the soup in the fridge overnight. You can also use the microwave for quicker thawing. When ready to eat, heat it on the stove or in the microwave. Stir well to ensure even heating. Add some water or broth if it seems too thick. The cook time for this soup is quick. You only need 15 minutes on high pressure. This makes it easy to enjoy a warm meal fast. After the cooking time ends, use a quick release to let the steam out. This lets you open the lid safely. Total time, including prep, is about 30 minutes. Yes, you can use frozen chicken. Keep in mind that it will take longer to cook. If using frozen chicken breasts, add about 5 extra minutes to the cook time. Make sure the chicken reaches a safe internal temperature of 165°F. This keeps your meal safe and tasty. This soup has a mild spice level. The chili powder adds some warmth, but it is not too hot. If you like more heat, you can add extra chili powder or jalapeños. You can also add toppings like hot sauce for more kick. Adjust the spice to fit your taste! This blog covered how to make Instant Pot Chicken Tortilla Soup. We explored main ingredients like chicken, fire-roasted tomatoes, beans, and spices that bring flavor. You learned step-by-step cooking instructions and tips for perfect results. I shared ideas for variations and storage, ensuring your soup stays fresh. In summary, this soup is quick, easy, and full of taste. Enjoy making this dish for family or friends!

Instant Pot Chicken Tortilla Soup Quick and Easy Recipe

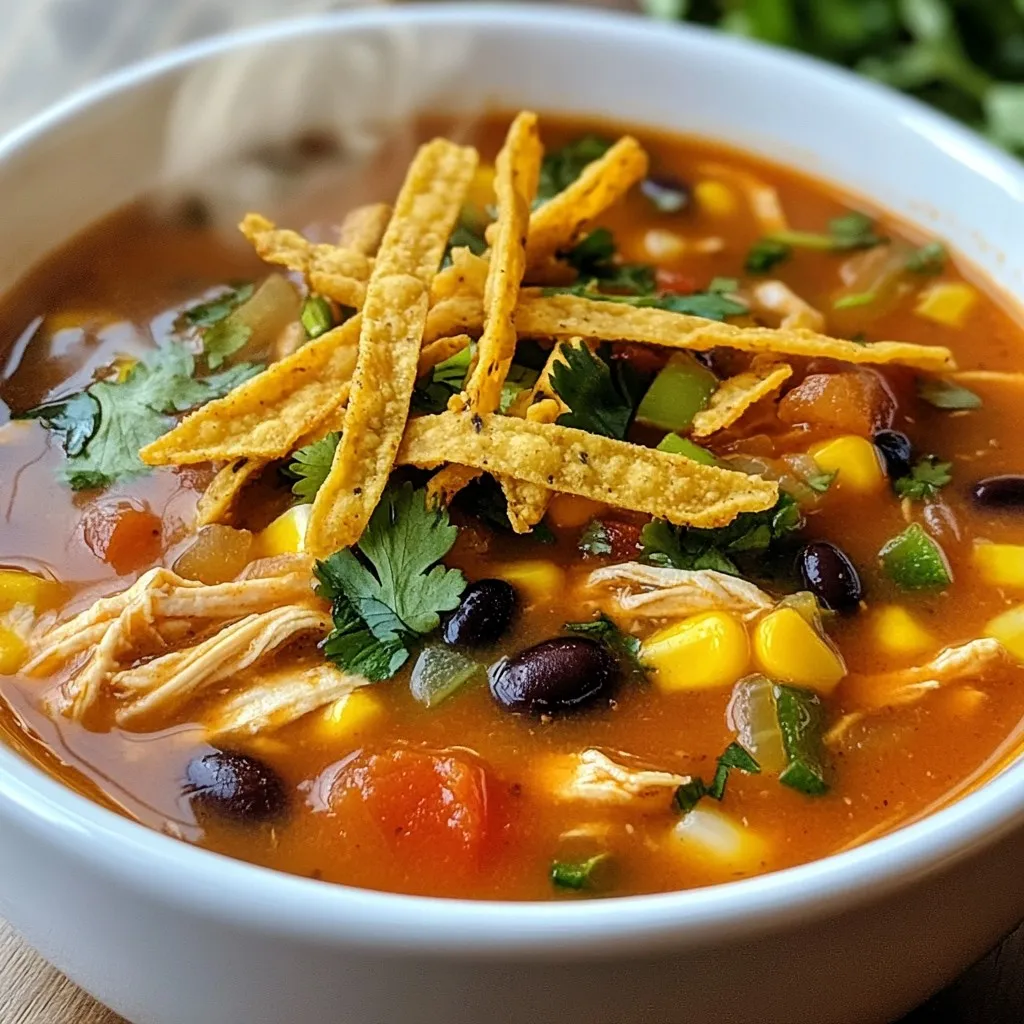
Are you ready to enjoy a warm bowl of Instant Pot Chicken Tortilla Soup? This quick and easy recipe will

- 4 tilapia fillets - 1 cup unsweetened shredded coconut - 1 cup panko breadcrumbs - 1 teaspoon garlic powder - 1 teaspoon onion powder - ½ teaspoon paprika - ½ teaspoon salt - ¼ teaspoon freshly ground black pepper - 2 large eggs, beaten - ¼ cup all-purpose flour - 3 tablespoons coconut oil, for frying - Fresh lime wedges, for serving - Fresh cilantro leaves, for garnish When I make coconut crusted tilapia, I focus on using fresh, high-quality ingredients. Tilapia is mild and cooks quickly, making it perfect for this dish. The unsweetened shredded coconut adds a sweet and nutty flavor. Panko breadcrumbs give a light and crispy texture that I love. I like to season the coconut and breadcrumbs with garlic powder, onion powder, paprika, salt, and black pepper. These spices add depth and make every bite taste amazing. For coating, I use eggs and flour, which help the coconut stick well. Coconut oil is my choice for frying. It gives a subtle coconut flavor and helps achieve that golden crust. I always serve the tilapia with lime wedges and fresh cilantro. The lime adds a zesty kick that brightens the dish. {{ingredient_image_2}} Set up three shallow dishes for easy coating. In the first dish, mix together the shredded coconut, panko breadcrumbs, garlic powder, onion powder, paprika, salt, and black pepper. This blend gives your tilapia a great flavor. In the second dish, beat the two large eggs until well mixed. In the third dish, place the all-purpose flour for dredging. Take each tilapia fillet and lightly dust it with flour. Make sure all sides are coated but not too thick. Next, dip the fillet into the beaten eggs, letting any extra egg drip off. Finally, press the fillet into the coconut mixture. Ensure it is fully coated on both sides for a crispy finish. Heat three tablespoons of coconut oil in a large skillet over medium heat. Wait until the oil shimmers, which means it's hot enough for frying. Make sure the oil covers the bottom of the skillet. Carefully place the coated tilapia fillets in the skillet. Avoid overcrowding the pan; fry in batches if needed. Cook for 3 to 4 minutes on each side. The fillets should turn golden brown when done. You can check for doneness by testing if the fish flakes easily with a fork. To get that perfect crispiness, the frying temperature matters a lot. Heat the coconut oil until it shimmers. This shows it’s hot enough for frying. If the oil isn’t hot enough, the fish will soak up the oil and lose its crunch. Avoid overcrowding the skillet. If you add too many fillets at once, the temperature drops. This can lead to soggy fish. Fry in batches to keep the oil hot and the fish crispy. You can add more flavor with extra spices. Try adding cayenne pepper for a kick. A bit of lemon zest can brighten the taste. These small changes can make a big difference. For serving, consider sauces that add zest. A mango salsa pairs well with tilapia. A simple lime vinaigrette can also enhance the dish. These sauces make the meal even more exciting. When cooking multiple tilapia fillets, manage your time well. Cook them in smaller groups. This ensures each fillet gets enough space in the pan. Once cooked, keep the fish warm. Place it on a plate in a low oven. This keeps it hot until you serve. It’s a great way to ensure everyone enjoys a warm meal. Pro Tips Ensure Freshness: Always use fresh tilapia fillets for the best flavor and texture. If possible, buy from a trusted fishmonger or opt for frozen fillets that have been properly stored. Customize Your Coating: Feel free to add other spices or herbs to the coconut mixture according to your taste preferences, such as cayenne pepper for heat or dried parsley for an aromatic touch. Control the Temperature: Maintain a steady medium heat while frying to prevent the coconut from burning and ensure the fish cooks evenly throughout. Use a thermometer to monitor the oil temperature if needed. Serve Immediately: For the best texture and taste, serve the coconut crusted tilapia right after frying. This keeps the coating crispy and the fish tender. {{image_4}} You can swap tilapia for other fish if you want. Cod or haddock works well. Both have a mild taste and cook nicely. You can also use shrimp or chicken. Shrimp adds a sweet bite, and chicken gives a hearty feel. Just make sure you adjust the cooking time. Shrimp cooks in just a few minutes, while chicken needs more time. If you need a gluten-free option, use almond flour instead of all-purpose flour. It gives a nice nutty flavor and helps the crust stick. For a vegan take, use plant-based alternatives. Try using chickpea flour for the crust and a plant-based egg substitute. Both options make the dish friendly for different diets. You can add tropical flavors by mixing in pineapple or mango. Add small pieces of these fruits to the coconut mix. This gives a sweet contrast to the fish. For a spicy twist, try adding cayenne pepper or chili powder to the crust. It gives the dish a kick and makes it more exciting. To keep your coconut crusted tilapia fresh, place it in an airtight container. Store it in the fridge. This way, it will stay tasty. It’s best to eat it within three days. After that, the flavor may fade. When reheating coconut crusted tilapia, use an oven or skillet. Preheat your oven to 350°F (175°C). Place the fillets on a baking sheet. Heat for about 10 minutes. This method keeps the fish crispy. If you use a skillet, heat it over medium-low heat. Add a touch of oil if needed. Heat each side for about 3 minutes until warm. Yes, you can freeze cooked tilapia. Allow it to cool first. Wrap each piece tightly in plastic wrap. Then place them in a freezer-safe bag. Use them within three months for the best taste. To thaw, move the fish to the fridge overnight. Reheat it gently to restore its crunch. You can pair coconut crusted tilapia with several tasty side dishes. Here are some great options: - Rice: Steamed jasmine or coconut rice complements the dish well. - Salad: A fresh green salad with lime vinaigrette adds a nice crunch. - Veggies: Roasted or sautéed vegetables, like asparagus or bell peppers, enhance the meal. - Mango Salsa: This sweet and spicy salsa brings a tropical twist. For sauces, consider these: - Sweet Chili Sauce: This adds a tangy kick. - Tartar Sauce: A classic choice that pairs perfectly with fish. - Coconut Cream Sauce: Drizzle some over the fish for a creamy touch. You can tell if tilapia is cooked by checking for these signs: - Color: The fish should turn from translucent to opaque. - Texture: It should feel firm to the touch. - Flakiness: The fish should flake easily with a fork. To test for flakiness, gently press the fish with a fork. If it flakes apart easily, it is done. Yes, you can bake coconut crusted tilapia for a healthier option. Here’s how: - Preheat your oven: Set it to 400°F (200°C). - Prepare the fish: Follow the same breading process. - Place on a baking sheet: Use parchment paper for easy cleanup. - Cooking time: Bake for about 15-20 minutes or until golden brown. Keep an eye on the fish to avoid overcooking. The internal temperature should reach 145°F (63°C). Coconut crusted tilapia is a tasty dish that is easy to make. We discussed the key ingredients and how to prepare them. The cooking steps were simple and clear, helping you create the perfect crispy fish. Remember, you can adapt this recipe with different proteins or flavors. Store and reheat leftovers to keep them fresh. With these tips, you can enjoy this dish any time. Try it out and impress your friends and family. The joy of cooking awaits!

Coconut Crusted Tilapia Crispy and Flavorful Delight

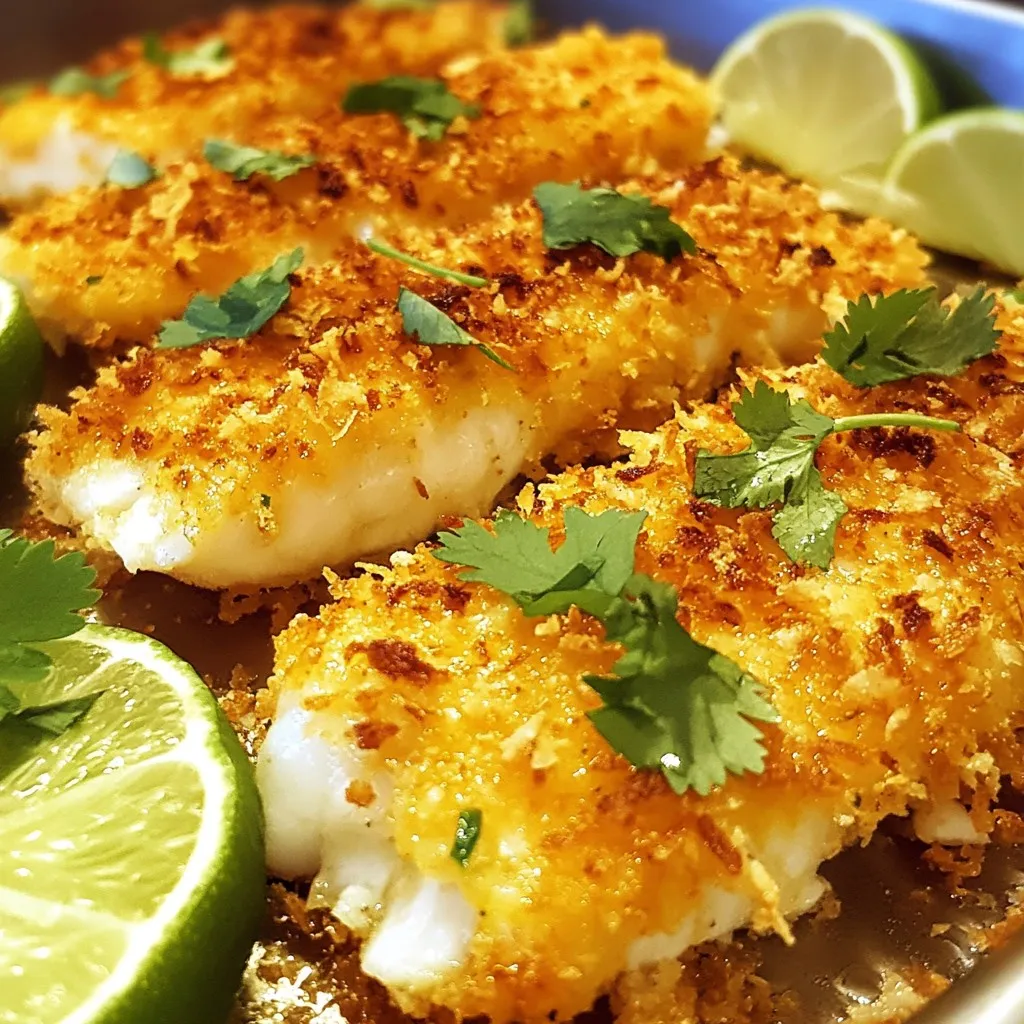
Are you ready to make a meal that sings with flavor and crunch? Coconut Crusted Tilapia is the dish you

- 3 cups rolled oats - 1 cup shredded unsweetened coconut - 1 cup almonds, roughly chopped - 1/2 cup honey or maple syrup - 1/4 cup coconut oil, melted - 1 teaspoon vanilla extract - 1/2 teaspoon salt - 1/2 teaspoon ground cinnamon - 1/2 cup dried fruit (such as cranberries or mango), optional Gather these ingredients to make a tasty granola. Rolled oats form the base. They add fiber and texture. Shredded coconut gives a nice tropical flavor. It also adds healthy fats. Almonds bring a crunchy bite and protein. You can choose honey or maple syrup for sweetness. Both work well to bind the granola. Coconut oil helps it cook evenly and adds richness. Vanilla extract adds a lovely aroma. Salt enhances all the flavors. Ground cinnamon adds warmth and a hint of spice. Finally, you can add dried fruit. This is optional but adds sweetness and chewiness. You can pick your favorites, like cranberries or mango. This combination makes a delightful mix for your granola. It keeps snacks fun and healthy! {{ingredient_image_2}} 1. Preheat the oven: Start by setting your oven to 350°F (175°C). This step is key for even baking. Line a large baking sheet with parchment paper to keep your granola from sticking. 2. Mix dry ingredients: In a big bowl, add 3 cups of rolled oats, 1 cup of shredded coconut, and 1 cup of roughly chopped almonds. Then sprinkle in 1/2 teaspoon of salt and 1/2 teaspoon of ground cinnamon. Stir well to make sure everything is mixed evenly. 3. Combine wet ingredients: In another bowl, whisk together 1/4 cup of melted coconut oil, 1/2 cup of honey or maple syrup, and 1 teaspoon of vanilla extract. Mix until it is smooth and well blended. 4. Merge wet and dry mixtures: Slowly pour the wet mix over the dry ingredients in the big bowl. Use a spoon to stir it all together. Make sure every oat and nut gets coated in that sweet mixture. 5. Spread on baking sheet: Carefully take the granola mixture and spread it on your prepared baking sheet. Use a spatula to press it down lightly. This helps it clump together while it bakes. 6. Baking process and tips: Place the baking sheet in the oven. Bake the granola for 20-25 minutes. Stir it halfway through to ensure it toasts evenly. Watch it closely! You want it to be a nice golden brown. 7. Cooling the granola: When it’s done baking, take it out of the oven and let it cool completely on the baking sheet. This step helps it become crunchy. 8. Adding optional dried fruit: After the granola has cooled, you can fold in 1/2 cup of dried fruit if you want. Mix it well so that the fruit spreads throughout the granola. Now you have a delicious, crunchy, and nutritious Coconut Almond Granola ready to enjoy! - Best oven temperature for toasting: The best oven temperature is 350°F (175°C). This heat allows the granola to toast evenly. - Stirring halfway through baking: Stir the granola halfway through baking. This step helps brown it evenly and prevents any burning. - Ensuring the right consistency: Aim for a mix that is sticky but not too wet. This balance ensures that your granola clumps nicely while baking. - Tips for clumping: To encourage clumping, press the mixture down firmly on the baking sheet. This creates a solid layer that will hold together as it bakes. Pro Tips Use Fresh Ingredients: Ensure your coconut and nuts are fresh for the best flavor and texture in your granola. Customize Your Sweetness: Adjust the honey or maple syrup according to your taste preference for a sweeter or less sweet granola. Experiment with Spices: Try adding nutmeg or ginger for an additional layer of flavor that complements the tropical ingredients. Clumping Tip: For chunkier granola, press the mixture down firmly before baking and avoid stirring too often during baking. {{image_4}} - Alternative sweeteners: You can swap honey for agave nectar or maple syrup. Both provide a nice sweetness. If you want less sugar, try mashed bananas or applesauce instead. - Nut substitutes: If you’re not a fan of almonds, use walnuts or pecans. Cashews also add a creamy texture and rich flavor. Feel free to mix different nuts for variety. - Adding spices for different flavors: Spice things up by adding a pinch of nutmeg or ginger. These spices give a warm, cozy taste. A dash of cardamom can also add a unique twist. - Different dried fruits to incorporate: Try adding raisins, chopped apricots, or dried cherries. Each fruit adds its own taste and texture. You can even use a mix for a colorful and flavorful granola. With these variations, you can make coconut almond granola truly your own. Explore and enjoy! To keep your Tropical Coconut Almond Granola fresh, use an airtight container. Glass jars work well, but plastic containers can also do the job. Make sure the lid seals tight to keep air out. Store the granola in a cool, dry place. A pantry or cupboard away from heat and moisture works best. Avoid areas near the stove or windows, where temperature can change. Homemade granola can last up to two weeks. After that, it may lose its crunch and flavor. If you want it to last longer, consider freezing it. Just place it in a freezer-safe bag or container. It can stay fresh for up to three months in the freezer. When ready to eat, let it thaw at room temperature. Enjoy your tasty snack anytime! Can I use rolled oats instead of instant oats? Yes, you can use rolled oats. They give a nice texture. Rolled oats are thicker than instant oats. This helps the granola stay crunchy. How do I make it gluten-free? To make gluten-free granola, use certified gluten-free oats. Check the label to be sure. All other ingredients, like honey and nuts, are naturally gluten-free. What are the health benefits of coconut almond granola? Coconut almond granola offers many health benefits. It is full of fiber, which helps digestion. Almonds provide healthy fats and protein. Coconut adds flavor and some vitamins. This snack can boost your energy too! How can I customize my granola recipe? You can customize your granola easily. Try different nuts like walnuts or pecans. Swap honey for maple syrup if you like. Add spices like nutmeg or ginger for extra flavor. You can also mix in seeds like chia or flax for crunch! You learned how to make coconut almond granola with simple steps and tasty ingredients. We covered the must-have ingredients, how to prepare them, and tips for perfect results. Don't forget about fun variations and proper storage to keep it fresh. Homemade granola can be healthy and delicious. Enjoy experimenting with flavors and sharing your creations.

Coconut Almond Granola Crunchy and Nutritious Snack

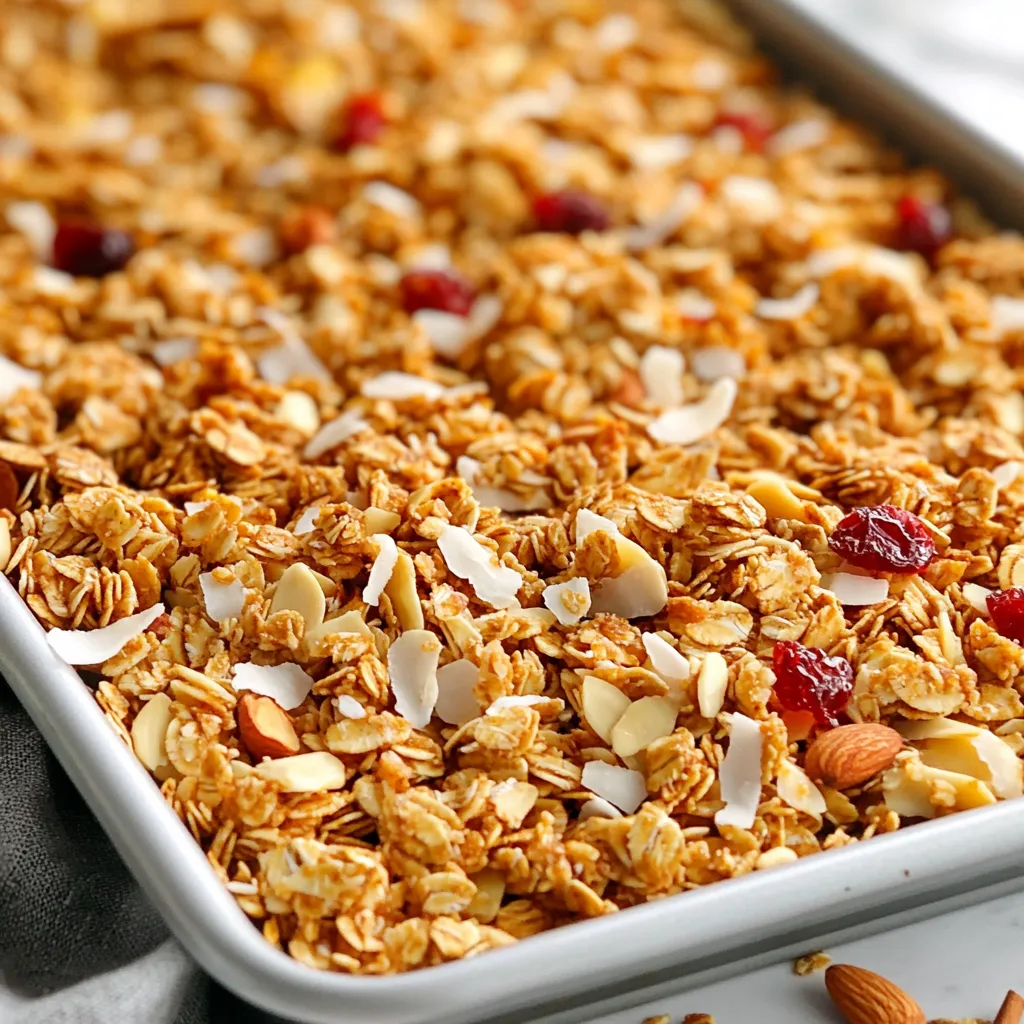
If you’re looking for a tasty, healthy snack, Coconut Almond Granola is the answer. Packed with rolled oats, crunchy almonds,

Older posts
Newer posts
← Previous Page1 … Page118 Page119 Page120 Next →

dsad

© 2026 recipetorch • Built with GeneratePress

Our Policies

  • Copyright Policy
  • Cookie Policy
  • GDPR Policy
  • Privacy Policy
  • Disclaimer
  • Terms Of Use

More Information

  • Home
  • About
  • Contact
  • Appetizers
  • Dessert
  • Dinner
  • Drinks
©2026, recipetorch About Back To Top